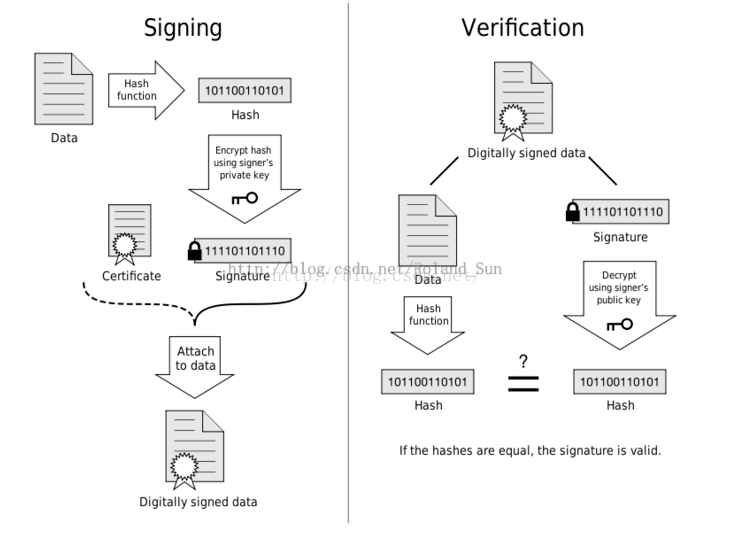
再看看四人帮是如何定义命令模式的: “Encapsulate a request as an object, thereby letting users parameterize clients with different requests, queue or log requests, and support undoable operations”(将一个请求封装为一个对象,从而使你可用不同的请求对客户进行参数化; 对请求排队或记录请求日志,以及支持可撤销的操作。)
// Use this for initialization voidStart () { // 添加UIController对UI点击事件的响应 mBtnRandomNumber.onClick.AddListener(UIController.Instance.OnBtnRandomNumberClick); }
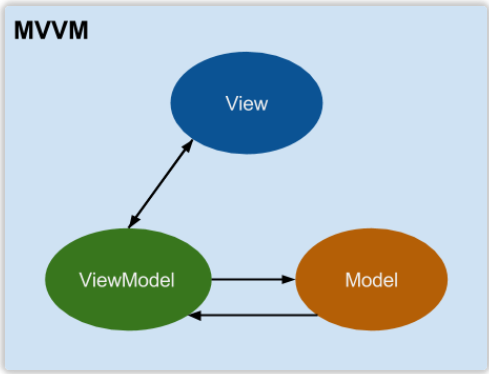
如何在Unity里实现Data Bidning? Data Binding的核心是在修改数据时能触发回调通知,能将数据和回调绑定起来。 明白了这一点,回顾C#里设置数据一般是通过方法或者属性或者直接访问public成员变量,要想实现回调触发,我们可以通过C#里的Property设置(set)的形式去确保回调相应。
///<summary> /// 属性值变化回调 ///</summary> public ValueChangedDelegate OnValueChanged;
///<summary> /// 属性 ///</summary> public T Value { get { return mValue; } set { T oldvalue = mValue; mValue = value; ValueChanged(oldvalue, mValue); } } private T mValue;
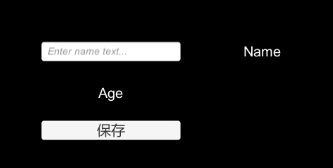
publicreadonly BindableProperty<string> Name = new BindableProperty<string>(); publicreadonly BindableProperty<int> AgeDetail = new BindableProperty<int>();
///<summary> /// 初始化View(主要是V到VM之间的绑定) ///</summary> publicvoidinitialize() { #region Bind VM to V Part mViewModel.Name.OnValueChanged = onNameChanged; mViewModel.Age.OnValueChanged = onAgeChanged; #endregion
#region Bind V To VM mInputFieldName.onValueChanged.AddListener(onInputNameChanged); mBtnSave.onClick.AddListener(onSaveClick); #endregion }
#region Bind VM to V Part privatevoidonNameChanged(string oldname, string newname) { mInputFieldName.text = newname; mTxtName.text = newname; }
privatevoidonAgeChanged(int oldvalue, int newvalue) { mTxtAge.text = newvalue.ToString(); } #endregion
#region Bind V To VM privatevoidonInputNameChanged(string newname) { mViewModel.Name.Value = newname; }
///<summary> Name输入文本(用于View输入改变Name) ///</summary> public InputField mInputFieldName;
///<summary> Name值展示文本 ///</summary> public Text mTxtName; ///<summary> Age值展示文本 ///</summary> public Text mTxtAge;
///<summary> Model数据保存按钮 ///</summary> public Button mBtnSave;
///<summary> /// 真实绑定的VM对象访问入口 ///</summary> public MVVMViewModel ViewModel { get { return (MVVMViewModel)mMVVMViewModelContext; } }
///<summary> /// 响应VM绑定变化回调 /// 在这里做V和VM绑定相关的事 ///</summary> ///<param name="oldvm"></param> ///<param name="newvm"></param> protectedoverridevoidOnBindingContextChanged(IMVVMViewModel oldvm, IMVVMViewModel newvm) { base.OnBindingContextChanged(oldvm, newvm); // 解除老的VM相关绑定 if(oldvm != null) { #region Bind VM to V Part MVVMViewModel ovm = oldvm as MVVMViewModel; ovm.Name.OnValueChanged -= onNameChanged; ovm.Age.OnValueChanged -= onAgeChanged; #endregion
#region Bind V To VM mInputFieldName.onValueChanged.RemoveListener(onInputNameChanged); mBtnSave.onClick.RemoveListener(onSaveClick); #endregion }
// 添加新的VM相关绑定 if (ViewModel != null) { #region Bind VM to V Part ViewModel.Name.OnValueChanged += onNameChanged; ViewModel.Age.OnValueChanged += onAgeChanged; #endregion
#region Bind V To VM mInputFieldName.onValueChanged.AddListener(onInputNameChanged); mBtnSave.onClick.AddListener(onSaveClick); #endregion } } #region Bind VM to V Part privatevoidonNameChanged(string oldname, string newname) { mInputFieldName.text = newname; mTxtName.text = newname; }
privatevoidonAgeChanged(int oldvalue, int newvalue) { mTxtAge.text = newvalue.ToString(); } #endregion
#region Bind V To VM privatevoidonInputNameChanged(string newname) { ViewModel.Name.Value = newname; }
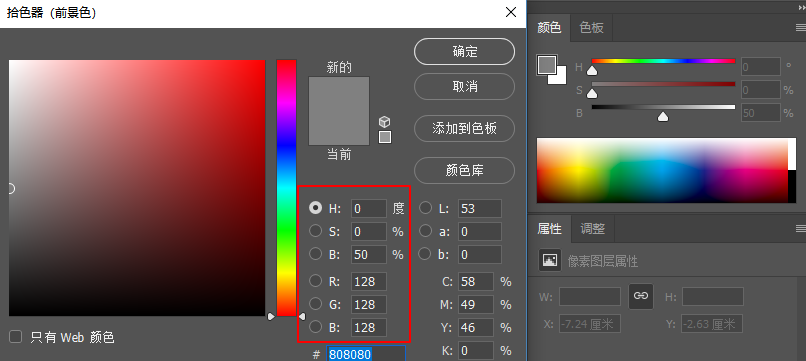
亮度决定了黑白的颜色量,这里可以理解成白色颜色的占比比重((255,255,255) X 0-1(亮度)),从而影响最终颜色的颜色占比,比如我们设置B亮度50%: 可以看到,我们的色相颜色红色(255,0,0)因为B亮度50%的设置,变成了RBG颜色信息是128,128,128,这真是因为50%的亮度决定了整体颜色的颜色基础值。
using System; using System.Collections; using System.Collections.Generic; using System.IO; using System.Security.Principal; using UnityEditor; using UnityEngine;
using System.Collections; using System.Collections.Generic; using UnityEngine;
using UnityEditor;
using Excel; using System.IO; using System.Data; using System.Reflection; using System.Text; using Microsoft.CSharp; using System.CodeDom.Compiler; using System; using System.Runtime.Serialization.Formatters.Binary;
//将数据序列化到本地文件 var bf = new BinaryFormatter(); var s = new FileStream(outputpath + type.Name + ".bytes", FileMode.CreateNew, FileAccess.Write); bf.Serialize(s, container); s.Close(); returntrue; }
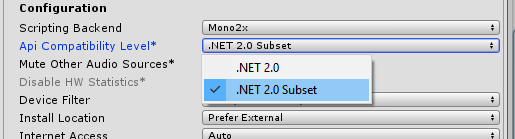
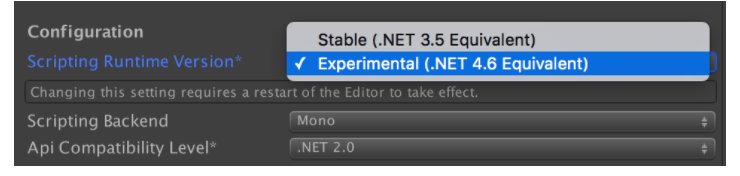
运用Protocol buffer编译器编译出我们对应语言的解析该数据结构的代码类。 首先下载对应语言的Protocol buffer编译器 “There are two NuGet packages: Google.Protobuf (the support library) and Google.Protobuf.Tools (containing protoc)” 根据上面写的,C#现在貌似有两个版本支持Protocol Buffer,但原生的Protobuf版本支持的.NET版本很高,所以不适合Unity(Unity是基于Mono的,Mono现在对.NET的支持还停留在.NET 2.0和.NET 2.0 subset)。
但只是这样的话,会报如下错误: NotSupportException: …… System.Reflection.Emit is not supported 这里出现了Emit类的使用,显然是用到了动态生成代码,根据我们之前讲到的IOS是在Full-AOT模式下运行不允许动态生成代码的。 所以直接使用.NET风格的Attribute会触发动态代码生成,那么我们就需要想办法提前生成,这里就需要使用.proto文件然后通过预编译的方式生成对应的代码类。 所以现在我们需要先定义.proto文件(Protobuf-net只支持Proto2),所以编写proto2参考
//PlayerData.cs //------------------------------------------------------------------------------ // <auto-generated> // This code was generated by a tool. // // Changes to this file may cause incorrect behavior and will be lost if // the code is regenerated. // </auto-generated> //------------------------------------------------------------------------------
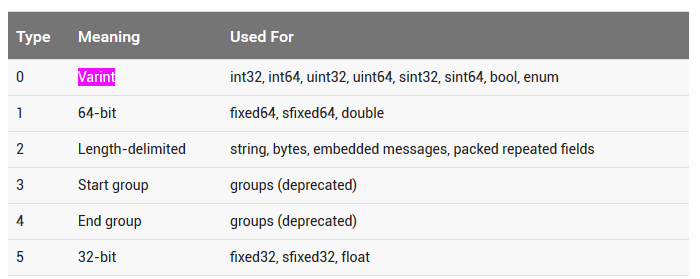
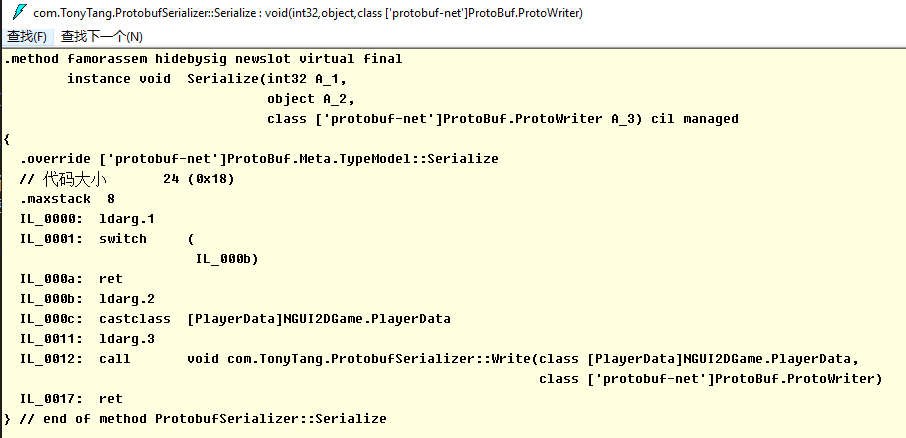
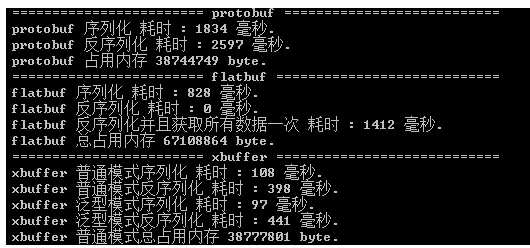
了解了什么(What)是Protobuf,如何(How)使用Protobuf,那么我们也应该大概了解下为什么(Why)Protobuf高效,更小,更快,更简单….. 参考下面两篇文章: Google Protocol Buffer 的使用和原理 官网讲到的Protocol buffer的Encode技术 从上面可以看出,更小更快是因为Protocol buffer采用了巧妙的Encoding方法。 而这个Encoding方法利用了Varint技术,那么什么是Varint了? “Varints are a method of serializing integers using one or more bytes. Smaller numbers take a smaller number of bytes. “ Varints通过更少的字节来表达准确的数据,比如0-127只需要1个字节就能表示。 当需要多个字节表达的时候,通过利用1byte里的first bit来区分,如果first bit是1表示后续的7个bit都表示数据,如果first bit是0表示这是最后一个字节用于表示数据。 同时Protocol buffer在Encode的时候通过key和value来存储数据。key只包含filed的名字和类型,value包含数据。 类型数据映射 当Decode的时候,如果遇到不识别的key值,只需要skip即可,保证了程序的老版本兼容。 更方便在于,我们只需通过编写简单易懂的.proto文件然后通过ProtoGen,Precompile工具就能生成对应的Message,Encode和Decode类。 结合前面的事例,让我们窥探一下到底Protocol-net是如何实现编写.proto文件结合编译生成Message类和序列化类来实现数据的Encode和Decode的。 首先反编译的ProtovufSerializer.dll,查看Serialize方法 可以看到ProtobufSerializer调用了Write方法,接下来查看Write方法 可以看到我们ProtobufSerializer实际是通过调用ProtoBuf.ProtoWriter::WriteFieldHeader(Protobuf-net库)实现数据的Encode的。同时因为ProtobufSerializer是根据PlayerData.dll编译而成,所以Write方法里的实现针对每一个需要Encode的Message成员进行数据Encode写入。 这样一来就完成了通过编写.proto文件定义Message,然后生成对应的Message类和序列化类再结合Protocol-net库实现了自定义Message的Encode和Decode了,而最终数据的Encode,Decode实现就落实到Protocol-net的实现了。
// <auto-generated> // Generated by the protocol buffer compiler. DO NOT EDIT! // source: GameConfig.proto // </auto-generated> #pragmawarning disable 1591, 0612, 3021 #region Designer generated code
using pb = global::Google.Protobuf; using pbc = global::Google.Protobuf.Collections; using pbr = global::Google.Protobuf.Reflection; using scg = global::System.Collections.Generic; namespaceGameData {
///<summary>Holder for reflection information generated from GameConfig.proto</summary> publicstaticpartialclassGameConfigReflection {
#region Descriptor ///<summary>File descriptor for GameConfig.proto</summary> publicstatic pbr::FileDescriptor Descriptor { get { return descriptor; } } privatestatic pbr::FileDescriptor descriptor;
staticGameConfigReflection() { byte[] descriptorData = global::System.Convert.FromBase64String( string.Concat( "ChBHYW1lQ29uZmlnLnByb3RvEghHYW1lRGF0YSJUCgpHYW1lQ29uZmlnEhcK", "D2RpZmZpY3VsdHlMZXZlbBgBIAEoCRIVCg12ZXJzaW9uTnVtYmVyGAIgASgF", "EhYKDnJlc291cmNlTnVtYmVyGAMgASgFYgZwcm90bzM=")); descriptor = pbr::FileDescriptor.FromGeneratedCode(descriptorData, new pbr::FileDescriptor[] { }, new pbr::GeneratedClrTypeInfo(null, new pbr::GeneratedClrTypeInfo[] { new pbr::GeneratedClrTypeInfo(typeof(global::GameData.GameConfig), global::GameData.GameConfig.Parser, new[]{ "DifficultyLevel", "VersionNumber", "ResourceNumber" }, null, null, null) })); } #endregion
using GameData; using Google.Protobuf; using System.Collections; using System.Collections.Generic; using System.IO; using UnityEngine; using UnityEngine.UI;
# Generated by the protocol buffer compiler. DO NOT EDIT! # source: GameConfig.proto
import sys _b=sys.version_info[0]<3and (lambda x:x) or (lambda x:x.encode('latin1')) from google.protobuf import descriptor as _descriptor from google.protobuf import message as _message from google.protobuf import reflection as _reflection from google.protobuf import symbol_database as _symbol_database # @@protoc_insertion_point(imports)
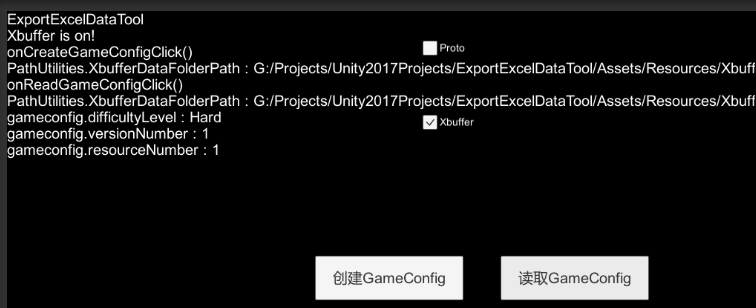
///<summary> /// 存储GameConfig数据 ///</summary> publicstaticvoidSaveGameConfigData() { // Create a `FlatBufferBuilder`, which will be used to create our // GameConfigFB' FlatBuffers. // 定义FlatBufferBulder对象用于我们构建数据对象 var builder = new FlatBufferBuilder(4); var difficultylevel = builder.CreateString("Hard-困难");
// Use the `CreateGameConfigFB()` helper function to create the GameConfigFB, since we set every field. // 往GameConfigFB里填充数据 var gameconfig = GameConfigFB.CreateGameConfigFB(builder, difficultylevel, 1, 1);
// Call `Finish()` to instruct the builder that this GameConfigFB is complete. // 指定GameConfigFB数据构建完成 builder.Finish(gameconfig.Value);
// This must be called after `Finish()`. // 包含GameConfigFB的二进制数据的数据对象 var buf = builder.DataBuffer; // GameConfigFB的二进制数据 byte[] bufbytes = builder.SizedByteArray();
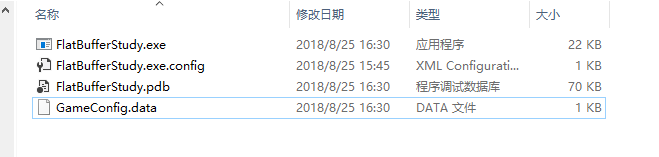
//写入GameConfig二进制数据得到本地 using (var filestream = new FileStream(GameConfigDataFullPath, FileMode.Create)) { filestream.Write(bufbytes, 0, bufbytes.Length); } }
// Get an accessor to the root object inside the buffer. // 通过字节流数据构建FlatBuff所需的Buf对象,然后使用该Buf对象通过FlatBuff构建GameConfigFB对象 var buf = new ByteBuffer(bufbytes); var gameconfig = GameConfigFB.GetRootAsGameConfigFB(buf);
///<summary> /// Responsible for building up and accessing a FlatBuffer formatted byte /// array (via ByteBuffer). ///</summary> publicclassFlatBufferBuilder { privateint _space; private ByteBuffer _bb; privateint _minAlign = 1;
// The vtable for the current table (if _vtableSize >= 0) privateint[] _vtable = newint[16]; // The size of the vtable. -1 indicates no vtable privateint _vtableSize = -1; // Starting offset of the current struct/table. privateint _objectStart; // List of offsets of all vtables. privateint[] _vtables = newint[16]; // Number of entries in `vtables` in use. privateint _numVtables = 0; // For the current vector being built. privateint _vectorNumElems = 0;
///<summary> /// Create a FlatBufferBuilder with a given initial size. ///</summary> ///<param name="initialSize"> /// The initial size to use for the internal buffer. ///</param> publicFlatBufferBuilder(int initialSize) { if (initialSize <= 0) thrownew ArgumentOutOfRangeException("initialSize", initialSize, "Must be greater than zero"); _space = initialSize; _bb = new ByteBuffer(initialSize); }
publicvoidAddInt(int o, int x, int d) { if (ForceDefaults || x != d) { AddInt(x); Slot(o); } }
publicByteBuffer(byte[] buffer, int pos) { _buffer = new ByteArrayAllocator(buffer); _pos = pos; }
publicvoidDispose() { if (_buffer != null) { _buffer.Dispose(); } }
publicint Position { get { return _pos; } set { _pos = value; } }
publicint Length { get { return _buffer.Length; } }
publicvoidReset() { _pos = 0; }
// Increases the size of the ByteBuffer, and copies the old data towards // the end of the new buffer. publicvoidGrowFront(int newSize) { _buffer.GrowFront(newSize); }
using GameData; using Google.Protobuf; using System.Collections; using System.Collections.Generic; using System.IO; using System.Text; using UnityEngine; using UnityEngine.UI; using xbuffer;
namespacexbuffer { publicclassProto { public Proto_Class[] class_protos;
publicProto(string proto) { var matchs = Regex.Matches(proto, @"//\s*(\S*)\s*((class)|(struct))\s*(\w+)\s*{\s*((\w+):([\[|\]|\w]+);\s*//\s*(\S*)\s*)*}"); class_protos = new Proto_Class[matchs.Count]; for (int i = 0; i < matchs.Count; i++) { class_protos[i] = new Proto_Class(matchs[i]); } } }
var varNames = match.Groups[7].Captures; var varTypes = match.Groups[8].Captures; var varComments = match.Groups[9].Captures; Class_Variables = new Proto_Variable[varNames.Count]; for (int i = 0; i < Class_Variables.Length; i++) { Class_Variables[i] = new Proto_Variable(varNames[i].Value, varTypes[i].Value, varComments[i].Value); } } } }
var nContents = newbyte[nCapacity_Group][]; for (uint i = 0; i < nCapacity_Group; i++) { if (i < capacity_group) nContents[i] = contents[i]; else nContents[i] = newbyte[capacity_cell]; } contents = nContents;
var nWastes = newuint[nCapacity_Group]; for (uint i = 0; i < capacity_group; i++) { nWastes[i] = wastes[i]; } wastes = nWastes;
capacity_group = nCapacity_Group; } } }
///<summary> /// 返回输出字节流 ///</summary> ///<returns></returns> publicbyte[] getBytes() { var len = index_group * capacity_cell + index_cell; for (int i = 0; i < index_group; i++) { len -= wastes[i]; }
var ret = newbyte[len]; var idx = 0; for (int i = 0; i < index_group; i++) { for (int j = 0; j < capacity_cell - wastes[i]; j++) { ret[idx++] = contents[i][j]; } } for (int i = 0; i < index_cell; i++) { ret[idx++] = contents[index_group][i]; }
/** * Auto generated by XbufferExcelToData, do not edit it * 表格名字 */ using System; using System.Collections.Generic; using System.IO; using UnityEngine; using xbuffer;
/** * Auto generated by XbufferExcelToData, do not edit it * 表格名字 */ using System; using System.Collections.Generic; using System.IO; using UnityEngine; using xbuffer;
“and Finalizers Lua does automatic memory management. Programs create objects (tables, threads, etc.), but there is no function to delete objects. Lua automatically deletes objects that become garbage, using garbage collection. “
Weak Table “Weak tables allow the collection of Lua objects that are still accessible to the program”
“A weak reference is a reference to an object hat is not considered by the garbage collector”
“In weak tables,, both keys and values can be weak”(three kinds of week table:1. weak key 2. weak value 3. weak key and value)
Object Attributes Implemetation Solution: use external table to associate objects with attributes Drawback: external table reference prevent objects from being collected Final solution: use weak keys for objects in external table
Tables with Default Values 这里有两种各有优缺点的实现方案: 方案1:
1 2 3 4 5 6 7
local defaults = {} setmetatable(defaults, {__mode = "k"}) local mt = {__index = function(t)return defaults[t] end} functionsetDefault(t, d) defaults[t] = d setmetatable(t, mt) end
方案2:
1 2 3 4 5 6 7 8 9 10
local metas = {} setmetatable(metas, {__mode = "v"}) functionsetDefault(t, d) local mt = metas[d] if mt == nilthen mt = {__index = function()return d end} metas[d] = mt -- memorize end setmetatable(t, mt) end
后者针对不同的default value分配了更多的内存(比如mt,entry on metas, closure……),但优点是同样的default value只需要分配一次即可,所以后者更适用于table数量多但default value大都相同的情况。
Ephemeron Tables(声明短暂的table Lua 5.2里提供) Ephemeron Table: “In Lua 5.2, a table with weak keys and strong values is an ephemeron table. In an ephemeron table, the accessibility of a key controls the accessibility of its corresponding value.(只当有strong reference to key时value才是strong的)” e.g. constant-function factory
Note: “Only objects can be collected from a weak table. Values, such as numbers and booleans, are not collectible”(只有Objects在weak table里能被gc回收,number和booleans这种Value类型不能在weak table里被gc回收)
“strings are collectible, but string is not removed from weak table(unless its associated value is collected)”
Finalizers “Finalizers allow the collection of externa objects that are not directly under control of the garbage collector”
“Finalizer is a function associated with an object that is called when that object is about to be collected.”(相当于C#里的Finalize,在GC object的时候会被调用。但只有一开始设置Metamethod的__gc时才能mark该object为可finalization的,否则就算后面在复制__gc也不会在调用该object的finalizer)
Lua里是通过Metamethod里的__gc实现。
1 2 3 4 5
-- 测试环境要求至少Lua 5.2 o = {x = "hi"} setmetatable(o, {__gc = function(o)print(o.x) end}) o = nil collectgarbage() --> hi
The order of finalization called: “When the collector finalizes several obejcts in the same cycle, it calls their finalizers in the reverse order that the objects were marked for finalization”(先声明__gc被mark为可finalization的object的finalizer后被调用)
1
2
3
4
5
6
7
8
9
10
11
-- 测试环境要求至少Lua 5.2 mt = {__gc = function(o)print(o[1]) end} list = nil for i = 1, 3do list = setmetatable({i, link = list}, mt) end list = nil collectgarbage() --> 1 --> 2 --> 3
---克隆对象(建议用于克隆Class对象) ---@param any 对象 ---@return any 克隆对象 functionClone(object) local lookup_table = {} localfunction_copy(object) iftype(object) ~= "table"then return object elseif lookup_table[object] then return lookup_table[object] end local new_table = {} lookup_table[object] = new_table for key, value inpairs(object) do new_table[_copy(key)] = _copy(value) end returnsetmetatable(new_table, getmetatable(object)) end return _copy(object) end
iftype(cname) == "table"then ifself.class == cname then returntrue; elseifself.super then returnself.super.IsClass(self.super, cname); end elseiftype(cname) == "string"then ifself.class.className == cname then returntrue; elseifself.super then returnself.super.IsClass(self.super, cname); end end returnfalse; end
--- 提供Lua的OOP实现,快速定义一个Class(不支持多重继承) --- 模拟Class封装,继承,多态,类型信息,构造函数等 --- 模拟一个基础的Class需要的信息 ---@param clsname string@类名 ---@param super super@父类 ---@return Class@含Class所需基本信息的Class table functionClass(clsname, super) local classtable = {} -- ctor模拟构造函数 classtable.Ctor = false -- className模拟类型信息,负责存储类名 classtable.className = clsname -- super模拟父类 -- Note: 外部逻辑层不允许直接._super访问父类 classtable._super = super -- 自身class类table classtable.class = classtable; -- 指定索引元方法__index为自身,模拟类访问 -- 后面实例化对象时会将classtable作为元表,从而实现访问类封装的数据 classtable.__index = classtable -- 是否是指定类或者继承至某类的方法接口 classtable.IsClass = IsClass; -- 如果指定了父类,通过设置Class的元表为父类模拟继承 if super then setmetatable(classtable, super) else --print("如果定义的不是最基类,请确认是否require了父类!") end return classtable end
--- 提供实例化对象的方法接口 --- 模拟构造函数的递归调用,从最上层父类构造开始调用 ---@param cls cls@类定义 ---@param ... ...@构造函数变长参数 ---@return cls@cls类的实例对象table functionNew(cls, ...) -- 实例对象表 local instance = {} -- 设置实例对象元表为cls类模拟类的封装访问 setmetatable(instance, cls) -- create模拟面向对象里构造函数的递归调用(从父类开始构造) localcreate create = function(cls, ...) if cls._super then create(cls._super, ...) end if cls.Ctor then cls.Ctor(instance, ...) end end create(cls, ...) return instance end
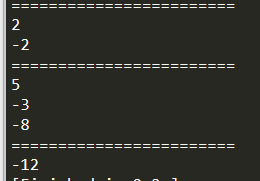
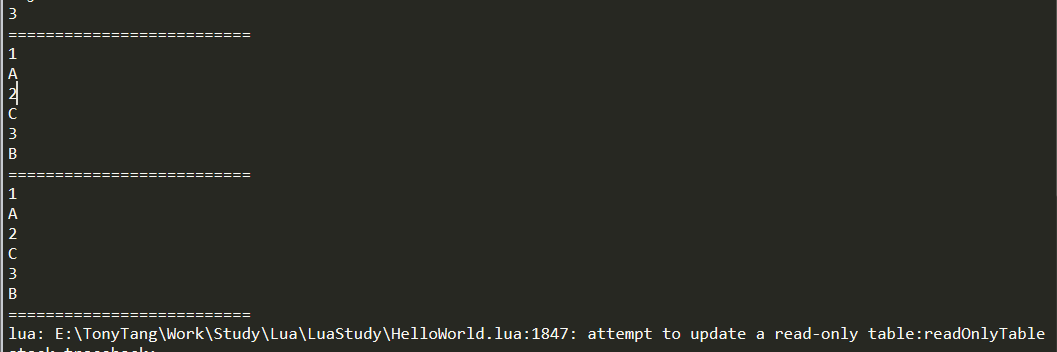
functionReadOnly(t, name) local proxy = {} local mt = { -- create metatable __index = t, __newindex = function(t,k,v) error(string.format("attempt to update a read-only table:%s", name)) end, __len = function() return #t end, __pairs = function() returnnext, t, nil end } setmetatable(proxy, mt) return proxy end
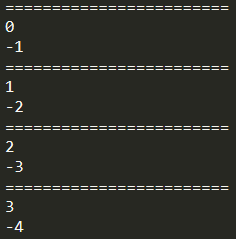
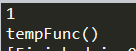
local originalTable = {} table.insert(originalTable, "A") table.insert(originalTable, "C") table.insert(originalTable, "B") local readOnlyTable = ReadOnly(originalTable, "readOnlyTable") print(#readOnlyTable) print("==========================") for key, value inpairs(readOnlyTable) do print(key) print(value) end print("==========================") for index, value inipairs(readOnlyTable) do print(index) print(value) end print("==========================") readOnlyTable[3] = "BB" --readOnlyTable[4] = "D"
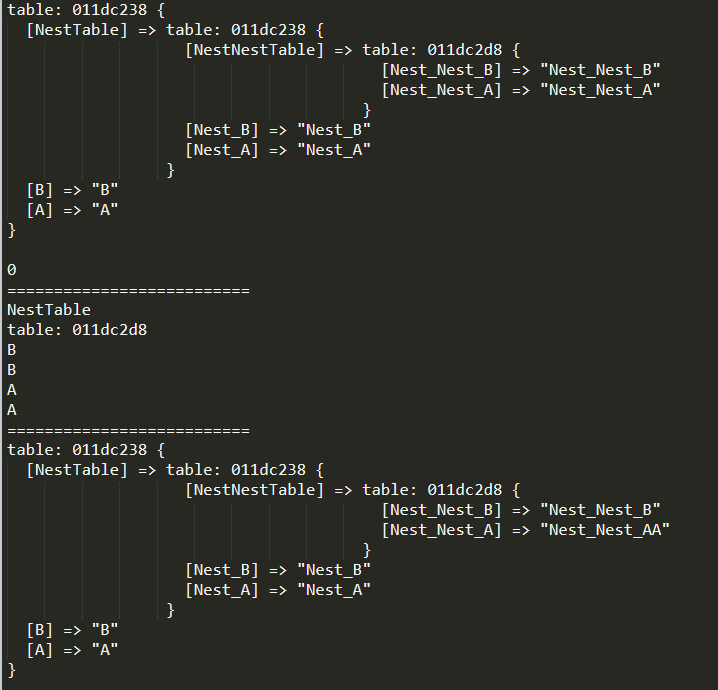
--- 转换table成只读table ---@param t table @需要变成ReadOnly的table ---@param name string @ReadOnly table的名字(方便报错打印定位) ---@param depth number @只读table深度 ---@return table @转换后的只读table functionReadOnlyTable(t, name, depth) iftype(t) ~= "table"then error("not support none table to a recusive read-only table!") return t end depth = depth or1 if depth > 1then local nextDepth = depth - 1 for key, value inpairs(t) do iftype(value) == "table"then t[key] = ReadOnlyTable (t[key], name, nextDepth) end end end local proxy = {} local mt = { __index = t, __newindex = function(t,k,v) error(string.format("attempt to update a read-only table:%s", name)) end, __len = function() return #t end, __pairs = function() returnnext, t, nil end } setmetatable(proxy, mt) return proxy end
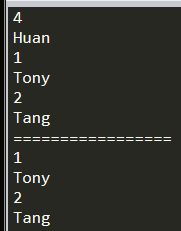
local originalTable = {} originalTable["A"] = "A" originalTable["NestTable"] = { ["Nest_A"] = "Nest_A", ["Nest_B"] = "Nest_B", ["NestNestTable"] = { ["Nest_Nest_A"] = "Nest_Nest_A", ["Nest_Nest_B"] = "Nest_Nest_B", } } originalTable["B"] = "B" local readOnlyTable = ReadOnlyTable(originalTable, "readOnlyTable", 2) print_table(readOnlyTable) print(#readOnlyTable) print("==========================") for key, value inpairs(readOnlyTable) do print(key) print(value) end print("==========================") --readOnlyTable["A"] = "AA" --> ReadOnly Error --readOnlyTable["NestTable"]["Nest_A"] = "Nest_AA" --> ReadOnly Error readOnlyTable["NestTable"]["NestNestTable"]["Nest_Nest_A"] = "Nest_Nest_AA" print_table(readOnlyTable)
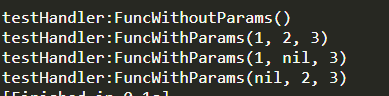
function testHandler:FuncWithParams(...) print("testHandler:FuncWithParams()") print(...) end function testHandler:TestHandlerBind(...) local handlerBind = _G.handlerBind(self, self.FuncWithParams, "param1", "param2") handlerBind(...) end
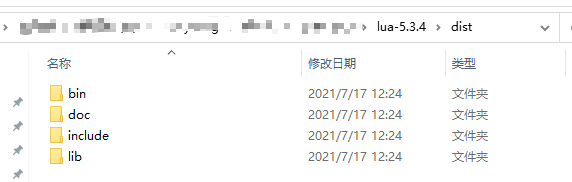
@echo off :: ======================== :: build.bat :: :: build lua to dist folder :: tested with lua-5.3.5 :: based on: :: https://medium.com/@CassiusBenard/lua-basics-windows-7-installation-and-running-lua-files-from-the-command-line-e8196e988d71 :: ======================== setlocal :: you may change the following variable’s value :: to suit the downloaded version set work_dir=%~dp0 :: Removes trailing backslash :: to enhance readability in the following steps set work_dir=%work_dir:~0,-1% set lua_install_dir=%work_dir%\dist set compiler_bin_dir=%work_dir%\tdm-gcc\bin set lua_build_dir=%work_dir% setpath=%compiler_bin_dir%;%path% cd /D %lua_build_dir% mingw32-make PLAT=mingw echo. echo **** COMPILATION TERMINATED **** echo. echo **** BUILDING BINARY DISTRIBUTION **** echo. :: create a clean “binary” installation mkdir%lua_install_dir% mkdir%lua_install_dir%\doc mkdir%lua_install_dir%\bin mkdir%lua_install_dir%\include mkdir%lua_install_dir%\lib copy%lua_build_dir%\doc\*.* %lua_install_dir%\doc\*.* copy%lua_build_dir%\src\*.exe %lua_install_dir%\bin\*.* copy%lua_build_dir%\src\*.dll %lua_install_dir%\bin\*.* copy%lua_build_dir%\src\luaconf.h %lua_install_dir%\include\*.* copy%lua_build_dir%\src\lua.h %lua_install_dir%\include\*.* copy%lua_build_dir%\src\lualib.h %lua_install_dir%\include\*.* copy%lua_build_dir%\src\lauxlib.h %lua_install_dir%\include\*.* copy%lua_build_dir%\src\lua.hpp %lua_install_dir%\include\*.* copy%lua_build_dir%\src\liblua.a %lua_install_dir%\lib\liblua.a echo. echo **** BINARY DISTRIBUTION BUILT **** echo. %lua_install_dir%\bin\lua.exe -e "print [[Hello!]];print[[Simple Lua test successful!!!]]" echo.
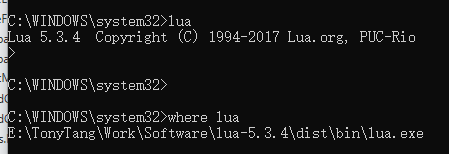
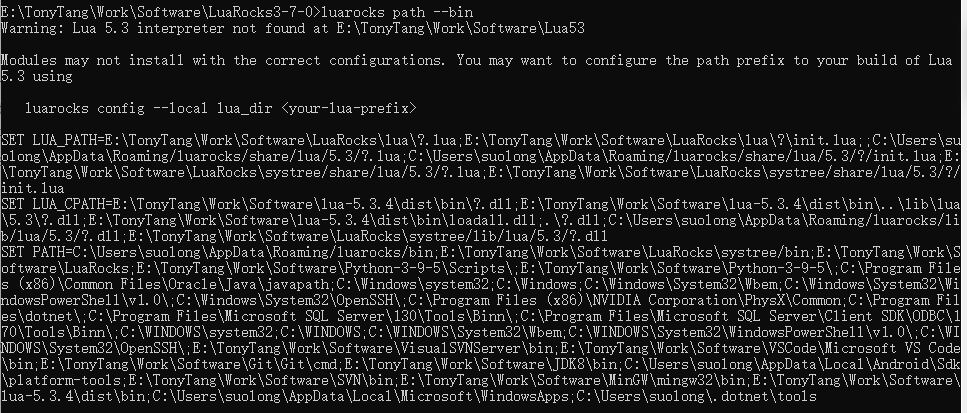
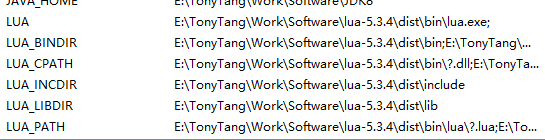
:: configure environment variable :: https://stackoverflow.com/a/21606502/4394850 :: http://lua-users.org/wiki/LuaRocksConfig :: SETX - Set an environment variable permanently. :: /m Set the variable in the system environment HKLM. setx LUA "%lua_install_dir%\bin\lua.exe" /m setx LUA_BINDIR "%lua_install_dir%\bin" /m setx LUA_INCDIR "%lua_install_dir%\include" /m setx LUA_LIBDIR "%lua_install_dir%\lib" /m
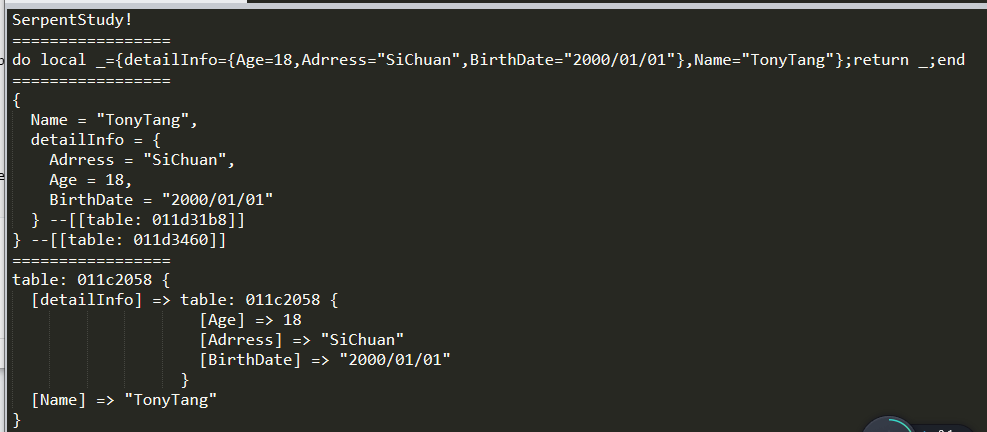
--- 最终目标1: {***}占位替换 --- 指定字符串,采用table里的key替换{key}成key对应的value functiontableGsub(s, tb) local result = s local replaceKey = nil local replaceValue = nil for key, value inpairs(tb) do replaceKey = string.format("{%s}", key) replaceValue = tostring(value) print(string.format("字符串:%s 替换:%s为%s", result, replaceKey, replaceValue)) result = gsub(result, replaceKey, replaceValue) print(string.format("替换后结果:%s", result)) end return result end
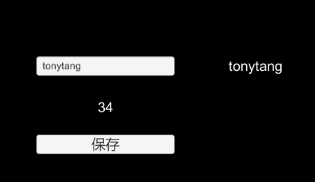
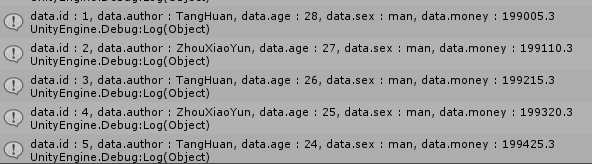
local content = "测试table替换,名字:{name} 年龄:{age} 性别:{sex} 名字2:{name} 名字3:{name}" local replaceTable = { name = "TonyTang", sex = "Man", age = 18, luckyNumber = 7, } local timeCounter = New(TimeCounter, "tableGsub") timeCounter:Start() content = tableGsub(content, replaceTable) timeCounter:Stop() print("替换后结果:replaceValue") print(content) print(string.format("替换耗时:%s", timeCounter.EllapseTime))
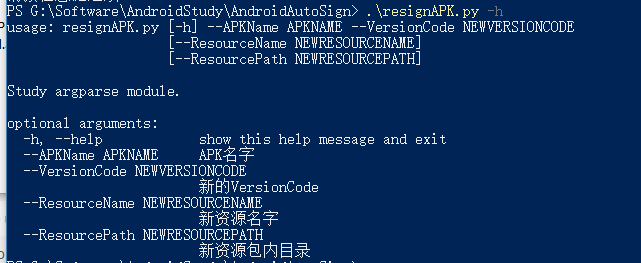
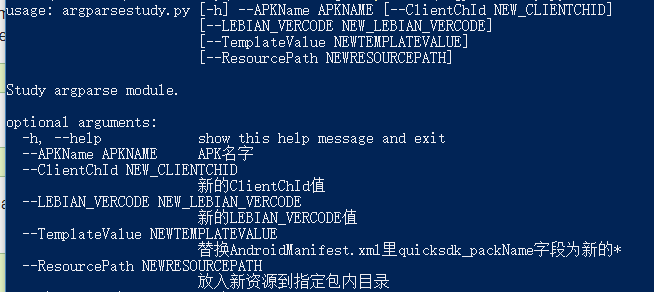
## Modify AndroidManifest File(修改AndroidMainifest.xml) defModifyAndroidManifest(): print("ModifyAndroidManifest()") lines = [] androidManifestFile = open(decompileAndroidManifestPath, mode='r') for line in androidManifestFile: line = ReplaceVersionCode(line, newVersionCode) lines.append(line) androidManifestFile.close()
androidManifestFile = open(decompileAndroidManifestPath, mode='w') for line in lines: androidManifestFile.write(line) androidManifestFile.close()
## Template Replace(模板替换AndroidManifest.xml里的值) defCheckTemplateReplace(line, qct, npn): # Python 2.X string.find #result = string.find(line, qct) # Python 3.X str.find result = line.find(qct) if result != -1: line = line.replace(qct, npn) return line
## Modify Version Code Value(修改AndroidManifest.xml里的version code值) ## 实际使用过程发现apktool反解APK后AndroidManifest.xmnl里没有对应versioncode值 ## 但以下代码如果存在versioncode="*"的话是能够替换成功的 defReplaceVersionCode(line, newverioncode): # Python 2.X string.find #result = string.find(line, versionCodeTemplate) # Python 3.X str.find result = line.find(versionCodeTemplate) if result != -1: line = re.sub('(versionCode="[0-9]*")', "versioncode=\"{}\"".format(newverioncode), line, 1) return line
## Copy new resource to APK(复制新资源到包内) defCopyNewResourceToAPK(): print("CopyNewResourceToAPK()") shutil.copy(newResourceName, "{}".format(replaceResourceDestinationPath))
Friendly & easy to learn(学习更友好更容易(对于无编程经验的人更加友好,语法更nature))
Supports multiple programming paradigms(支持多种编程范式)
Large and comprehensive standard library(丰富的标准库和Package)
Note: 这里提一句Python里很有名的一句话: “Life is short, you need python.”
IDE & Editor
学习任何一门编程语言,好的IDE或者Editor都能帮助我们更加快速的学习。 因为初学Python且Python是解析执行,这里暂时不考虑过于强大的IDE。 IDE详情选择可以参考Python IDE 这里通过使用Sublime Text 3以及其Python相关的扩展插件作为学习Python的Editor。 Sublime Text 3 Python相关插件设置详情
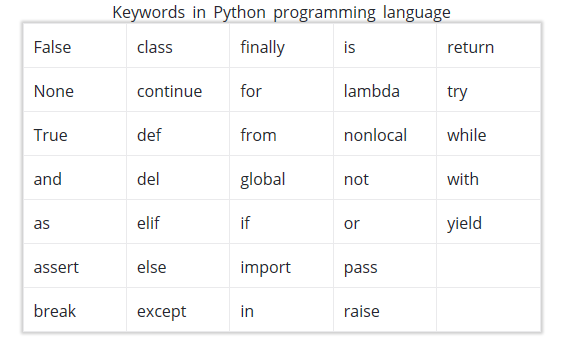
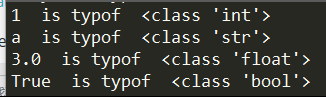
Python设计理念强调可读性(通过缩进而非{}来表示代码块): 同时Python注释是通过# or ‘’’ or “””:
1 2 3 4 5 6 7 8
for i inrange(5): if i >= 5: print("{0} >= 5".format(i)) break else: # No break happends in for loop # Then execute this block print("No number is equal or greater than 5!")
Docstring(Docstring is short for documentation string): 可以看出Docstring是一段文档描述(好比在C#里通过///编写描述信息一样)。Python在书写格式上要求比较严,虽然不会导致报错,但会算作不是规范的写法,这也就是我们为什么会去安装Sublime Text 3 flake8这样的linter插件了。
1 2 3 4 5 6
defaddition(par1, par2): """This funtion is used to get result of (a + b).""" return par1 + par2
for i inrange(5): if i >= 5: print("{0} >= 5".format(i)) break else: # No break happends in for loop # Then execute this block print("No number is equal or greater than 5!")
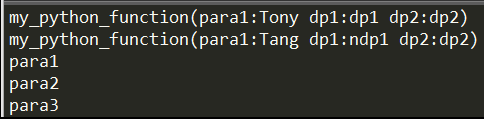
# Keyword para call my_python_function(dp1="ndp1", para1="Tang")
# Parameters without length limited defarbitrary_para_function(*paras): """ Python function without length of parameter limitation.""" for para in paras: print(para)
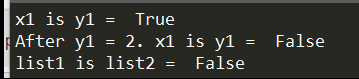
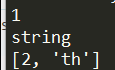
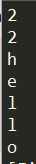
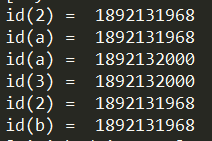
my_tuple = (1, "string", [1, "th"]) my_tuple[2][0] = 2 for tuplemember in my_tuple: print(tuplemember) del my_tuple # my_tuple -- Error: name 'my_tuple' is not defined
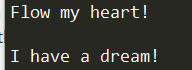
# try: finally: Make sure f close successfully # specify encoding='utf-8' is used to avoid platform dependent problems try: f = open("./FilesFolder/TonyTangFile.txt", mode='r', encoding='utf-8') for line in f: print(line) finally: f.close()
# Another way to make sure file close successfully withopen("./FilesFolder/TonyTangFile.txt", mode='w', encoding='utf-8') as f: # Do file operation here f.write("Flow my heart!\nI have a dream!")
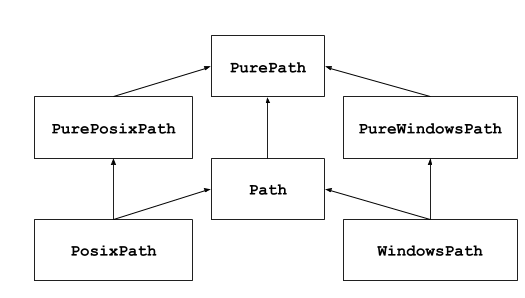
namespace is a collection of names.(前面讲解了什么是Name,接下来要理解的Namespace就好比一系列Name的集合) 我们平时用到的Build-in Functions就属于Build-in Namespace里。 让我们结合下图看看Python里Namespace的层级:
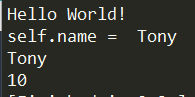
defsayhi(self): """Class Member Function.""" print("Hello World!")
defprintname(self): """Print name member.""" print("self.name = ", self.name)
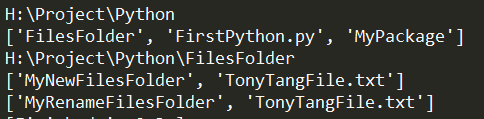
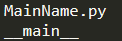
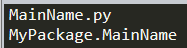
# 这里因为我是定义在MyFirstPython.py文件里的,所以导入的是MyFirstPython import MyFirstPython mfp = MyFirstPython.MyFirstClass("Tony") mfp.sayhi() mfp.printname() print(mfp.name) mfp.age = 10 print(mfp.age) del mfp.name # mfp.printname() AttributeError: 'MyFirstClass' object has no attribute 'name' del mfp # mfp.sayhi() NameError: name 'mfp' is not defined
从上面可以看出Python里Class的定义格式如下:
1 2 3 4 5 6 7 8 9
defclassname(父类): """Docstring Class description.""" def__init__(self,arg): """Docstring Constructor description.""" # constructor's body
deffunctionname(arg): """DocString Member Function description.""" # body
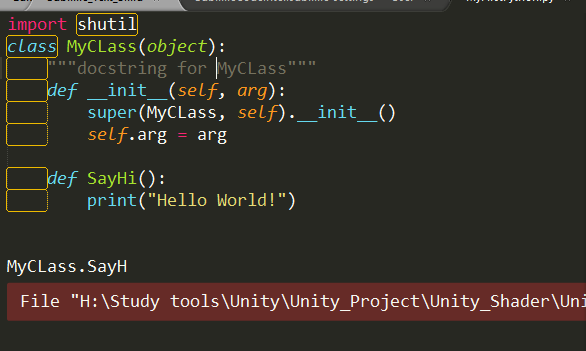
# MyFirstPython.py # File Name: MyFirstPython.py # Description: This file is used to study python # Author: TangHuan # Create Date: 2017/6/5
import shutil
classMyFirstClass(object): """docstring for MyClass""" # class Static Member age = 10 # 构造函数 def__init__(self, name): """Class Constructor.""" super().__init__() print("MyFirstClass:__init__({})".format(name)) self.name = name
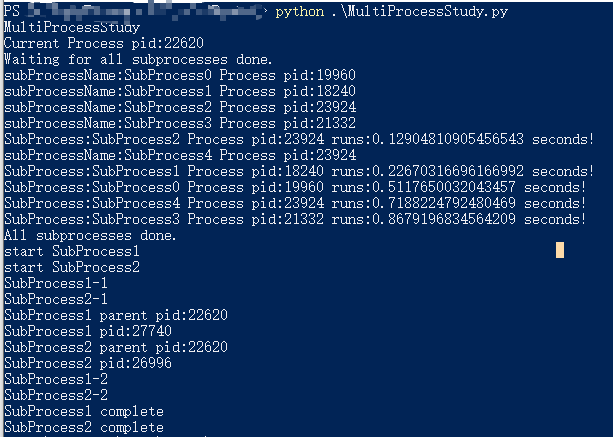
""" File Name: MultiProcessStudy.py Description: This file is used to study python subprocess Author: TangHuan Create Date: 2021/8 """
import os import subprocess import time import random from multiprocessing import Pool
defprocess_task(subProcessName): print("subProcessName:{0} Process pid:{1}".format(subProcessName, os.getpid())) start = time.time() time.sleep(random.random()) end = time.time() print("SubProcess:{0} Process pid:{1} runs:{2} seconds!".format(subProcessName, os.getpid(), end - start))
if __name__=='__main__': print("MultiProcessStudy") # 打印主进程id print("Current Process pid:{0}".format(os.getpid()))
# 创建4个多进程(子进程)的进程池 p = Pool(4) for i inrange(5): p.apply_async(process_task, args=("SubProcess{0}".format(i),)) print("Waiting for all subprocesses done.") # 停止提交更多的任务到p里 p.close() # 等待p里的所有子线程任务完成 p.join() print("All subprocesses done.")
Extensible – “The Pipeline plugin supports custom extensions to its DSL [5: Domain-Specific Language] and multiple options for integration with other plugins.”
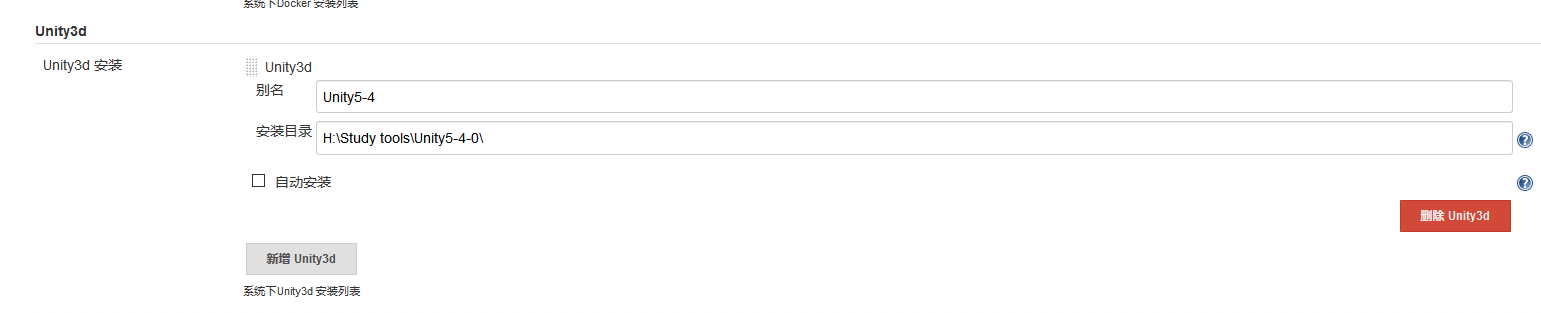
打包IOS时报错:_RegisterApplication(), FAILED TO establish the default connection to the WindowServer, _CGSDefaultConnection() is NULL. 这是因为Jenkins默认安装时是以Jenkins作为用户和组。开机自启动时也是以Jenkins用户和组来运行的。而Unity我是默认安装在我自己的用户apple和admin组下。所以在Jenkins需要启动Unity时应该是没有权限调用 Unity Editor 的命令行。所以我们要做的就是确保Unity和Jenkins运行在同一个User和Group下。 以下采用把Jenkins改到apple和wheel下运行以支持Unity的命令行运行。 详情参见macOS 安装配置 Jenkins 持续集成 Unity 项目指南
指定Custom Workspace(自定义到桌面特定目录后每次都报Failed to mkdir,这个跟第四个问题是同一个问题,默认Jenkins用户权限问题)
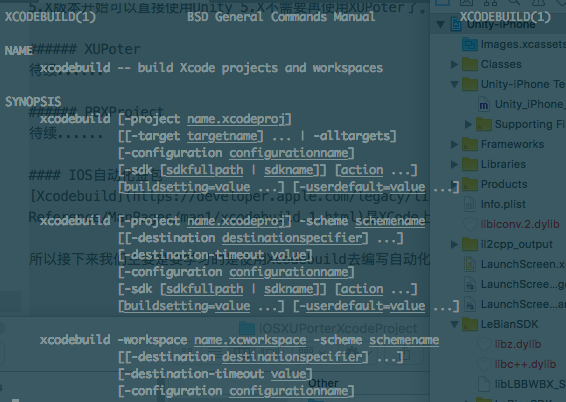
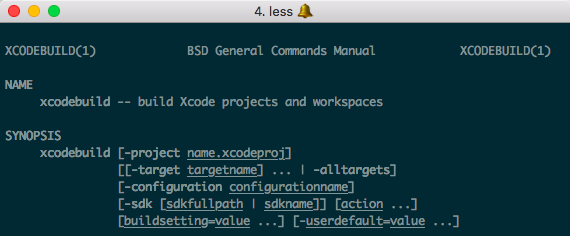
clean – Remove build products and intermediate files from the build root(SYMROOT)(清楚通过build触发编译的所有中间文件)
build – Build the target in the build root(SYMROOT). This is the default action, and is used if no action is given.(build指定target)
archive – Archive a scheme from the build root(SYMROOT). This requires specifying a scheme.(打包指定scheme)
exportArchive – Specifies that an archive should be exported. Requires -archivePath, -exportPath, and -exportOptionsPlist. Cannot be passed along with an action.(指定Archive文件导出IPA)
每一种都各有各的优势,作为一个小白用户,连Sublime Text 3和VS Code都算不上使用熟悉,所以这里并不能做详细的比较。
Editor Chosen
How to choose editor? 在选择自己的IDE或则编辑器的时候,我很赞同一句话“没有最厉害最优秀的只有最适合。” 所以哪一种最好最适合取决于我们用它做什么。
What do I need? 作为一个前端程序员,大部分时间是在做手游或者PC端的开发,需要和Android,IOS,PC打交道。 在Windows上主要使用VS,Android Studio作为IDE。 在Mac上使用XCode作为IDE。 主要使用C++,C#,Java,Python,bat,Lua等编程语言。 但VS,Android Studio,XCode都属于比较大型的IDE,这里主要是需要一个轻量级的编辑器。 主要希望有下列功能:
跨平台(跨Mac和Windows开发)
语法高亮
代码补充
调试(option)
快速切换,查询,跳转等方便快捷的快捷修改
快速启动
方便自定义(比如背景,快捷键设置等)
扩展性强(方便添加支持更多功能) ……
Why choose Sublime Text 3? 这里就不一一说明Sublime Text 3的好处了,几乎上面我需要的都可以很方便的扩展支持,这也就是为什么选择Sublime Text 3的原因。
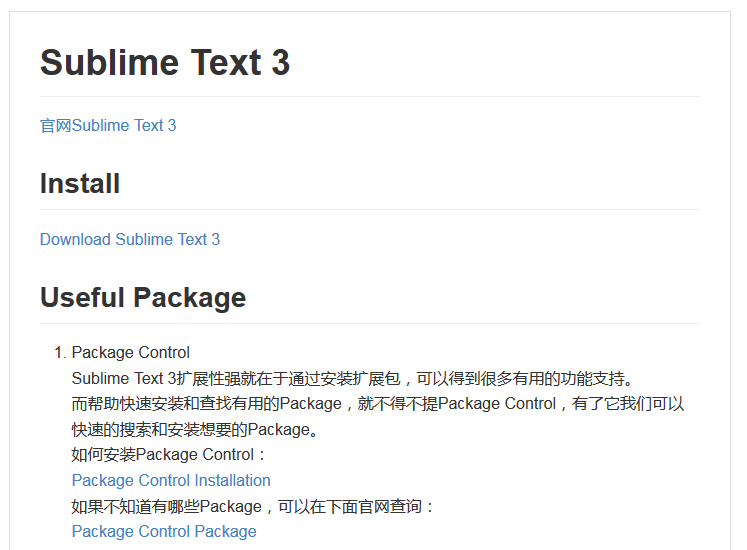
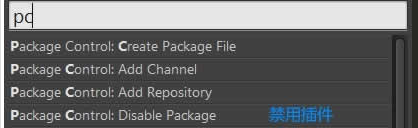
Package Control Sublime Text 3扩展性强就在于通过安装扩展包,可以得到很多有用的功能支持。 而帮助快速安装和查找有用的Package,就不得不提Package Control,有了它我们可以快速的搜索和安装想要的Package。 如何安装Package Control: Package Control Installation 如果不知道有哪些Package,可以在下面官网查询: Package Control Package
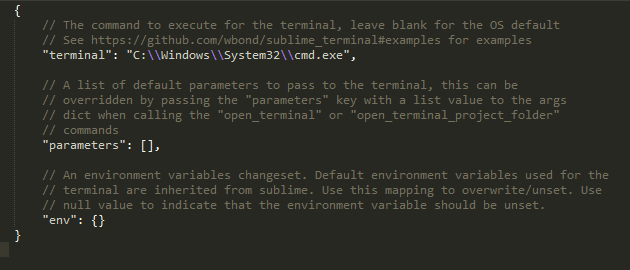
Terminal 偶尔会需要打开命令行窗口,这个插件可以帮助我们直接在Sublime里通过快捷键快速打开系统自带命令行 Terminal Note: 虽然Sublime Text 3也有Git相关的插件,但是考虑已经添加了快速打开命令行的插件,并且Git使用不会太频繁,所以不单独添加Git扩展。
其中是Python和Python3分别代表Python2.x和Python3.x的安装路径
如果需要配置其他语言,也写在"codeintel_language_settings"里即可。
这个由于还没正式开始学习使用Python,但测试无论配没配置上面,系统提示和自定义方法都会有自动提示和补全功能和函数跳转(Alt+click)(不确定是Sublime Text 3自带的还是SublimeCodeIntel的功能,暂时先按上面的方式设置)
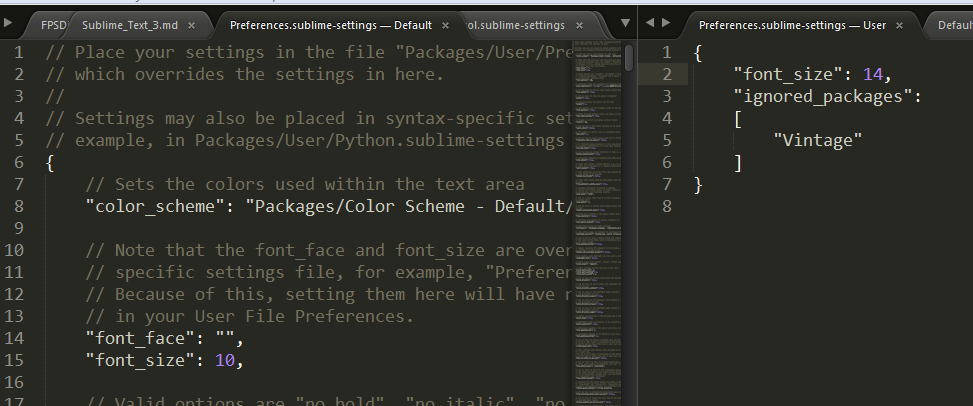
Sublime Text 3 Setting 字体大小,行号显示,拼写检查等设置。 修改默认设置跟自定义快捷键差不多。 比如我们想默认字体大小改大一点: Preference -> Settings 我们希望修改只针对MarkDown文件的语法高亮规则: 打开*.md文件 Preference -> Settings - Syntax Specific
Theme
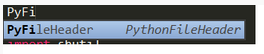
Custom Snippets 自定义快速填充片段。帮助我们在快速编写重复的代码或者注释。 Tools -> Developer -> New Snippets 放在:C:\Users\mshz\AppData\Roaming\Sublime Text 3\Packages\User下 貌似每一个Snippets文件只能编写一个对应的Snippet。 所以要想管理不同编程语言之间的Snippets,我们可以通过建立不同的文件夹进行管理分类。 接下来看看Snippet事例和使用效果:
1 2 3 4 5 6 7 8 9 10 11 12
<snippet> <content><![CDATA[ # File Name: $TM_FILENAME # Description: This file is used to ${1:Staff} # Author: ${2:TangHuan} # Create Date: ${3:Year}/${4:Month}/${5:Day} ]]></content> <!-- Optional: Set a tabTrigger to define how to trigger the snippet --> <tabTrigger>PyFileHeader</tabTrigger> <!-- Optional: Set a scope to limit where the snippet will trigger --> <scope>source.python</scope> </snippet>
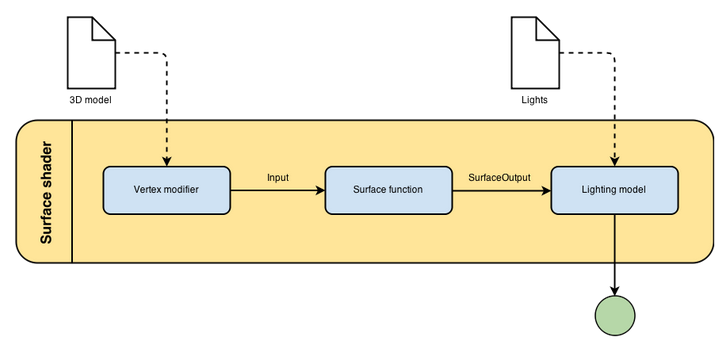
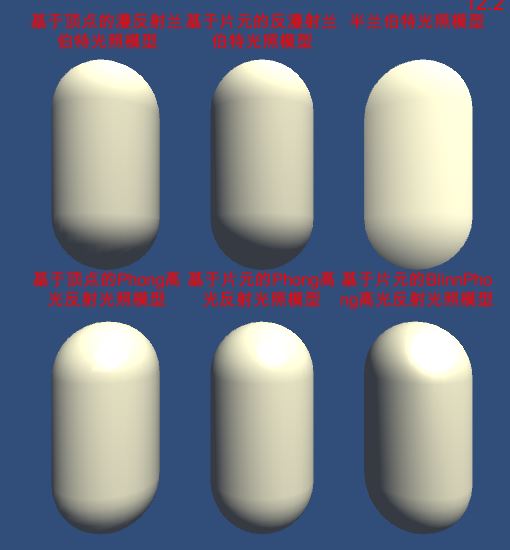
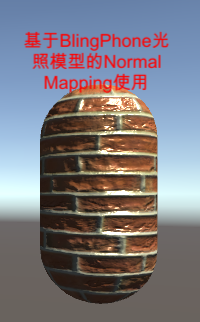
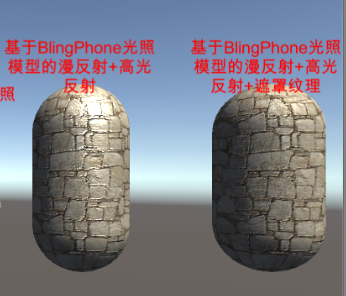
Surface shader Time to use – “Whenever the material you want to simulate needs to be affected by lights in a realistic way, chances are you’ll need a surface shader. Surface shaders hide the calculations of how light is reflected and allows to specify “intuitive” properties such as the albedo, the normals, the reflectivity and so on in a function called surf.” 可以看出Unity的Surface Shader帮我们把光照对物体的影响的计算抽象了出来。我们只需设定一些控制系数,然后通过Surface Shader的surf方法就能触发光照作用对表面的运算。 下面简单看下官网给出的Surface Shader Code:
1
2
3
4
5
6
7
8
9
10
11
12
13
14
CGPROGRAM // Uses the Lambertian lighting model #pragma surface surf Lambert
Fragment and Vertex Shaders Fragment and Vertex Shaders就跟OpenGL里差不多,model的vertex会经历完整的Shader Pipeline,最终通过计算得出最终的颜色。 让我们来看看官网给出的Fragment and Vertex Shaders Code:
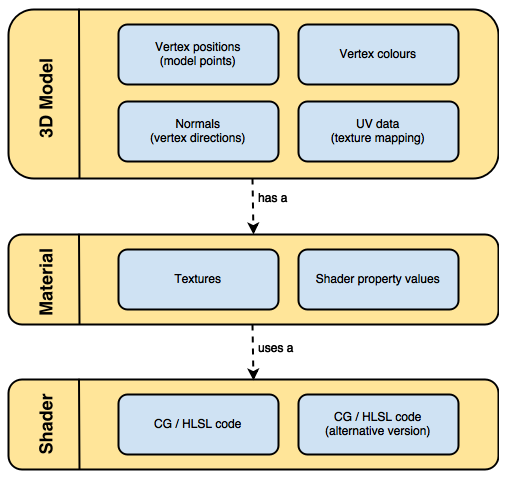
Shader "MyShader" { Properties { // The properties of your shaders // - textures // - colours // - parameters // ... }
SubShader { // The code of your shaders // - surface shader // OR // - vertex and fragment shader // OR // - fixed function shader } }
Properties: “The properties of your shader are somehow equivalent to the public fields in a C# script; they’ll appear in the inspector of your material, giving you the chance to tweak them.” 从这里看出Properties在Unity里相当于OPENGL Shader里定义的Uniform,Sampler,全局变量等,用于作为可控的输入。 让我们来看看官网给出的例子
struct SurfaceOutput { fixed3 Albedo; // diffuse color fixed3 Normal; // tangent space normal, if written fixed3 Emission; half Specular; // specular power in 0..1 range fixed Gloss; // specular intensity fixed Alpha; // alpha for transparencies };
fixed4 _ColorTint; // final color function格式, color会影响所有lightmaps,light probes等的颜色信息 voidmycolor(Input IN, SurfaceOutput o, inout fixed4 color) { color *= _ColorTint; }
参考书籍: 《3D数学基础:图形与游戏开发》 《Fundamentals of Computer Graphics (3rd Edition)》 — Peter Shirley, Steve Marschnner 《Real-Time Rendering, Third Edition》 — Tomas Akenine-Moller, Eric Haines, Naty Hoffman
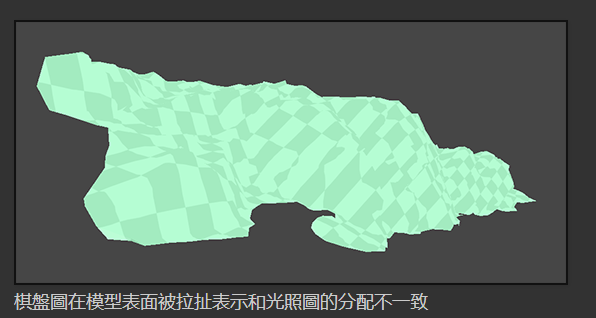
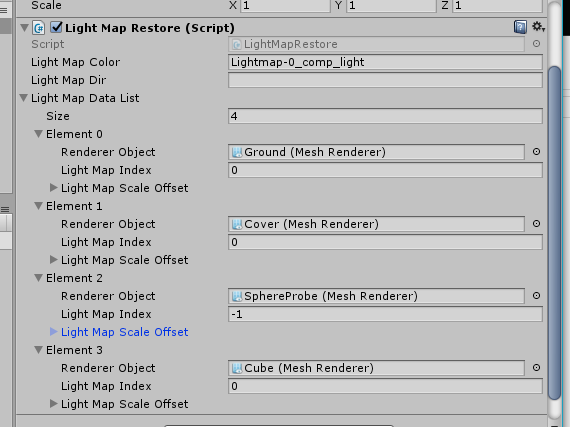
var lightmaptex = TextureResourceLoader.getInstance().loadTexture(newlightmapname); var newlightmapdata = new LightmapData(); newlightmapdata.lightmapColor = lightmaptex; LightmapSettings.lightmaps = new LightmapData[] { newlightmapdata };
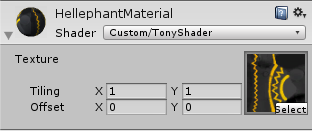
// **_ST // x contains X tiling value // y contains Y tiling value // z contains X offset value // w contains Y offset value // 主纹理的UV信息 o.uv.xy = v.texcoord.xy * _MainTex_ST.xy + _MainTex_ST.zw; // 法线纹理的UV信息 o.uv.zw = v.texcoord.xy * _NormalMap_ST.xy + _NormalMap_ST.zw;