Python使用
- 1. Python Study
- 1.1. Introduction
- 1.2. IDE & Editor
- 1.3. Python Version Choosen
- 1.4. Useful Package
- 1.5. Tutorial(基础篇)
- 1.6. Tips
- 1.7. Python GUI
- 2. Reference
Python Study
Introduction
When
Python is a widely used high-level programming language for general-purpose programming, created by Guido van Rossum and first released in 1991.
Python第一版发布于1991年,由Guido van Rossum编写。
What
An interpreted language, Python has a design philosophy which emphasizes code readability (notably using whitespace indentation to delimit code blocks rather than curly brackets or keywords), and a syntax which allows programmers to express concepts in fewer lines of code than possible in languages such as C++ or Java.[22][23] The language provides constructs intended to enable writing clear programs on both a small and large scale.
首先我们要知道Python跟Lua一样,是解释型语言(不需要编译,通过解析执行,有自己的解析器)。Python设计理念强调可读性(通过缩进而非{}来表示代码块)。
Python features a dynamic type system and automatic memory management and supports multiple programming paradigms, including object-oriented, imperative, functional programming, and procedural styles.
Python是动态类型语言,同时有自己的内存管理机制,支持多种编程范式(待深入学习了解)。
Why
了解了Python When & What。那么我们Why什么要选择学习使用Python了?
Python is powerful… and fast; plays well with others; runs everywhere; is friendly & easy to learn; is Open.
supports multiple programming paradigms. It has a large and comprehensive standard library.[25]
把上面可以归纳如下:
- Run everywhere(跨平台)
- Friendly & easy to learn(学习更友好更容易(对于无编程经验的人更加友好,语法更nature))
- Supports multiple programming paradigms(支持多种编程范式)
- Large and comprehensive standard library(丰富的标准库和Package)
Note:
这里提一句Python里很有名的一句话:
“Life is short, you need python.”
IDE & Editor
学习任何一门编程语言,好的IDE或者Editor都能帮助我们更加快速的学习。
因为初学Python且Python是解析执行,这里暂时不考虑过于强大的IDE。
IDE详情选择可以参考Python IDE
这里通过使用Sublime Text 3以及其Python相关的扩展插件作为学习Python的Editor。
Sublime Text 3 Python相关插件设置详情
Python Version Choosen
Python有一个比较重要版本分割线2.x & 3.x。
详情参见Python2orPython3
这里就不深入去了解2.x和3.x之间的区别了。
简单的理解就是3.x提供了更多更全的功能支持,同时有更多的丰富的库支持。如果作为初学者,并不需要维护老版本(2.x)的工具代码时,完全可以从3.x学起。
Useful Package
Pip
Python有丰富的标准库。而其中最重要也是新手第一时间就应该安装的就是Pip。
Pip对于Python就好比Package Control好比Sublime Text 3。
Pip(Python Package Index)是一个Python Package集中管理安装的扩展包。
Pip安装详情参考官方文档
Pip安装成功后我们就可以通过Pip去查看或安装丰富的Python Package了。
Package Install:
Show Intalled Packages: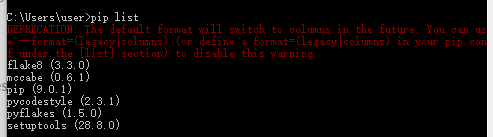
安装之后的Package可以在安装目录查看到: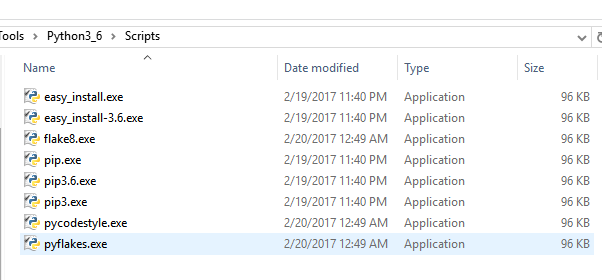
更多关于Pip使用查看官方文档
argparse
详细的介绍会在后面Tip的Command Line Args篇章
Tutorial(基础篇)
Introduction
Keywords and Identifier
Identifier(标识.e.g funcname, variable ……)定义规则:
- Keywords不能用做变量声明(这应该是任何语言都通用的规范了吧)
- 变量名不能以数字开头
- 变量名不能用特殊符号(e.g. !, @, #, $, %)
简单了解下Python的关键词: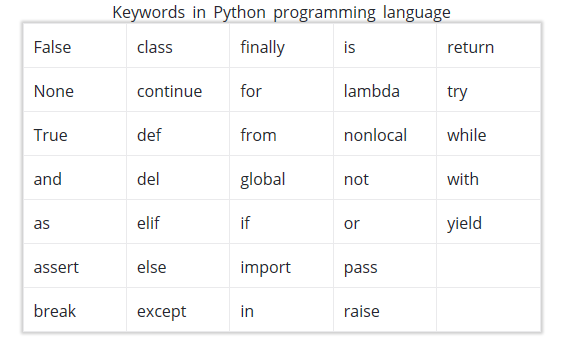
Note:
Python is a case-sensitive language. This means, Variable and variable are not the same. Always name identifiers that make sense.
Python是大小写敏感的,大小写不同的变量名是不同变量。
Statements & Comments
Instructions that a Python interpreter can execute are called statements.
Python可解析执行的语句叫做Statements。
多行Statements可以通过\或者[]或者{}或者()链接或封装:
1 | a = 1 + 2 + \ |
Python设计理念强调可读性(通过缩进而非{}来表示代码块):
同时Python注释是通过# or ‘’’ or “””:
1 | for i in range(5): |
Docstring(Docstring is short for documentation string):
可以看出Docstring是一段文档描述(好比在C#里通过///编写描述信息一样)。Python在书写格式上要求比较严,虽然不会导致报错,但会算作不是规范的写法,这也就是我们为什么会去安装Sublime Text 3 flake8这样的linter插件了。
1 | def addition(par1, par2): |

可以看到我们定义了一个加法函数,并编写了docstring。
通过func_name.__doc__我们可以得到那段描述
Python I/O and Import
Python里的输入输出交互(好比C++里的cin,cout)是通过input和print。
因为需要交互所以需要在可执行Python代码的terminal里执行python脚本:
因为Python的import是指import Module,我们需要知道Python里Module的定义,
Modules refer to a file containing Python statements and definitions.
Modules在Python里是指一个文件所包含的所有定义和声明(以文件为单位划分,文件名即为import的名字)。
在import Module还有一个重要的点就是,我们需要知道Python查找所有*.py的搜索路径(跟环境变量有点像):
1 | print("sys.path:{0}".format(sys.path)) |

我们可以指定只导入特定定义(e.g. from math import pi)
Note:
Python的Module和C#的namespace概念不一样,前者是以文件为单位,后者是以命名空间划分(支持在多个文件里定义在同一命名空间下)
Python Operators
运算符跟大多数编程差不多,这里只讲几个比较特殊的:
Logical Operators:
1 | x = True |

或许跟Python提倡简洁明了有关,可以直接采用and or not之类的逻辑运算符
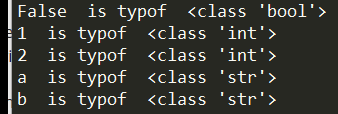
Identity operators:
1 | x1 = 1 |
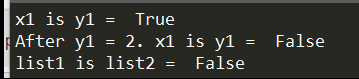
Note:
is and is not are used to check if two values (or variables) are located on the same part of the memory.
List可以理解成分配了不同的内存去存储实际成员值所以是不同identity,上面x1 = 1和y1 = 1是located on the same part of the memory就需要理解后续会讲到的[Namespaces概念](http://tonytang1990.github.io/2017/06/12/Python-Study/#Object & Class)
Membership operators:
1 | list3 = [1, 'T', 'H'] |

Note:
in & not in are used to test whether a value or variable is found in a sequence (string, list, tuple, set and dictionary).
in & not in 主要是用于判断特定变量或者值是否存在于特定sequence里。
Flow Control
if,elif,else,while,for这里主要记录一些Python相对于C++,C#,Java这些语言里的一些区别。
Python里是以:结束条件语句,以缩进表示层级。
while和for有一点比较特殊,支持else语句(没有break语句执行时)。
1 | for i in range(5): |

Function
Python的Function定义关键词是def,格式如下:
1 | def func_name(paras): |
Python支持显示传递参数,也支持默认参数和不限数量参数。
1 | # User-defined functions |
Python也支持匿名函数(Lambda Function),只是不像C++,C#使用(x)=>表示而是lambda x:
1 | sqrfunc = lambda x: x * 2 |

Modules
C,C++里有#include。C#有using。Java有import。Python里有Modules。
但Python里的Modules更像C,C++是针对文件为单位。
使用的时候通过import filename即可(也支持指定别名 as newname)
1 | def my_first_python_func(): |
1 | import MyFirstPython as MFP |

知道了Python是以文件为单位导入的,那么我们也需要知道Python导入文件时的搜索路径(通过打印sys.path即可)
Note:
Python也支持只导入指定文件里的指定对象
e.g.
1 | from math import pi |
Package
C++,C#里有namespace。Java有package。Python里有Package(相当于Java里package和C#里namespace概念,负责抽象对应Directory到指定Package里)
Steps:
- 创建文件夹(文件夹名作为Package Name)
- 文件夹目录下创建一个__init__.py文件(默认可以不写任何内容)
- 通过import PackageName.Module引入特定文件
e.g.
1 | import MyPackage.MyFirstPython |

Note:
Package是针对Directory而言,Module是针对file而言
Datatypes
Variable变量赋值在Python里简单明了:
1 | p1 = 1 |
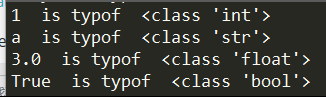
判断数据类型Python是通过type()这个类似C#GetType()。
判断是否是某个类型实例Python是通过isinstance(),类似于Python里的is关键词。
1 | class MyClass: |

可以看出在Python是弱语言类型,声明变量是无需显示指定变量类型。
同时通过type和isinstance可以判断实例对象类型。
Note:
这里的Data Type是指实例对象的类型,Python是弱类型语言。
Basic Data Types
Python支持大部分基本数据类型,e.g. int, float等。
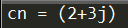
有一点比较特殊的是Python支持complex numbers(复数):x + yj(x为实部,yj为虚部)
1 | cn = 2 + 3j |
同时表示不同进制的Number只需添加不同前缀即可: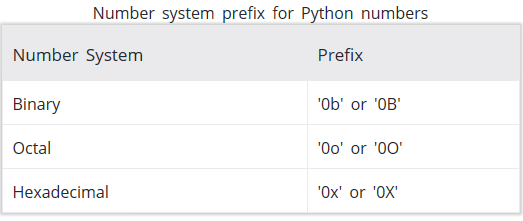
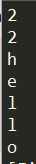
List
List is an ordered sequence of items. It is one of the most used datatype in Python and is very flexible. All the items in a list do not need to be of the same type.
Python的List好比数组,但是更灵活,可存储不同类型的对象。
1 | pythonList = [1, "a", 3.0, True] |
更多的List处理参见List.Method和其他Build-in Functions(比如len(),sorted()等)
Note:
List是通过[]定义。
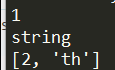
Tuple
Tuple is an ordered sequence of items same as list.The only difference is that tuples are immutable. Tuples once created cannot be modified.
Tuple和List的唯一区别就是创建后不可再被改变,但如果内嵌可变的(e.g. List)那么List的数据是可以被改变的。Tuple是通过()定义内容。
1 | my_tuple = (1, "string", [1, "th"]) |
从上面可以看出del关键词可以删除变量的引用。
Note:
Tuple是通过()定义。
Tuple相比List更适合用于存储固定的不同数据类型的数据。
Everything is object in Python.(这一点跟Java,C#一样)
Strings
1 | mypythonstring = "我的名字是TonyTang" |

Note:
String is sequence of Unicode characters. Strings are immutable
Python里是采用Unicode编码存储字符串。Strings可以通过[]访问,但是不可被改变的。
We cannot delete or remove characters from a string. But deleting the string entirely is possible using the keyword del.因为string是immutable的,所以我们不能通过del删除string里面的个别character,但是我们可以删除对string的整个引用。
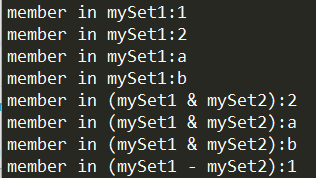
Set
Set is an unordered collection of unique items. Set is defined by values separated by comma inside braces { }. Items in a set are not ordered.
Set也是一系列数据的集合类型,但是是无序的。
1 | mySet1 = {1, "a", 2, "b", 1} |
可以看出因为Set是无序的,连循环遍历出来的结果也是不确定的。所以针对Set,[]访问就是无意义也是不被允许的。
Every element is unique (no duplicates) and must be immutable (which cannot be changed).
Set还有一点特性就是成员是唯一且不可变的同时支持类似于集合与或等操作:
1 | mySet2 = {"a", 2, "b"} |
Note:
Set是通过{}定义。
更多操作参考Set.API
Dictionary
Dictionary is an unordered collection of key-value pairs.
Python里的Dictionary跟C#里的Dictionary差不多,代表无序的Key-Value主键值对。
1 | myDictionary = {1: "Tony", "Tang": 2} |

可以看出Python里Dictionary的键值对定义时通过:分割,然后通过[]去方案对应Key得到Value值。
Note:
Dictionary是通过{}定义。
更多操作参考Dictionary.API
Conversion between data types
基础数据类型转换通过int,float,complex显示转换即可:
1 | myint = int(2.5) |
Files
File Operation
首先看看最新官方文档给出的API说明:
open(file, mode=’r’, buffering=-1, encoding=None, errors=None, newline=None, closefd=True, opener=None)
1 | # try: finally: Make sure f close successfully |
从上面可以看到,open的几个关键参数,mode决定了可读还是可写等模式,encoding决定编码格式是为了确保不同平台脚本的一致性。
Directory
Python提供了os module支持很多文件夹目录操作的API
1 | import os |
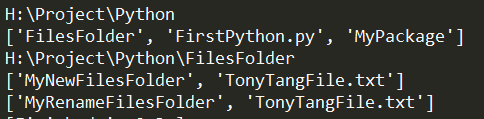
从上面可以看出Python的API都很简洁明了,跟bat,shell很像,具体使用过程中主要还是按需求差文档写自己的自动化即可。
Exception
Python Exception
Exception Handling
User-defined Exception
Object & Class
Name
Name (also called identifier) is simply a name given to objects.
1 | a = 2 |
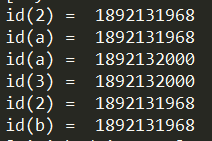
id()适用于打印object地址,从上面的输出可以看到只要Name指向Object的值是一致的,那么他们所指向的地址就是一致的。详情参考下图: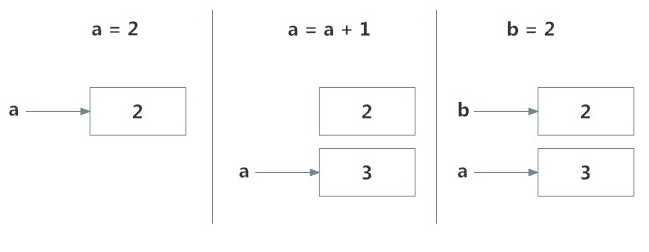
This is efficient as Python doesn’t have to create a new duplicate object. This dynamic nature of name binding makes Python powerful; a name could refer to any type of object.
Note:
Everything in Python is an object.
1 | import this |
上面这段代码很有意思,会在控制台打印出Python的编程哲学: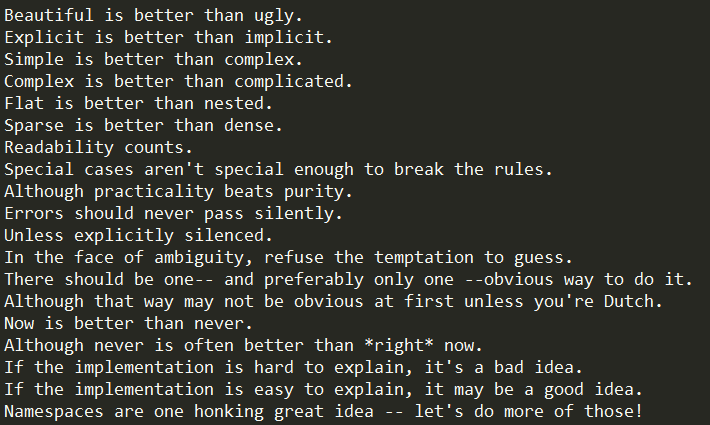
Namepsace & Scope
namespace is a collection of names.(前面讲解了什么是Name,接下来要理解的Namespace就好比一系列Name的集合)
我们平时用到的Build-in Functions就属于Build-in Namespace里。
让我们结合下图看看Python里Namespace的层级:
讲完Namespace,Python里还有一点跟Namespace密切相关的Scope:
Scope is the portion of the program from where a namespace can be accessed directly without any prefix.(Namespace在Python就好比C++,C#里的namespace。Scope就好比C++,C#里变量的有效区域。)
现阶段主要分为3中Scope:
- Scope of the current function which has local names(当前function scope)
- Scope of the module which has global names(全局scope)
- Outermost scope which has build-in names(最外层Build-in scope)
接下来透过实例学习理解Python里的Scope:
1 | def outer_function(): |

可以看出在Function内的定义因为在不同的Scope不会覆盖Global Scope的a定义。当我们显示指定Function Scope里的a为global的a时,我们可以在Function Scope内引用到Global的a。
Class
接触过面向对象编程的人应该对Class都不陌生,他是我们抽象对象定义的关键类型。
在面向对象编程语言的Python里Class也起着同样的作用,只不过定义的方式有所区别,详情如下:
1 | class MyFirstClass(object): |
从上面可以看出Python里Class的定义格式如下:
1 | def classname(父类): |
__init__就好比C++里的构造函数。
Python里的继承写法:classname()括号里面跟的是父类,在子类可以通过super去访问父类。
值得一提的是Docstring,每一个类或者方法都有Docstring,我们可以通过classname.__doc__的方式去访问。
同时我们看到Python里还可以在运行时动态定义成员变量(e.g. mfp.age)
Python里不是通过new关键词去实例化类对象,但del关键词就好比C++里和new配对的delete,但这里的delete不仅是针对new出来的实例化对象进行回收,还能针对特定实例化成员进行删除。(当我们del mfp实例对象时,我们只是把mfp的对于Object的引用从corresponding namespace里移除而非真的销毁内存里Object。真正的销毁是发生在没有人在绑定到该Object时。)
This automatic destruction of unreferenced objects in Python is also called garbage collection.(真正的销毁就好比C++里的GC对内存进行释放)
Note:
Python is an object oriented programming language.
Inheritance
关于继承这里就不多讲了,大家参考文档介绍。
Operator Overloading
Operator Overloading翻译过来应该是运算符重载。
在了解Operator Overloading之前,让我们来了解下Python Class里的一些特殊方法。
这里的特殊方法学过lua的同学应该会感到很亲切:
- new – New一个Class的实例对象时会被调用
- init – Class的构造函数(父类构造函数需要手动调用,默认不递归调用)
- del – Class实例对象销毁时调用(类似C#析构函数)
- class – 访问类的静态变量的时候(实例对象可以直接通过self访问)
- str – str(),format()以及print()函数触发Class获取字符串表达方法
- lt – <运算符操作时调用
- le – ==运算法操作时调用
- hash – hash()方法计算Class实例对象Hash值时
- getattr – 访问Class成员不能存在时调用(类似Lua的__index元方法)
- setattr – 设置Class成员值时调用(类似Lua的__newindex元方法)
- ……
更多特殊方法参考:Special method names
从上面可以看出Python和Lua有很多相似的地方。
接下来让我们看看实战效果:
1 | # MyFirstPython.py |
1 | # Class e.g. |
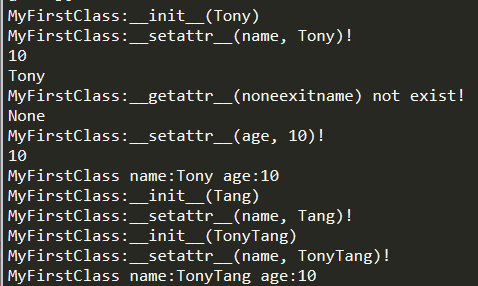
通过上面的学习用例,可以看到我们通过自定义__init__,str,getattr,setattr,__add__等特殊方法实现了类构造,类成员自定义访问设置,类+运算符重载,类print()等方法自定义输出等效果。看到这里,不得不说Python特殊方法和Lua的元方法概念很像。
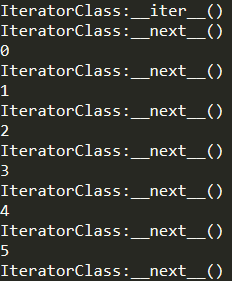
Iterator
Iterator in Python is simply an object that can be iterated upon. An object which will return data, one element at a time.
这里的Iterator和C#里的迭代器应该是一个概念。实现迭代器需要实现两个特殊方法(iter__和__next)。
1 | # File Name: IteratorStudy.py |
Generator
看介绍Generators的概念和C#的携程差不多。
Generator和普通方法的区别:
- Generator function contains one or more
yieldstatements. - When called, it returns an object (iterator) but does not start execution immediately.
- Methods like
__iter__()and__next__()are implemented automatically. So we can iterate through the items usingnext(). - Once the function yields, the function is paused and the control is transferred to the caller.
- Local variables and their states are remembered between successive calls.
- Finally, when the function terminates,
StopIterationis raised automatically on further calls.
1 | # Generator |
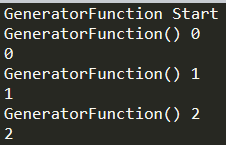
可以看到Generator在Python里还能直接通过for循环的形式便利这一点和C#的携程还不太一样。
通过Generator我们可以简化自定义Iterator的写法,无需自定义__iter__和__next__方法,通过自定义的Generator方法即可实现迭代效果。Generator更多好处参考:Generator
Closure
Closure指类似传统语言里的闭包,但在Python里有几个较大的区别:
- 闭包访问外围变量时,默认是只读的,需要通过nonlocal关键字来标识闭包内部可写。
- 闭包必须是嵌套函数定义
- 嵌套函数必须访问外部成员
- 外围函数必须返回嵌套函数自身
Python里用闭包的好处:
Decorators
A decorator takes in a function, adds some functionality and returns it.
看介绍Decorator像是设计模式里的修饰器概念,能够做到给现有功能添加额外功能的作用。
看介绍利用万物皆object的概念(类似Lua里第一类值)的概念,实现封装函数调用实现扩展函数功能。
还有更多更复杂的使用方式,详情参考:Decorators
Note:
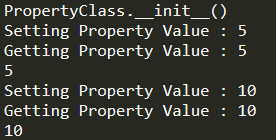
Property
Property类似于C#里的属性概念。Python通过关键字@property实现属性的快速定义。

1 | # File Name: PropertyStudy.py |
更多学习参考:[Property][https://www.programiz.com/python-programming/property]
RegEx
Date and Time
Process
从介绍可以看出,multiprocessing包是用于支持多进程类似多线程功能的模块。
threading是多线程的一个上层抽象模块。
multiprocessing是多进程的一个上层抽象模块(相比threading,不受限于**Global Interpreter Lock(多线程锁,限定同时只有一个Thread执行)**可以真正利用多核来跑多进程功能。
subprocess模块是封装的更好的一个创建使用子进程的模块,同时提供了和子进程处理交互相关的接口。
这里我们重点学习process相关即multiprocessing和subprocess相关概念和使用。
1 | #!/usr/bin/python |
1 | # File Name: SubProcess1.py |
1 | # File Name: SubProcess2.py |
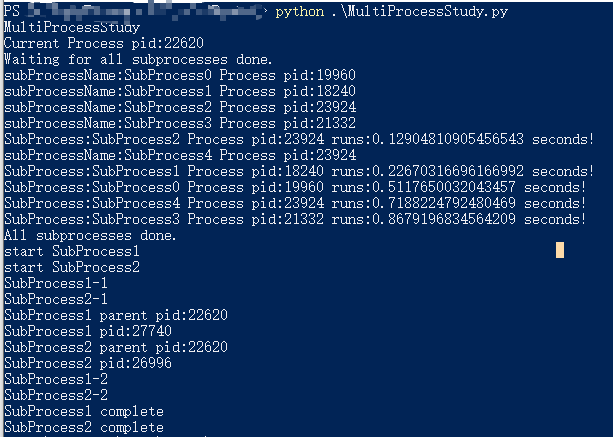
从上面的测试代码可以看出,我们通过mutilprocessing模块提供的Pool(用于控制一组子进程的创建使用)成功创建了4个多进程池开启5个多进程任务(其中有一个任务需要等待一个可用的进程才能执行)。
通过SubProcess模块,我们实现了开启多个进程执行不同Python脚本的功能,从而实现多进程执行多Python脚本任务的需求。
更多更细节的学习参考:
Note:
- multiprocessing和subprocess是提供了多进程而非多线程
- Unix/Linux操作系统多进程是采用fork()实现真正的进程复制,而Windows不支持fork()函数,Windows上多进程是通过在子进程里创建新的Python解析器来实现的(来源:On Windows, there is no such system call. Python needs to perform the quite heavy task of creating a fresh Python interpreter session in the child, and re-create (step by step) the state of the parent.),所以我们执行多进程时要通过命令行而非Sumblime等软件。
待续……
Tips
encode and decode
字符编码问题,无论是shell,python都是需要考虑的,不然会出现乱码的情况。
encode(编码)和decode(解码)是需要一一对应的,不然同一个二进制数据,通过不同的编码和解码会得出不一样的结果。
从上面可以看出,我们的string最终都是以字节码形式存储起来的。我们指定如何编码字符串到字节码的方法叫做编码。我们制定如何解析字节码到字符串的方法叫做解码。
关于字符编码的详细学习,这里参考以前转载的一片文章来加深理解:
关于字符编码,你所需要知道的(ASCII,Unicode,Utf-8,GB2312…)
不难看出,编码和解码方式要是不一致,最终字节码数据解析出来就会出现不正确(比如乱码)的情况。
这里需要提一下Python 3.X里有提供codecs的Package专门负责处理encode,decode问题。
codecs深入了解链接
1 | #!/usr/bin/python |

可以看到当我们把通过gb2312编码的字符串通过对应的gb2312解析时能正确显示,但用utf-8去解析时就出现了问题。同理文件读取指定的解码格式与文件自身的编码格式不一致也会出现无法读取的情况。
结论:
编码和解码格式要一一对应才能正确解析显示。
String is sequence of Unicode characters. Strings are immutable. We cannot delete or remove characters from a string. But deleting the string entirely is possible using the keyword del.
Python里是采用Unicode编码存储字符串。Strings可以通过[]访问,但是不可被改变的。
因为string是immutable的,所以我们不能通过del删除string里面的个别character,但是我们可以删除对string的整个引用。
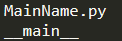
main
从上面的介绍可以看出__main__表示是否是从最上层执行(比如直接执行脚本,命令行执行脚本)代码的名字。
如何判定是否是从最上层执行当前python脚本了?
从上面的介绍可以看出,__name__变量标识了当前python脚本是通过什么方式执行的。
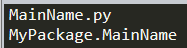
1 | # File Name: MainName.py |
比如上面这段代码,在通过脚本直接执行时,我们会看到打印输出:
如果我们通过以下代码导入MainName.py会看到打印输出:
1 | import MyPackage.MainName |
在命令行执行脚本和直接执行脚本同理。
可以看出当我们通过非import方式导入脚本时,__name__的值为__main__这个特殊的值,我们可以通过判定这个值来判定当前python脚本的执行方式,因此我们经常会看到以下代码:
1 | if __name__ == "__main__": |
这样就能做到只有通过非import方式执行当前python脚本时才执行某些东西。
Command Line Args
os.argv
很多时候作为脚本语言Python,我们写的Python脚本更多是用于自动化流程(比如打包签包等),而调用此Python脚本的方式大多为命令行调用。这里就引出了如何通过命令行将我们所需的参数传递进我们Python脚本的问题。
Python自带了一个os.argv的参数用于获取命令行传入参数数据。
1 | for arg in sys.argv: |
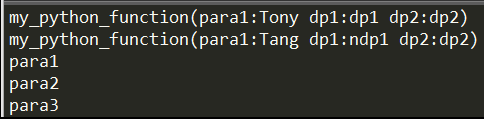
如果我们通过命令执行以下脚本传入参数:
1 | ***.py param1 param2 param3 |
我们会看到以下输出:

可以看到第0个参数表示当前python脚本执行的文件路径。
但上面这种方式,虽然能获得命令行传入的参数,但对于参数的格式以及参数的要求对于用的人来说都还是不透明且未做任何安全检查也未给与任何提示信息的,这样会导致Python脚本内部还需要自行做这些参数检查。这里就要引出接下来要提到的模块功能:argparse
Note:
- 如果以-c的参数触发python,os.argv的第一个参数是-c,详情参考:-c
argparse
argparse是Python里帮助我们引导输入参数和快速解析参数的模块。
接下来我们直接上学习Demo,简单学习了解下如何使用argparse帮助我们快速引导输入参数和快速解析参数:
argparsestudy.py
1 | #!/usr/bin/python |
命令行输入:
Python .\argparsestudy.py -h
会看到每个参数的详细信息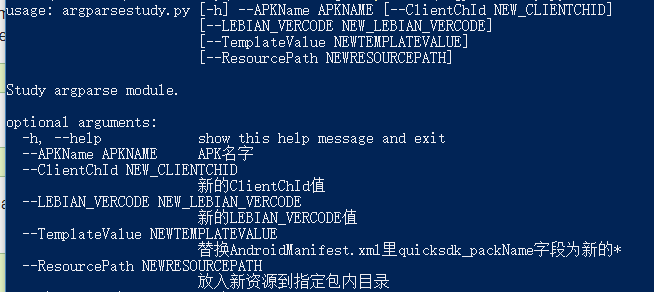
真正使用时因为–APKName是必传参数,所以按下面方式调用即可:
Python .\argparsestudy.py –APKName com.tonytang.com
可以看到我们通过argparse模块轻松的完成参数输入引导以及参数解析的任务。
更多详细学习参考:
argparse — Parser for command-line options, arguments and sub-commands
Path
关于Path模块,这里需要先了解一下跟语言无关的一个基础知识。
从博客介绍中可以看出,斜杠和反斜杠主要是Windows路径和Unix路径里区分,大部分情况(无论是浏览器还是html url都是反斜杠)。
这里就引出了在自动化流程里涉及路径时,我们需要兼容Windows,Mac,Android或者IOS时候路径问题需要处理。而Path模块正是能够处理这一问题的现有模块功能。
os.path
这里只是简单示范几个常规API用法,详情参考:os.path
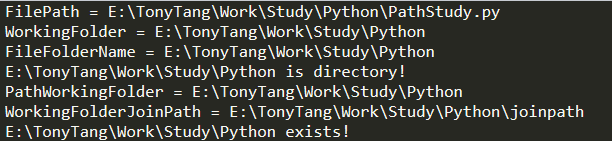
1 | import os |

pathlib
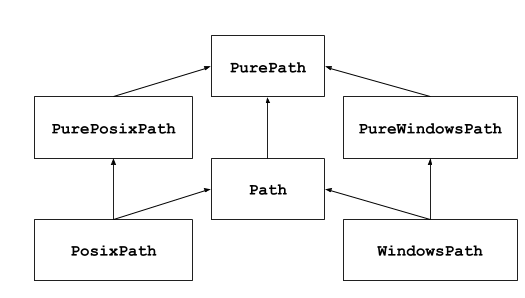
This module offers classes representing filesystem paths with semantics appropriate for different operating systems. Path classes are divided between pure paths, which provide purely computational operations without I/O, and concrete paths, which inherit from pure paths but also provide I/O operations.
上面提到了两种概念PurePath和Concrete Paths,前者只是提供路径概念(比如区分Windows还是Unix文件系统以及路径相关操作)不和文件系统挂钩。后者就是Pathlib提供的OOP文件路径系统抽象,提供了一系列的文件操作接口(Pathlib相当于进阶版的Path抽象模块)。
1 | import os |
这里用Pathlib除了他提供了更多的文件路径操作外,还有就是它继承了PurePath跨平台文件路径处理的特性,让我们可以在处理文件路径时无需关心平台。
Bat and Shell
Bat和Shell在Unity自动化&IOS自动化签包文章中已经了解过了,这里主要是介绍如何在python里和bat,shell交互(比如我们想获取环境变量里的数据,执行shell命令等)。
1 | import os |

注释和用法都很详细了,这里就不多介绍了。
Python GUI
GUI(Graphic User Interface)可视化用户界面。
Python实现GUI有很多选择,这里参考一位博主的分享:
Python 的图形界面(GUI)编程?
学习需要从需求出发,这里本人主要是想用Python写点简单的GUI来满足可视化即可,所以对GUI要求不高,本人不是以Python为主,只是用Python写点周边小工具,所以这里本人考虑的是学习了解Python自带的TKinter。
如果对GUI要求比较高,有比较常用Python,根据上面那位博主的建议来看,PyQT是个不错的选择。
TKinter
接下来将根据Tkinter 8.5 reference: a GUI for Python去学习了解TKinter的概念以及使用。
待续……
Reference
Conception Part
Tutorial Part
Python Tutorial
Python Package Index
Tkinter 8.5 reference: a GUI for Python
