Unity中的Lua
Lua
结合以前的初步学习了解,这一次要对Lua进行进一步的深入学习。
首先我们要知道Lua是脚本语言,是有自己的虚拟机,是解析执行而非像C#,C++,Java这些编译执行。同时Lua是弱类型语言。
这里不更多的讲解Lua虚拟机相关概念,详情参考[http://blog.sina.com.cn/s/blog_8c7d49f20102uzsx.html](Scripting System)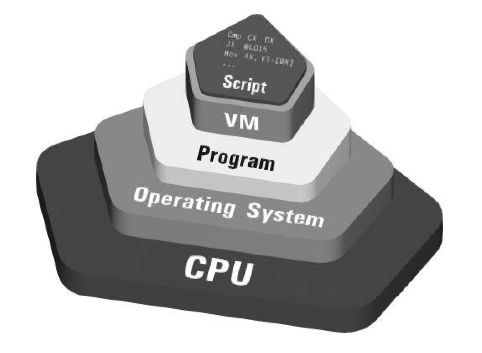
这里只要知道Lua的虚拟机(程序模拟线程,堆栈等)是运行在程序里而非物理CPU上,因此只要虚拟机把Lua脚本解析成对应平台的机器码就能支持跨平台(好比Java的JVM)。
Lua Study
以前的部分学习参考:
Scripting System & Lua Study
Lua – some important concept and knowledge
Lua - C API
Lua - C call Lua & Lua call C
Lua - Object Oriented Programming
Lua - Userdata
Lua - Managing Resources & Threads and States
Weak Tables And Finalizers
“and Finalizers Lua does automatic memory management. Programs create objects (tables, threads, etc.), but there is no function to delete objects. Lua automatically deletes objects that become garbage, using garbage collection. “
Weak Table
“Weak tables allow the collection of Lua objects that are still accessible to the program”
“A weak reference is a reference to an object hat is not considered by the garbage collector”
“In weak tables,, both keys and values can be weak”(three kinds of week table:1. weak key 2. weak value 3. weak key and value)
Weak Table Using:
- 释放使用不再使用的缓存数据(memorizing)
Auxiliary table(辅助表),Lua里有类似于C#里的internal hash table用于重用使用过的string和访问结果(C#里主要是使用过的string重用。Lua还能将访问过的string的table结果缓存返回)
但Auxiliary table有个缺点就是使用不频繁的string和result会一直被缓存无法释放。weak table正是用于解决这一问题的方案之一。(因为weak table的weak reference一旦不再被使用就会被下一次GC释放)
Object Attributes Implemetation
Solution: use external table to associate objects with attributes
Drawback: external table reference prevent objects from being collected
Final solution: use weak keys for objects in external tableTables with Default Values
这里有两种各有优缺点的实现方案:
方案1:
1 | local defaults = {} |
方案2:
1 | local metas = {} |
前者针对每一个不同的Table都会分配一个defaults入口,table作为key,default value作为value。这样的缺点就是当table数量很大的时候会需要分配很多内存去存储不同table的default value。
后者针对不同的default value分配了更多的内存(比如mt,entry on metas, closure……),但优点是同样的default value只需要分配一次即可,所以后者更适用于table数量多但default value大都相同的情况。
- Ephemeron Tables(声明短暂的table Lua 5.2里提供)
Ephemeron Table:
“In Lua 5.2, a table with weak keys and strong values is an ephemeron table. In an ephemeron table, the accessibility of a key controls the accessibility of its corresponding value.(只当有strong
reference to key时value才是strong的)”
e.g. constant-function factory
Note:
“Only objects can be collected from a weak table. Values, such as numbers and booleans, are not collectible”(只有Objects在weak table里能被gc回收,number和booleans这种Value类型不能在weak table里被gc回收)
“strings are collectible, but string is not removed from weak table(unless its associated value is collected)”
Finalizers
“Finalizers allow the collection of externa objects that are not directly under control of the garbage collector”
“Finalizer is a function associated with an object that is called when that object is about to be collected.”(相当于C#里的Finalize,在GC object的时候会被调用。但只有一开始设置Metamethod的__gc时才能mark该object为可finalization的,否则就算后面在复制__gc也不会在调用该object的finalizer)
Lua里是通过Metamethod里的__gc实现。
1 | -- 测试环境要求至少Lua 5.2 |
The order of finalization called:
“When the collector finalizes several obejcts in the same cycle, it calls their finalizers in the reverse order that the objects were marked for finalization”(先声明__gc被mark为可finalization的object的finalizer后被调用)
1 | -- 测试环境要求至少Lua 5.2 |
对于被finalize的object,Finlization会使被finalize的object处于两个特殊的状态:
- transient resurrection(短暂的复苏)
- permanent resurrection(永久的复苏)
前者因为在调用__gc的metamethod时我们会得到finalize的object,这样一来使得该object alive again,然后我们可以通过该object用于访问里面的对象。
finalizer被调用时,该alive again的object被存储在了global table里,导致该object在finalize后依然存在。要想使用finalize也真正回收obejct,我们需要调用两次gc,第一次用于回收原始object,第二次用于回收alive again的object。
1 | -- 因为当前测试环境是Lua 5.1(基于LuaTo#插件学习的,JIT支持到5.1的版本)所以不支持Talbe的__gc Metamethod,这里暂时没有写测试程序。 |
Note:
“In lua 5.1 the only lua values that work with __gc metamethod is userdata. “(Lua 5.1不支持table的__gc metamethod,只支持userdata的__gc metamethod)
Lua里的位运算
在了解Lua里的位运算之前我们需要了解原码,反码,补码相关的概念,详情参考:
原码, 反码, 补码 详解
这里直接说结论:
机器的数字存储采用补码的方式来编码存储的。
正数的反码 = 自身
负数的反码 = 符号位不变 + 其他位取反
正数的补码 = 自身
负数的补码 = 反码 + 1
移码 = 2^n + 补码(真值为排开非符号位的值,n为真值的位数) = 补码符号位取反
为什么会需要原码,反码,补码?
个人总结原因有以下几点:
- 计算机运算设计为了简化让符号位直接参与运算,同时只有加法没有减法,减法用加一个负数的表示
- 直接用原码相加无法解决符号位相加问题,导致结果不正确
- 直接用反码相加无法解决0的准确表达,即10和00都表示0但区分了正负之分(有效范围127到-127)
- 用补码相加不仅解决了正负0的问题,同时1*0还能表示-128(扩展有效范围为127到-128。这也是为什么我们的int32的有效范围为2^31 - 1到(-2)^31的原因)
- 移码解决补码不能快速比较两个数大小的问题
了解了基础的理论知识,让我们再来看看Lua里的位运算。
取反
1 | for i = 0, 3, 1 do |
让我们看下输出结果: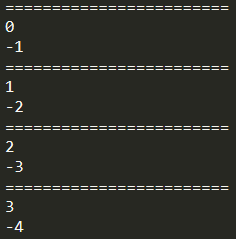
上面的结果出人意料,0取反为-1,1取反为-2,2取反为-3,3取反为-4,并不是我们想象中的0取反为-2^31
那么为什么会有这样的结果了,让我们结合前面学习的原码,反码,补码知识来破解其中的奥妙。
让我们来一步一步看看,0在取反的过程中是怎么一步一步变成-1的。
正向:
0000(原码) 0
0000(反码) 0
0000(补码) 0
1111(补码取反) -2^31 + 1
因为机器是以补码存储数字的,所以0的存储编码为0000
我们通过对0取反,得到1111(补码取反)
得到了取反后的补码,我们如何知道这个补码表达的是什么数值了?这个时候需要结合补码的计算方式逆向推导出原码值。
补码逆向:
1111 - 1 = 1110(反码) -2^31 + 1
1110(反码) = 原码符号位不变 + 原码其他位取反 = 1001(原码) = -1
可以看到通过正向和逆向反推,我们成功得出了0取反后的值为-1而不是我们想象中的-2^31
移位和异或
1 | print("========================") |
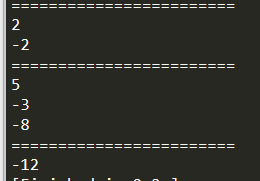
可以看到num5和num6异或因为补码的影响得到-12的结果。
Note:
1. 有负数的情况,异和或操作都会受补码影响,整数补码等于原码,所以整数异和或操作等价于原码直接异或
2. 异或操作对符号位会有影响,需要考虑补码影响
3. 位移操作左移会替换符号位,右移会丢弃低位
Lua里的OOP
OOP(Object Oriented Programming)
首先Lua里面编写更重要的是Think in Lua,所以这里我不是强调OOP的重要性,而是单纯因为OOP被更多的C#程序员所熟悉。
Class抽象
1 | -- File Name: Class.lua |
上面的代码注释已经很清楚了,就不一一解释了。
理解上面Lua实现OOP的关键在于通过table模拟Class的抽象以及数据封装,通过metatable模拟继承特性。
Class定义
定义一个类的方式如下:
1 | 类名 = Class("类名") |
Class继承
继承一个类的方式如下:
1 | 子类名 = Class("子类名", 父类名) |
Class对象实例化
Lua OOP对象实例化方式如下:
1 | local 变量名 = New(类名) |
Lua只读Table
在游戏开发里,配置表数据往往是固定不允许修改的,无论是C#还是Lua,对于对象修改限制都只能通过上层封装实现此功能。
而这里我要学习了解的就是在Lua里实现ReadOnly table用于配置表,确保开发人员不会出现对配置表的错误操作。
参考:
Sweet Snippet 之 Lua readonly table
基础版只读Table
在Lua官网上其实已经给出了一版ReadOnly的基础实现思路:
1 | function readOnly (t) |
通过上面的事例可以看出,设计Readonly table的核心思想是通过**__index**(访问不存在Key时触发)和**__newindex**(赋值不存在Key时触发)元方法来接手所有的table访问赋值。
为了确保**__index和__newindex的触发,我们需要通过实现一个空table作为代理table来实现所有的Key访问和赋值都能触发__index和__newindex**,然后通过实现**__index和__newindex**将数据访问赋值指向原始table来实现数据访问和ReadOnly功能。
进阶版只读Table(支持#和pairs)
上面的事例代码虽然实现了基础的ReadOnly功能,但当我们采用#或pairs访问数据长度和数据时会发现,访问不到数据,原因是因为我们的代理table本来就没有数据并且我们也没有自己实现**__len和__pairs**元方法指向原始数据访问导致的。所以进阶版ReadOnly实现如下:
1 | function ReadOnly (t, name) |
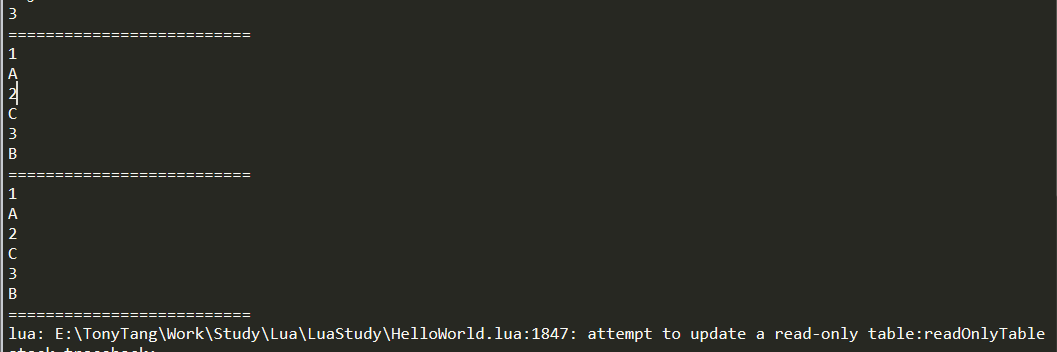
可以看到,通过重写**__len和__pairs**我们已经支持了ReadOnly的长度获取和pairs遍历访问。
完善版只读Table(支持递归ReadOnly)
经过上面的努力我们已经支持了#和pairs的遍历操作,但我们的只读Table还只支持了一层,也就是说嵌套的table并没有支持只读设定。
实现思路:
- 递归对所有的table调用ReadOnly方法
1 | --- 转换table成只读table |
通过上面的完善,我们成功的实现了支持指定深度的ReadOnly表实现。
优化点
- 考虑到原表的性能开销,我们可以在开发期开启ReadOnly表的设计,发包后直接采用原始表访问的方式来优化掉这部分性能开销
Lua回调绑定
在Lua里函数有着第一类值的说法(在Lua中函数和其他值(数值、字符串)一样,函数可以被存放在变量中,也可以存放在表中,可以作为函数的参数,还可以作为函数的返回值。)。
很多时候我们想传递一个类方法作为回调方法,希望回来的时候是自带self,如果我们只按以下写法来使用,我们将丢掉self这个上下文:
1 | local testHandler = {} |
所以为了封装self的,我们需要通过闭包机制来实现一个handler,以下代码实现了带参和不带参的handler.lua版本:
1 | -- File Name: Handler.lua |
1 | local testHandler = {} |
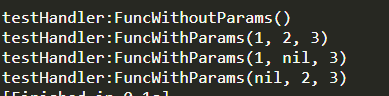
但上面这种设计,还不支持自定义传参的基础上保留自定义函数传参:
1 | function testHandler:FuncWithParams(...) |
理论上上面这种情况,我们预期的testHandler:FuncWithParams()最终调用传入的参数为2+N个(“param1”+”param2”+…)
实现上面的需求,核心我们需要利用table.pack和table.unpack的机制(但要注意table.unpack(tb)默认效果等价于table.unpack(tb, 1, #tb)即会被nil打断的,这个不是我们希望看到的)。
解决上述问题,我们只需要通过封装参数pack和unpack过程,并明确指定table.unpack(tb, 1, count)的方式来解决被nil打断的情况,最终handler.lua代码如下:
1 | -- File Name: Handler.lua |
Note:
- table.unpack()默认是table.unpack(tb, 1, #tb),所以如果传递了nil的话是会被打断无法返回所有的
Lua小知识
Lua里没有Class只有通过Table模拟的Class
参考前面的Lua OOP实现Lua里没有this的概念,self不等价于this,函数调用传的是谁谁就是self。Lua里.定义和:定义相对于self的用法来说相当于静态和成员定义。
Lua里通过.调用的话是不会默认传递自身作为self的,不主动传的话self为空
Lua里通过:调用的话默认第一个参数就是调用者,既self
1 | tab = {} |
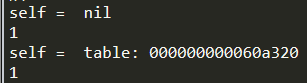
Note:
:只是起了省略第一个参数self的作用,该self指向调用者本身,并没有其他特殊的地方。
Lua中的函数是带有词法定界(lexical scoping)的第一类值(first-class values)(在Lua中函数和其他值(数值、字符串)一样,函数可以被存放在变量中,也可以存放在表中,可以作为函数的参数,还可以作为函数的返回值)
1
2
3
4
5
6
7
8class = {}
function class:Func(param1, func)
print(param1)
func()
end
myfunc = function() print("tempFunc()") end
class:Func(1, myfunc)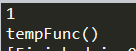
指定Lua搜索文件路径
1
package.path = *
package.path是在Lua触发require时会去搜索的路径,默认是LUA_PATH_5_3或者LUA_PATH,详情参考:Lua Manual
Lua文件热重载
Lua通过require加载进来的文件都会被记录在package.loaded里,所以Lua热重载的核心就是让pacakge.loaded里的对应Lua文件清除后重新加载。1
2
3
4
5
6
7
8
9
10
11
12---热重载指定Lua脚本
function reloadLua(filename)
if(package.loaded[filename] == nil) then
Log.log(string.format("lua脚本 : %s 未被加载", filename))
else
Log.log(string.format("lua脚本 : %s 已加载", filename))
--重置loaded信息
package.loaded[filename] = nil
end
--重新加载Lua脚本
require(filename)
endLua里pairs和ipairs有区别。pairs是key,value的形式遍历所有值。ipairs是从1开始按顺序递增遍历。
1
2
3
4
5
6
7
8
9
10
11
12
13testtab = {[1] = "Tony", [4] = "Huan", [2] = "Tang", [5] = nil }
for k, v in pairs(testtab) do
print(k)
print(v)
end
print("=================")
for i, v in ipairs(testtab) do
print(i)
print(v)
end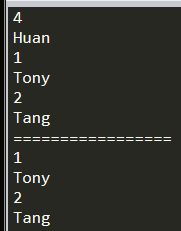
Note:
pairs不会被nil打断但ipairs都会被nil打断
ipairs还会被不是按1递增的打断Lua参数传递
Lua里通过arg[?]的形式访问传入的参数,默认第一个参数是arg[1],arg[0]是lua脚本自身Lua里面可以通过#得到table长度
Note:
#会被nil打断Lua里打印数据类型用type
1 | print(type(1)) |

Lua常用插件
luarocks
LuaRocks is the package manager for Lua modules.
从官方的介绍可以看出,LuaRocks相对于Lua,就好比Package Ctronl在Sublime Text里的存在,主要目的就是包管理器,方便Lua快速安装各种第三方Lua库。
根据官方的教程,LuaRocks安装设置相当复杂,单纯下载一个exe还有很多环境问题要处理。
这里本人不想使用官方Installation instructions for WindowsNew Page]的一键安装方式,主要是希望能用Lua5.3,他一键安装的方式好像是Lua5.1,所以最后打算把Lua和LuaRocks都按照以下博主的方式从源码编译走一遍流程:
Windows 平台 Luarocks 3.0.2 编译安装
安装MinGW(用于编译源码)
添加**/MinGW/bin到环境变量,确保gcc编译器能找到.

关于MinGW和Cygwin的区别这里暂时不深入,详情参考:
MinGW 的主要方向是让GCC的Windows移植版能使用Win32API来编程。 Cygwin 的目标是能让Unix-like下的程序代码在Windows下直接被编译。
这里考虑到这里的主要目的是编译Windows版的Lua5.3,用哪一个都行,暂时是用MinGW了。
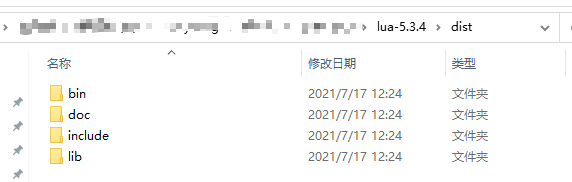
编译Lua5.3
下载Lua5.3源码
MinGW安装好后,编译Lua5.3就很容易了,因为Lua5.3里面自带了MakeFile(指定make如何编译的文件,这里暂时不深入学习),通过命令:
1
mingw32-make mingw
就能触发编译Lua5.3,但为了LuaSocks后续会用到的相关目录准备工作,这里还是采用前面博主提供的build.bat:
1
2
3
4
5
6
7
8
9
10
11
12
13
14
15
16
17
18
19
20
21
22
23
24
25
26
27
28
29
30
31
32
33
34
35
36
37
38
39
40
41
42
43
44
45
46
47
48
49
50
51
52
53
54
55
56
57
58
59@echo off
:: ========================
:: build.bat
::
:: build lua to dist folder
:: tested with lua-5.3.5
:: based on:
:: https://medium.com/@CassiusBenard/lua-basics-windows-7-installation-and-running-lua-files-from-the-command-line-e8196e988d71
:: ========================
setlocal
:: you may change the following variable’s value
:: to suit the downloaded version
set work_dir=%~dp0
:: Removes trailing backslash
:: to enhance readability in the following steps
set work_dir=%work_dir:~0,-1%
set lua_install_dir=%work_dir%\dist
set compiler_bin_dir=%work_dir%\tdm-gcc\bin
set lua_build_dir=%work_dir%
set path=%compiler_bin_dir%;%path%
cd /D %lua_build_dir%
mingw32-make PLAT=mingw
echo.
echo **** COMPILATION TERMINATED ****
echo.
echo **** BUILDING BINARY DISTRIBUTION ****
echo.
:: create a clean “binary” installation
mkdir %lua_install_dir%
mkdir %lua_install_dir%\doc
mkdir %lua_install_dir%\bin
mkdir %lua_install_dir%\include
mkdir %lua_install_dir%\lib
copy %lua_build_dir%\doc\*.* %lua_install_dir%\doc\*.*
copy %lua_build_dir%\src\*.exe %lua_install_dir%\bin\*.*
copy %lua_build_dir%\src\*.dll %lua_install_dir%\bin\*.*
copy %lua_build_dir%\src\luaconf.h %lua_install_dir%\include\*.*
copy %lua_build_dir%\src\lua.h %lua_install_dir%\include\*.*
copy %lua_build_dir%\src\lualib.h %lua_install_dir%\include\*.*
copy %lua_build_dir%\src\lauxlib.h %lua_install_dir%\include\*.*
copy %lua_build_dir%\src\lua.hpp %lua_install_dir%\include\*.*
copy %lua_build_dir%\src\liblua.a %lua_install_dir%\lib\liblua.a
echo.
echo **** BINARY DISTRIBUTION BUILT ****
echo.
%lua_install_dir%\bin\lua.exe -e "print [[Hello!]];print[[Simple Lua test successful!!!]]"
echo.
:: configure environment variable
:: https://stackoverflow.com/a/21606502/4394850
:: http://lua-users.org/wiki/LuaRocksConfig
:: SETX - Set an environment variable permanently.
:: /m Set the variable in the system environment HKLM.
setx LUA "%lua_install_dir%\bin\lua.exe" /m
setx LUA_BINDIR "%lua_install_dir%\bin" /m
setx LUA_INCDIR "%lua_install_dir%\include" /m
setx LUA_LIBDIR "%lua_install_dir%\lib" /m
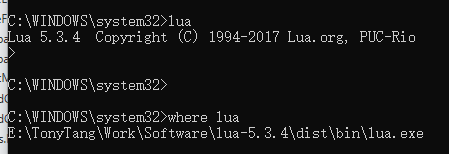
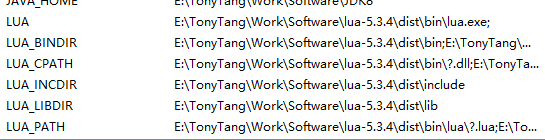
pause这样一来Lua编译以及Lua环境变量设置就搞定了:

测试以下Lua使用:
Note:
- 因为我们使用的是MinGW,所以博客上的make命令是找不到的需要用mingw32-make
- 因为涉及到设置环境变量等操作所以启动cmd或者powershell运行bat时需要以管理员身份
- 上文的Lua环境变量设置并未设置Lua到Path中,所以还需要单独添加Lua/bin到能确保Lua能被找到使用
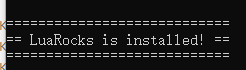
编译LuaRocks
下载LuaRocks源码(下一键带Install.bat的)
执行Install.bat触发编译流程

详细参数介绍参考:
Installation instructions for Windows
最后看到LuaRocks安装成功:
最后将LuaRocks/systree/bin所在目录添加到环境变量Path里,这样通过LuaRocks安装的第三方库就可以使用了(经测试单独只加到Path里还不行(好像是因为Lua和LuaRocks默认分开安装的),package.path里默认是不会去LuaRocks/systree/bin下找的),需要执行以下命令来查看手动设置LUA_PATH所需的位置信息:
1
luarocks path --bin
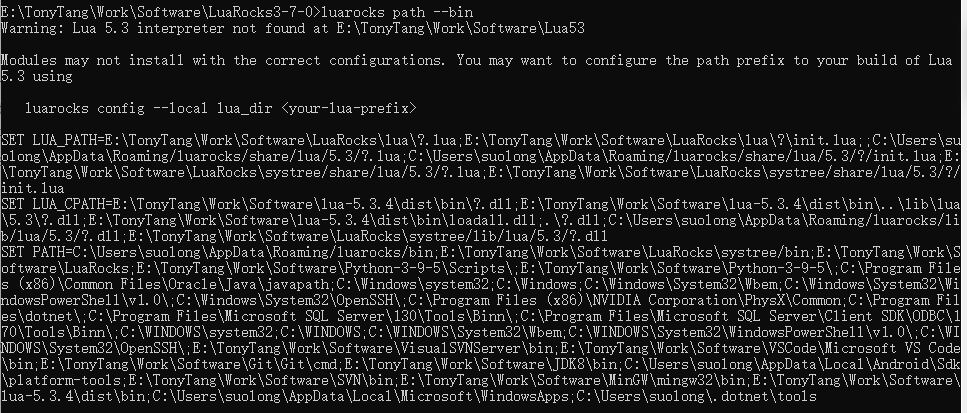
原本的LUA_PATH和LUACPATH信息:

把上面两个手动设置到环境变量LUA_PATH和LUA_CPATH里:
接下来测试LuaRocks的使用:
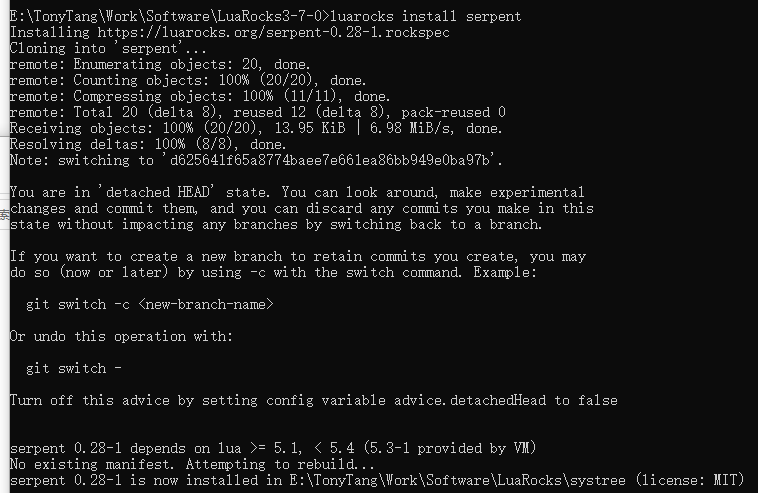
我们尝试安装serpent:
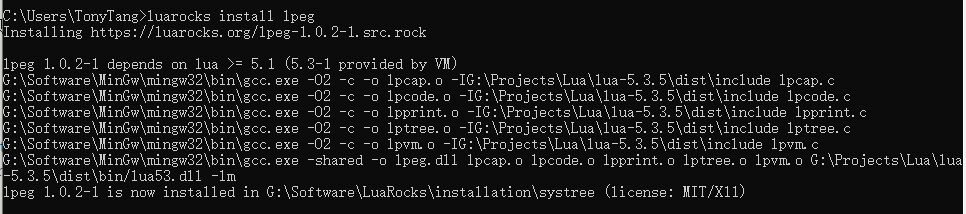
1 | luarocks install serpent |

后续会讲到serpent的使用学习,到这里Lua5.3和LuaRocks以及serpent的LuaRocks快速安装就全部结束了。
serpent
Lua serializer and pretty printer.
从Git上的介绍可以看出,Serpent是一个支持序列化反序列化以及格式化打印的第三方库。
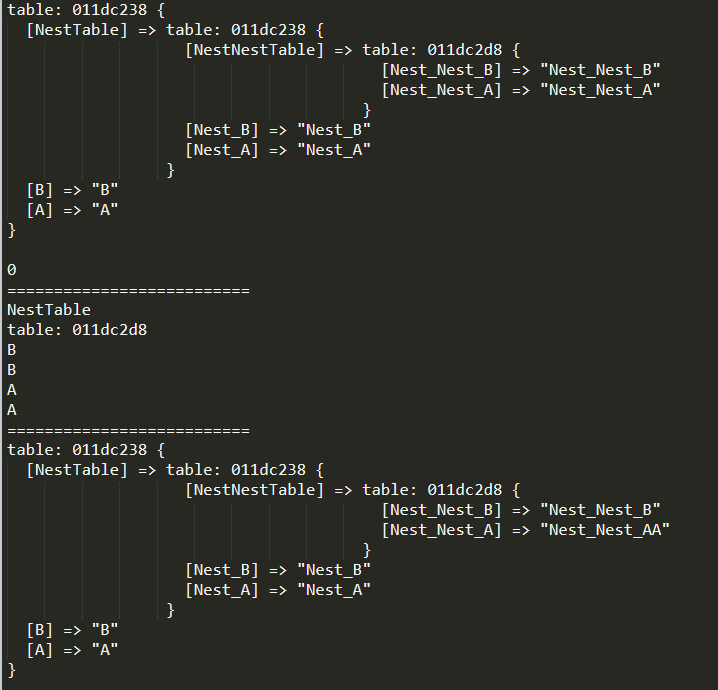
比如我们希望把内存里的某个Table序列化到本地,支持下一次反序列化加载:
1 | print("SerpentStudy!") |
输出:
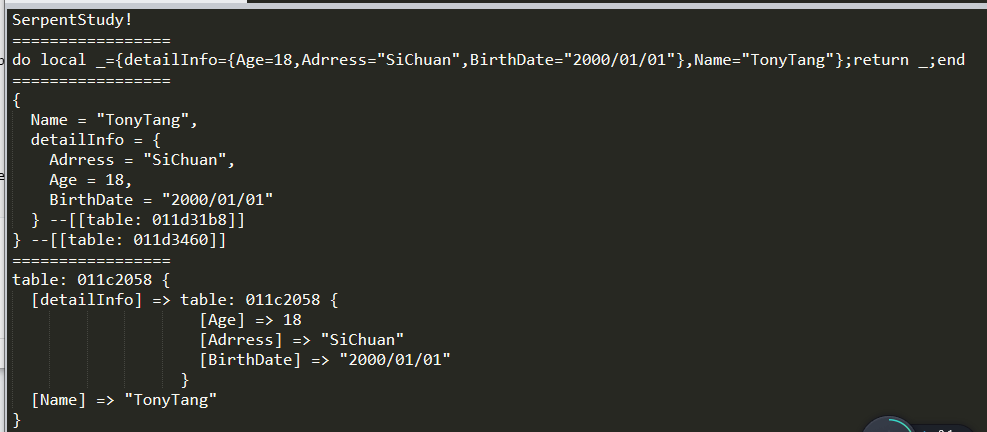
从上面测试用例结果可以看出,通过Serpent我们轻易的做到了Lua序列化反序列化以及格式化输出
Lpeg
LPeg is a new pattern-matching library for Lua, based on Parsing Expression Grammars (PEGs).
从官方的介绍可以看出Lpeg是一个类似正则的但并不是正则的新一代(基于Parsing Expression Grammars)的模式匹配Lua库。
那么什么是Parsing Expression Grammars了?
根据Wiki的介绍可以看出Parsing Expression Grammars就是我们编程语言里的解析表达式语法。
为了进一步的深入学习和使用,让我们先通过Luasocks安装Lpeg库。
接下来文档Lpeg和下面这篇文章通过 LPeg 介绍解析表达式语法(Parsing Expression Grammars)来深入学习Lpeg的设计和使用:
Pattern
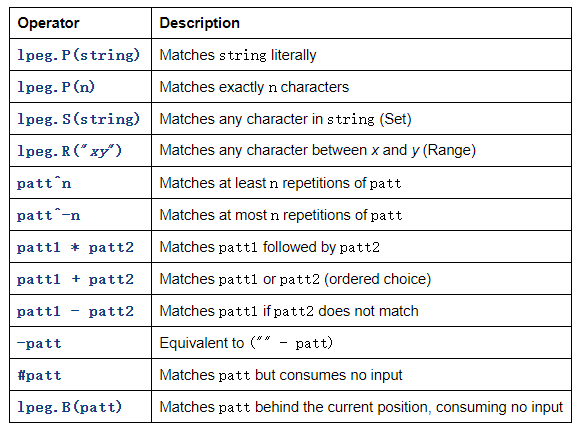
Pattern差不多可以理解成正则里的匹配表达式。
为了方便理解,这里先截图下Lpeg Pattern相关定义的基础介绍:
Match
Match也和正则里的概念差不多,就是触发指定字符串使用指定Pattern进行匹配的一个过程,同时返回匹配相关结果(比如返回匹配到的字符位置的下一个字符位置。或者通过Capture函数将匹配结果转换成指定值)
了解了Lpeg里面的一些基础Pattern定义后,让我们看看Lpeg里匹配函数match的介绍:
lpeg.match (pattern, subject [, init])
从上面的介绍可以看出,match匹配成功会返回匹配位置的下一个位置或者是捕获到的值(后续会讲到捕获函数相关)。同时match不想正则可以把所有匹配都找出来而是需要通过自行通过match的init方式来loop所有捕获后的子字符串来找出所有匹配的结果。
Note:
Capture
从介绍大概理解Capture也是一种Pattern,但它是一种基于Pattern匹配结果转换出结果值的Pattern而不是常规的匹配Pattern(个人理解就好比Pattern+转换函数)。
为了方便理解,这里先截图下Capture相关定义的基础介绍:

Note:
- A capture pattern produces its values only when it succeeds.(Capture Pattern只会在成功时计算值)
实战
1 | print("LpegStudy") |
Lua IDE
首先这里决定选一个相对轻量级的Lua IDE,VS因为太重量级了,这里不考虑。
其次考虑到跨平台和前端常用的(平时主要会用到C#和Lua),最初决定选择VSCode作为Lua代码编写的IDE,VSCode丰富的插件库也是选择VSCode很重要的一个原因之一。经过调研发现VSCode第三方插件Luaide在VSCode 1.33.1以上版本有严重的内存暴涨问题,所以最后笔者转向了VSCode + EmmyLua 插件的方式。
VSCode
设置同步
VSCode支持高度自由的自定义插件和自定义设置,我们如何在不同的工作环境快速同步IDE信息(插件,自定义设置等),避免每一次在不同工作环境下都重复下载插件设置等操作是一个需要解决的问题。
借助于第三方插件:
SettingsSync(使用了Github Gist)可以同步保存VSCode配置和扩展。
详细配置流程参考:
Settings Sync
上传快捷键:
Shift + Alt + U
下载同步快捷键:
Shift + Alt + D
快捷键
当拿到新的IDE时,为了工作效率,快捷键不熟是一个很影响开发效率的问题。
VSCode丰富的插件库和高度的可自定义可以轻松解决这个问题:
- Visual Studio Keymap(第三方插件 – 快速导入VS的快捷键)
- Custom Shortcup Keymap(自定义设置快捷键File -> Preference -> Keyboard Shortcuts – 用于满足自定义需求)
Snippets
Snippets又名代码片段,主要目的是为了通过自定义关键词和模板,快速触发代码片段生成。
这里主要针对自定义代码片段的功能使用来学习。
File -> Preference -> User Snippets
e.g.个人文件署名的代码片段:
lua.json
1 | { |
这样一来当我们输入LuaFileTitle关键词时,VSCode就会自动触发提示,直接table键选择Snippets就能触发代码生成。
效果如下:
1 | -- File Name: Base.lua |
详细使用Snippets参考:
Creating your own snippets
Lua调试
Lua作为解析执行的语言,调试相比其他高级语言比较麻烦一点,这里选择借助第三方(Luaide)插件作为辅助工具。
经过调研发现VSCode第三方插件Luaide在VSCode 1.33.1以上版本有严重的内存暴涨问题,所以最后笔者转向了VSCode + EmmyLua 插件的方式。
这里就没有详细了解VSCode + LuaIde的调试方式了。
EmmyLua
EmmyLua
VSCode安装EmmyLua很简单,直接插件里搜索安装即可,这里就不多做说明。
接下来主要结合XLua+VSCode+EmmyLua实战使用EmmyLua提示和调试两大重要功能。
VSCode配置
安装EmmyLua插件后,VSCode基本就已经完成配置了,但要使用VSCode开始编写Lua代码,我们还需要把Lua代码导入到VSCode里来。
VSCode导入Lua代码是以目录的形式,我们导入的我们加载Lua文件所在的最上层目录即可:
XLua
XLua官网
XLua的集成很简单,从Git下下来,把关键的几个目录放到项目里即可。
主要是如下几个目录:
- Tools(打包时XLua代码注入需要的工具在这里 Note: 放Assets同一层不要放到Assets里了)
- Assets/XLua/Src(XLua需要的CS源代码)
- Assets/XLua/Editor/ExampleConfig.cs(XLua默认给的一套纯Lua开发基于反射生成需要标记CSharpCallLua || LuaCallCSharp || BlackList || Hotfix的一套模板)
- Assets/Plugins(XLua编译多平台后的库文件)
Unity加载Lua文件默认不认.lua后缀的文件,我们需要自定义CustomLoader去加载到我们想要加载的.lua文件。
LuaManager.cs
1 | using System.Collections.Generic; |
可以看到为了成功加载.lua后缀的Lua文件我做了以下几件事:
- 通过Directory.GetFiles()获取到所有*.lua文件的路径映射,用于加载时消除目录的概念
- 自定义CustomLoader,支持加载(通过File.ReadAllBytes).lua后缀文件
代码提示
Test.lua
1 | -- File Name: Test.lua |
输入table.时会看到成员变量提示:
EmmyLua提示详细使用参考:
@class类声明注解
查找方法引用
EmmyLua查找方法引用很简单,直接在方法上右键查找所有引用即可: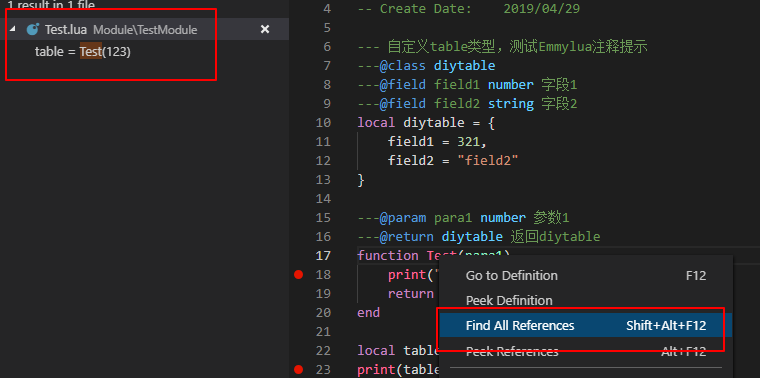
调试
EmmyLua插件装好后,VSCode导入了Lua加载最上层目录后,调试Lua就很简单了:
F5 -> EmmyLua Attach Debug -> 选择对应Unity进程
然后通过F9下断点就可以像VS一样给Lua下断点了。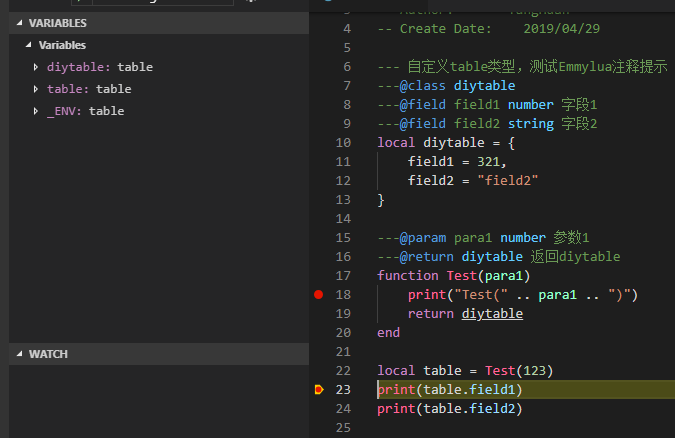
ToLua
待续……
Refrence
通过 LPeg 介绍解析表达式语法(Parsing Expression Grammars)
以前学习笔记
[http://blog.sina.com.cn/s/blog_8c7d49f20102uzsx.html](Game Scripting Mastery)
[http://blog.sina.com.cn/s/blog_8c7d49f20102v0rk.html](Lua – some important concept and knowledge)
[http://blog.sina.com.cn/s/blog_8c7d49f20102v0s0.html](Lua - Coroutines Study )
[http://blog.sina.com.cn/s/blog_8c7d49f20102v0s5.html](Lua - Metatables and Metamethods)
[http://blog.sina.com.cn/s/blog_8c7d49f20102v0s9.html](Lua - Object Oriented Programming)
[http://blog.sina.com.cn/s/blog_8c7d49f20102v0zp.html](Lua - C API)
[http://blog.sina.com.cn/s/blog_8c7d49f20102v0zs.html](Lua - C call Lua & Lua call C )
[http://blog.sina.com.cn/s/blog_8c7d49f20102v1qg.html](Lua - Userdata )
[http://blog.sina.com.cn/s/blog_8c7d49f20102v383.html](Lua - Managing Resources & Threads and States)
官方网站
参考书籍
《Programming in Lua third edition》 – Roberto Ierusalimschy
《Lua用户手册》
《Game Scripting Mastery》 – Alex Varanese
