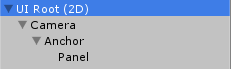
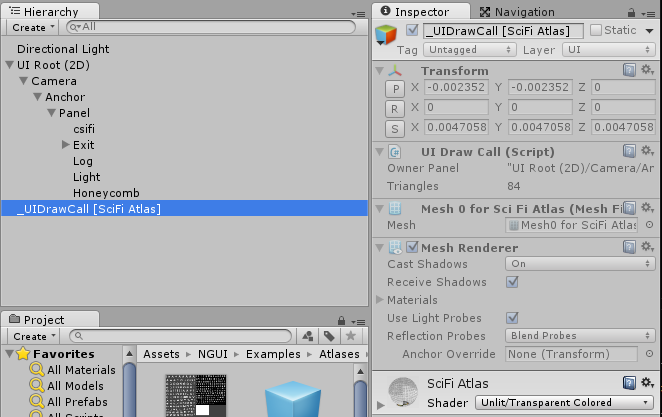
Camera 上面挂载了UICamera Script,这个脚本的主要目的是”contains NGUI’s event system”,至于消息是如何传递的这里先暂时不管,以后会深入学习。
Anchor 上面挂载了UIAnchor Script,这个脚本的主要目的是”apply a half-pixel offset on Windows machines, for pixel-perfect results.”(把UI限定在窗口特定位置,当窗口变化的时候会依然处于相对窗口的位置)
Panel 上面挂载了UIPanel,这个脚本的主要目的是”container that will collect all UI widgets under it and will combine them into as few draw calls as possible.”(这里相当于UI的管理容器,负责以最少的draw call去管理UI)
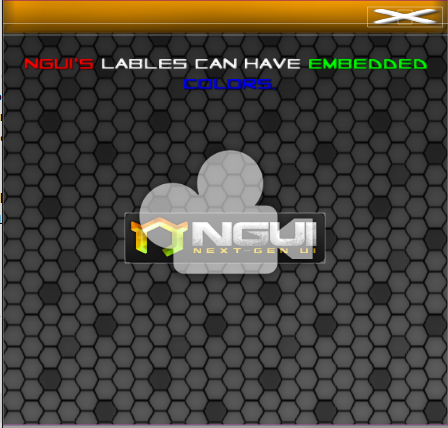
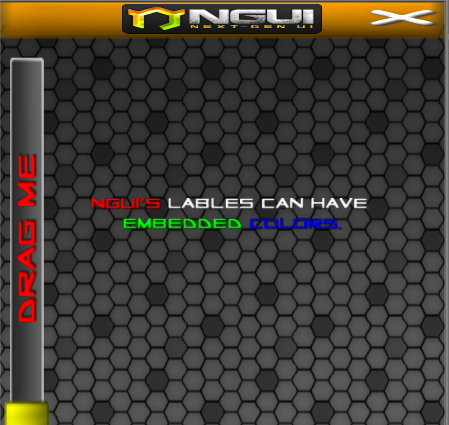
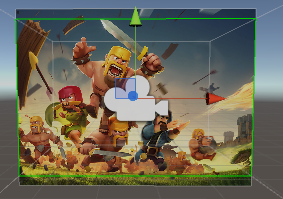
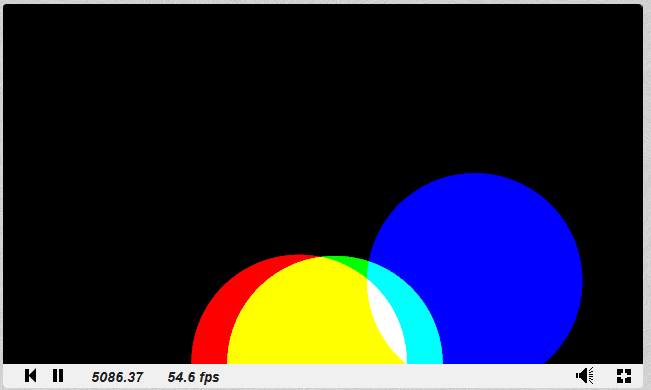
[FF0000]NGUI's [FFFFFF]lables can have [00FF00]embedded [0000FF]colors.
Button
当我们添加了Button后,如何响应事件了? “anything with a collider on it will receive all of the events.”
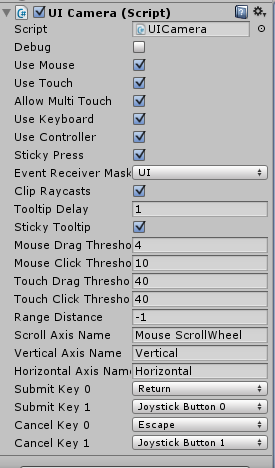
还记得之前说UICamera负责发送所有事件吗?所有在Camera(绑定了UICamera)下的UI都会接受到Event(前提是设置了event发送到UI层)。 让我们来看下UICamera的一些public可控变量: 让我们关注一些比较重要的点: Event Receive Mask – 控制了接受events的layer层 Debug – debug模式下可以让我们看到哪一个game objec t接收到了event Range Distance – 控制raycast的有效范围 Scroll Axis Name – 设定横向控制来源 Vertical Axis Name – 设定纵向控制来源 ……
接下来让我们看看UICamera都负责发送哪些事件?(具体可以参见UICamera源码) OnHover (isOver) is sent when the mouse hovers over a collider or moves away. OnPress (isDown) is sent when a mouse button gets pressed on the collider. OnSelect (selected) is sent when a mouse button is first pressed on a game object. Repeated presses on the same object won’t result in a new OnSelect. OnClick () is sent with the same conditions as OnSelect, with the added check to see if the mouse has not moved much. UICamera.currentTouchID tells you which button was clicked. OnDoubleClick () is sent when the click happens twice within a fourth of a second. UICamera.currentTouchID tells you which button was clicked. OnDragStart () is sent to a game object under the touch just before the OnDrag() notifications begin. OnDrag (delta) is sent to an object that’s being dragged. OnDragOver (draggedObject) is sent to a game object when another object is dragged over its area. OnDragOut (draggedObject) is sent to a game object when another object is dragged out of its area. OnDragEnd () is sent to a dragged object when the drag event finishes. OnInput (text) is sent when typing (after selecting a collider by clicking on it). OnTooltip (show) is sent when the mouse hovers over a collider for some time without moving. OnScroll (float delta) is sent out when the mouse scroll wheel is moved. OnKey (KeyCode key) is sent when keyboard or controller input is used.
那么知道了发送哪些事件,那么我们如何通过添加的控件去响应事件了?
控件要处于Camera(含UICamera脚本)之下
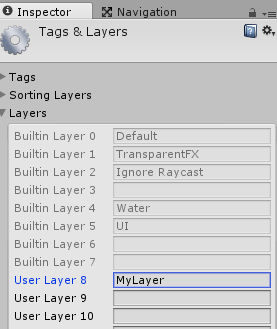
Layer处于UICamera的Event Receiver Mask
接受事件的控件必须包含Collider
自定义响应方法
定义对应事件响应的方法并挂载到需要响应的Game Object上
1 2 3 4 5 6 7 8 9 10 11
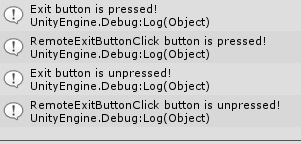
voidOnPress(bool isPressed) { if(isPressed) { Debug.Log("Exit button is pressed!"); } else { Debug.Log("Exit button is unpressed!"); } }
///<summary> /// Event Hook class lets you easily add remote event listener functions to an object. /// Example usage: UIEventListener.Get(gameObject).onClick += MyClickFunction; ///</summary>
public VoidDelegate onSubmit; public VoidDelegate onClick; public VoidDelegate onDoubleClick; public BoolDelegate onHover; public BoolDelegate onPress; public BoolDelegate onSelect; public FloatDelegate onScroll; public VectorDelegate onDrag; public ObjectDelegate onDrop; public StringDelegate onInput; public KeyCodeDelegate onKey;
// Use this for initialization voidStart () { GameObject exitbutton = GameObject.Find("UI Root (2D)/Camera/Anchor/Panel/Exit"); // 这里的回调方法要和delegate签名一致 UIEventListener.Get(exitbutton).onPress = RemoteExitButtonClick; } // Update is called once per frame voidUpdate () { }
voidRemoteExitButtonClick(GameObject go, bool state) { if (state) { Debug.Log("RemoteExitButtonClick button is pressed!"); } else { Debug.Log("RemoteExitButtonClick button is unpressed!"); } } }
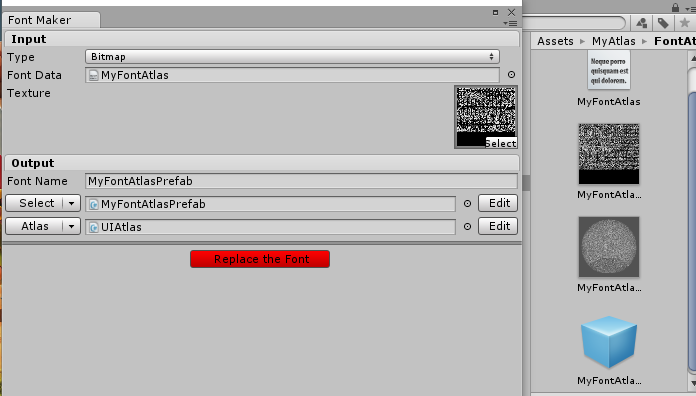
Font Maker里的字体是由什么制作而来的了? “All fonts are created using the free BMFont program, or the more advanced Glyph Designer.”(NGUI使用的Font是由BMFont program或Glyph Designer制作的)
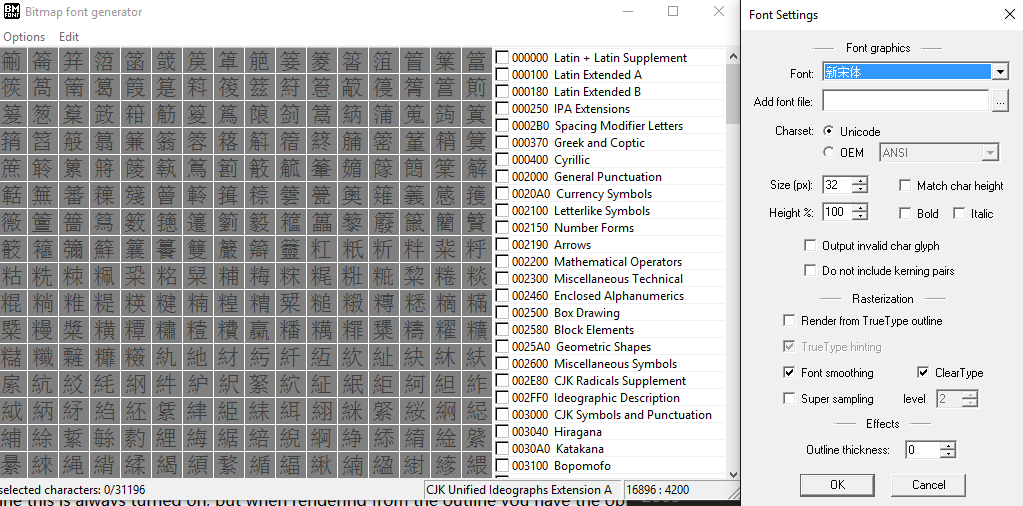
最后点击存储为Bitmap导出字符集(Option -> Save Bitmap Font As) 这里就会生成对应的字符集纹理图片和Font Descriptor文件。 Note: 但我发现由于包含了大量中文字符,字符纹理比较大,包括中文和英文就有10M了,如果文字比较多比如做本地化,静态字体(我们这里提前生成字符集纹理就是静态字体)不适合。
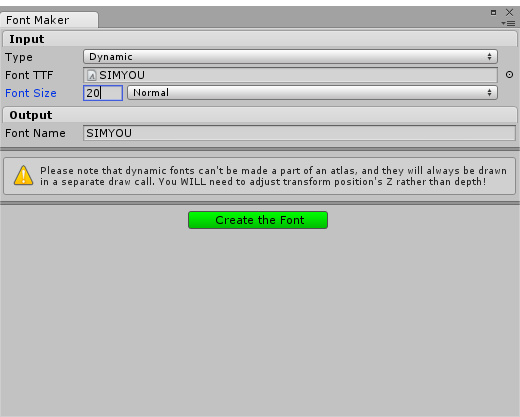
NGUI支持动态字体的生成: 让我们先看看什么是动态字体? “When you set the Characters drop-down in the Import Settings to Dynamic, Unity will not pre-generate a texture with all font characters. Instead, it will use the FreeType font rendering engine to create the texture on the fly.”(https://docs.unity3d.com/Manual/class-Font.html) 可以看出动态字体不需提前生成字符集纹理,而是通过导入的ttf动态的在游戏里生成对应字体纹理。这样做的好处就是减少了像静态字体这样的纹理内存开销,我们只需指定使用哪些ttf并确保用户包含了该ttf就能正确显示所有语言。 个人认为动态字体是本地化的一个解决方案。 动态字体直接从ttf文件生成。 Note: 值得注意的是动态字体下写的那个警告”Please note that dynamic fonts can’t be made a part of an atlas, and they will always be draw in a speparate draw call. You will need to adjust transform position’s Z rather than depth.” 使用动态字体后会增加一个draw call,而且动态字体的深度不再是有depth来控制而是z值。
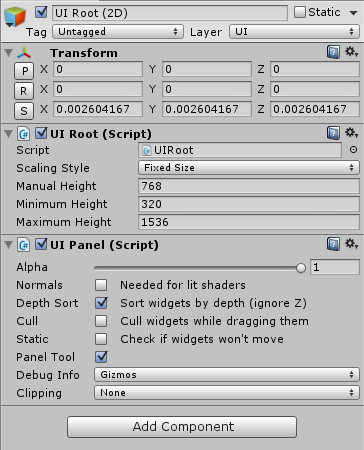
protectedvirtualvoidStart () { UIOrthoCamera oc = GetComponentInChildren<UIOrthoCamera>(); if (oc != null) { Debug.LogWarning("UIRoot should not be active at the same time as UIOrthoCamera. Disabling UIOrthoCamera.", oc); Camera cam = oc.gameObject.GetComponent<Camera>(); oc.enabled = false; if (cam != null) cam.orthographicSize = 1f; } else Update(); }
publicint activeHeight { get { int height = Mathf.Max(2, Screen.height);
// Base on width instead of height manualHeight = Screen.height * UIRootExtend.ManualWidth / Screen.width; if (scalingStyle == Scaling.FixedSize) return manualHeight;
#if UNITY_IPHONE || UNITY_ANDROID if (scalingStyle == Scaling.FixedSizeOnMobiles) return manualHeight; #endif if (height < minimumHeight) return minimumHeight; if (height > maximumHeight) return maximumHeight; return height; } }
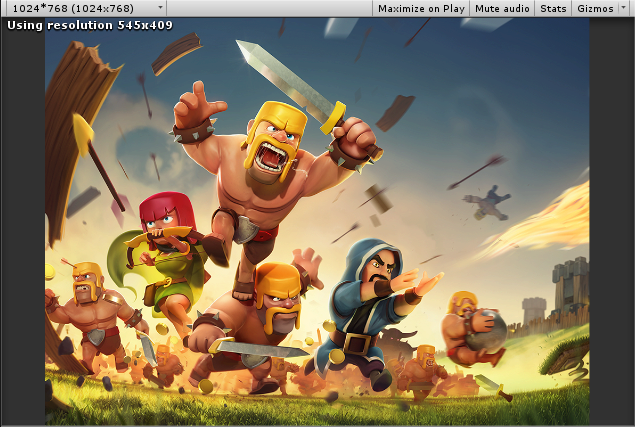
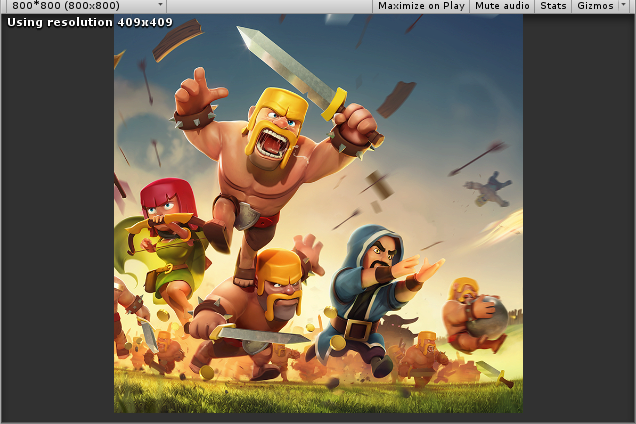
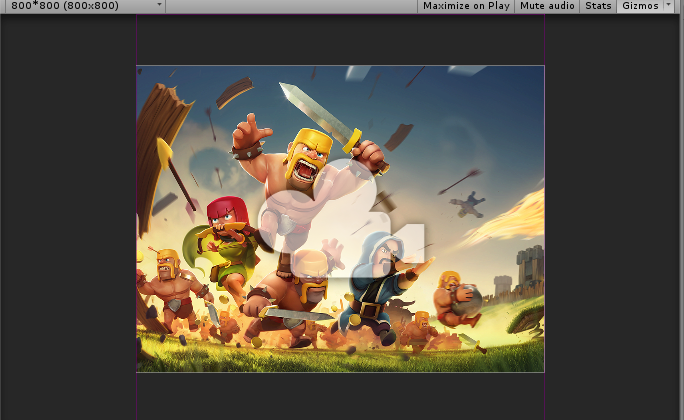
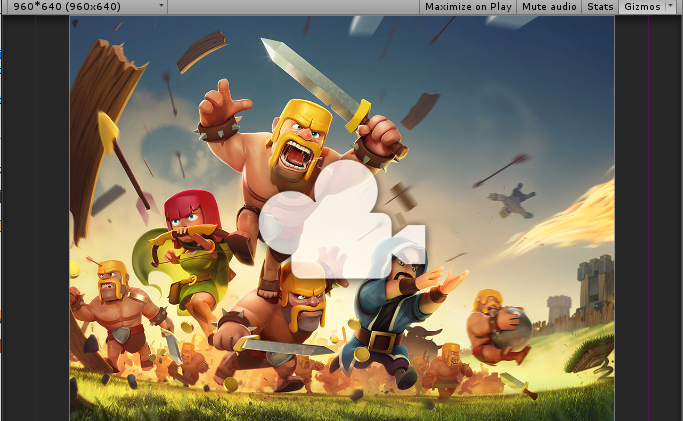
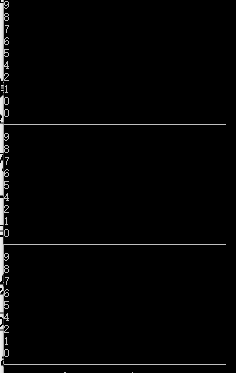
但上述在低分辨率变到高分辨率的时候会因为以宽为基准导致高度的自适应超出范围,见下图: 这种情况只能通过拉伸背景来铺满屏幕,但会失去原始比例(UIStretch可以实现基于屏幕或容器的自适应,不建议使用,后续NGUI都放弃了)。 我们肯定不希望我们的主要的UI都被拉伸变形,所以这里需要提到的是UIAnchor, 让我们在回忆下UIAnchor的作用: “apply a half-pixel offset on Windows machines, for pixel-perfect results.”(把UI限定在窗口特定位置,当窗口变化的时候会依然处于相对窗口的位置) 待续……
关于UI制作尺寸的选择以及UI自适应相关设置: 前面的学习结合Unity Unit Pixel Per Unit的学习,可以看出,UI自适应和Pixel显示我們需要考虑的点有以下几个: UI需要考虑的点:
Canvas Render Mode(Canvas) – Screen Space Camera(一般来说不是作为3D UI摄像机的话,都会选择Screen Space Camera去自己指定一個UI Camera)
UI Scale Mode(Canvas Scaler) – Scale With Screen Size(一般来说为了根据不同设备分辨率进行自适应,我們都会选择这种模式(跟物理size无关))
简单看一下官网提到的Features(这里只Copy一部分): Speed and efficiency: Not only very fast, but also very efficient: everything is cached and reused to avoid useless GC allocations. Shortcuts: Shortcut extensions that directly extend common objects Extremely accurate: Time is calculated in a very precise way. This means that 1000 loops of 1 second each will play exactly as long as a single loop of 1000 seconds. Animate everything (almost) DOTween can animate every numeric value and also some non-numeric ones. It can even animate strings, with support for rich-text. Full control Play, Pause, Rewind, Restart, Complete, Goto and tons of other useful methods to control your tweens. Grouping Combine tweens into Sequences to create complex animations (which don’t need to be in a, uh, sequence: they can also overlap each other). Blendable tweens Some tweens can blend between each other in realtime, thanks to powerful DOBlendable shortcuts. Paths Animate stuff along both linear and curved paths, with additional options for the orientation of your traveling agents. Change values and duration while playing Change a tween’s start/end values or duration at any moment, even while playing. Yield for coroutines Various “WaitFor…” methods to use inside coroutines, that allow you to wait for a tween to be completed, killed, started, or for it to reach a given position or loops. Plugins DOTween is built with an extensible architecture in mind, which allows you to create your own tween plugins as separate files. Extras Extra virtual methods to do stuff like calling a function after a given delay. ……. 总的来说DOTween可以满足我们做动画的任何要求且高效快速方便使用。
深入学习DOTween之前,让我们先了解下DOTween里的命名方式和一些关键术语: 以下学习源于DOTween官网 Nomenclature: Tweener – A tween that takes control of a value and animates it.(Tweener是控制动画细节参数和播放的) Sequence – A special tween that, instead of taking control of a value, takes control of other tweens and animates them as a group.(Sequence可以理解成负责对tweens进行动画而非对属性比如position做动画) Tween – A generic word that indicates both a Tweener and a Sequence. Nested tween – A tween contained inside a Sequence.
Prefixes: DO – Prefix for all tween shortcuts (operations that can be started directly from a known object, like a transform or a material). Also the prefix of the main DOTween class.
Set – Prefix for all settings that can be chained to a tween (except for From, since it’s applied as a setting but is not really a setting).(tween的setting函数)
The generic way DOTween.TO(getter, setter, to float duration) Changes the given property from its current value to the given one. getter A delegate that returns the value of the property to tween. Can be written as a lambda like this: ()=> myValue where myValue is the name of the property to tween. setter A delegate that sets the value of the property to tween. Can be written as a lambda like this: x=> myValue = x where myValue is the name of the property to tween. to The end value to reach. duration The duration of the tween.
1 2 3 4
// Tween a Vector3 called myVector to 3,4,8 in 1 second
DOTween.To(()=> myVector, x=> myVector = x, new Vector3(3,4,8), 1);
// Tween a float called myFloat to 52 in 1 second
DOTween.To(()=> myFloat, x=> myFloat = x, 52, 1);
static DOTween.Punch(getter, setter, Vector3 direction, float duration, int vibrato, float elasticity)
static DOTween.Shake(getter, setter, float duration, float/Vector3 strength, int vibrato, float randomness, bool ignoreZAxis)
static DOTween.ToAlpha(getter, setter, float to, float duration)
static DOTween.ToArray(getter, setter, float to, float duration)
static DOTween.ToAxis(getter, setter, float to, float duration, AxisConstraint axis)
貌似是会对Tween做特殊的限制,比如DOTween.Shake延axis轴变化vector3。
接下来让我们看看如何使用Sequence: The sequenced tweens don’t have to be one after each other. You can overlap tweens with the Insert method.(sequence可包含其他sequence,可以通过Insert把tween插入到特定时间执行) A tween (Sequence or Tweener) can be nested only inside a single other Sequence, meaning you can’t reuse the same tween in multiple Sequences. (同一个tween不能被多个sequence使用) 创建一个Sequence:
1
DOTween.Sequence();
我们可以通过添加tweens,callback到sequence里去做一些特别的动画。 Note: “ all these methods need to be applied before the Sequence starts (usually the next frame after you create it, unless it’s paused), or they won’t have any effect.”(添加tweens,callback这些都必须在Sequence开始之前,可以理解为同一帧里)
Via Static methods and filters DOTween class给我们提供了大量的静态方法去控制tween动画。 比如我们想暂停某个tween动画或暂停所有tween:
1
2
DOTween.Pause(tweenname);
DOTween.PauseAll();
Directly from the tween 我们也可以通过保存的tween动画引用去调用控制相关的动画
1
myTween.Pause();
From a shortcut-enhanced reference 直接通过扩展方法去停止对应的物体上的tween(这里要注意的是,所有控制tween的扩展方法都带DO前缀)
1
transfrom.DOPause();
Note: “IMPORTANT: remember that to use these methods on a tween after it has ended, you have to disable its autoKill behaviour, otherwise a tween is automatically killed at completion.”(对tween设置的时候一定要disable automatically kill,否则在tween完成的时候tween会被销毁) 同时DOTween还给我们提供了很多静态方法去获取tween的信息(比如Delay(),Duration()等)
// 需要等到tween结束 IEnumerator SomeCoroutine() { Tween myTween = transform.DOMoveX(45, 1); yieldreturn myTween.WaitForCompletion(); // This log will happen after the tween has completed Debug.Log("Tween completed!"); }
voidDelete(T v) { if (mHeadNode == NULL) { return; }
SingleLinkNode<T> *tempnode = mHeadNode;
SingleLinkNode<T> *prenode = NULL;
bool find = false;
while (tempnode != NULL) { //remove first v element if (tempnode->mElement == v) { //when remove first node, move forward mHeadNode if (tempnode == mHeadNode) { mHeadNode = tempnode->Next; } else { prenode->Next = tempnode->Next; } delete tempnode; mLength--; find = true; break; } //Record pre node for later operation prenode = tempnode; tempnode = tempnode->Next; }
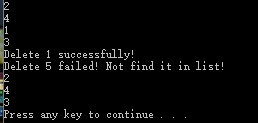
if (find) { cout << "Delete " << v << " successfully!" << endl; } else { cout << "Delete " << v << " failed! Not find it in list!" << endl; } }
intFind(T v) { int position = 0; SingleLinkNode<T> *tempnode = mHeadNode; while (tempnode != NULL) { position++; if (tempnode->mElement == v) { return position; } else { tempnode = tempnode->Next; } } return-1; }
SingleLinkNode<T>* GetNodeAt(int position) { if (position < 1 || position > mLength) { cout << position << " Out of range of link list!" << endl; cout << "Current length of link list = " << mLength << endl; cout << "Insert failed!" << endl; returnNULL; } else { //链表是非连续的存储方式,所以需要通过循环访问到特定位置 SingleLinkNode<T> *tempnode = mHeadNode;
if (position == 1) { return mHeadNode; } else { for (int i = 1; i < position; i++) { tempnode = tempnode->Next; } return tempnode; } } }
//when insert first element, tail node equals to head node if (mLength == 0) { tempnode->Pre = NULL; tempnode->Next = NULL; mHeadNode = tempnode; mTailNode = mHeadNode; } else { mHeadNode->Pre = tempnode; tempnode->Next = mHeadNode; mHeadNode = tempnode; }
mLength++; }
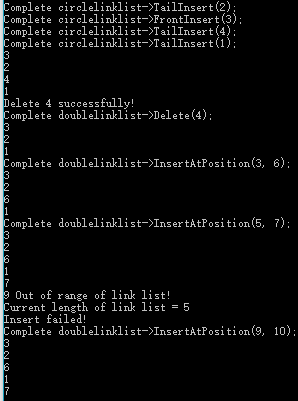
voidInsertAtPosition(int position, T v) { if (position < 1 || position > mLength + 1) { cout << position << " Out of range of link list!" << endl; cout << "Current length of link list = " << mLength << endl; cout << "Insert failed!" << endl; } //when insert element as first element. elseif (position == 1) { FrontInsert(v); } //when insert at final position //when position is larger than length of link list, //we insert it at the end of the link list elseif (position == mLength + 1) { TailInsert(v); } //insert element between head and last element else { DoubleLinkNode<T> *tempnode = newDoubleLinkNode<T>();
DoubleLinkNode<T>* GetNodeAt(int position) { if (position < 1 || position > mLength) { cout << position << " Out of range of link list!" << endl; cout << "Current length of link list = " << mLength << endl; cout << "Insert failed!" << endl; returnNULL; } else { //链表是非连续的存储方式,所以需要通过循环访问到特定位置 DoubleLinkNode<T> *tempnode = mHeadNode;
if (position == 1) { return mHeadNode; } elseif (position == mLength) { return mTailNode; } else { for (int i = 1; i < position; i++) { tempnode = tempnode->Next; } return tempnode; } } }
boolIsEmpty() { return mLength; }
voidDelete(T v) { if (mHeadNode == NULL) { return; }
DoubleLinkNode<T> *tempnode = mHeadNode;
DoubleLinkNode<T> *prenode = NULL;
bool find = false;
while (tempnode != NULL) { //remove first v element if (tempnode->mElement == v) { //when remove first node, move forward mHeadNode if (tempnode == mHeadNode) { if (mLength <= 1) { mHeadNode = NULL; mTailNode = NULL; } else { mHeadNode = tempnode->Next; mHeadNode->Pre = NULL; } } elseif (tempnode == mTailNode) { if (mLength <= 1) { mHeadNode = NULL; mTailNode = NULL; } else { mTailNode = prenode; mTailNode->Next = NULL; } } else { prenode->Next = tempnode->Next; tempnode->Next->Pre = prenode; } delete tempnode; mLength--; find = true; break; } //Record pre node for later operation prenode = tempnode; tempnode = tempnode->Next; }
if (find) { cout << "Delete " << v << " successfully!" << endl; } else { cout << "Delete " << v << " failed! Not find it in list!" << endl; } }
intFind(T v) { int position = 0; DoubleLinkNode<T> *tempnode = mHeadNode; while (tempnode != NULL) { position++; if (tempnode->mElement == v) { return position; } else { tempnode = tempnode->Next; } } return-1; }
int _tmain(int argc, _TCHAR* argv[]) { int n; cout<<"Please Enter the Fibonacci's n:"<<endl; cin>>n; cout<<"Fibonacci("<<n<<") = "<<Fibonacci(n)<<endl;
形式化描述: 给定c > 0,w(i) > 0, v(i) > 0, i <= i <=n,要求找出一个n元0-1向量(x1,x2,x3…..,xn), x(i) ∈ {0, 1}, 1 <= i <= n,使得∑(i= 1 - n)(w(i) x x(i)) <= c,而且∑(i= 1 - n)(v(i) x x(i))达到最大。 转换成式子如下: max(∑( 1 <= i <= n)(v(i) x x(i))) { ∑(i= 1 - n)(w(i) x x(i)) <= c { x(i) ∈ {0, 1}, 1 <= i <= n
分析: 最优子结构性质: 设(y1,y2……yn)是所给0-1背包问题的一个最优解,则(y2,y3…..yn)是下面相应子问题的一个最优解: max(∑(2 <= i <= n)(v(i) x x(i))) { ∑(2 <= i <= n)(w(i) x x(i)) <= c - w(1) x y(1) { x(i) ∈ {0, 1}, 2 <= i <= n
递归关系: 0-1背包问题的子问题: max(∑(i <= k <= n)(v(k) x x(k))) { ∑(i <= k <= n)(w(k) x x(k)) <= j { x(k) ∈ {0, 1}, i <= k <= n m(i,j)是背包容量为j,可选物品为i,i+1…..n时0-1背包问题的最优解。 x(i)表示背包i的选择∈ {0, 1} 根据最优子结构性质,可以建立就按m(i,j)的递归式如下: { max{m((i+1,j), m(i+1, j - w(i)) + v(i))} j >= w(i) m(i,j) = { { m(i+1,j) 0 <= j <= w(i)
voidKnapsack(float *v, int *w, int c, int n, float **m) { int jmax = fmin(w[n] - 1,c); //根据最优子结构性质,m[n - 1][j]的最优解是m[n][j]最优解的子集, //我们先构建出m[n][j]时的数据,然后利用m[n][j]的数据去构建m[i][c] 1 <= i < n for (int j = 0; j <= jmax; j++) { m[n][j] = 0; }
//Finally, we can get m[1][c] from c[2][c] m[1][c] = m[2][c]; if (c >= w[1]) { m[1][c] = fmax(m[2][c], m[2][c - w[1]] + v[1]); } }
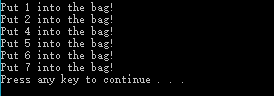
voidTraceback(float **m, int *w, int c, int n, int *x) { for (int i = 1; i < n; i++) { if (m[i][c] == m[i + 1][c]) { x[i] = 0; } else { x[i] = 1; c -= w[i]; cout << "Put " << i << " into the bag!" << endl; } } //check for last one x[n] = m[n][c] ? 1 : 0; if (x[n] == 1) { cout << "Put " << n << " into the bag!" << endl; } }
int _tmain(int argc, _TCHAR* argv[]) { //0-1背包问题 //因为我们从v[1]开始访问当做第一个背包的价值, //所以这里加一个0在最前面方便从1开始索引 float v[] = { 0, 1, 5, 2, 3, 6, 8, 3 }; int w[] = { 0, 4, 3, 6, 7, 2, 3, 1 }; int c = 20; //减掉我们额外增加的第一个 int n = GetArrayLength(v) - 1; float **m = newfloat*[GetArrayLength(v)]; //为了从1开始索引 int *x = newint[n + 1]; for (int i = 0; i < GetArrayLength(v); i++) { //m[i][j] 1 <= j <= n用于表示背包容量为j,可选物品为i,i+1....n是0-1背包问题的最优解 //为了m[i][c]来访问背包重量为c的时候的最优解,这里需要额外增加数组长度1 m[i] = newfloat[c + 1]; } Knapsack(v, w, c, n, m); Traceback(m, w, c, n, x); for (int i = 0; i < GetArrayLength(v); i++) { delete m[i]; }
接下来以0-1背包问题为例来学习理解回溯法: 假设0-1背包n = 3,w = [16, 15, 15] v = [45, 25, 25] c= 30 解空间为: {(0,0,0), (0,1,0), (0,0,1), (1,0,0), (0,1,1), (1,0,1), (1,1,0), (1,1,1)} 因为是以深度优先搜索,所以是延A -> B -> D -> H -> D -> I -> D -> B -> E -> J -> K的顺序来搜索,直到回溯完所有的解空间节点或找到答案为止。
问题: 上述回溯法把所有的解空间都搜索了一遍,时间和空间复杂度大。
优化: 回溯法通常采用两种策略避免无效搜索,提高回溯法的搜索效率:
用约束函数在扩展结点处剪去不满足约束条件的子树。
用限界函数剪去得不到最优解的子树。(两个函数统称为剪枝函数)
在0-1背包里左子树表示装载当前背包,右子树表示不装载当前背包。 所以在针对剪枝函数的优化上,我们可以在判断只有在右子树中有可能包含最优解时才进入。设r是当前剩余物品价值总和;cp是当前价值;bestp是当前最优价值。当cp + r <= bestp时,可剪去右子树。
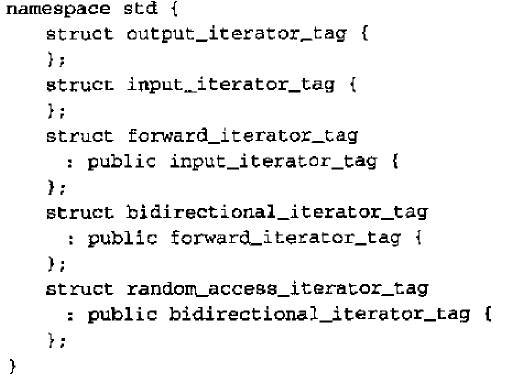
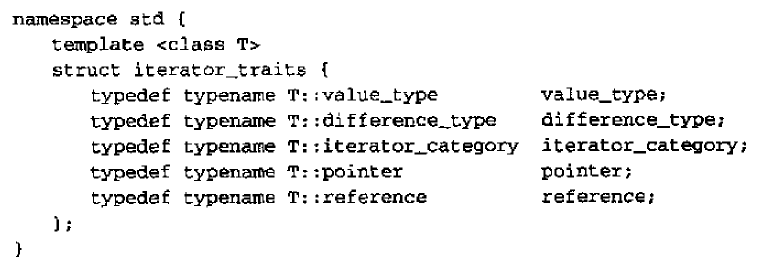
template<class Forwarditerator> voidshift_left(Forwarditerator beg, Forwarditerator end) { //temporary variable for first element typedeftypename std::iterator_traits<Forwarditerator>::value_type value_type;
if(beg != end) { //save value of first element value_type temp(*beg);
//convenience function to create the MyInsertIterator template<class Container> inline MyInsertIterator<Container> MyInsert(Container& c) { returnMyInsertIterator<Container>(c); }
template<class InputIterator, class Function>
  Function for_each(InputIterator first, InputIterator last, Function fn)
{
  while (first!=last) {
    fn (*first);
    ++first;
  }
  return fn;      // or, since C++11: return move(fn);
}
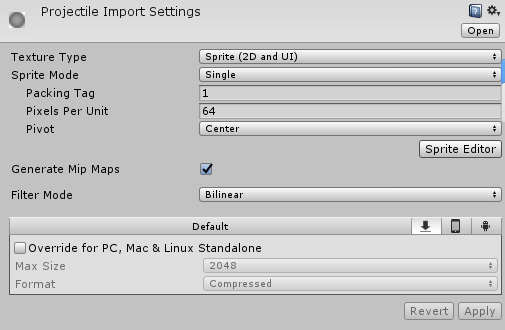
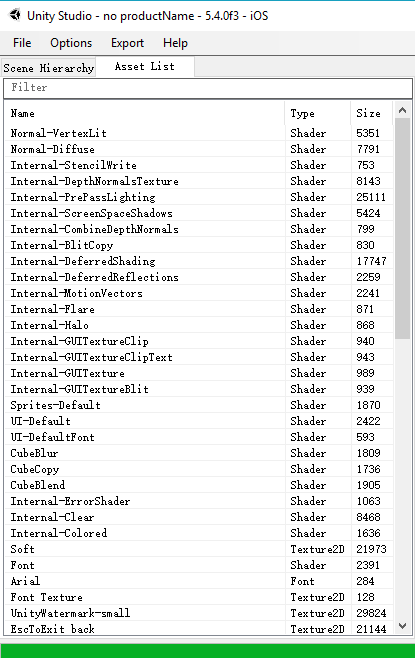
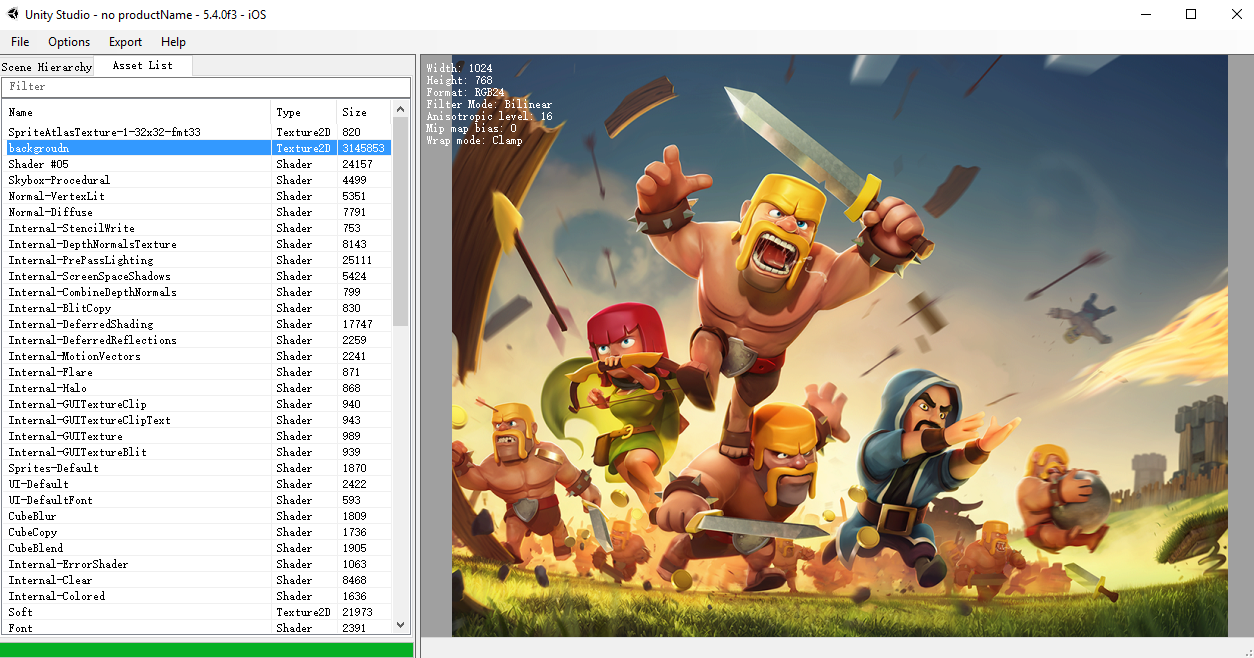
在进一步了解我们导入Assets的时候,会发生些什么之前,先让我们来学习了解一些相关的概念。 首先,什么是Asset? Asset – “An Asset is a file on disk, stored in the Assets folder of a Unity Project. e.g. texture files, material files and FBX files……”(Asset代表的所有存储在Assets目录下的文件资源)
遇到Unity不支持的格式,Unity需要通过import process导入资源文件(e.g. PNG, JPG) “The import process converts source Assets into formats suitable for the target platform selected in the Unity Editor.”(Import process主要是为了将不支持的资源格式转换到Unity对应平台设置的对应格式)
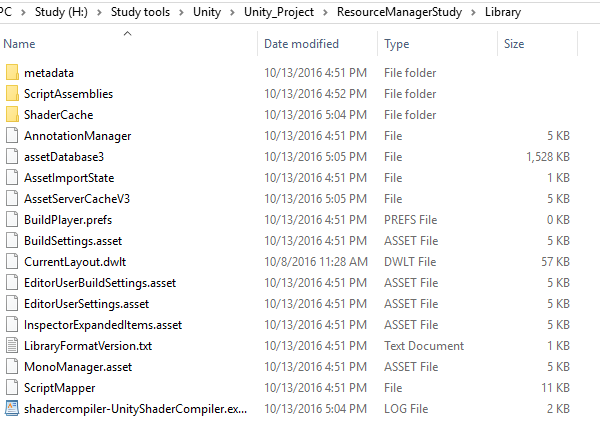
Unity不可能每一次都去重新Import这些资源,那么Unity是如何将import结果存储在哪里了? 为了避免重复的import导入,” the results of Asset importing are cached in the Library folder.”(Asset导入的结果被缓存在了library folder – 我想这也就是为什么每次删掉Library文件会导致一些asset重新导入的原因)
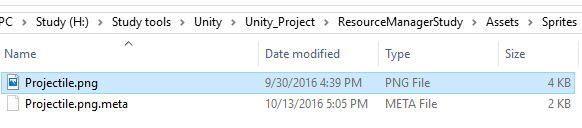
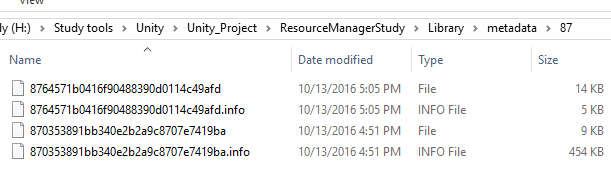
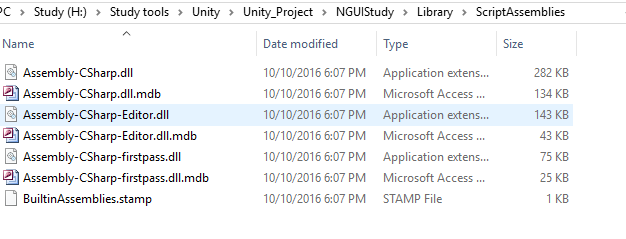
“the results of the import process are stored in a folder named for the first two digits of the Asset’s File GUID. This folder is stored inside the Library/metadata/ folder. The individual Objects are serialized into a single binary file that has a name identical to the Asset’s File GUID.”(可以看出import的结果存储在Library/metadata/文件夹下,并且把File GUID的前两位bit作为文件夹名,以File GUID作为文件名字) 以前面Projectile.png导入为例: 因为Projectile.png.meta的File ID为8764571b0416f90488390d0114c49afd 所以导入的结果就存储在Library\metadata\87\文件夹下,文件名为8764571b0416f90488390d0114c49afd(由于是二进制文件,无法查看具体内容) Note: Non-Native asset type需要通过asset importer去导入Unity。(自动调用,也可以通过AssetImporter API去调用)
先来看看什么是AssetDatabase: “AssetDatabase is an API which allows you to access the assets contained in your project. Among other things, it provides methods to find and load assets and also to create, delete and modify them. The Unity Editor uses the AssetDatabase internally to keep track of asset files and maintain the linkage between assets and objects that reference them.”(可以看出,AssetDatabase在Unity对于Asset管理上起了关键性作用,AssetDatabase里存储了Asset相关的很多信息(e.g. Asset Depedency, Asset Path…..))
using UnityEngine; using System.Collections; #if UNITY_EDITOR using UnityEditor; #endif
publicclassCreateCubeAssetMenu { //Only works under editor #if UNITY_EDITOR [MenuItem("AssetDatabase/CreateCubeAsset")] staticvoidCreateCudeAsset() { //load Projectile.png as texture Texture2D texture = (Texture2D)AssetDatabase.LoadAssetAtPath("Assets/Sprites/Projectile.png", typeof(Texture2D));
//create material and cube assets string matassetname; string cubename; string materialfoldername = "Materials"; string cubefoldername = "Prefabs";
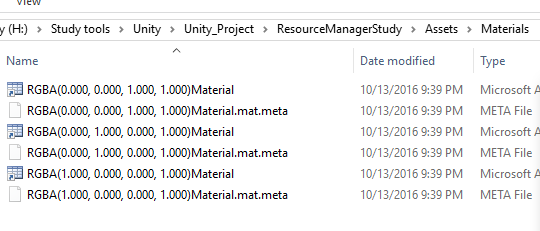
Color[] colors = { Color.red, Color.blue, Color.green }; for (int i = 0; i < colors.Length; i++) { //Create material first Material mat = new Material(Shader.Find("Transparent/Diffuse")); mat.mainTexture = texture; mat.color = colors[i];
//create a new cube and set material for it GameObject obj = GameObject.CreatePrimitive(PrimitiveType.Cube); MeshRenderer meshrender = obj.GetComponent<MeshRenderer>(); if (meshrender != null) { meshrender.material = mat; } else { Debug.Log("meshrender == null!"); break; }
matassetname = mat.color.ToString() + "Material.mat"; cubename = mat.color.ToString() + "Cube.prefab"; //create material folder //check whether material folder exist if (AssetDatabase.Contains(mat)) { Debug.Log("Material asset has been created before!"); } else { if (!AssetDatabase.IsValidFolder("Assets/" + materialfoldername)) { AssetDatabase.CreateFolder("Assets", materialfoldername); }
if (!AssetDatabase.IsValidFolder("Assets/" + cubefoldername)) { AssetDatabase.CreateFolder("Assets", cubefoldername); }
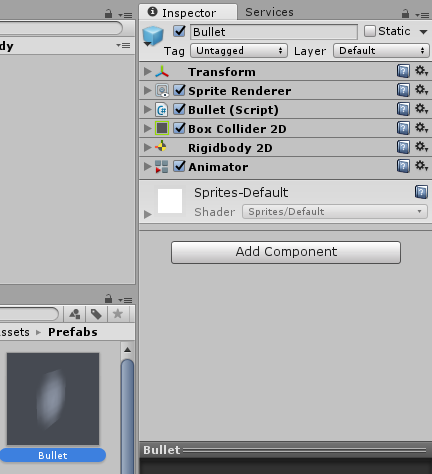
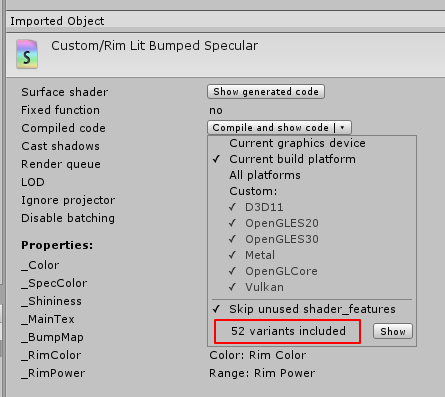
在进一步了解还应该存储哪些信息之前,这里需要理解一个概念UnityEngine.Object 那么Object在Unity里是什么概念了? UnityEngine.Object – “Object with a capitalized ‘O’, is a set of serialized data collectively describing a specific instance of a resource. This can be any type of resource which the Unity Engine uses, such as a mesh, a sprite, and AudioClip …..”(Object是指描述了Asset上使用的所有resources的序列化数据。比如制作一个2D Bullet Prefab,上面会挂载Transform,Sprite Renderer,Box Collider 2D,Rigidbody 2D, Bullet Script,Animator等Object,这里我们需要分别标识和记录这些Object的信息)
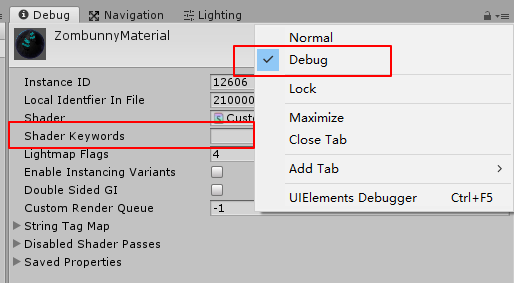
前面我们提到了Asset是通过Unique ID(File GUID)来标识,那么这里的Object用什么来标识了?并且又存储在哪里了? 答案是使用Local ID来标识并存储在Asset文件里(需要设置Asset Serialization到Force Text才能查看(默认是Mixed(Text和Binary))) Local ID – identifies each Object within an Asset file because an Asset file may contain multiple Objects.
那么Asset和Object之间是什么样的关系了? “There is a one-to-many relationship between Assets and Objects: that is, any given Asset file contains one or more Objects.”(Asset file可以包含一个或多个Objects)
那么为什么要采用File GUID和Local ID了? “The File GUID provides an abstraction of a file’s specific location. As long as a specific File GUID can be associated with a specific file, that file’s location on disk becomes irrelevant. The file can be freely moved without having to update all Objects referring to the file.”(通过指定唯一个File GUID和Local ID,使文件的位置变的无关紧要,我们可以随意的移动文件位置而无需更新所有的Object reference信息)
那么Instance ID是如何运作的了? “At startup, the Instance ID cache is initialized with data for all Objects that are built-in to the project (i.e. referenced in Scenes), as well as all Objects contained in the Resources folder. Additional entries are added to the cache when new assets are imported at runtime(3) and when Objects are loaded from AssetBundles. Instance ID entries are only removed from the cache when they become stale. This happens when an AssetBundle providing access to a specific File GUID and Local ID is unloaded.”(当游戏启动的时候,Instance ID的cache开始初始化所有在项目场景里引用到的Object。额外的Instance ID Cache只有在通过运行时导入或则AssetBundle动态加载Object的时候添加。Instance ID只有在Instance ID标识的Object被Unloaded的时候才会被removed from cache)
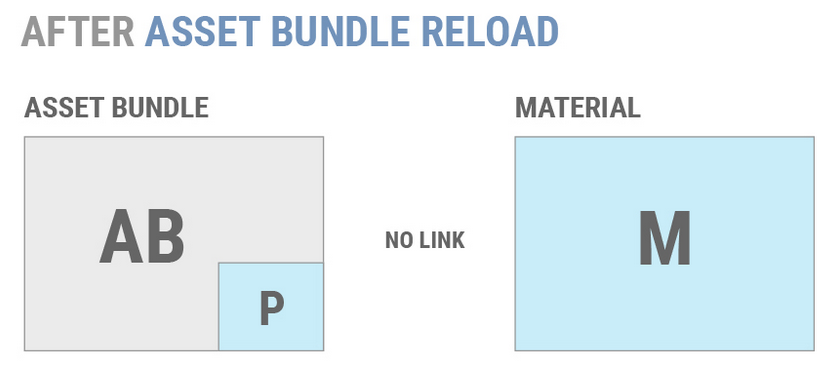
那么什么时候Object才会被Unloaded了?Object的Instance ID与AssetBundle之间又是如何关联起来的了? “When the unloading of an AssetBundle causes an Instance ID to become stale, the mapping between the Instance ID and its File GUID and Local ID is deleted to conserve memory. If the AssetBundle is re-loaded, a new Instance ID will be created for each Object loaded from the re-loaded AssetBundle.”(当AssetBundle(后面会详细讲到)被unload后,通过AssetBundle加载的Object的Instance ID会被删除以节约内存。当AssetBundle再次加载进来后,当AssetBundel里的Obejct被再次加载时,会为该Object生成新的Instance ID到cache里)
ScriptableObject “Provides a convenient system for developers to define their own data types.”(用于定义自定义类型数据)
MonoBehaviour “Provides a wrapper that lins to a MonoScript. A MonoScript is an internal data type that Unity uses to hold a reference to a specific scripting class within a specific assembly and namespace. The MonoScript does not contain any actual executable code.”
Monoscripts: “a MonoBehaviour has a reference to a MonoScript, and MonoScripts simply contain the information needed to locate a specific script class. Neither type of Object contains the executable code of script class.” “A MonoScript contains three strings: an assembly name, a class name, and a namespace.”(正如前面MonoBehavior提到的,MonoScript包含了定位script class需要的信息。 e.g. assembly name, class name, namspace……)
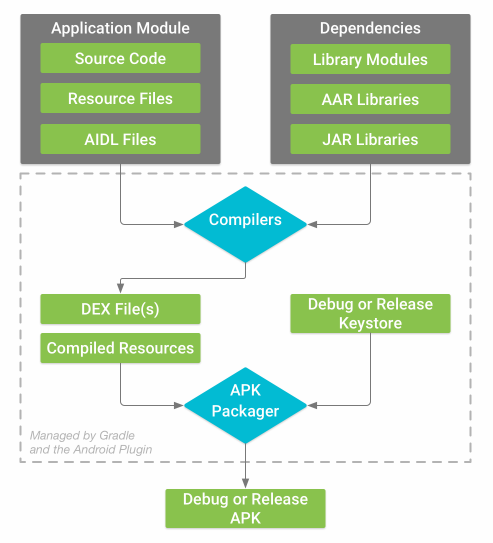
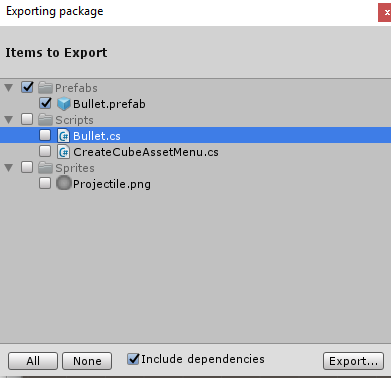
说了这么多Asset和Object相关的知识和概念,下面提一个与之相关却又常常遇到的问题。 Unity Store可以下载很多Asset Package资源,那么这里的问题就是,Asset Package是个什么概念?为什么通过导入Asset Package我们就能导入别人做好的Asset资源?如何制作自己的Asset Package? Asset Package概念: “Packages are collections of files and data from Unity projects, or elements of projects, which are compressed and stored in one file, similar to Zip files.”(可以看出Asset Package只是相当于Unity对于一系列Assets的打包,单记录了Assets原始的目录结构和Asset信息,好比压缩包)
Use of the Resources folder makes fine-grained memory management more difficult.(使用Resources folder会使内存管理更困难)
Improper use of Resources folders will increase application startup time and the length of builds.(不合理的使用Resources folders会使程序启动和编译时间变长) As the number of Resources folders increases, management of the Assets within those folders becomes very difficult.(随着Resources folders数量的增加,Assets管理越来越困难)
The Resources system degrades a project’s ability to deliver custom content to specific platforms and eliminates the possibility of incremental content upgrades.(Resources System降低了项目对于各平台和资源的动态更新能力,因为Resources目录下的资源无论如何都会被打包到游戏程序里) AssetBundle Variants are Unity’s primary tool for adjusting content on a per-device basis.(AssetBundle是Unity针对设备动态更新的主要工具)
Resources is an excellent system for during rapid prototyping and experimentation because it is simple and easy to use. However, when a project moves into full production, it is strongly recommended to eliminate uses of the Resources folder.(快速开发,但到了真正发布还是应该减少Resources Folder的使用)
The Resources folder is also useful in trivial cases, when all of the following conditions are met(当下列情况都满足的时候,Resource folder比较有用):
The content stored in the Resources folder is not memory-intense
The content is generally required throughout a project’s lifetime(该资源在项目生命周期里都需要)
The content rarely requires patching(很少需要改动patch)
The content does not vary across platforms or devices.(在各个平台设备都一致) 比如一些第三方配置文件等asset。
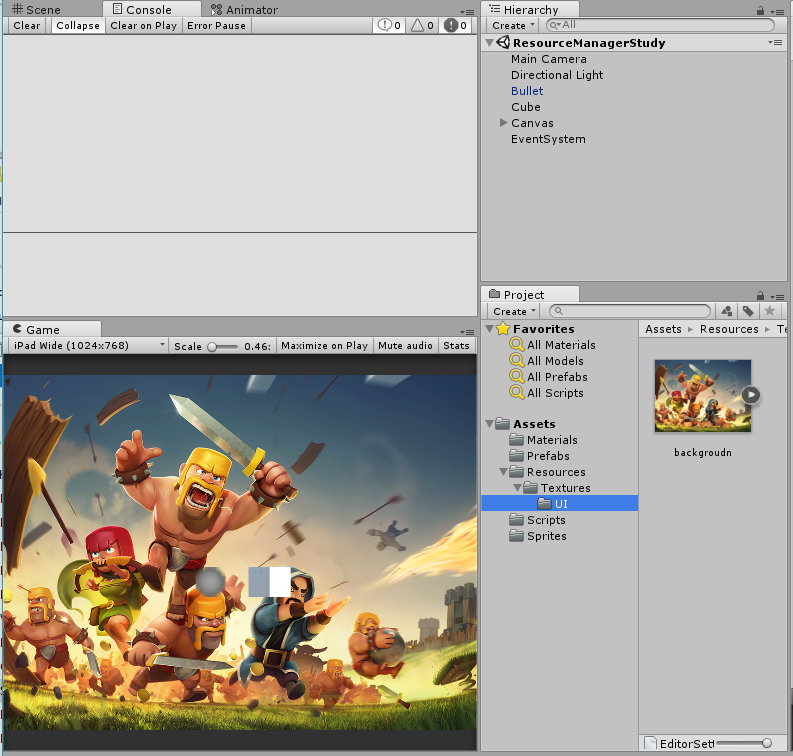
那么接下来让我们了解下Resources是如何被保存到Unity里的: Serialization of resources: “The Assets and Objects in all folders named “Resources” are combined into a single serialized file when a project is built.”(当项目编译的时候,所有放到Resources目录下的Assets和Object最终会被序列化到一个单独的文件,根据前面的测试应该是resources.assets)
“This file also contains metadata and indexing information, similar to an AssetBundle. This indexing information includes a serialized lookup tree that is used to resolve a given Object’s name into its appropriate File GUID and Local ID. It is also used to locate the Object at a specific byte offset in the serialized file’s body.”(Resource会去维护一个映射表,用于查询特定Object
“As the lookup data structure is (on most platforms) a balanced search tree(1), its construction time grows at an O(N log(N)) rate.”(Lookup是通过平衡二叉树来查找,所以时间复杂度为N x Log(N))
“This operation is unskippable and occurs at application startup time while the initial non-interactive splash screen is displayed.”(在程序启动的时候会去初始化index info(Lookup data)的时候,Resources里assets数量过多的话会导致花费大量时间)
A header The header is generated by Unity when the AssetBundle is built.(header是在Unity编译AssetBundle的时候生成)主要包含下列内容:
The AssetBundle’s identifier
Whether the AssetBundle is compressed or uncompressed
A manifest(“The manifest is a lookup table keyed by an Object’s name. Each entry provides a byte index that indicates where a given Object can be found within the AssetBundle’s data segment.”(manifest把Object的名字作为key,用于查询特定object是否存在于AssetBundle的数据字段里)) (manifest里通过std::multimap实现,不同平台multimap的实现有些许差别,Windows和OSX采用red-black tree,所以在构造manifest的时候,时间复杂度是N x Log(N))
A data segment. “Contains the raw data generated by serializing the Assets in the AssetBundle.”(data segment包含了序列化Assets的原始数据) data segment最后还会通过LZMA algorithm压缩。 “Prior to Unity 5.3, Objects could not be compressed individually inside an AssetBundle. “(Unity 5.3之前Object不支持被单独压缩到AssetBundle里,所以在去访问一个被包含在压缩了的AssetBundle里的Object时,Unity需要去解压整个AssetBundle) “Unity 5.3 added a LZ4 compression option. AssetBundles built with the LZ4 compression option will compress individual Objects within the AssetBundle, allowing Unity to store compressed AssetBundles on disk.”(Unity 5.3加入了LZ4压缩选项,支持单独的Object压缩到AssetBundle里,这样一来就可以通过单独解压特定的Object来实现访问该Object)
AssetBundle能包含哪些Assets? Models,Materials,textures and secenes.AssetBundle can not contain scripts.
AssetBundle.LoadFromFile “A highly-efficient API intended for loading uncompressed AssetBundle from local storage, such as a hard disk or an SD card.”(可以高效的加载本地未压缩的AssetBundle,也支持加载LZ4压缩的AssetBundle,但不支持LZMA压缩的AssetBundle) Mobile和Editor表现不一样,详情参见
WWW.LoadFromCacheOrDownload “A useful API for loading Objects both from remote servers and from local storage.”(主要用于加载远程服务器端和本地的Object) 使用建议: “Due to the memory overhead of caching an AssetBundle’s bytes in the WWW object, it is recommended that all developers using WWW.LoadFromCacheOrDownload ensure that their AssetBundles remain small”(尽量保证AssetBundle很小,避免内存消耗过大) “Each call to this API will spawn a new worker thread. Be careful of creating an excessive number of threads when calling this API multiple times.”(避免同时调用多次,导致大量的Thread执行,确保同一时间很少的thread执行)
UnityWebRequest’s DonwloadHandleAssetBundle(on Unity 5.3 or newer) “UnityWebRequest allows developers to specify exactly how Unity should handle downloaded data and allows developers to eliminate unnecessary memory usage.”(UnityWebRequest支持更细致的AssetBundle加载的内存使用,可以通过配置UnityWebRequest达到使用最少内存的目的得到我们想要加载的Obejct) “Note: Unlike WWW, the UnityWebRequest system has an internal pool of worker threads and an internal job system to ensure that developers cannot start an excessive number of simultaneous downloads. The size of the thread pool is not currently configurable.”(UnituWebRequest system内部有自身的线程管理,避免同一时间大量的线程同时加载)
Loading Assets from AssetBundles: Synchronous API:
LoadAsset
LoadAllAssets
LoadAssetWithSubAsset
Asynchronous API:
LoadAssetAsync
LoadAllAssetsAsync
LoadAssetWithSubAssetAsync
使用建议: “LoadAllAssets should be used when loading multiple independent UnityEngine.Objects.”(当需要加载大量独立的Objects的时候,使用LoadAllAssets。当需要加载的Object数量很多,又少于AssetBundle里的2/3的时候,我们可以采用制作多个小的AssetBundle,然后再通过LoadAllAssets加载) “LoadAssetWithSubAssets should be used when loading a composite Asset which contains multiple embedded Objects. If the Objects that need to be loaded all come from the same Asset, but are stored in an AssetBundle with many other unrelated Objects.”(当加载由多个obejct构成的Object的时候,建议使用LoadAssetWithSubAssets。当加载的Objects都来之同一个Asset,但存储的AssetBundle里包含很多其他无关的Obejcts时,采用LoadAssetWithSubAssets) “For any other case, use LoadAsset or LoadAssetAsync.”(其他情况都是用LoadAsset和LoadAssetAsync)
Low-Level Loading details: “UnityEngine.Object loading is performed off the main thread: an Object’s data is read from storage on a worker thread. Anything which does not touch thread-sensitive parts of the Unity system (scripting, graphics) will be converted on the worker thread.”(Object的加载是在main thread上,而object data的数据读取是在worker thread。所有线程不敏感的数据都是在worker thread进行。)
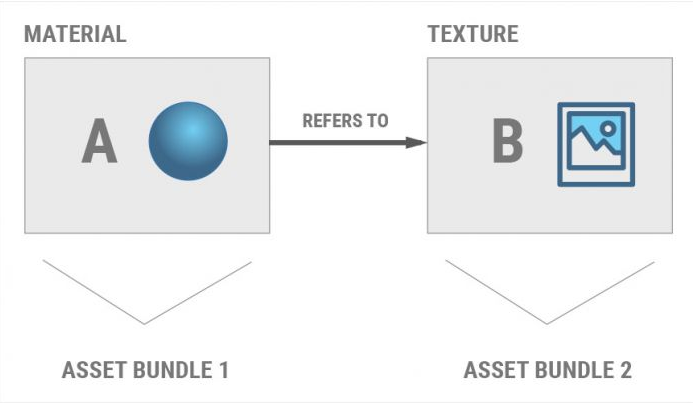
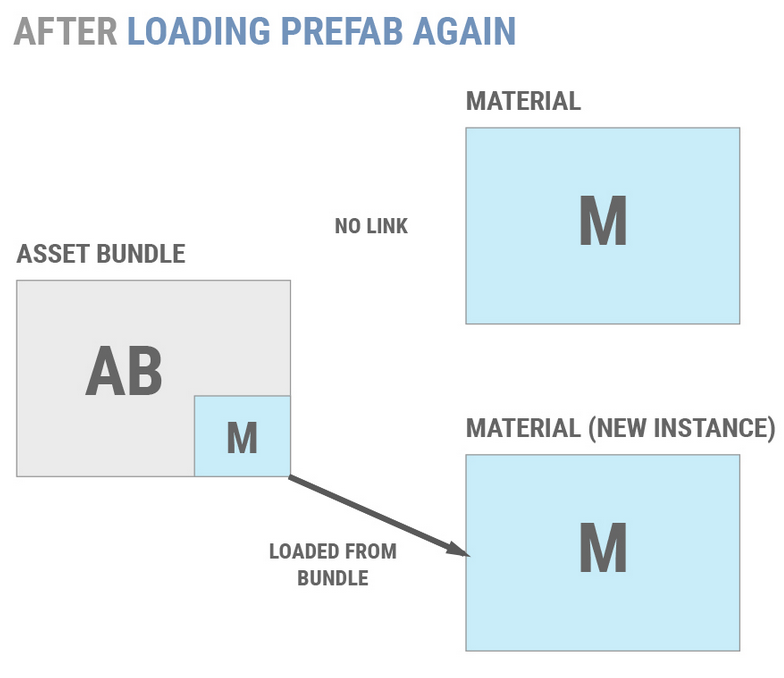
加载AssetBundle里的Object需要注意些什么? “An Object is assigned a valid Instance ID when its AssetBundle is loaded, the order in which AssetBundles are loaded is not important. Instead, it is important to load all AssetBundles that contain dependencies of an Object before loading the Object itself. Unity will not attempt to automatically load any child AssetBundles when a parent AssetBundle is loaded.”(当AssetBundle被加载的时候,Object会被assigned一个valide instance ID,因为这个instance ID是唯一的,所以AssetBundle的加载顺序并不重要,重要的是我们要确保所有Object依赖的Objects都被加载(Unity不会自动加载所有Child AssetBundles当Parent AssetBundle被加载的时候)) 下面以Material A引用Texture B为例。Material A被Packaged到了AssetBundle1,而Texture B被packaged到了AssetBundle2。 所以我们要使用Material A,我们不仅要加载AssetBundle1,还得确保在此之前我们加载了AssetBundle2里的Texture B
如何查询AssetBundle里的Dependecy信息? Depending on the runtime environmen:
Editor AssetDatabase API(Query AssetBundle dependencies) AssetImporter API(Access and change AssetBundle assignments and dependencies)
Runtime AssetBundleManifest API(load the dependency information of AssetBundle) AssetBundleManifest.GetAllDependencies AssetBundleManifest.GetDirectDependencies Note: “Both of these APIs allocate arrays of strings. Use them sparingly, and preferably not during performance-sensitive portions of an application’s lifetime.”(因为上述API会分配大量的string字符串,所以要尽量少用并且避开性能敏感的时期)
if (manifest == null) { Debug.Log(string.Format("Failed to load {0}.manifest!", bundlename)); yieldbreak; }
//try to instantiate backgroundimage assetbundle //but need to load dependencies assetbundle first Debug.Log("Instantiate BackgroundImage.prefab");
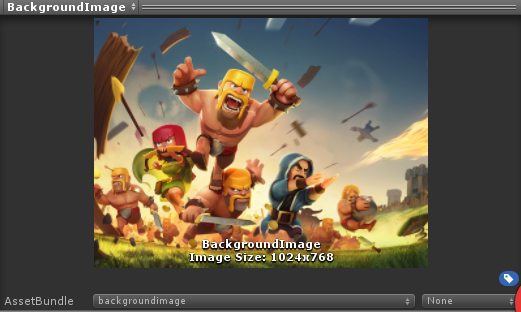
var backgroundbundlename = "backgroundimage"; var backgroundimagerequest = AssetBundle.LoadFromFileAsync(Path.Combine(Application.streamingAssetsPath, backgroundbundlename));
yieldreturn backgroundimagerequest;
if (backgroundimagerequest == null) { Debug.Log(string.Format("Load {0} falied!", "backgroundimagerequest")); }
var backgrounddependencies = manifest.GetAllDependencies(backgroundbundlename); if (backgrounddependencies.Length == 0) { Debug.Log("dependencies.length == 0"); }
//Load dependencies assetbundle first foreach (string dependency in backgrounddependencies) { Debug.Log("Dependency : " + dependency); var dependencyabrequest = AssetBundle.LoadFromFileAsync(Path.Combine(Application.streamingAssetsPath, dependency)); yieldreturn dependencyabrequest; AssetBundle dependencyab = dependencyabrequest.assetBundle; if (dependencyab == null) { Debug.Log(string.Format("Load {0} failed!", dependency)); yieldbreak; } }
//Once load all dependencies assetbundle, we can instantiate the gameobject in assetbundle var backgroundprefabrequest = backgroundimageassetbundle.LoadAssetAsync("BackgroundImage.prefab"); yieldreturn backgroundprefabrequest; if(backgroundprefabrequest == null) { Debug.Log(string.Format("Load {0} faled!", "BackgroundImage.prefab")); }
//After complete using AssetBundle, always remember unload it, //otherwise you can not load it again due to it has exists in memory assetbundle.Unload(false); } }
上面仅仅是以本地读取作为事例,了解了如何去访问AssetBundle以及manifest里的信息以及如何实例化AssetBundle里的资源。 那么如何判断AssetBundle是否需要更新了? 这里我们可以利用Built-in caching去实现版本更新判断。 “AssetBundle caching system that can be used to cache AssetBundles downloaded via the WWW.LoadFromCacheOrDownload or UnityWebRequest APIs.”(AssetBundle caching system可以帮助我们缓存加载了的AssetBundle而无需每次都重新加载) 而AssetBundle caching system是根据AssetBundle的version number来决定时是否下载新的AssetBundle。(AssetBundleManifest API支持通过MD5算法去计算出AssetBundle的version number,这样一来每次AssetBundle有变化都会得到一个新的Hash version number)
“AssetBundles in the caching system are identified only by their file names, and not by the full URL from which they are downloaded.”(AssetBundles在Caching system里是通过文件名来标识的跟URL无关,所以无论AssetBundle放在服务器哪里都没有关系)
Cach相关的API控制:
Caching.expirationDelay “The minimum number of seconds that must elapse before an AssetBundle is automatically deleted. If an AssetBundle is not accessed during this time, it will be deleted automatically.”(AssetBundle可允许被删除的未使用时间,只有未被使用的时间达到了才能才被删除)
Caching.maximumAvailableDiskSpace “The amount of space on local storage that the cache may use before it begins deleting AssetBundles that have been used less recently than the expirationDelay. It is counted in bytes.”(Caching内存使用上限)
Note: “As of Unity 5.3, control over the built-in Unity cache is very rough. It is not possible to remove specific AssetBundles from the cache. They will only be removed due to expiration, excess disk space usage, or a call to Caching.CleanCache. (Caching.CleanCache will delete all AssetBundles currently in the cache.) “(Caching System还不完善,所以还不允许删除特定AssetBundle,而只能通过Caching.CleanCache去删除所有的AssetBundle)
Cache Priming: Steps:
Store the initial or base version of each AssetBundle in /Assets/StreamingAssets/
Loading AssetBundles from Application.streamingAssetsPath the first time the application is run
Call WWW.LoadFromCacheOrDownload or UnityWebRequest normally.
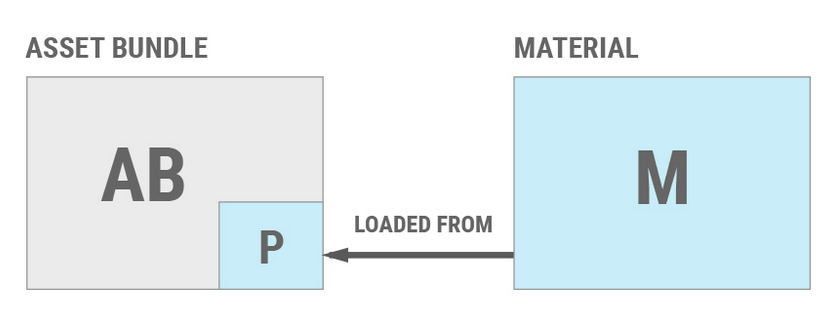
那么在使用AssetBundle的过程中,我们应该遵循后续讲到的内容(大部分翻译至官网,翻译不太对的地方欢迎指出): Managing Loaded Assets: “If an AssetBundle is unloaded improperly, it can cause Object duplication in memory. Improperly unloading AssetBundles can also result in undesirable behavior in certain circumstances.”(不合理的释放Object会导致在内存中重复创建Object。同时也可能导致非预期的问题(比如texture丢失))
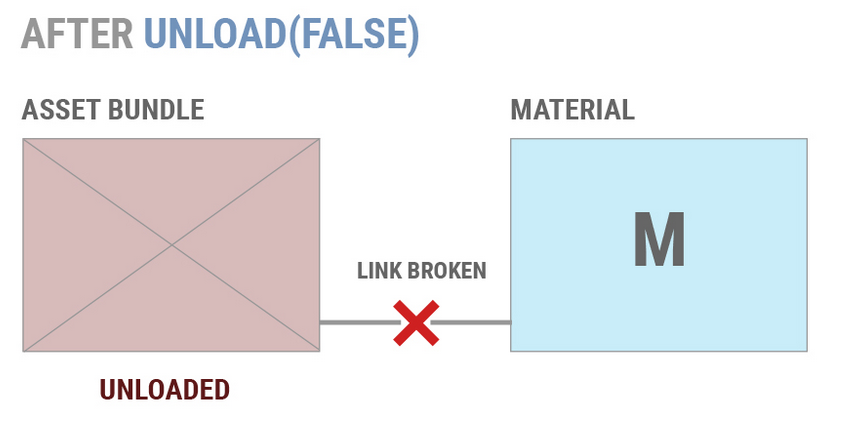
对于AssetBundle里Assets管理,这里需要强调的一个API是AssetBundle.Unload(bool); Unloads all assets in the bundle. Unload frees all the memory associated with the objects inside the bundle. 当传递true的时候所有从AssetBundle里实例化的Object都会被unload。传递false则只释放AssetBundle资源。
那么这里释放的AssetBundle资源是哪些了? 还记得之前提到的AssetBundle的组成吗(header & data segment)
Eliminate all references to an unwanted Object, both in the scene and in code. After this is done, call Resources.UnloadUnusedAssets.(取消所有引用,并调用Resources.UnloadUnusedAssets)
Load a scene non-additively. This will destroy all Objects in the current scene and invoke Resources.UnloadUnusedAssets automatically.(切换Scene,触发Resources.UnloadUnusedAssets)
“Another problem can arise if Unity must reload an Object from its AssetBundle after the AssetBundle has been unloaded. In this case, the reload will fail and the Object will appear in the Unity Editor’s hierarchy as a (Missing) Object.”(当AssetBundle被释放后,如果再从该AssetBundle里加载Object会加载失败,出现missing object)
Distribution: Two basic ways to distribute a project’s AssetBundles to clients:
Installing them simultaneously with the project
Downloading them after installation. 使用哪一种方式,主要取决于平台需求。 “Mobile projects usually opt for post-install downloads to reduce initial install size and remain below over-the-air download size limits. Console and PC projects generally ship AssetBundles with their initial install.”(手机上为了减少安装程序大小,通常选择post-installation。而PC不担心硬盘不够,所以通常选择initial install)
Shipped with Project: “To reduce project build times and permit simpler iterative development. If these AssetBundles do not need to be updated separately from the application itself, then the AssetBundles can be included with the application by storing the AssetBundles in Streaming Assets.”(和程序一起更新的AssetBundle可以放在streaming assets伴随程序一起打包发布)
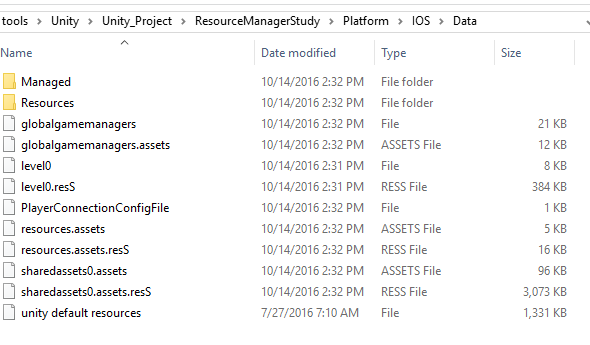
Streaming Assets: “The easiest way to include any type of content within a Unity application at install time is to build the content into the /Assets/StreamingAssets/ folder, prior to building the project. Anything contained in the StreamingAssets folder at build time will be copied into the final application. This folder can be used to store any type of content within the final application, not just AssetBundles.”(可以看出Streaming Assets被存放在/Assets/StreamingAssets/目录下,最终会被打包到应用程序里)
Note: “Android Developers: On Android, Application.streamingAssetsPath will point to a compressed .jar file, even if the AssetBundles are compressed. In this case, WWW.LoadFromCacheOrDownload must be used to load each AssetBundle.”(在Android上,streamingAssetsPath指向的是压缩后的.jar文件,所以我们需要采用LoadFromCacheOrDonwload去解压读取(5.3及以后可以采用UnityWebRequest’s DonwloadHandleAssetBundle))
“Streaming Assets is not a writable location on some platforms. If a project’s AssetBundles need to be updated after installation, either use WWW.LoadFromCacheOrDownload or write a custom downloader. “(因为Streaming Assets在一些平台上是一个不可写的位置,所以我们如果还需要更新该AssetBundle,我们而已通过WWW.LoadFromCacheOrDonwload或则自己编写custom downloader)
Donwloaded post-install: 手机上出于程序安装大小考虑多采用这个方案。 同时AssetBundle通过WWW.LoadFromCacheOrDownload or UnityWebRequest的更新可以快速方便的更新一些经常变化的资源。 更多内容参见
Asset Assignment Strategies: The key decision is how to group Objects into AssetBundles. The primary strategies are:
Split frequently-updated Objects into different AssetBundles than Objects that usually remain unchanged
Group together Objects that are likely to be loaded simultaneously
Patching with AssetBundles: “Patching AssetBundles is as simple as downloading a new AssetBundle and replacing the existing one.”(Patching AssetBundles用于实现动态替换一些资源很方便)
实战学习使用AssetBundle Manager: 首先粗略的了解下AssetBundle Manager提供的一些API: Initialize() – Initializes the AssetBundle manifest object.(初始化AssetBundle Manifest Object) LoadAssetAsync() – Loads a given asset from a given AssetBundle and handles all the dependencies.(加载特定Asset,并负责处理器所有的dependencies) LoadLevelAsync() – Loads a given scene from a given AssetBundle and handles all the dependencies.(加载特定scene,并负责处理所有的dependencies) LoadDependencies() – Loads all the dependent AssetBundles for a given AssetBundle.(加载AssetBundle所依赖的所有dependencies) BaseDownloadingURL – Sets the base downloading url which is used for automatic downloading dependencies.(设置dependencies下载url) SimulateAssetBundleInEditor – Sets Simulation Mode in the Editor.(设置editor的模拟模式) Variants – Sets the active variant.(设置激活的variants) RemapVariantName() – Resolves the correct AssetBundle according to the active variant.
那么Object什么情况下才会被加载到游戏里了? An Object will be loaded on-demand the first time its Instance ID is dereferenced if two criteria are true:(当Instance ID被间接引用同时满足以下两个条件的时候,Object会被加载)
The Instance ID references an Object that is not currently loaded(Instance ID引用的Object还没加载)
The Instance ID has a valid File GUID and Local ID registered in the cache(Instance ID拥有的File GUID和Local ID已经存在于cache里)
什么情况下,Object会被unloaded了? Objects are unloaded in three specific scenarios(Object被Unloaded的三种情况):
Objects are automatically unloaded when unused Asset cleanup occurs.(比如Application.LoadLevel() Rersources.UnloadUnusedAssets()调用的时候,Object会被自动unloaded)
Objects sourced from the Resources folder can be explicitly unloaded by invoking the Resource.UnloadAsset API.(主动调用Resource API去unload resoures下的object)
Objects source from Asset Bundles are automatically and immediately unloaded when invoking the AssetBundle.Unload(true) API.(这样会导致AssetBundle里的Objects InstanceID的引用无效) 具体Resource API如何影响Object的的生命周期,还需进一步学习,参考文档AssetBundle
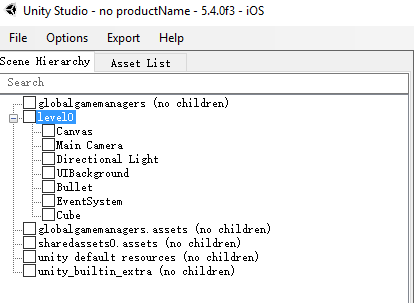
知道了Resources的生命周期和如何被映射缓存的,那么如何才能以高效的方式存储resources了? Loading Large Hierarchies(当我们制作一个复杂的Resources时): “When serializing hierarchies of Unity GameObjects (such as when serializing prefabs), it is important to remember that the entire hierarchy will be fully serialized.”(当序列化Unity GameObject的时候,所有存在于hierarchy下的GameObject都会被一一序列化。)
When creating any GameObject hierarchy, CPU time is spent in several different ways:
Time to read the source data (from storage, from another GameObject, etc.)
Time to set up the parent-child relationships between the new Transforms
Time to instantiate the new GameObjects and Components
Time to awaken the new GameObjects and Components 我们的关注点放到第一点上,数据的读写方式对后面三点影响不大,第一点跟数据的读写方式和数据的大小紧密相关。 “On all current platforms, it is considerably faster to read data from elsewhere in memory rather than loading it from a storage device. “(所有平台上,从内存中读取都比从存储设备去读取快,当然不同的平台的读取速度会有一些差别)
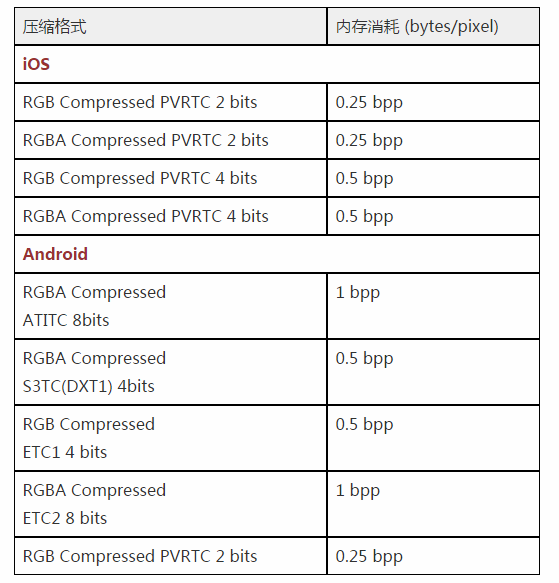
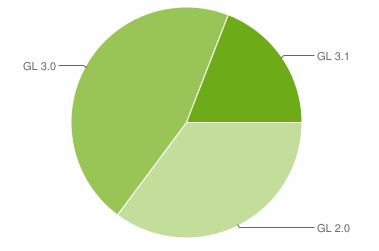
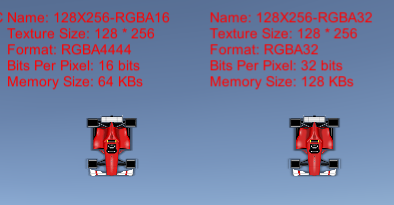
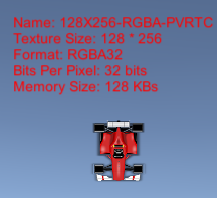
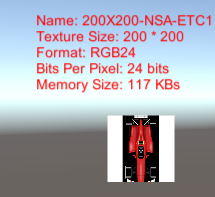
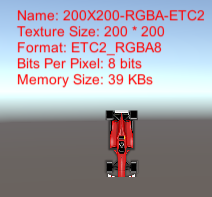
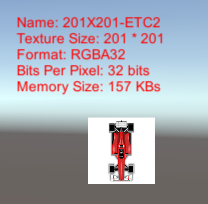
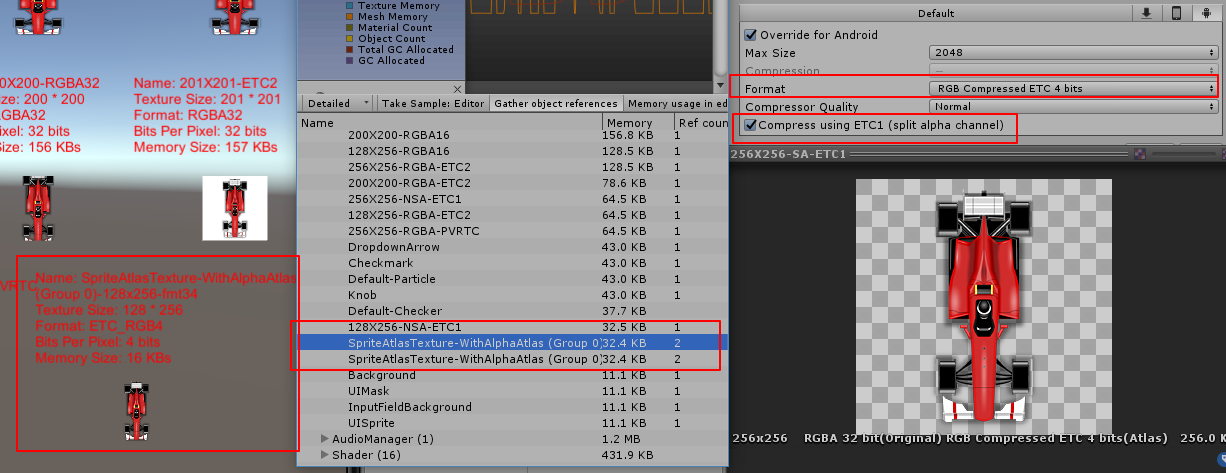
ETC1主要是用于RGB的24-bit数据压缩(Note:不包含Alpha通道,在OpenGL ES 2.0就要求支持,所以基本是所有Android机型通用。参考:GL_OES_compressed_ETC1_RGB8_texture。ETC1想要配合使用Alpha信息需要拆成两张图,一张RGB,一张A。)
ETC2在兼容ETC1的基础上支持了Alpha通道的压缩(Note:ECT2至少要OpenGL ES 3.0 参考:ETC2 Compression)
///<summary> /// 获取指定纹理压缩格式的Bits Per Pixel(多少bit每像素) ///</summary> ///<param name="textureformat"></param> ///<returns></return>s publicstaticintGetTextureFormatBitsPerPixel(TextureFormat textureformat) { switch(textureformat) { case TextureFormat.ETC_RGB4: return4; case TextureFormat.ETC2_RGB: case TextureFormat.ETC2_RGBA8: return8; case TextureFormat.PVRTC_RGB4: case TextureFormat.PVRTC_RGBA4: return4; case TextureFormat.ARGB4444: case TextureFormat.RGBA4444: case TextureFormat.RGB565: return16; case TextureFormat.RGB24: return24; case TextureFormat.RGBA32: case TextureFormat.ARGB32: return32; default: Debug.LogErrorFormat("没有被包含的纹理压缩格式:{0},无法返回对应BitsPerPixel信息,请自己添加。", textureformat); return0; } } }
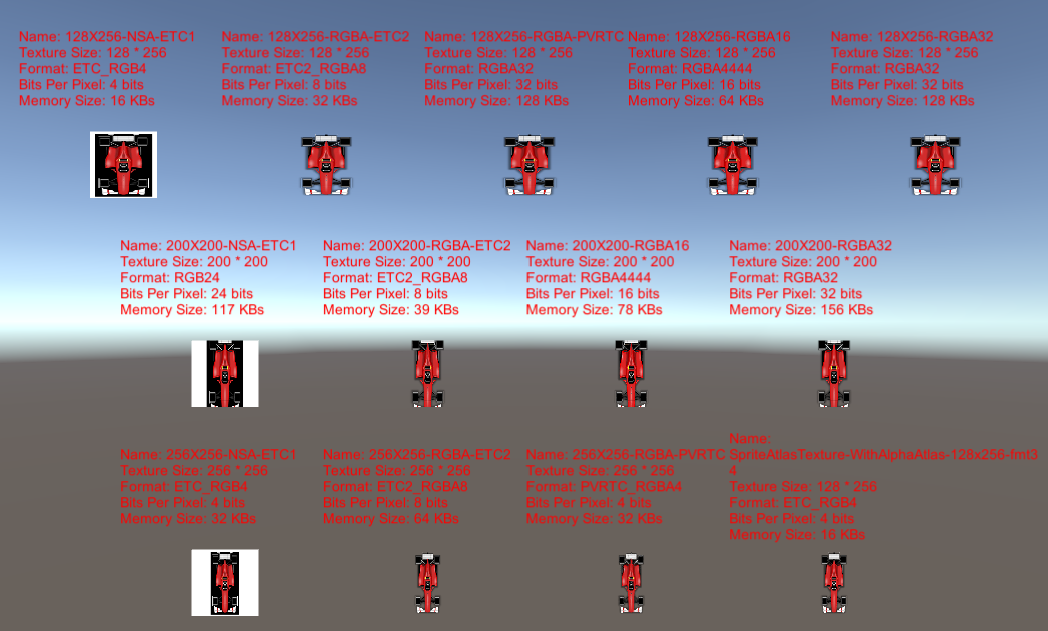
输出结果:
从上面我们可以看出以下几个结论:
纹理的大小主要取决于纹理压缩格式和自身宽高,纹理压缩格式所占的Bits Per Pixel越大,纹理内存占用越大。
XCode project is generated by Unity with all the required libraries, precompiled .NET code and serialized assets.(打包所有需要的库和资源生成XCode项目) 第一步是通过Unity的Building Settings设定IOS平台点击Build生成
XCode project is built by XCode and deployed and run on the actual device.(编译Xcode项目安装到设备上) 第二部必须在Mac上执行(或者黑苹果),因为需要用到IOS SDK和XCode编译器
Cloud Build
关于Cloud Build让我们直接看看官网的介绍吧: What is Unity Cloud Build? A service that automates the build pipeline for Unity games.(自动化编译打包服务 – Build Machine)
Why Should I Use Cloud Build? By using Cloud Build automation services, you will - Save Time. Builds are compiled and distributed automatically, minimizing manual work and intervention. Games with multiple platforms can be consolidated into a single build process.
Improve Quality. Games are built continuously as changes are detected (“Continuous Integration”), enabling detection of issues as they are introduced to the project. - Distribute Faster. Cloud-based infrastructure compiles builds; in parallel if for multi platform projects. Completed builds are available to download by anyone on the team through Cloud Build’s website.(快捷方便,自动化检测变化进行编译打包。每个人都可以自己去下载安装对应的版本)
How does Unity Cloud Build work? Unity Cloud Build monitors your source control repository (e.g. Git, Subversion, Mercurial, Perforce). When a change is detected, a build is automatically generated by Cloud Build. When the build is completed, you and your team are notified via email. Your build is hosted by Unity for you and your team mates. If the build is not successful, you’re also notified and provided with logs to begin troubleshooting.(通过检测Git等工具上传变化,自动触发编译打包流程,完成或出错的时候有邮件提醒和log)
What do I need to use Unity Cloud Build? 使用Unity Cloud Build我们必须先选择一个版本管理器 Git, Subversion, Mercurial, Perforce 这里我使用Git。
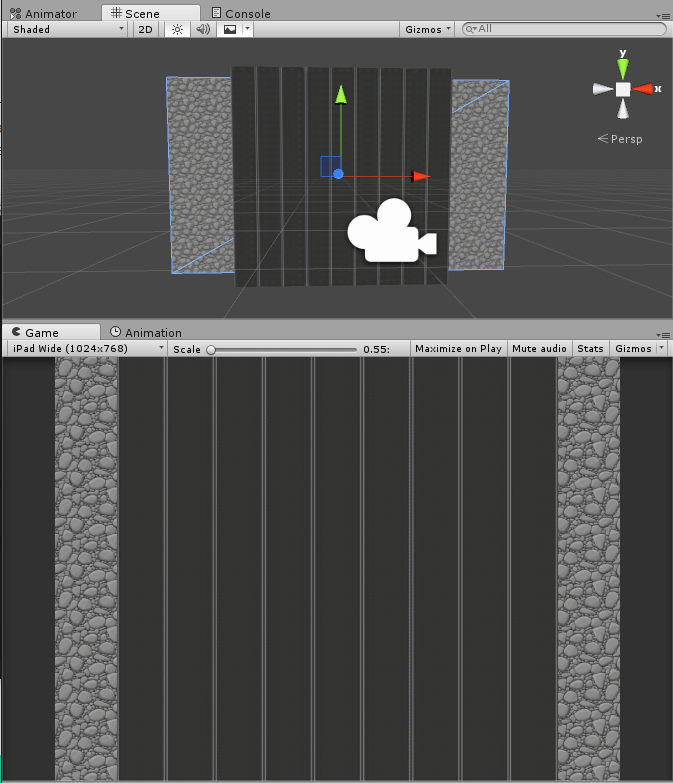
// Update is called once per frame voidUpdate () { float y = Mathf.Repeat(Time.time * mScrollSpeed, 1); Vector2 offset = new Vector2(0.0f, y); if(mBackgroundMeshRender != null) { mBackgroundMeshRender.material.mainTextureOffset = offset; } else { Debug.Log("This script only works with Gameobject that contains MeshRenderer and Material."); } }
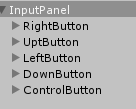
// Use this for initialization voidStart () { InputControllerManager.mInputControllerManager.RightButtonClickDelegate(MoveRight); InputControllerManager.mInputControllerManager.LeftButtonClickDelegate(MoveLeft); InputControllerManager.mInputControllerManager.UpButtonClickDelegate(MoveUp); InputControllerManager.mInputControllerManager.UpButtonOnPressDelegat(KeepMoveUp); InputControllerManager.mInputControllerManager.DownButtonClickDelegate(MoveDown); InputControllerManager.mInputControllerManager.DownButtonOnPressDelegat(KeepMoveDown); InputControllerManager.mInputControllerManager.ControlButtonClickDelegate(Jump);
StartCoroutine(MoveUpCoroutine()); StartCoroutine(MoveDownCoroutine()); } // Update is called once per frame voidUpdate () { }
privatevoidMoveRight(GameObject go) { if (mIsTweenComplete == true && mIsCrash == false) { Vector2 start = new Vector2(transform.position.x, transform.position.y); mTargetPosition = transform.position + mHorizontalOffset; Vector2 end = new Vector2(mTargetPosition.x, mTargetPosition.y); RaycastHit2D hit = Physics2D.Linecast(start, end, mBolockingLayer); if(hit.transform == null) { if (mPlayerCarAnimator != null) { mPlayerCarAnimator.SetTrigger("IsTurningRight"); } mIsTweenComplete = false; transform.DOMove(mTargetPosition, mMoveTweenTime).OnComplete(OnTweenComplete); } } }
privatevoidMoveLeft(GameObject go) { if (mIsTweenComplete == true && mIsCrash == false) { Vector2 start = new Vector2(transform.position.x, transform.position.y); mTargetPosition = transform.position - mHorizontalOffset; Vector2 end = new Vector2(mTargetPosition.x, mTargetPosition.y); RaycastHit2D hit = Physics2D.Linecast(start, end, mBolockingLayer); if (hit.transform == null) { if (mPlayerCarAnimator != null) { mPlayerCarAnimator.SetTrigger("IsTurningLeft"); } mIsTweenComplete = false; mTargetPosition = transform.position - mHorizontalOffset; transform.DOMove(mTargetPosition, mMoveTweenTime).OnComplete(OnTweenComplete); } } }
voidStart() { mEnemyCarTwoDimensionList = new List<List<GameObject>>();
for (int i = 0; i < mEnemyCar.Length; i++) { List<GameObject> enemycarlist = new List<GameObject>(mAmountForEachEnemyCar); for(int j = 0; j < mAmountForEachEnemyCar; j++) { GameObject enemycarobj = Instantiate(mEnemyCar[i]) as GameObject; enemycarobj.SetActive(false); enemycarlist.Add(enemycarobj); } mEnemyCarTwoDimensionList.Add(enemycarlist); } }
public GameObject GetEnemyCarObject(int carindex) { for (int i = 0; i < mEnemyCarTwoDimensionList[carindex].Count; i++) { if (!mEnemyCarTwoDimensionList[carindex][i].activeInHierarchy) { mEnemyCarTwoDimensionList[carindex][i].SetActive(true); return mEnemyCarTwoDimensionList[carindex][i]; } }
if (mWillGrow) { GameObject enemycar = Instantiate(mEnemyCar[carindex]) as GameObject; mEnemyCarTwoDimensionList[carindex].Add(enemycar); return enemycar; }
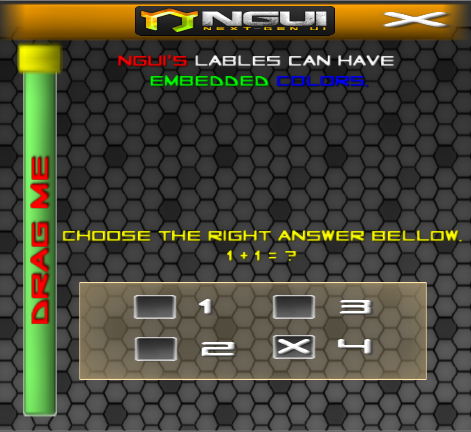
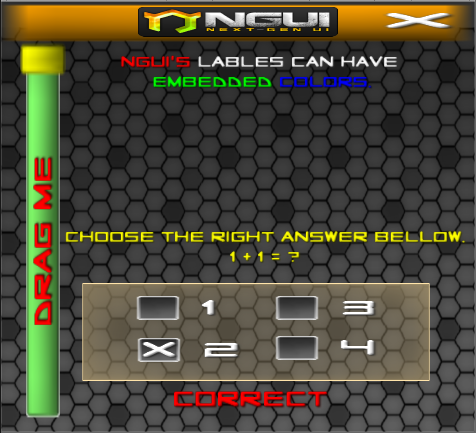
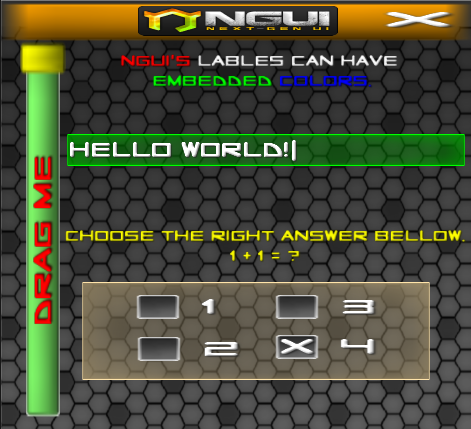
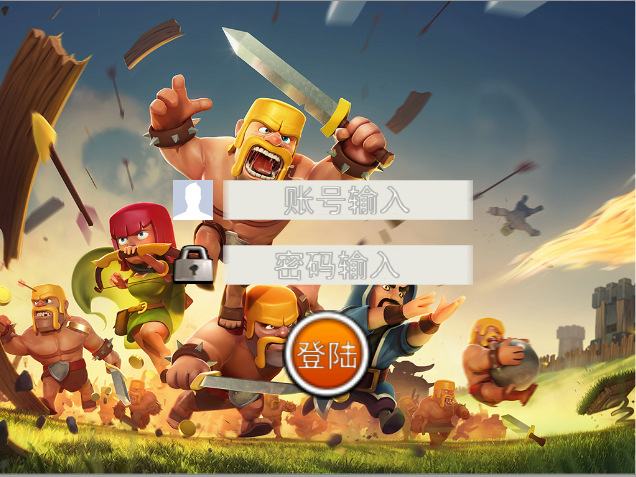
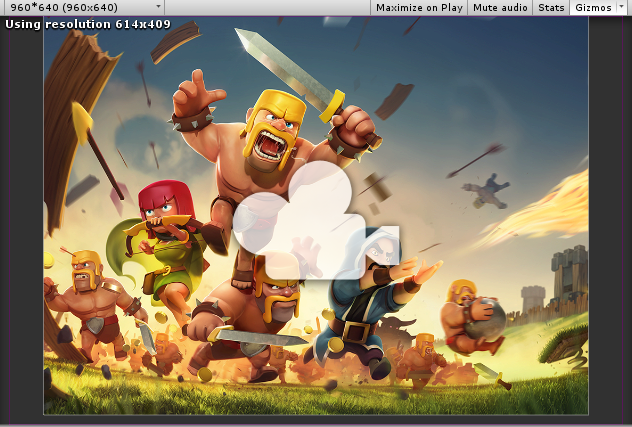
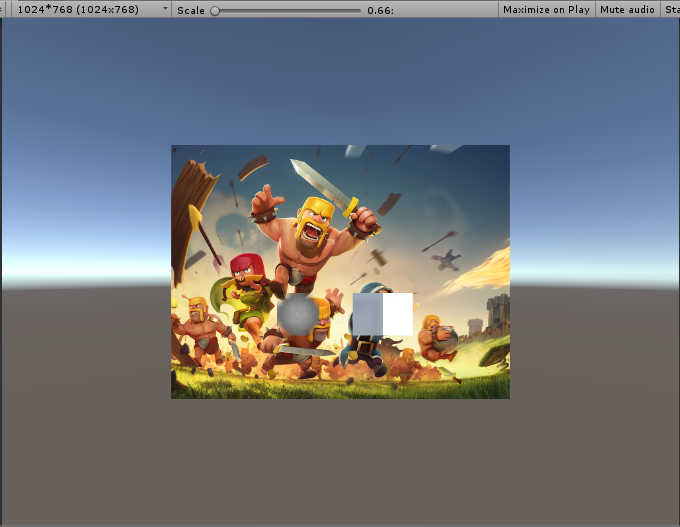
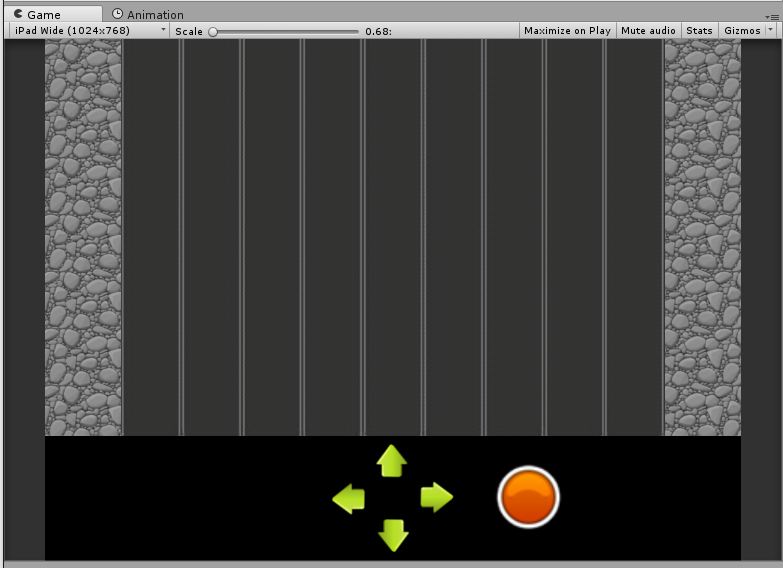
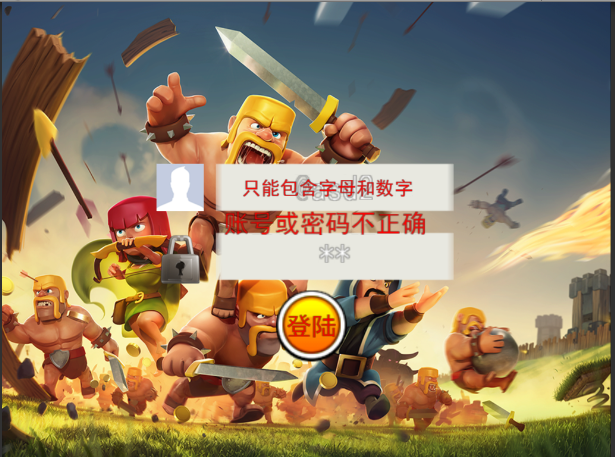
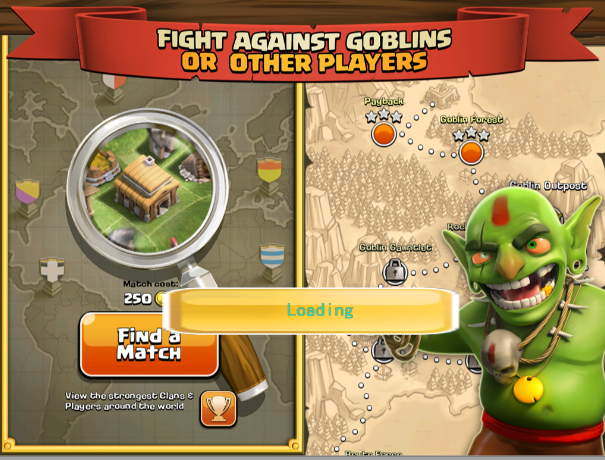
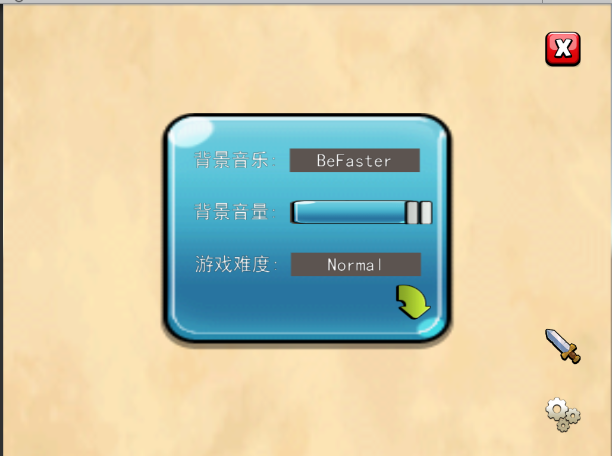
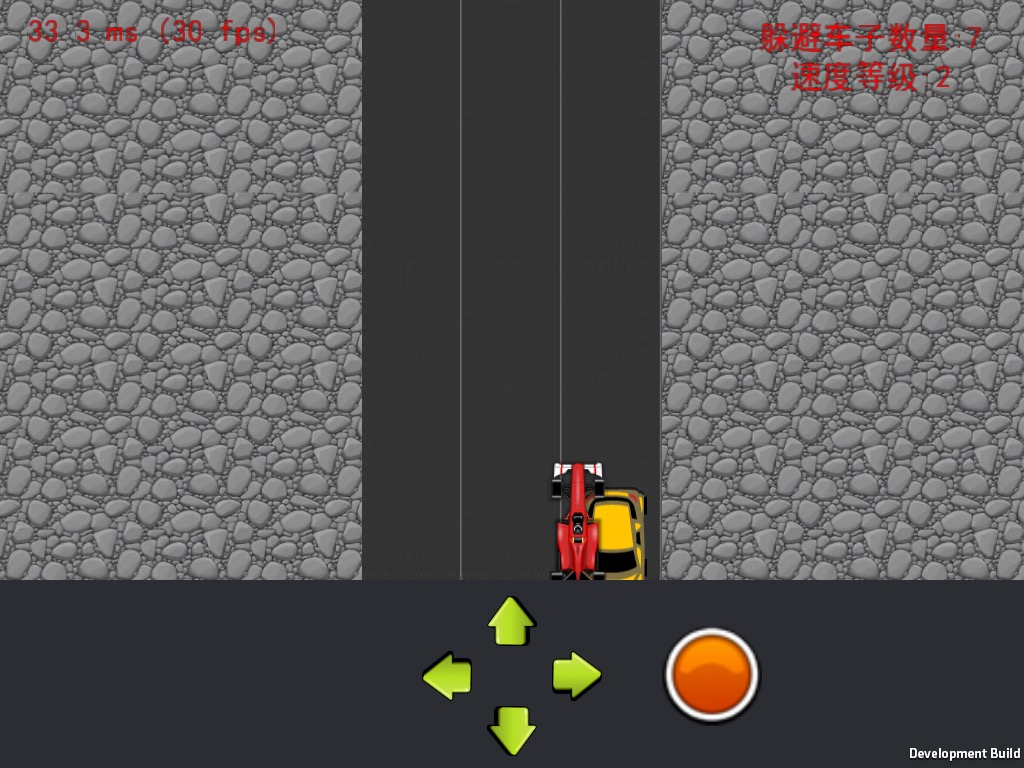
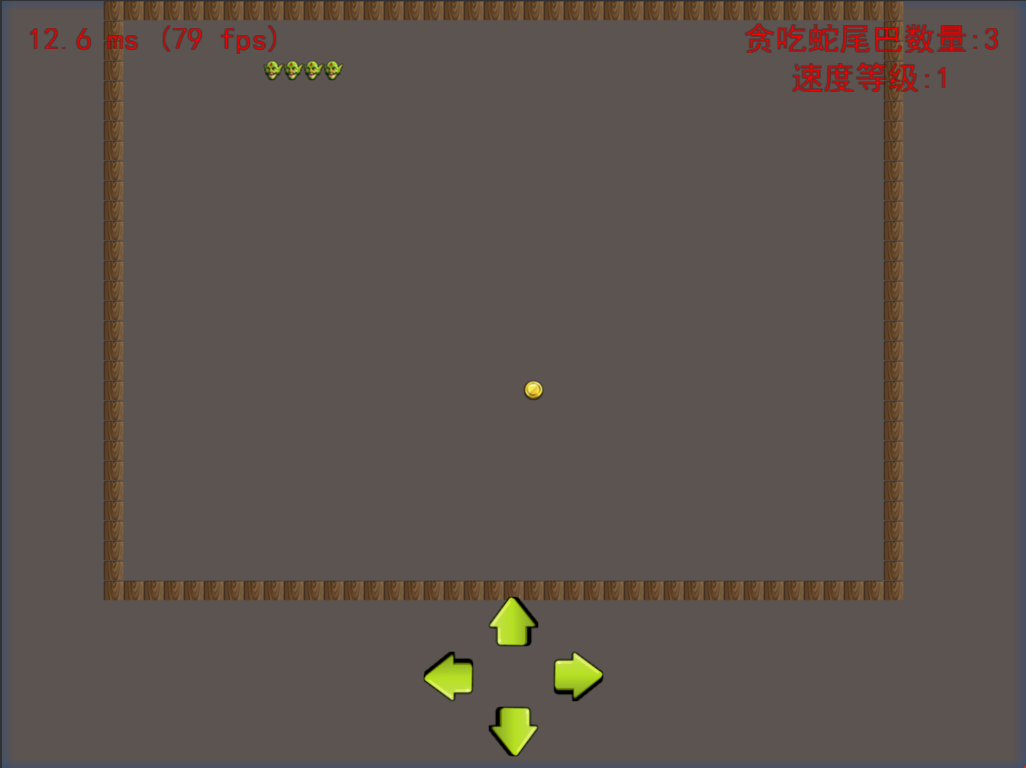
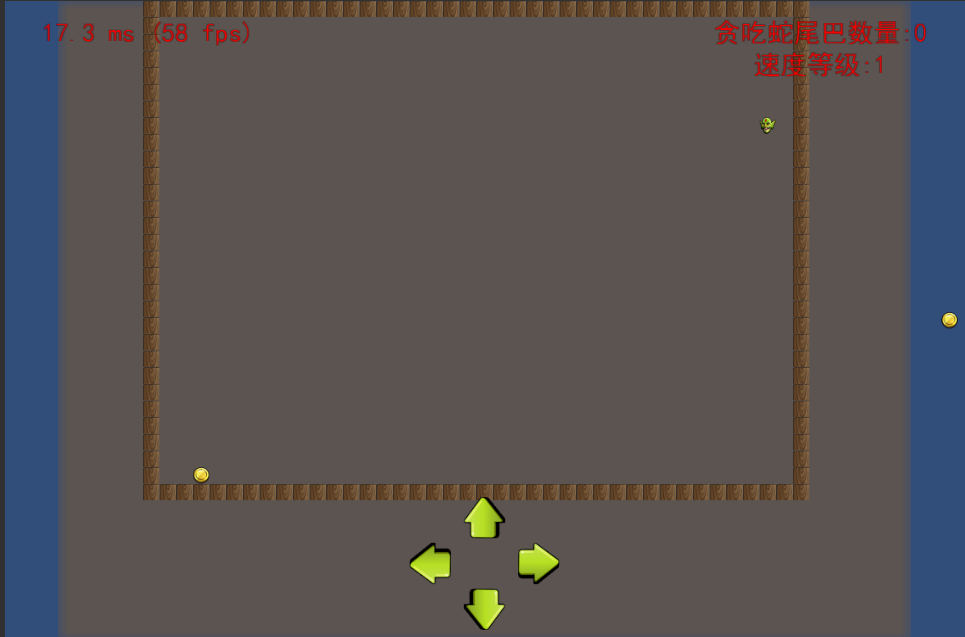
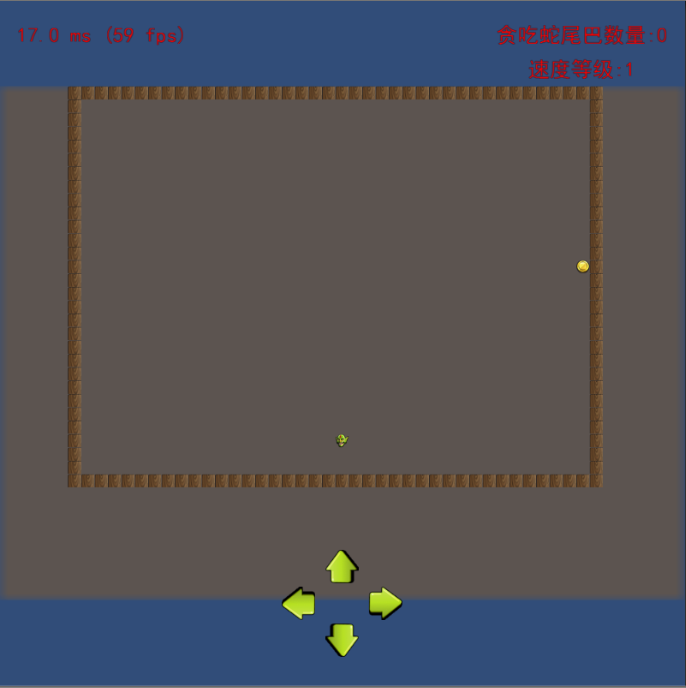
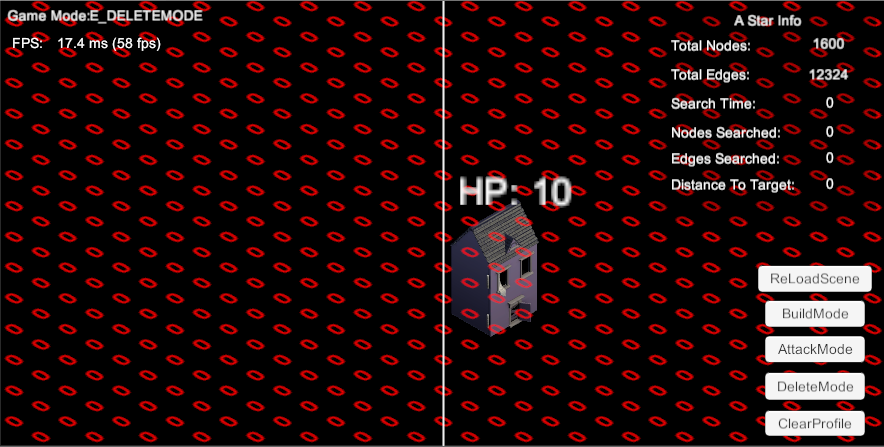
最终游戏截图(大部分游戏UI素材选至COC): 出于是学习使用旧版的NGUI,所以上述UI并没有实际的账号注册检查,只实现了简单的输入文字要求和账号对错(账号暂时是硬代码写的,PC上是通过读取Excel(使用的是ExcelReader,参考ExcelRead website),真机对应功能还没做)检查。 这一个主要是尝试Scroll Bar 这三个主要是尝试UIBUtton,UIPopupList,UIISlider,UIDraggable Panel的使用和TweenPosition制作简单UI动画(包含了对背景音乐和音量的设置功能,存储采取PlayerPrefs写入程序文件)。 最后这一个是本章2D赛车躲避的最终真机(Ipad mini 1)游戏截图,主要实现了赛车跳跃,前后左右移动,随着赛车数量躲避增加游戏速度增加,限制了移动范围。
编译打包XCode项目出问题 Failed to Copy File / Directory from ‘**\Unity\Editor\Data\Tools/MapFileParser/MapFileParser’ to ‘Temp/StagingArea\Trampoline\MapFileParser’. 这是Unity 5.1版本的一个bug。 解决方案 修改.\Unity\Editor\Data\Tools\MapFileParser\MapFileParser.exe到MapFileParser然后打包XCode项目,然后在XCode项目里把MapFileParser改回MapFileParser.exe 或者使用新版本Unity
编译打包XCode项目时库找不到的问题 ArgumentException: The Assembly System.Configuration is referenced by System.Data. But the dll is not allowed to be included or could not be found. 解决方案 Change it from .NET sub 2.0 to .NET
指定Android NDK的时候报错”Unable to detect NDK version, please pick a different folder” 解决方案: 需要下载特定版本的NDK 10r Edit -> Preference -> External Tool -> NDK download 或者 自己去下载后指定目录
XCode编译项目报错:MapParser.sh: bin/sh^M: bad interpreter: no such file or directory 解决方案 这是不同系统编码格式引起的:在windows系统中编辑的.sh文件可能有不可见字符,所以在Linux系统下执行会报以上异常信息。 使用dos2unix工具转换字符编码后放到Xcode项目里。(为了避免XCode生成每次都出这个问题,我们替换字符编码为Unix位于Unity引擎里的Editor->Data->PlaybackEngines->iOSSupport->Trampoline->MapFileParser.sh)
Unity Cloud Build error:”2015-12-10 17:21:27.407 xcodebuild[7363:75765] Failed to locate a valid instance of CoreSimulatorService in the bootstrap. Adding it now. Could not find service “com.apple.CoreSimulator.CoreSimulatorService” in domain for uid: 502 2015-12-10 17:21:27.431 xcodebuild[7363:75765] launchctl print returned an error code: 28928” 解决方案 从上面链接发现这是Xcode 7.2的一个bug,我们需要用Xcode 7.3,所以我们只需要把Unity Cloud Build设置到Xcode 7.3即可。
Unity Icloud Build打包出来的.ipa文件很大 一. 关闭Bitcode 关闭Bitcode Bitcode好像是Apple提交App后用于帮助优化的数据,IOS上是optional的,但watchOS and tvOS apps是必须的。
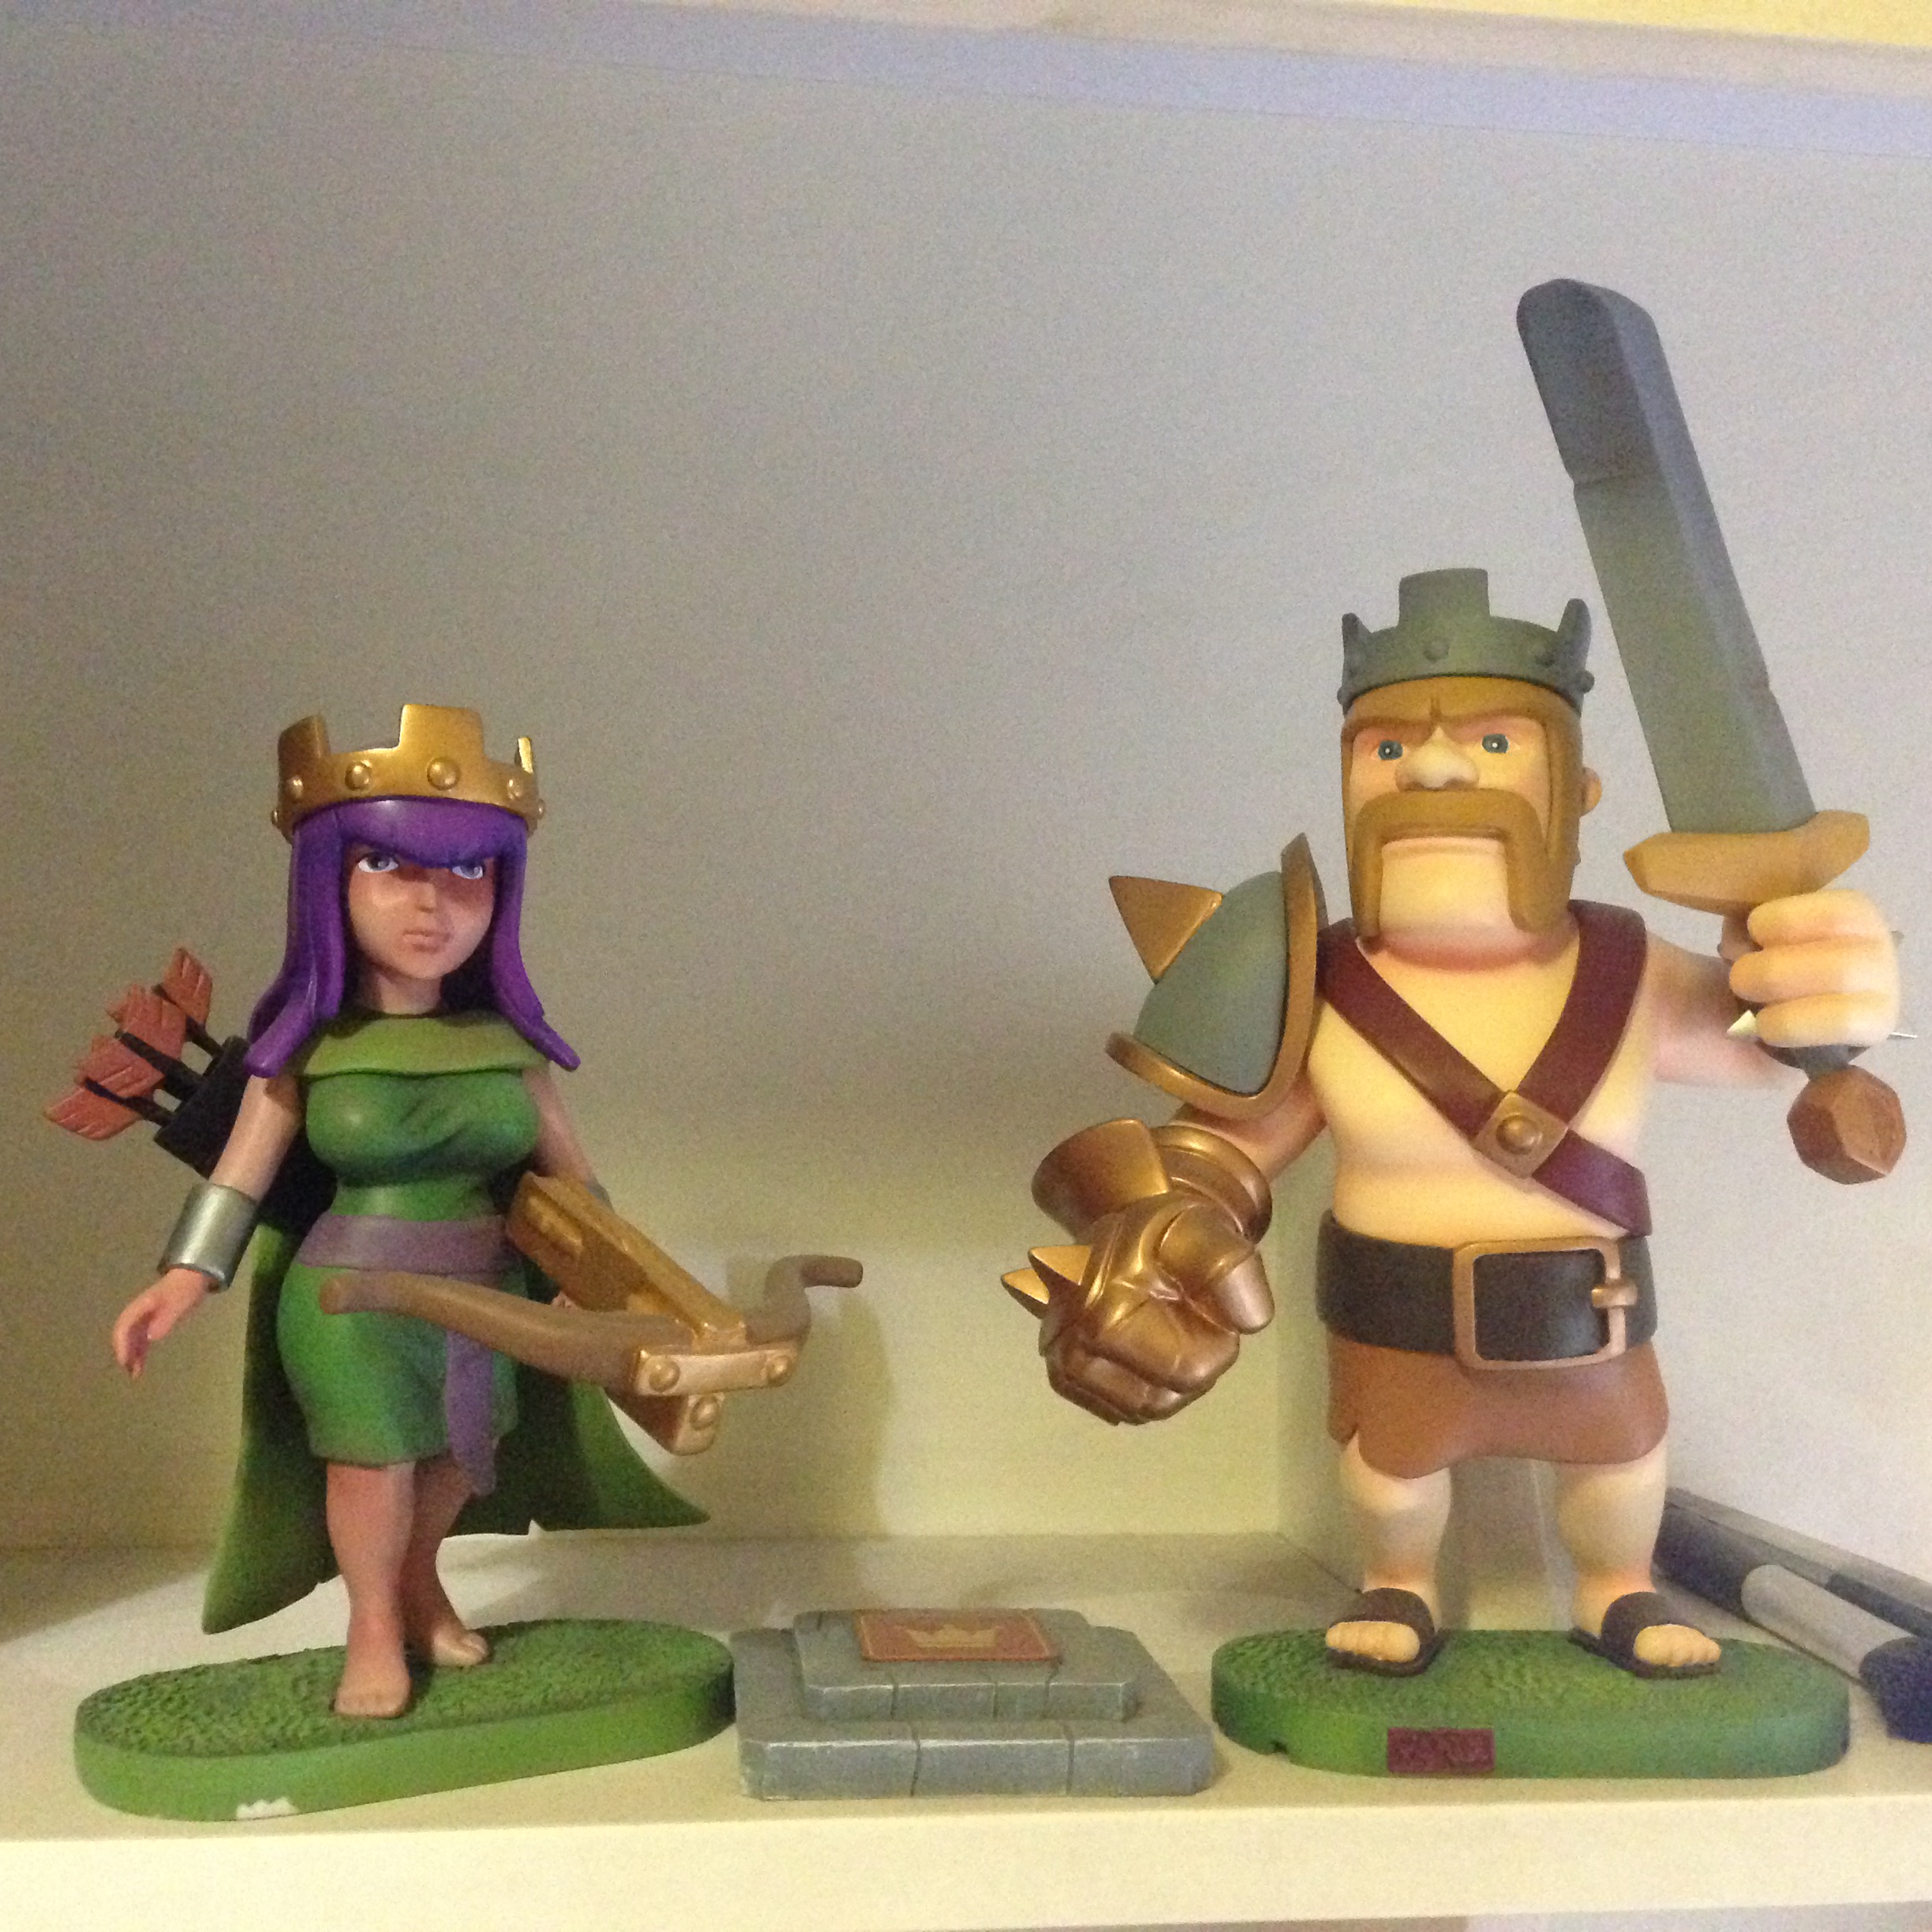
COC(Clash of Clans) is a freemium mobile MMO strategy video game developed and published by Supercell.The game was released for iOS platforms on 2 August, 2012,[1] and on Google Play for Android on 7 October, 2013 (from wiki)
The answer is 2D game,actually we should call 2.5D. 第一眼看到COC里面的所有动画人物给人的感觉都是3D的,但后来知道了Isometric Tileset Engine的概念。
Isometric Tileset Engine
What is Isometric Tileset Engine?
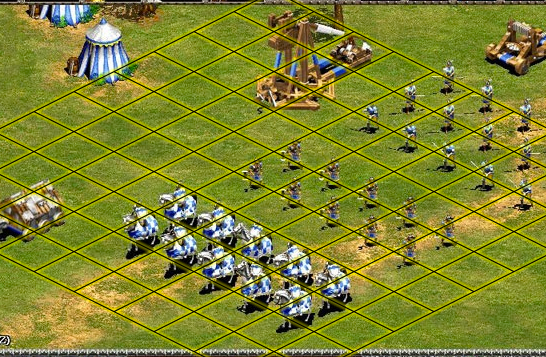
(斜视角游戏的地图渲染) (Isometric Tiles Introduction) 结合上述文章,我们可以知道,Isometric Tileset Engine主要是通过美术制作出Isometric Projection(we angle our camera along two axes (swing the camera 45 degrees to one side, then 30 degrees down))的2D图片来实现游戏的3D效果(2.5D)。
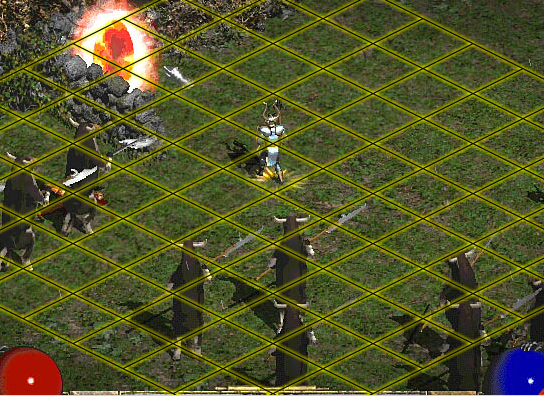
What does game with isometric projection look like?
典型的Isometric Projection游戏有: Age of Empires Diablo 2
UI的Render Mode主要分为三种 2.1 Screen Space – Overlay(Rendered on top of the secene) 2.2 Screen Space – Camera(有距离感的UI,受摄像机设置影响) 2.3 World Space(3D UI,有深度概念,会被3D物体遮挡)
voidStart() { mBBulletsList = new List<GameObject>(); mSBulletsList = new List<GameObject>();
for (int i = 0; i < mBBulletPoolAmount; i++) { GameObject bbulletobj = Instantiate(mBuildingBullet) as GameObject; bbulletobj.SetActive(false); mBBulletsList.Add(bbulletobj); }
for (int j = 0; j < mSBulletPoolAmount; j++) { GameObject sbulletobj = Instantiate(mSoldierBullet) as GameObject; sbulletobj.SetActive(false); mSBulletsList.Add(sbulletobj); } }
public GameObject GetBuildingBulletObject() { for (int i = 0; i < mBBulletsList.Count; i++) { if (!mBBulletsList[i].activeInHierarchy) { mBBulletsList[i].SetActive(true); return mBBulletsList[i]; } }
if (mWillGrow) { GameObject bbulletobj = Instantiate(mBuildingBullet) as GameObject; mBBulletsList.Add(bbulletobj); return bbulletobj; }
returnnull; }
public GameObject GetSoldierBulletObject() { for (int i = 0; i < mSBulletsList.Count; i++) { if (!mSBulletsList[i].activeInHierarchy) { mSBulletsList[i].SetActive(true); return mSBulletsList[i]; } }
if (mWillGrow) { GameObject sbulletobj = Instantiate(mSoldierBullet) as GameObject; mSBulletsList.Add(sbulletobj); return sbulletobj; }
[Serializable] publicclassSoldier : MonoBehaviour, GameObjectType { public SoldierState SCurrentState { set { if (mSCurrentState != null) { mSCurrentState.ExitState(); } mSCurrentState = value; mSCurrentState.EnterState(); } } [HideInInspector] private SoldierState mSCurrentState;
[HideInInspector] public SoldierAttackState mSAttackState;
[HideInInspector] public SoldierDeadState mSDeadState;
[HideInInspector] public SoldierMoveState mSMoveState;
......
publicvirtualvoidAwake() { mSAttackState = new SoldierAttackState(this);
mSMoveState = new SoldierMoveState(this);
mSDeadState = new SoldierDeadState(this);
...... }
publicvirtualvoidUpdate() { if (gameObject) { mSCurrentState.UpdateState(); } }
...... }
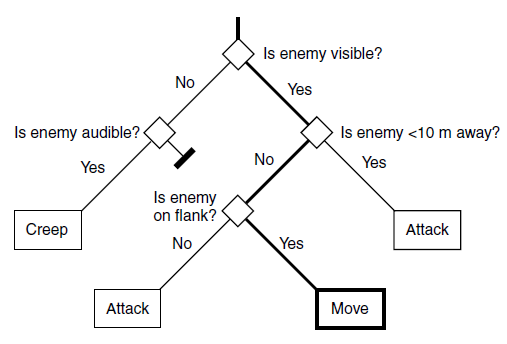
Decision Trees(决策树 – 用于简单的AI(Decision making)) Decision Trees主要用于AI体做决策,通过对已知数据的分析判断,根据Decision Tree抉择出最终的决定(即AI行为)。(项目里我主要使用FSM而非Decision Trees) 下图来源:《Artificial Intelligence for Game》 – Ian Millington
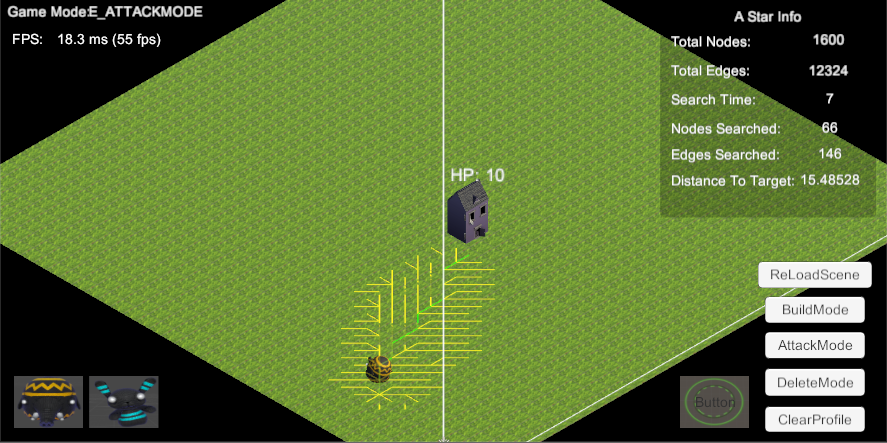
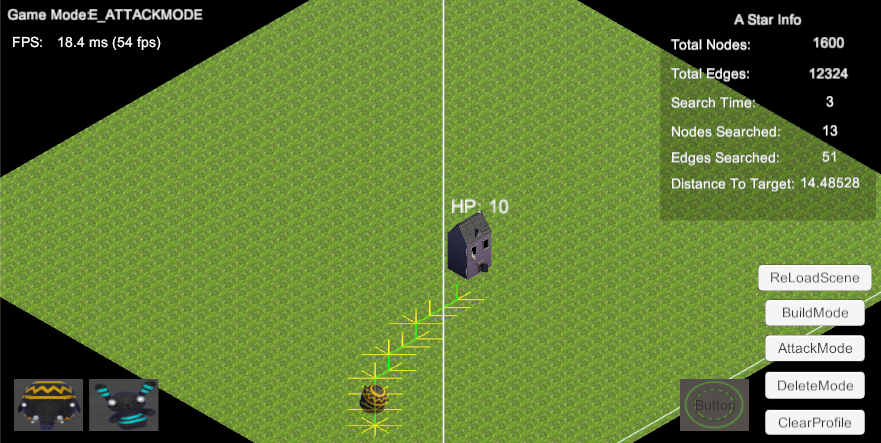
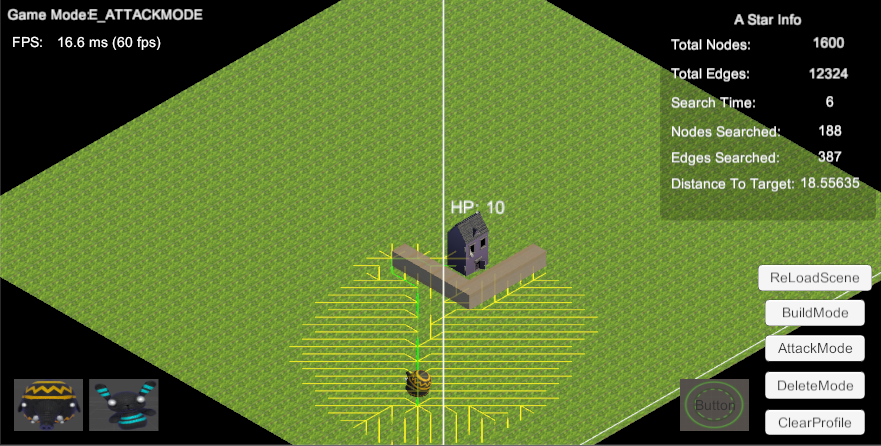
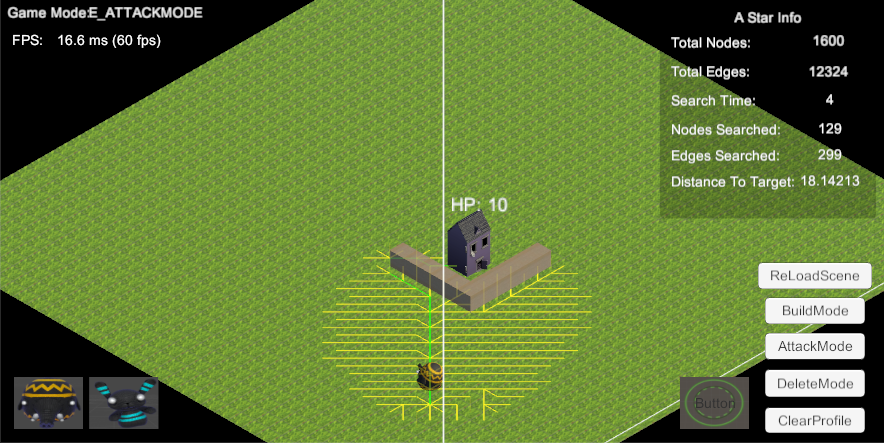
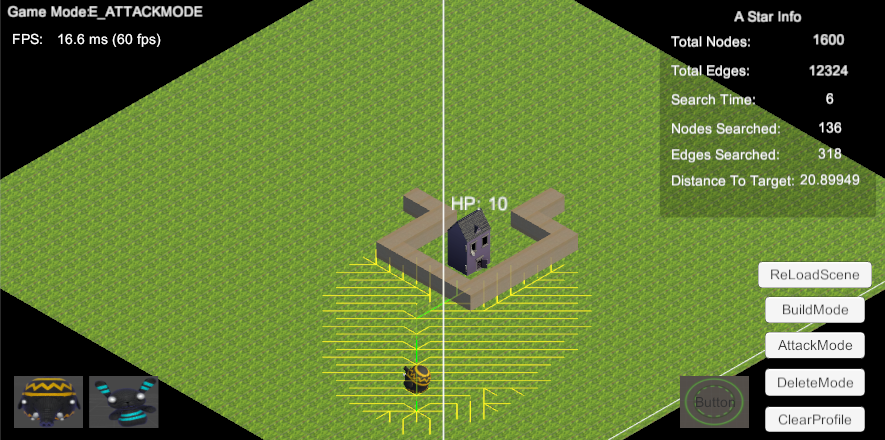
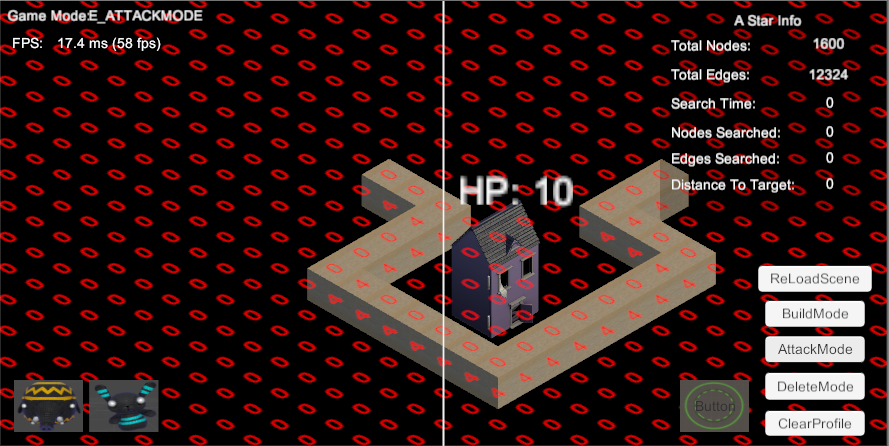
A Star(A Star是 Dijkstra(著名的最短路径算法)基础上通过一个启发因子来预估给定节点到目标节点的距离来使得路径节点搜索是向目标节点方向逼近不至于出现搜索大量无效节点的情况) (AI相关学习)
A Star
Searching
通过搜索,我发现网络上有现成的很完善的A Star的版本 A Star Pathfinding Project(Asset) 但通过使用后发现,里面所支持的Four,Six and Eight connections都不符合我的需求(每个点都和周围的八个点连通),所以最终放弃了A Star Pathfinding Project而决定自己实现自己的A Star Pathfinding
Create Myself A Star
A Star Preperation
结合Artificial-Inteligence-Study的学习,让我们了解下A Star里的一些基本概念和核心思想: A Star属于什么图? A Star里的图属于导航图(Navigation Graph),是基于开销的图搜索(cost-based graph searches)
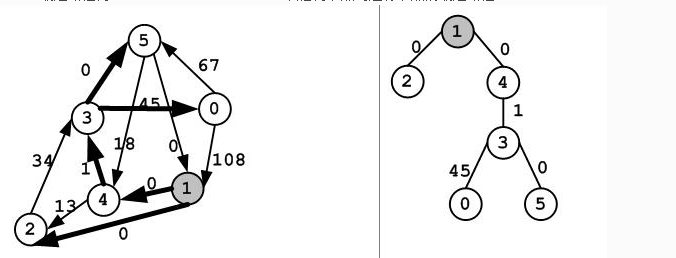
Dijstra算法改进: A Star – 和Dijkstra算法的唯一区别是对搜索边界上的点的开销(GCost)的计算。因为Dijstra的搜索扩展方向是由GCost决定的,所以A Star算法通过给GCost添加一个启发因子(H)来确保搜索行进方向。 F的计算: F = G + H G是到达一个节点的累计开销, H是一个启发因子,它给出的是节点到目标节点的估计距离。
using UnityEngine; using System.Collections; using System.Collections.Generic; using System; using UnityEngine.Assertions;
publicclassSearchAStar { publicstruct PathInfo {
public List<int> PathToTarget { get { return mPathToTarget; } set { mPathToTarget = value; } } private List<int> mPathToTarget;
public List<Vector3> MovementPathToTarget { get { return mMovementPathToTarget; } set { mMovementPathToTarget = value; } } private List<Vector3> mMovementPathToTarget;
publicbool IsWallInPathToTarget { get { return mIsWallInPathToTarget; } set { mIsWallInPathToTarget = value; } } privatebool mIsWallInPathToTarget;
publicint WallInPathToTargetIndex { get { return mWallInPathToTargetIndex; } set { mWallInPathToTargetIndex = value; } } privateint mWallInPathToTargetIndex;
publicfloat CostToTarget { get { return mCostToTarget; } set { mCostToTarget = value; } } privatefloat mCostToTarget;
publicint ITarget { set { mITarget = value; } get { return mITarget; } } privateint mITarget;
publicint OriginalTarget { get { return mOriginalTarget; } set { mOriginalTarget = value; } } privateint mOriginalTarget;
publicint NodesSearched { get { return mNodesSearched; } set { mNodesSearched = value; } } privateint mNodesSearched;
publicint EdgesSearched { get { return mEdgesSearched; } set { mEdgesSearched = value; } } privateint mEdgesSearched;
//this list of edges is used to store any subtree returned from any of the graph algorithms /* public List<GraphEdge> SubTree { get { return mSubTree; } set { mSubTree = value; } } private List<GraphEdge> mSubTree; */ /* public PathInfo() { ResetPathInfo(); } */
public PathInfo DeepCopy() { PathInfo pi = (PathInfo)this.MemberwiseClone(); pi.PathToTarget = new List<int>(mPathToTarget); pi.MovementPathToTarget = new List<Vector3>(mMovementPathToTarget);
if (!mIsIgnoreWall) { //No matter the wall in path is jumpable or not, we should record it as useful information if (mGraph.Nodes[nd].IsWall /*&& !mGraph.Nodes[nd].IsJumpable*/) { mAStarPathInfo.IsWallInPathToTarget = true; mAStarPathInfo.WallInPathToTargetIndex = nd; } }
while (!mPQ.Empty()) { //Get lowest cost node from the queue int nextclosestnode = mPQ.Pop().Key;
mAStarPathInfo.NodesSearched++;
//move this node from the frontier to the spanning tree if (mSearchFrontier[nextclosestnode] != null && mSearchFrontier[nextclosestnode].IsValidEdge()) { mShortestPathTree[nextclosestnode] = mSearchFrontier[nextclosestnode]; } //If the target has been found exit if (nextclosestnode == mITarget) { return; }
//Now to test all the edges attached to this node List<GraphEdge> edgelist = mGraph.EdgesList[nextclosestnode]; GraphEdge edge; for (int i = 0; i < edgelist.Count; i++) { edge = edgelist[i]; //calculate the heuristic cost from this node to the target (H) float hcost = Heuristic_Euclid.Calculate(mGraph, mITarget, edge.To) * mHCostPercentage;
//calculate the 'real' cost to this node from the source (G) float gcost = mGCosts[nextclosestnode] + edge.Cost;
//if the node has not been added to the frontier, add it and update the G and F costs if (mSearchFrontier[edge.To] != null && !mSearchFrontier[edge.To].IsValidEdge()) { mFCosts[edge.To].Value = gcost + hcost; mGCosts[edge.To] = gcost;
mPQ.Push(mFCosts[edge.To]);
mSearchFrontier[edge.To] = edge;
mAStarPathInfo.EdgesSearched++;
if (mBDrawExplorePath) { Debug.DrawLine(mGraph.Nodes[edge.From].Position, mGraph.Nodes[edge.To].Position, Color.yellow, mExplorePathRemainTime); } }
//if this node is already on the frontier but the cost to get here //is cheaper than has been found previously, update the node //cost and frontier accordingly elseif (gcost < mGCosts[edge.To]) { mFCosts[edge.To].Value = gcost + hcost; mGCosts[edge.To] = gcost;
//Due to some node's f cost has been changed //we should reoder the priority queue to make sure we pop up the lowest fcost node first //compare the fcost will make sure we search the path in the right direction //h cost is the key to search in the right direction mPQ.ChangePriority(edge.To);
while (!mPQ.Empty()) { //Get lowest cost node from the queue int nextclosestnode = mPQ.Pop().Key;
mAStarPathInfo.NodesSearched++;
//move this node from the frontier to the spanning tree if (mSearchFrontier[nextclosestnode] != null && mSearchFrontier[nextclosestnode].IsValidEdge()) { mShortestPathTree[nextclosestnode] = mSearchFrontier[nextclosestnode]; }
//Now to test all the edges attached to this node List<GraphEdge> edgelist = mGraph.EdgesList[nextclosestnode]; GraphEdge edge; for (int i = 0; i < edgelist.Count; i++) { edge = edgelist[i]; //calculate the heuristic cost from this node to the target (H) float hcost = Heuristic_Euclid.Calculate(mGraph, mITarget, edge.To) * mHCostPercentage;
//calculate the 'real' cost to this node from the source (G) float gcost = mGCosts[nextclosestnode] + edge.Cost;
//if the node has not been added to the frontier, add it and update the G and F costs if (mSearchFrontier[edge.To] != null && !mSearchFrontier[edge.To].IsValidEdge()) { mFCosts[edge.To].Value = gcost + hcost; mGCosts[edge.To] = gcost;
mPQ.Push(mFCosts[edge.To]);
mSearchFrontier[edge.To] = edge;
mAStarPathInfo.EdgesSearched++;
if (mBDrawExplorePath) { Debug.DrawLine(mGraph.Nodes[edge.From].Position, mGraph.Nodes[edge.To].Position, Color.yellow, mExplorePathRemainTime); } }
//if this node is already on the frontier but the cost to get here //is cheaper than has been found previously, update the node //cost and frontier accordingly elseif (gcost < mGCosts[edge.To]) { mFCosts[edge.To].Value = gcost + hcost; mGCosts[edge.To] = gcost;
//Due to some node's f cost has been changed //we should reoder the priority queue to make sure we pop up the lowest fcost node first //compare the fcost will make sure we search the path in the right direction //h cost is the key to search in the right direction mPQ.ChangePriority(edge.To);
mSearchFrontier[edge.To] = edge;
mAStarPathInfo.EdgesSearched++; } } } }
//The A* search algorithm with strickdistance with wall consideration privatevoidSearch(float strickdistance, bool isignorewall) { float currentnodetotargetdistance = Mathf.Infinity;
mPQ.Clear();
mPQ.Push(mFCosts[mISource]);
//mSearchFrontier [mISource] = new GraphEdge (mISource, mISource, 0.0f); mSearchFrontier[mISource].From = mISource; mSearchFrontier[mISource].To = mISource; mSearchFrontier[mISource].Cost = 0.0f; GraphEdge edge = new GraphEdge(); int nextclosestnode = -1;
while (!mPQ.Empty()) { //Get lowest cost node from the queue nextclosestnode = mPQ.Pop().Key;
mAStarPathInfo.NodesSearched++;
//move this node from the frontier to the spanning tree if (mSearchFrontier[nextclosestnode] != null && mSearchFrontier[nextclosestnode].IsValidEdge()) { mShortestPathTree[nextclosestnode] = mSearchFrontier[nextclosestnode]; }
//Now to test all the edges attached to this node List<GraphEdge> edgelist = mGraph.EdgesList[nextclosestnode]; for (int i = 0; i < edgelist.Count; i++) { //Avoid pass refrence edge.Reset(); edge.From = edgelist[i].From; edge.To = edgelist[i].To; edge.Cost = edgelist[i].Cost; //calculate the heuristic cost from this node to the target (H) float hcost = Heuristic_Euclid.Calculate(mGraph, mITarget, edge.To) * mHCostPercentage;
//calculate the 'real' cost to this node from the source (G) float gcost = 0.0f; if (isignorewall) { gcost = mGCosts[nextclosestnode] + edge.Cost;
if (mGraph.Nodes[edge.From].IsWall) { gcost -= mGraph.Nodes[edge.From].Weight; } if (mGraph.Nodes[edge.To].IsWall) { gcost -= mGraph.Nodes[edge.To].Weight; } } else { gcost = mGCosts[nextclosestnode] + edge.Cost; if (mGraph.Nodes[edge.From].IsJumpable) { gcost -= mGraph.Nodes[edge.From].Weight; } if (mGraph.Nodes[edge.To].IsJumpable) { gcost -= mGraph.Nodes[edge.To].Weight; } }
//if the node has not been added to the frontier, add it and update the G and F costs if (mSearchFrontier[edge.To] != null && !mSearchFrontier[edge.To].IsValidEdge()) { mFCosts[edge.To].Value = gcost + hcost; mGCosts[edge.To] = gcost;
mPQ.Push(mFCosts[edge.To]);
mSearchFrontier[edge.To].ValueCopy(edge);
mAStarPathInfo.EdgesSearched++;
if (mBDrawExplorePath) { Debug.DrawLine(mGraph.Nodes[edge.From].Position, mGraph.Nodes[edge.To].Position, Color.yellow, mExplorePathRemainTime); } }
//if this node is already on the frontier but the cost to get here //is cheaper than has been found previously, update the node //cost and frontier accordingly elseif (gcost < mGCosts[edge.To]) { mFCosts[edge.To].Value = gcost + hcost; mGCosts[edge.To] = gcost;
//Due to some node's f cost has been changed //we should reoder the priority queue to make sure we pop up the lowest fcost node first //compare the fcost will make sure we search the path in the right direction //h cost is the key to search in the right direction mPQ.ChangePriority(edge.To);
盲目搜索(Uniformed Graph Searches) (在搜索一个图时不考虑相关的边的开销) a. 深度优先搜索(DFS: Depth First Search) (搜索时尽可能地深入一个图。在搜索时,当它走入死胡同时,才会回溯,以回到上一个较浅的节点,在那里继续深度搜索) 注意: 使用Stack来模拟,先进后出(FILO)的原则 DFS优化: 一些图可能非常深,深度优先便可能非常容易地就在错误的路径上陷得很深,因而延误了搜索。 限制深度的搜索(Limited Search): 限制深度优先搜索算法在开始回溯之前可以进行多少步的深度搜索 缺点: 如何设置最大搜索深度 迭代加深深度优先搜索(Iterative Deepending Depth First Search) b. 广度优先搜索(BFS:Breadth First Search) (从源节点展开以检查从它出发的边指向的每一个节点,然后再从那些刚检查过的节点继续展开) 注意: 使用Queue来模拟,先进先出(FIFO)的原则 BFS缺点: 如果搜索的图非常大而且分支数很高,那么BFS就会浪费大量的内存并且表现出很低的效率。
基于开销的图搜索(cost-based graph searchs) a. 边放松(Edge Relaxation) (从源节点到抵达目标节点的路径上的所有其他节点中搜集当前最优路径(BPFSF: Best Path Found So Far)信息。这个信息在检查新的边时得到更新。如果刚检查的边表明,如果用通过此边到达一个节点的路径取代现有的最优路径会使路程更短,那么,这条边就 被加入,而路径也相应地更新) b. 最短路径树(SPT: Short Path Tree) (从任何节点到达源节点的最短路径) c. Dijkstra算法(Dijkstra Algorithm) (教授Edsger Wybe Dijkstra著名的寻找带全图的最短路径算法) 注意: 使用一个索引的优先队列(Indexed Priority Queue)来实现。 缺点: Dijkstra算法检查了太多的边。 d. Dijkstra算法的一个改进:A算法 (Dijkstra算法通过最小化开销进行搜索。在处理搜索边界上的点时,如果估计一下他们距离目标节点的开销,并将这个信息考虑进去,那么算法的效率就可以大大提高。这个估计值被称为启发因子。) 注意: A算法和Dijkstra算法的唯一区别是对搜索边界上的点的开销的计算。被修正的到节点的开销F用来决定节点在优先队列中的位置。 F的计算: F = G + H G是到达一个节点的累计开销, H是一个启发因子,它给出的是节点到目标节点的估计距离。 通过用这种方法使用一个启发因子,被修正的开销会指引搜索逼近目标节点,而不是在各个可能的方向发散的搜索。这也使需要检查的边更少。因此搜索的加速是Disjkstra算法和A算法的最主要区别。 A算法的实现需要维护两个用来存储开销的std::vector,一个用来保存每一个节点的F开销,作为优先队列的索引,另一个是每一个节点的G开销。
《Artificial Intelligence for Game》 – Ian Millington 1. Introduction 1.1 What is AI? Artificial intelligence is about making computers able to perform the thinking tasks that humans and animals are capable of
1.1.2 Game AI Pacman [Midway Games West, Inc, 1979] – state machine Warcraft –[Blizzard Entertainment, 1994] – Path finding
AI three basic needs: 1. Move Movement refers to algorithms that turn decisions into some kind of motion 2. Decision making Decision making involves a characterworking out what to do next 3. Strategy Strategy refers to an overall approach used by a group of characters – e.g. Harf-Life Note: Not all game applications require all levels of AI
1.2.5 Agent-Based AI Agent-based AI is about producing autonomous characters that take in information from the game data, determine what actions to take based on the information, and carry out those actions
1.3 Algorithms, Data Structures, and Representations 1.3.1 Algorithms
Tactical and Strategic AI 6.1 Waypoint Tactics 6.1.1 Tactical Locations
参考书籍: 《OpenGL Programming Guide 8th Edition》 – Addison Wesley 《Fundamentals of Computer Graphics (3rd Edition)》 – Peter Shirley, Steve Marschnner 《Real-Time Rendering, Third Edition》 – Tomas Akenine-Moller, Eric Haines, Naty Hoffman
Rendering Knowledge
在进入书籍内容的学习之前,先了解一些必要的知识
What is Rendering?
“Rendering is a process that takes as its input a set of objects and produces as its output an array of pixels.” – 《Fundamentals of Computer Graphics (3rd Edition)》
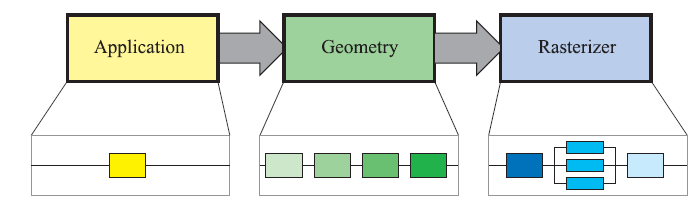
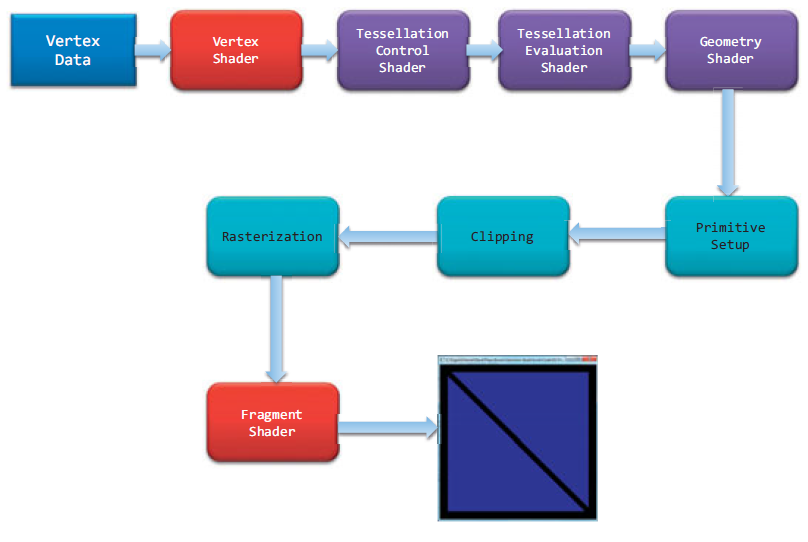
既然Rendering是通过处理一系列的对象数据最终输出成一组一组的像素呈现出来,那接下来的问题就是What is the rendering process(Graphic Pipeline)?
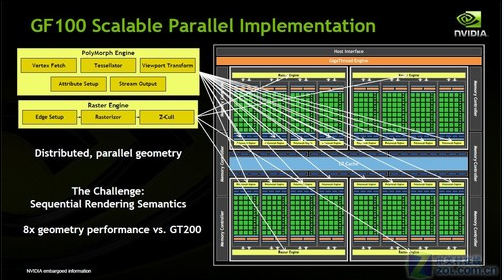
Application e.g collision detection, global acceleration algorithms, animation, physics simulation….. (On CPU) Acceleration algorithms, such as hierarchical view frustum culling, are also implemented in this stage. – 《Real-Time Rendering, Third Edition》 可以看出Application阶段主要是做一些非渲染相关的一些计算,但部分计算也可以帮助我们减少渲染数量提高渲染效率(比如:hierachical view frustum culling)
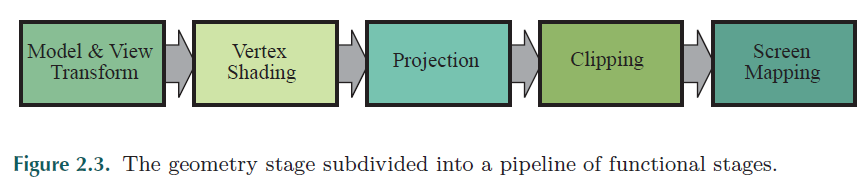
Geometry Deal with transforms, projection. Computes what is to be draw, how it should be drawn, and where it should be drawn (On GPU) e.g. model and view transform, vertex shading, projection, clipping, and screen mapping – 《Real-Time Rendering, Third Edition》 可以看出Geometry阶段主要是负责3D到2D Screen的顶点运算和顶点剔除
Rasterizer Conversion from two-dimensional vertices in screen space – each with a z-value (depth value), and various shading information associated with each vertex – into pixels on the screen (On GPU) – 《Real-Time Rendering, Third Edition》 可以看出Rasterizer阶段主要是负责2D Screen的顶点像素运算(包括Z-Buffer test, Color computation, Alpha test, Stencil buffer等)
Accumulation Buffer – Images can be accumulated using a set of operators. E,g, motion blur……
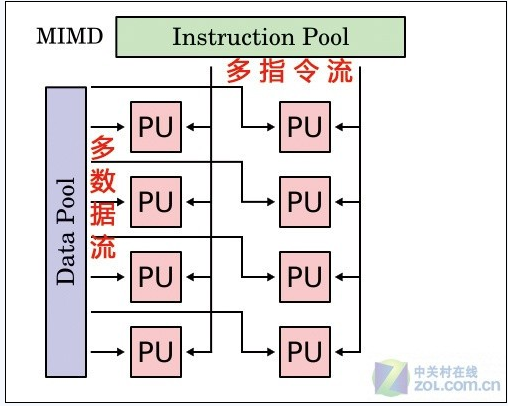
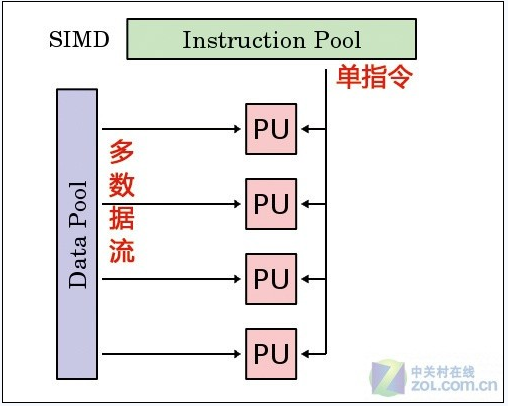
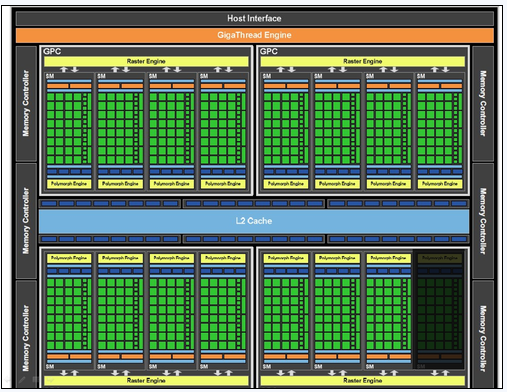
那么什么是Shader(着色器)?Shader(着色器)和GPU硬件的关系是怎样的了? “Shaders are programmed using C-like shading languages such as HLSL, Cg and GLSL. These are compiled to a machine-independent assembly language, also called the intermediate language(IL). This assembly language is converted to the actual machine language in a separate step, usually in the drivers. This arrangement allows compatibility across different hardware implementations.” – Real-Time Rendering, Third Edition》 GPU的像素着色器单元和顶点着色器单元就对应了Shader里面的Pixel Shader和Vertex Shader。由于像素在计算机都是以RGB三种颜色构成,加上Alpha总共4个通道,所以GPU的像素着色器单元和顶点着色器单元一开始就被设计成为同时具备4次运算能力的算数逻辑运算器(ALU)
从上面可以看出Shader是machine-independent的,因为事先被编译成了与机器无关的intermediate language(This intermediate language can be seen as defining a virtual machine, which is targeted by the shading language compiler – 《Real-Time Rendering, Third Edition》), 最后才会被机器转换成机器码来运行.
可编程Shading进化史可参考 3.3 The Evolution of Programmable Shading – 《Real-Time Rendering, Third Edition》
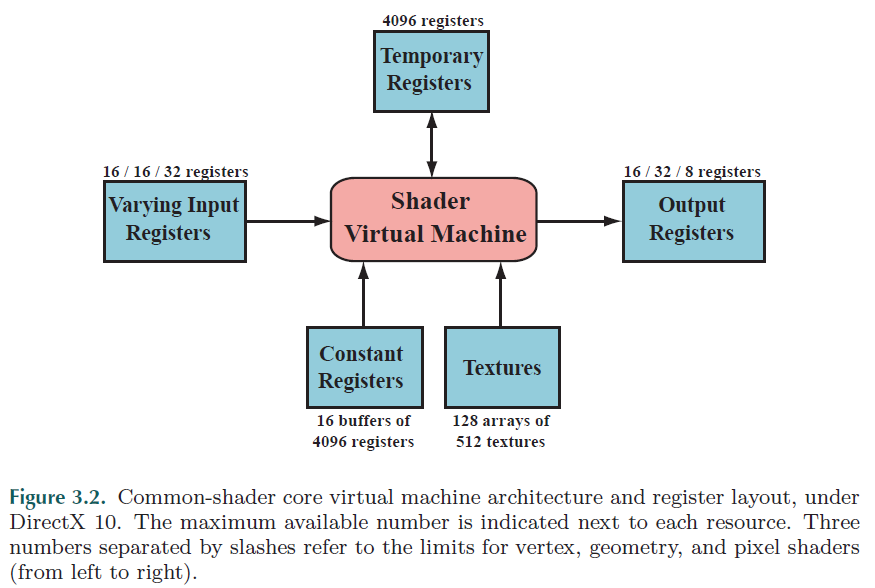
了解了计算机架构与Shader的关系,让我们来看看Common-shader core virtual machine architecture and register layout吧
Input Type
Uniform inputs With values that remain constant throughout a draw call(but can be changed between draw calls) – accessed via read-only constant registers or constant buffers
Varying inputs Which are different for each vertex or pixel processed by the shader – accessed via varying input registers
Shader Knowledge
Shader
Shader programs can be compiled offline before program load or during run time. As with any compiler, there are options for generating different output files and for using different optimization levels. A compiled shader is stored as a string of text, which is passed to the GPU via the driver.


