Unity第三方插件
Unity第三方插件
本章节主要讲解学习Unity第三方工具插件(比如NGUI,Dotween,2DToolkit……)。
NGUI
NGUI是C#写的第三方插件,堪称Unity 4.6之前最完美的GUI解决方案(NGUI 2.7及之前貌似是免费),复杂的UI都能在一个Draw Call完成渲染。
出于学习目的下载NGUI 2.7试试:
NGUI 2.7 Download
一下学习都是基于NGUI 2.7版本学习的,新的版本特性这里没有涉及到。
Tutorials
Creating Your UI
这里就不再一一讲述步骤了,主要记录一些重要的概念。
先来看看我们创建出UI之后的UI层次结构: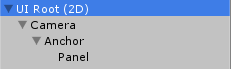
看看各组成部分的作用:
- UI Root
上面挂载UIRoot Script,这个脚本的主要目的是把所有挂载在UI Root下的object 所在屏幕比例根据屏幕大小变化而变化
When attached to the root object of the UI, it will scale that object by the inverse of the screen’s height, thus maintaining a 1 pixel = 1 unit ratio, ensuring pixel-perfect UIs.
UIStretch – This script is capable of stretching the widget relative to the size of the screen (or, if specified — panel or widget size).
UIStretch是自适应的关键,根据屏幕或特定panel长宽变化去做适应。但后来的NGUI版本好像对自适应这一块做了很大修改,UIStretch貌似不再支持。 - Camera
上面挂载了UICamera Script,这个脚本的主要目的是”contains NGUI’s event system”,至于消息是如何传递的这里先暂时不管,以后会深入学习。 - Anchor
上面挂载了UIAnchor Script,这个脚本的主要目的是”apply a half-pixel offset on Windows machines, for pixel-perfect results.”(把UI限定在窗口特定位置,当窗口变化的时候会依然处于相对窗口的位置) - Panel
上面挂载了UIPanel,这个脚本的主要目的是”container that will collect all UI widgets under it and will combine them into as few draw calls as possible.”(这里相当于UI的管理容器,负责以最少的draw call去管理UI)
Sprite
创建了UI,那么接下来就是增加我们的UI组件。
通过Widget Tool可以创建一系列不同类型的组件,这里有两个概念比较重要。
Atlas(图集) – Atlas好比我们的图片库,因为组件会需要选择图案,而Atlas定义了切割好的图集可供选择
Font(字体库) – 正如其名,字体库,至于字体库是怎么制作的这里暂时不得而知(待学习)
让我们简单看一下创建一个Sprite后的显示面板:![]()
这里Sprite有深度的概念,通过调节Depth我们可以实现层次排序。
还值得注意的一点是Sprite有个属性Sprite Type,这里的Sprite Type不仅可以决定Sprite如何显示,还会影响Sprite如何去适应显示区域。
9-Sliced Sprite
Sliced技术会决定如何去拉伸图案去适应显示区域而不至于看起来变形。
9-Sliced详解
Tiled Sprite
Tiled Sprite是用原始sprite大小去铺满显示区域
Note:
这里有一个官网说是显示Debug Info的东西,通过把Panel的Debug Info设置成Geometry,场景里会增加一个叫_UIDrawCall的对象。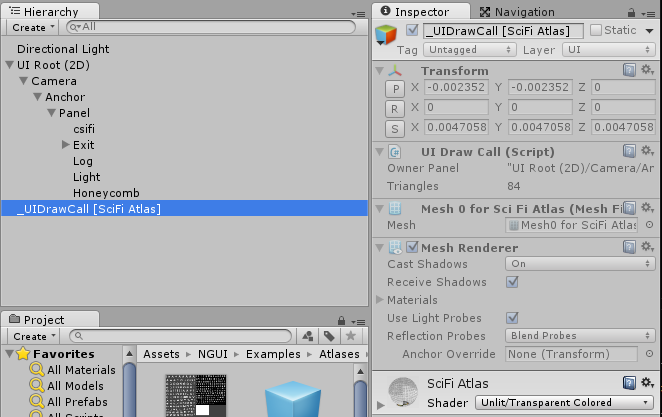
(这里还不太明白是什么,但看起来是把UI更新整合到一个Draw Call里了)
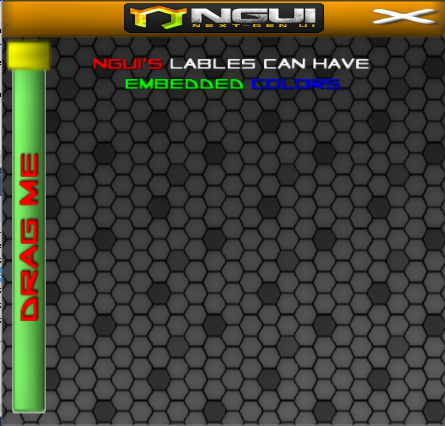
Label
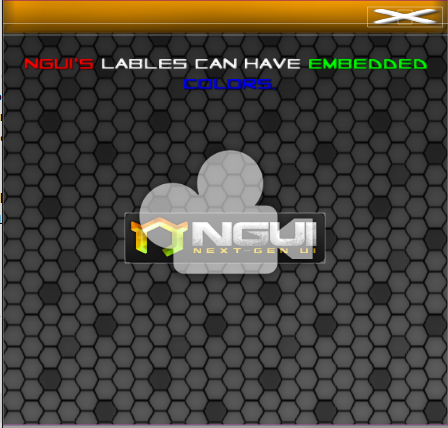
Lable里的字来源于我们之前选的字库。
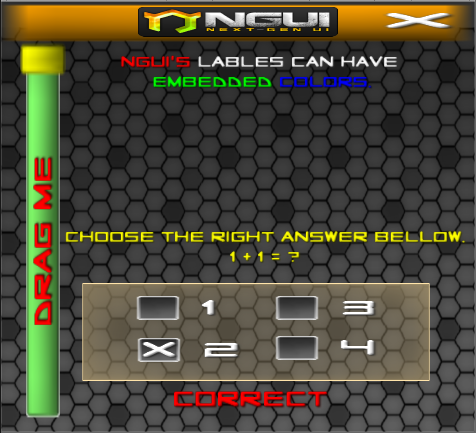
在Label里填写文本有个比较方便的设定,可以通过[hex color]改变后续文本的颜色e.g. [FF0000]代表红色。
1 | []NGUI's [FFFFFF]lables can have [00FF00]embedded |
Button
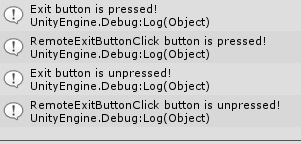
当我们添加了Button后,如何响应事件了?
“anything with a collider on it will receive all of the events.”
还记得之前说UICamera负责发送所有事件吗?所有在Camera(绑定了UICamera)下的UI都会接受到Event(前提是设置了event发送到UI层)。
让我们来看下UICamera的一些public可控变量: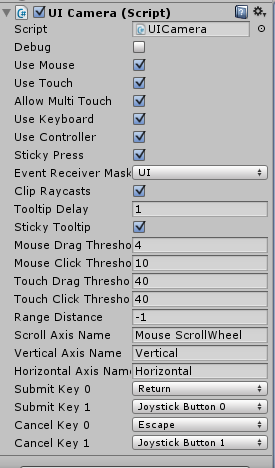
让我们关注一些比较重要的点:
Event Receive Mask – 控制了接受events的layer层
Debug – debug模式下可以让我们看到哪一个game objec
t接收到了event
Range Distance – 控制raycast的有效范围
Scroll Axis Name – 设定横向控制来源
Vertical Axis Name – 设定纵向控制来源
……
接下来让我们看看UICamera都负责发送哪些事件?(具体可以参见UICamera源码)
OnHover (isOver) is sent when the mouse hovers over a collider or moves away.
OnPress (isDown) is sent when a mouse button gets pressed on the collider.
OnSelect (selected) is sent when a mouse button is first pressed on a game object. Repeated presses on the same object won’t result in a new OnSelect.
OnClick () is sent with the same conditions as OnSelect, with the added check to see if the mouse has not moved much. UICamera.currentTouchID tells you which button was clicked.
OnDoubleClick () is sent when the click happens twice within a fourth of a second. UICamera.currentTouchID tells you which button was clicked.
OnDragStart () is sent to a game object under the touch just before the OnDrag() notifications begin.
OnDrag (delta) is sent to an object that’s being dragged.
OnDragOver (draggedObject) is sent to a game object when another object is dragged over its area.
OnDragOut (draggedObject) is sent to a game object when another object is dragged out of its area.
OnDragEnd () is sent to a dragged object when the drag event finishes.
OnInput (text) is sent when typing (after selecting a collider by clicking on it).
OnTooltip (show) is sent when the mouse hovers over a collider for some time without moving.
OnScroll (float delta) is sent out when the mouse scroll wheel is moved.
OnKey (KeyCode key) is sent when keyboard or controller input is used.
那么知道了发送哪些事件,那么我们如何通过添加的控件去响应事件了?
- 控件要处于Camera(含UICamera脚本)之下
- Layer处于UICamera的Event Receiver Mask
- 接受事件的控件必须包含Collider
- 自定义响应方法
- 定义对应事件响应的方法并挂载到需要响应的Game Object上
1 | void OnPress(bool isPressed) |
2. 通过UIListener,直接添加delegate去监听事件
首先现在需要实现delegate监听事件的控件上添加一个UIListener脚本(Component -> NGUI -> Internal -> Event Listener)。
1 | // UIListener Soure Code |
可以看出通过UIListener,该控件已经具备了响应UI Event的能力,而且每一个UI Event都定义了对应的delegate,这样一来我们就可以通过动态的添加修改每一个UI event的delegate实现控制UI Event响应了。
那么接下来我们只需在任何一个Game Object挂载下列代码就能响应特定控件的特定UI事件了。
1 | using UnityEngine; |
同时NGUI还为Button控制添加了很多可自定义的脚本:
- UIButton – 自定义控件被点击或处于控件之上等颜色信息
- UIButtonScale – 自定义焦点处于控件之上时的scale变换
- UIButtonOffset – 自定义控件被点击后的位移
- UIButtonSound – 自定义控件被点击时播放的声音
- UIButtonMessage – 自定义控件触发事件
- UIButtonTween – 自定义控件触发tween
- UIButtonPlayAnimation – 自定义控件触发动画
Slider
通过传递接受Slider Event的Game Object,我们可以去对应物体上定义OnSliderChange(float stepvalue)去响应slider事件,这样一来响应了Slider Event的物体就可以根据Slider的拖拽去做对应的事情了。
1 | using UnityEngine; |
Checkbox
通过把一组Checkbox放到同一个Game Object,然后设定所有UICheckbox的Radio Button Root到同一个Game Object可以实现一组单选按钮。
然后通过添加UICheckboxControlledComponent到Checkbox上,我们可以指定当该Checkbox激活或未激活时去enable的Game Object(做到根据Checkbox状态响应)。
Input
Label要具有而输入的特性需要确保以下几点:
- 父节点或自身包含Box Collider
- 父节点或自身包含UIInput Script(所有的Input相关的东西都抽象到这里了e.g. IME,键盘弹出,平台相关输入等)
- 指定需要增加Input功能的Laybel到UIInput的Laybel属性
Note:
两者必须都在同一个Game Object上才能起作用,因为UIInput要通过Box Collider去接收OnSelect等事件。
NGUI为我们提供了方便的控件类,Input – 直接用于创建可接收输入的Laybel模板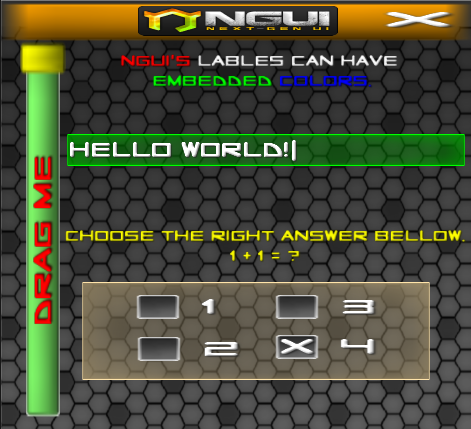
3D
将2D UI变换到3D UI很容易。
步骤如下:
- 去掉Anchor,直接把panel挂载在UIRoot(2D)上
还记得最初创建NGUI UI的时候Anchor上面挂载的UIAnchor Script的作用吗?因为变换到3D后我们不需要在控制相对窗口的位置,所以不需要UIAnchor了。 - 设置Camera的投影方式到Perspective(为了3D显示)
就这么简单,通过这样设置后,UI就完全当做3D Game Object显示在scene里了。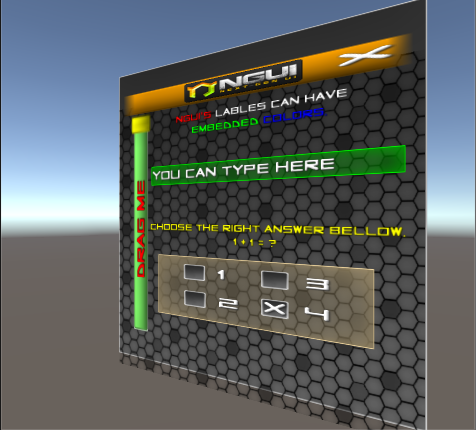
Atlas Maker
声明:后续用到的UI素材来源于COC,仅用于学习目的。
首先要知道为什么要使用图集?
减少纹理的使用,比如当多个材质只是纹理不同的时候,我们可以合并纹理到一个大的纹理,给材质指定对应的UV坐标即可。另外合并多个小的纹理到大的纹理图集也可以减少Memory使用。详情见Texture atlas。
这一节讲一下图集的制作。
- 准备好所有图片素材(可以通过PS等工具制作)
- 打开NGUI Atlas Maker
NGUI -> Open the Altas Maker - 设置一个Atlas名字,点击Create,选中要放到一张图集里的所有纹理图片,然后等Altas Maker切割完成后点击Add/Update All
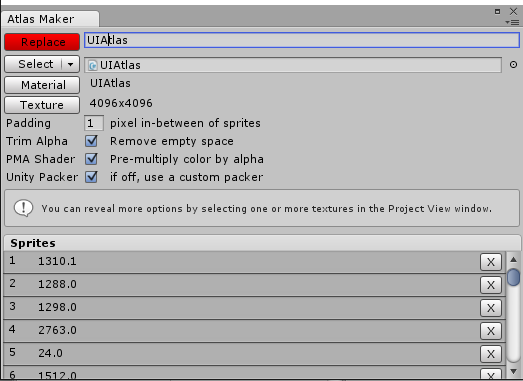

Note:
NGUI也支持导入Texture Packer导出的文件
NGUI Atlas Maker支持多种图片格式(e.g. PNG, psd……)
一旦Sprite导入并生成UI Atlas后,我们可以直接在Atlas Maker里添加并更新该Atlas即可。
Font Maker
Font Maker里的字体是由什么制作而来的了?
“All fonts are created using the free BMFont program, or the more advanced Glyph Designer.”(NGUI使用的Font是由BMFont program或Glyph Designer制作的)
那么BMFont program又是什么了?
This program will allow you to generate bitmap fonts from TrueType fonts. The application generates both image files and character descriptions that can be read by a game for easy rendering of fonts.BMFont program通过TrueType fonts生成bitmap fonts(一个是Font的image file文件,一个是描述了每一个字符渲染所需的信息文件))
那么这里提到了两个概念:
TrueType Font
TrueType is an outline font
Outline fonts (also called vector fonts) use Bézier curves, drawing instructions and mathematical formulae to describe each glyph, which make the character outlines scalable to any size.
可以看出TrueType是outline font,outline font是一种vector font(可以理解成矢量字体,放大缩小不会出现锯齿和模糊。之所以称作vector font是因为TrueType记录每一个字符的轮廓信息,通过这些信息可以计算出如何绘制字符)
以下引用至What are TrueType fonts?
TrueType technology actually involves two parts:
The TrueType Rasterizer
TrueType fonts – “The fonts themselves contain data that describes the outline of each character in the typeface. “Bitmap Font
Bitmap fonts consist of a matrix of dots or pixels representing the image of each glyph in each face and size.
可以看出Bitmap Font是记录的每一个字符的像素和位置等信息。
以下引用至What is a Bitmap Font?
A bitmap font is essentially an image file containing a bunch of characters and a control file detailing the size and location of each character within the image. Each character is represented by a number of dots or pixels, rendered in a particular font and size.
可以看出Bitmap Font包含两部分:Image file – 包含了所有文字的纹理图片
Control file – 包含了字体大小,每一个字符所在位置等信息
Bitmap Font因为不是outline font(vector font),所以在字体拉伸变换的时候会出现失真的情况。
既然这样我们为什么还要使用Bitmap Font了?
OpenGL itself doesn’t even understand fonts(e.g. vector font), so in order to display text in your game you would need to use whats known as a bitmap font.
当计算去利用vector font渲染字体的时候,不会失真。但是在游戏里,如果我们还想对vector font做进一步的处理就显得心有余而力不足了。
The major benefit of using bitmap fonts is that each character can be pre-rendered using multiple effects, loaded into OpenGL as a texture, and rendered to the screen using very little resources.
但Bitmap Font不一样,Bitmap Font存储的就是字体的纹理图片,纹理图片在OpenGL里做额外的效果处理就容易的多了。
说了这么多让我们看看BMFon program是如何制作Bitmap Font的?
- 下载BitMap Font Program
Bitmap Font Program Download Link - 通过Font Settings我可以选择我们要导入的ttf字库,是否采用unicode编码等。
- 然后选中我们要导出的字符集(这里主要选择了英文和中文字符集)
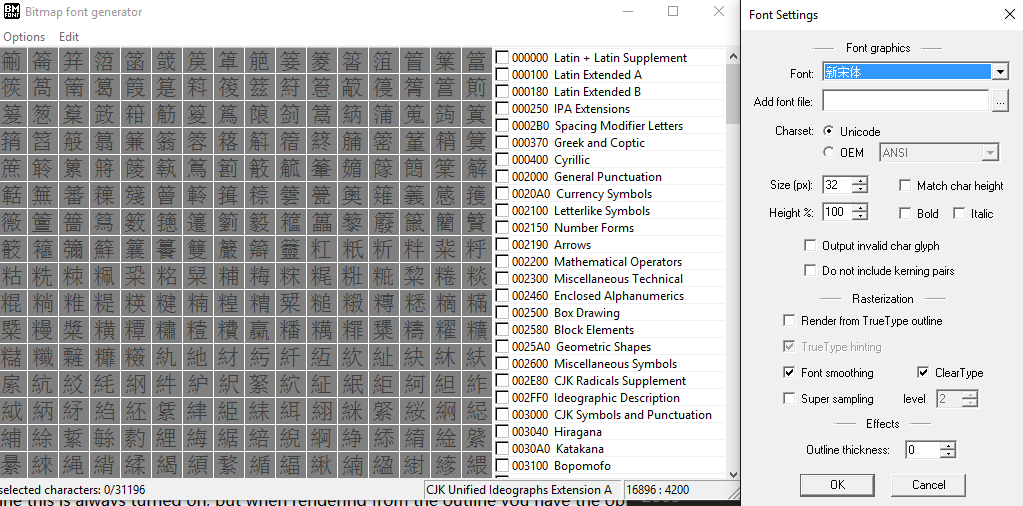
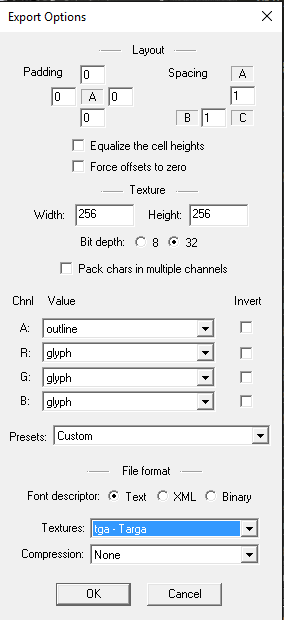
- 设置export option,为导出的文件设置相关配置
Note:
If you’re importing colored icons, or planning on using post processing to add colors to the characters, then you’ll want to choose the 32bit format, otherwise the 8bit format may be sufficient.
官网提到如果要后期再对字符做颜色等处理,需要选择32bit的存储模式(应该是为了能存储颜色信息)
同时File Format会决定我们导出的字符集纹理图片和Font descriptor的格式。
为了将字符都导出到一张纹理图片我们需要定义合适的Texture Size。 - 最后点击存储为Bitmap导出字符集(Option -> Save Bitmap Font As)
这里就会生成对应的字符集纹理图片和Font Descriptor文件。
Note:
但我发现由于包含了大量中文字符,字符纹理比较大,包括中文和英文就有10M了,如果文字比较多比如做本地化,静态字体(我们这里提前生成字符集纹理就是静态字体)不适合。
NGUI支持动态字体的生成:
让我们先看看什么是动态字体?
“When you set the Characters drop-down in the Import Settings to Dynamic, Unity will not pre-generate a texture with all font characters. Instead, it will use the FreeType font rendering engine to create the texture on the fly.”(https://docs.unity3d.com/Manual/class-Font.html)
可以看出动态字体不需提前生成字符集纹理,而是通过导入的ttf动态的在游戏里生成对应字体纹理。这样做的好处就是减少了像静态字体这样的纹理内存开销,我们只需指定使用哪些ttf并确保用户包含了该ttf就能正确显示所有语言。
个人认为动态字体是本地化的一个解决方案。
动态字体直接从ttf文件生成。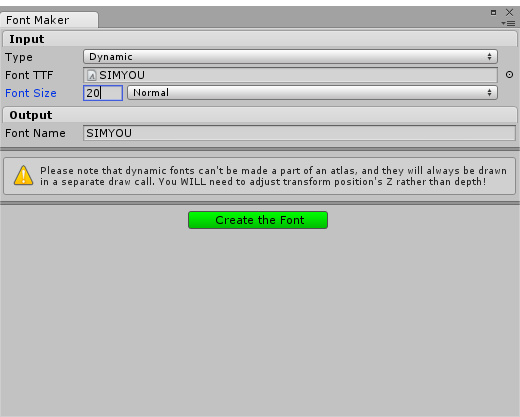
Note:
值得注意的是动态字体下写的那个警告”Please note that dynamic fonts can’t be made a part of an atlas, and they will always be draw in a speparate draw call. You will need to adjust transform position’s Z rather than depth.”
使用动态字体后会增加一个draw call,而且动态字体的深度不再是有depth来控制而是z值。
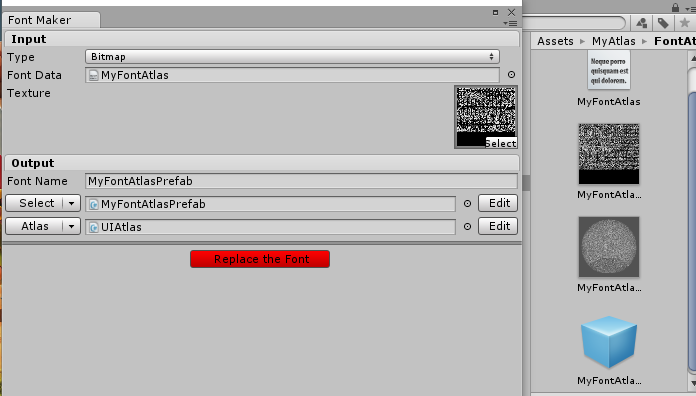
Bitmap Font制作好了,那么接下来我就应该用制作好的Bitmap Font去通过Font Maker制作我们的字符集(Atlas)了。
- 打开Font Maker
- 选定我们刚才制作的Font Texture和Font Descriptor作为输入,指定生成的字符集名字
- 点击创建
这里看一下用自己制作的字体集和UI图片集做的登陆界面: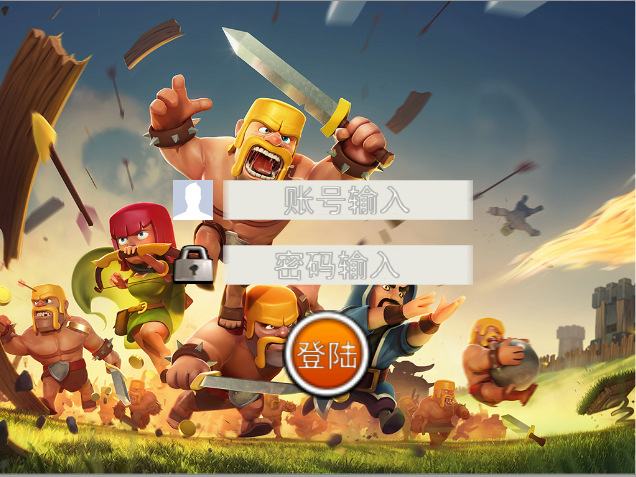
NGUI 2.7屏幕自适应
下文主要参考:
NGUI所见即所得之UIRoot
Unity3d + NGUI 的多分辨率适配
Unity3D开发(一):NGUI之UIRoot屏幕分辨率自适应
NGUI研究院之自适应屏幕(十)
Unity3d + NGUI 的多分辨率适配
屏幕自适应是UI在所难免会遇到的问题。
那么为什么需要做屏幕自适应了?
美术在做UI的时候,程序需要确定我们资源的最基本的分辨率,比如我们是基于1024 * 768(1.3333比例)。
在屏幕分辨率为1024 * 768(1.333比例)的时候完美显示如下: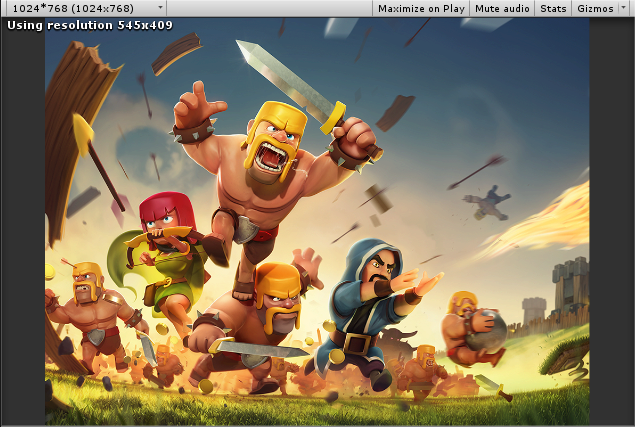
当我们把屏幕分辨率设置成800 * 800(1.0比例)的时候显示如下: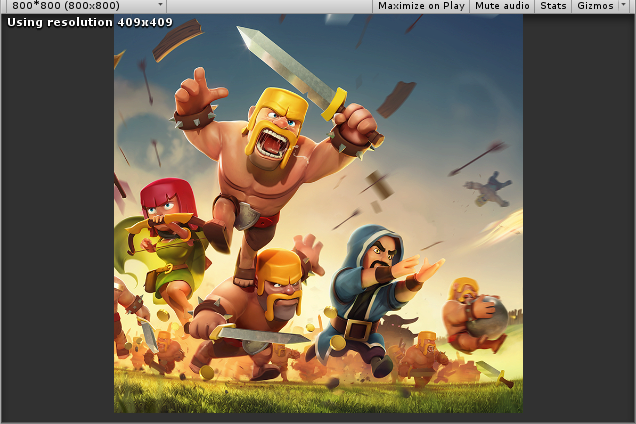
当我们把屏幕分辨率设置成960 * 640(1.5比例)的时候显示如下: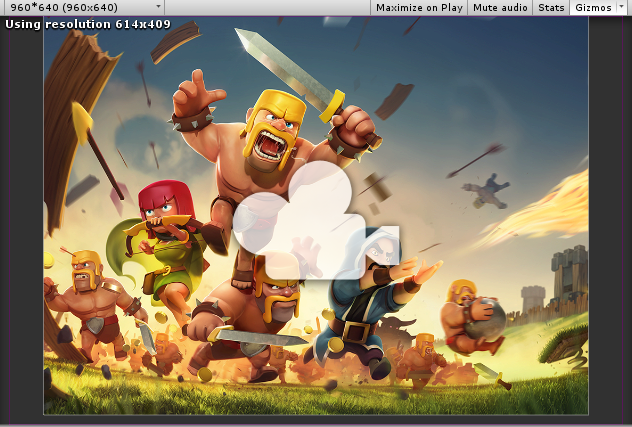
Note:
UIRoot的Manual Height设置为768,Scaling Stype为FixedSize(后续会讲到UIRoot的缩放自适应原理)
从上面可以看出当分辨率比例降低的时候,会出现图像显示不全,这是因为NGUI是基于高度去缩放的。(后续会详细讲解)
所以当比例从1.33变到1.0的时候,768/800=0.96的缩放比例,宽度应该是1024/0.96=1066.66大于800这也就是为什么会出现图像显示不全的原因了。
再来看看从1.33变到1.5的时候,同理768/640=1.2缩放比例,宽度应该是1024/1.2=853.33小于960这也就是为什么会出现宽度铺不满的情况。
所以在这个时候为了不去做多套不同分辨率的资源去适应各种分辨率的机型,我们需要使用NGUII里的自适应。
当下移动设备的主流分辨率,数据来源腾讯分析移动设备屏幕分辨率分析报告:
1 | iOS设备的分辨率主要有: |
那么让我们进入正题,NGUI是如何实现屏幕自适应的了?
这里有三个最重要的脚本需要学习:
- UIRoot
- UIStretch
- Anchor
让我们先来看看UIRoot的界面: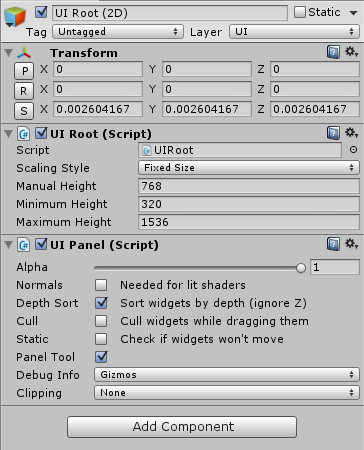
还记得之前提到UIRoot的功能吗?
This script rescales the object it’s on to be 2/ScreenHeight in size, letting you specify widget coordinates in pixels and still have them be relatively small when compared to the rest of your game world.
可以看出UIRoot通过scale UIRoot到2/ScreenHeight比例后,使得所有控件的坐标与像素一一对应。那么为什么这样能实现控件坐标与像素一一对应了?这个问题后面会讲到。
让我们先分别看看具体参数的含义:
Scaling Style
1 | public enum Scaling |
而已看出NGUI 2.7给我们提供了3种scale方式。
那么三种方式是如何起作用的了?
1 | public int activeHeight |
从上面可以看出PixelPerfect,FixedSize(FixedSizeOnMobile是移动平台的FixedSize设置)主要是缩放标准的选取。
当设置为PixelPerfect的时候会根据ScreenHeight与minmumHeight和maxmumHeight的比较来决定是以ScreenHeight为基准按2/ScreenHeight比例缩放还是2/minmumHeight or 2/maxmumHeight为比例缩放。
当设置FixedSize的时候只根据我们设定的manualHeight作为参考标准去缩放UIRoot,缩放比例为2/manualHeight。
根据缩放标准的选取去设定UIRoot localScale的值以实现UI缩放。
那么这里就有个疑问,为什么是2/manualHeight而不是1/manualHeight了?
要明白2这个常数的含义,我们先要看看Camera设定为Orthographic类型中的Orthographic Size的含义。
Camera’s half-size when in orthographic mode. This is half of the vertical size of the viewing volume. Horizontal viewing size varies depending on viewport’s aspect ratio. Orthographic size is ignored when camera is not orthographic (see orthographic). See Also: camera component.
可以看出Orthographic Size是指摄像机所观察垂直区域的一半。(前提是设置了orthographic camera)。如果Size设置为1,那么Camera所看到的高度为2 Unit。摄像机所看到的垂直区域一半也就是屏幕高度的一半,Orthographic Size所指示的1个Unit的高度为Screen.Height/2。(结合Orthographic Size和Pixel Per Unit设置,我们可以实现Sprite的Pixels Perfect显示)
如果屏幕高度为1000个像素,Size设置的值为1表示1000/2=500个像素。所以,我们通过整个关系计算UIRoot下的GameObject的实际对应屏幕的高度:从GameObject向上一直到UIRoot,将它们的loaclScal相乘得到的乘积除以Size乘以屏幕高度的一半,即(localScale*….localScale)/Size*Screen.height/2。
如果屏幕分辨率为1024 * 768,那么如果我们把Size设置为1,那么1 Unit就对应屏幕分辩率高度的一半即384,也就是说UIRoot下Gameobject实际对应屏幕的高度应该按照384来计算即Screen.height/2来计算,因为Size的大小会使物体所占比例成倍缩小,所以我们还需要除以Size。
最终得出UIRoot下GameObject的实际对应屏幕的高度计算如下:
(localScale *…….*localScale)Screen.height/2/Size
(这也就是为什么UIRoot缩放比例是2/manuaHeight里常数为2的原因,这样一来localScale的值就和屏幕所占比例一一对应了(前提是Size为1))
这可以解释UIRoot的localStyle为啥都是很小的小数,因为这样可以保证UIRoot的子节点都可以以原来的大小作为localScale,比如一张图片是20*20的,我们可以直接设置localScale为(20,20,1)不用进行换算,直观方便。(NGUI3.0(or 2.7)以后的版本已经不再使用localScale来表示UISprite ,UILable(UIWidget的子类)的大小了,而是在UIWidget的width和height来设置,这样做的好处就是一个gameObject节点可以挂多个UISprite或UILabel了,而不会受localScale的冲突影响 2013/11/16增补)。
这样一来控件坐标与像素一一对应了。这也就是为什么在缩放UIRoot的时候采用2f / calcActiveHeight的原因。
那么如何让我们的制作的Sprite的像素完美一一对应显示在屏幕上了?
我们知道了屏幕分辨率为1024768且Orthographic Size设置为1时,1个Unit对应的高度是384,那么也就是说要想让Sprite像素完美一一对应屏幕显示,我们要确保Sprite的Pixel Per Unit设定为Screen.height/2/Size。
之前提到当我们的常数是2来除以Screen.height的时候需要把Camera的Orthographic Size设置成1才能实现控件坐标与像素的一一对应,让我们看看UIRoot的源码:
1 | protected virtual void Start () |
看得出NGUI并没有为我们强制设置为1,只是警告我们不能把UIRoot和UIOrthoCamera一起使用,如果使用了会自动剔除UIOrthoCamera,并设置orthographicSize为1。我们可以去设置orthographicSize实现不同的效果。
了解了UIRoot的实现,那么回到我们原始的话题,如何通过UIRoot实现屏幕自适应了?
当屏幕分辨率变化的时候UIRoot下的UI会出现显示不全或者两边有黑边的问题,因为FixedSize结合Manual Height而已控制UIRoot的按比例缩放,所以我们只需把两边未能显示全的UI以宽为基准按比例缩放即可(通过动态计算Manual Height的值)。
UIRoot分辨率自适应代码
ManualWidth和ManualHeight是我们最初美术设计所针对的分辨率,修改到对应的即可。
1 | using UnityEngine; |
自适应后在屏幕分辨率为1024768(1.333比例)的时候完美显示如下:
自适应后在屏幕分辨率为800800(1.0比例)的时候显示如下: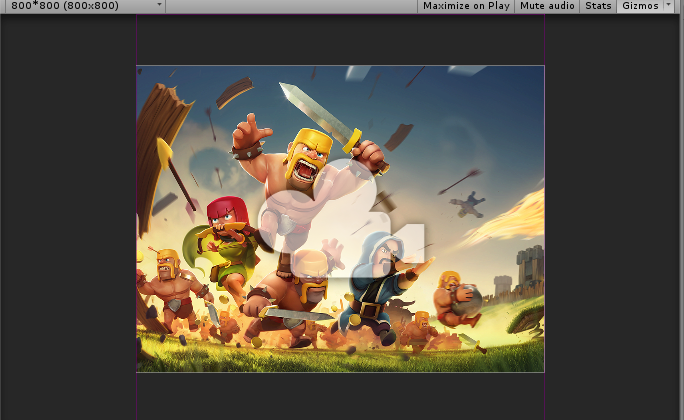
自适应后在屏幕分辨率设置为960*640(1.5比例)的时候显示如下: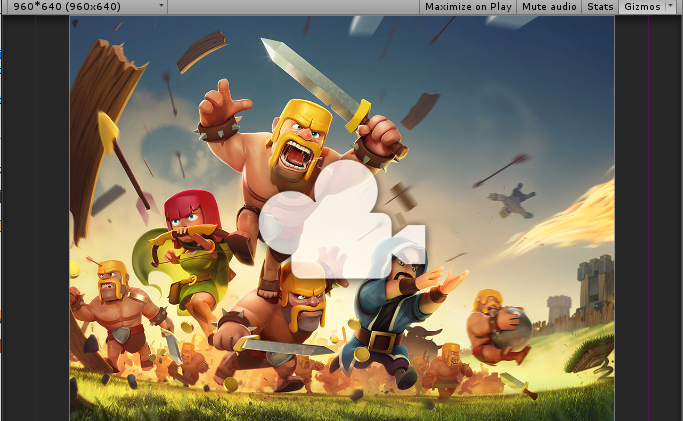
这样一来就实现了保持比例自适应。因为UIRoot是基于高度来缩放的,所以在低分辨率变到高分辨率的时候会出现左右黑边,这在横版游戏里是肯定不行的,所以我们需要做到以宽为基准的自适应。
那么基于宽度缩放的代码如下:
1 | public int activeHeight |
但上述在低分辨率变到高分辨率的时候会因为以宽为基准导致高度的自适应超出范围,见下图: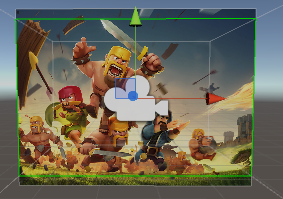
这种情况只能通过拉伸背景来铺满屏幕,但会失去原始比例(UIStretch可以实现基于屏幕或容器的自适应,不建议使用,后续NGUI都放弃了)。
我们肯定不希望我们的主要的UI都被拉伸变形,所以这里需要提到的是UIAnchor,
让我们在回忆下UIAnchor的作用:
“apply a half-pixel offset on Windows machines, for pixel-perfect results.”(把UI限定在窗口特定位置,当窗口变化的时候会依然处于相对窗口的位置)
待续……
关于UI制作尺寸的选择以及UI自适应相关设置:
前面的学习结合Unity Unit Pixel Per Unit的学习,可以看出,UI自适应和Pixel显示我們需要考虑的点有以下几个:
UI需要考虑的点:
- Canvas Render Mode(Canvas) – Screen Space Camera(一般来说不是作为3D UI摄像机的话,都会选择Screen Space Camera去自己指定一個UI Camera)
- UI Scale Mode(Canvas Scaler) – Scale With Screen Size(一般来说为了根据不同设备分辨率进行自适应,我們都会选择这种模式(跟物理size无关))
- Project(Camera) – 不是用于3D UI的话,一般来说UI Camera都是设置成Orthographic(正交投影)
- Screen Match Mode(Canvas Scaler) – 一般都选择Match Width Or Height指定是以宽为主还是以高为主(影响最终黑边情况 – 是上下黑边还是左右黑边)
- Reference Size(Canvas Scaler) – 影响不同机器上的自适应情况(分辨率降低或者升高会影响自适应结果 – 比如居中满屏显示的UI,以高分辨Reference Size在低分辨率Screen Size上以高度自适应会导致左右两侧的UI超出显示范围)(主流手机分辨率比例都在1.333 - 1.778,大部分是1.778)
- UI Anchors – 主要影響UI的自適應佈局方式(是自适应缩放还是相对位置)
Note:
横版2D和竖版2D游戏选择时,主要要考虑Screen Match Mode和Reference Size的选择,因为前者是不允许左右黑边,后者是不允许上下黑边的,两者同时也不允许超出的情况,所以个人认为横版2D应该选择Match Width Or Height值为0(以宽为主不让左右有黑边),同时Reference Size选择高分辨率,在低分辨率机器上显示时不至于超出高度(只是上下有黑边,这个问题可以通过用背景结合UI Anchors自适应的方式避免)。普通的2D UI,我们最主要要考虑的是Refrence Size的选择(选择高分辨率Reference Size和以宽度为基准自适应,然后结合UI Anchor
s布局和拉升背景即可),这样居中的物体不会被切割显示不全,在低分辨率Screen Size上只是显示高度缩小而已,UI Anchor靠边布局的UI依然正常显示。
Pixel Perfect显示考虑的点:
- Reference Size(Canvas Scaler) – 我们作为基准计算PPU的分辨率
- Orthographic Size(Camera) – 参与Pixel Perfect显示计算,同时把屏幕划分成Orthographci Size * 2个高Unit
- Reference Pixels Per Unit(Canvas Scaler) – 参与SpriteRectSize显示计算的参数(SpriteRectSize = SpriteSize * SpritePPU / CanvaReferencePPU),一般设置跟Sprite PPU一样保证Sprite按原始大小显示即可
- Pixels Per Unit(Asset) – Asset相对一个屏幕Unit显示的Pixels,用于确保Asset Pixel Perfect显示
Pixel Perfect显示公式:
Orthographic Size = Screen.height / 2 / PPU;
从前面的学习我们知道了,要想Pixel Perfect显示,除了动态修正Orthographic Size以外就是针对不同分辨率机器做多套PPU的资源去使用。
如果想Pixel Perfect显示,那么UI尺寸的选择就要参考计算出的PPU来设计。
DOTween
DOTween Instroduction
简单看一下官网提到的Features(这里只Copy一部分):
Speed and efficiency:
Not only very fast, but also very efficient: everything is cached and reused to avoid useless GC allocations.
Shortcuts:
Shortcut extensions that directly extend common objects
Extremely accurate:
Time is calculated in a very precise way. This means that 1000 loops of 1 second each will play exactly as long as a single loop of 1000 seconds.
Animate everything (almost)
DOTween can animate every numeric value and also some non-numeric ones. It can even animate strings, with support for rich-text.
Full control
Play, Pause, Rewind, Restart, Complete, Goto and tons of other useful methods to control your tweens.
Grouping
Combine tweens into Sequences to create complex animations (which don’t need to be in a, uh, sequence: they can also overlap each other).
Blendable tweens
Some tweens can blend between each other in realtime, thanks to powerful DOBlendable shortcuts.
Paths
Animate stuff along both linear and curved paths, with additional options for the orientation of your traveling agents.
Change values and duration while playing
Change a tween’s start/end values or duration at any moment, even while playing.
Yield for coroutines
Various “WaitFor…” methods to use inside coroutines, that allow you to wait for a tween to be completed, killed, started, or for it to reach a given position or loops.
Plugins
DOTween is built with an extensible architecture in mind, which allows you to create your own tween plugins as separate files.
Extras
Extra virtual methods to do stuff like calling a function after a given delay.
…….
总的来说DOTween可以满足我们做动画的任何要求且高效快速方便使用。
DOTween Install
看得出DOTween的定位是一个动画引擎。
首先是DOTween下载
其次是DOTween加入到我们的工程项目里(Assets下),然后DOTween被自动加载。
DOTween加载进来后会弹出设置界面: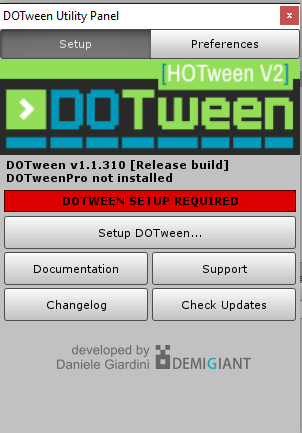
点击Setup DOTween进行设置,设置DOTween好使DOTween根据我们的Unity版本去导入一些特定库。
接下来我们就可以使用DOTween里的库函数做动画了。
DOTween Nomenclature and Prefixes
深入学习DOTween之前,让我们先了解下DOTween里的命名方式和一些关键术语:
以下学习源于DOTween官网
Nomenclature:
Tweener – A tween that takes control of a value and animates it.(Tweener是控制动画细节参数和播放的)
Sequence – A special tween that, instead of taking control of a value, takes control of other tweens and animates them as a group.(Sequence可以理解成负责对tweens进行动画而非对属性比如position做动画)
Tween – A generic word that indicates both a Tweener and a Sequence.
Nested tween – A tween contained inside a Sequence.
Prefixes:
DO – Prefix for all tween shortcuts (operations that can be started directly from a known object, like a transform or a material). Also the prefix of the main DOTween class.
1 | transform.DOMoveX(100, 1); |
Set – Prefix for all settings that can be chained to a tween (except for From, since it’s applied as a setting but is not really a setting).(tween的setting函数)
1 | myTween.SetLoops(4, LoopType.Yoyo).SetSpeedBased(); |
On – Prefix for all callbacks that can be chained to a tween.(tween的一些回调设定函数)
1 | myTween.OnStart(myStartFunction).OnComplete(myCompleteFunction); |
DOTween使用学习
在使用DOTween之前,我们需要在项目添加命名空间并对DOTween的初始化(初始化这一步不是必须的,不手动初始化也会自动初始化,官网推荐手动初始化设定):
1 | using DG.Tweening; |
让我们来看看DOTween里的函数定义:
1 | public static Tweener DOMove(this Transform target, Vector3 endValue, float duration, bool snapping = false); |
可以看出DOTween里面的大量方法都是通过C#里extend method的方式添加进去的。
所以我们要使用特定DOTween方法,我只需要在对应类的实例调用扩展方法即可。
接下来看看我们如何创建自定义的Tween。
有三中方式可供选择:
- The generic way
DOTween.TO(getter, setter, to float duration)
Changes the given property from its current value to the given one.
getter A delegate that returns the value of the property to tween. Can be written as a lambda like this: ()=> myValue
where myValue is the name of the property to tween.
setter A delegate that sets the value of the property to tween. Can be written as a lambda like this: x=> myValue = x
where myValue is the name of the property to tween.
to The end value to reach.
duration The duration of the tween.
1 | // Tween a Vector3 called myVector to 3,4,8 in 1 second |
- The shortcuts way(Extension method)
1 | transform.DOMove(new Vector3(2,3,4), 1); |
在shortcuts方法后面调用From()的话,就会初始位置当做dest,把dest当做初始绘制来做动画。
1 | transform.DOMove(new Vector3(2,3,4), 1).From(); |
- Additional generic ways
这种没太看明白
1 | static DOTween.Punch(getter, setter, Vector3 direction, float duration, int vibrato, float elasticity) |
貌似是会对Tween做特殊的限制,比如DOTween.Shake延axis轴变化vector3。
接下来让我们看看如何使用Sequence:
The sequenced tweens don’t have to be one after each other. You can overlap tweens with the Insert method.(sequence可包含其他sequence,可以通过Insert把tween插入到特定时间执行)
A tween (Sequence or Tweener) can be nested only inside a single other Sequence, meaning you can’t reuse the same tween in multiple Sequences. (同一个tween不能被多个sequence使用)
创建一个Sequence:
1 | DOTween.Sequence(); |
我们可以通过添加tweens,callback到sequence里去做一些特别的动画。
Note:
“ all these methods need to be applied before the Sequence starts (usually the next frame after you create it, unless it’s paused), or they won’t have any effect.”(添加tweens,callback这些都必须在Sequence开始之前,可以理解为同一帧里)
接下来我们看看Tween的一些设置:
这些设置分为针对全局,tweens,sequence,tweener设置。
举个简单的例子,比如我们在初始化DOTween的时候设置了tween在同一时刻激活的最大数量。我超过这个数量后想要修改,我们可以通过:
1 | DOTween.SetTweensCapacity(***); |
上述这个方法就是针对全局设置的
接下来我们看看如何动态的控制tween动画的:
有三种方式:
- Via Static methods and filters
DOTween class给我们提供了大量的静态方法去控制tween动画。
比如我们想暂停某个tween动画或暂停所有tween:
1 | DOTween.Pause(tweenname); |
- Directly from the tween
我们也可以通过保存的tween动画引用去调用控制相关的动画
1 | myTween.Pause(); |
- From a shortcut-enhanced reference
直接通过扩展方法去停止对应的物体上的tween(这里要注意的是,所有控制tween的扩展方法都带DO前缀)
1 | transfrom.DOPause(); |
Note:
“IMPORTANT: remember that to use these methods on a tween after it has ended, you have to disable its autoKill behaviour, otherwise a tween is automatically killed at completion.”(对tween设置的时候一定要disable automatically kill,否则在tween完成的时候tween会被销毁)
同时DOTween还给我们提供了很多静态方法去获取tween的信息(比如Delay(),Duration()等)
Tween结合Coroutines的使用:
Tween提供了一些YieldInstructions的方法,可以让我们结合Coroutines去方便快速的实现一些对调用时机有讲究的动画:
1 | // 需要等到tween结束 |
总结:
给我的感觉,DOTween是一个基于Unity扩展的强大的数学动画库。
通过DOTween我们可以快速的去针对Unity里的一些属性比如位置,材质,UI等做动画,可以说是属于程序员的动画制作工具。
待续……
