前言 本篇文章是为了记录学习Unity官方一些好的第三方插件,作为基础的学习了解,为未来遇到问题思考解决方案时拓宽思路。
Sprite Atlas 依然从What,Why,How三个角度了学习了解Sprite Atlas。
What Sprite Atlas是官方Sprite Packer的升级版本,是为了更好的解决图集打包加载问题而开发的,而图集是为了解决Draw Call问题。
Why 老版Unity的时候,图集打包功能(SpritePacker,打Tag的方式)并不完善,更多的是采用第三方好比TexturePacker打包图集在放到Unity项目里的工作流。
Sprite Atlas主要提供了以下三个功能:
新版Sprite Atals已经很完善了,考虑到以下几个原因,决定学习官方的打包图集工具跟着官方走:
TexturePacker是付费的,Sprite Atlas免费
Sprite Atlas是官方的,跟官方走一般来说不会错
Spritre Atlas已经成熟可以商用的级别
How 使用Sprite Atlas之前,我们需要打开Sprite Atlas功能开关:
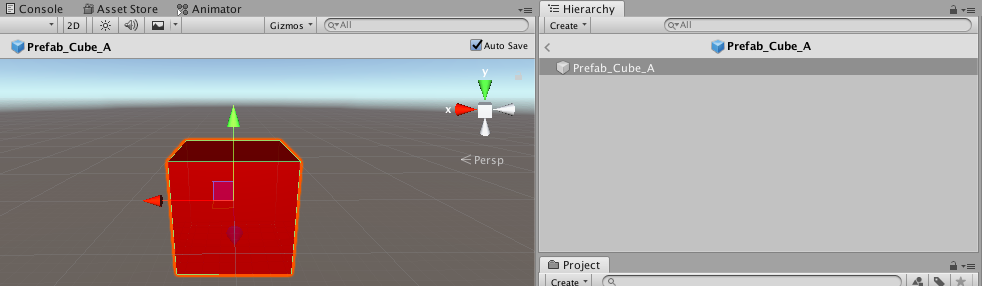
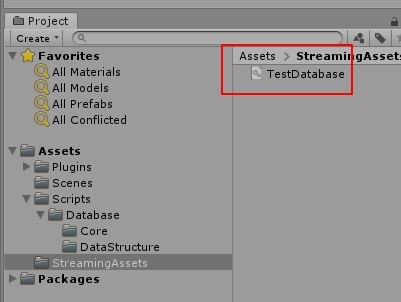
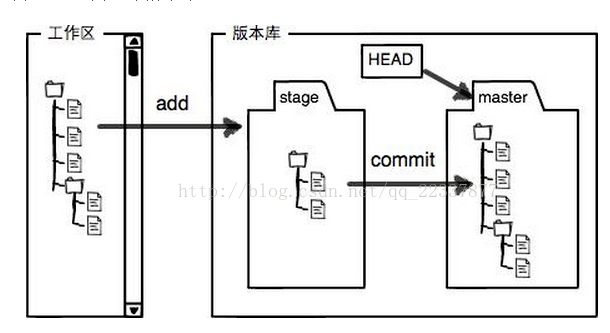
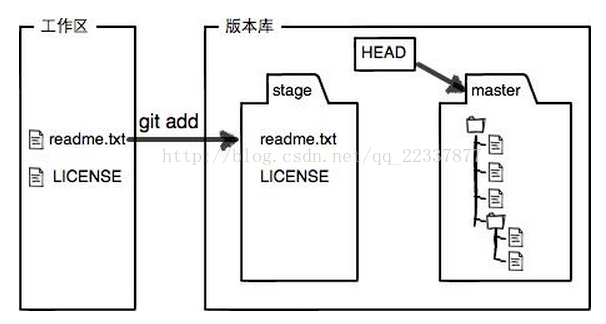
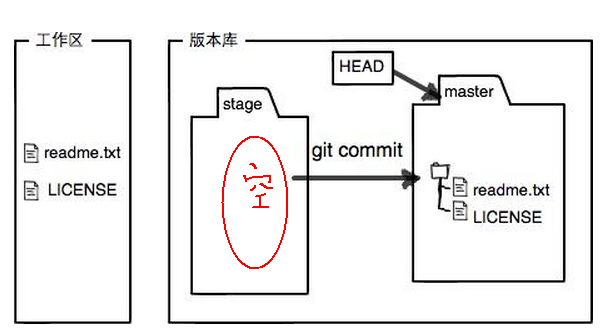
创建、编辑图集以及设定图集参数 在Sprite Atlas里Sprite Atlas是作为一种资源(Asset)存在。
选中创建的Sprite Atlas我们能看到相关设置:Sprite Atlas
点击Sprite Atlas -> Pack Preview即可查看打包后的结果:
这里关于Include in Build这个参数要详细说明一下,这个参数会决定一下几方面:
影响使用SpriteAtlas图集资源的资源是如何关联SpriteAtlas的(会决定使用该SpriteAtlas资源加载时加载哪一个图集资源–这里指的是有图集Variant的情况)
影响SpriteAtlas是否需要采用Later Bind(触不触发SpriteAtlasManager.atlasRequested接口,通过这个接口结合图集Variant我们可以做到例如不同平台加载不同图集的适配)。反之勾选Include in Build在依赖使用时会自动加载依赖的Sprite Atlas。这里貌似有些Unity版本有个Bug,勾选Include in Build会导致资源打包冗余
针对第一条详情参考:Resolving different Sprite Atlas scenarios
Note:
Sprite Atlas支持Objects for Packing设置文件夹 参与打包的图片必须设置成Sprite(2D and UI)格式 Include in Build会影响SpriteAtlas的选择(比如是否要使用Later Bind等)
添加图集Variant(变种) 什么是图集Variant?A Variant Sprite Atlas is a type of Sprite Atlas that does not contain its own list of selected Textures as it has no Objects for Packing list in its properties. Instead, it receives a copy of the content from the Sprite Atlas set as its Master Atlas.
图集Variant的适用场景?
图集Variant设置适用:
结论:
图集变体是类似Mipmap的东西,通过多打包多个不同大小的图集到游戏里,Unity自动帮我们选择合适的图集来加载,从而做到高分辨率机型加载高分辨率的,低分辨率机型加载低分辨率的,典型的空间换时间做法 。
Note:
要想只打包使用图集Variant,需要把图集Variant的Include in Build打开,把图集Master的Include in Build关闭
运行时访问图集 Sprite Atlas作为一种资源开放给用户,支持在脚本中直接访问,还可以通过名字获取图集中的精灵。
这里我们采用设置不勾选Include in Build的设置打包SpriteAtlas
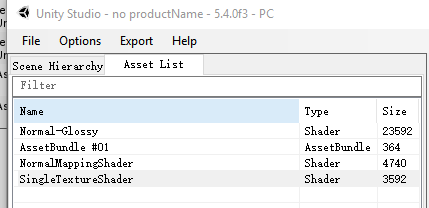
接下来我们通过SpriteAtlas接口访问打包AB后的Sprite Atlas里的图片资源试试:
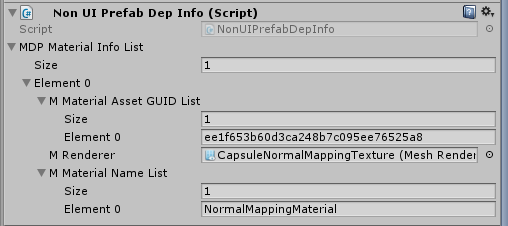
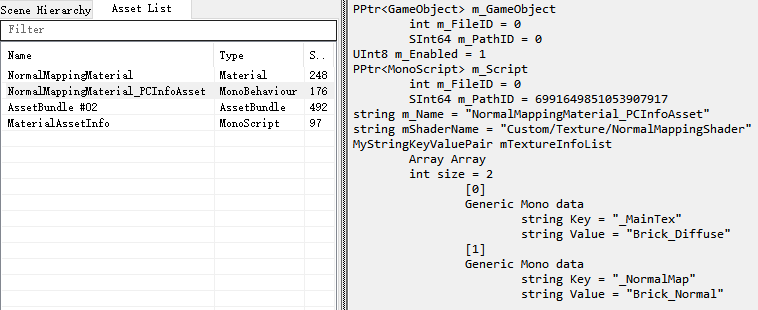
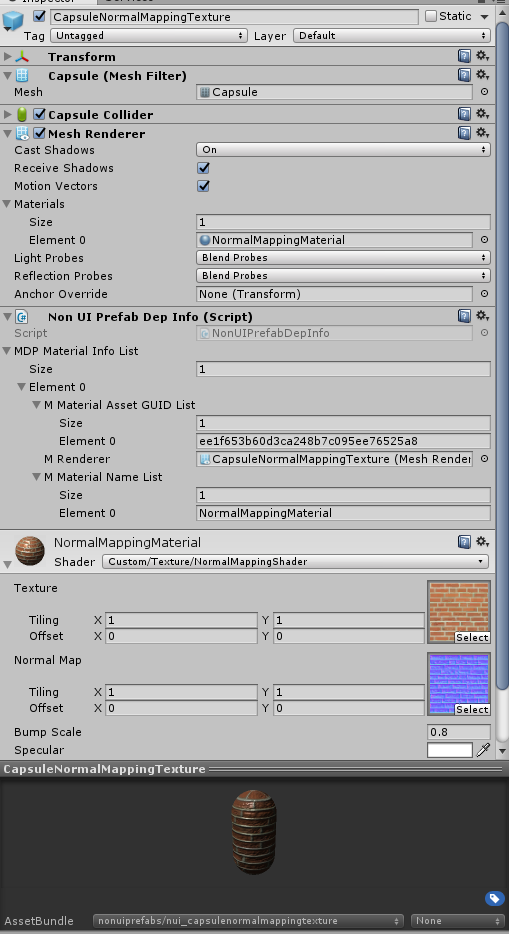
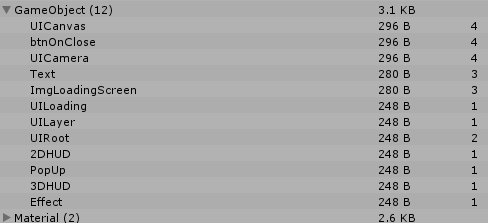
这里我们看看UI预制件引用SpriteAtlas看看依赖打包的情况:
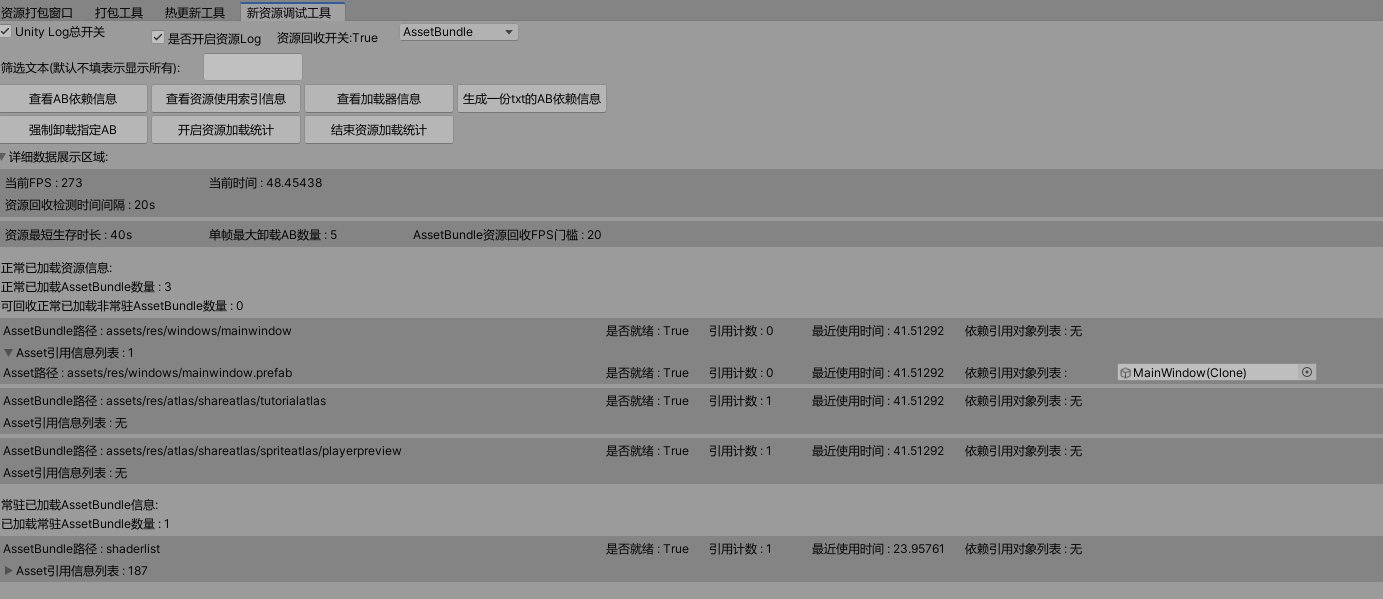
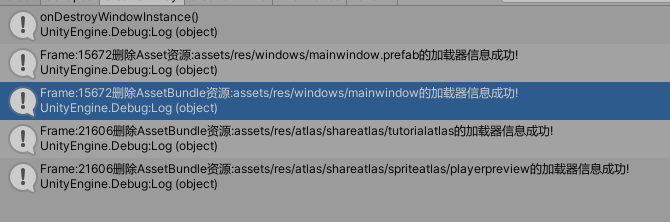
加载UI窗口预制件后发现Sprite Missing了:不知道这算不算是一个Bug还是设计如此,因为没有依赖信息对资源加载管理会造成问题,忘知道的朋友告知。
问题:
加载使用SpriteAtlas的UI Prefab,SpriteAtlas会自动加载进内存且没有依赖信息。但如果此时主动加载了Sprite Atlas并主动强制卸载该Sprite Atlas的AB会导致UI Prefab使用的Sprite Atlas也跟随被清除。从这里看出UI Prefab对Sprite Atlas的依赖信息是有必要的,不然没法正确的管理资源加载。
这里引申出了SpriteAtlas一个很重要的功能,Later Bind
Note:
图集的被动(依赖)加载管理会有使用该图集的资源所决定(比如UI Prefab使用了SpriteAtlas,两个分别打包AB,这时加载UI Prefab后SpriteAtlas会自动加载进内存,而UI Prefab卸载以后,SpriteAtlas没有其他主动加载该SpriteAtlas的会自动卸载。)
Later Bind SpritePacker时代“图集”我们是看不到的,因为设计者的初衷是想让开发者完全不用考虑图集的事。但是,这跟游戏开发时的动态加载图集时矛盾的!我们要动态加载就必须要知道atlas名字和sprite名,这样才能在 运行时动态的找到一张sprite!所以U3D程序员必须要清楚的知道你当前界面用的是哪atlas的哪个sprite。但是按照SpritePacker的做法他的初衷应该是想把图集干掉(干掉的意思让开发者不用关心),只需要考虑sprite即可,但是这是行不通的!
AtlasManager.cs
1 2 3 4 5 6 7 8 9 10 11 12 13 14 15 16 17 18 19 20 21 22 23 24 25 26 27 28 29 public class AtlasManager : SingletonTemplate <AtlasManager >{ public AtlasManager () { DIYLog.Log("添加SpriteAtals图集延时绑定回调!" ); SpriteAtlasManager.atlasRequested += onAtlasRequested; } private void onAtlasRequested (string atlasname, Action<SpriteAtlas> callback { DIYLog.Log($"加载SpriteAtlas:{atlasname} " ); ResourceModuleManager.Singleton.requstResource( atlasname, (abi) => { DIYLog.Log($"Later Bind加载SpriteAtlas:{atlasname} " ); var sa = abi.loadAsset<SpriteAtlas>(atlasname); callback(sa); }); } ****** }
在加载使用SpriteAtlas(仅当设置成不勾选Include in Build )的相关资源时(比如UI Prefab)上诉回调会被触发完成对SpriteAtlas的加载,确保引用的Sprite能正确显示。同时这一机制就允许我们做到不同平台的不同图集资源加载适配这样的功能。
疑问:
Later Bind只是加载SpriteAtlas提供的一个回调接口(无论是主动还是被动(依赖)加载),回调接口内只知道加载了指定的SpriteAtlas却不知道具体的详细用法,这样一来基于对象绑定和索引计数的资源管理系统就无法正确的加载管理了(因为被动(依赖)加载得不到SpriteAtlas的依赖信息)。
个人方案:
当前这套基于对象绑定和索引计数的方案暂时没想到好的方案,可能需要对SpriteAtals的资源管理单独做一套管理策略来支持Later Bind的用法。有更好方案的朋友,望告知。
注意事项
开启Sprite Packer的设置Sprite Packer -> Mode(Always Enable)只决定图集合成时机(比如是运行时还是打包时还是编辑器时)。
Sprite Atlas支持Objects for Packing设置文件夹
参与打包的图片必须设置成Sprite(2D and UI)格式
Include in Build会影响SpriteAtlas图集资源的资源是如何关联SpriteAtlas(比如影响是否需要使用Later Bind,不勾选需要使用Later Bind否则会报警告)
相关概念
Sprite Atlas把图集打包的概念延迟到特定时刻(比如打包或者打包AB)而编辑模式依然可以使用原始Sprite工作,总的来说就是延时自动化打包图集时机+允许使用原始Sprite的概念。
Include in Build设置主要是看有没有动态适配加载图集需求,有的话就建议不勾选,然后结合Later Bind来做动态图集加载适配。反之勾选Include in Build在依赖使用时会自动加载依赖使用的Sprite Atals。
Include in Build其次还会影响Sprite Atlas变体使用的选择。
SpriteAtlas到了Unity 2018 LTS版本感觉才稳定些,建议使用稳定版本的SpriteAtlas
Later Bind不会区分主动加载还是被动(依赖)加载SpriteAtlas,都会统一回调,要使用Later Bind机制的需要取消勾选Include in Build并解决SpriteAtlas的资源加载管理问题(在沿用原来的对象绑定和索引计数的资源管理方案基础上本人暂时没有好的方案)
Sprite Atlas无论够不够选Include in Build打包AB都得不到Sprite Atlas的依赖信息,感觉这是一个bug
Bug记录
勾选Include in Build会导致资源打包冗余(部分Unity版本比如Unity2018.4.1f1),建议升级到LTS版本
结论 SpriteAtlas虽然解决了Atlas和UIPrefab的解耦,同时提供了图集变体的概念来解决适配图集适配方案,但也带来了一些新的问题要解决(e.g. 要解决没有依赖信息的SpriteAtals基础上做到正确的资源加载管理)。
——————————–2021/20/12更新开始————————————–
正确使用姿势参考:
【Unity游戏开发】SpriteAtlas与AssetBundle最佳食用方案
简单来说:
SpriteAtlas 勾选Include in build SpriteAtlas不设置AB打包 直接当做单Sprite一样加载
——————————–2021/20/12更新结束————————————–
Timeline Timeline to create cinematic content, game-play sequences, audio sequences, and complex particle effects.
官方介绍Timeline可以用于制作类似电影过场表现的工具。
Timeline分为两个部分:
Timeline Asset(数据)
Timeline instance(数据关联实体对象)
Timeline Asset 介绍 Timeline Asset : Stores the tracks, clips, and recorded animations without links to the specific GameObjects being animated.
通过介绍可以看出Timeline Asset是类似于Animation Clip一样的资源文件可以用于录制动画但不需要关联到特定的物体上
Timeline Asset记录的动画数据是以子节点资源的形式挂载在Timeline Asset下的:
Note:
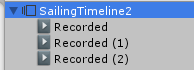
分类 Timeline Asset是以Track为最小单位。
主要支持以下几种Track:
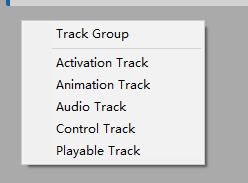
Track Group(仅分层管理用)
Activation Track(激活物体Track)
Animation Track(动画Track)
Audio Track(音频Track)
Control Track(时间相关的控制)
Playable Track(自定义Track )
这里我们着重学习Playable Track,自定义的一些表现行为都是通过Playable Track来做的。其他几个就不一一讲解了。
Playable Track 自定义Playable Track需要知道两个东西:
PlayableAsset(用于支持Timeline创建和显示自定义PlayableAsset数据定义)
PlayableBehaviour(用于Playable实际的生命周期等逻辑实现)
示例:
1 2 3 4 5 public enum EEventId{ DefaultEvent = 1 , }
1 2 3 4 5 6 7 8 9 10 11 12 13 14 15 16 17 18 19 [System.Serializable ] public class EventDispatcherAsset : PlayableAsset { public EEventId EventId = EEventId.DefaultEvent; public override Playable CreatePlayable (PlayableGraph graph, GameObject go ) { var playable = ScriptPlayable<EventDispatcherPlayable>.Create(graph); playable.GetBehaviour().EventId = EventId; return playable; } }
1 2 3 4 5 6 7 8 9 10 11 12 13 14 15 16 17 18 19 20 21 22 23 24 25 26 27 28 29 30 31 32 33 34 35 36 37 38 39 40 41 42 43 44 45 46 public class EventDispatcherPlayable : PlayableBehaviour { [Header("事件" ) ] public EEventId EventId = EEventId.DefaultEvent; public override void OnGraphStart (Playable playable ) { } public override void OnGraphStop (Playable playable ) { } public override void OnBehaviourPlay (Playable playable, FrameData info ) { Debug.Log(string .Format("OnBehaviourPlay() 分发事件 : {0}" , EventId)); } public override void OnBehaviourPause (Playable playable, FrameData info ) { } public override void PrepareFrame (Playable playable, FrameData info ) { } }
代码不复杂就不详细介绍了。通过上面的代码,我们支持了一个创建自定义分发事件的Playable Track,而这个自定义的事件分发就可以用作我们Timeline和游戏逻辑之间的一个桥梁,帮助我们在Timeline播放的过程中自定义响应做一些表现。
Timeline instance 介绍 Timeline instance : Stores links to the specific GameObjects being animated or affected by the Timeline Asset. These links, referred to as bindings , are saved to the Scene.
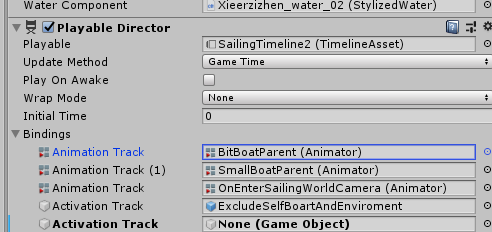
要想关联场景物体和Timeline Asset让我们制作的电影过场动起来,我们需要创建Timeline instance(这里指的Playable Director组件)。
可以看到我们通过Timeline Asset录制的动画是通过Playable Director的Bindings动态关联到了场景物体上。
Note:因为Timeline Asset是纯数据,Timeline instance决定了数据关联的对象,所以我们可以重用Timeline Asset对不同的物体做动画表现。
Timeline类设计 Playable The Playables API provides a way to create tools, effects or other gameplay mechanisms by organizing and evaluating data sources in a tree-like structure known as the PlayableGraph. The PlayableGraph allows you to mix, blend, and modify multiple data sources, and play them through a single output.
从介绍个人的理解,Playable是一套可自定义数据处理流程成树状结构的工具。而自定义出来的树状结构数据就叫做PlayableGraph(后续会讲到)。而Timeline的核心正是Playable。
使用Playables API的好处:
The Playables API allows for dynamic animation blending. This means that objects in the scenes
The Playables API allows you to easily play a single animation without the overhead involved in creating and managing an AnimatorController asset.
The Playables API allows users to dynamically create blending graphs and control the blending weights directly frame by frame.
A PlayableGraph can be created at runtime, adding playable node as needed, based on conditions. Instead of having a huge “one-size-fit-all” graph where nodes are enabled and disabled, the PlayableGraph can be tailored to fit the requirements of the current situation.
官网上介绍了Playable的不少好处,从介绍可以看出最大的好处就是运行时自定义组装数据处理流程,避免离线构建一套过于臃肿的数据定义(比如AnimatorController)
Note:
Playable是Struct而非Class,为了避免内存分配导致GC Playable和PlayableOutput没有提供太多方法,而是通过PlayableExtension和PlayableOutputExtension用扩展方法的方式来提供的方法
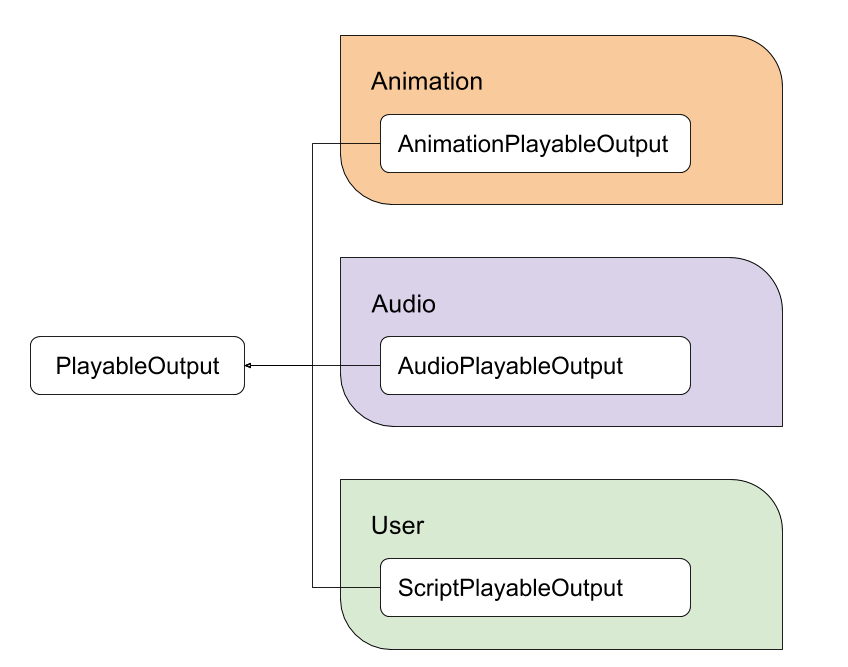
PlayableGraph The PlayableGraph defines a set of playable outputs that are bound to a GameObject or component. The PlayableGraph also defines a set of playables and their relationships. Figure 1 provides an example.
The PlayableGraph is responsible for the life cycle of its playables and their outputs. Use the PlayableGraph to create, connect, and destroy playables.
从上面的介绍,个人理解,PlayableGraph是一个自定义数据处理流程的完整单位,负责自定义数据处理流程里的节点定义,关联,以及生命周期。PlayableGraph是由Plyable(e.g.Playable,MixPlayable)+PlayableOuput组成。
PlayableAsset A base class for assets that can be used to instantiate a Playable at runtime.
PlayableAsset是自定义Playable时定义数据Asset的基类。
PlayableBehaviour PlayableBehaviour is the base class from which every custom playable script derives.
PlayableBehaviour是自定义Playable时定义行为实现的脚本基类。
PlayableOutput 个人理解是定义Playable里面的输出节点。所有的输入节点最后连接成树状结构后连到输出节点上,执行出自定义行为的输出表现。
参考下图:
PlayableBinding Struct that holds information regarding an output of a PlayableAsset. PlayableAssets specify the type of outputs it supports using PlayableBindings.
看介绍PlayableBinding是用于定义并持有PlayableAsset的数据输出信息。
ExposedReference Creates a type whos value is resolvable at runtime. ExposedReference is a generic type that can be used to create references to Scene objects and resolve their actual values at runtime and by using a context object. This can be used by assets, such as a ScriptableObject or PlayableAsset to create references to Scene objects.
从介绍可以看出,ExposedReference是用于创建一个类型(其值在运行时处理绑定的)。用于解决PlayableAsset引用场景对象组件数据等问题。
辅助工具(GraphVisualizer) The PlayableGraph Visualizer is a tool that displays the PlayableGraphs in the scene. It can be used in both Play and Edit mode and will always reflect the current state of the graph.
因为Playable的设计很庞大,里面有很多类和概念,为了方便理解Playable设计和使用可视化的查看构建出来的PlayableGraph显得额外有用,而PlayableGraph Visualizer正是这么一款工具。
接下来我们结合GraphVisualizer动态通过代码创建模拟用Playable API实现动画Animator Controller里的动画状态机类似的效果,从而深入学习理解Playable里各个类的设计和使用。
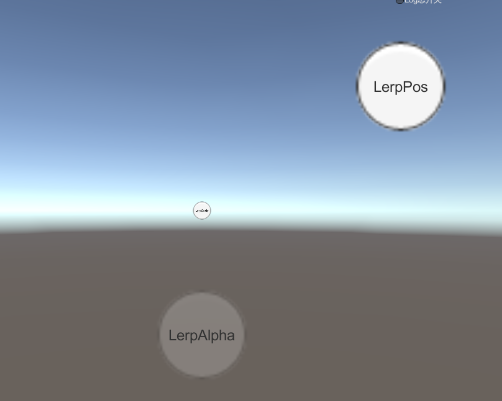
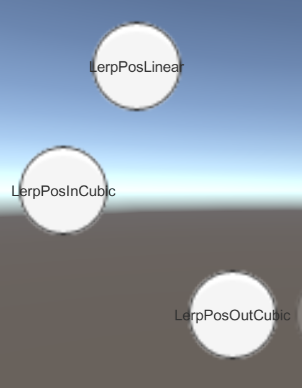
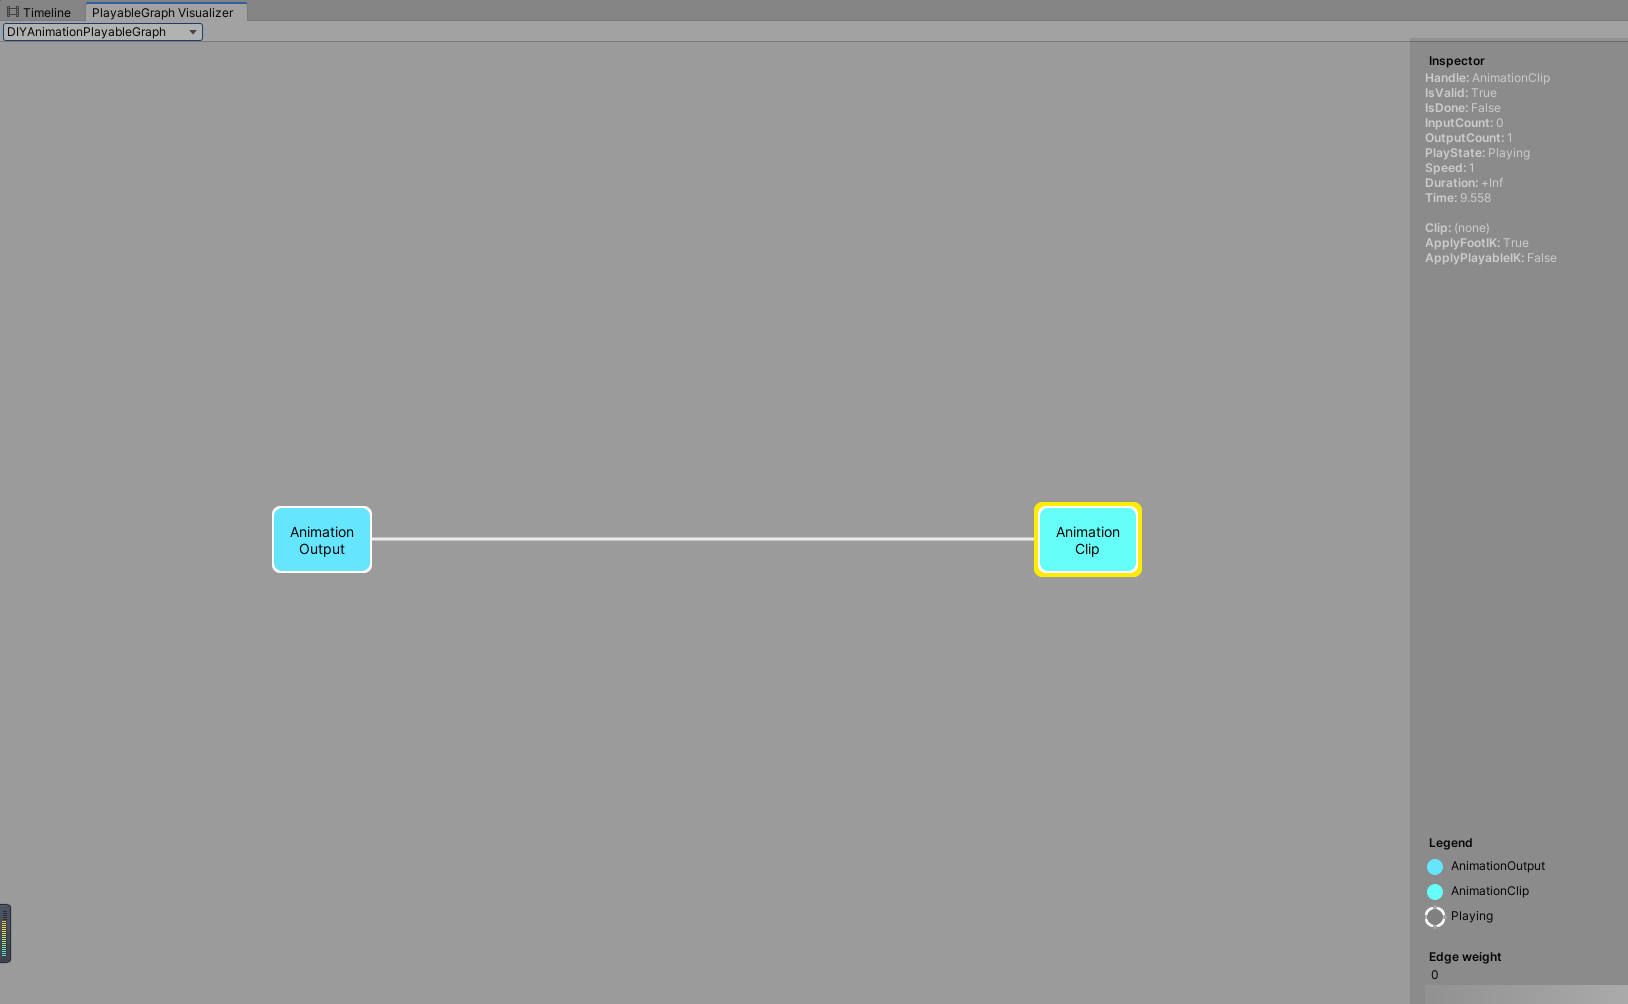
单AnimationClip单AniamtionOuput的动画播放 1 2 3 4 5 6 7 8 9 10 mCustomGraph = PlayableGraph.Create("DIYAnimationPlayableGraph" ); var animoutput = AnimationPlayableOutput.Create(mCustomGraph, "AnimationOutput" , CustomAnimator1);var animationclipplayable = AnimationClipPlayable.Create(mCustomGraph, CustomAnimationClip1);animoutput.SetSourcePlayable(animationclipplayable); mCustomGraph.Play();
通过上面的代码我们动态创建了1个PlayableGraph,1个动画Plyable,1个动画PlayableOutput作为动画播放输出,并设置他们之间的关联,运行代码打开PlayableGraphVisualizer就可以查看到生成的单动画Clip播放PlayableGraph图了。
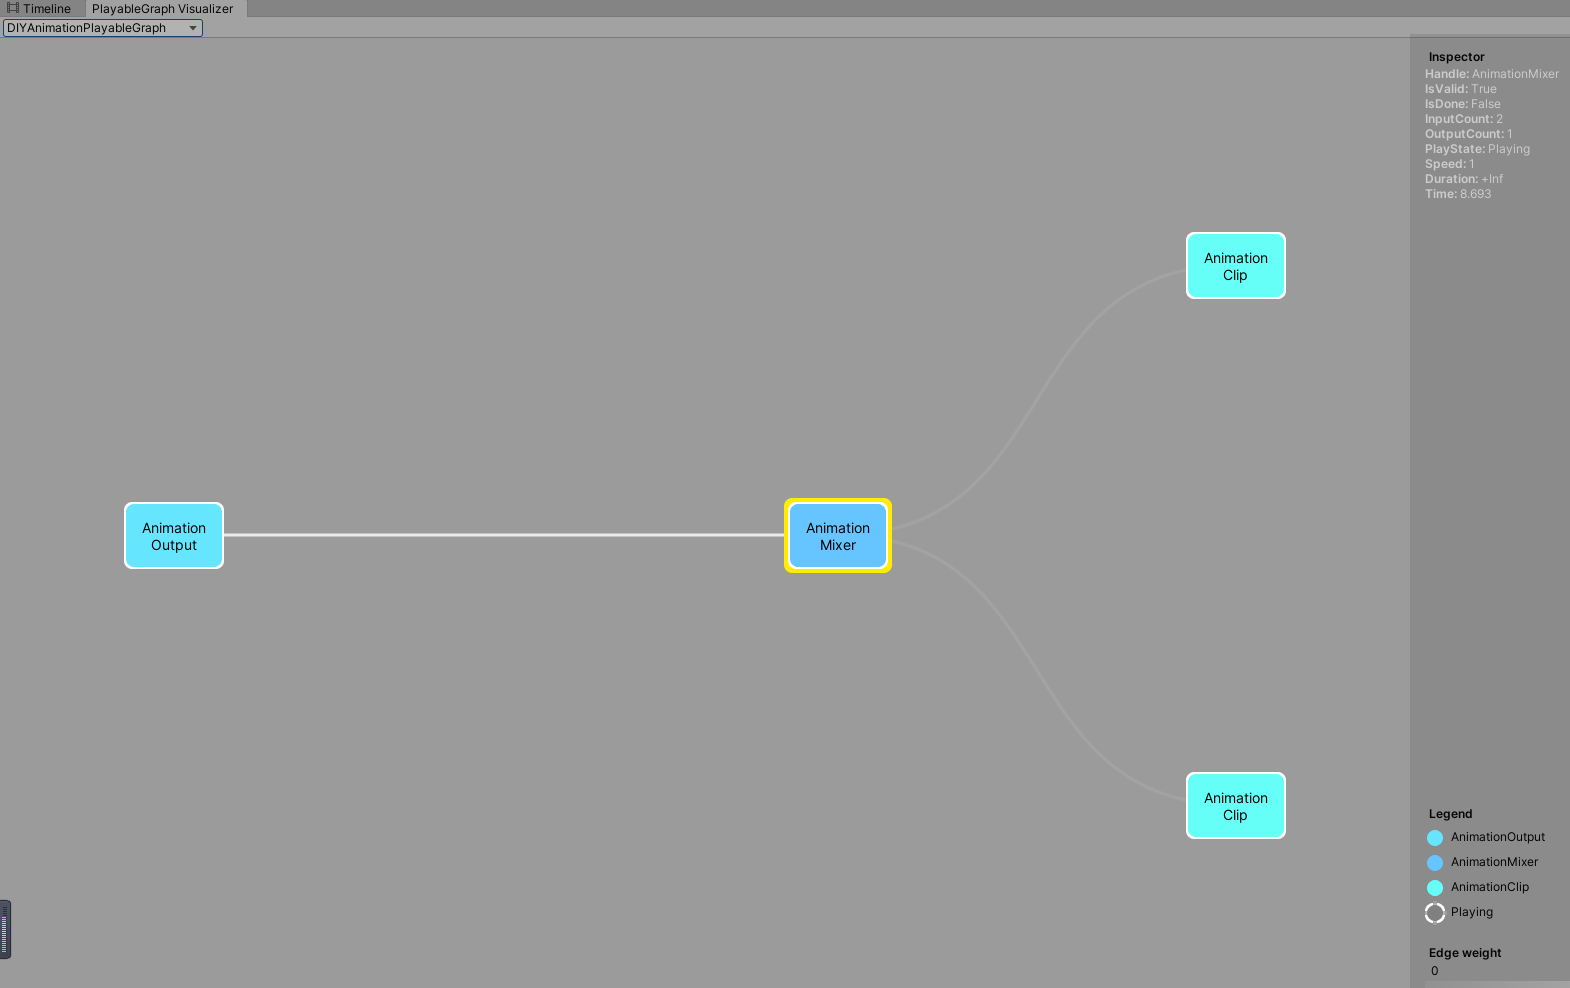
多AnimationClip混合 1 2 3 4 5 6 7 8 9 10 11 12 13 14 15 16 mCustomGraph = PlayableGraph.Create("DIYAnimationPlayableGraph" ); var animationOutput = AnimationPlayableOutput.Create(mCustomGraph, "AnimationOutput" , CustomAnimator1);mAnimationMixerPlayable = AnimationMixerPlayable.Create(mCustomGraph, 2 ); animationOutput.SetSourcePlayable(mAnimationMixerPlayable); var animationClipPlayable1 = AnimationClipPlayable.Create(mCustomGraph, CustomAnimationClip1);var animationClipPlayable2 = AnimationClipPlayable.Create(mCustomGraph, CustomAnimationClip2);mCustomGraph.Connect(animationClipPlayable1, 0 , mAnimationMixerPlayable, 0 ); mCustomGraph.Connect(animationClipPlayable2, 0 , mAnimationMixerPlayable, 1 ); mCustomGraph.Play();
通过上面的代码我们动态创建了一个PlayableGraph,2个动画Plyable作为基础输入,1个动画混合Playable作为混合节点,1个动画PlayableOutput作为动画播放输出,并设置他们之间的关联,运行代码打开PlayableGraphVisualizer就可以查看到生成的动画混合播放PlayableGraph图了。
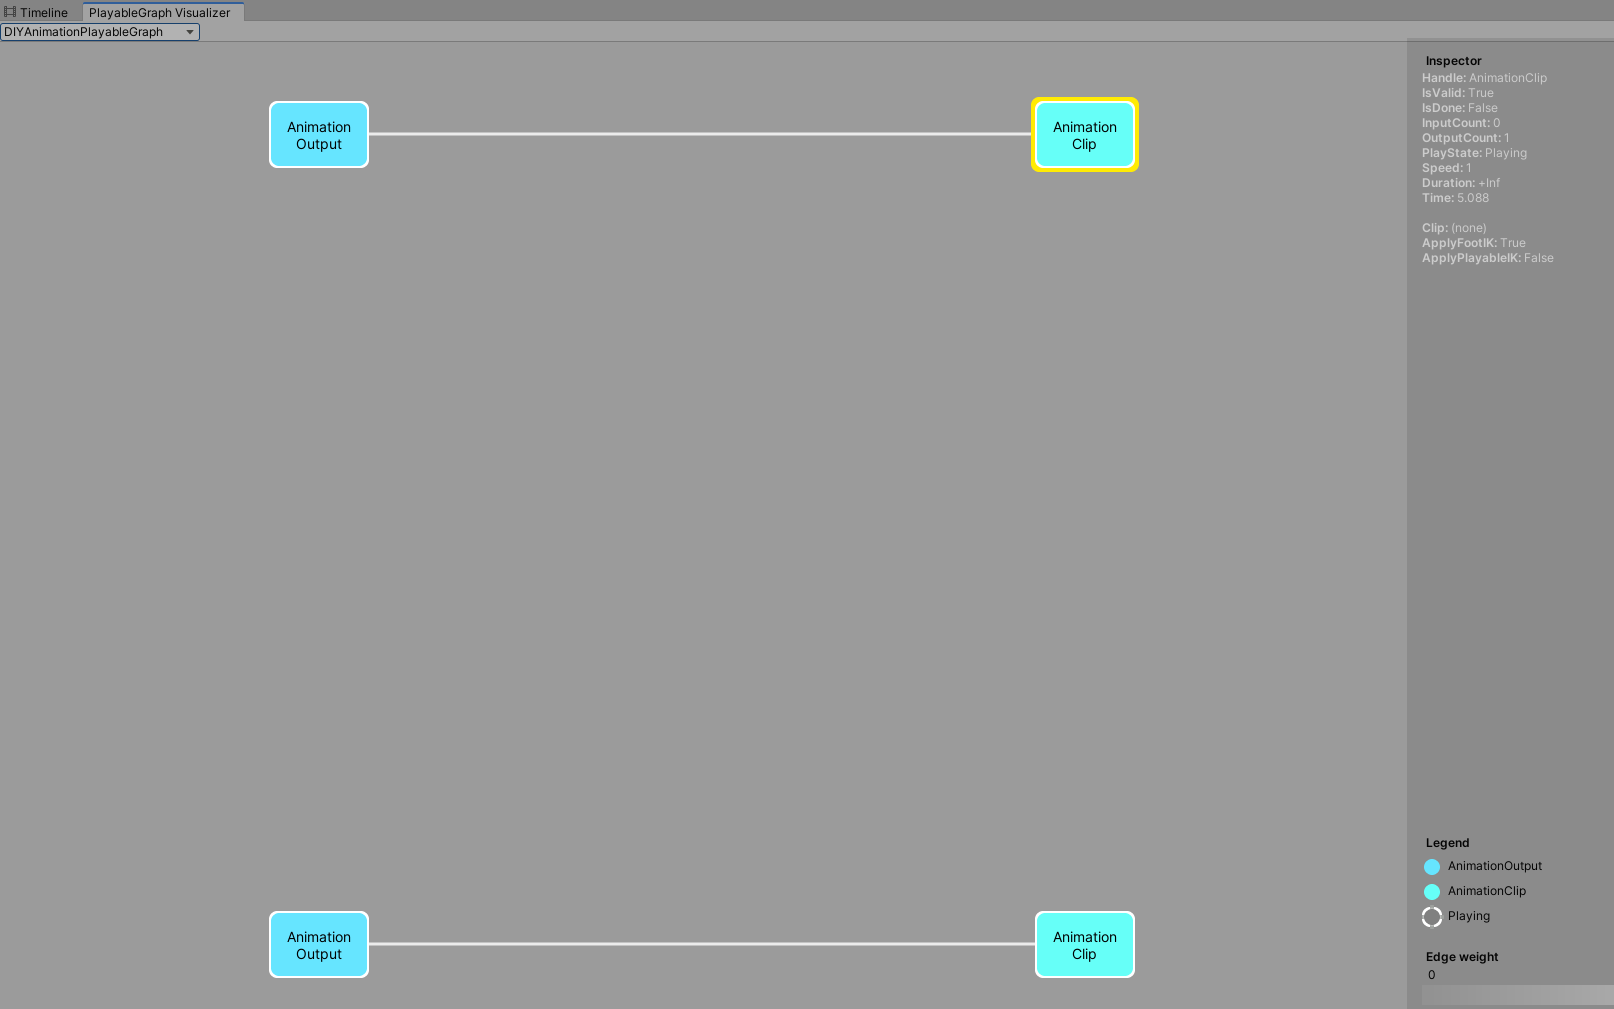
多AnimationClip多AnimationOuput 一个PlayableGraph是可以拥有多个PlayableOutput输出的
1 2 3 4 5 6 7 8 9 10 11 12 13 14 mCustomGraph = PlayableGraph.Create("DIYAnimationPlayableGraph" ); var animationOutput1 = AnimationPlayableOutput.Create(mCustomGraph, "AnimationOutput1" , CustomAnimator1);var animationOutput2 = AnimationPlayableOutput.Create(mCustomGraph, "AnimationOutput2" , CustomAnimator2);var animationClipPlayable1 = AnimationClipPlayable.Create(mCustomGraph, CustomAnimationClip1);var animationClipPlayable2 = AnimationClipPlayable.Create(mCustomGraph, CustomAnimationClip2);animationOutput1.SetSourcePlayable(animationClipPlayable1); animationOutput2.SetSourcePlayable(animationClipPlayable2); mCustomGraph.Play();
通过上面的代码我们动态创建了一个PlayableGraph,2个动画Plyable对应2个动画PlayableOutput动画播放输出的输入,并设置他们之间的关联,运行代码打开PlayableGraphVisualizer就可以查看到生成的动画混合播放PlayableGraph图了。
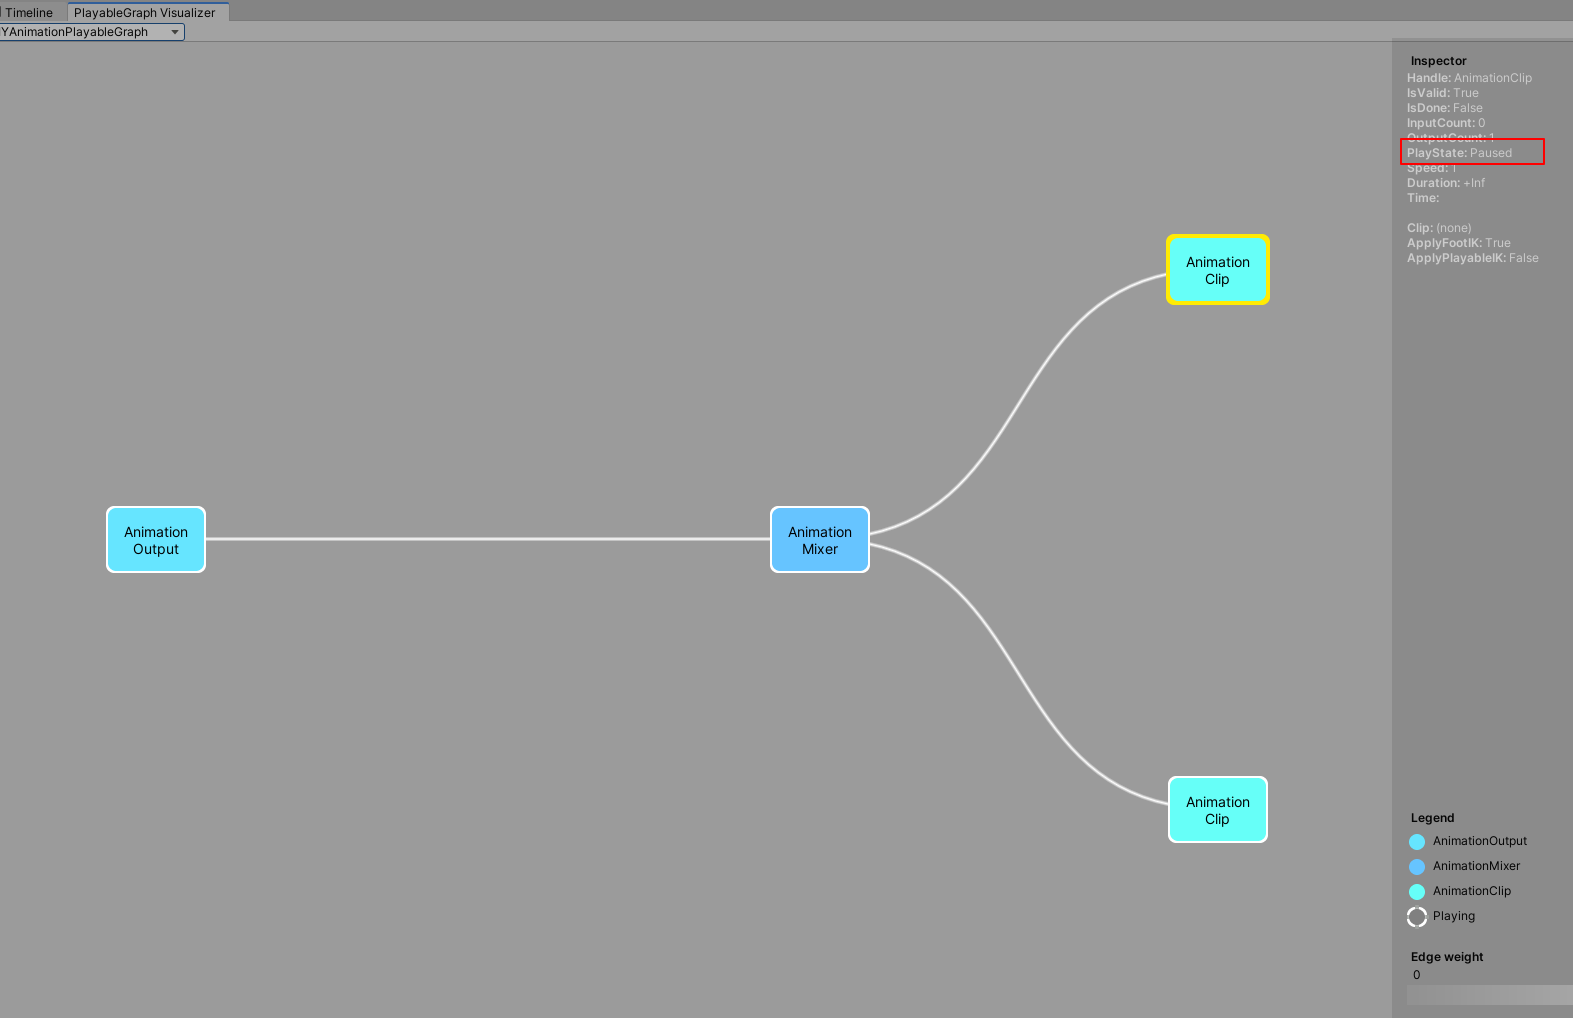
多AnimationClip混合并控制权重加播放状态 不同的Playable是可以设置混合权重加播放状态的
1 2 3 4 5 6 7 8 9 10 11 12 13 14 15 16 17 18 19 20 mCustomGraph = PlayableGraph.Create("DIYAnimationPlayableGraph" ); var animationOutput = AnimationPlayableOutput.Create(mCustomGraph, "AnimationOutput1" , CustomAnimator1);mAnimationMixerPlayable = AnimationMixerPlayable.Create(mCustomGraph, 2 ); animationOutput.SetSourcePlayable(mAnimationMixerPlayable); var animationClipPlayable1 = AnimationClipPlayable.Create(mCustomGraph, CustomAnimationClip1);var animationClipPlayable2 = AnimationClipPlayable.Create(mCustomGraph, CustomAnimationClip2);mCustomGraph.Connect(animationClipPlayable1, 0 , mAnimationMixerPlayable, 0 ); mCustomGraph.Connect(animationClipPlayable2, 0 , mAnimationMixerPlayable, 1 ); mAnimationMixerPlayable.SetInputWeight(0 , 1.0f ); mAnimationMixerPlayable.SetInputWeight(1 , 1.0f ); animationClipPlayable1.Pause(); mCustomGraph.Play();
通过上面的代码我们动态创建了一个PlayableGraph,2个动画Plyable作为动画混合Playable的输入,1个动画混合Playable作为动画播放输出的输入,1个PlayableOutput作为动画播放输出,并设置他们之间的关联和权重,并把其中一个动画播放Playable设置成暂停状态,运行代码打开PlayableGraphVisualizer就可以查看到生成的动画混合播放PlayableGraph图了。
Note:
父Playable的播放状态设置会影响所有子节点Playable播放状态
Timeline实战 通过上面有了基础的知识后,接下来我们以实战的方式深入学习Timeline。
人物模型移动(Timeline自带)+人物模型动画播放(Timeline自带)+镜头移动(Cinemachine+Timeline)+2D对话+3D气泡对话的剧情表现+特效播放(Timeline自带)+音乐播放控制(扩展自定义Track,方便走自己的音效播放接口)
支持Timeline Editor拖拽预览+运行时播放预览
音乐播放控制(扩展自定义Track,方便走自己的音效播放接口)
Timeline模型移动控制Track(TimeLine支持)
学习Cinemachine扩展Timeline的Track使用控制镜头移动表现
实现2D气泡对话+3D对话功能
扩展Timneline实现2D气泡对话Track+3D对话Track
动态创建实体对象的自定义Track绑定控制(如何实现?)
Package Manager里安装Cinemachine模块
下载导入模型特效音效等相关资源
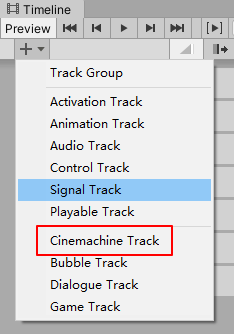
安装好Cinemachine后,打开Timeline里面就会看到多了Cinemachine的Track,从而就可以在Timeline里使用Cinemachine相关的扩展功能了:
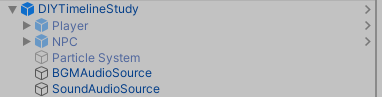
首先我们先放一下我们自定义制作的Timeline的预制件结构:
音乐播放控制Track
CustomAduioTrack.cs(自定义音乐播放Track)
1 2 3 4 5 6 7 8 9 [TrackClipType(typeof(CustomAudioAsset)) ] public class CustomAudioTrack : PlayableTrack { }
CustomAudioAsset.cs(自定义音乐播放Asset数据结构)
1 2 3 4 5 6 7 8 9 10 11 12 13 14 15 16 17 18 19 20 21 22 23 24 25 26 27 28 29 30 31 32 33 34 35 36 37 38 39 40 41 42 43 44 45 46 47 48 49 public class CustomAudioAsset : BaseGameAsset , ITimelineClipAsset { public enum AudioType { Bgm = 1 , Sound = 2 , } public ExposedReference<AudioSource> SourceAudio; public AudioType PlayedAudioType = AudioType.Bgm; public string AudioPath; public ClipCaps clipCaps { get { return ClipCaps.None; } } public override Playable CreatePlayable (PlayableGraph graph, GameObject owner ) { var playable = ScriptPlayable<CustomAudioBehaviour>.Create(graph); var audiobehaviour = playable.GetBehaviour(); audiobehaviour.Name = Name; audiobehaviour.SourceAudio = SourceAudio.Resolve(graph.GetResolver()); audiobehaviour.PlayedAudioType = PlayedAudioType; audiobehaviour.AudioPath = AudioPath; return playable; } }
CustomAudioBehaviour.cs(自定义音乐播放行为)
1 2 3 4 5 6 7 8 9 10 11 12 13 14 15 16 17 18 19 20 21 22 23 24 25 26 27 28 29 30 31 32 33 34 35 36 37 38 39 40 41 42 43 44 45 46 47 48 49 50 51 52 53 54 55 56 57 58 59 60 61 62 63 64 65 66 67 68 69 70 71 72 73 public class CustomAudioBehaviour : BaseGameBehaviour { public AudioSource SourceAudio; public CustomAudioAsset.AudioType PlayedAudioType; public string AudioPath; private bool mIsPlayingAudio; public override void OnBehaviourPlay (Playable playable, FrameData info ) { Debug.Log($"AudioBehaviour:OnBehaviourPlay() 执行指令:{Name} " ); } public override void ProcessFrame (Playable playable, FrameData info, object playerData ) { TryPlayAudio(); } public override void OnBehaviourPause (Playable playable, FrameData info ) { Debug.Log($"AudioBehaviour:OnBehaviourPause() 执行指令:{Name} " ); if (SourceAudio != null && SourceAudio.clip != null ) { SourceAudio.clip = null ; } mIsPlayingAudio = false ; } private void TryPlayAudio () { if (mIsPlayingAudio == false && SourceAudio != null ) { if (PlayedAudioType == CustomAudioAsset.AudioType.Bgm) { SourceAudio.clip = Resources.Load<AudioClip>(AudioPath); SourceAudio.Play(); } else if (PlayedAudioType == CustomAudioAsset.AudioType.Sound) { SourceAudio.clip = Resources.Load<AudioClip>(AudioPath); SourceAudio.Play(); } mIsPlayingAudio = true ; } } }
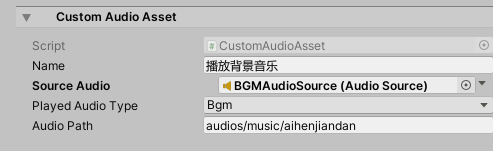
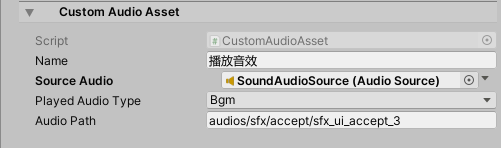
接下来看下我们自定义的音效播放Track和音乐Asset的使用面板效果:
从上面可以看到,我们通过ExposedReference的方式,挂载绑定了场景里的AudioSource作为背景音乐和音效播放组件。
接下来为了避免每一个CustomAudioAsset都自己去指定AudioSource绑定组件,我们可以通过在CustomAudioTrack来支持在Track统一指定AudioSource。
CustomAudioTrack.cs
1 2 3 4 5 6 7 8 9 10 [TrackClipType(typeof(CustomAudioAsset)) ] [TrackBindingType(typeof(AudioSource)) ] public class CustomAudioTrack : PlayableTrack { }
CustomAudioBehaviour.cs
1 2 3 4 5 6 7 8 9 10 11 12 13 14 15 16 17 18 19 20 21 22 23 24 25 26 public class CustomAudioBehaviour : BaseGameBehaviour { ****** private AudioSource mSourceAudio; public override void ProcessFrame (Playable playable, FrameData info, object playerData ) { if (mSourceAudio == null ) { mSourceAudio = playerData as AudioSource; } TryPlayAudio(); } ****** }
CustomAudioTrack通过声明TrackBindingType(typeof(AudioSource))指定Track可以绑定AudioSource组件。
CustomAudioBehaviour通过在运行时ProcessFrame里动态使用Track上指定的AudioSource组件作为音乐播放组件来实现CustomAudioBehaviour采用Track统一绑定组件的的效果。
进阶 Unity使用Cinemachine和Timeline入门 Cinemachine and Timeline
Cinemachine
Timeline可以看做是自定义展示效果的工具,而Cinemachine可以看做是多摄像机的一套完整控制表现的工具。
更多的Cinemachine学习见后面
Cinemachine Powering cameras for films and games
根据官网的简单介绍可以看出,Cinemachine是官方出的一款摄像机强大的控制系统,通过该系统,我们可以轻松的做到电影或者游戏级别的摄像机功能以及表现。
博主这里考虑学习使用Cinemachine的一个重大原因是,做赛车游戏,希望有一个稳定(不抖动)跟随的摄像机。(自己写的效果有抖动问题)
Cinemachine里有两个重要的组件和概念:
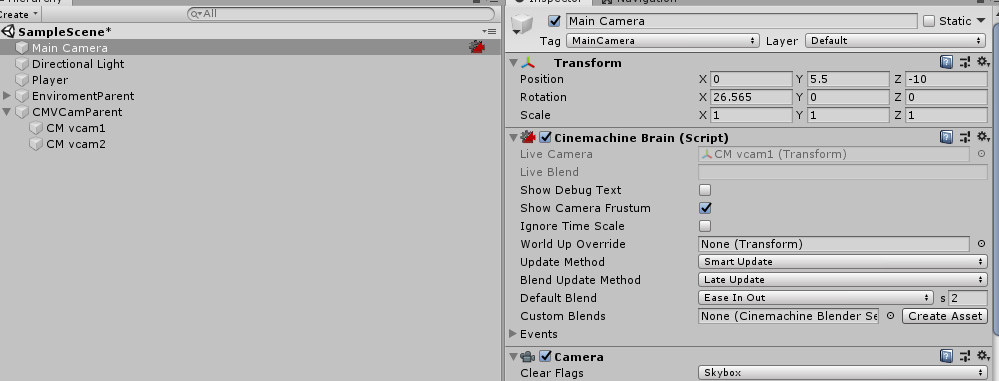
Cinemachine Brain
Virtual Cameras
Cinemachine Brain The Cinemachine Brain is a component in the Unity Camera itself. Cinemachine Brain monitors all active Virtual Cameras in the Scene. To specify the next live Virtual Camera, you activate or deactivate the desired Virtual Camera’s game object.
从上面的介绍可以看出,Cinemachine Brain组件式挂载在摄像机对象上的一个组件,负责管理所有Virual Camera,同一时间只有一个Virtual Camera起作用用于主摄像机,优先选择Priority高的已激活Virutal Camera作为当前起作用的摄像机,优先级相同的情况下看哪个Virtual Camera后激活优先。
关于Cinemachine Brain的详细参数介绍,这里就不深入探讨了,感兴趣的朋友参考文档去自行了解。
Note:
Timeline重写了Cinemachine Brain的Priority系统可以更好的控制摄像机达到更精准的摄像机控制。
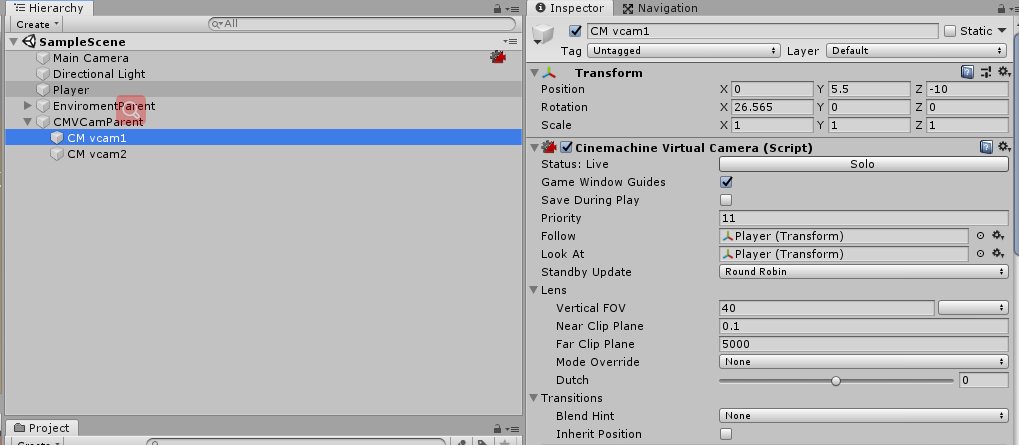
Virtual Cameras Cinemachine does not create new cameras. Instead, it directs a single Unity camera for multiple shots. You compose these shots with Virtual Cameras . Virtual Cameras move and rotate the Unity camera and control its settings.
从上面的介绍可以知道,Cinemachine里的Virtual Cameras并非真正的Camera组件,而是一个抽象概念,而这个抽象的Virtuel Cameras会去负责控制真正的摄像机达到预定的效果。
每一个Virtual Cameras都会对应一个GameObject和一个CinemachineVirtualCamera组件脚本:
Virtual Camera States Virtual Camera有三种状态:
Live :The virtual camera is actively controlling the Unity Camera. The virtual camera is tracking its targets and being updated every frame.Standby : The virtual camera is tracking its targets and being updated every frame, but no Unity Camera is actively being controlled by it. This is the state of a virtual camera that is enabled in the scene but perhaps at a lower priority than the Live virtual camera.Disabled : The virtual camera is present but disabled in the scene. It is not actively tracking its targets and so consumes no processing power. However, the virtual camera can be made live from the Timeline.
从介绍可以看到Live是指当前Virtual Camera优先级最高起作用的那个。而Standby是优先级低于当前起作用的Virtual Camera但没有Disable的Virtual Camera,这些摄像机逻辑上依然会更新跟随自己设定的对象,但不会影响真实摄像机运作。最后Disabled是即低于当前最高优先级Virtual Camera也没有激活的Virtual Camera,这类摄像机不会有任何运行开销,逻辑层面也不会在继续跟随自己的目标对象。
Virtual Camera Params 关于Virtual Camera的细节参数学习,接下来学习几个重要的参数,更多的细节参考:
Cinemachine overview
Priority 正如前面提到的,决定了Virtual Camera在Cinemachine Brain里的选择优先级。
Follow 和Look At 两个参数分别决定了摄像机的跟随对象和对焦对象,这两个参数是常规游戏类型里都需要的概念,好比博主当前要做的赛车游戏,Follow和Look At对象都是赛车就能做到跟随和聚焦赛车的效果。
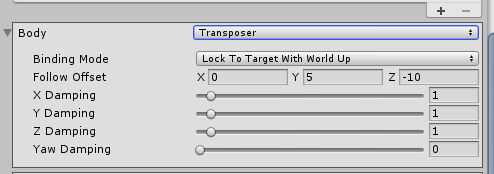
Body 属性提供了Virtual Camera对于摄像机移动的算法选择,从而达到适配各种游戏类型的摄像机镜头移动要求。
这里博主的赛车游戏默认选择Transposer来达到平滑跟随效果。
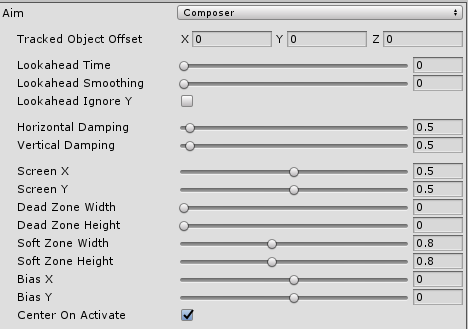
Aim 属性提供了Virtual Camera对于佘香即旋转的算法选择,从而达到适配各种游戏类型的摄像机镜头选择要求。
Body 和Aim 通过细节的参数调整能实现各种角度以及各种游戏类型需求的摄像机跟随聚焦效果,这里博主暂时就不深入学习讨论了,有兴趣的可以参考文档去了解细节。
那么Virtual Camera的聚焦效果是如何实现的了?
了解聚焦效果之前有几个重钙的概念需要了解:
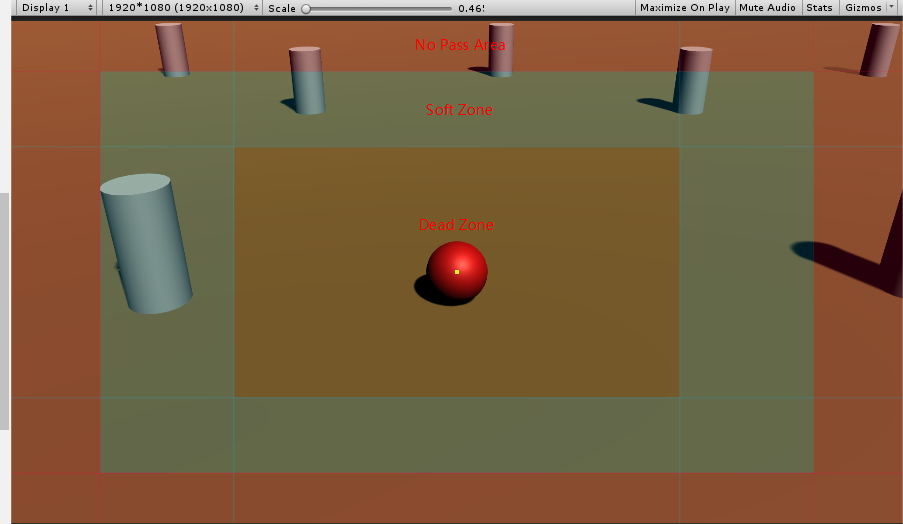
Dead zone : The area of the frame that Cinemachine keeps the target in.
Soft zone : If the target enters this region of the frame, the camera will re-orient to put it back in the dead zone. It will do this slowly or quickly, according to the time specified in the Damping settings.
Screen : The screen position of the center of the dead zone. 0.5 is the center of the screen.
Damping : Simulates the lag that a real camera operator introduces while operating a heavy physical camera. Damping specifies quickly or slowly the camera reacts when the target enters the soft zone while the camera tracks the target. Use small numbers to simulate a more responsive camera, rapidly moving or aiming the camera to keep the target in the dead zone . Larger numbers simulate heavier cameras, The larger the value, the more Cinemachine allows the target to enter the soft zone.
Dead Zone, Soft Zone, Screen参数在Body和Aim的属性面板上有体现,他们决定了摄像机是如何应对Look At对象走出指定区域时响应变化以及如何确保Look At对象在指定区域内的。
Cinemachine Camera Types Unity Cinemachine自带了很多种摄像机用于不同的游戏种类:
不同的摄像机种类适用于不同的游戏类型。
Virtual Camera Virtual Camera在前面的介绍已经提过了,这里就不再重复了,后续的摄像机类型大部分也是基于Virtual Camera的,只是在Virtual Camera的基础上实现了一套各自摄像机管理方式从而达到不同的摄像机类型效果。
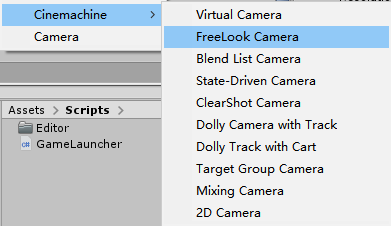
FreeLook Camera 此类摄像机没有基于Virtual Camera而是单独挂载了一个Cinemachine Free Look的脚本实现的。
A Cinemachine Camera geared towards a 3rd person camera experience. The camera orbits around its subject with three separate camera rigs defining rings around the target. Each rig has its own radius, height offset, composer, and lens settings. Depending on the camera’s position along the spline connecting these three rigs, these settings are interpolated to give the final camera position and state.
从介绍可以看出,FreeLook Camera是用于第三人称围绕目标对象旋转控制的一套摄像机类型(比如第三人称RPG等游戏,有围绕主角相关的摄像机旋转控制等)。
State-Driven Camera 这里的State指的是Animator里的State,通过State-Drive Camera我们可以轻易的实现Animator State和Virtual Camera选择的绑定。这样就能轻易实现Walk状态用什么Virtual Camera,Idle状态使用什么Virtual Camera的效果。
更多的摄像机类型参考:
About Cinemachine
这里还值得一提的是摄像机限定移动范围和摄像机被障碍物主档导致目标对象不可见时Cinemachine提供的一种解决方案:
Collision Avoidance and Shot Evaluation CinemachineCollider An add-on module for Cinemachine Virtual Camera that post-processes the final position of the virtual camera. Based on the supplied settings, the Collider will attempt to preserve the line of sight with the LookAt target of the virtual camera by moving away from objects that will obstruct the view.
简单来说CinemachineCollider是通过相关设置,通过射线检测评估出当前摄像机最优的位置,从而避免被障碍物遮挡视线等问题。
Note:
The collider uses Physics Raycasts to do these things, hence obstacles in the scene must have collider volumes in order to be visible to the CinemachineCollider.
CinemachineConfiner An add-on module for Cinemachine Virtual Camera that post-processes the final position of the virtual camera. It will confine the virtual camera’s position to the volume specified in the Bounding Volume field.
从介绍可以看出CinemachineConfiner相比CinemachineCollider,这是一个单纯限制摄像机运动范围的组件,更加轻量,没有过多多射线检测评估等过程,用于简单的限制摄像机运动范围,此组件更佳。
Note:
This is less resource-intensive than CinemachineCollider, but it does not perform shot evaluation.
实战 实战前,先让我们明确下个人的摄像机需求,需求明确了才能更加正确的使用Cinemachine达到效果。
摄像机需求:
支持相机单独控制操作
支持相机限定移动范围操作
支持相机锁定目标操作
支持相机锁定目标和自由操作自由切换操作
支持相机锁定目标操作回调上层逻辑(用于配合逻辑层做事情)
场景摄像机支持多个摄像机同时控制(比如:MainCamera和3D UI Camera)
待续……
TextMeshPro What TextMesh Pro is the ultimate text solution for Unity. It’s the perfect replacement for Unity’s UI Text and the legacy Text Mesh.
TextMeshPro原本是第三方个人编写的一款更优的Unity文本替代方案,后被Unity官方收购。
Why 使用TextMeshPro替代原生文本的原因有很多:
TMP使用了SDF(Signed Distance Field )技术达到不失真的放大缩小渲染
TMP自带实现了图文混排(通过富文本打Tag的形式)以及很多文本所需的功能(e.g. 字间距,自定义字体大小,段落格式,对齐方式等)
TMP使用Shader去实现更好的文本表现效果(类似PS的一些效果)满足文本需求
缺点:
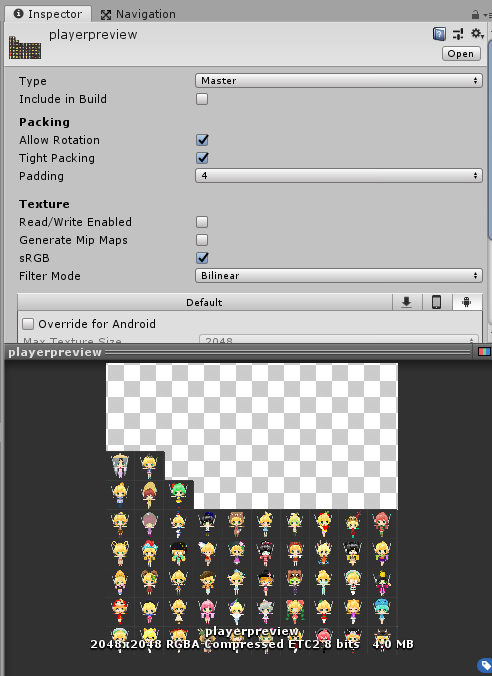
不支持动态字体(看网上说是TMP1.4支持动态字体(Generating Settings),但我在Unity2018.4.1.f1上导入的TMP没有找到动态字体设置的入口,望知道的朋友告知一声在哪里设置),需要生成对应的字体纹理库(对于文字多的比如中文来说有很大的内存压力)
SDF(Signed Distance Field )介绍:一个空间区域的SDF函数定义为,从空间中任意给定的一点到该区域边界的距离,SDF函数值的符号取决于该点在区域的内部还是外部,外部为正,内部为负。
这里可以简单的理解成TMP通过函数式的定义方式(类似矢量图的定义方式)来解决像素图放大模糊的问题来渲染出可动态放大缩小不模糊的图像。深入理解参考下面的链接:函数式编程与 Signed Distance Field
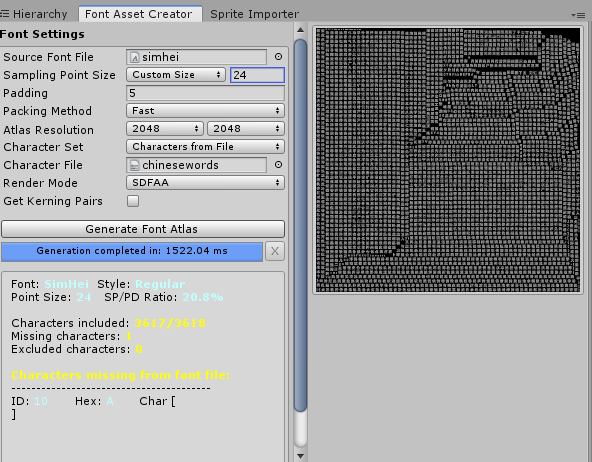
How TMP需要通过TMP提供的字体库制作工具制作所需的对应字体文件:
最终效果:
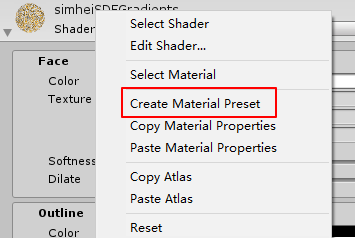
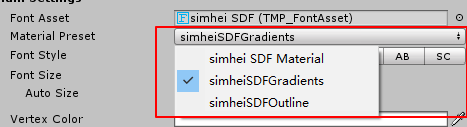
然后在针对新创建的Material Asset调整Shader和具体效果即可,创建完成后就可以在Font Asset的材质下拉列表里选择需要使用的效果:
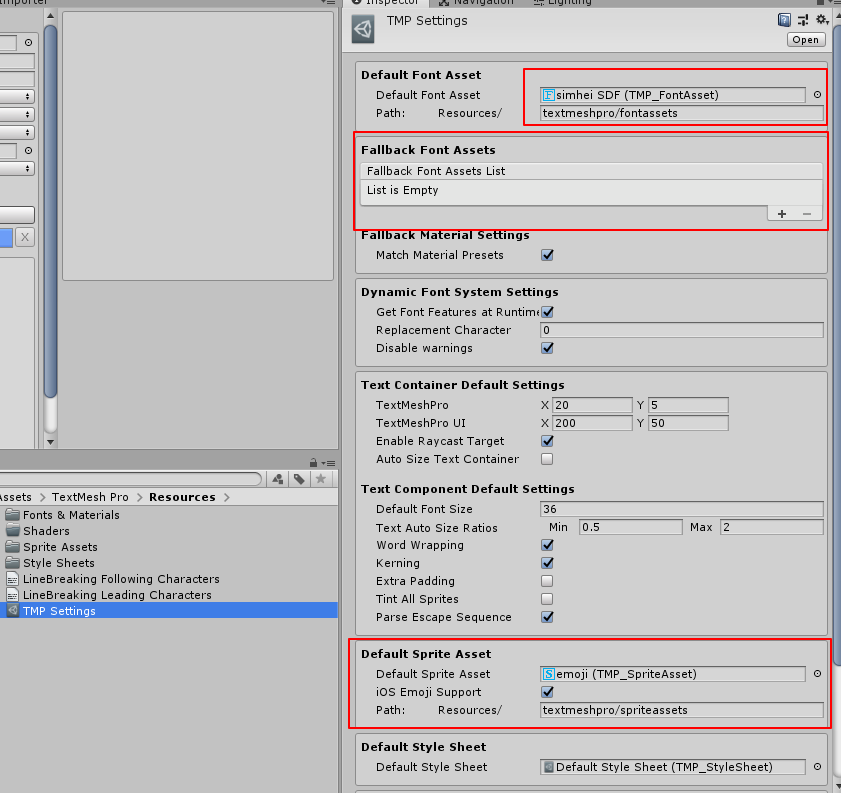
关于TextMeshPro的默认相关设置(e.g. 默认创建的Font Asset,默认Fallback到的Font Asset等)是通过TMP Settings文件里的设置来完成的:
Note:
TMP的Fallback的使用是在原始设定的Font Asset里找不到对应文字时的一种回退安全机制,官方的建议是真正使用的Font Asset采用高分率图集,Fallback的Font Asset采用低分辨率图集。
引用 Sprite Atlas Sprite Atlas Master and Variant Sprite Atlases Variant Sprite Atlas Sprite Atlas workflow Preparing Sprite Atlases for distribution Sprite Packer Modes Unity2017新功能之Sprite Atlas详解 UGUI的图集处理方式-SpriteAtlas的前世今生
Timeline Unity–Timeline自定义PlayableTrack Unity2017中Timeline的简单使用方法 Unity使用Cinemachine和Timeline入门
graph-visualizer
Timeline
xtending Timeline: A Practical Guide
Creative Scripting for Timeline
Playable API:定制你的动画系统
Playables API
The PlayableGraph
ScriptPlayable and PlayableBehaviour
Playables Examples
TextMesh Pro TextMesh Pro 函数式编程与 Signed Distance Field Unity游戏开发——TextMeshPro的使用 在Unity 2018中充分使用TextMesh Pro Making the most of TextMesh Pro in Unity 2018
Cinemachine Cinemachine overview
Cinemachine Learn