前言 本篇文章是为了记录学习使用Unity第三方插件Odin,通过深入学习Odin,加快平时我们编写编辑器工具的效率。
Odin Odin是一款可以帮助我们快速制作友好编辑器界面的工具。
功能特性 Serialize Anything 那么什么是序列化?
接下来看看Unity官方对序列化的定义:Serialization is the automatic process of transforming data structures or object states into a format that Unity can store and reconstruct later. (序列化就是将数据结构或对象状态转换成可供Unity保存和随后重建的自动化处理过程。)
官方的序列化远比我们平常说的数据对象序列化更宏大:
文件的保存/读取,包括Scene、Asset、AssetBundle,以及自定义的ScriptableObject等。
Inspector窗口
编辑器重加载脚本脚本
Prefab
Instantiation
Unity序列化有一套规则,这里就不详细介绍了,详情查看官网:Script Serialization
众所周知,Unity官方序列化并非所有类型都支持,比如:Dictionary,OOP多态。Unity插件开发基础—浅谈序列化系统
所以这里再引出Odin的一大特性:
Note:Odin’s serialization is currently supported on all platforms, save Universal Windows Platform without IL2CPP..
实战 While Odin by default injects itself into the inspector for every type that doesn’t already have a custom editor defined, the serialization system is more conservative than that. You always have to explicitly decide to make use of Odin’s serialization system.
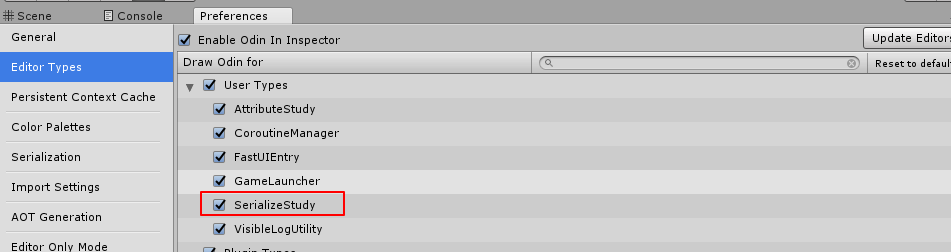
开启Odin代码Inspector
1
2
3
4
5
6
7
8
9
10
11
12
public class SerializeStudy : MonoBehaviour { public Dictionary<int , string > SerializeDictionary = new Dictionary<int , string >(); public List<string > SerializeNormalList = new List<string >(); }
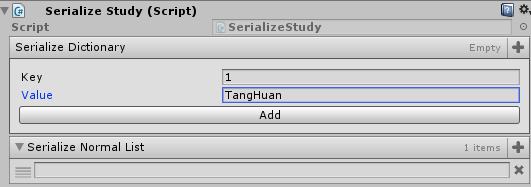
接下来我们通过打开Odin序列化再来对比下区别:
指定使用Odin序列化
1
2
3
4
public class SerializeStudy : SerializedMonoBehaviour { ****** }
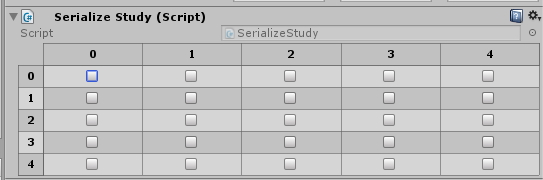
这里再展现一个Odin二维数组类型的序列化使用,从这个可以看出Odin的强大之处:
1
2
3
4
5
6
7
public class SerializeStudy : SerializedMonoBehaviour { public bool [,] TwoDimensionArray = new bool [5 , 5 ]; }
Note:Unity插件开发基础—浅谈序列化系统 文章里的测试结果不一致(Unity自带序列化支持多态),本人使用的是2017.4.3f1,所以这里就不实战Odin的OOP多态功能了。
New Attributes 这里的Attribute指的是C#语言里的那个标签Attribute。A core feature of Odin is how easy it makes it to change the appearance of your scripts in the editor - essentially letting you create powerful, complex custom editors at a whim merely by applying a few attributes to your members.
在不使用Odin前,我们一般是类通过自定义CustomEditor的形式去自定义Editor UI或者是直接通过继承EditorWindow去编写Editor UI工具,主要是通过EditorGUILayout,GUILayout一系列的类来手动完成布局和排版显示等功能。
实战
PropertyOrder(快速指定面板显示顺序)
1
2
3
4
5
6
public class AttributeStudy : MonoBehaviour { public int Second; public int First; }
1
2
3
4
5
6
7
8
public class AttributeStudy : MonoBehaviour { [PropertyOrder(2) ] public int Second; [PropertyOrder(1) ] public int First; }
1
2
3
4
5
6
7
8
9
10
11
public class AttributeStudy : MonoBehaviour { [ValueDropdown("DropDownListString" ) ] public string DropDownListStringName; private List<string > DropDownListString = new List<string >(){ "Tony" , "Tang" , "Huan" , }; }
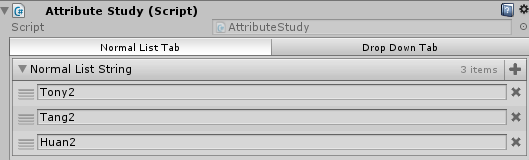
1
2
3
4
5
6
7
8
9
10
11
12
13
14
15
16
17
18
19
20
21
public class AttributeStudy : MonoBehaviour { [TabGroup("Normal List Tab" ) ] [PropertyOrder(2) ] public List<string > NormalListString = new List<string >(){ "Tony2" , "Tang2" , "Huan2" , }; [TabGroup("Drop Down Tab" ) ] [PropertyOrder(1) ] [ValueDropdown("DropDownListString" ) ] public string DropDownListStringName; private List<string > DropDownListString = new List<string >(){ "Tony1" , "Tang1" , "Huan1" , }; }
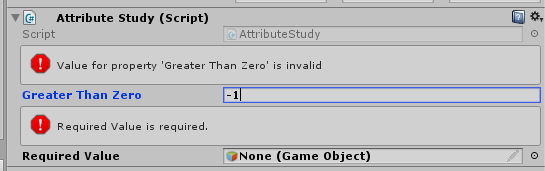
1
2
3
4
5
6
7
8
9
10
11
12
13
public class AttributeStudy : MonoBehaviour { [ValidateInput("IsGreaterThanZero" ) ] public int GreaterThanZero; private bool IsGreaterThanZero (int value { return value > 0 ; } [Required ] public GameObject RequiredValue; }
Odin Attributes
Effortless Integration 容易集成这一特性从前面的Serialize Anything和Attribute的简单易用其实已经不言而喻了。
接下来主要学习Odin是如何帮助我们快速创建自定义窗口UI显示的。
Odin普通编辑器窗口
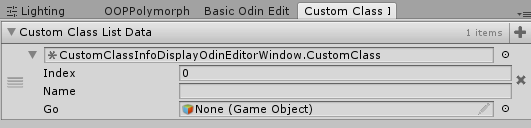
1
2
3
4
5
6
7
8
9
10
11
12
13
14
15
16
17
public class CustomClassInfoDisplayOdinEditorWindow : OdinEditorWindow { public class CustomClass { public int Index; public string Name; public GameObject Go; } [MenuItem("/TonyTang/Tools/OdinEditorWindow/MyFirstOdinEditorWindow" ) ] private static void OpenWindow () { var window = GetWindow<CustomClassInfoDisplayOdinEditorWindow>(); } public List<CustomClass> CustomClassListData = new List<CustomClass>(); }
Odin带菜单栏的自定义编辑器窗口
带菜单栏的Odin窗口需要继承至OdinMenuEditorWindow
OdinMenuTree用于创建窗口菜单管理
OdinMenuItem用于创建自定义菜单节点(重写OnDrawMenuItem可自定义菜单节点显示)
自定义类结合Odin Attribute做自定义显示界面
1
2
3
4
5
6
7
8
9
10
11
12
13
14
15
16
17
18
19
20
21
22
23
24
25
26
27
28
29
30
31
32
33
34
35
36
37
38
39
40
41
42
43
44
45
46
47
48
49
50
51
52
53
54
55
56
57
58
59
60
61
62
63
64
65
66
67
68
69
70
71
72
73
74
75
76
77
78
79
80
81
82
83
84
85
86
87
88
89
90
91
92
93
94
95
96
97
98
99
100
101
102
103
104
105
106
107
108
109
110
111
112
113
114
115
116
117
118
119
120
121
122
123
124
125
126
127
128
129
130
131
132
133
134
135
136
137
138
139
140
141
142
143
144
145
146
147
148
using Sirenix.OdinInspector;using Sirenix.OdinInspector.Editor;using Sirenix.Utilities;using System;using System.Collections;using UnityEditor;using UnityEngine;public class CustomOdinMenuEditorWindow : OdinMenuEditorWindow { public class CustomMenuItem : OdinMenuItem { public class CustomMenuItemContentClass { public int Index; public string Name; public GameObject Go; public bool CheckOn; public CustomMenuItemContentClass (int index, string name, GameObject go, bool checkon { Index = index; Name = name; Go = go; CheckOn = checkon; } } public CustomMenuItem (OdinMenuTree tree, string name, IList value ) : base (tree, name, value ) { } public CustomMenuItem (OdinMenuTree tree, string name, object value ) : base (tree, name, value ) { } } public class CustomDrawMenuItem : OdinMenuItem { public class CustomDrawMenuItemContentClass { [FoldoutGroup("自定义折叠组" ) ] public int Index; [FoldoutGroup("自定义折叠组" ) ] public string Name; [FoldoutGroup("自定义折叠组" ) ] public GameObject Go; [FoldoutGroup("自定义折叠组" ) ] public bool CheckOn; public CustomDrawMenuItemContentClass (int index, string name, GameObject go, bool checkon { Index = index; Name = name; Go = go; CheckOn = checkon; } } private CustomDrawMenuItemContentClass mCustomDrawMenuData; public CustomDrawMenuItem (OdinMenuTree tree, string name, CustomDrawMenuItemContentClass data ) : base (tree, name, data ) { mCustomDrawMenuData = data; } public CustomDrawMenuItem (OdinMenuTree tree, string name, IList value ) : base (tree, name, value ) { } public CustomDrawMenuItem (OdinMenuTree tree, string name, object value ) : base (tree, name, value ) { } protected override void OnDrawMenuItem (Rect rect, Rect labelRect ) { labelRect.x -= 16 ; this .mCustomDrawMenuData.CheckOn = GUI.Toggle(labelRect.AlignMiddle(18 ).AlignLeft(16 ), this .mCustomDrawMenuData.CheckOn, GUIContent.none); } } [MenuItem("TonyTang/Tools/OdinMenuEditorWindow/CustomOdinMenuEditorWindow" ) ] private static void OpenWindow () { var window = GetWindow<CustomOdinMenuEditorWindow>(); } protected override OdinMenuTree BuildMenuTree () { var menutree = new OdinMenuTree(true ); var custommenustyle = new OdinMenuStyle { BorderPadding = 0f , AlignTriangleLeft = true , TriangleSize = 16f , TrianglePadding = 0f , Offset = 20f , Height = 23 , IconPadding = 0f , BorderAlpha = 0.323f }; menutree.DefaultMenuStyle = custommenustyle; menutree.AddObjectAtPath("菜单风格" , custommenustyle); var custommenuitemdata = new CustomMenuItem.CustomMenuItemContentClass(1 , "CustomMenuItemContentClass" , null , false ); var custommenuitemobj = new CustomMenuItem(menutree, "默认菜单子子节点名" , custommenuitemdata); menutree.AddMenuItemAtPath("菜单子节点1" , custommenuitemobj); var customdrawmenuitemdata = new CustomDrawMenuItem.CustomDrawMenuItemContentClass(1 , "CustomDrawMenuItemContentClass" , null , false ); var customdrawmenuitemobj = new CustomDrawMenuItem(menutree, "自定义菜单子子节点名" , customdrawmenuitemdata); menutree.AddMenuItemAtPath("菜单子节点2" , customdrawmenuitemobj); menutree.EnumerateTree().AddThumbnailIcons().SortMenuItemsByName(); return menutree; } }
这里就不再一一学习使用Odin相关特性,详情查询:Code Reference
Extendable 在了解Odin的高度扩展性之前,我们需要了解Odin的Drawer机制。
The single most important part of understanding how Odin’s drawing system works, is understanding the drawing chain . In Odin, any single property is not drawn by a single drawer; instead each property has many drawers assigned to it.
从上面可以看到,理解Odin drawing system工作机制,我们需要了解Odin的drawing chain(绘制链)。在Odin里每一个显示在面板的Property(这里的Property不等价于C#里的Property)都不是单一一个drawer绘制出来的而是许多个drawers的连续绘制的结果。
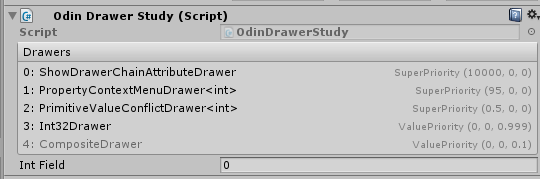
首先Odin提供我们了一个叫ShowDrawerChain的Attibute属性,可视化的显示二楼每一个Property的绘制Drawer组合(每一个Drawer有一个优先级,优先级高的在前面 )。
从上图可以看出,我们定义一个int的可序列化字段,通过Odin绘制出来需要三个Drawer:
PropertyContextMenuDrawer (并不做任何的绘制,只做了右键Content Menu显示的检查)
PrimitiveValueConflictDrawer (检查值冲突(比如多选时有不一样的值类型))
Int32Drawer(最终负责绘制int值面板显示的Drawer)
理解了Odin绘制Property是通过连续的多个Drawer组合的形式后,让我们来学习了解Odin里不同种类的Drawer是如何组成Odin的Drawer绘制机制的。
Value Drawers(继承至OdinValueDrawer,优先级(0, 0, 1),类型默认的Drawer)
Attribute Drawers(继承至OdinAttributeDrawer,优先级(0, 0, 1000),Attibute绘制)
Attribute Value Drawers(Value Drawers和Atrribute Drawers两者的结合)
Group Drawers(继承至PropertyGroupAttribute,不同于前面三个Drawers,Group Drawers是负责一组Property的指定绘制方式)
Gemeric Drawers(泛型 – 解决显示指定Drawers类型信息的问题)
这里不过多的去纠结Odin底层源代码设计和实现,只是通过了解Odin的绘制设计方式来加深对Odin使用的理解,便于应用到实际工程里去解决具体问题。
更多学习请参考Odin里的Demo和官方文档。
Note:
Note that all drawers in Odin are always strongly typed, and do not allow type polymorphism. (Odin里的Drawer是强类型,不支持多态)
官方使用建议 Getting Started
实战 目标
编写一个基于Odin的游戏模块的文档说明编辑器工具(Odin)
自动根据编译信息反射生成最新类型和字段信息(反射判定)
提供字段可编写自定义介绍的内容并存储共享(ScriptableObject存储共享)
提供类型,枚举搜索查看功能
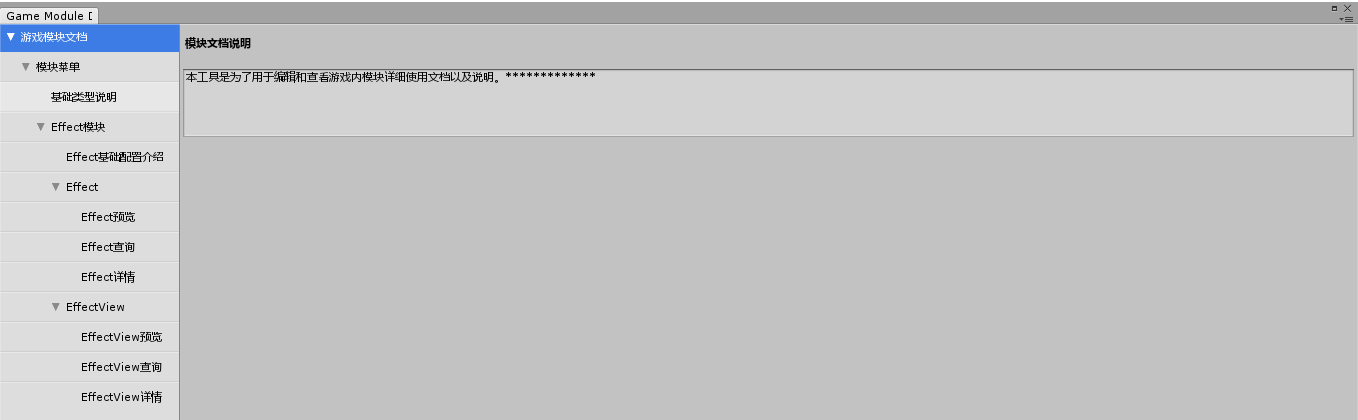
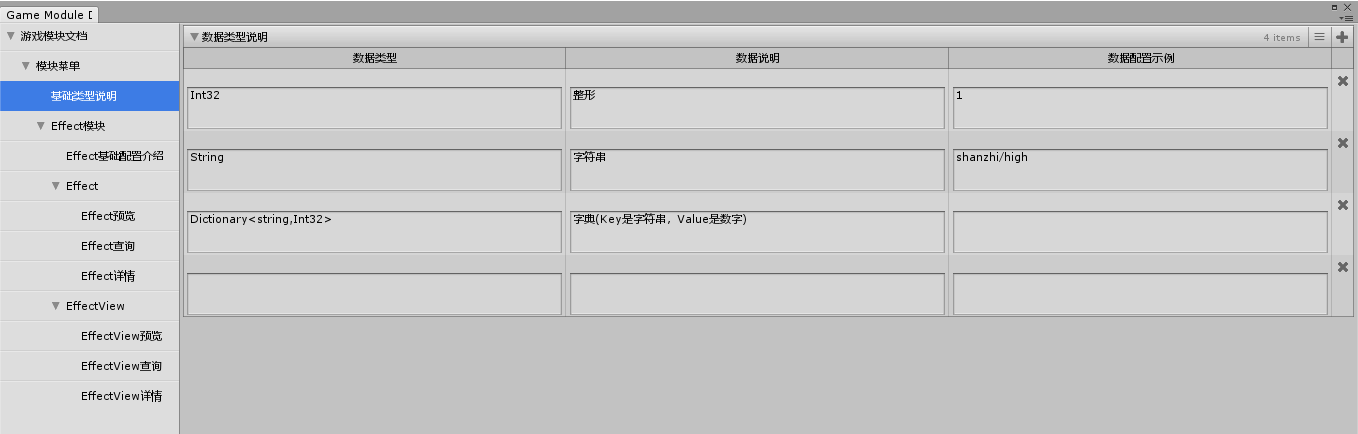
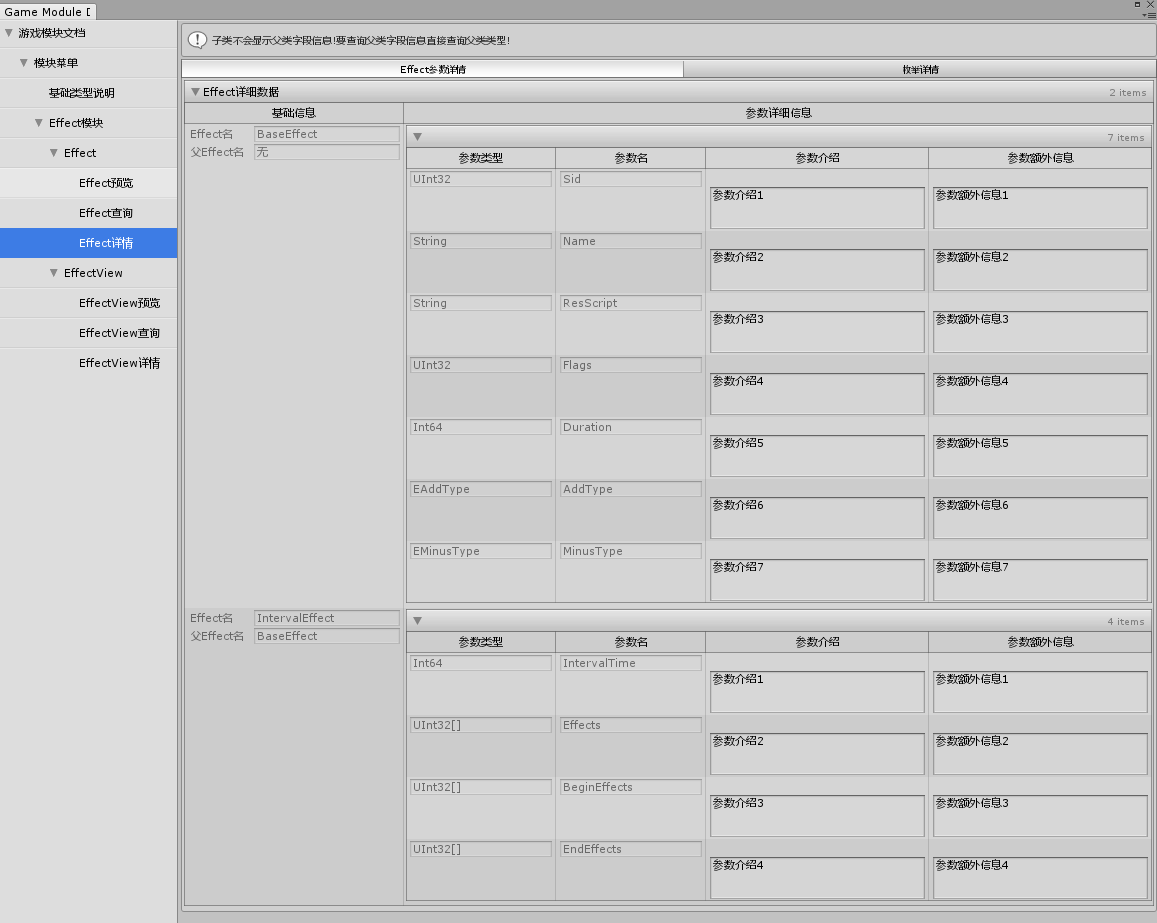
先上最终效果图(这里只挑个别展示,主要是学习编写过程中Odin的小知识和小技巧):
模块文档整体界面
基础类型说明
Effect详情
实现 接下来主要从三个方面来学习讲解上面文档工具通过Odin编写所需要注意的技巧和实现。
Odin自定义编辑器菜单实现
Odin自定义类型+Odin自定义编辑器布局显示实现
自定义编辑器数据序列化存储
自定义编辑器菜单 自定义菜单主要是通过继承Odin的OdinMenuEditorWindow类然后结合自定义OdinMenuTree + 自定义OdinMenuStyle来实现自定义的菜单布局加风格显示。
1 2 3 4 5 6 7 8 9 10 11 12 13 14 15 16 17 18 19 20 21 22 23 24 25 26 27 28 29 30 31 32 33 34 35 36 37 38 39 40 41 42 43 44 45 46 47 48 49 50 51 52 53 54 55 56 57 58 59 60 61 62 63 64 65 66 using Sirenix.OdinInspector;using Sirenix.OdinInspector.Editor;using Sirenix.Utilities.Editor;using System;using System.Collections.Generic;using UnityEditor;using UnityEngine;public class GameModuleDocumentEditorWindow : OdinMenuEditorWindow { public static OdinMenuStyle MenuStyle = new OdinMenuStyle { BorderPadding = 0f , AlignTriangleLeft = true , TriangleSize = 16f , TrianglePadding = 0f , Offset = 20f , Height = 30 , IconPadding = 0f , BorderAlpha = 0.323f }; ******* protected override OdinMenuTree BuildMenuTree () { DocDataUtility.CheckAndCreateFolder(DocDataUtility.DocumentDataSaveFolderPath); LoadAllData(); var menutree = new OdinMenuTree(true ); menutree.DefaultMenuStyle = MenuStyle; menutree.AddObjectAtPath("游戏模块文档" , IntroductionEditorWindowData); menutree.AddObjectAtPath("游戏模块文档/模块菜单" , null ); menutree.AddObjectAtPath("游戏模块文档/模块菜单/基础类型说明" , DataTypeIntroEditorWindowData); menutree.AddObjectAtPath("游戏模块文档/模块菜单/Effect模块" , EffectModuleIntroEditorWindowData); menutree.AddObjectAtPath("游戏模块文档/模块菜单/Effect模块/Effect" , EffectIntroEditorWindowData); menutree.AddObjectAtPath("游戏模块文档/模块菜单/Effect模块/Effect/Effect预览" , EffectPreviewEditorWindowData); menutree.AddObjectAtPath("游戏模块文档/模块菜单/Effect模块/Effect/Effect查询" , EffectQueryEditorWindowData); menutree.AddObjectAtPath("游戏模块文档/模块菜单/Effect模块/Effect/Effect详情" , EffectDetailEditorWindowData); menutree.AddObjectAtPath("游戏模块文档/模块菜单/Effect模块/EffectView" , EffectViewIntroEditorWindowData); menutree.AddObjectAtPath("游戏模块文档/模块菜单/Effect模块/EffectView/EffectView预览" , EffectViewPreviewEditorWindowData); menutree.AddObjectAtPath("游戏模块文档/模块菜单/Effect模块/EffectView/EffectView查询" , EffectViewQueryEditorWindowData); menutree.AddObjectAtPath("游戏模块文档/模块菜单/Effect模块/EffectView/EffectView详情" , EffectViewDetailEditorWindowData); return menutree; } [MenuItem("TonyTang/Tools/GameModuleDocument/GameModuleDocumentMenuEditorWindow" ) ] private static void OpenWindow () { var window = GetWindow<GameModuleDocumentEditorWindow>(); } ****** }
代码已经很清晰了,这里就不详细说明了。
自定义编辑器布局 自定义编辑器布局主要是通过使用Odin的OdinEditorWindow + Odin自定义序列化类型显示 + Odin序列化标签来实现的。
Effect详细信息自定义窗口部分代码(工作原因,不方便放出全部代码,这里只用作学习记录分享Odin的使用):
1 2 3 4 5 6 7 8 9 10 11 12 13 14 15 16 17 18 19 20 21 22 23 24 25 26 27 28 29 30 31 32 33 34 35 36 37 38 39 40 41 42 43 44 45 46 47 48 49 50 51 52 53 54 55 56 57 58 59 60 61 62 63 64 65 66 67 68 69 70 71 72 73 74 75 76 77 78 79 80 81 82 83 84 85 86 87 88 89 90 91 92 93 94 95 96 97 98 99 100 101 102 103 104 105 106 107 108 109 110 111 112 113 114 115 116 117 118 119 120 121 122 123 124 125 126 127 128 129 130 131 132 133 134 135 136 137 138 139 140 141 142 143 144 145 146 147 using Sirenix.OdinInspector;using Sirenix.OdinInspector.Editor;using System;using System.Collections;using System.Collections.Generic;using System.Reflection;using UnityEngine;[TypeInfoBox("子类不会显示父类字段信息!要查询父类字段信息直接查询父类类型!" ) ] public class EffectDetailEditorWindow : OdinEditorWindow { public class EffectDetailData { public class EffectDetailParamDesData { [LabelText("" ) ] [VerticalGroup("参数类型" ) ] [TableColumnWidth(150, Resizable = false) ] [ReadOnly ] public string ParamType; [LabelText("" ) ] [VerticalGroup("参数名" ) ] [TableColumnWidth(150, Resizable = false) ] [ReadOnly ] public string ParamName = "参数名" ; [LabelText("" ) ] [VerticalGroup("参数介绍" ) ] [TextArea ] public string ParamIntro; [LabelText("" ) ] [VerticalGroup("参数额外信息" ) ] [TextArea(3, 6) ] public string ParamExtraInfo; } [LabelText("Effect名" ) ] [VerticalGroup("基础信息" ) ] [TableColumnWidth(220, Resizable = false) ] [ReadOnly ] public string EffectName; [LabelText("父Effect名" ) ] [VerticalGroup("基础信息" ) ] [TableColumnWidth(220, Resizable = false) ] [ReadOnly ] public string ParentTypeName; [LabelText("" ) ] [VerticalGroup("参数详细信息" ) ] [TableList(DrawScrollView = false, IsReadOnly = true) ] public List<EffectDetailParamDesData> EffectParamDesDetailList = new List<EffectDetailParamDesData>(); } [LabelText("Effect详细数据" ) ] [TabGroup("Effect参数详情" ) ] [TableList(DrawScrollView = true, MaxScrollViewHeight = 800, MinScrollViewHeight = 800, IsReadOnly = true) ] public List<EffectDetailData> EffectDetailDataList = new List<EffectDetailData>(); public class EffectEnumData { [LabelText("" ) ] [VerticalGroup("枚举类型全名" ) ] [HideInInspector ] [ReadOnly ] public string QualifiedEnumType; [LabelText("" ) ] [VerticalGroup("枚举名" ) ] [ReadOnly ] public string EnumType; [LabelText("" ) ] [VerticalGroup("枚举可选值" ) ] [ListDrawerSettings(HideAddButton = true, HideRemoveButton = true) ] public string [] EnumValues; [LabelText("" ) ] [VerticalGroup("枚举值说明" ) ] [TextArea ] public string EnumValueDecs; } [LabelText("枚举详细数据" ) ] [TabGroup("枚举详情" ) ] [TableList(DrawScrollView = true, MaxScrollViewHeight = 800, MinScrollViewHeight = 500, IsReadOnly = true) ] public List<EffectEnumData> EffectEnumDataList = new List<EffectEnumData>(); ****** }
OdinEditorWindow实现了基于Odin的自定义编辑器入口。
1 public class EffectDetailEditorWindow : OdinEditorWindow
结合自定义类型 + Public类型成员定义决定自定义编辑器显示内容。
1
2
3
4
5
6
7
8
9
10
11
12
13
public class EffectDetailData { ****** } public List<EffectDetailData> EffectDetailDataList = new List<EffectDetailData>();public class EffectEnumData { ****** } public List<EffectEnumData> EffectEnumDataList = new List<EffectEnumData>();
自定义类型需要序列化显示的参数结合Odin序列化标签实现指定方式显示字段。
1 2 3 4 5 6 7 [LabelText("枚举详细数据" ) ] [VerticalGroup("枚举类型全名" ) ] [HideInInspector ] [ReadOnly ] [TableColumnWidth(220, Resizable = false) ] [TabGroup("枚举详情" ) ] [TableList(DrawScrollView = true, MaxScrollViewHeight = 800, MinScrollViewHeight = 500, IsReadOnly = true) ]
LabelText -- 表示显示标题
VerticalGroup -- 表示显示分组
HideInInspector -- 表示不显示在编辑器上
ReadOnly -- 表示字段只读不可编辑
TableColumnWidth -- 表示字段单列显示宽度
TabGroup -- 表示标签页分组
TableList -- 表示按表格列表形式显示(DrawScrollView = true, MaxScrollViewHeight = 800, MinScrollViewHeight = 500, IsReadOnly = true -- 是TableList里的细节显示控制)
更多标签详情查看官网:
[OdinDocumentation](https://odininspector.com/documentation)
数据序列化存储 数据序列化存储主要是采用Odin + Unity ScriptableObject
1 2 3 4 5 6 7 8 9 10 11 12 13 14 15 16 17 18 19 20 21 22 23 24 25 26 27 28 29 30 31 32 33 public static T LoadDocumentData <T >(string datafullpathwhere T : ScriptableObject{ if (File.Exists(datafullpath)) { Debug.Log(string .Format("{0}数据加载成功!" , datafullpath)); return AssetDatabase.LoadAssetAtPath<T>(datafullpath); } else { Debug.Log(string .Format("{0}数据不存在!" , datafullpath)); return null ; } } public static void SaveDocumentData <T >(T documentdata, string datafullpath ) where T : ScriptableObject{ AssetDatabase.CreateAsset(documentdata, datafullpath); AssetDatabase.SaveAssets(); Debug.Log(string .Format("保存资源:{0}完成!" , documentdata)); }
Reference Odin Asset Store链接 Odin官网 Script Serialization Unity插件开发基础—浅谈序列化系统 OdinDocumentation