前言 在学习了UIElement相关知识以后,实战实现一套基于事件驱动的行为树(用UIElement开发编辑器)作为目标,深入基于事件驱动的行为树设计和UIElement的深入使用,为未来实现引导节点编辑器等功能需求做准备。
行为树 行为树主要用于AI开发,将AI逻辑通过树状逻辑进行组装表达,可以方便的制作和调试AI。
常规的行为树中,每帧都要从根节点开始遍历行为树,而目的仅仅是为了得到最近激活的节点,这也是博主之前设计的基于Lua的简易行为树BehaviourTreeForLua 的设计方案。
但此方案会导致每帧大量的逻辑浪费(比如已经运行到很深很远的节点处,第二帧又会从头跑一次前面相关的逻辑判定),这也是实现一个基于事件驱动的行为树的原因所在。
基于事件的行为树设计是,我们不再每帧都从根节点去遍历行为树,而是维护一个调度器负责保存已激活的节点,当正在执行的行为终止时,由其父节点决定接下来的行为。
行为树节点编辑器 结合前面学习到关于GraphView的相关知识,在实战前再回顾下几个GraphView相关的重要概念:
GraphView – Unity官方推出的一套编写节点边的通用节点编辑器编写的UI组件
Node – GraphView里的节点类型
Port – GraphView里的端口连线
节点设计 设计之初是面向节点编辑器需求,为后续支持行为树编辑器,剧情编辑器,新手引导编辑器细分做准备,目前是面向事件驱动行为树编辑器来编写的 。
BaseNode.cs(节点基类,标识GUID,根节点以及节点大类型分类)
1 2 3 4 5 6 7 8 9 10 11 12 13 14 15 16 17 18 19 20 21 22 23 24 25 26 27 28 29 30 31 32 33 34 35 36 37 38 39 40 41 42 43 44 45 46 47 48 49 50 51 52 53 54 55 56 57 58 59 public class BaseNode : ScriptableObject { [Header("唯一ID" ) ] public string GUID; [Header("位置" ) ] [HideInInspector ] public Rect Position; [Header("节点描述" ) ] [HideInInspector ] public string Des = "节点描述" ; public virtual bool EntryPoint { get { return false ; } } public virtual NodeType NodeType { get { return NodeType.Composition; } } public NodeState NodeState { get ; protected set ; } ****** }
NodeType.cs(节点大类型,用于分类分列表显示)
1 2 3 4 5 6 7 8 9 10 11 public enum NodeType{ Composition, Decoration, Condition, Action, }
BaseCompositionNode.cs(组合节点抽象基类)
BaseDecorationNode.cs(装饰节点抽象基类)
BaseConditionNode.cs(条件节点抽象基类)
BaseActionNode.cs(行为节点抽象基类)
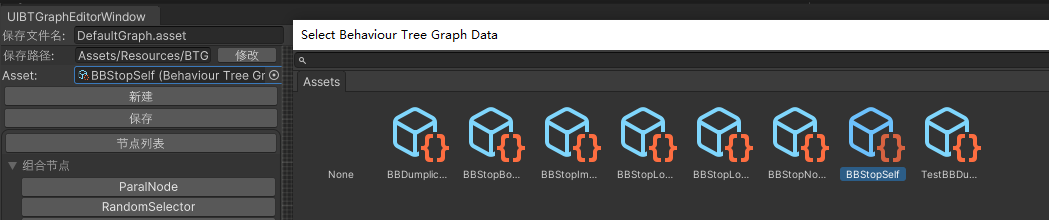
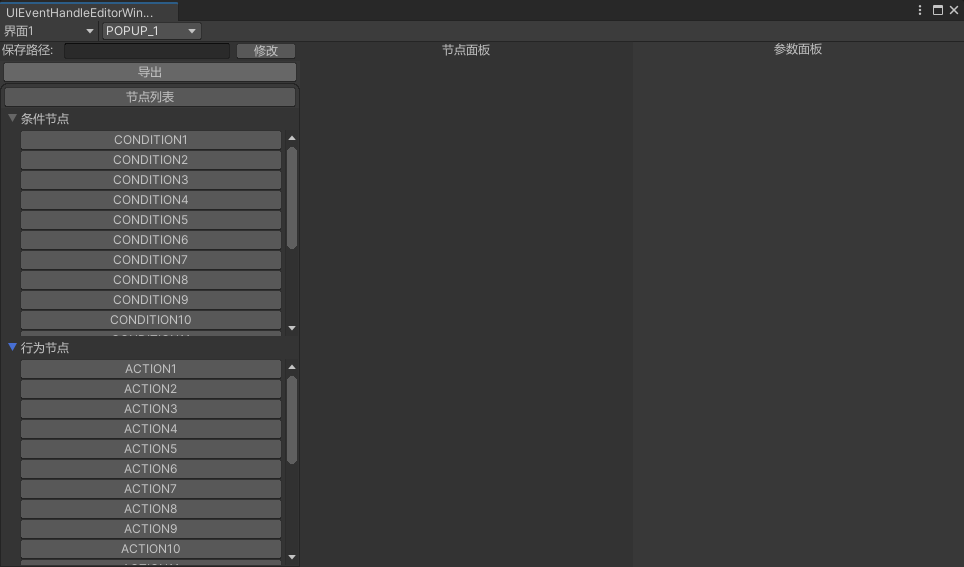
节点选择列表设计 UIBTGraphEditorWindow.cs(行为树图窗口类,未来扩展不同类型节点编辑器参考此代码即可)
1 2 3 4 5 6 7 8 9 10 11 12 13 14 15 16 17 18 19 20 21 22 23 24 25 26 27 28 29 30 31 32 33 34 35 36 37 38 39 40 41 42 43 44 45 46 47 48 49 50 51 52 53 54 55 56 57 58 59 60 61 62 63 64 65 66 67 68 69 70 71 72 73 74 75 76 77 78 79 80 81 82 83 84 85 86 87 88 89 90 91 92 93 94 95 96 97 98 99 100 101 102 103 104 105 106 107 108 109 110 111 112 113 114 115 116 117 118 119 120 121 122 123 124 125 126 127 128 129 130 131 132 public class UIBTGraphEditorWindow : EditorWindow { ****** private List<NodeType> mAvailableNodeTypeList; private Dictionary<NodeType, NodeType> mAvailableNodeTypeMap; private Dictionary<NodeType, List<Type>> mNodeTypeTypeMap; ****** private void InitNodeDatas () { mAvailableNodeTypeList = GetInitAvalibleNodeTypeList(); InitNodeTypeDatas(); } protected virtual List <NodeType > GetInitAvalibleNodeTypeList () { return new List<NodeType>() { NodeType.Dialogue, NodeType.Composition, NodeType.Decoration, NodeType.Condition, NodeType.Action, }; } private void InitNodeTypeDatas () { InitAvalibleNodeTypeMapData(); InitNodeTypeTypeListData(); } private void InitAvalibleNodeTypeMapData () { mAvailableNodeTypeMap = new Dictionary<NodeType, NodeType>(); foreach (var availableNodeType in mAvailableNodeTypeList) { if (!mAvailableNodeTypeMap.ContainsKey(availableNodeType)) { mAvailableNodeTypeMap.Add(availableNodeType, availableNodeType); } } } private void InitNodeTypeTypeListData () { mNodeTypeTypeMap = new Dictionary<NodeType, List<Type>>(); foreach (var availableNodeType in mAvailableNodeTypeList) { if (!mNodeTypeTypeMap.ContainsKey(availableNodeType)) { mNodeTypeTypeMap.Add(availableNodeType, new List<Type>()); } } var allNodeTypes = CommonGraphConst.BaseNodeAssembly.GetTypes().Where( nodeType => (CommonGraphConst.BaseNodeType.IsAssignableFrom(nodeType) && !nodeType.IsAbstract && nodeType != CommonGraphConst.BaseNodeType)); foreach (var type in allNodeTypes) { var nodeInstance = Activator.CreateInstance(type) as BaseNode; if (IsAvailableNodeType(nodeInstance.NodeType)) { List<Type> typeList; if (mNodeTypeTypeMap.TryGetValue(nodeInstance.NodeType, out typeList)) { typeList.Add(type); } } } } private void CreateAllNodeTypeUI () { foreach (var availableNodeType in mAvailableNodeTypeList) { var nodeFoldOut = new FoldOut(); var nodeTypeTitle = CommonGraphUtilities.GetNodeTypeTitle(availableNodeType); nodeFoldOut.name = nodeTypeTitle; nodeFoldOut.viewDataKey = CommonGraphUtilities.GetNodeTypeFoldOutViewDataKeyName(availableNodeType); nodeFoldOut.text = nodeTypeTitle; nodeFoldOut.AddToClassList("unity-box" ); var typeList = GetTypeListByNodeType(availableNodeType); var nodeListView = new ListView(typeList, 20 , OnMakeNodeItem, (NodeItemUserData, index) => { OnBindNodeItem(item, index, availableNodeType); }); nodeFoldOut.Add(nodeListView); nodeFoldOut.ReigsterValueChangedCallback(OnNodeFoldOutValueChange); var nodeVerticalContainer = rootVisualElement.Q<VisualElement>(CommonGraphElementNames.NodeVerticalContainerName); nodeVerticalContainer.Add(nodeFoldOut); } } ****** }
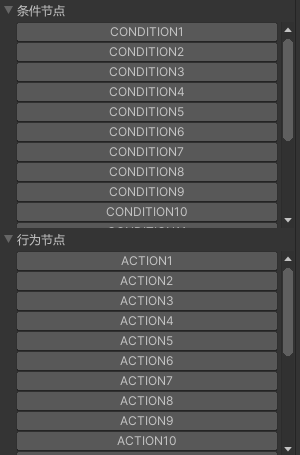
节点列表通过以下流程定义和展示:
通过GetInitAvalibleNodeTypeList()方法定义节点窗口可用节点类型列表 结合反射InitNodeTypeTypeListData()初始化所有符合的节点类型信息列表 通过CreateAllNodeTypeUI()使用UIElement创建可选节点列表
节点操作显示设计 GraphView设计 BehaviourTreeGraphView.cs(通用节点编辑器GraphView(继承至GraphView),不同的节点编辑器继承修改部分接口即可)
继承UIBTGraphEditorWindow修改获取新的GraphView接口GetNewGraphView()即可。
UIBTGraphEditorWindow.cs
1 2 3 4 5 6 7 8 9 10 11 12 13 14 15 16 17 18 19 20 21 22 23 24 25 26 27 28 29 30 31 public class UIBTGraphEditorWindow : EditorWindow { ****** protected virtual void CreateGraphView () { ClearGraphView(); var middleGraphViewContainer = rootVisualElement.Q<VisualElement>(BTGraphElementNames.MiddleGraphViewContainerName); mGraphView = GetNewGraphView(); mGraphView.StretchToParentSize(); middleGraphViewContainer.Add(mGraphView); } protected BehaviourTreeGraphView GetNewGraphView () { return new BehaviourTreeGraphView(mAvailableNodeTypeList, this .OnSelectedNodeChange); } ****** }
StyleSheet添加 创建UIBTGraphEditorWindow.uss文件,编写相关USS
BehaviourTreeGraphView.cs定义StyleSheet路径和加载流程
BehaviourTreeGraphView.cs
1 2 3 4 5 6 7 8 9 10 11 12 13 14 15 16 17 18 19 20 21 22 23 24 25 26 27 28 29 30 31 32 33 34 35 36 37 38 39 40 41 42 43 44 45 46 47 48 49 50 51 52 53 54 55 56 57 58 59 public class BehaviourTreeGraphView : GraphView { ****** protected virtual string StyleSheetAssetPath { get { return "Assets/Scripts/Editor/UIToolkitStudy/UIBTGraphEditorWindow/DefaultGraphStyleSheet.uss" ; } } public BehaviourTreeGraphView () { mAvailableNodeTypeList = new List<NodeType>() ; mSelectedNodeChangeDelegate = null ; Init(); } public BehaviourTreeGraphView (List<NodeType> availableNodeTypeList, Action<NodeView> selectedNodeChangeCB = null ) { mAvailableNodeTypeList = availableNodeTypeList; mSelectedNodeChangeDelegate += selectedNodeChangeCB; Init(); } protected virtual void Init () { ****** LoadStyleSheet(); ****** } protected virtual void LoadStyleSheet () { var styleSheet = AssetDatabase.LoadAssetAtPath<StyleSheet>(StyleSheetAssetPath); styleSheets.Add(styleSheet); } ****** }
UICommonGraphEditorWindow.uss
1 2 3 4 5 6 GridBackground { --grid-background-color: #282828; --line-color: rgba(193, 196, 192, 0.1); --thick-line-color: rgba(193, 196, 192, 0.1); --spacing: 10; }
节点创建添加 BehaviourTreeGraphView.cs
1 2 3 4 5 6 7 8 9 10 11 12 13 14 15 16 17 18 19 20 21 22 23 24 25 26 27 28 29 30 31 32 33 34 35 36 37 38 39 40 41 42 43 44 45 46 47 48 49 50 51 52 53 54 55 56 57 58 59 60 61 62 63 64 65 66 67 68 69 70 71 72 73 74 75 76 77 78 79 80 81 82 83 84 85 86 87 88 89 90 91 92 93 94 95 96 97 98 99 100 101 102 103 104 105 106 107 108 109 110 111 112 113 114 115 116 117 118 119 120 121 122 123 124 125 126 127 128 129 130 131 132 133 134 135 136 public class BehaviourTreeGraphView : GraphView { protected readonly Rect NodeDefaultRect = new Rect(100 , 200 , 100 , 150 ); protected readonly Type RootNodeType = BTGraphConstEditor.RootNodeType; protected virtual Orientation GraphOrientation { get { return GraphOrientation.Horizontal; } } ******* protected virtual void Init () { ****** AddEntryPointNode(); ****** } protected virtual void AddEntryPointNode () { AddElement(GenerateEntryPointNode()); } protected NodeView GenerateEntryPointNode () { var rootNode = CreateNodeByType(RootNodeType, BTGraphConstEditor.NodeDefaultPos); return rootNode; } public virtual NodeView CreateNode <T >(bool isEntryNode = false , bool addNodeData = true where T : BaseNode, new () { var typeInfo = typeof (T); var nodeView = CreateNodeByType(typeInfo, isEntryNode, addNodeData); return nodeView; } public NodeView CreateNodeByType (Type typeInfo, Vector2 position ) { var newNode = BTGraphUtilitiesEditor.CreateNodeInstance(typeInfo); var guid = Guid.NewGuid().ToString(); var nodeRect = BTGraphConstEditor.NodeDefaultRect; nodeRect.x = position.x; nodeRect.y = position.y; newNode.Init(guid, nodeRect); var nodeView = BTGraphUtilitiesEditor.CreateNodeViewInstance(typeInfo); nodeView.Init(SourceGraphData, newNode, OnNodeSelected, null , GraphOrientation); AddNodeData(newNode); AddElement(nodeView); UpdateNodeViewRect(nodeView, nodeRect); return nodeView; } protected bool UpdateNodeViewRect (NodeView nodeView, Rect position ) { if (nodeView == null ) { Debug.LogError($"不允许更新空NodeView的位置数据!" ); return false ; } nodeView.SetPosition(position); return true ; } protected bool AddNodeData (BaseNode node, bool enableUndoSystem = true ) { if (node == null ) { Debug.LogError($"不允许添加空节点数据!" ); return false ; } if (enableUndoSystem) { Undo.RecordObject(SourceGraphData, "AddNodeData" ); } var result = SourceGraphData.AddNode(node); if (result) { OnAddNodeData(node); EditorUtility.SetDirty(SourceGraphData); } return true ; } ****** }
BTGraphUtilitiesEditor.cs
1 2 3 4 5 6 7 8 9 10 11 12 13 14 15 16 17 18 19 20 21 22 23 24 25 26 27 28 29 30 31 32 33 34 35 36 37 38 39 40 41 42 43 44 45 46 47 48 49 50 51 52 53 public static class BTGraphUtilitiesEditor { ****** public static BaseNode CreateNodeInstance (Type typeInfo ) { if (typeInfo == null ) { Debug.LogError($"不支持创建空类型信息的节点对象!" ); return null ; } if (typeInfo != CommonGraphConstEditor.BaseNodeType && !typeInfo.IsSubclassOf(CommonGraphConstEditor.BaseNodeType)) { Debug.LogError($"不允许创建未继承BaseNode的类型:{typeInfo.Name} 信息节点对象!" ); return null ; } return ScriptableObject.CreateInstance(typeInfo) as BaseNode; } public static NodeView CreateNodeViewInstance (Type typeInfo ) { if (typeInfo == null ) { Debug.LogError($"不支持创建空类型信息的节点View对象!" ); return null ; } var nodeViewType = GetNodeViewType(typeInfo); if (nodeViewType != CommonGraphConstEditor.NodeViewType && !nodeViewType.IsSubclassOf(CommonGraphConstEditor.NodeViewType)) { Debug.LogError($"不允许创建未继承BaseNode的类型:{nodeViewType.Name} 信息节点View对象!" ); return null ; } return Activator.CreateInstance(nodeViewType) as NodeView; } ****** }
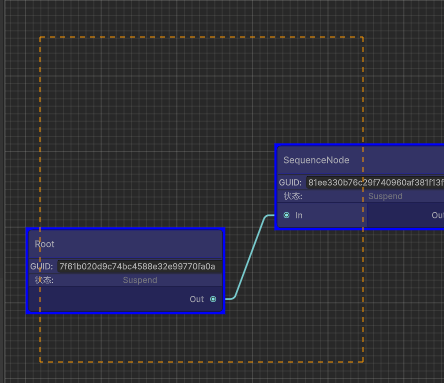
BehaviourTreeGraphView.GenerateEntryPointNode()负责创建根节点。
BehaviourTreeGraphView.CreateNode()和CreateNodeByType()负责创建新节点。
BTGraphUtilitiesEditor.CreateNodeInstance()和BTGraphUtilitiesEditor.CreateNodeViewInstance()负责构建节点对象和节点显示对象(TODO:添加非反射版节点实例对象创建实现)。
BehaviourTreeGraphView.UpdateNodeViewRect()负责更新显示节点数据和位置。
Note:
GraphView.GetNodeByGuid()获取指定GUID的节点是根据Node.viewDataKey来标识的
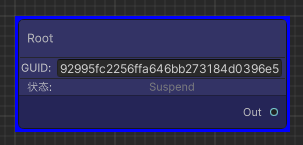
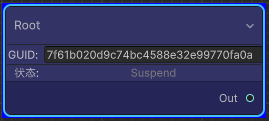
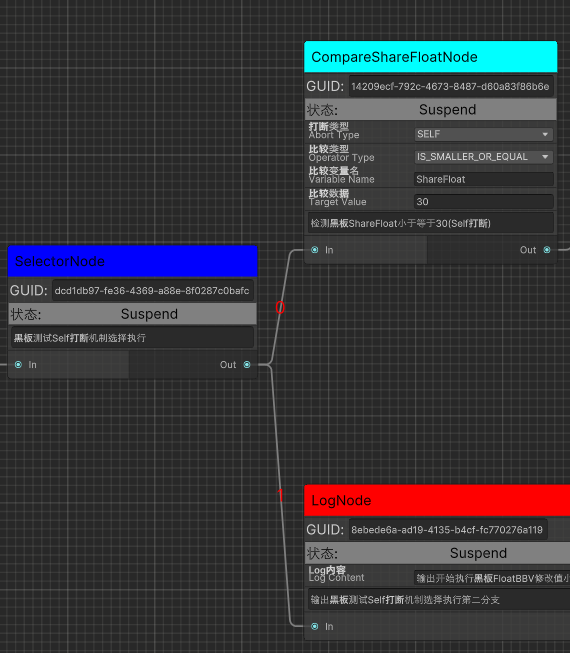
节点自定义UI添加 通过style.color根据不同节点类型设置不同节点颜色显示
通过创建插入竖向容器Element添加自定义UI显示
NodeState.cs
1 2 3 4 5 6 7 8 9 10 11 12 public enum NodeState{ Suspend = 0 , Running, Abort, Success, Failed, }
BaseNode.cs
1 2 3 4 5 6 7 8 9 10 11 12 13 14 15 16 17 18 19 20 21 22 23 24 25 26 27 28 29 30 31 32 33 34 35 36 37 38 39 40 41 42 43 44 45 46 47 48 49 50 51 52 53 54 55 56 57 58 59 60 61 62 63 64 65 66 67 68 69 70 71 72 73 74 75 76 77 78 79 80 81 82 83 84 85 86 87 88 89 90 [Serializable ] public class BaseNode : Node { [Header("唯一ID" ) ] public string GUID; [Header("位置" ) ] [HideInInspector ] public Rect Position; [Header("节点描述" ) ] [HideInInspector ] public string Des = "节点描述" ; public virtual bool EntryPoint { get { return false ; } } public virtual NodeType NodeType { get { return NodeType.Composition; } } public NodeState NodeState { get ; protected set ; } public bool IsEnteredAbort { get ; protected set ; } public BaseNode () { ****** } public void Init (string guid, Rect position, NodeState nodeState = NodeState.Suspend { GUID = guid; Position = position; NodeState = nodeState; IsEnteredAbort = false ; name = GetType().Name; } }
NodeView.cs
1 2 3 4 5 6 7 8 9 10 11 12 13 14 15 16 17 18 19 20 21 22 23 24 25 26 27 28 29 30 31 32 33 34 35 36 37 38 39 40 41 42 43 44 45 46 47 48 49 50 51 52 53 54 55 56 57 58 59 60 61 62 63 64 65 66 67 68 69 70 71 72 73 74 75 76 77 78 79 80 81 82 83 84 85 86 87 88 89 90 91 92 93 94 95 96 97 98 99 100 101 102 103 104 105 106 107 108 109 110 111 112 113 114 115 116 117 118 119 120 121 122 123 124 125 126 127 128 129 130 131 132 133 134 135 136 137 138 139 140 141 142 143 144 145 146 147 148 149 150 151 152 153 154 155 156 157 158 159 160 161 162 163 164 165 166 167 168 169 170 171 172 173 174 175 176 177 178 179 180 181 182 183 184 185 186 187 188 189 190 191 192 193 194 195 196 197 198 199 200 201 202 203 204 205 206 207 208 209 210 211 212 213 214 215 216 217 218 219 220 221 222 223 224 225 226 227 228 229 230 231 232 233 234 235 236 237 238 239 240 241 242 243 244 245 246 247 248 249 250 251 252 253 254 255 256 257 258 259 260 261 262 263 264 265 266 267 268 269 270 271 272 273 274 275 public class NodeView : Node { public BehaviourTreeGraphData OwnerGraphData { get ; private set ; } public BaseNode NodeData { get ; private set ; } public virtual Port.Capacity InPortCapacity { get { return Port.Capacity.Single; } } public virtual Port.Capacity OutPortCapacity { get { return Port.Capacity.Single; } } protected Orientation mOrientation; protected Action<NodeView> mNodeSelectedDelegate; protected List<Port> mAllInputPorts; protected List<Port> mAllOutputPorts; public NodeView () { mAllInputPorts = new List<Port>(); mAllOutputPorts = new List<Port>(); } public NodeView (BehaviourTreeGraphData ownerGraphData, BaseNode nodeData, Action<NodeView> nodeSelectedCB = null , string nodeName = null , Orientation orientation = Orientation.Horizontal ) { Init(ownerGraphData, nodeData, nodeSelectedCB, nodeName, orientation); } public void Init (BehaviourTreeGraphData ownerGraphData, BaseNode node, Action<NodeView> nodeSelectedCB = null , string nodeName = null , Orientation orientation = Orientation.Horizontal ) { OwnerGraphData = ownerGraphData; name = node.GUID; viewDataKey = node.GUID; NodeData = node; mNodeSelectedDelegate += nodeSelectedCB; mOrientation = orientation; title = nodeName == null ? node.GetType().Name : nodeName; titleContainer.style.backgroundColor = BTGraphUtilitiesEditor.GetBackgroundColorByNodeData(NodeData); var titleLabel = titleContainer.Q<Label>("title-label" ); titleLabel.style.color = Color.black; titleLabel.style.fontSize = BTGraphConstEditor.NormalLabelFontSize; CreateNodeUI(); GenerateAllPort(); RefreshExpandedState(); RefreshPorts(); } ****** protected void CreateNodeUI () { CreateNodeContainerUI(); CreateNodeGUIDUI(); CreateNodeStateUI(); CreateCustomUI(); CreateNodeDesUI(); } protected void CreateNodeContainerUI () { var nodeVerticalUIContainer = UIToolkitUtilities.CreateVerticalContainer(BTGraphElementNames.NodeUIVerticalContainerName, 1 , "unity-box" , 0 , 0 , 0 , 0 , BTGraphConstEditor.NodeContainerBGColor); var nodeContentElement = this .Q<VisualElement>("contents" ); nodeContentElement.Insert(0 , nodeVerticalUIContainer); } protected void CreateNodeGUIDUI () { var nodeVerticalUIContainer = this .Q<VisualElement>(BTGraphElementNames.NodeUIVerticalContainerName); var nodeGUIDHorizontalUIContainer = UIToolkitUtilities.CreateHorizontalContainer(BTGraphElementNames.NodeGUIDUIHorizontalContainerName); var nodeGUIDDivider = UIToolkitUtilities.CreateHorizontalDivider(BTGraphConstEditor.DividerColor); nodeVerticalUIContainer.Add(nodeGUIDDivider); nodeVerticalUIContainer.Add(nodeGUIDHorizontalUIContainer); var nodeGuidTitleLabel = new Label(); nodeGuidTitleLabel.text = "GUID:" ; nodeGuidTitleLabel.style.height = BTGraphConstEditor.NodeOneLineHeight; nodeGuidTitleLabel.style.fontSize = BTGraphConstEditor.NormalLabelFontSize; nodeGuidTitleLabel.style.unityTextAlign = TextAnchor.MiddleCenter; nodeGuidTitleLabel.style.alignSelf = Align.Center; nodeGUIDHorizontalUIContainer.Add(nodeGuidTitleLabel); var nodeGuidLabel = new TextField(); nodeGuidLabel.isReadOnly = true ; nodeGuidLabel.value = NodeData.GUID; nodeGuidLabel.style.height = BTGraphConstEditor.NodeOneLineHeight; nodeGuidLabel.style.fontSize = BTGraphConstEditor.NormalLabelFontSize; nodeGuidLabel.style.unityTextAlign = TextAnchor.MiddleCenter; nodeGuidLabel.style.alignSelf = Align.Center; nodeGUIDHorizontalUIContainer.Add(nodeGuidLabel); } protected void CreateNodeStateUI () { var nodeVerticalUIContainer = this .Q<VisualElement>(BTGraphElementNames.NodeUIVerticalContainerName); var nodeStateHorizontalUIContainer = UIToolkitUtilities.CreateHorizontalContainer(BTGraphElementNames.NodeStateUIHorizontalContainerName); var nodeStateDivider = UIToolkitUtilities.CreateHorizontalDivider(BTGraphConstEditor.DividerColor); nodeVerticalUIContainer.Add(nodeStateDivider); nodeVerticalUIContainer.Add(nodeStateHorizontalUIContainer); var nodeStateTitleLabel = new Label(); nodeStateTitleLabel.style.width = 40f ; nodeStateTitleLabel.style.height = BTGraphConstEditor.NodeOneLineHeight; nodeStateTitleLabel.text = "状态:" ; nodeStateTitleLabel.style.fontSize = BTGraphConstEditor.NormalLabelFontSize; nodeStateTitleLabel.style.color = Color.black; nodeStateTitleLabel.style.unityTextAlign = TextAnchor.MiddleCenter; nodeStateTitleLabel.style.alignSelf = Align.Center; nodeStateHorizontalUIContainer.Add(nodeStateTitleLabel); var nodeStateLabel = new Label(); nodeStateLabel.name = BTGraphElementNames.NodeStateLabelName; nodeStateLabel.style.width = 40f ; nodeStateLabel.style.unityTextAlign = TextAnchor.MiddleCenter; nodeStateLabel.style.alignSelf = Align.Center; nodeStateLabel.style.height = BTGraphConstEditor.NodeOneLineHeight; nodeStateLabel.style.fontSize = BTGraphConstEditor.NormalLabelFontSize; nodeStateLabel.style.color = Color.black; nodeStateLabel.style.flexGrow = 1 ; nodeStateHorizontalUIContainer.Add(nodeStateLabel); UpdateNodeStateBackgroundColor(); UpdateNodeStateLabel(); } protected virtual void CreateCustomUI () { } public void UpdateNodeStateBackgroundColor () { var nodeStateHorizontalUIContainer = this .Q<VisualElement>(BTGraphElementNames.NodeStateUIHorizontalContainerName); if (nodeStateHorizontalUIContainer != null ) { nodeStateHorizontalUIContainer.style.backgroundColor = BTGraphUtilitiesEditor.GetColorByNodeState(NodeData.NodeState); } } public void UpdateNodeStateLabel () { var nodeStateLabel = this .Q<Label>(BTGraphElementNames.NodeStateLabelName); if (nodeStateLabel != null ) { var stateDes = NodeData.NodeState.ToString(); if (NodeData.IsEnteredAbort) { stateDes = $"{stateDes} (打断)" ; } nodeStateLabel.text = stateDes; } } protected void CreateNodeDesUI () { var nodeVerticalUIContainer = this .Q<VisualElement>(BTGraphElementNames.NodeUIVerticalContainerName); var nodeDesHorizontalUIContainer = UIToolkitUtilities.CreateHorizontalContainer(BTGraphElementNames.NodeDesUIHorizontalContainerName); var nodeDesDivider = UIToolkitUtilities.CreateHorizontalDivider(BTGraphConstEditor.DividerColor); nodeVerticalUIContainer.Add(nodeDesDivider); nodeVerticalUIContainer.Add(nodeDesHorizontalUIContainer); UIToolkitUtilities.CreateBindSOTextField(nodeDesHorizontalUIContainer, NodeData, BTGraphConstEditor.NodeDesPropertyName, 1 , BTGraphConstEditor.NodeOneLineHeight, BTGraphConstEditor.NormalLabelFontSize); } protected virtual void CreateCustomUI () { } ****** }
BTGraphUtilitiesEditor.cs
1 2 3 4 5 6 7 8 9 10 11 12 13 14 15 16 17 18 19 20 21 22 23 24 25 26 27 28 29 30 31 32 33 34 35 36 37 38 39 40 41 42 43 44 45 46 47 48 49 50 51 52 53 54 55 56 57 58 59 60 61 62 63 64 65 66 67 public static class BTGraphUtilitiesEditor { ****** private static Dictionary<NodeType, Color> NodeTypeBackgroundColorMap = new Dictionary<NodeType, Color> { {NodeType.Composition, Color.blue}, {NodeType.Decoration, Color.cyan}, {NodeType.Condition, Color.yellow}, {NodeType.Action, Color.red}, }; private static readonly Dictionary<NodeState, Color> NodeStateColorMap = new Dictionary<NodeState, Color> { {NodeState.Suspend, Color.grey}, {NodeState.Running, Color.yellow}, {NodeState.Abort, Color.magenta}, {NodeState.Success, Color.green}, {NodeState.Failed, Color.red}, }; ****** public static Color GetBackgroundColorByNodeType (NodeType nodeType ) { Color nodeTypeBackgroundColor; if (NodeTypeBackgroundColorMap.TryGetValue(nodeType, out nodeTypeBackgroundColor)) { return nodeTypeBackgroundColor; } Debug.LogError($"未配置节点类型:{nodeType} 的背景颜色!" ); return Color.grey; } public static Color GetColorByNodeState (NodeState nodeState ) { Color nodeStateColor; if (NodeStateColorMap.TryGetValue(nodeState, out nodeStateColor)) { return nodeStateColor; } Debug.LogError($"未配置节点状态:{nodeState} 的颜色!" ); return Color.grey; } ****** }
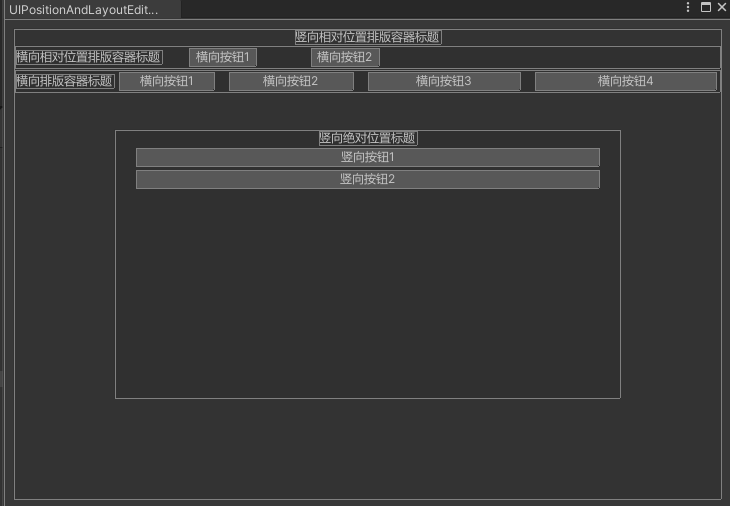
UIToolkitUtilities.cs
1 2 3 4 5 6 7 8 9 10 11 12 13 14 15 16 17 18 19 20 21 22 23 24 25 26 27 28 29 30 31 32 33 34 35 36 37 38 39 40 41 42 43 44 45 46 47 48 49 50 51 52 53 54 55 56 57 58 59 60 61 62 63 64 65 66 67 68 69 70 71 72 73 74 75 76 77 78 79 80 81 82 83 84 85 86 87 88 89 90 91 92 93 94 95 96 97 98 99 100 101 102 103 104 105 106 107 108 109 110 111 112 113 114 115 116 117 118 119 120 121 122 123 124 125 126 127 128 129 130 131 132 133 134 135 136 137 138 139 140 141 142 143 144 145 146 147 148 149 150 151 152 153 154 155 156 157 158 159 160 161 162 163 164 165 166 167 168 169 170 171 172 173 174 175 176 177 178 179 180 181 182 183 184 185 186 187 188 189 190 191 192 193 194 195 196 197 198 199 200 201 202 203 204 205 206 207 public static class UIToolkitUtilities { public static VisualElement CreateHorizontalContainer (string containerName, float flexGrow = 1f , string classList = null , float styleLeft = 0 , float styleRight = 0 , float styleTop = 0 , float styleBottom = 0 , StyleColor styleColor = default (StyleColor { var nodeHorizontalUIContainer = new VisualElement(); nodeHorizontalUIContainer.name = containerName; nodeHorizontalUIContainer.style.left = styleLeft; nodeHorizontalUIContainer.style.right = styleRight; nodeHorizontalUIContainer.style.flexGrow = flexGrow; nodeHorizontalUIContainer.style.top = styleTop; nodeHorizontalUIContainer.style.bottom = styleBottom; nodeHorizontalUIContainer.style.flexDirection = FlexDirection.Row; nodeHorizontalUIContainer.style.backgroundColor = styleColor; if (!string .IsNullOrEmpty(classList)) { nodeHorizontalUIContainer.AddToClassList(classList); } return nodeHorizontalUIContainer; } public static VisualElement CreateVerticalContainer (string containerName, float flexGrow = 1f , string classList = null , float styleLeft = 0 , float styleRight = 0 , float styleTop = 0 , float styleBottom = 0 , StyleColor styleColor = default (StyleColor { var nodeHorizontalUIContainer = new VisualElement(); nodeHorizontalUIContainer.name = containerName; nodeHorizontalUIContainer.style.left = styleLeft; nodeHorizontalUIContainer.style.right = styleRight; nodeHorizontalUIContainer.style.flexGrow = flexGrow; nodeHorizontalUIContainer.style.top = styleTop; nodeHorizontalUIContainer.style.bottom = styleBottom; nodeHorizontalUIContainer.style.flexDirection = FlexDirection.Column; nodeHorizontalUIContainer.style.backgroundColor = styleColor; if (!string .IsNullOrEmpty(classList)) { nodeHorizontalUIContainer.AddToClassList(classList); } return nodeHorizontalUIContainer; } public static VisualElement CreateHorizontalDivider (Color color, float height = 1f ) { var horizontalDivider = new VisualElement(); horizontalDivider.style.height = height; horizontalDivider.style.flexGrow = 1 ; horizontalDivider.style.backgroundColor = color; return horizontalDivider; } public static VisualElement CreateVerticalDivider (Color color ) { var horizontalDivider = new VisualElement(); horizontalDivider.style.width = 1 ; horizontalDivider.style.flexGrow = 1 ; horizontalDivider.style.backgroundColor = color; return horizontalDivider; } public static VisualElement CreateBindSOInspector (ScriptableObject scriptableObject, Dictionary<string , PropertyBindData> propertyBindDataMap = null ) { if (scriptableObject == null ) { Debug.LogError($"不允许给空ScriptableObject创建可视化Inspector!" ); return null ; } var container = CreateVerticalContainer(null , 1 ); var serializedObject = new SerializedObject(scriptableObject); var propertyIterator = serializedObject.GetIterator(); propertyIterator.NextVisible(true ); while (propertyIterator.NextVisible(false )) { var propertyField = new PropertyField(); var propertyName = propertyIterator.name; var property = serializedObject.FindProperty(propertyName); propertyField.name = propertyName; propertyField.BindProperty(property); container.Add(propertyField); if (propertyBindDataMap != null ) { var propertyBindData = new PropertyBindData(serializedObject, property, propertyField); propertyBindDataMap.Add(propertyName, propertyBindData); } } return container; } public static PropertyBindData CreateBindSOPropertyField (VisualElement container, ScriptableObject scriptableObject, string propertyName, float flexGrow = 0 , float height = 25f ) { if (container == null ) { Debug.LogError($"不允许给空容器创建绑定PropertyField!" ); return null ; } if (scriptableObject == null ) { Debug.LogError($"不允许给空ScriptableObject创建绑定PropertyField!" ); return null ; } var serializedObject = new SerializedObject(scriptableObject); var property = serializedObject.FindProperty(propertyName); if (property == null ) { Debug.LogError($"ScriptableObject:{scriptableObject.name} 没找到属性名:{propertyName} 的属性,创建绑定PropertyField失败!" ); return null ; } var propertyField = new PropertyField(); propertyField.name = propertyName; propertyField.BindProperty(property); propertyField.style.height = height; propertyField.style.flexGrow = flexGrow; container.Add(propertyField); var propertyBindData = new PropertyBindData(serializedObject, property, propertyField); return propertyBindData; } public static PropertyBindData CreateBindSOTextField (VisualElement container, ScriptableObject scriptableObject, string propertyName, float flexGrow = 0 , float height = 25f , float fontSize = 15f , TextAnchor textAnchor = TextAnchor.MiddleCenter ) { if (container == null ) { Debug.LogError($"不允许给空容器创建绑定TextField!" ); return null ; } if (scriptableObject == null ) { Debug.LogError($"不允许给空ScriptableObject创建绑定TextField!" ); return null ; } var serializedObject = new SerializedObject(scriptableObject); var property = serializedObject.FindProperty(propertyName); if (property == null ) { Debug.LogError($"ScriptableObject:{scriptableObject.name} 没找到属性名:{propertyName} 的属性,创建绑定TextField失败!" ); return null ; } var textField = new TextField(); textField.name = propertyName; textField.BindProperty(property); textField.style.height = height; textField.style.fontSize = fontSize; textField.style.flexGrow = flexGrow; textField.style.unityTextAlign = textAnchor; container.Add(textField); var propertyBindData = new PropertyBindData(serializedObject, property, textField); return propertyBindData; } ****** }
Note:
子类重写CreateCustomUI()自定义节点UI显示
节点Port创建添加 NodeView.cs
1 2 3 4 5 6 7 8 9 10 11 12 13 14 15 16 17 18 19 20 21 22 23 24 25 26 27 28 29 30 31 32 33 34 35 36 37 38 39 40 41 42 43 44 45 46 47 48 49 50 51 52 53 54 55 56 57 58 59 60 61 62 63 64 65 66 67 68 69 70 71 72 73 74 75 76 77 78 79 80 81 82 83 84 85 86 87 88 89 90 91 92 93 94 95 96 97 98 99 100 101 102 103 104 105 106 107 108 109 110 111 112 113 114 115 116 117 118 119 120 121 122 123 124 125 126 127 128 129 130 131 132 133 134 135 136 137 138 139 140 141 142 143 144 145 146 147 148 149 150 151 152 153 154 155 156 157 158 159 160 161 162 163 164 165 166 167 168 169 170 171 172 173 174 175 176 177 178 179 180 181 182 183 184 185 186 187 188 189 190 191 192 193 194 195 196 197 198 199 200 201 202 203 204 205 206 207 208 209 210 211 212 213 214 215 216 217 218 219 220 221 222 public class NodeView : Node { public BehaviourTreeGraphData OwnerGraphData { get ; private set ; } public BaseNode NodeData { get ; private set ; } public virtual Port.Capacity InPortCapacity { get { return Port.Capacity.Single; } } public virtual Port.Capacity OutPortCapacity { get { return Port.Capacity.Single; } } protected Orientation mOrientation; protected Action<NodeView> mNodeSelectedDelegate; protected List<Port> mAllInputPorts; protected List<Port> mAllOutputPorts; public NodeView () { mAllInputPorts = new List<Port>(); mAllOutputPorts = new List<Port>(); } public NodeView (BehaviourTreeGraphData ownerGraphData, BaseNode nodeData, Action<NodeView> nodeSelectedCB = null , string nodeName = null , Orientation orientation = Orientation.Horizontal ) { Init(ownerGraphData, nodeData, nodeSelectedCB, nodeName, orientation); } public void Init (BehaviourTreeGraphData ownerGraphData, BaseNode node, Action<NodeView> nodeSelectedCB = null , string nodeName = null , Orientation orientation = Orientation.Horizontal ) { OwnerGraphData = ownerGraphData; name = node.GUID; viewDataKey = node.GUID; NodeData = node; mNodeSelectedDelegate += nodeSelectedCB; mOrientation = orientation; title = nodeName == null ? node.GetType().Name : nodeName; titleContainer.style.backgroundColor = BTGraphUtilitiesEditor.GetBackgroundColorByNodeData(NodeData); var titleLabel = titleContainer.Q<Label>("title-label" ); titleLabel.style.color = Color.black; titleLabel.style.fontSize = BTGraphConstEditor.NormalLabelFontSize; CreateNodeUI(); GenerateAllPort(); RefreshExpandedState(); RefreshPorts(); } public Port InstantiateCustomInputPort (string portName, System.Type type { var port = InstantiateCustomPort(portName, Direction.Input, InPortCapacity, type); inputContainer.Add(port); mAllInputPorts.Add(port); return port; } public Port InstantiateCustomOutputPort (string portName, System.Type type { var port = InstantiateCustomPort(portName, Direction.Output, OutPortCapacity, type); outputContainer.Add(port); mAllOutputPorts.Add(port); return port; } public List<Port> GetAllInputPorts () { return mAllInputPorts; } public List<Port> GetAllOutputPorts () { return mAllOutputPorts; } protected virtual Port InstantiateCustomPort (string portName, Direction direction, Port.Capacity capacity, System.Type type { var port = InstantiatePort(mOrientation, direction, capacity, type); port.name = portName; port.portName = portName; return port; } public override Port InstantiatePort (Orientation orientation, Direction direction, Port.Capacity capacity, Type type ) { return Port.Create<EdgeView>(orientation, direction, capacity, type); } ****** protected void GenerateAllPort () { GenerateAllInputPort(); GenerateAllOutputPort(); } protected virtual void GenerateAllInputPort () { InstantiateCustomInputPort(BTGraphConstEditor.DefaultInputPortName, BTGraphConstEditor.FloatType); } protected virtual void GenerateAllOutputPort () { InstantiateCustomOutputPort(BTGraphConstEditor.DefaultOutputPortName, BTGraphConstEditor.FloatType); } ****** }
BaseParentNode.cs
1 2 3 4 5 6 7 8 9 10 11 12 13 14 15 16 17 18 19 20 21 22 23 24 25 26 27 28 29 30 31 public abstract class BaseParentNode : BaseNode { public int ChildNodeCount { get { return mChildNodeList != null ? mChildNodeList.Count : 0 ; } } protected List<BaseNode> mChildNodeList; public virtual void SetChildNodeList (List<BaseNode> childNodeList ) { mChildNodeList = childNodeList; } }
BaseCompositionNode.cs
1 2 3 4 5 6 7 8 9 10 11 12 13 14 15 16 17 18 [Serializable ] public abstract class BaseCompositionNode : BaseParentNode { public override NodeType NodeType { get { return NodeType.Composition; } } }
SequnceNode.cs
1 2 3 4 5 6 7 8 9 [Serializable ] public class SequenceNode : BaseCompositionNode { }
从上面代码可以看到节点Port创建流程如下:
NodeView.GenerateAllPort(),NodeView.GenerateAllInputPort()和NodeView.GenerateAllOutputPort()负责节点Port的初始化创建流程 NodeView.InstantiateCustomInputPort()和NodeView.InstantiateCustomOutputPort()方法分别负责创建输入和输出节点Port NodeView.inputContainer和NodeView.outputContainer分别对应输入和输出节点容器通过*Container.Add(port)方法给对应节点容器添加创建节点 调用RefreshExpandedState()和RefreshPorts()触发节点输出节点排版刷新显示
Note:
InPortCapacity或OutPortCapacity实现自定义节点的输入输出Port连线数量定义 GenerateAllInputPort()或GenerateAllOutputPort()实现自定义输入输出节点Port创建
节点Port连线功能添加 节点的连线规则是通过GraphView:GetCompatiblePorts()接口返回决定的
BehaviourTreeGraphView.cs
1 2 3 4 5 6 7 8 9 10 11 12 13 14 15 16 17 18 19 20 21 22 23 24 25 26 27 28 29 30 31 32 33 34 35 36 37 38 39 40 41 42 43 44 45 46 47 48 49 50 51 52 53 54 55 56 57 58 59 60 61 62 63 64 65 66 67 68 69 70 71 72 73 74 75 76 77 78 79 80 81 82 83 84 85 86 87 88 89 90 91 92 93 94 95 96 97 98 99 100 101 102 103 104 105 106 107 108 109 110 111 112 113 114 115 116 117 118 119 120 121 122 123 124 125 126 127 128 129 130 131 132 133 134 135 136 137 138 139 140 141 142 143 144 public class BehaviourTreeGraphView : GraphView { ****** protected Dictionary<NodeType, Dictionary<NodeType, NodeType>> mPortAvailableConnectNodeTypeMap; protected Dictionary<NodeType, Dictionary<Type, Type>> mPortUnavailableConnectTypeMap; protected List<Port> mCompatiblePortList; public Init () { ****** InitPortConnectRuleData(); ****** } private void InitPortConnectRuleData () { mCompatiblePortList = new List<Port>(); InitPortAvalibleConnectNodeTypeData(); InitPortUnavalibleConnectTypeData(); } protected void InitPortConnectRuleData () { mCompatiblePortList = new List<Port>(); InitPortAvalibleConnectNodeTypeData(); InitPortUnavalibleConnectTypeData(); } protected void InitPortAvalibleConnectNodeTypeData () { mPortAvailableConnectNodeTypeMap = new Dictionary<NodeType, Dictionary<NodeType, NodeType>>(); AddPortAvalibleConnectNodeType(NodeType.Composition, NodeType.Composition); AddPortAvalibleConnectNodeType(NodeType.Composition, NodeType.Decoration); AddPortAvalibleConnectNodeType(NodeType.Composition, NodeType.Condition); AddPortAvalibleConnectNodeType(NodeType.Composition, NodeType.Action); AddPortAvalibleConnectNodeType(NodeType.Decoration, NodeType.Composition); AddPortAvalibleConnectNodeType(NodeType.Decoration, NodeType.Decoration); AddPortAvalibleConnectNodeType(NodeType.Decoration, NodeType.Condition); AddPortAvalibleConnectNodeType(NodeType.Decoration, NodeType.Action); } protected bool AddPortAvalibleConnectNodeType (NodeType sourceNodeType, NodeType targetNodeType ) { Dictionary<NodeType, NodeType> portAvalibleConnectNodeTypeMap; if (!mPortAvailableConnectNodeTypeMap.TryGetValue(sourceNodeType, out portAvalibleConnectNodeTypeMap)) { portAvalibleConnectNodeTypeMap = new Dictionary<NodeType, NodeType>(); mPortAvailableConnectNodeTypeMap.Add(sourceNodeType, portAvalibleConnectNodeTypeMap); } if (portAvalibleConnectNodeTypeMap.ContainsKey(targetNodeType)) { Debug.LogError($"重复添加节点类型:{sourceNodeType} 的Port可连接节点类型:{targetNodeType} " ); return false ; } portAvalibleConnectNodeTypeMap.Add(targetNodeType, targetNodeType); return true ; } protected void InitPortUnavalibleConnectTypeData () { mPortUnavailableConnectTypeMap = new Dictionary<NodeType, Dictionary<Type, Type>>(); } ****** public override List<Port> GetCompatiblePorts (Port startPort, NodeAdapter nodeAdapter ) { mCompatiblePortList.Clear(); foreach (var port in ports) { if (startPort == port || startPort.node == port.node || startPort.direction == port.direction) { continue ; } var startNode = startPort.node as NodeView; var portNode = port.node as NodeView; if (!IsPortAvalibleConnectNodeType(startNode.NodeData.NodeType, portNode.NodeData.NodeType)) { continue ; } var portNodeType = port.node.GetType(); if (IsPortUnavalibleConnectType(startNode.NodeData.NodeType, portNodeType)) { continue ; } if (portNode.NodeData.EntryPoint && port.direction == Direction.Input) { continue ; } if (startNode.NodeData.EntryPoint && port.direction == Direction.Output) { continue ; } mCompatiblePortList.Add(port); } return mCompatiblePortList; } }
InitPortAvalibleConnectNodeTypeData()实现自定义节点类型和哪些节点类型可连
IsPortUnavalibleConnectType()实现自定义节点类型哪些节点类型信息不可连
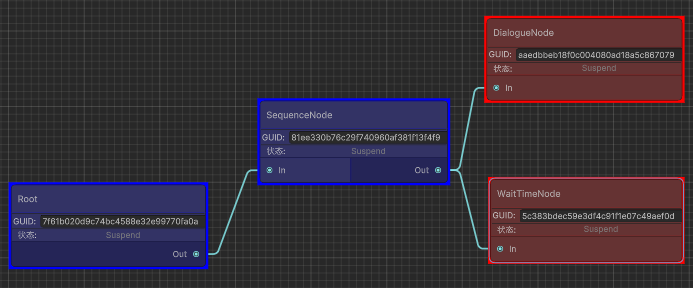
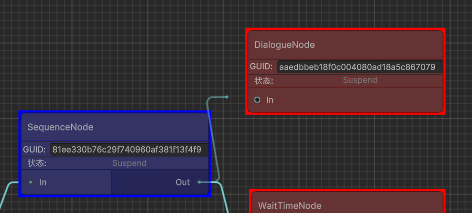
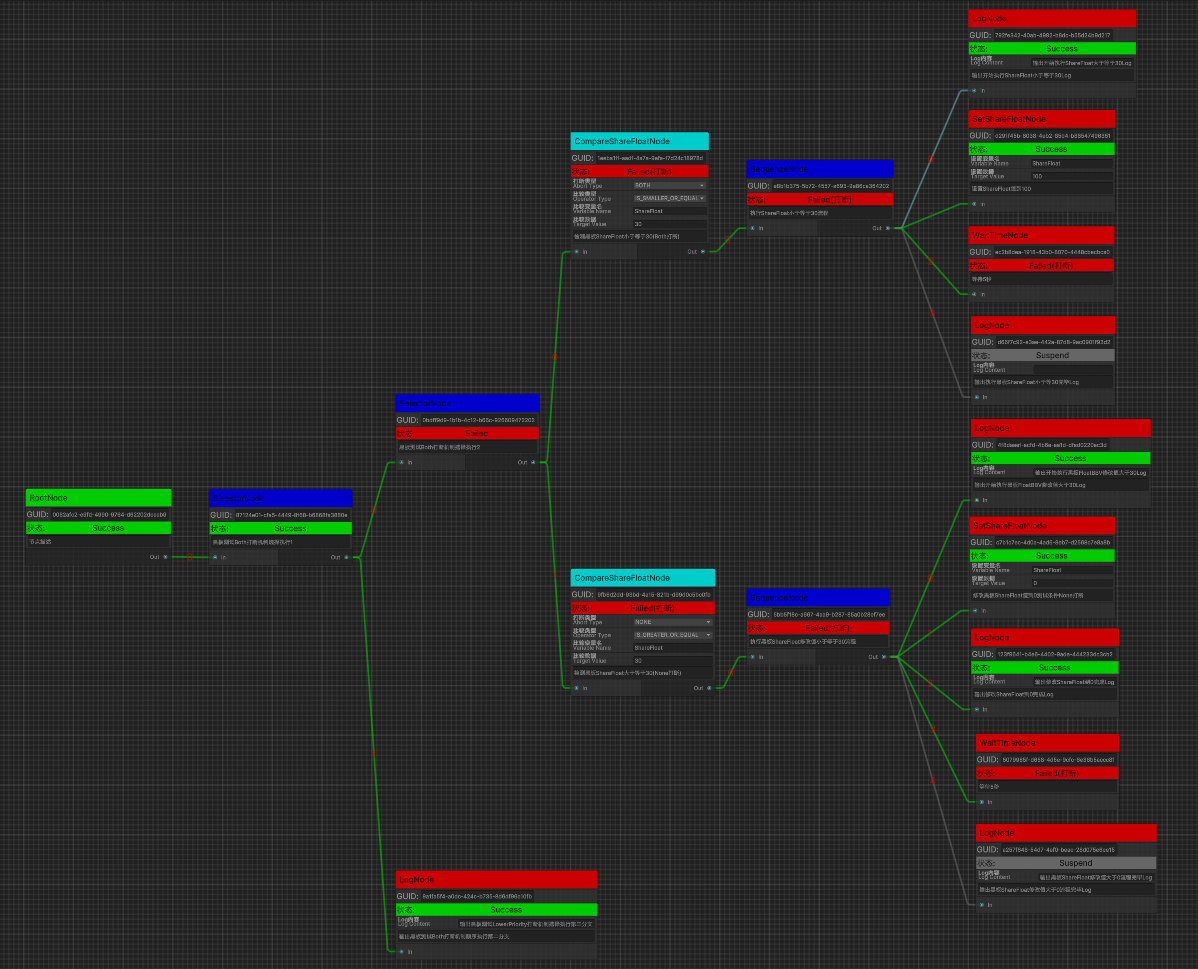
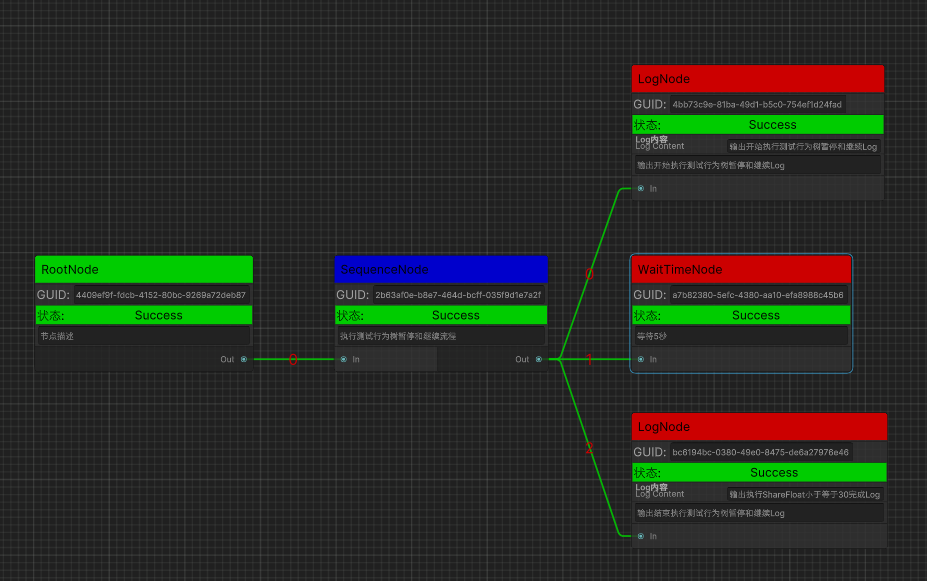
通过GraphView:GetCompatiblePorts()返回所有可连接Port,我们可以看到当我们点击需要连接Port后,所有可连接Port会处于高亮状态(表示可连接)。
节点Port连线还原 前面我们实现了自定义Port连接操作,在端口连接后,我们重新加载图数据后如何还原Port连线了?
Port的连接是通过Edge(边)来实现的。
BehaviourTreeGraphView.cs
1 2 3 4 5 6 7 8 9 10 11 12 13 14 15 16 17 18 19 20 21 22 23 24 25 26 27 28 29 30 31 32 33 34 35 36 37 38 39 40 41 42 43 44 45 46 47 48 49 50 51 52 53 54 55 56 57 58 59 60 61 62 63 64 65 66 67 68 69 70 71 72 73 74 75 76 77 78 79 80 81 82 83 84 85 86 87 88 89 90 91 92 93 94 95 96 97 98 99 100 101 102 103 104 105 106 107 108 109 110 111 112 113 114 115 116 117 118 119 120 121 122 123 124 125 126 127 128 129 130 131 132 133 134 135 136 137 138 139 140 141 142 143 public class BehaviourTreeGraphView : GraphView { ****** protected void CreateGraphAllEdges (BehaviourTreeGraphData graphData, bool addEdgeData = true , bool enableUndoSystem = true ) { if (graphData == null || graphData.AllEdgeDataList == null ) { return ; } foreach (var edgeData in graphData.AllEdgeDataList) { CreateEdgeByEdgeData(graphData, edgeData, addEdgeData, enableUndoSystem); } } protected Port GetOrCreateInputPort (NodeView nodeView, string portName, string portTypeFullName ) { if (nodeView == null ) { Debug.LogError($"不允许给空节点View创建输入端口,创建端口名:{portName} 类型:{portTypeFullName} 的输入节点端口失败!" ); return null ; } var port = nodeView.inputContainer.Q<Port>(portName); if (port == null ) { var portType = TypeCache.GetType(portTypeFullName); if (portType == null ) { Debug.LogError($"找不到类型全名:{portTypeFullName} 的类型信息,创建端口名:{portName} 的输入节点端口失败!" ); return null ; } port = nodeView.InstantiateCustomInputPort(portName, portType); } return port; } protected Port GetOrCreateOutputPort (NodeView nodeView, string portName, string portTypeFullName ) { if (nodeView == null ) { Debug.LogError($"不允许给空节点View创建输出端口,创建端口名:{portName} 类型:{portTypeFullName} 的输出节点端口失败!" ); return null ; } var port = nodeView.outputContainer.Q<Port>(portName); if (port == null ) { var portType = TypeCache.GetType(portTypeFullName); if (portType == null ) { Debug.LogError($"找不到类型全名:{portTypeFullName} 的类型信息,创建端口名:{portName} 的输出节点端口失败!" ); return null ; } port = nodeView.InstantiateCustomOutputPort(portName, portType); } return port; } protected Edge AddEdgeView (EdgeData edgeData, Port inputPort, Port outputPort ) { if (edgeData == null || inputPort == null || outputPort == null ) { Debug.LogError($"不允许创建空边数据或空输入端口或空输出端口的显示边,创建显示边失败!" ); return null ; } var edgeView = CreateEdgeView(edgeData, inputPort, outputPort); outputPort.Connect(edgeView); inputPort.Connect(edgeView); Add(edgeView); OnEdgeViewUpdate(edgeView); return edgeView; } protected EdgeView CreateEdgeView (EdgeData edgeData, Port inputPort, Port outputPort ) { var edgeView = new EdgeView() { input = inputPort, output = outputPort, }; edgeView.Init(SourceGraphData, edgeData); edgeView.UpdateEdgeControlStateColor(); return edgeView; } protected EdgeView CreateEdgeView (EdgeData edgeData, Port inputPort, Port outputPort ) { var edgeView = new EdgeView() { input = inputPort, output = outputPort, }; edgeView.Init(SourceGraphData, edgeData); edgeView.UpdateEdgeControlStateColor(); return edgeView; } ****** }
NodeView.cs
1 2 3 4 5 6 7 8 9 10 11 12 13 14 15 16 17 18 19 20 21 22 23 24 25 26 27 28 29 30 31 32 33 34 35 36 37 38 public class NodeView : Node { ****** public Port InstantiateCustomInputPort (string portName, System.Type type { var port = InstantiateCustomPort(portName, Direction.Input, InPortCapacity, type); inputContainer.Add(port); mAllInputPorts.Add(port); return port; } public Port InstantiateCustomOutputPort (string portName, System.Type type { var port = InstantiateCustomPort(portName, Direction.Output, OutPortCapacity, type); outputContainer.Add(port); mAllOutputPorts.Add(port); return port; } ****** }
EdgeView.cs
1 2 3 4 5 6 7 8 9 10 11 12 13 14 15 16 17 18 19 20 21 22 public class EdgeView : Edge { ****** public void UpdateEdgeControlStateColor () { var edgeInputNode = OwnerGraphData.GetNodeByGUID(EdgeData.InputNodeGUID); var edgeInputColor = BTGraphUtilitiesEditor.GetEdgeColorByNodeState(edgeInputNode.NodeState); var edgeOutputColor = BTGraphUtilitiesEditor.GetEdgeColorByNodeState(edgeInputNode.NodeState); edgeControl.inputColor = edgeInputColor; edgeControl.outputColor = edgeOutputColor; } ****** }
在创建完所有NodeView(BehaviourTreeGraphView.CreateGraphAllNodes())后,我们根据BehaviourTreeGraphData.AllEdgeDataList的所有边数据,通过边数据EdgeData.OutputNodeGUID和EdgeData.InputNodeGUID获得边所对应的输入输出NodeView。
得到边所对应的NodeView后,我们通过EdgeData边数据的端口信息给NodeView创建对应的输入和输出端口(GetOrCreateOutputPort()和GetOrCreateInputPort())。
创建好NodeView的对应输入和输出端口后,我们通过创建自定义EdgeView(CreateEdgeView())将创建的输入和输出端口传入作为边的对应连接端口,最后初始化EdgeView对应图和边数据(EdgeData.Init())并添加到GraphView (Add(edgeView))则成功创建并还原了连接NodeView之间的EdgeView显示。
Note:
Edge(边)的输入Port是被连线的一侧,输出Port是开始连线的一侧。 Node(节点)的输入端口是Edge连入的一侧,输出端口是Edge连出的一侧。
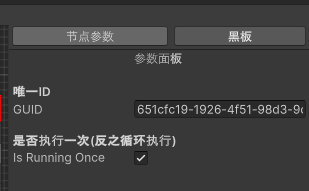
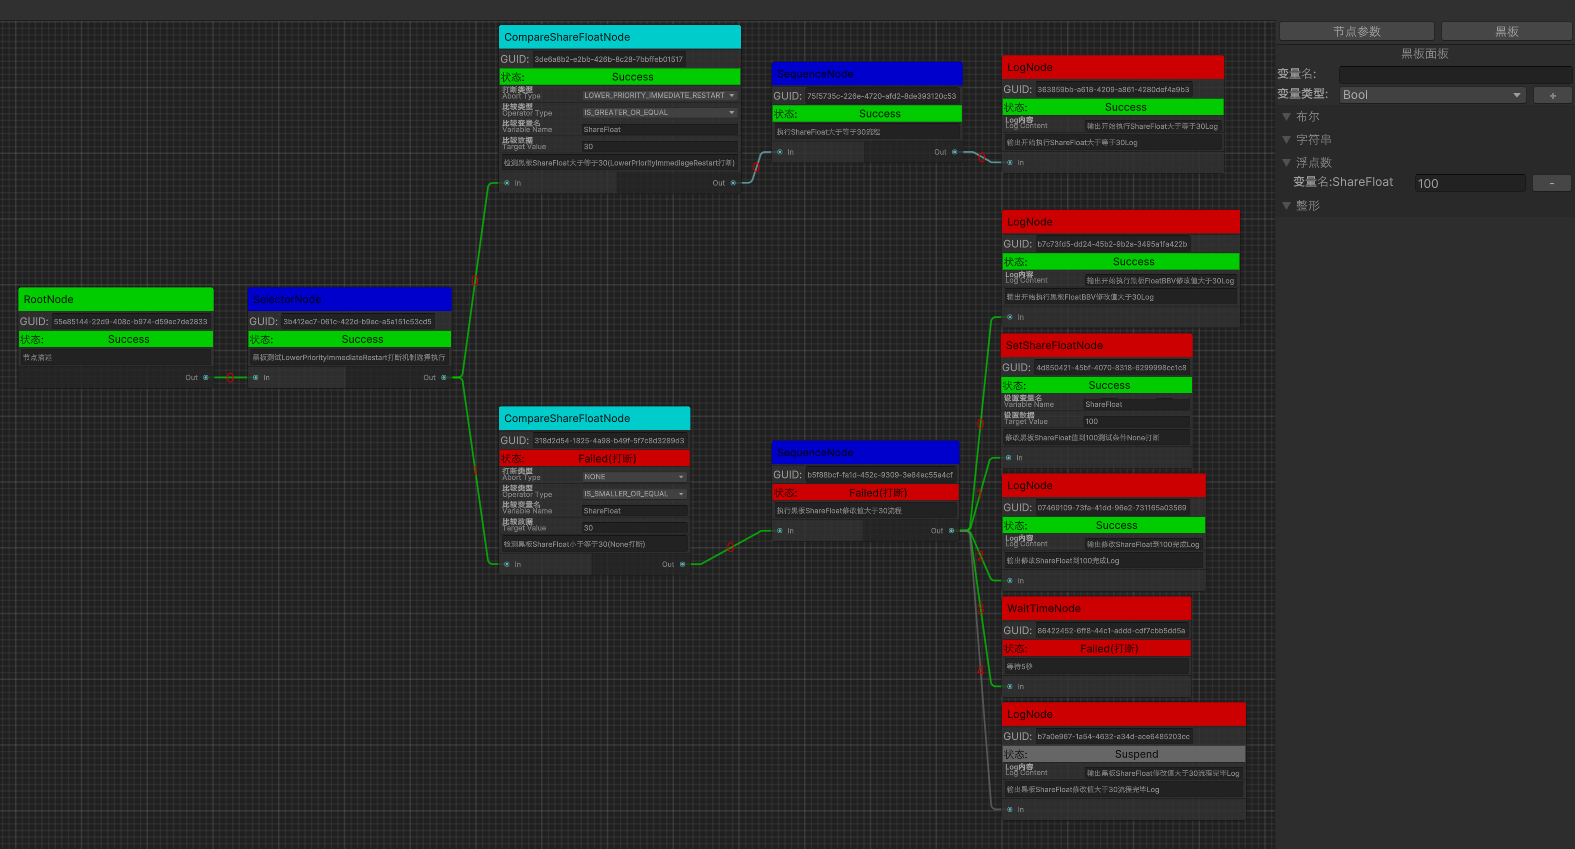
节点参数面板添加 不同的节点有不同的数据需要展示和配置,节点数据的配置面板在节点编辑器中是必不可少的。
显示节点参数面板步骤如下:
创建节点参数面板容器
检测节点选中
创建节点参数显示UI并添加到参数面板容器显示
UIBTGraphEditorWindow.cs
1 2 3 4 5 6 7 8 9 10 11 12 13 14 15 16 17 18 19 20 21 22 23 24 25 26 27 28 29 30 31 32 33 34 35 36 37 38 39 40 41 42 43 44 45 46 47 48 49 50 51 52 53 54 55 56 57 58 59 60 61 62 63 64 65 66 67 68 69 70 71 72 73 74 75 76 77 78 79 80 81 82 83 84 85 86 87 88 89 90 91 92 93 94 95 96 97 98 99 100 101 102 103 104 105 106 107 108 109 110 111 112 113 114 115 116 117 118 119 120 121 122 123 124 125 126 127 128 129 130 131 132 133 134 135 136 137 138 139 140 141 142 143 144 145 146 147 148 149 150 151 152 153 154 155 156 157 158 159 160 161 162 public class UIBTGraphEditorWindow : EditorWindow { ****** private Dictionary<string , PropertyBindData> mTempBindPropertyDataMap = new Dictionary<string , PropertyBindData>(); private void CreateRightContentUI () { var rightVerticalContentContainer = new VisualElement(); rightVerticalContentContainer.name = BTGraphElementNames.RightVerticalContentContainerName; rightVerticalContentContainer.style.left = 0 ; rightVerticalContentContainer.style.width = 300f ; rightVerticalContentContainer.style.top = 0 ; rightVerticalContentContainer.style.bottom = 0 ; rightVerticalContentContainer.style.flexDirection = FlexDirection.Column; rightVerticalContentContainer.AddToClassList("unity-rect-field" ); var toolbarMenu = new Toolbar(); toolbarMenu.name = BTGraphElementNames.RightToolbarMenuName; toolbarMenu.style.flexDirection = FlexDirection.Row; toolbarMenu.style.height = 25f ; var rightNodeConfigMenuButton = new Button(OnNodeConfigMenuClick); rightNodeConfigMenuButton.name = BTGraphElementNames.RightNodeConfigMenuButtonName; rightNodeConfigMenuButton.text = "节点参数" ; rightNodeConfigMenuButton.style.flexGrow = 1f ; rightNodeConfigMenuButton.AddToClassList("unity-toggle" ); toolbarMenu.Add(rightNodeConfigMenuButton); var rightBlackboardMenuButton = new Button(OnBlackboardMenuClick); rightBlackboardMenuButton.name = BTGraphElementNames.RightBlackboardMenuButtonName; rightBlackboardMenuButton.text = "黑板" ; rightBlackboardMenuButton.style.flexGrow = 1f ; rightBlackboardMenuButton.AddToClassList("unity-toggle" ); toolbarMenu.Add(rightBlackboardMenuButton); rightVerticalContentContainer.Add(toolbarMenu); var rightPanelVerticalContainer = UIToolkitUtilities.CreateVerticalContainer(BTGraphElementNames.RightPanelVerticalContainerName, 1f , "unity-rect-field" ); rightVerticalContentContainer.Add(rightPanelVerticalContainer); var horizontalContentContainer = rootVisualElement.Q<VisualElement>(BTGraphElementNames.HorizontalContentContainerName); horizontalContentContainer.Add(rightVerticalContentContainer); UpdateSelectedPanelUI(); } protected void UpdateSelectedPanel (PanelType panelType ) { mCurrentSelectedPanelType = panelType; UpdateSelectedPanelUI(); } protected void UpdateSelectedPanelUI () { var rightPanelVerticalContainer = rootVisualElement.Q<VisualElement>(BTGraphElementNames.RightPanelVerticalContainerName); rightPanelVerticalContainer.Clear(); if (mCurrentSelectedPanelType == PanelType.NODE_CONFIG_PANEL) { CreateSelectionNodeConfigUI(); } else if (mCurrentSelectedPanelType == PanelType.BLACKBOARD_PANEL) { CreateBlackboardUI(); } else { CreateNotSupportPanelTypeUI(); } } protected void CreateSelectionNodeConfigUI () { var rightPanelVerticalContainer = rootVisualElement.Q<VisualElement>(BTGraphElementNames.RightPanelVerticalContainerName); var rightNodeConfigVerticalContainer = UIToolkitUtilities.CreateVerticalContainer(BTGraphElementNames.RightNodeConfigVerticalContainerName); rightPanelVerticalContainer.Add(rightNodeConfigVerticalContainer); var rightVerticalContentLableTitle = new Label(); rightVerticalContentLableTitle.text = "参数面板" ; rightVerticalContentLableTitle.style.height = 20f ; rightVerticalContentLableTitle.style.alignSelf = Align.Center; rightNodeConfigVerticalContainer.Add(rightVerticalContentLableTitle); if (mGraphView.SelectedNode != null ) { CreateSelectedNodeInspector(rightNodeConfigVerticalContainer, mGraphView.SelectedNode); } else { var rightSelectedNodeTipLabelTitle = new Label(); rightSelectedNodeTipLabelTitle.text = "无选中节点" ; rightSelectedNodeTipLabelTitle.style.height = 20 ; rightSelectedNodeTipLabelTitle.style.alignSelf = Align.Center; rightNodeConfigVerticalContainer.Add(rightSelectedNodeTipLabelTitle); } } protected void CreateSelectedNodeInspector (VisualElement nodeInspectorContainer, NodeView selectedNodeView ) { if (nodeInspectorContainer == null || selectedNodeView == null ) { Debug.Log($"不允许给空容器或空显示节点创建选中节点GUI显示!" ); return ; } mTempBindPropertyDataMap.Clear(); var inspectorUIElement = selectedNodeView.CreateInspectorGUIElement(mTempBindPropertyDataMap); nodeInspectorContainer.Add(inspectorUIElement); } protected void OnNodeEntryPointValueChange (NodeView nodeView ) { var nodeData = nodeView.NodeData; Debug.Log($"响应节点GUID:{nodeData.GUID} 的根节点设置变化到:{nodeData.EntryPoint} " ); nodeView.style.backgroundColor = BTGraphUtilitiesEditor.GetBackgroundColorByNodeData(nodeData); if (nodeData.EntryPoint) { DisconnectAllInputPort(nodeView); } } protected BehaviourTreeGraphView GetNewGraphView () { return new BehaviourTreeGraphView(mAvailableNodeTypeList, this .OnSelectedNodeChange); } ****** }
PropertyBindData.cs
1 2 3 4 5 6 7 8 9 10 11 12 13 14 15 16 17 18 19 20 21 22 23 24 25 26 27 28 29 30 31 32 33 34 35 36 37 38 39 40 41 42 43 44 45 46 47 48 49 50 51 52 53 54 55 56 public class PropertyBindData { public string BindPropertyName { get { return ; } } public SerializedObject BindSerializedObject { get ; private set ; } public SerializedProperty BindSerializedProperty { get ; private set ; } public PropertyField BindVisualElement { get ; private set ; } public PropertyBindData (SerializedObject bindSerializedObject, SerializedProperty bindSerializedProperty, PropertyField bindVisualElement ) { BindSerializedObject = bindSerializedObject; BindSerializedProperty = bindSerializedProperty; BindVisualElement = bindVisualElement; } }
UIToolkitUtilities.cs
1 2 3 4 5 6 7 8 9 10 11 12 13 14 15 16 17 18 19 20 21 22 23 24 25 26 27 28 29 30 31 32 33 34 35 36 37 38 39 40 41 42 43 public static class UIToolkitUtilities { ****** public static VisualElement CreateBindSOInspector (ScriptableObject scriptableObject, Dictionary<string , PropertyBindData> propertyBindDataMap = null ) { if (scriptableObject == null ) { Debug.LogError($"不允许给空ScriptableObject创建可视化Inspector!" ); return null ; } var container = CreateVerticalContainer(null , 1 ); var serializedObject = new SerializedObject(scriptableObject); var propertyIterator = serializedObject.GetIterator(); propertyIterator.NextVisible(true ); while (propertyIterator.NextVisible(false )) { var propertyField = new PropertyField(); var propertyName = propertyIterator.name; var property = serializedObject.FindProperty(propertyName); propertyField.name = propertyName; propertyField.BindProperty(property); container.Add(propertyField); if (propertyBindDataMap != null ) { var propertyBindData = new PropertyBindData(serializedObject, property, propertyField); propertyBindDataMap.Add(propertyName, propertyBindData); } } return container; } ****** }
NodeView.cs
1 2 3 4 5 6 7 8 9 10 11 12 13 14 15 16 17 18 19 20 21 22 23 24 25 26 27 28 29 30 31 32 33 34 35 36 37 38 39 40 41 42 public class NodeView : Node { protected Action<NodeView> mNodeSelectedDelegate; ****** public void Init (BaseNode node, Action<NodeView> nodeSelectedCB = null , string nodeName = null , Orientation orientation = Orientation.Horizontal ) { ****** mNodeSelectedDelegate += nodeSelectedCB; ****** } ****** public override void OnSelected () { base .OnSelected(); Debug.Log($"节点GUID:{NodeData.GUID} ,节点类型:{NodeData.NodeType} ,节点名:{NodeData.GetType().Name} 被选中!" ); if (mNodeSelectedDelegate != null ) { mNodeSelectedDelegate(this ); } } }
BehaviourTreeGraphView.cs
1 2 3 4 5 6 7 8 9 10 11 12 13 14 15 16 17 18 19 20 21 22 23 24 25 26 27 28 29 30 31 32 33 34 35 36 37 38 39 40 41 42 43 44 45 46 47 48 49 50 51 52 53 54 55 56 public class BehaviourTreeGraphView : GraphView { ****** public NodeView CreateNodeByType (Type typeInfo, Vector2 position ) { var newNode = BTGraphUtilitiesEditor.CreateNodeInstance(typeInfo); var guid = Guid.NewGuid().ToString(); var nodeRect = BTGraphConstEditor.NodeDefaultRect; nodeRect.x = position.x; nodeRect.y = position.y; newNode.Init(guid, nodeRect); var nodeView = BTGraphUtilitiesEditor.CreateNodeViewInstance(typeInfo); nodeView.Init(SourceGraphData, newNode, OnNodeSelected, null , GraphOrientation); AddNodeData(newNode); AddElement(nodeView); UpdateNodeViewRect(nodeView, nodeRect); return nodeView; } protected void OnNodeSelected (NodeView selectedNode ) { Debug.Log($"CommonGraphView:OnNodeSelected()" ); UpdateSelectedNode(selectedNode); } protected void UpdateSelectedNode (NodeView selectedNode ) { SelectedNode = selectedNode; if (mSelectedNodeChangeDelegate != null ) { mSelectedNodeChangeDelegate(SelectedNode); } } ****** }
从上面可以看到,我们通过创建BehaviourTreeGraphView时传入节点选择回调,然后创建节点时有把这个回调传给节点,最后在Node.OnSelected()里响应选中,最终成功实现选中节点的逻辑回调。
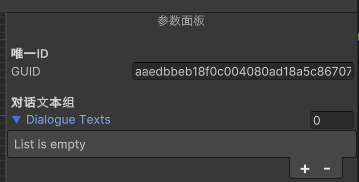
得到选中节点后,我们把UIBTGraphEditorWindow.CreateSelectionNodeConfigUI()实现参数面板的动态创建。
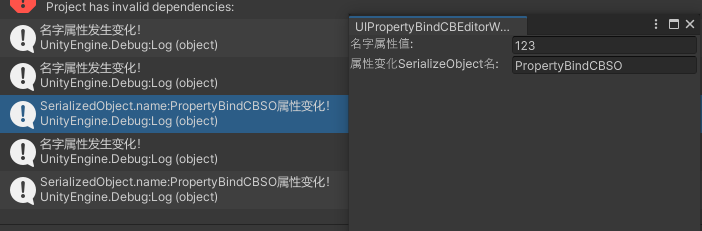
为了监听节点的EntryPoint属性变化做出节点刷新显示,在UIToolkitUtilities.CreateBindSOInspector()方法里,我支持了传递绑定数据Map返回所有属性绑定Map的方式,实现对指定属性的自定义变化监听绑定。
Note:
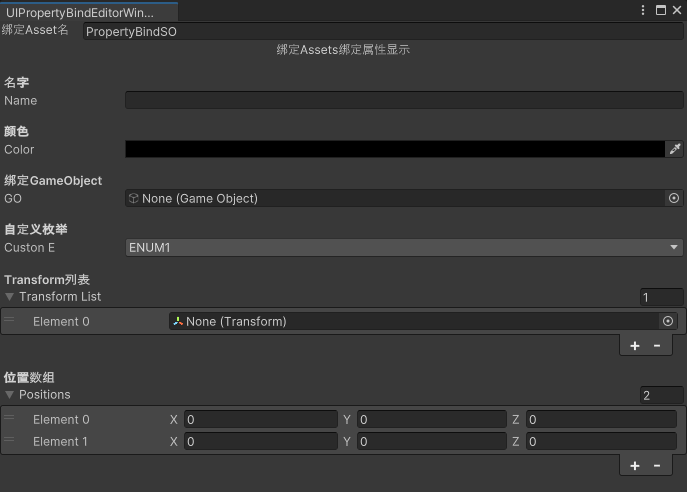
为了使用PropertyField快速实现属性绑定展示,这里图和节点数据都继承至ScriptableObject,存储成Asset和SubAsset的方式,最后通过UIToolkitUtilities.CreateBindSOInspector()方法创建通用的节点属性绑定显示
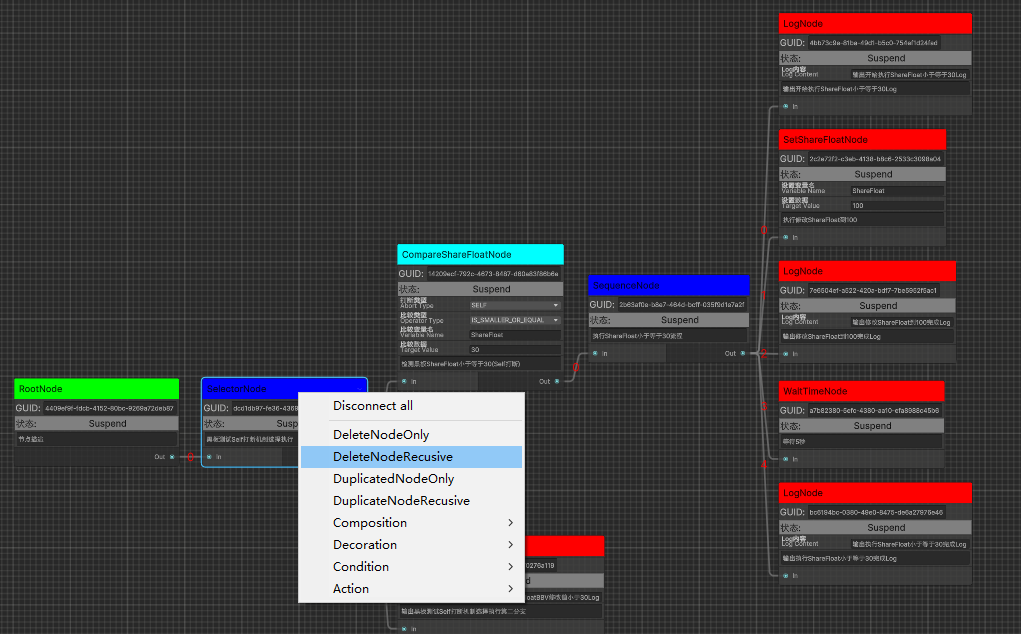
节点右键操作添加 除了通过操作面板选择节点进行节点创建操作,我们还可以给节点实现右键打开附属菜单的方式实现快捷节点操作功能。
BehaviourTreeGraphView.cs
1 2 3 4 5 6 7 8 9 10 11 12 13 14 15 16 17 18 19 20 21 22 23 24 25 26 27 28 29 30 31 32 33 34 35 36 37 38 39 40 41 42 43 44 45 46 47 48 49 50 51 52 53 54 55 56 57 58 59 60 61 62 63 64 65 66 67 68 69 70 71 72 73 74 75 76 77 78 79 80 81 82 83 84 85 86 87 88 89 90 91 92 93 94 95 96 97 98 99 100 101 102 103 104 105 106 107 108 109 110 111 112 113 114 115 116 117 118 119 120 121 122 123 124 125 126 127 128 129 130 131 132 133 134 135 136 137 138 139 140 141 142 143 144 145 146 147 148 149 150 151 152 153 154 155 156 157 158 159 160 161 162 163 164 165 166 167 168 169 170 171 172 173 174 175 176 177 178 179 180 181 182 183 184 185 186 187 188 189 190 191 192 193 194 195 196 197 198 199 200 201 202 203 204 205 206 207 208 209 210 211 212 213 214 215 216 217 218 219 220 221 222 223 224 225 226 227 228 229 230 231 232 233 234 235 236 237 238 239 240 241 242 243 244 245 246 247 248 249 250 251 252 253 254 255 256 257 258 259 260 261 262 263 264 265 266 267 268 269 270 271 272 273 274 275 276 277 278 279 280 281 282 283 284 285 286 287 288 289 290 291 292 293 294 295 296 297 298 299 300 301 302 303 304 305 306 307 308 309 310 311 312 313 314 315 316 317 318 319 320 321 322 323 324 325 326 327 328 329 330 331 332 333 334 335 336 337 338 339 340 341 342 343 344 345 346 347 348 349 350 351 352 353 354 355 356 357 358 359 360 361 362 363 364 365 366 367 368 369 370 371 372 373 374 375 376 377 378 379 380 381 382 383 384 385 386 387 388 389 390 391 392 393 394 395 396 397 398 399 400 401 402 403 404 405 406 407 408 409 410 411 412 413 414 415 416 417 418 419 420 421 422 423 424 425 426 427 428 429 430 431 432 433 434 435 436 437 438 439 440 441 442 443 444 445 446 447 448 449 450 451 452 453 454 455 456 457 458 459 460 461 462 463 464 465 466 467 468 469 470 471 472 473 474 475 476 477 478 479 480 481 482 483 484 485 486 487 488 489 490 491 492 493 494 495 496 497 498 499 500 501 502 503 504 505 506 507 508 public class BehaviourTreeGraphView : GraphView { public enum MenuOperationType { CreateNode = 1 , DeleteNodeOnly, DeleteNodeRecusive, DuplicatedNodeOnly, DuplicateNodeRecusive, } public class MenuUserData { public MenuOperationType OperationType { get ; private set ; } public VisualElement OperationElement { get ; private set ; } public System.Object CustomData { get ; private set ; } public MenuUserData (MenuOperationType operationType, VisualElement operationElement, System.Object customData ) { OperationType = operationType; OperationElement = operationElement; CustomData = customData; } } ****** protected Dictionary<NodeType, List<MenuOperationType>> mNodeCommonOperationTypesMap; protected Dictionary<NodeType, Dictionary<NodeType, List<Type>>> mNodeTypeMenuTypesMap; public BehaviourTreeGraphView (List<NodeType> availableNodeTypeList, Action<NodeView> selectedNodeChangeCB = null ) { mAvailableNodeTypeList = availableNodeTypeList; mSelectedNodeChangeDelegate += selectedNodeChangeCB; Init(); } protected virtual void Init () { ****** InitMenuData(); ****** } protected void InitMenuData () { InitNodeCommonMenuOperationDatas(); InitNodeMenuTypesData(); InitGraphViewMenuTypesData(); } protected void InitNodeCommonMenuOperationDatas () { mNodeCommonOperationTypesMap = new Dictionary<NodeType, List<MenuOperationType>>(); var nodeTypeValues = Enum.GetValues(typeof (NodeType)); foreach (var nodeTypeValue in nodeTypeValues) { var commonMenuOperationTypeList = new List<MenuOperationType>(); mNodeCommonOperationTypesMap.Add((NodeType)nodeTypeValue, commonMenuOperationTypeList); commonMenuOperationTypeList.Add(MenuOperationType.DeleteNodeOnly); commonMenuOperationTypeList.Add(MenuOperationType.DeleteNodeRecusive); commonMenuOperationTypeList.Add(MenuOperationType.DuplicatedNodeOnly); commonMenuOperationTypeList.Add(MenuOperationType.DuplicateNodeRecusive); } } protected void InitNodeMenuTypesData () { mNodeTypeMenuTypesMap = new Dictionary<NodeType, Dictionary<NodeType, List<Type>>>(); foreach (var portAvalibleConnectNodeTypeInfo in mPortAvailableConnectNodeTypeMap) { if (portAvalibleConnectNodeTypeInfo.Value.Count == 0 ) { continue ; } var nodeTypeMenuTypeMap = new Dictionary<NodeType, List<Type>>(); mNodeTypeMenuTypesMap.Add(portAvalibleConnectNodeTypeInfo.Key, nodeTypeMenuTypeMap); foreach (var portAvalibleConnectNodeTypeMap in portAvalibleConnectNodeTypeInfo.Value) { var targetNodeType = portAvalibleConnectNodeTypeMap.Key; var targetNodeBaseType = GetBaseTypeByNodeType(targetNodeType); if (targetNodeBaseType == null ) { continue ; } var menuTypeList = new List<Type>(); nodeTypeMenuTypeMap.Add(targetNodeType, menuTypeList); var allSubTypeList = TypeUtilities.GetAllSubTypes(targetNodeBaseType); foreach (var subType in allSubTypeList) { if (subType.IsAbstract || IsPortUnavalibleConnectType(targetNodeType, subType)) { continue ; } menuTypeList.Add(subType); } if (menuTypeList.Count == 0 ) { nodeTypeMenuTypeMap.Remove(targetNodeType); } } } } protected void InitGraphViewMenuTypesData () { mGraphViewMenuTypesMap = new Dictionary<NodeType, List<Type>>(); foreach (var availableNodeType in mAvailableNodeTypeList) { var targetNodeBaseType = GetBaseTypeByNodeType(availableNodeType); if (targetNodeBaseType == null ) { continue ; } var menuTypeList = new List<Type>(); mGraphViewMenuTypesMap.Add(availableNodeType, menuTypeList); var allSubTypeList = TypeUtilities.GetAllSubTypes(targetNodeBaseType); foreach (var subType in allSubTypeList) { if (subType.IsAbstract) { continue ; } menuTypeList.Add(subType); } if (menuTypeList.Count == 0 ) { mGraphViewMenuTypesMap.Remove(availableNodeType); } } } protected string GetMenuOperationName (MenuOperationType menuOperationType ) { return $"{menuOperationType.ToString()} " ; } protected string GetNodeTypeSubMenuName (NodeType nodeType, Type type ) { if (type == null || type == BTGraphConstEditor.BaseNodeType || !type.IsSubclassOf(BTGraphConstEditor.BaseNodeType)) { return null ; } return $"{nodeType.ToString()} /{type.Name} " ; } public override void BuildContextualMenu (ContextualMenuPopulateEvent evt ) { BuildNodeContextualMenu(evt); BuildGraphContextualMenu(evt); } protected void BuildNodeContextualMenu (ContextualMenuPopulateEvent evt ) { var target = evt.target; var targetNodeView = target as NodeView; if (targetNodeView == null ) { return ; } var nodeType = targetNodeView.NodeData.NodeType; var allCommonMenuOperationTypes = GetNodeCommonMenuOperationTypes(nodeType); if (allCommonMenuOperationTypes != null ) { foreach (var commonOperationType in allCommonMenuOperationTypes) { var menuOperationName = GetMenuOperationName(commonOperationType); if (string .IsNullOrEmpty(menuOperationName)) { continue ; } var menuUserData = new MenuUserData(commonOperationType, targetNodeView, commonOperationType); evt.menu.AppendAction(menuOperationName, OnNodeViewCommonMenuOperationNode, OnSubMenuStatus, menuUserData); } } var allSubMenuTypesMap = GetNodeTypeMenuTypesMap(nodeType); if (allSubMenuTypesMap != null ) { foreach (var subMenuTypesMap in allSubMenuTypesMap) { var targetNodeType = subMenuTypesMap.Key; foreach (var subMenuType in subMenuTypesMap.Value) { if (subMenuType.IsAbstract) { continue ; } var subMenuName = GetNodeTypeSubMenuName(targetNodeType, subMenuType); if (string .IsNullOrEmpty(subMenuName)) { continue ; } var menuUserData = new MenuUserData(MenuOperationType.CreateNode, targetNodeView, subMenuType); evt.menu.AppendAction(subMenuName, OnNodeViewSubMenuCreateNode, OnSubMenuStatus, menuUserData); } } } } protected void OnNodeViewCommonMenuOperationNode (DropdownMenuAction menuAction ) { var menuUserData = menuAction.userData as MenuUserData; var targetNodeView = menuUserData.OperationElement as NodeView; var menuOperationType = menuUserData.OperationType; if (menuOperationType == MenuOperationType.DeleteNodeOnly) { RemoveNodeView(targetNodeView, false ); } if (menuOperationType == MenuOperationType.DeleteNodeRecusive) { RemoveNodeView(targetNodeView, true ); } else if (menuOperationType == MenuOperationType.DuplicatedNodeOnly) { DuplicateNodeView(targetNodeView, false ); } else if (menuOperationType == MenuOperationType.DuplicateNodeRecusive) { DuplicateNodeView(targetNodeView, true ); } } protected void OnNodeViewSubMenuCreateNode (DropdownMenuAction menuAction ) { var menuUserData = menuAction.userData as MenuUserData; var nodeType = menuUserData.CustomData as Type; Vector2 actualGraphPosition = TransformGridLocalMousePosToGraphPos(menuAction.eventInfo.localMousePosition); var nodeView = CreateNodeByType(nodeType, actualGraphPosition); var nodeViewPosition = nodeView.GetPosition(); nodeViewPosition.position = actualGraphPosition; UpdateNodeViewRect(nodeView, nodeViewPosition); } protected DropdownMenuAction.Status OnSubMenuStatus (DropdownMenuAction menuAction ) { MenuUserData menuUserData = menuAction.userData as MenuUserData; NodeView nodeView = menuUserData.OperationElement as NodeView; if (nodeView != null ) { if (nodeView.NodeData.EntryPoint) { bool isDeleteNodeOnlyType = menuUserData.OperationType == MenuOperationType.DeleteNodeOnly; bool isDeleteNodeRecusiveType = menuUserData.OperationType == MenuOperationType.DeleteNodeRecusive; bool isDuplicatedNodeOperationType = menuUserData.OperationType == MenuOperationType.DuplicatedNodeOnly; bool isDuplicateNodeRecusiveOperation = menuUserData.OperationType == MenuOperationType.DuplicateNodeRecusive; if (isDeleteNodeOnlyType || isDeleteNodeRecusiveType || isDuplicatedNodeOperationType || isDuplicateNodeRecusiveOperation) { return DropdownMenuAction.Status.Disabled; } } return DropdownMenuAction.Status.Normal; } return DropdownMenuAction.Status.Disabled; } protected void BuildGraphContextualMenu (ContextualMenuPopulateEvent evt ) { var target = evt.target; var targetGraphView = target as GraphView; if (targetGraphView == null ) { return ; } foreach (var graphViewTypesMap in mGraphViewMenuTypesMap) { var nodeType = graphViewTypesMap.Key; foreach (var graphViewType in graphViewTypesMap.Value) { if (graphViewType.IsAbstract) { continue ; } var subMenuName = GetNodeTypeSubMenuName(nodeType, graphViewType); if (string .IsNullOrEmpty(subMenuName)) { continue ; } var menuUserData = new MenuUserData(MenuOperationType.CreateNode, null , graphViewType); evt.menu.AppendAction(subMenuName, OnGraphViewSubMenuCreateNode, OnGraphSubMenuStatus, menuUserData); } } } protected void OnGraphViewSubMenuCreateNode (DropdownMenuAction menuAction ) { var menuUserData = menuAction.userData as MenuUserData; var nodeType = menuUserData.CustomData as Type; Vector2 actualGraphPosition = TransformGridLocalMousePosToGraphPos(menuAction.eventInfo.localMousePosition); var nodeView = CreateNodeByType(nodeType, actualGraphPosition); var nodeViewPosition = nodeView.GetPosition(); nodeViewPosition.position = actualGraphPosition; UpdateNodeViewRect(nodeView, nodeViewPosition); } protected DropdownMenuAction.Status OnGraphSubMenuStatus (DropdownMenuAction menuAction ) { return DropdownMenuAction.Status.Normal; } protected bool RemoveNodeView (NodeView nodeView, bool recusive = false , bool enableUndoSystem = true ) { if (nodeView == null ) { Debug.LogError($"不允许移除空NodeView,删除节点View失败!" ); return false ; } if (!Contains(nodeView)) { Debug.LogError($"未包含NodeView GUID:{nodeView.NodeData.GUID} 的节点View,删除节点View失败!" ); return false ; } if (enableUndoSystem) { Undo.RecordObject(SourceGraphData, $"RemoveNodeView({recusive} )" ); } if (!recusive) { RemoveNodeViewWithAllEdge(nodeView); return true ; } var allChildNodeViews = GetAllChildNodeViews(nodeView); if (allChildNodeViews != null ) { foreach (var childNodeView in allChildNodeViews) { RemoveNodeView(childNodeView, recusive); } } RemoveNodeViewWithAllEdge(nodeView); return true ; } protected bool RemoveNodeViewWithAllEdge (NodeView nodeView ) { if (nodeView == null ) { Debug.LogError($"不允许移除空NodeView,删除节点View和其所有边失败!" ); return false ; } mDeleteElementTempList.Clear(); var allInputPorts = nodeView.inputContainer.Query<Port>().ToList(); foreach (var inputPort in allInputPorts) { mDeleteElementTempList.AddRange(inputPort.connections); } var allOutputPorts = nodeView.outputContainer.Query<Port>().ToList(); foreach (var outputPort in allOutputPorts) { mDeleteElementTempList.AddRange(outputPort.connections); } mDeleteElementTempList.Add(nodeView); DeleteElements(mDeleteElementTempList); return true ; } protected void DuplicateNodeView (NodeView nodeView, bool recusive = false ) { } ****** }
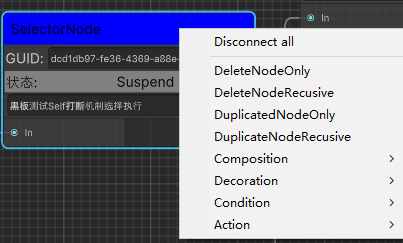
从上面可以看到,GraphView.BuildContextualMenu()方法是响应添加菜单的接口,我们通过初始化BehaviourTreeGraphView.InitMenuData()所有节点相关菜单数据,在GraphView.BuildContextualMenu()里通过获取可用菜单的方式动态构建节点对应菜单,从而实现节点自定义右键菜单操作。
这里简单介绍下插入菜单的参数:
DropdownMenuAction.menu.AppendAction(string actionName, Action action, Func<DropdownMenuAction,Status> actionStatusCallback, object userData)
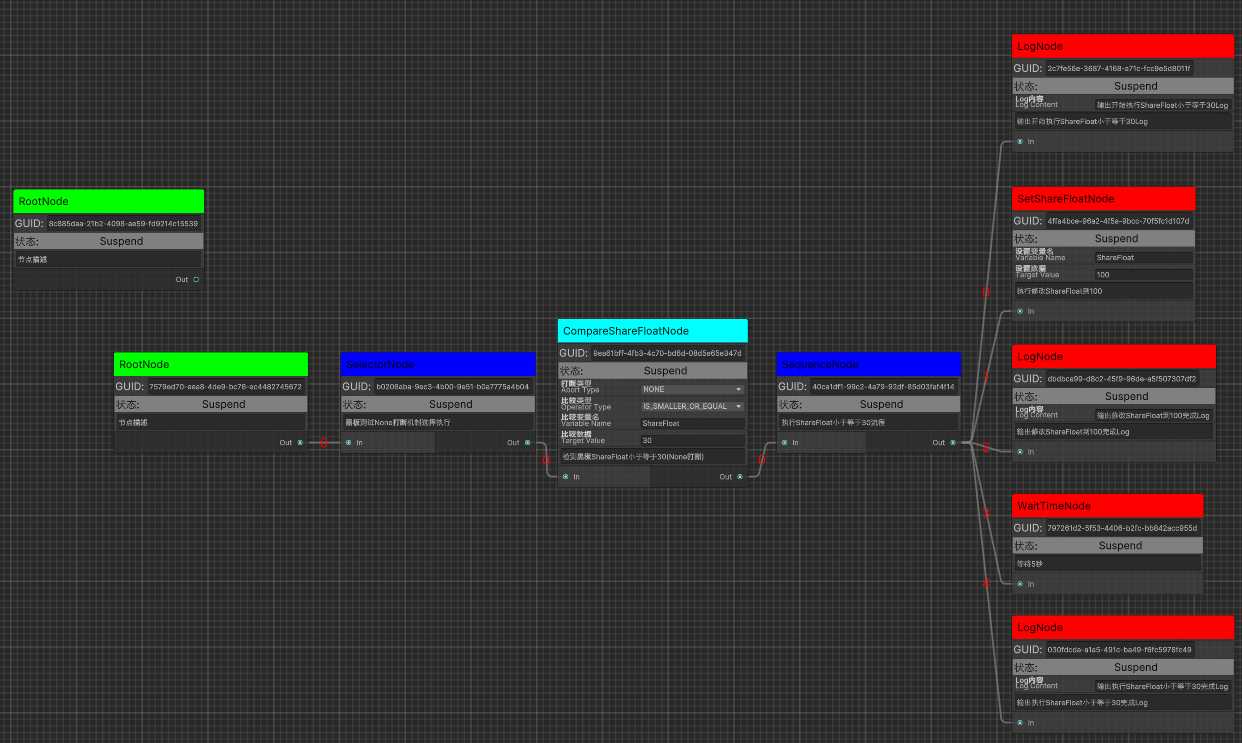
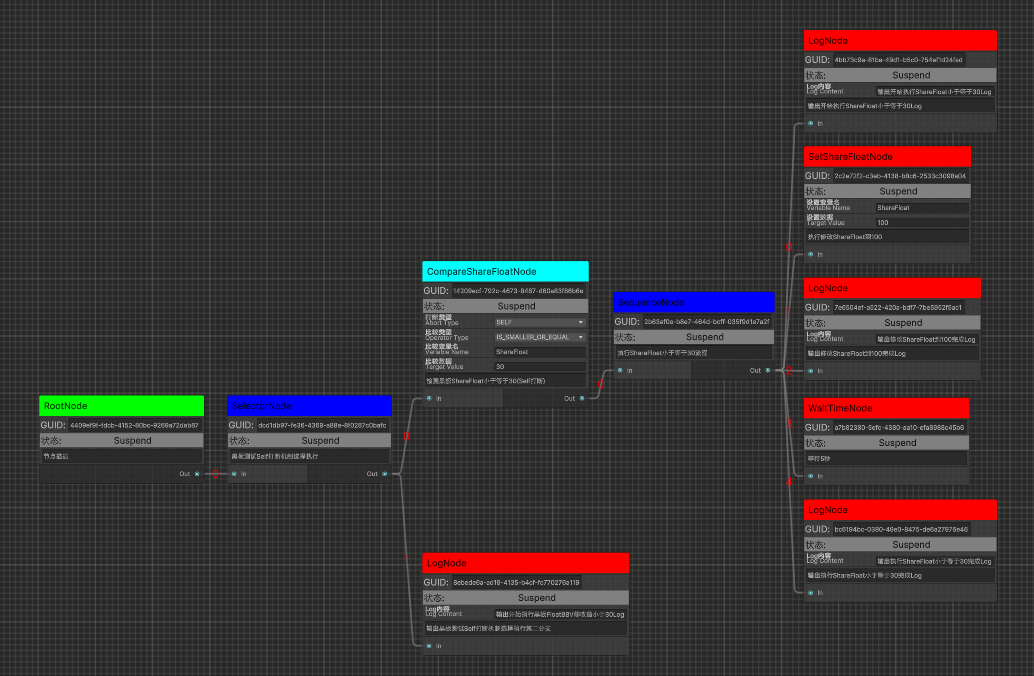
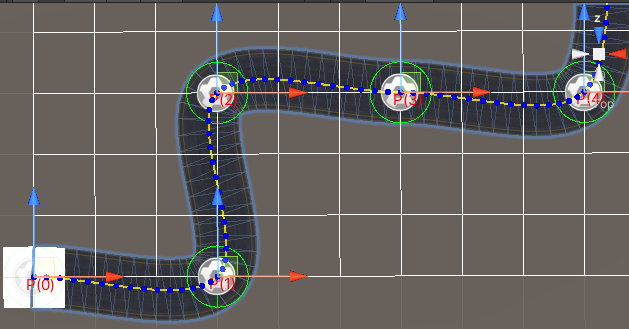
输出端口节点边顺序索引数据排序显示 无论是横向GraphView还是纵向GraphView,常规定义节点顺序都是通过横向(竖向GraphView)或则纵向(横向GraphView)位置大小来判定的
为了方便和快速看出节点顺序的正确性,我通过对端口各条边的位置大小进行排序并显示。
BehaviourTreeGraphView.cs
1 2 3 4 5 6 7 8 9 10 11 12 13 14 15 16 17 18 19 20 21 22 23 24 25 26 27 28 29 30 31 32 33 34 35 36 37 38 39 40 41 42 43 44 45 46 47 48 49 50 51 52 53 54 55 56 57 58 59 60 61 62 63 64 65 66 67 68 69 70 71 72 73 74 75 76 77 78 79 80 81 82 83 84 85 86 87 public class BehaviourTreeGraphView : GraphView { ****** protected GraphViewChange OnGraphViewChanged (GraphViewChange graphViewChange ) { Debug.Log($"CommonGraphVIew:OnGraphViewChanged()" ); if (graphViewChange.elementsToRemove != null ) { foreach (var elementToRemove in graphViewChange.elementsToRemove) { if (elementToRemove is NodeView removeNodeView) { Debug.Log($"删除节点GUID:{removeNodeView.NodeData.GUID} ,节点数据类型:{removeNodeView.NodeData.GetType().Name} " ); RemoveNodeData(removeNodeView.NodeData); } else if (elementToRemove is Edge removeEdge) { var inputNodeView = removeEdge.input.node as NodeView; var outputNodeView = removeEdge.output.node as NodeView; var inputNodeViewName = inputNodeView != null ? inputNodeView.NodeData.GetType().Name : string .Empty; var outputNodeViewName = outputNodeView != null ? outputNodeView.NodeData.GetType().Name : string .Empty; Debug.Log($"删除边,Input节点名:{inputNodeViewName} ,Input端口名:{removeEdge.input.portName} ,Output节点名:{outputNodeViewName} ,Output端口名:{removeEdge.output.portName} " ); RemoveEdgeData(outputNodeView.NodeData.GUID, removeEdge.output.portName, inputNodeView.NodeData.GUID, removeEdge.input.portName); OnEdgeViewUpdate(removeEdge); } else { Debug.Log($"TODO:删除其他Element类型:{elementToRemove.GetType().Name} !" ); } } } if (graphViewChange.edgesToCreate != null ) { foreach (var edgeToCreate in graphViewChange.edgesToCreate) { var edgeView = edgeToCreate as EdgeView; var inputNodeView = edgeToCreate.input.node as NodeView; var outputNodeView = edgeToCreate.output.node as NodeView; var inputNodeViewName = inputNodeView != null ? inputNodeView.NodeData.GetType().Name : string .Empty; var outputNodeViewName = outputNodeView != null ? outputNodeView.NodeData.GetType().Name : string .Empty; var ouputNodeGUID = outputNodeView.NodeData.GUID; var outputPortName = edgeToCreate.output.portName; var outputPortTypeFullName = edgeToCreate.output.portType.FullName; var inputNodeGUID = inputNodeView.NodeData.GUID; var intputPortName = edgeToCreate.input.portName; var intputPortTypeFullName = edgeToCreate.input.portType.FullName; var guid = Guid.NewGuid().ToString(); EdgeData edgeData = new EdgeData(guid, ouputNodeGUID, outputPortName, outputPortTypeFullName, inputNodeGUID, intputPortName, intputPortTypeFullName); Debug.Log($"创建边,Input节点名:{inputNodeViewName} ,Input端口名:{edgeToCreate.input.portName} ,Output节点名:{outputNodeViewName} ,Output端口名:{edgeToCreate.output.portName} " ); AddEdgeData(edgeData); OnEdgeViewUpdate(edgeView); UpdateEdgeViewIndex(edgeView); } } if (graphViewChange.movedElements != null ) { foreach (var moveElement in graphViewChange.movedElements) { if (moveElement is NodeView moveNodeView) { Debug.Log($"更新节点GUID:{moveNodeView.NodeData.GUID} ,节点数据类型:{moveNodeView.NodeData.GetType().Name} 的位置X:{moveNodeView.NodeData.Position.x} Y:{moveNodeView.NodeData.Position.y} " ); UpdateNodeRectByNodeView(moveNodeView); OnNodeViewMove(moveNodeView); } else { Debug.Log($"TODO:移动Element类型:{moveElement.GetType().Name} !" ); } } } return graphViewChange; } ****** }
BehaviourTreeGraphData.cs
1 2 3 4 5 6 7 8 9 10 11 12 13 14 15 16 17 18 19 20 21 22 23 24 25 26 27 28 29 30 31 32 33 34 35 36 37 38 39 40 41 42 43 44 45 46 47 48 49 public class BehaviourTreeGraphData : ScriptableObject { ****** private void OnEdgeDataUpdate (EdgeData edgeData ) { if (edgeData == null ) { Debug.LogError($"不应该更新空边数据,请检查代码!" ); return ; } UpdateNodeOutputPortEdgeIndex(edgeData.OutputNodeGUID, edgeData.OutputPortName); } public bool UpdateNodeOutputPortEdgeIndex (string nodeGUID, string outputPortName { mTempEdgeDataList.Clear(); GetOutputNodePortEdgeDatas(nodeGUID, outputPortName, ref mTempEdgeDataList); if (mTempEdgeDataList.Count == 0 ) { return false ; } mTempEdgeDataList.Sort(SortPortEdgeDataIndex); for (int index = 0 , length = mTempEdgeDataList.Count; index < length; index++) { var edgeData = mTempEdgeDataList[index]; edgeData.UpdateEdgeOutputPortIndex(index); } Debug.Log($"更新节点GUID:{nodeGUID} 的输出端口明:{outputPortName} 的边索引数据!" ); AllEdgeDataList.Sort(SortAllEdgeDataIndex); return true ; } ****** }
从上面可以看到实现对节点顺序排序流程如下:
监听OnGraphViewChanged的EdgeView变化(增(BehaviourTreeGraphView.AddEdgeData()),删(BehaviourTreeGraphView.RemoveEdgeData())和移动(BehaviourTreeGraphView.OnNodeViewMove()) )对EdgeData的输出端口边索引数据(EdgeData.OutputPortEdgeIndex)进行了根据位置大小的排序(BehaviourTreeGraphData.UpdateNodeOutputPortEdgeIndex()和BehaviourTreeGraphData.SortPortEdgeDataIndex() )。
EdgeData输出端口边索引数据的排序原理是通过边输出端口节点GUID和输出端口名得到对应所有连接的边数据(EdgeData)列表,然后通过遍历所有边数据列表所连接的输入节点GUID得到所有对应的输入节点数据(BaseNode),最后根据图朝向(BehaviourTreeGraphData.GraphOrientation)去比较所有输入节点(BaseNode)的横向或纵向位置大小进行排序得出所有边对应的顺序并保存在边数据(EdgeData.OutputPortEdgeIndex)里。
Note:
新增边EdgeView在OnGraphViewChange里访问时不存在,此时通过强制更新指定EdgeView索引的方式更新显示(BehaviourTreeGraphView.UpdateEdgeViewIndex()) 删除边EdgeView时OnGraphViewChange里访问时还依然存在,所以通过判定逻辑边数据(EdgeData)不存在来避免问题(BehaviourTreeGraphView.UpdateEdgeViewIndex())
背景网格添加 前面讲到我们加载了自定义的UICommonGraphEditorWindow.uss的StyleSheet,那么在代码里我们直接创建GridBackground即可使用对应GridBackground的StyleSheet设置了。
BehaviourTreeGraphView.cs
1 2 3 4 5 6 7 8 9 10 11 12 13 14 15 16 17 public BehaviourTreeGraphView (){ ****** protected void AddGridBackground () { var grid = new GridBackground(); grid.name = BTGraphElementNames.GridBackgroundName; Insert(0 , grid); grid.StretchToParentSize(); } ****** }
图数据拖拽重用 数据拖拽我们可以监听DragExitedEvent
CommonGraphView.cs
1 2 3 4 5 6 7 8 9 10 11 12 13 14 15 16 17 18 19 20 21 22 23 24 25 26 27 28 29 30 31 32 33 34 35 36 37 38 39 40 41 42 43 44 45 46 47 48 49 50 51 52 53 54 55 56 57 58 59 60 61 62 63 64 65 66 67 68 69 70 71 72 73 74 75 76 77 78 79 80 81 82 83 84 85 86 87 88 89 90 91 92 93 94 95 96 97 98 99 100 101 102 103 104 105 106 107 108 public class BehaviourTreeGraphView : GraphView { ****** protected virtual void Init () { ****** AddAllEvents(); } ****** protected virtual void AddAllEvents () { graphViewChanged += OnGraphViewChanged; RegisterCallback<DragExitedEvent>(OnDragExistedEvent); ****** } protected virtual void RemoveAllEvents () { graphViewChanged -= OnGraphViewChanged; UnregisterCallback<DragExitedEvent>(OnDragExistedEvent); ****** } ****** protected Vector2 TransformContentLocalMousePosToGraphPos (Vector2 localMousePosition ) { Vector2 worldMousePosition = contentContainer.LocalToWorld(localMousePosition); Vector2 actualGraphPosition = contentViewContainer.WorldToLocal(worldMousePosition); return actualGraphPosition; } protected void OnDragExistedEvent (DragExitedEvent dragExitedEvent ) { Debug.Log($"响应拖拽结束!" ); Debug.Log($"拖拽结束位置:{dragExitedEvent.localMousePosition} " ); Debug.Log($"当前拖拽物体数量:{DragAndDrop.objectReferences.Length} " ); foreach (var objectReference in DragAndDrop.objectReferences) { Debug.Log($"拖拽物体名:{objectReference.name} " ); var graphData = objectReference as BehaviourTreeGraphData; if (graphData != null && AssetDatabase.Contains(graphData)) { var graphDataAssetPath = AssetDatabase.GetAssetPath(graphData); Debug.Log($"拖拽的图数据Asset路径:{graphDataAssetPath} " ); var cloneGraphData = graphData.CloneSelf(); Vector2 actualGraphPosition = TransformContentLocalMousePosToGraphPos(dragExitedEvent.localMousePosition); AddGraphData(cloneGraphData, actualGraphPosition); } } } public bool AddGraphData (BehaviourTreeGraphData graphData, Vector2? targetPos = null ) { if (graphData == null ) { Debug.LogError($"不允许添加空图数据,添加图数据失败!" ); return false ; } graphData.RegenerateAllNodeGUID(); if (targetPos != null ) { graphData.MoveToTargetPosition((Vector2)targetPos); } CreateGraphAllNodes(graphData, true , false ); CreateGraphAllEdges(graphData, true , false ); Debug.Log($"添加指定Graph:{graphData.name} 数据到指定位置成功!" ); return true ; } ***** }
GraphData.cs
1 2 3 4 5 6 7 8 9 10 11 12 13 14 15 16 17 18 19 20 21 22 23 24 25 26 public class BehaviourTreeGraphData : ScriptableObject { ****** public BehaviourTreeGraphData CloneSelf () { var cloneGraphData = this .Clone(); for (int index = 0 , length = AllNodeList.Count; index < length; index++) { cloneGraphData.AllNodeList[index] = AllNodeList[index].CloneSelf(); } return cloneGraphData; } ****** }
BaseNode.cs
1 2 3 4 5 6 7 8 9 10 11 12 13 14 15 16 17 18 19 20 21 22 [Serializable ] public abstract class BaseNode : ScriptableObject { ****** public virtual BaseNode CloneSelf () { return this .Clone(); } ****** }
ScriptableObjectExtension.cs
1 2 3 4 5 6 7 8 9 10 11 12 13 14 15 16 17 18 19 20 21 22 23 24 public static class ScriptableObjectExtension { public static T Clone <T >(this T scriptableObjectwhere T : ScriptableObject { if (scriptableObject == null ) { Debug.LogError($"ScriptableObject is null. Returning default {typeof (T)} object." ); return (T)ScriptableObject.CreateInstance(typeof (T)); } T instance = Object.Instantiate(scriptableObject); instance.name = scriptableObject.name; return instance; } ****** }
这里就不展示所有代码了,核心就是通过DragExitedEvent监听拖拽到图上的Asset判定是否是支持的图Asset,是的话直接读取图Asset然后通过Clone的方式实现深拷贝一个图Asset数据进行动态图数据添加。
实现ScriptableObject深拷贝的核心是通过扩展ScriptableObjectClone泛型方法实现通用的ScriptableObject克隆。
克隆之后的图Asset数据进行所有节点GUID的重新生成避免GUID重复问题。
潜在设计和可优化点:
目前的克隆实现是图数据实例化克隆,克隆后的数据跟原始图数据没有任何关系了,既无法直接通过修改克隆数据修改原始图数据,果想做像BehaviorDesginer图数据直接重用,需要支持一个图数据节点类型,然后在运行时读取图数据节点原始指向数据进行真是图数据克隆(注意排除重复的根节点)。图数据节点的调试可以分为Editor只查看图数据节点,而运行时查看真是图数据克隆还原后的树结构。
Note:
目前克隆图数据是连带根节点也复制了,如果不需要请自行删除根节点
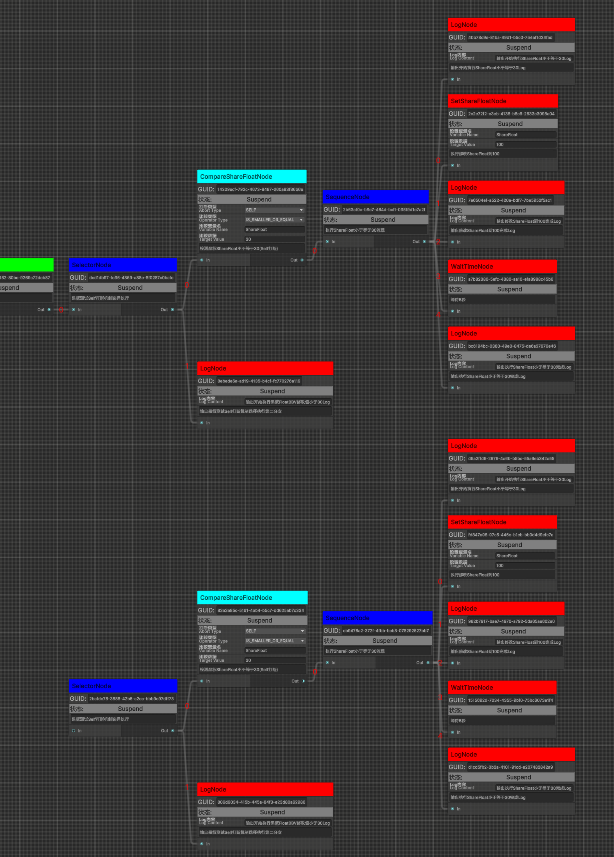
节点数据复制 前面已经实现了图数据的重用,节点数据的复制重用原理是类似的,核心就是将所有的节点数据(NodeData)通过克隆并重新生成新的GUID再添加并创建对应NodeView显示(为了避免新复制的节点重叠,会添加一定的位置偏移),然后将所有的边数据(EdgeData)克隆并按照新生成的节点GUID重新修改边数据相关的节点GUID数据并创建对应EdgeView显示即可。
BehaviourTreeGraphView.cs
1 2 3 4 5 6 7 8 9 10 11 12 13 14 15 16 17 18 19 20 21 22 23 24 25 26 27 28 29 30 31 32 33 34 35 36 37 38 39 40 41 42 43 44 45 46 47 48 49 50 51 52 53 54 55 56 57 58 59 60 61 62 63 64 65 66 67 68 69 70 71 72 73 74 75 76 77 78 79 80 81 82 83 84 85 86 87 88 89 90 91 92 93 94 95 96 97 98 99 100 101 102 103 104 105 106 107 108 109 110 111 112 113 114 115 116 117 118 119 120 121 122 123 124 125 126 127 128 129 130 131 132 133 134 135 136 137 138 139 140 141 142 143 144 145 146 147 148 149 150 151 152 153 154 155 156 157 158 159 160 161 162 163 164 165 166 167 168 169 170 171 172 173 174 175 176 177 178 179 180 181 182 183 184 185 186 187 188 189 190 191 192 193 194 public class BehaviourTreeGraphView : GraphView { ****** protected void DuplicateNodeView (NodeView duplicateNodeView, bool recusive = false ) { Undo.RecordObject(SourceGraphData, $"DuplicateNodeView({recusive} )" ); var allNodeViews = new List<NodeView>(); allNodeViews.Add(duplicateNodeView); var allNodeOuputEdgeViews = new List<EdgeView>(); if (recusive) { var allChildNodeViews = GetAllChildNodeViews(duplicateNodeView, recusive); allNodeViews.AddRange(allChildNodeViews); var allChildOutputEdgeViews = GetAllChildOutputEdgeViews(duplicateNodeView, recusive); allNodeOuputEdgeViews.AddRange(allChildOutputEdgeViews); } var allNewNodeDatas = new List<BaseNode>(); foreach (var nodeView in allNodeViews) { var oldNodeData = nodeView.NodeData; var newNodeData = oldNodeData.CloneSelf(); allNewNodeDatas.Add(newNodeData); } var allNewEdgeDatas = new List<EdgeData>(); foreach (var edgeView in allNodeOuputEdgeViews) { var oldEdgeData = edgeView.EdgeData; var newEdgeData = oldEdgeData.CloneSelf(); allNewEdgeDatas.Add(newEdgeData); } CommonUtilities.RegenerateAllNodeGUID(allNewNodeDatas, allNewEdgeDatas); CommonUtilities.MoveAllNodePosByOffset(allNewNodeDatas, BTGraphConstEditor.DumplicateNodePositionOffset); foreach (var newNodeData in allNewNodeDatas) { CreateNodeByNodeData(SourceGraphData, newNodeData, true , false ); } foreach (var newEdgeData in allNewEdgeDatas) { CreateEdgeByEdgeData(SourceGraphData, newEdgeData, true , false ); } } public List<NodeView> GetAllChildNodeViews (NodeView nodeView, bool recusive = true ) { if (nodeView == null ) { return null ; } var allChildNodeViews = new List<NodeView>(); GetAllChildNodeViewsRecusive(nodeView, ref allChildNodeViews, recusive); return allChildNodeViews; } public void GetAllChildNodeViewsRecusive (NodeView nodeView, ref List<NodeView> allChildNodeView, bool recusive = true ) { if (nodeView == null ) { return ; } var allOuputPortList = nodeView.outputContainer.Query<Port>().ToList(); foreach (var outputPort in allOuputPortList) { foreach (var edge in outputPort.connections) { var outputNodeView = edge.input.node as NodeView; if (outputNodeView != null && !allChildNodeView.Contains(outputNodeView)) { allChildNodeView.Add(outputNodeView); if (recusive) { GetAllChildNodeViewsRecusive(outputNodeView, ref allChildNodeView, recusive); } } } } } public List<EdgeView> GetAllChildOutputEdgeViews (NodeView nodeView, bool recusive = true ) { var allChildOutputEdgeViews = new List<EdgeView>(); if (recusive) { var nodeAllDirectOutputEdgeViews = GetAllDirectChildOutputEdgeViews(nodeView); allChildOutputEdgeViews.AddRange(nodeAllDirectOutputEdgeViews); var allChildNodeViews = GetAllChildNodeViews(nodeView, recusive); foreach (var childNodeView in allChildNodeViews) { var childAllDirectChildOutputEdgeViews = GetAllDirectChildOutputEdgeViews(childNodeView); allChildOutputEdgeViews.AddRange(childAllDirectChildOutputEdgeViews); } } return allChildOutputEdgeViews; } public NodeView CreateNodeByNodeData (BehaviourTreeGraphData graphData, BaseNode nodeData, bool addNodeData = true , bool enableUndoSystem = true ) { if (graphData == null || nodeData == null ) { Debug.LogError($"不允许传递空图数据或空节点数据创建显示节点!" ); return null ; } BaseNode newNode = null ; newNode = nodeData; nodeData.Init(nodeData.GUID, nodeData.Position, nodeData.NodeState, nodeData.IsEnteredAbort); var typeInfo = nodeData.GetType(); var nodeView = BTGraphUtilitiesEditor.CreateNodeViewInstance(typeInfo); nodeView.Init(graphData, newNode, OnNodeSelected, null , GraphOrientation); if (addNodeData) { AddNodeData(nodeData, enableUndoSystem); } AddElement(nodeView); UpdateNodeViewRect(nodeView, nodeData.Position); return nodeView; } public EdgeView CreateEdgeByEdgeData (BehaviourTreeGraphData graphData, EdgeData edgeData, bool addEdgeData = true , bool enableUndoSystem = true ) { if (graphData == null || edgeData == null ) { Debug.LogError($"不允许传递空图数据或空边点数据创建显示边!" ); return null ; } if (addEdgeData) { AddEdgeData(edgeData, enableUndoSystem); } var outputNode = GetNodeByGuid(edgeData.OutputNodeGUID) as NodeView; var outputPort = GetOrCreateOutputPort(outputNode, edgeData.OutputPortName, edgeData.OutputPortTypeFullName); var inputNode = GetNodeByGuid(edgeData.InputNodeGUID) as NodeView; var inputPort = GetOrCreateInputPort(inputNode, edgeData.InputPortName, edgeData.InputPortTypeFullName); var edgeView = AddEdgeView(edgeData, inputPort, outputPort); Debug.Log($"创建输出节点GUID:{edgeData.OutputNodeGUID} 的端口名:{edgeData.OutputPortName} 和输入节点GUID:{edgeData.InputNodeGUID} 的端口名:{edgeData.InputPortName} 边!" ); return edgeView as EdgeView; } ****** }
EdgeData.cs
1 2 3 4 5 6 7 8 9 10 11 12 13 14 15 16 17 18 19 20 21 [Serializable ] public class EdgeData { ****** public EdgeData CloneSelf () { var newEdgeData = new EdgeData(GUID, OutputNodeGUID, OutputPortName, OutputPortTypeFullName, InputNodeGUID, InputPortName, InputPortTypeFullName); return newEdgeData; } ****** }
节点复制流程如下:
通过需要复制的NodeView找到所有相关联的NodeView和EdgeView
然后通过找到的NodeView和EdgeView获取到所有对应的BaseNode和EdgeData并调用CloneSelf()进行数据复制
然后通过将复制的BaseNode和EdgeData进行所有节点GUID数据重新随机的方式更新新节点GUID(CommonUtilities.RegenerateAllNodeGUID() )
为了避免复制节点重叠,统一将复制的节点数据做位置偏移(CommonUtilities.MoveAllNodePosByOffset() )
使用新的节点数据和边数据创建对应新的对应NodeView和EdgeView即完成节点数据复制
Note:
因为节点复制后,第一个节点的父节点不一定支持多个子节点相连(比如修饰节点只允许一个子节点),所以节点复制会排除第一个节点的输入端口边数据,剩余节点和边数据全部复制。 EdgeData并非继承至ScriptableObejct,所以Clone需要自行实现CloneSelf方法。
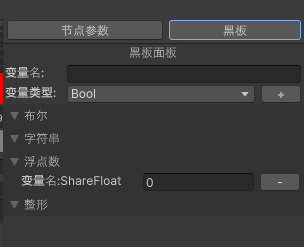
黑板数据 黑板数据可以简单的理解成一个共享数据的地方,每棵树可以快速访问修改黑板上的公共数据作为临时数据使用。
黑板数据运行时存储 黑板数据的核心设计是一个K-V结构的Map容器(结合泛型的设计支持不同类型的数据访问),通过统一的数据访问方式实现行为树统一的数据访问。
首先我们来看看黑板是如何使用泛型快速支持多种数据类型存储的:
Blackboard.cs
1 2 3 4 5 6 7 8 9 10 11 12 13 14 15 16 17 18 19 20 21 22 23 24 25 26 27 28 29 30 31 32 33 34 35 36 37 38 39 40 41 42 43 44 45 46 47 48 49 50 [Serializable ] public abstract class BaseBlackboardData { [Header("变量名" ) ] public string Name; public BaseBlackboardData (string name { Name = name; } } [Serializable ] public class BlackboardData <T > : BaseBlackboardData { [Header("数据" ) ] public T Data; public BlackboardData (string name, T database (name ) { Data = data; } } public class Blackboard { ****** private Dictionary<string , BaseBlackboardData> mBlackboardDataMap; ****** }
可以看到首先定义了字符串Key作为黑板数据的唯一标识的BaseBlackboardData基类,然后通过泛型子类BlackboardData支持不同类型的数据泛型支持。
黑板数据运行时驱动和通知 事件驱动的行为树黑板和常规Update驱动行为树的黑板最大的不同就是Clock(定时器)+监听者模式组成。
为什么事件驱动的行为树黑板也是Clock驱动了?
为了避免不必要的Update更新驱动 统一Clock驱动能更好的处理行为树的Update驱动和黑板通知的顺序逻辑 如果行为树在更新中,缓一帧再通知能有效避免通知系统遍历过程中插入删除的情况
Blackboard.cs
1 2 3 4 5 6 7 8 9 10 11 12 13 14 15 16 17 18 19 20 21 22 23 24 25 26 27 28 29 30 31 32 33 34 35 36 37 38 39 40 41 42 43 44 45 46 47 48 49 50 51 52 53 54 55 56 57 58 59 60 61 62 63 64 65 66 67 68 69 70 71 72 73 74 75 76 77 78 79 80 81 82 83 84 85 86 87 88 89 90 91 92 93 94 95 96 97 98 99 100 101 102 103 104 105 106 107 108 109 110 111 112 113 114 115 116 117 118 119 120 121 122 123 124 125 126 127 128 129 130 131 132 133 134 135 136 137 138 139 public class Blackboard { public enum BBOperationType { ADD, REMOVE, CHANGE } private struct Notification { public string key; public BBOperationType type; public object value ; public Notification (string key, BBOperationType type, object value { this .key = key; this .type = type; this .value = value ; } } ****** public bool UpdateData <T >(string key, T value = default , bool noNotification = false { var data = GetBlackboardData(key); if (data != null ) { var targetData = data as BlackboardData<T>; if (targetData == null ) { Debug.LogError($"黑板数据里Key:{key} 的数据类型和更新数据类型:{typeof (T).Name} 不匹配,更新数据失败!" ); return false ; } targetData.Data = value ; if (!noNotification) { mNotifications.Add(new Notification(key, BBOperationType.CHANGE, value )); mClock.AddTimer(0f , 0 , NotifiyObservers); } return true ; } else { BlackboardData<T> targetData = new BlackboardData<T>(key, value ); mBlackboardDataMap.Add(key, targetData); if (!noNotification) { mNotifications.Add(new Notification(key, BBOperationType.ADD, value )); mClock.AddTimer(0f , 0 , NotifiyObservers); } return true ; } } private void NotifiyObservers () { if (mNotifications.Count == 0 ) { return ; } mNotificationsDispatch.Clear(); mNotificationsDispatch.AddRange(mNotifications); mNotifications.Clear(); mIsNotifying = true ; foreach (Notification notification in mNotificationsDispatch) { if (!this .mObservers.ContainsKey(notification.key)) { continue ; } List<System.Action<BBOperationType, object >> observers = GetObserverList(this .mObservers, notification.key); foreach (System.Action<BBOperationType, object > observer in observers) { if (this .mRemoveObservers.ContainsKey(notification.key) && this .mRemoveObservers[notification.key].Contains(observer)) { continue ; } observer(notification.type, notification.value ); } } foreach (string key in this .mAddObservers.Keys) { GetObserverList(this .mObservers, key).AddRange(this .mAddObservers[key]); } foreach (string key in this .mRemoveObservers.Keys) { foreach (System.Action<BBOperationType, object > action in mRemoveObservers[key]) { GetObserverList(this .mObservers, key).Remove(action); } } this .mAddObservers.Clear(); this .mRemoveObservers.Clear(); mIsNotifying = false ; } } ****** }
可以看到对于黑板的增删改操作类型和通知都做了对应类型定义和封装,通过Clock开启数据相关操作(增删改)通知。
黑板作为单棵行为树的公共数据存储的地方,每个行为树构建时都会传入对应的一个黑板对象:
TBehaviourTree.cs
1 2 3 4 5 6 7 8 9 10 11 12 13 14 15 16 17 18 19 20 21 22 23 24 25 26 27 28 29 30 31 32 33 34 35 36 37 38 39 40 41 42 43 44 45 46 47 48 49 50 51 52 53 54 55 56 57 58 59 60 public class TBehaviourTree : IRecycle { ****** public BehaviourTreeGraphData BTRunningGraph { get ; private set ; } public Clock BehaviourTreeClock { get ; private set ; } public void Init (int bindUID { BehaviourTreeClock = new Clock(); UpdateBindUID(bindUID); RegisterBehaviourTree(); } public void LoadBTGraphData (string assetPath { ReleaseBTGraphAsset(); BTOriginalGraph = TBehaviourTreeManager.Singleton.GetCacheBTGraph(assetPath); if (BTOriginalGraph == null ) { var btGraphAsset = Resources.Load<BehaviourTreeGraphData>(assetPath); BTOriginalGraph = btGraphAsset; TBehaviourTreeManager.Singleton.CacheBTGraph(assetPath, BTOriginalGraph); } BTRunningGraph = BTOriginalGraph?.CloneSelf(); BTRunningGraph?.SetBTOwner(this ); BTRunningGraph?.InitRuntimeDatas(BehaviourTreeClock); BTRunningGraph?.Start(); } ****** }
从上面的代码可以看出,每棵行为树(TBehaviourTree)运行时都够建了一个新的Clock(TBehaviourTree.BehaviourTreeClock)用于驱动整棵树的更新。
黑板数据编辑器编辑和存储加载 前面提到的都是行为树黑板运行时部分,那编辑器的行为树数据是如何存储?编辑器编辑的行为树数据又是如何读取到运行时使用的了?
Dictionary<string, BaseBlackboardData> mBlackboardDataMap是不支持序列化的结构,所以编辑器的黑板数据存储和修改还需要独立定义。
BlackboardData.cs
1 2 3 4 5 6 7 8 9 10 11 12 13 14 15 16 17 18 19 20 21 22 23 24 25 26 27 28 29 30 31 32 33 34 35 36 37 38 39 40 41 42 43 44 45 46 47 48 49 50 51 52 53 54 55 56 57 58 59 60 61 62 63 64 65 66 67 68 69 70 71 72 73 74 75 76 77 78 79 80 81 82 83 84 85 86 87 88 89 90 91 92 93 94 95 96 97 98 99 100 101 102 103 104 105 106 107 108 109 110 111 112 113 114 115 116 117 118 119 120 121 122 123 124 125 126 public enum BlackboardDataType{ Bool = 1 , Int, Float, String, } [Serializable ] public class BlackboardData { [Header("Bool变量黑板数据" ) ] public List<BlackboardData<bool >> AllBoolDataList; [Header("Int变量黑板数据" ) ] public List<BlackboardData<int >> AllIntDataList; [Header("Float变量黑板数据" ) ] public List<BlackboardData<float >> AllFloatDataList; [Header("String变量黑板数据" ) ] public List<BlackboardData<string >> AllStringDataList; public bool AddDataByType (BlackboardDataType blackboardDataType, string key ) { if (ExistData(key)) { Debug.LogError($"黑板数据里已存在Key:{key} 的数据,添加数据失败!" ); return false ; } if (blackboardDataType == BlackboardDataType.Bool) { return AddData<bool >(key); } else if (blackboardDataType == BlackboardDataType.Int) { return AddData<int >(key); } else if (blackboardDataType == BlackboardDataType.Float) { return AddData<float >(key); } else if (blackboardDataType == BlackboardDataType.String) { return AddData<string >(key); } else { Debug.LogError($"不支持的黑板变量类型:{blackboardDataType} ,添加数据名:{key} 数据失败!" ); return false ; } } public bool AddData <T >(string key, T value = default (T { if (ExistData(key)) { Debug.LogError($"黑板数据里已存在Key:{key} 的数据,添加数据失败!" ); return false ; } var dataType = typeof (T); if (dataType == CommonGraphConst.BoolType) { var data = new BlackboardData<T>(key, value ); AllBoolDataList.Add(data as BlackboardData<bool >); return true ; } else if (dataType == CommonGraphConst.IntType) { var data = new BlackboardData<T>(key, value ); AllIntDataList.Add(data as BlackboardData<int >); return true ; } else if (dataType == CommonGraphConst.FloatType) { var data = new BlackboardData<T>(key, value ); AllFloatDataList.Add(data as BlackboardData<float >); return true ; } else if (dataType == CommonGraphConst.StringType) { var data = new BlackboardData<T>(key, value ); AllStringDataList.Add(data as BlackboardData<string >); return true ; } else { Debug.LogError($"不支持的黑板变量类型:{dataType.Name} ,添加数据名:{key} 数据失败!" ); return false ; } } ****** }
BehaviourTreeGraphData.cs
1 2 3 4 5 6 7 8 9 10 11 12 13 14 15 16 17 18 19 20 21 22 23 24 25 26 27 28 29 30 31 32 33 34 35 36 37 38 39 40 41 42 43 44 45 46 47 48 49 50 51 52 53 54 55 56 57 58 59 60 61 62 63 64 65 66 67 68 public class BehaviourTreeGraphData : ScriptableObject { ****** [Header("黑板数据" ) ] public BlackboardData BlackboardData; ****** public BehaviourTreeGraphData () { AllNodeList = new List<BaseNode>(); AllEdgeDataList = new List<EdgeData>(); OwnerBT = null ; TreeDataList = new List<TreeData>(); BlackboardData = new BlackboardData(); Clock = null ; Blackboard = null ; RootTree = null ; mInitRunTimeDataComplete = false ; mTempEdgeDataList = new List<EdgeData>(); } public void InitRuntimeDatas (Clock clock ) { InitClock(clock); InitBlackboard(); InitTreeDatas(); mInitRunTimeDataComplete = true ; } protected void InitBlackboard () { Blackboard = new Blackboard(Clock); foreach (var boolVariableData in BlackboardData.AllBoolDataList) { UpdateBlackboardData<bool >(boolVariableData.Name, boolVariableData.Data, true ); } foreach (var intVariableData in BlackboardData.AllIntDataList) { UpdateBlackboardData<int >(intVariableData.Name, intVariableData.Data, true ); } foreach (var floatVariableData in BlackboardData.AllFloatDataList) { UpdateBlackboardData<float >(floatVariableData.Name, floatVariableData.Data, true ); } foreach (var stringVariableData in BlackboardData.AllStringDataList) { UpdateBlackboardData<string >(stringVariableData.Name, stringVariableData.Data, true ); } Blackboard.PrintAllBlackBoardDatas(); } ****** }
UIBTGraphEditorWindow.cs
1 2 3 4 5 6 7 8 9 10 11 12 13 14 15 16 17 18 19 20 21 22 23 24 25 26 27 28 29 30 31 32 33 34 35 36 37 38 39 40 41 42 43 44 45 46 47 48 49 50 51 52 53 54 55 56 57 58 59 60 61 62 63 64 65 66 67 68 69 70 71 72 73 74 75 76 77 78 79 80 81 82 83 84 85 86 87 88 89 90 91 92 93 94 95 96 97 98 99 100 101 102 103 104 105 106 107 108 109 110 111 112 113 114 115 116 117 118 119 120 121 122 123 124 125 126 127 128 129 130 131 132 133 134 135 public class UIBTGraphEditorWindow : EditorWindow { ****** protected void CreateBlackboardUI () { var rightPanelVerticalContainer = rootVisualElement.Q<VisualElement>(BTGraphElementNames.RightPanelVerticalContainerName); var rightVerticalContentLabelTitle = new Label(); rightVerticalContentLabelTitle.text = "黑板面板" ; rightVerticalContentLabelTitle.style.height = 20f ; rightVerticalContentLabelTitle.style.alignSelf = Align.Center; rightPanelVerticalContainer.Add(rightVerticalContentLabelTitle); CreateBlackboardOperationUI(); CreateBlackboardDataUI(); } protected void CreateBlackboardDataUI () { var rightPanelVerticalContainer = rootVisualElement.Q<VisualElement>(BTGraphElementNames.RightPanelVerticalContainerName); var blackboardDataVerticalContainer = UIToolkitUtilities.CreateVerticalContainer(BTGraphElementNames.BlackboardDataVerticalContainerName); rightPanelVerticalContainer.Add(blackboardDataVerticalContainer); UpdateBlackboardDataUI(); } protected void UpdateBlackboardDataUI () { if (mCurrentSelectedPanelType != PanelType.BLACKBOARD_PANEL) { return ; } var blackboardDataVerticalContainer = rootVisualElement.Q<VisualElement>(BTGraphElementNames.BlackboardDataVerticalContainerName); blackboardDataVerticalContainer.Clear(); foreach (var variabletype in mAvalibleVariableTypeList) { var variableTypeFoldOut = new Foldout(); var variableTypeTitle = BTGraphUtilitiesEditor.GetVariableTypeFoldTitle(variabletype); variableTypeFoldOut.name = variableTypeTitle; variableTypeFoldOut.viewDataKey = BTGraphUtilitiesEditor.GetVariableTypeFoldOutViewDataKeyName(variabletype); variableTypeFoldOut.text = variableTypeTitle; variableTypeFoldOut.AddToClassList("unity-box" ); blackboardDataVerticalContainer.Add(variableTypeFoldOut); CreateVariableDataUI(variabletype); } } private void CreateVariableDataUI (BlackboardDataType variableType ) { if (!Application.isPlaying) { CreateEditorVariableDataUI(variableType); } else { CreateRuntimeVariableDataUI(variableType); } } private void OnBlackboardAddVariableDataClick (ClickEvent evt ) { Debug.Log($"响应黑板添加变量数据按钮点击!" ); var blackboardVariableInputText = rootVisualElement.Q<TextField>(BTGraphElementNames.BlackboardInputVariableTextName); var newVariableName = blackboardVariableInputText.value ; if (string .IsNullOrEmpty(newVariableName)) { Debug.LogError($"不允许添加空变量名的黑板数据!" ); return ; } Undo.RegisterCompleteObjectUndo(mGraphView.SourceGraphData, "AddBlackboardData" ); PopupField<BlackboardDataType> variableTypePopField = rootVisualElement.Q<PopupField<BlackboardDataType>>(BTGraphElementNames.BlackboardVariableTypePopName); var newVariableType = variableTypePopField.value ; if (mGraphView.SourceGraphData.BlackboardData.AddDataByTyoe(newVariableType, newVariableName)) { UpdateBlackboardDataUI(); EditorUtility.SetDirty(mGraphView.SourceGraphData); } } private bool UpdateEditorVariableData <T >(string variableName, T newValue { Debug.Log($"编辑器变量类型:{typeof (T).Name} 的变量名:{variableName} 值更新:{newValue} " ); Undo.RegisterCompleteObjectUndo(mGraphView.SourceGraphData, "UpdateBlackboardData" ); var result = mGraphView.SourceGraphData.BlackboardData.UpdaetValue<T>(variableName, newValue); EditorUtility.SetDirty(mGraphView.SourceGraphData); return result; } private bool RemoveEditorVariableData <T >(string variableName { Debug.Log($"编辑器删除变量类型:{typeof (T).Name} 的变量名:{variableName} 数据!" ); Undo.RegisterCompleteObjectUndo(mGraphView.SourceGraphData, "RemoveBlackboardData" ); var result = mGraphView.SourceGraphData.BlackboardData.RemoveData<T>(variableName); UpdateBlackboardDataUI(); EditorUtility.SetDirty(mGraphView.SourceGraphData); return result; } ****** }
可以看到针对每一个行为树图数据(BehaviourTreeGraphData)都定义了一个 BlackboardData(行为树编辑器黑板数据)
可以看到编辑器和运行时,UIBTGraphEditorWindow.CreateVariableDataUI()通过选择性读取BlackboardData或Blackboard数据进行黑板数据读取显示。
编辑器模式下BehaviourTreeGraphData.BlackboardData支持序列化,然后通过创建UIToolkit的编辑器UI进行读取和修改BehaviourTreeGraphData.BlackboardData数据,从而实现编辑器对黑板数据的编辑和保存。
黑板数据操作UI界面展示:
Note:
目前的黑板设计是针对单棵行为树的,所以是局部黑板而非全局黑板(也就是多棵行为树之间无法通过黑板存储公共数据交流)。
GraphView操作添加 给GraphView添加额外操作功能(e.g. 节点拖拽,点击节点选择,方形选框节点选择,滚轮缩放 ……)
1 2 3 4 5 6 7 8 9 10 11 12 13 14 15 16 17 public class BehaviourTreeGraphView : GraphView { ****** protected void AddAllManipulator () { this .AddManipulator(new ContentDragger()); this .AddManipulator(new SelectionDragger()); this .AddManipulator(new RectangleSelector()); this .AddManipulator(new ContentZoomer()); } ****** }
AddManipulator()是VisualElement的扩展方法,通过添加Manipulator我们可以快速实现对Element添加各种各样的操作功能,GraphView也继承至UIElement,所以通过上述几行代码我们成功的给图添加了框选,缩放等功能。
坐标转换 当我们的GraphView支持放大缩小时,我们点击创建节点的位置需要通过坐标转换才能得到正确的节点位置。
BehaviourTreeGraphView.cs
1 2 3 4 5 6 7 8 9 10 11 12 13 14 15 16 17 18 19 20 21 22 23 24 25 26 27 28 29 30 31 32 33 34 35 36 37 38 39 40 41 42 43 44 public class BehaviourTreeGraphView : GraphView { ****** protected Vector2 TransformGridLocalMousePosToGraphPos (Vector2 localMousePosition ) { var gridElement = ElementAt(0 ); Vector2 worldMousePosition = contentContainer.ChangeCoordinatesTo(gridElement, localMousePosition); Vector2 actualGraphPosition = contentViewContainer.WorldToLocal(worldMousePosition); return actualGraphPosition; } protected void OnNodeViewSubMenuCreateNode (DropdownMenuAction menuAction ) { var menuUserData = menuAction.userData as MenuUserData; var nodeType = menuUserData.CustomData as Type; Vector2 actualGraphPosition = TransformGridLocalMousePosToGraphPos(menuAction.eventInfo.localMousePosition); var nodeView = CreateNodeByType(nodeType, actualGraphPosition); var nodeViewPosition = nodeView.GetPosition(); nodeViewPosition.position = actualGraphPosition; UpdateNodeViewRect(nodeView, nodeViewPosition); } ****** }
首先我们通过获取添加到根节点且铺满的Grid UIElement作为转换获取显示区域世界坐标的参考组件。
然后通过VisualElementExtension.ChangeCoordinatesTo()将通过DropdownMenuAction.eventInfo.localMousePosition得到鼠标局部点击坐标转换到网格的局部坐标(个人理解因为网格是铺满显示范围的,所以这里的局部坐标也就等价于世界坐标)。
最后将转换到网格的局部坐标(即世界坐标)通过VisualElementExtension.WorldToLocal()转换到我们节点目标显示父UIElement(contentViewContainer)坐标下得到对应局部坐标。
数据保存和加载添加 数据保存和加载首先需要两步:
创建操作UI
响应操作保存和加载数据
UICommonGraphEditorWindow.cs
1 2 3 4 5 6 7 8 9 10 11 12 13 14 15 16 17 18 19 20 21 22 23 24 25 26 27 28 29 30 31 32 33 34 35 36 37 38 39 40 41 42 43 44 45 46 47 48 49 50 51 52 53 54 55 56 57 58 59 60 61 62 63 64 65 66 67 68 69 70 71 72 73 74 75 76 77 78 79 80 81 82 83 84 85 86 87 88 89 90 91 92 93 94 95 96 97 98 99 100 101 102 103 104 105 106 107 108 109 110 111 112 113 114 115 116 117 118 119 120 121 122 123 124 125 126 127 128 129 130 131 132 133 134 135 136 137 138 139 140 141 142 143 144 145 146 147 148 149 150 151 152 153 154 155 156 157 158 159 160 161 162 163 164 165 166 167 168 169 170 171 172 173 174 175 176 177 178 179 180 181 182 183 184 185 186 187 188 189 190 191 192 193 194 195 196 197 198 199 200 201 202 203 204 205 206 207 208 209 210 211 212 213 214 215 216 217 218 219 220 221 222 223 224 225 226 227 228 229 230 231 232 233 234 235 236 237 238 239 240 241 242 243 244 245 246 247 248 249 250 251 public class UIBTGraphEditorWindow : EditorWindow { ****** private void CreateLeftOperationContent () { CreateSavePathContent(); CreateNodeOperationContent(); } private void CreateSavePathContent () { var leftVerticalContentContainer = rootVisualElement.Q<VisualElement>(BTGraphElementNames.LeftVerticalContentContainerName); var savePathHorizontalContainer = new VisualElement(); savePathHorizontalContainer.style.left = 0 ; savePathHorizontalContainer.style.right = 0 ; savePathHorizontalContainer.style.height = 20 ; savePathHorizontalContainer.style.flexDirection = FlexDirection.Row; savePathHorizontalContainer.AddToClassList("unity-box" ); var savePathLabelTitle = new Label(); savePathLabelTitle.style.width = 70f ; savePathLabelTitle.style.unityTextAlign = TextAnchor.MiddleLeft; savePathLabelTitle.style.alignSelf = Align.Center; savePathLabelTitle.text = "保存路径:" ; savePathHorizontalContainer.Add(savePathLabelTitle); var savePathTextField = new TextField(); savePathTextField.name = BTGraphElementNames.SavePathTextFieldName; savePathTextField.style.flexGrow = 1 ; savePathTextField.style.flexShrink = 1 ; savePathTextField.value = mGraphSaveFolderPath; savePathHorizontalContainer.Add(savePathTextField); var savePathButton = new Button(); savePathButton.style.width = 60 ; savePathButton.text = "修改" ; savePathHorizontalContainer.Add(savePathButton); savePathButton.RegisterCallback<ClickEvent>(OnSavePathButtonClick); leftVerticalContentContainer.Add(savePathHorizontalContainer); } private void OnSavePathButtonClick (ClickEvent clickEvent ) { Debug.Log($"保存路径按钮点击!" ); var newSavePath = EditorUtility.OpenFolderPanel("保存路径" , mGraphSaveFolderPath, string .Empty); if (!AssetDatabase.IsValidFolder(newSavePath)) { Debug.LogError($"请选择有效的Asset路径,此:{newSavePath} 路径无效,修改保存路径失败!" ); return ; } if (!string .IsNullOrEmpty(newSavePath)) { mGraphSaveFolderPath = newSavePath; Debug.Log($"更新保存路径:{newSavePath} " ); var savePathTextField = rootVisualElement.Q<TextField>(BTGraphElementNames.SavePathTextFieldName); savePathTextField.value = mGraphSaveFolderPath; } } private void CreateNodeOperationContent () { var leftVerticalContentContainer = rootVisualElement.Q<VisualElement>(BTGraphElementNames.LeftVerticalContentContainerName); var assetSelectionHorizontalContainer = UIToolkitUtilities.CreateHorizontalContainer(BTGraphElementNames.AssetSelectionHorizontalContainerName, 0f , null , 0 , 0 , 0 , 0 , default (StyleColor)); assetSelectionHorizontalContainer.style.height = 20f ; leftVerticalContentContainer.Add(assetSelectionHorizontalContainer); var assetSelectionTitleLabel = new Label(); assetSelectionTitleLabel.text = "Asset:" ; assetSelectionTitleLabel.style.width = 70f ; assetSelectionTitleLabel.style.unityTextAlign = TextAnchor.MiddleLeft; assetSelectionTitleLabel.style.alignSelf = Align.Center; assetSelectionHorizontalContainer.Add(assetSelectionTitleLabel); var assetSelectionObjectField = new ObjectField(); assetSelectionObjectField.objectType = GetGraphViewDataType(); assetSelectionObjectField.name = BTGraphElementNames.AssetSelectionName; assetSelectionObjectField.style.flexGrow = 1 ; assetSelectionObjectField.style.width = 210 ; assetSelectionObjectField.allowSceneObjects = false ; assetSelectionObjectField.RegisterValueChangedCallback(OnAssetSelectionValueChange); assetSelectionHorizontalContainer.Add(assetSelectionObjectField); UpdateAssetSelectionValue(); var newGraphButton = new Button(); newGraphButton.name = BTGraphElementNames.SaveButtonName; newGraphButton.text = "新建" ; newGraphButton.style.height = 20 ; leftVerticalContentContainer.Add(newGraphButton); newGraphButton.RegisterCallback<ClickEvent>(OnNewGraphButtonClick); var saveButton = new Button(); saveButton.name = BTGraphElementNames.SaveButtonName; saveButton.text = "保存" ; saveButton.style.height = 20 ; leftVerticalContentContainer.Add(saveButton); saveButton.RegisterCallback<ClickEvent>(OnSaveButtonClick); } private void UpdateAssetSelectionValue () { var assetSelectionObjectField = rootVisualElement.Q<ObjectField>(BTGraphElementNames.AssetSelectionName); ; if (assetSelectionObjectField != null ) { assetSelectionObjectField.value = mSelectedGraphData; } } private void OnAssetSelectionValueChange (ChangeEvent<UnityEngine.Object> assetSelected ) { var previewAssetName = assetSelected.previousValue != null ? assetSelected.previousValue.name : string .Empty; var newAssetName = assetSelected.newValue != null ? assetSelected.newValue.name : string .Empty; Debug.Log($"响应Asset选择变化,从:{previewAssetName} 到:{newAssetName} " ); UpdateSelectedGraphData(assetSelected.newValue as BehaviourTreeGraphData); } private void OnSaveButtonClick (ClickEvent clickEvent ) { if (Application.isPlaying) { Debug.LogWarning($"运行时不允许保存操作!" ); return ; } if (string .IsNullOrEmpty(mGraphSaveFileName)) { Debug.LogError($"不允许保存空文件名!" ); return ; } var graphDataPath = Path.Combine(mGraphSaveFolderPath, mGraphSaveFileName); graphDataPath = PathUtilities.GetRegularPath(graphDataPath); var graphData = mGraphView.SourceGraphData; if (graphData != null ) { var saveFodlerFullPath = PathUtilities.GetAssetFullPath(mGraphSaveFolderPath); FolderUtilities.CheckAndCreateSpecificFolder(saveFodlerFullPath); var assetSourcePath = AssetDatabase.GetAssetPath(graphData); assetSourcePath = PathUtilities.GetRegularPath(assetSourcePath); if (!string .IsNullOrEmpty(assetSourcePath)) { Debug.Log($"目标Asset:{assetSourcePath} 已存在本地!" ); if (string .Equals(assetSourcePath, graphDataPath)) { Debug.Log($"目标Asset:{graphDataPath} 保存路径相同,直接保存!" ); } else { Debug.Log($"目标Asset:{assetSourcePath} 保存路径不同,移动到:{graphDataPath} 并保存!" ); AssetDatabase.MoveAsset(assetSourcePath, graphDataPath); } } else { var targetPathAsset = AssetDatabase.LoadAssetAtPath<UnityEngine.Object>(graphDataPath); if (targetPathAsset != null ) { AssetDatabase.DeleteAsset(graphDataPath); Debug.Log($"目标Assets不存在,但目标位置:{graphDataPath} 存在同名Asset,删除同名Asset!" ); } AssetDatabase.CreateAsset(graphData, graphDataPath); Debug.Log($"目标Asset不存在,创建新Asset!" ); } foreach (var node in graphData.AllNodeList) { AssetDatabase.RemoveObjectFromAsset(node); AssetDatabase.AddObjectToAsset(node, graphData); } var allSubAssets = AssetDatabase.LoadAllAssetsAtPath(graphDataPath); foreach (var subAsset in allSubAssets) { var subNode = subAsset as BaseNode; if (subNode != null && graphData.GetNodeByGUID(subNode.GUID) == null ) { Debug.Log($"节点GUID:{subNode.GUID} Asset的逻辑对象不存在了,需要删除冗余Node Asset!" ); AssetDatabase.RemoveObjectFromAsset(subAsset); } } AssetDatabase.ImportAsset(graphDataPath); AssetDatabase.SaveAssets(); Debug.Log($"保存图:{graphDataPath} 数据成功!" ); } else { Debug.LogError($"不允许保存空图数据,保存图:{graphDataPath} 数据失败!" ); } } protected void UpdateSelectedGraphData (BehaviourTreeGraphData graphData ) { if (mGraphView == null ) { Debug.Log($"未创建有效GraphView,清理之前的选中数据!" ); ClearSelectedGraphData(); return ; } if (mSelectedGraphData == graphData) { Debug.Log($"选中了相同GraphData,不重复加载!" ); return ; } if (graphData != null ) { mSelectedGraphData = graphData; mSelectedGraphAssetPath = mSelectedGraphData == null ? null : AssetDatabase.GetAssetPath(mSelectedGraphData); mGraphSaveFolderPath = string .IsNullOrEmpty(mSelectedGraphAssetPath) ? BTGraphConstEditor.DefaultGraphSaveFolderPath : Path.GetDirectoryName(mSelectedGraphAssetPath); mGraphSaveFileName = string .IsNullOrEmpty(mSelectedGraphAssetPath) ? BTGraphConstEditor.DefaultGraphSaveFileName : Path.GetFileName(mSelectedGraphAssetPath); mGraphView.LoadGraphData(mSelectedGraphData); UpdateAssetSelectionValue(); UpdateSelectedPanelUI(); } } ****** }
从上面可以看到,我实现以下几个功能:
自定义文件名保存设置
自定义文件保存路径设置
自主图数据选择加载还原
Note:
图数据和节点数据采用的是ScriptableObject方式存储(为了方便通过PropertyField快速绑定ScriptableObject实现属性绑定显示) ScriptableObject必须存储到本地,所以节点数据是作为子Asset添加到图数据ScriptableObject Asset上的
撤销系统 所有针对ScriptableObject的数据操作,为了方便快速撤销,我们都会使用Ctrl+Z 的快捷键,但Unity默认对ScriptableObject的修改是不会自动支持修改和快速撤销的,此时我们需要使用Undo 相关的接口。
在我们对UnityEngine.Object对象(含ScriptableObejct)修改数据前,我们调用Undo.RecordObject()或者Undo.RegisterCompleteObjectUndo(),第一个参数传需要修改的UnityEngine.Object,第二个参数传一个自定义名字的字符串即可。
BehaviourTreeGraphView.cs
1 2 3 4 5 6 7 8 9 10 11 12 13 14 15 16 17 18 19 20 21 22 23 24 25 26 27 28 29 30 31 32 33 34 35 36 37 38 39 40 41 42 43 44 45 46 47 48 49 50 51 52 53 54 55 56 57 58 59 60 61 62 63 64 65 66 67 68 69 70 71 72 73 74 75 76 77 78 79 80 81 82 83 84 85 86 87 88 89 90 91 92 93 94 95 96 97 98 99 100 101 102 103 104 105 106 107 108 109 110 111 112 113 114 115 116 117 118 119 120 121 122 123 124 125 126 127 128 129 130 131 132 133 134 135 136 137 138 139 140 141 142 143 144 145 146 147 148 149 150 151 152 153 154 155 156 157 158 159 160 161 public class BehaviourTreeGraphView : GraphView { ****** protected GraphViewChange OnGraphViewChanged (GraphViewChange graphViewChange ) { Debug.Log($"CommonGraphVIew:OnGraphViewChanged()" ); if (graphViewChange.elementsToRemove != null ) { foreach (var elementToRemove in graphViewChange.elementsToRemove) { if (elementToRemove is NodeView removeNodeView) { Debug.Log($"删除节点GUID:{removeNodeView.NodeData.GUID} ,节点数据类型:{removeNodeView.NodeData.GetType().Name} " ); RemoveNodeData(removeNodeView.NodeData); } else if (elementToRemove is Edge removeEdge) { var inputNodeView = removeEdge.input.node as NodeView; var outputNodeView = removeEdge.output.node as NodeView; var inputNodeViewName = inputNodeView != null ? inputNodeView.NodeData.GetType().Name : string .Empty; var outputNodeViewName = outputNodeView != null ? outputNodeView.NodeData.GetType().Name : string .Empty; Debug.Log($"删除边,Input节点名:{inputNodeViewName} ,Input端口名:{removeEdge.input.portName} ,Output节点名:{outputNodeViewName} ,Output端口名:{removeEdge.output.portName} " ); RemoveEdgeData(outputNodeView.NodeData.GUID, removeEdge.output.portName, inputNodeView.NodeData.GUID, removeEdge.input.portName); OnEdgeViewUpdate(removeEdge); } else { Debug.Log($"TODO:删除其他Element类型:{elementToRemove.GetType().Name} !" ); } } } if (graphViewChange.edgesToCreate != null ) { foreach (var edgeToCreate in graphViewChange.edgesToCreate) { var edgeView = edgeToCreate as EdgeView; var inputNodeView = edgeToCreate.input.node as NodeView; var outputNodeView = edgeToCreate.output.node as NodeView; var inputNodeViewName = inputNodeView != null ? inputNodeView.NodeData.GetType().Name : string .Empty; var outputNodeViewName = outputNodeView != null ? outputNodeView.NodeData.GetType().Name : string .Empty; var ouputNodeGUID = outputNodeView.NodeData.GUID; var outputPortName = edgeToCreate.output.portName; var outputPortTypeFullName = edgeToCreate.output.portType.FullName; var inputNodeGUID = inputNodeView.NodeData.GUID; var intputPortName = edgeToCreate.input.portName; var intputPortTypeFullName = edgeToCreate.input.portType.FullName; var guid = Guid.NewGuid().ToString(); EdgeData edgeData = new EdgeData(guid, ouputNodeGUID, outputPortName, outputPortTypeFullName, inputNodeGUID, intputPortName, intputPortTypeFullName); Debug.Log($"创建边,Input节点名:{inputNodeViewName} ,Input端口名:{edgeToCreate.input.portName} ,Output节点名:{outputNodeViewName} ,Output端口名:{edgeToCreate.output.portName} " ); AddEdgeData(edgeData); OnEdgeViewUpdate(edgeView); UpdateEdgeViewIndex(edgeView); } } if (graphViewChange.movedElements != null ) { foreach (var moveElement in graphViewChange.movedElements) { if (moveElement is NodeView moveNodeView) { Debug.Log($"更新节点GUID:{moveNodeView.NodeData.GUID} ,节点数据类型:{moveNodeView.NodeData.GetType().Name} 的位置X:{moveNodeView.NodeData.Position.x} Y:{moveNodeView.NodeData.Position.y} " ); UpdateNodeRectByNodeView(moveNodeView); OnNodeViewMove(moveNodeView); } else { Debug.Log($"TODO:移动Element类型:{moveElement.GetType().Name} !" ); } } } return graphViewChange; } protected bool AddNodeData (BaseNode node, bool enableUndoSystem = true ) { if (node == null ) { Debug.LogError($"不允许添加空节点数据!" ); return false ; } if (enableUndoSystem) { Undo.RegisterCompleteObjectUndo(SourceGraphData, "AddNodeData" ); } var result = SourceGraphData.AddNode(node); if (result) { OnAddNodeData(node); EditorUtility.SetDirty(SourceGraphData); } return true ; } protected bool RemoveNodeData (BaseNode node, bool enableUndoSystem = true ) { if (node == null ) { Debug.LogError($"不允许移除空节点数据!" ); return false ; } if (enableUndoSystem) { Undo.RegisterCompleteObjectUndo(SourceGraphData, "RemoveNodeData" ); } var result = SourceGraphData.RemoveNode(node); if (result) { OnRemoveNode(node); EditorUtility.SetDirty(SourceGraphData); } return result; } protected bool DoRemoveNodeView (NodeView nodeView, bool recusive = false ) { Undo.RegisterCompleteObjectUndo(SourceGraphData, $"RemoveNodeView({recusive} )" ); return RemoveNodeViewRecusive(nodeView, recusive); } protected bool DoDuplicateNodeView (NodeView duplicateNodeView, bool recusive = false ) { Undo.RegisterCompleteObjectUndo(SourceGraphData, $"DuplicateNodeView({recusive} )" ); return DumplicateNodeViewRecusive(duplicateNodeView, recusive); } ****** }
从上面可以看到我们无论是主动递归删除节点数据还是递归复制节点数据,又或是主动添加节点View,又或是主动添加边View,我们都通过Undo.RegisterCompleteObjectUndo()对我们的图数据(SourceGraphData继承至ScriptableObject)进行了撤销标记,这样一来我们就能通过Ctrl+Z快速撤销修改并还原正确的图数据Asset了。
递归删除节点操作:
Ctrl+Z还原递归是删除节点操作:
Note:
Undo只支持的是继承至UntiyEngine.Object的对象。 Undo.RecordObject只记录增量快照,Undo.RegisterCompleteObjectUndo记录完整的对象数据,为了确保数据操作的撤销正确性,推荐用后者,本人就是在删除嵌套删除节点数据时发现Undo.RecordObejct未能正确还原数据导致报错后使用Undo.RegisterCompleteObjectUndo才正确实现嵌套删除节点功能。
事件驱动行为树 事件驱动的行为树核心是参考NPBehave 的设计思路。
基于事件的行为树设计是,我们不再每帧都从根节点去遍历行为树,而是维护一个调度器负责保存已激活的节点,当正在执行的行为终止时,由其父节点决定接下来的行为。
事件驱动行为树类图设计 Clock – 行为树驱动时钟(事件驱动行为树的核心,负责统一调度定时器)
BehaviourTreeGraphData – 树编辑器存储数据(基于ScriptableObject)
BaseNode – 树节点数据(基于ScriptableObject)
EdgeData – 树边数据
NodePortData – 树连接端口数据
NodeState – 树节点状态
NodeType – 树节点类型
Blackboard – 树黑板数据
TBehaviourTree – 行为树执行抽象
TBehaviourTreeManager – 行为树执行统一管理类
TreeData – 行为树树数据抽象
UnityContext – Unity驱动类(驱动全局Clock)
AbortType – 行为树打断类型
BaseActionNode – 行为树行为节点基类
BaseConditionNode – 行为树条件节点基类
BaseParentNode – 行为树父节点基类抽象(带子节点的节点需要继承)
BaseCompositionNode – 行为树复合节点基类
BaseDecorationNode – 行为树装饰节点基类
BaseObservingDecorationNode – 行为树可被观察条件打断的装饰节点基类
BaseCompareShareNode – 行为树黑板比较节点基类
BaseConditionDecorationNode – 行为树条件装饰节点基类
RootNode – 行为树根节点类
SelectorNode – 行为树选择节点
SequenceNode – 行为树顺序节点
ParalNode – 行为树并发节点
RandomSelector – 行为树随机选择节点
更多细节的行为树节点这里就不一一介绍了。
事件驱动行为树数据编辑 前面通过UIElement,GraphView的相关使用,我们已经成功完成了对树数据(BehaviourTreeGraphData.cs)的树数据编辑。
事件驱动行为树运行时数据构建 通过编辑的树数据到事件驱动的行为树,我们还需要利用树数据构建TBehaviourTree的过程。
第一步:
读取BehaviourTreeGraphData.cs数据并克隆数据以备运行时使用
TBehaviourTree.cs
1 2 3 4 5 6 7 8 9 10 11 12 13 14 15 16 17 18 19 20 public void LoadBTGraphData (string assetPath{ ReleaseBTGraphAsset(); BTOriginalGraph = TBehaviourTreeManager.Singleton.GetCacheBTGraph(assetPath); if (BTOriginalGraph == null ) { var btGraphAsset = Resources.Load<BehaviourTreeGraphData>(assetPath); BTOriginalGraph = btGraphAsset; TBehaviourTreeManager.Singleton.CacheBTGraph(assetPath, BTOriginalGraph); } BTRunningGraph = BTOriginalGraph?.CloneSelf(); BTRunningGraph?.SetBTOwner(this ); BTRunningGraph?.InitRuntimeDatas(); BTRunningGraph?.Start(); }
构建行为树运行时数据
BehaviourTreeGraphData.cs
1 2 3 4 5 6 7 8 9 10 11 12 13 14 15 16 17 18 19 20 21 22 23 24 25 26 27 28 29 30 31 32 33 34 35 36 37 38 39 40 41 42 43 44 45 46 47 48 49 50 51 52 53 54 55 public void InitRuntimeDatas (){ InitClock(); InitBlackboard(); InitTreeDatas(); mInitRunTimeDataComplete = true ; } protected void InitTreeDatas (){ RecyleAllTreeDatas(); TreeDataList.Clear(); var rootNodeList = GetAllRootNodes(); foreach (var rootNode in rootNodeList) { var treeData = ObjectPool.Singleton.Pop<TreeData>(); treeData.SetData(this , rootNode, Blackboard, Clock); TreeDataList.Add(treeData); if (RootTree == null ) { RootTree = treeData; } } if (TreeDataList.Count > 1 ) { Debug.LogError($"行为树不应该有多个根节点树,请检查配置!" ); } } public List<BaseNode> GetAllRootNodes (){ List<BaseNode> rootNodeList = new List<BaseNode>(); foreach (var node in AllNodeList) { if (node.EntryPoint) { rootNodeList.Add(node); } } if (rootNodeList.Count == 0 ) { Debug.LogWarning($"图:{name} 没有根节点,获取所有根节点数量为0!" ); } return rootNodeList; }
可以看到我们通过Clone的树数据(BehaviourTreeGraphData.cs)构建了我们想要的单颗树数据(TreeData.cs)(这一步的目的是为未来支持多个根节点的编辑器设计的,目前行为树只允许一个根节点 )
TreeData.cs
1 2 3 4 5 6 7 8 9 10 11 12 13 14 15 16 17 18 19 20 21 22 23 24 25 26 27 28 29 30 31 32 33 34 35 36 37 38 39 40 41 42 43 44 45 46 47 48 49 50 51 52 53 54 55 56 57 58 59 60 61 62 63 64 65 66 67 68 69 public void SetData (BehaviourTreeGraphData graphData, BaseNode rootNode, Blackboard blackboard, Clock clock ){ OwnerGraphData = graphData; RootNode = rootNode; Blackboard = blackboard; Clock = clock; InitAllNodeAndEdgeDatas(); mInitComplete = true ; } private void InitAllNodeAndEdgeDatas (){ mAllNodeList.Clear(); OwnerGraphData.GetAllChildNodeList(ref mAllNodeList, RootNode, true ); mAllEdgeDataList.Clear(); OwnerGraphData.GetAllChildEdgeDataList(ref mAllEdgeDataList, RootNode, true ); InitNodeMapData(); InitEdgeMapData(); InitNodesTreeData(); } ****** private void InitNodesTreeData (){ foreach (var node in mAllNodeList) { if (node == null ) { continue ; } node.SetOwnerTreeData(this ); List<BaseNode> childNodeList = new List<BaseNode>(); OwnerGraphData.GetAllChildNodeList(ref childNodeList, node); childNodeList.Remove(node); foreach (var childNode in childNodeList) { if (childNode == null ) { continue ; } childNode.SetParentNode(node as BaseParentNode); } var childCount = childNodeList.Count; if (childCount > 0 ) { var parentNode = node as BaseParentNode; parentNode.SetChildNodeList(childNodeList); if (node is BaseDecorationNode && childCount > 1 ) { Debug.LogError($"修饰节点名:{node.name} ,GUID:{node.GUID} 有超过1个数量的子节点,请检查配置!" ); } } node.SetClock(Clock); } }
通过构建TreeData.cs以及所有相关BaseNode的运行时数据,我们为行为树的执行的数据准备工作就算是完成了。
行为树启动执行
BehaviourTreeGraphData.cs
1 2 3 4 5 6 7 8 9 10 11 12 13 14 public void Start (){ if (!mInitRunTimeDataComplete) { Debug.LogError($"未初始化运行时数据,开始行为树图数据失败!" ); return ; } Clock?.Enable(); RootTree?.Start(); }
TreeData.cs
1 2 3 4 5 6 7 8 9 10 11 12 public void Start (){ if (!mInitComplete) { Debug.LogError($"树数据未初始化完成,开始运行树数据失败!" ); return ; } RootNode?.Start(); }
BaseNode.cs
1 2 3 4 5 6 7 8 9 10 11 12 13 14 15 16 17 public void Start (){ Debug.Log($"节点GUID:{GUID} 开始运行!" ); NodeState = NodeState.Running; DoStart(); } protected virtual void DoStart (){ }
RootNode.cs
1 2 3 4 5 6 7 8 protected override void DoStart (){ base .DoStart(); DecorateNode.Start(); }
从上面可以看到我们通过BehaviourTreeGraphData.cs树数据可用并构建TreeData.cs,然后驱动TreeData调用RootNode的Start实现了行为树的执行驱动,。
事件驱动行为树执行设计 传统行为树和事件驱动行为树在驱动树执行上的区别:
传统行为树每帧都要从根节点开始遍历行为树,而目的仅仅是为了得到最近激活的节点进行逻辑驱动。事件驱动的行为树是通过定时器进行驱动实现节点逻辑执行。 传统行为树和事件驱动的行为树还有一大区别节点执行结果的返回方式。传统行为树是子节点执行完成后直接通过return的方式把子节点执行结果直接返回给父节点,然后父节点根据子节点结果决定后续逻辑。而事件驱动行为树子节点结束是通过调用父节点的ChildStop()通知父节点子节点结束,而不同节点类型对于子节点结束的后续处理逻辑是在自身的OnChildStop里
事件驱动执行最核心的是计时器(Clock.cs)
接下来让我们看看事件驱动行为树是如何利用定时器Clock.cs实现执行驱动和事件驱动的。
在了解之前,这里先说明下RootNode.cs的类继承设计,RootNode.cs这里我设计成的是装饰节点,所以无论行为树的根是驱动顺序执行(SequenceNode.cs)还是选择执行(SelectorNode.cs),都得连接在RootNode之下。
RootNode.cs继承关系如下:
RootNode : BaseDecorationNode : BaseParentNode : BaseNode
这里我以RootNode连接一个SequenceNode,SequenceNode连接一个WaitTimeNode.cs和LogNode.cs节点为例来说明事件驱动的执行过程。
RootNode执行Start()
BaseNode.cs
1 2 3 4 5 6 7 8 9 public void Start (){ Debug.Log($"节点GUID:{GUID} 开始运行!" ); NodeState = NodeState.Running; DoStart(); }
RootNode驱动子节点SequenceNode执行
RootNode.cs
1 2 3 4 5 6 7 8 protected override void DoStart (){ base .DoStart(); DecorateNode.Start(); }
SequenceNode执行Start()
SequenceNode.cs
1 2 3 4 5 6 7 8 9 10 11 12 13 14 15 16 17 18 19 20 21 22 23 24 25 26 27 28 29 30 31 32 protected override void DoStart (){ base .DoStart(); mCurrentIndex = -1 ; ProcessChildren(); } protected void ProcessChildren (){ mCurrentIndex++; if (mCurrentIndex < ChildNodeCount) { if (IsAbort) { Stop(false ); } else { mChildNodeList[mCurrentIndex].Start(); } } else { Stop(true ); } }
SequenceNode驱动子节点WaitTimeNode执行Start()
WaitTimeNode.cs
1 2 3 4 5 6 7 8 9 10 11 12 13 14 15 16 17 18 19 20 21 22 23 24 25 26 27 28 protected override void DoStart (){ base .DoStart(); mOwnerTreeData.Clock.AddTimer(WaitTime, 1 , OnWaitTimeComplete); } ****** protected override void DoStop (){ base .DoStop(); mOwnerTreeData.Clock.RemoveTimer(OnWaitTimeComplete); } protected void OnWaitTimeComplete (){ Debug.Log($"UID:{GUID} ,WaitTimeNode:OnWaitTimeComplete(),WaitTime:{WaitTime} " ); Stop(true ); }
可以看到WaitTimeNode的等待执行不像传统行为树通过每一次Update进行时间累加,而是通过定时器Clock注入一个等待时长的定时器来驱动等待逻辑判定的。
WaitTimeNode等待执行完毕,通知父节点SequenceNode自身子节点执行完成,SequenceNode.ChildStop()执行然后调用SequenceNode的DoChildStop()
SequenceNode.cs
1 2 3 4 5 6 7 8 9 10 11 12 13 14 15 16 17 18 19 20 21 22 23 24 25 26 27 28 29 30 31 32 33 34 35 36 37 38 39 40 protected override void DoChildStop (BaseNode child, bool success ){ base .DoChildStop(child, success); if (success) { ProcessChildren(); } else { Stop(false ); } } protected void ProcessChildren (){ mCurrentIndex++; if (mCurrentIndex < ChildNodeCount) { if (IsAbort) { Stop(false ); } else { mChildNodeList[mCurrentIndex].Start(); } } else { Stop(true ); } }
响应WaitTimeNode执行完成成功,所以SequenceNode接着执行下一个节点LogNode
LogNode执行Start()然后标记执行完成
LogNode.cs
1 2 3 4 5 6 7 8 9 protected override void DoStart (){ base .DoStart(); Debug.Log($"GUID:{GUID} ,LogNode:{LogContent} " ); Stop(true ); }
LogNode执行打印Log完成后,调用Stop(true)表示完成,然后通过调用父节点SequenceNode.ChildStop(),然后调用SequenceNode.DoChildStop()
SequenceNode响应LogNode子节点执行完成,发现所有子节点都执行完成,调用自身节点执行完成Stop(true)
SequenceNode.cs
1 2 3 4 5 6 7 8 9 10 11 12 13 14 15 16 17 18 19 20 21 22 23 24 25 26 27 28 29 30 31 32 33 34 35 36 37 38 39 40 protected override void DoChildStop (BaseNode child, bool success ){ base .DoChildStop(child, success); if (success) { ProcessChildren(); } else { Stop(false ); } } protected void ProcessChildren (){ mCurrentIndex++; if (mCurrentIndex < ChildNodeCount) { if (IsAbort) { Stop(false ); } else { mChildNodeList[mCurrentIndex].Start(); } } else { Stop(true ); } }
RootNode响应SequenceNode执行完成,执行RootNode.ChildStop()和RootNode.DoChildStop()
RootNode.cs
1 2 3 4 5 6 7 8 9 10 11 12 13 14 15 16 17 18 19 20 protected override void DoChildStop (BaseNode child, bool success ){ base .DoChildStop(child, success); if (!IsRunningOnce) { ResetAllNodeState(); Clock.AddTimer(0 , 0 , Start); } else { Stop(success); } }
到这里我们的行为树逻辑就算是执行完成一遍了,但行为树如何实现循环执行,逻辑在RootNode.DoChildStop() 里通过重新注入Clock定时器开启RootNode.Start()从而实现了事件驱动行为树的循环执行。
从上面可以看出事件驱动行为树无论是节点的执行还是行为树的循环执行,都是通过Clock定时器注入定时器来实现的。
事件驱动的优点:
避免每帧从根节点执行一遍所有逻辑,而是在对应节点上通过定时器方式实现对应节点逻辑直接执行的方式,从而避免每帧无用的逻辑更新执行,更加高效。
事件驱动行为树条件判定设计 传统行为树和事件驱动行为树在驱动条件节点判定的区别:
传统行为树每帧都要把执行的条件节点执行一次去比较条件是否变化,从而实现监听条件变化的目的。事件驱动的行为树是通过启动定时器实现条件节点逻辑判定执行。
接下来让我们看看行为树是如何利用定时器Clock.cs实现条件执行判定的。
在实战理解事件驱动行为树条件判定执行之前,我们需要了解几个主要的类设计:
BaseObservingDecorationNode.cs – 实现可被观察条件打断的装饰节点基类
1 2 3 4 5 6 7 8 9 10 11 12 13 14 15 16 17 18 19 20 21 22 23 24 25 26 27 28 29 30 31 32 33 34 35 36 37 38 39 40 41 42 43 44 45 46 47 48 49 50 51 52 53 54 55 56 57 58 59 60 61 62 63 64 65 66 67 68 69 70 71 72 73 74 75 76 77 78 79 80 [Serializable ] public abstract class BaseObservingDecorationNode : BaseDecorationNode { [Header("打断类型" ) ] public AbortType AbortType; protected bool mIsObserving; protected override void DoStart () { base .DoStart(); if (AbortType != AbortType.NONE) { if (!mIsObserving) { mIsObserving = true ; StartObserving(); } } if (!IsConditionMet()) { Stop(false ); } else { DecorateNode.Start(); } } ****** protected override void DoChildStop (BaseNode child, bool success ) { base .DoChildStop(child, success); if (AbortType == AbortType.NONE || AbortType == AbortType.SELF) { if (mIsObserving) { mIsObserving = false ; StopObserving(); } } Stop(success); } ****** protected abstract void StartObserving () protected abstract void StopObserving () protected abstract bool IsConditionMet () }
从上面的代码可以看出BaseObservingDecorationNode.cs实现了节点条件监听(StartObserving())和取消监听的流程(StopObserving())
BaseConditionDecorationNode.cs – 实现间隔时长判定条件的装饰节点基类
1 2 3 4 5 6 7 8 9 10 11 12 13 14 15 16 17 18 19 20 21 22 23 24 25 26 27 28 29 30 31 32 33 34 35 36 37 38 39 40 41 42 43 44 45 46 47 48 49 50 [Serializable ] public abstract class BaseConditionDecorationNode : BaseObservingDecorationNode { [Header("条件检查时间间隔(秒)" ) ] public float CheckInterval = 0f ; [Header("条件检查时间随机参考值" ) ] public float CheckVariance = 0f ; protected override void StartObserving () { mOwnerTreeData.Clock.AddTimer(CheckInterval, CheckVariance, -1 , Evaluate); } protected override void StopObserving () { mOwnerTreeData.Clock.RemoveTimer(Evaluate); } protected override bool IsConditionMet () { return ConditionCheck(); } protected abstract bool ConditionCheck () }
从上面代码可以看出BaseConditionDecorationNode.cs实现了定时器间隔的条件判定
这里我以RootNode连接一个SequenceNode,SequenceNode连接一个HelthValueNode,HelthValueNode连接一个SequenceNode,SequenceNode连接一个WaiterTimeNode和LogNode.cs节点为例来说明事件驱动条件节点的判定更新过程。
RootNode执行Start()
SequenceNode执行Start()
HelthValueNode执行Start(),如果打断类型不为NONE,此时会触发BaseConditionDecorationNode的StartObserving()开启条件定时器监听
HelthValueNode.cs
1 2 3 4 5 6 7 8 9 10 11 12 13 14 15 16 17 18 19 20 21 22 23 24 25 26 27 28 29 30 31 32 33 34 35 36 37 38 39 40 41 42 43 44 45 46 47 48 49 50 51 52 53 54 55 56 57 58 59 [Serializable ] public class HealthValueNode : BaseConditionDecorationNode { [Header("比较类型" ) ] public ComparisonType ComparisonType; [Header("生命值" ) ] public float HealthValue = 0f ; protected override bool ConditionCheck () { var bindUID = mOwnerTreeData.OwnerGraphData.OwnerBT.BindUID; var bindActor = ActorManager.Singleton.GetActorByUID(bindUID); if (bindActor == null ) { Debug.LogError($"找不到UID:{bindUID} 对象,生命值检查比较失败!" ); return false ; } if (ComparisonType == ComparisonType.LESS) { return bindActor.Health < HealthValue; } else if (ComparisonType == ComparisonType.GREATER) { return bindActor.Health > HealthValue; } else if (ComparisonType == ComparisonType.LESS_AND_EQUAL) { return bindActor.Health <= HealthValue; } else if (ComparisonType == ComparisonType.GREATER_AND_EQUAL) { return bindActor.Health >= HealthValue; } else if (ComparisonType == ComparisonType.EQUAL) { return bindActor.Health == HealthValue; } else { Debug.LogError($"不支持的比较运算类型:{ComparisonType} ,比较对象UID:{bindUID} 的生命值失败!" ); return false ; } } }
从上面代码可以看到HelthValueNode.cs实现了ConditionCheck()方法,,结合父类的定时器执行,实现了血量的定时条件判定逻辑。
HelthValueNode条件判定ConditionCheck()通过,执行SequenceNode.cs的Start()
WaitTimeNode执行Start()
在WaitTimeNode执行的过程中HelthValueNode的ConditionCheck()依然在执行
WaitTimeNode执行完毕Stop(true),SequenceNode执行下一个节点LogNode的Start
LogNode执行Start()触发执行完毕Stop(true),SequenceNode触发DoChildStop()触发执行完成Stop(true)
SequenceNode执行完成触发HelthValueNode的DoChildStop(),此时如果没有设置打断类型(默认为NONE),那么此时为调用BaseConditionDecorationNode的StopObserving()取消条件定时器判定
HelthValueNode执行完毕Stop(true),SequenceNode执行DoChildStop()执行Stop(true),最后触发RootNode的DoChildStop()完成执行。
Node:
事件驱动行为树里,需要支持定时判定和打断的都封装成了装饰节点而非条件节点 目前纯条件节点不支持定时器判定和打断,只支持常规单次条件判定,推荐尽量用装饰节点来定义条件
事件驱动行为树黑板 事件驱动行为树的黑板和传统的行为树黑板有所区别。传统行为树黑板主要作为行为树局部黑板负责存储和修改数据。事件驱动的行为树为了支持黑板数据修改的监听,黑板的设计还考虑了数据监听通知逻辑,而黑板的监听通知逻辑是通过定时器(Clock)来完成的。
接下来直接给我们看下黑板的关键部分代码定义就能知道事件驱动行为树的黑板是如何实现黑板数据监听通知逻辑的,后续在讲解打断篇章会涉及实例理解黑板的数据修改和打断监听设计。
Blackboard.cs
1 2 3 4 5 6 7 8 9 10 11 12 13 14 15 16 17 18 19 20 21 22 23 24 25 26 27 28 29 30 31 32 33 34 35 36 37 38 39 40 41 42 43 44 45 46 47 48 49 50 51 52 53 54 55 56 57 58 59 60 61 62 63 64 65 66 67 68 69 70 71 72 73 74 75 76 77 78 79 80 81 82 83 84 85 86 87 88 89 90 91 92 93 94 95 96 97 98 99 100 101 102 103 104 105 106 107 108 109 110 111 112 113 114 115 116 117 118 119 120 121 122 123 124 125 126 127 128 129 130 131 132 133 134 135 136 137 138 139 140 141 142 143 144 145 146 147 148 149 150 151 152 153 154 155 156 157 158 159 160 161 162 163 164 165 166 167 168 169 170 171 172 173 174 175 176 177 178 179 180 181 182 183 184 185 186 187 188 189 190 191 192 193 194 195 196 197 198 199 200 201 202 203 204 205 206 207 208 209 210 211 212 213 214 215 216 217 218 219 220 221 222 223 224 225 226 227 228 229 230 231 public class Blackboard { public enum BBOperationType { ADD, REMOVE, CHANGE } private struct Notification { public string key; public BBOperationType type; public object value ; public Notification (string key, BBOperationType type, object value { this .key = key; this .type = type; this .value = value ; } } private Clock mClock; private Dictionary<string , BaseBlackboardData> mBlackboardDataMap; private Dictionary<string , List<Action<BBOperationType, object >>> mObservers; private bool mIsNotifying; private Dictionary<string , List<Action<BBOperationType, object >>> mAddObservers; private Dictionary<string , List<Action<BBOperationType, object >>> mRemoveObservers; private List<Notification> mNotifications; private List<Notification> mNotificationsDispatch; ****** public bool UpdateData <T >(string key, T value = default , bool noNotification = false { var data = GetBlackboardData(key); if (data != null ) { var targetData = data as BlackboardData<T>; if (targetData == null ) { Debug.LogError($"黑板数据里Key:{key} 的数据类型和更新数据类型:{typeof (T).Name} 不匹配,更新数据失败!" ); return false ; } targetData.Data = value ; if (!noNotification) { mNotifications.Add(new Notification(key, BBOperationType.CHANGE, value )); mClock.AddTimer(0f , 0 , NotifiyObservers); } return true ; } else { BlackboardData<T> targetData = new BlackboardData<T>(key, value ); mBlackboardDataMap.Add(key, targetData); if (!noNotification) { mNotifications.Add(new Notification(key, BBOperationType.ADD, value )); mClock.AddTimer(0f , 0 , NotifiyObservers); } return true ; } } public bool RemoveData (string key, bool noNotification = false { var result = mBlackboardDataMap.Remove(key); if (result && !noNotification) { mNotifications.Add(new Notification(key, BBOperationType.REMOVE, null )); mClock.AddTimer(0f , 0 , NotifiyObservers); } return result; } ****** public void AddObserver (string key, System.Action<BBOperationType, object > observer { List<System.Action<BBOperationType, object >> observers = GetObserverList(this .mObservers, key); if (!mIsNotifying) { if (!observers.Contains(observer)) { observers.Add(observer); } } else { if (!observers.Contains(observer)) { List<System.Action<BBOperationType, object >> addObservers = GetObserverList(this .mAddObservers, key); if (!addObservers.Contains(observer)) { addObservers.Add(observer); } } List<System.Action<BBOperationType, object >> removeObservers = GetObserverList(this .mRemoveObservers, key); if (removeObservers.Contains(observer)) { removeObservers.Remove(observer); } } } private void NotifiyObservers () { if (mNotifications.Count == 0 ) { return ; } mNotificationsDispatch.Clear(); mNotificationsDispatch.AddRange(mNotifications); mNotifications.Clear(); mIsNotifying = true ; foreach (Notification notification in mNotificationsDispatch) { if (!this .mObservers.ContainsKey(notification.key)) { continue ; } List<System.Action<BBOperationType, object >> observers = GetObserverList(this .mObservers, notification.key); foreach (System.Action<BBOperationType, object > observer in observers) { if (this .mRemoveObservers.ContainsKey(notification.key) && this .mRemoveObservers[notification.key].Contains(observer)) { continue ; } observer(notification.type, notification.value ); } } foreach (string key in this .mAddObservers.Keys) { GetObserverList(this .mObservers, key).AddRange(this .mAddObservers[key]); } foreach (string key in this .mRemoveObservers.Keys) { foreach (System.Action<BBOperationType, object > action in mRemoveObservers[key]) { GetObserverList(this .mObservers, key).Remove(action); } } this .mAddObservers.Clear(); this .mRemoveObservers.Clear(); mIsNotifying = false ; } ****** }
在Blackboard.UpdateData()和Blackboard.RemoveData()方法里可以看到,Blackboard把黑板数据的操作和操作数据封装成Notification,然后结合定时器(Clock)实现下一帧对黑板相关数据和操作监听的通知。
事件驱动行为树打断 个人理解行为树打断主要是为了支持因为条件满足已经执行过的逻辑执行条件变了不满足需要打断执行往后执行或者因为条件不满足没有执行过的逻辑因为条件变了满足了希望重新激活执行。
首先我们来理解下事件驱动打断的核心设计原理,之后再针对不同的行为树打断类型进行实战分析和测试。
看下BaseObservingDecorationNode.cs的核心代码设计:
1 2 3 4 5 6 7 8 9 10 11 12 13 14 15 16 17 18 19 20 21 22 23 24 25 26 27 28 29 30 31 32 33 34 35 36 37 38 39 40 41 42 43 44 45 46 47 48 49 50 51 52 53 54 55 56 57 58 59 60 61 62 63 64 65 66 67 68 69 70 71 72 73 74 75 76 77 78 79 80 81 82 83 84 85 86 87 88 89 90 91 92 93 94 95 96 97 98 99 100 101 102 103 104 105 106 107 108 109 110 111 112 113 114 using System;using UnityEngine;namespace TCommonGraph { [Serializable ] public abstract class BaseObservingDecorationNode : BaseDecorationNode { [Header("打断类型" ) ] public AbortType AbortType; protected bool mIsObserving; protected override void DoStart () { base .DoStart(); if (AbortType != AbortType.NONE) { if (!mIsObserving) { mIsObserving = true ; StartObserving(); } } if (!IsConditionMet()) { Stop(false ); } else { DecorateNode.Start(); } } protected override void DoAbort () { base .DoAbort(); DecorateNode.Abort(); } protected override void DoChildStop (BaseNode child, bool success ) { base .DoChildStop(child, success); if (AbortType == AbortType.NONE || AbortType == AbortType.SELF) { if (mIsObserving) { mIsObserving = false ; StopObserving(); } } Stop(success); } protected override void DoParentCompositeStop (BaseCompositionNode parentNode ) { base .DoParentCompositeStop(parentNode); if (mIsObserving) { mIsObserving = false ; StopObserving(); } } protected void Evaluate () { ****** } protected abstract void StartObserving () protected abstract void StopObserving () protected abstract bool IsConditionMet () } }
事件驱动行为树打断设计:
事件驱动行为树打断是设计在修饰节点
修饰节点BaseObservingDecorationNode:DoStart()时根据打断类型配置决定是否开启条件监听(打断类型不为NONE就要开启条件监听)
子节点执行完成后BaseObservingDecorationNode:DoChildStop()里根据打断类型决定是否停止条件监听(只有打断类型为NONE或SELF时停止条件监听)
修饰节点在上层父复合节点执行完成后进入BaseObservingDecorationNode:DoParentCompositeStop()决定是否停止监听(无论什么打断类型此刻都要停止条件监听)
没有停止条件监听的装饰节点即使节点逻辑执行完毕也会根据打断类型和条件监听被后续通知进行打断或激活执行,具体条件变化如何打断根据打断类型而定(BaseObservingDecorationNode:Evaluate)
接下来结合BaseConditionDecorationNode.cs和BaseCompareShareNode.cs来理解条件监听 和黑板数据监听 是如何实现统一的打断流程的。
BaseConditionDecorationNode.cs(条件监听父类)
1 2 3 4 5 6 7 8 9 10 11 12 13 14 15 16 17 18 19 20 21 22 23 24 25 26 27 28 29 30 31 32 33 34 35 36 37 38 39 40 41 42 43 44 45 46 47 48 49 50 [Serializable ] public abstract class BaseConditionDecorationNode : BaseObservingDecorationNode { [Header("条件检查时间间隔(秒)" ) ] public float CheckInterval = 0f ; [Header("条件检查时间随机参考值" ) ] public float CheckVariance = 0f ; protected override void StartObserving () { mOwnerTreeData.Clock.AddTimer(CheckInterval, CheckVariance, -1 , Evaluate); } protected override void StopObserving () { mOwnerTreeData.Clock.RemoveTimer(Evaluate); } protected override bool IsConditionMet () { return ConditionCheck(); } protected abstract bool ConditionCheck () }
从上面代码可以看到,BaseConditionDecorationNode.cs通过在StartObserving()里实现可配置间隔时长的定时器,将条件评估(BaseObservingDecorationNode.Evaluate())逻辑实现了定期执行。然后抽象BaseConditionDecorationNode:onditionCheck()接口让子类只关心条件逻辑的编写,真正的打断核心逻辑设计依然在BaseObservingDecorationNode.Evaluate()里。
BaseCompareShareNode.cs(黑板数据监听父类)
1 2 3 4 5 6 7 8 9 10 11 12 13 14 15 16 17 18 19 20 21 22 23 24 25 26 27 28 29 30 31 32 33 34 35 36 37 38 39 40 41 42 43 44 45 46 47 48 49 50 51 52 53 54 55 56 57 58 59 60 61 62 63 64 65 66 67 68 69 70 71 72 73 74 75 76 77 78 79 80 81 82 83 84 85 86 87 88 89 90 91 92 93 94 95 96 97 98 99 100 101 102 public abstract class BaseCompareShareNode : BaseObservingDecorationNode { [Header("比较类型" ) ] public OperatorType OperatorType = OperatorType.IS_EQUAL; [Header("比较变量名" ) ] public string VariableName = "" ; protected override void StartObserving () { mOwnerTreeData.Blackboard.AddObserver(VariableName, OnValueChanged); } protected override void StopObserving () { mOwnerTreeData.Blackboard.RemoveObserver(VariableName, OnValueChanged); } private void OnValueChanged (Blackboard.BBOperationType operationType, object newValue ) { Evaluate(); } protected override bool IsConditionMet () { if (OperatorType == OperatorType.ALWAYS_TRUE) { return true ; } if (!mOwnerTreeData.Blackboard.ExistData(VariableName)) { return OperatorType == OperatorType.IS_NOT_SET; } switch (OperatorType) { case OperatorType.IS_SET: return true ; case OperatorType.IS_EQUAL: return IsValueEqual(); case OperatorType.IS_NOT_EQUAL: return !IsValueEqual(); case OperatorType.IS_GREATER_OR_EQUAL: return IsValueEqual() || IsValueGreater(); case OperatorType.IS_GREATER: return IsValueGreater(); case OperatorType.IS_SMALLER_OR_EQUAL: return IsValueEqual() || !IsValueGreater(); case OperatorType.IS_SMALLER: return !IsValueEqual() && !IsValueGreater(); default : return false ; } } protected abstract bool IsValueEqual () protected abstract bool IsValueGreater () public override string ToString () { return $"OperatorType:{OperatorType} ,VariableName:{VariableName} " ; } }
从上面代码可以看到,BaseCompareShareNode.cs通过在StartObserving()里实现对黑板特定黑板变量数据的监听,实现对特定黑板变量数据时变化通知。在监听黑板数据变化时调用Evaluate()实现对监听黑板数据进行再次条件评估,从而实现监听特定黑板变量数据的条件变化重新判定逻辑,最终实现黑板数据变量变化监听的条件打断流程。而针对不同数据结构类型(e.g. int, bool, string, float……)等数据结构的比较逻辑,BaseCompareShareNode.cs抽象了IsValueEqual和IsValueGreater接口,子类比如CompareShareBoolNode.cs,CompareShareIntNode.cs等都只需实现此接口即可实现对应数据类型的黑板变量比较逻辑。
理解了条件监听和黑板数据监听的核心设计,接下来让我们看看不同打断类型的核心设计是如何实现不同打断类型的逻辑执行的。
不同打断类型的核心逻辑设计在BaseObservingDecorationNode:Evaluate()里。
BaseObservingDecorationNode.cs
1 2 3 4 5 6 7 8 9 10 11 12 13 14 15 16 17 18 19 20 21 22 23 24 25 26 27 28 29 30 31 32 33 34 35 36 37 38 39 40 41 42 43 44 45 46 47 48 49 50 51 52 53 54 55 56 57 58 59 60 61 62 63 64 65 66 67 68 69 70 71 72 73 74 75 76 77 78 79 80 81 82 83 84 85 86 87 88 89 90 91 92 93 94 95 96 97 98 99 100 101 102 103 104 105 106 107 108 109 110 111 112 113 114 115 116 117 118 119 120 121 122 123 124 125 126 127 128 [Serializable ] public abstract class BaseObservingDecorationNode : BaseDecorationNode { [Header("打断类型" ) ] public AbortType AbortType; protected bool mIsObserving; protected override void DoStart () { base .DoStart(); if (AbortType != AbortType.NONE) { if (!mIsObserving) { mIsObserving = true ; StartObserving(); } } if (!IsConditionMet()) { Stop(false ); } else { DecorateNode.Start(); } } protected override void DoAbort () { base .DoAbort(); DecorateNode.Abort(); } protected override void DoChildStop (BaseNode child, bool success ) { base .DoChildStop(child, success); if (AbortType == AbortType.NONE || AbortType == AbortType.SELF) { if (mIsObserving) { mIsObserving = false ; StopObserving(); } } Stop(success); } protected override void DoParentCompositeStop (BaseCompositionNode parentNode ) { base .DoParentCompositeStop(parentNode); if (mIsObserving) { mIsObserving = false ; StopObserving(); } } protected void Evaluate () { if (IsRunning && !IsConditionMet()) { if (AbortType == AbortType.SELF || AbortType == AbortType.BOTH || AbortType == AbortType.IMMEDIATE_RESTART) { Abort(); } } else if (!IsRunning && IsConditionMet()) { if (AbortType == AbortType.LOWER_PRIORITY || AbortType == AbortType.BOTH || AbortType == AbortType.IMMEDIATE_RESTART || AbortType == AbortType.LOWER_PRIORITY_IMMEDIATE_RESTART) { BaseParentNode parentNode = ParentNode; BaseNode childNode = this ; while (parentNode != null && !(parentNode is BaseCompositionNode)) { childNode = parentNode; parentNode = parentNode.ParentNode; } if (parentNode is ParalNode) { if (AbortType != AbortType.NONE && AbortType != AbortType.IMMEDIATE_RESTART) { Debug.LogError($"ParalNode的所有子节点优先级一致,不支持配置AbortType.Node和AbortType.IMMEDIATE_RESTART以外打断类型,请检查配置!" ); } } var isImmediateRestart = AbortType == AbortType.IMMEDIATE_RESTART || AbortType == AbortType.LOWER_PRIORITY_IMMEDIATE_RESTART; var parentCompositionNode = parentNode as BaseCompositionNode; parentCompositionNode?.StopLowerPriorityChildrenForChild(childNode, isImmediateRestart); } } } ****** }
在了解详细的打断流程设计前,先了解下打断类型设计。
事件驱动行为树打断支持了以下类型:
Stops.NONE :装饰器只会在启动时检查一次它的状态,并且永远不会停止任何正在运行的节点。Stops.SELF :装饰器将在启动时检查一次它的条件状态,如果满足,它将继续观察黑板的变化。一旦不再满足该条件,它将终止自身,并让父组合继续处理它的下一个节点。Stops.LOWER_PRIORITY :装饰器将在启动时检查它的状态,如果不满足,它将观察黑板的变化。一旦条件满足,它将停止比此结点优先级较低的节点,允许父组合继续处理下一个节点Stops.BOTH :装饰器将同时停止:self和优先级较低的节点。Stops.LOWER_PRIORITY_IMMEDIATE_RESTART :一旦启动,装饰器将检查它的状态,如果不满足,它将观察黑板的变化。一旦条件满足,它将停止优先级较低的节点,并命令父组合立即重启此装饰器。Stops.IMMEDIATE_RESTART :一旦启动,装饰器将检查它的状态,如果不满足,它将观察黑板的变化。一旦条件满足,它将停止优先级较低的节点,并命令父组合立即重启装饰器。正如在这两种情况下,一旦不再满足条件,它也将停止自己。
装饰节点常规执行流程设计:
在装饰节点开始执行时DoStart(),如果打断类型不为None,节点就会开启条件监听。
如果条件不满足,此装饰节点会直接Stop(false)将此节点停止执行,反之开始执行修饰节点的子节点。
如果装饰节点一开始条件满足,则会触发装饰节点的子节点执行(Start和DoStart),
装饰节点核心打断流程设计:
装饰节点开始执行,装饰节点未配置打断类型,不开启条件监听,条件满足则执行子节点,条件不满足则直接Stop(false)
装饰节点开始执行,装饰节点配置了打断类型,开启条件监听,一开始不满足条件
不满足条件直接Stop(false),通知父节点(复合节点或修饰节点)执行DoChildStop(),如果父节点是修饰节点则会继续调用此节点的Stop(false)直到找到第一个复合父节点调用OnChildStop(),复合节点根据自身类型和子节点执行结果决定是否Stop()还是继续执行其他子节点,如果第一个复合父节点选择Stop(),则会通知其子节点,复合父节点执行结束调用子节点的ParentCompositeStop()方法,如果子节点是修饰节点则会触发修饰节点的ParentCompositeStop()方法,此时会执行修饰节点的DoParentCompositeStop()和子节点的ParentCompositeStop(),修饰节点的DoParentCompositeStop()则触发停止条件监听 ,子节点的ParentCompositeStop()是为了确保子节点如果依然是修饰节点时把对应条件监听也取消掉。
执行过程中第一个复合父节点一直未执行结束,此时监听的条件由不满足变到满足 ,找到第一个父复合节点通知该复合节点执行StopLowerPriorityChildrenForChild(非SELF打断类型 ),复合节点根据修饰节点所在分支的对应子节点+修饰节点的打断类型决定是从此修饰节点的所在分支子节点重新开始执行还是打断比修饰节点的所在分支子节点优先级低的节点执行第一个父复合节点后续的节点逻辑(正在执行的子节点会调用Abort进行打断)。
1 2 3 4 5 6 7 8 9 10 11 12 13 14 15 16 17 18 19 20 21 22 23 24 25 26 27 28 29 30 31 32 33 34 public override void StopLowerPriorityChildrenForChild (BaseNode child, bool immediateRestart ){ int indexForChild = 0 ; bool found = false ; foreach (BaseNode currentChild in mChildNodeList) { if (currentChild == child) { found = true ; } else if (!found) { indexForChild++; } else if (found && currentChild.IsRunning) { if (immediateRestart) { mCurrentIndex = indexForChild - 1 ; } else { mCurrentIndex = ChildNodeCount; } currentChild.Abort(); break ; } } }
装饰节点开始执行,装饰节点配置了打断类型,开启条件监听,一开始满足条件
满足条件开始执行子节点Start,子节点执行完毕后通知修饰节点执行DoChildStop(),此时修饰节点会根据根据打断类型决定是否要停止条件监听(此时如果打断类型是SELF,因为已经满足执行过了,不需要再考虑监听打断,所以就需要停止条件监听 )。
修饰节点子节点持续执行,修饰节点条件定时检查(BaseConditionDecorationNode.cs)和黑板数据监听检查(BaseCompareShareNode.cs)触发定时条件评估(BaseObservingDecorationNode:Evaluate()) 如果修饰节点运行中条件由满足变到不满足,此时打断类型SELF,BOTH,IMMEDIATE_RESTART都需要将正在执行的修饰节点打断执行,执行修饰节点的Abort,修饰节点通知其子节点Abort,子节点Abort时通知父修饰节点执行DoChildStop从而实现修饰节点的打断后正确结束Stop流程,修饰节点此时如果打断类型不是NONE和SELF,则不会停止条件监听,直到第一个父复合节点执行结束时通知修饰节点DoParentCompositeStop才停止条件监听 。
Note:
事件驱动行为树的打断是支持在装饰节点上的 修饰节点的监听和打断流程核心逻辑在BaseObservingDecorationNode.cs 条件监听(基于定时器)和黑板数据监听(基于定时器+监听者模式) 装饰节点的子节点必须编写DoAbort方法流程,不然其子节点运行时无法因为打断而正确Stop 装饰节点条件从一开始满足的开始条件监听到条件监听取消,核心是由子节点是否执行完成和第一个复合节点执行是否完成决定 装饰节点条件从一开始不满足的开始条件监听到条件监听取消,核心是由装饰节点的第一个父复合节点执行是否完成决定 装饰节点连接的子节点都应该编写DoAbort接口,用于支持装饰节点的相关打断执行逻辑 不同的复合节点的打断处理方式不一样,具体参考代码设计 ParalNode的所有子节点优先级一致,不支持配置AbortType.Node和AbortType.IMMEDIATE_RESTART以外打断类型 所有节点逻辑(e.g 行为节点……)都要基于定时器驱动
事件驱动行为树打断单元测试 这里主要i针对不同打断类型,编写单元测试,验证不同的打断类型的执行逻辑是否正确。
Stops.NONE 装饰器只会在启动时检查一次它的状态,并且永远不会停止任何正在运行的节点。
测试结果截图:
上图不清晰,这里我描述下我的行为树设计。
Root->Selector
Selector->CompareShareFloatNode(打断方式为None)(比较ShareFloat<=30)
CompareShareFloatNode->SequenceNode
SequenceNode->LogNode(打印”输出开始执行ShareFloat小于等于30Log”)
SequenceNode->SetShareFloat(设置ShareFloat到100)
SequenceNode->LogNode(打印”输出修改ShareFloat到100完成Log”)
SequenceNode->WaitTimeNode(等待5秒)
SequenceNode->LogNode(打印”输出执行ShareFloat小于等于30完成Log”)
从上面可以看到当执行到设置ShareFloat到100的节点时,第一个CompareShareFloatNode(打断方式为None)(比较ShareFloat<=30)的修饰节点并没有被打断而是将SequenceNode完美执行完成,这也就是符合StopNone的不打断设计。
Note:
黑板比较数据,只要不是勾选的存在和不存在,那么比较时如果黑板没有设置过基础黑板变量值,那么统一返回失败! 因为为了展示打断机制,所以RootNode根节点勾选了只执行一次的设置
Stops.SELF 装饰器将在启动时检查一次它的条件状态,如果满足,它将继续观察黑板的变化。一旦不再满足该条件,它将终止自身,并让父组合继续处理它的下一个节点。
测试结果截图:
从上图结果可以看到,执行SetShareFloatNode(设置ShareFloat值到100时)后,因为CompareShareFloatNode(比较ShareFloat<=30)修饰节点从条件满足变成了条件不满足,同时因为设置的StopSelf打断策略,所以在WaitTimeNode(等待5秒的过程中),WaitTimeNode直接被打断,让SelectorNode直接执行了第二分支的LogNode打印节点,这也正符合StopSelf的打断策略设计。
Stops.LOWER_PRIORITY 装饰器将在启动时检查它的状态,如果不满足,它将观察黑板的变化。一旦条件满足,它将停止比此结点优先级较低的节点,允许父组合继续处理下一个节点
测试结果截图:
可以看到第一个CompareShareFloatNode(比较ShareFloat>=30,设置打断为LowerPriority),因为不满足条件所以一开始没有执行,执行到SetShareFloatNode(设置ShareFloat值到100)节点后,WaitTimeNode被打断执行,第二个SelectorNode直接被打断执行,然后第一个SelectorNode直接执行了第一个SelectorNode的第二分支的LogNode节点,这也完美符合了修饰节点LowerPriority从不满足到满足的时候,打断比如LowerPriority低的节点的父组合节点执行,让更上层父节点执行下一个节点的设计。
Stops.BOTH 装饰器将同时停止:self和优先级较低的节点。
测试结果截图:
通过将第一个CompareShareFloatNode(设置成比较ShareFloat<=30且Both打断类型),我们在后续SequenceNode将ShareFloat设置成100让条件从满足到不满足,从而打断CompareShareFloatNode执行,让第二个SelectorNode接着第二条分支执行,但第二个SelectorNode的第二条分支我又通过将ShareFloat设置成0让CompareShareFloatNode从不满足到满足,从而直接打断第二个SelectorNode的执行,直接进入第二个SelectorNode的第二分支执行打印出最终Log。可以看出这个测试用例完美符合了Both既满足SELF又满足LowerPriority的两个打断机制设计。
一旦启动,装饰器将检查它的状态,如果不满足,它将观察黑板的变化。一旦条件满足,它将停止优先级较低的节点,并命令父组合立即重启此装饰器。
测试结果截图:
可以看到SelectorNode的第一个分支的CompareShareFloatNode(设置成比较ShareFloat>=30且LowerPriorityImmediateRestart打断类型),所以一开始就不满足,所以会直接进入SelectorNode的第二个分支,第二个分支里SetShareFloatNode将ShareFloat设置成100,此时第一分支的CompareShareFloatNode从不满足条件到满足条件,因为是LowerPriorityImmediateRestart打断类型的缘故,打断了SelectorNode第二分支的执行,直接重启了SelectorNode第一分支的执行。可以看出这个测试用例完美符合了LowerPriorityImmediateRestart的条件从不满足到满足时打断低优先级分支且从其当前修饰节点所在组合节点的分支设计。
一旦启动,装饰器将检查它的状态,如果不满足,它将观察黑板的变化。一旦条件满足,它将停止优先级较低的节点,并命令父组合立即重启装饰器。正如在这两种情况下,一旦不再满足条件,它也将停止自己。
测试结果截图:
这里测试ImmediateRestart打断类型的测试用例比较复杂,这里简单来说就是先让CompareShareFloatNode(ImmediateRestart打断类型)不满足,然后通过运行其他分支将CompareShareFloatNode从不满足到满足(验证ImmediateRestart的打断低优先级并重启的机制),然后在CompareShareFloatNode后续流程里将ShareFloat设置成10测试CompareShareFloatNode从条件满足到不满足的自我打断机制,然后借助CompareShareFloatNode(比较ShareFloat值为10)来实现SelectorNode的执行完成流程结束单次运行。可以看出这个测试用例完美验证了ImmediateRestart的从不满足到满足的重启和从满足到不满足的自我打断机制,完美符合ImmediateRestart打断策略。
事件驱动行为树暂停 通过前面的学习,可以知道,事件驱动行为树的执行核心是定时器(Clock.cs)
所以要想实现单个行为树逻辑的暂停继续功能,我们必须把定时器(Clock.cs)实现成每个行为树(TBehaviourTree.cs)一个定时器(Clock.cs)
NPBehave的Clock采用的是全局唯一的UnityContext,同时他的Clock设计没有支持暂停继续功能。我这里的设计修改算是我自己的一个改进。
目前设计如下:
TBehaviourTreeManager负责管理所有的TBehaviourTree添加,删除和更新 为了确保正确的更新(Update)删除TBehaviourTreeManager采用延迟添加和删除TBehaviourTree的方式 TBehaviourTreeManager的Upadte由外部统一调用传递deltaTime TBehaviourTree和Clock一对一
TBehaviourTreeManager.cs
1 2 3 4 5 6 7 8 9 10 11 12 13 14 15 16 17 18 19 20 21 22 23 24 25 26 27 28 29 30 31 32 33 34 35 36 37 38 39 40 41 42 43 44 45 46 47 48 49 50 51 52 53 54 55 56 57 58 59 60 61 62 63 64 65 66 67 68 69 70 71 72 73 74 75 76 77 78 79 80 81 82 83 84 85 86 87 88 89 90 91 92 93 94 95 96 97 98 99 100 101 102 103 104 105 106 107 108 109 110 111 112 113 114 115 116 117 118 119 120 121 122 123 124 125 126 127 128 129 130 131 132 133 134 135 136 137 138 139 140 141 142 143 144 145 146 147 148 149 150 151 152 153 154 155 156 157 158 159 160 161 162 163 164 165 166 167 168 169 170 171 172 173 174 175 176 177 178 179 180 181 182 183 184 185 186 187 188 189 190 191 192 193 194 195 196 197 198 199 200 201 202 203 204 205 206 207 208 209 210 211 212 213 214 215 216 217 218 219 220 221 222 223 224 225 226 227 228 229 230 231 232 233 234 235 236 237 238 239 240 241 242 243 public class TBehaviourTreeManager : SingletonTemplate <TBehaviourTreeManager >{ public List<TBehaviourTree> AllBehaviourTreeList { get ; private set ; } private Dictionary<TBehaviourTree, TBehaviourTree> mWaitAddBehaviourTreeMap; private Dictionary<TBehaviourTree, TBehaviourTree> mWaitRemoveBehaviourTreeMap; public bool IsPauseAll { get ; set ; } ****** public bool RegisterTBehaviourTree (TBehaviourTree behaviourTree ) { if (behaviourTree == null ) { Debug.LogError($"不允许注册空行为树对象,注册失败!" ); return false ; } if (IsWaitRemoveBehaviourTree(behaviourTree)) { RemoveWaitRemoveBehaviourTree(behaviourTree); } return AddWaitAddBehaviourTree(behaviourTree); } public bool UnregisterTBehaviourTree (TBehaviourTree behaviourTree ) { if (behaviourTree == null ) { Debug.LogError($"不允许取消注册空行为树对象,取消注册失败!" ); return false ; } if (IsWaitAddBehaviourTree(behaviourTree)) { RemoveWaitAddBehaviourTree(behaviourTree); } return AddWaitRemoveBehaviourTree(behaviourTree); } public void PauseAll () { ****** } public void ResumeAll () { ****** } public void AbortAll () { ****** } public void Update (float deltaTime { DoAllWaitRemoveBehaviourTree(); DoAllWaitAddBehaviourTree(); UpdateAllBehaviourTree(deltaTime); } private void DoAllWaitRemoveBehaviourTree () { foreach (var waitRemoveBehaviourTree in mWaitRemoveBehaviourTreeMap) { RemoveBehaviourTree(waitRemoveBehaviourTree.Key); } } private void DoAllWaitAddBehaviourTree () { foreach (var waitAddBehaviourTree in mWaitAddBehaviourTreeMap) { AddBehaviourTree(waitAddBehaviourTree.Key); } } private void UpdateAllBehaviourTree (float deltaTime { if (IsPauseAll) { return ; } for (int index = 0 , length = AllBehaviourTreeList.Count; index < length; index++) { var behaviourTree = AllBehaviourTreeList[index]; behaviourTree?.Update(deltaTime); } } private bool AddBehaviourTree (TBehaviourTree behaviourTree ) { ****** } private bool RemoveBehaviourTree (TBehaviourTree behaviourTree ) { ****** } private bool IsContainBehaviourTree (TBehaviourTree behaviourTree ) { return AllBehaviourTreeList.Contains(behaviourTree); } private bool AddWaitAddBehaviourTree (TBehaviourTree behaviourTree ) { ****** } private bool RemoveWaitAddBehaviourTree (TBehaviourTree behaviourTree ) { ****** } private bool IsWaitAddBehaviourTree (TBehaviourTree behaviourTree ) { return mWaitAddBehaviourTreeMap.ContainsKey(behaviourTree); } private bool AddWaitRemoveBehaviourTree (TBehaviourTree behaviourTree ) { ****** } private bool RemoveWaitRemoveBehaviourTree (TBehaviourTree behaviourTree ) { ****** } private bool IsWaitRemoveBehaviourTree (TBehaviourTree behaviourTree ) { return mWaitRemoveBehaviourTreeMap.ContainsKey(behaviourTree); } ****** }
TBehaviourTree.cs
1 2 3 4 5 6 7 8 9 10 11 12 13 14 15 16 17 18 19 20 21 22 23 24 25 26 27 28 29 30 31 32 33 34 35 36 37 38 39 40 41 42 43 44 45 46 47 48 49 50 51 52 53 54 55 56 57 58 59 60 61 62 63 64 65 66 67 68 69 70 71 72 73 74 75 76 77 78 79 80 81 82 83 84 85 86 87 public class TBehaviourTree : IRecycle { ****** public Clock BehaviourTreeClock { get ; private set ; } public TBehaviourTree () { } public void Init (int bindUID { BehaviourTreeClock = new Clock(); UpdateBindUID(bindUID); RegisterBehaviourTree(); } ****** private void RegisterBehaviourTree () { TBehaviourTreeManager.Singleton.RegisterTBehaviourTree(this ); } private void UnregisterBehaviourTree () { TBehaviourTreeManager.Singleton.UnregisterTBehaviourTree(this ); } ****** public void Pause () { BTRunningGraph?.Clock.Disable(); } public void Resume () { BTRunningGraph?.Clock.Enable(); } public void Stop () { BTRunningGraph?.Stop(); } public void Update (float deltaTime { BTRunningGraph?.Clock?.Update(deltaTime); } **** }
Clock.cs
1 2 3 4 5 6 7 8 9 10 11 12 13 14 15 16 17 18 19 20 21 22 23 24 25 26 27 28 29 30 31 32 33 34 35 36 37 38 39 40 41 42 43 44 45 46 47 48 49 public class Clock { ****** public bool IsEnable { get ; private set ; } ****** public void Enable () { IsEnable = true ; } public void Disable () { IsEnable = false ; } ****** public void Update (float deltaTime { if (!IsEnable) { return ; } ****** } ****** }
上面代码设计有几个要点:
行为树的注册和取消注册我通过添加到待添加和待删除列表里,将真正的删除和添加延迟到下一帧Update里去执行,确保了Update所有行为树时不会出现遍历的同时触发删除添加等导致更新所有行为树报错问题。 行为树的暂停除了TBehaviourTreeManager的总暂停开关,单个行为树的暂停实际上是通过对每个TBehaviourTree的一对一Clock进行暂停实现的
AI暂停和继续截图:
Note:
这里我暂时没有对TBehavourTree和Clock做对象池优化,算是一个优化点。
事件驱动行为树调试 行为树调试很重要的一点就是要可视化整个行为树执行过程,行为树编辑器已经实现了行为树数据的可视化绘制,那么剩下的工作就是将行为树运行时的一些数据(比如节点运行状态,节点运行结果等)通过编辑器将数据可视化显示。
目前行为树的调试是通过加载AI(BaseActor.LoadAI())时挂在BTDebugger 脚本来决定选中对象是否支持数据加载显示调试(为了区分运行时编辑器就没有采用TBehaviourTree作为调试加载依据 )。
行为树窗口UIBTGraphEditorWindow.cs 结合OnSelectionChange 实现对选中对象的BTDebugger 对应的运行时BehaviourTreeGraphData 进行数据读取构建显示。
关于为树运行时的一些数据(比如节点运行状态,节点运行结果,是否打断等)数据可视化,通过BTGraphEditorWindow.cs ,BehaviourTreeGraphView.cs ,NodeView.cs 和EdgeView.cs 相关代码进行数据显示:
BTGraphEditorWindow.cs
1 2 3 4 5 6 7 8 9 10 11 12 13 14 15 16 17 18 19 20 21 22 23 24 public class UIBTGraphEditorWindow : EditorWindow { ****** private void Update () { mGraphView?.Update(); if (Application.isPlaying) { UpdateBlackboardDataUI(); } } ****** }
BehaviourTreeGraphView.cs
1 2 3 4 5 6 7 8 9 10 11 12 13 14 15 16 17 18 19 20 21 22 23 24 25 26 27 28 29 30 31 32 33 34 35 36 37 38 39 40 41 42 43 44 45 46 47 48 49 50 51 52 53 54 public class BehaviourTreeGraphView : GraphView { ****** public void Update () { UpdateAllNodeStateView(); UpdateAllEdgeViewColors(); } protected void UpdateAllNodeStateView () { if (SourceGraphData == null ) { return ; } for (int i = 0 ; i < SourceGraphData.AllNodeList.Count; i++) { var node = SourceGraphData.AllNodeList[i]; var nodeView = GetNodeByGuid(node.GUID) as NodeView; nodeView?.UpdateNodeStateBackgroundColor(); nodeView?.UpdateNodeStateLabel(); } } protected void UpdateAllEdgeViewColors () { if (SourceGraphData == null ) { return ; } for (int i = 0 ; i < SourceGraphData.AllEdgeDataList.Count; i++) { var edge = SourceGraphData.AllEdgeDataList[i]; var edgeView = GetEdgeByGuid(edge.GUID) as EdgeView; edgeView?.UpdateEdgeControlStateColor(); } } ****** }
NodeView.cs
1 2 3 4 5 6 7 8 9 10 11 12 13 14 15 16 17 18 19 20 21 22 23 24 25 26 27 28 29 30 31 32 33 34 35 36 37 38 39 40 41 42 43 44 45 46 47 48 49 50 51 public class NodeView : Node { ****** protected void CreateNodeStateUI () { ****** UpdateNodeStateBackgroundColor(); UpdateNodeStateLabel(); } ****** public void UpdateNodeStateBackgroundColor () { var nodeStateHorizontalUIContainer = this .Q<VisualElement>(BTGraphElementNames.NodeStateUIHorizontalContainerName); if (nodeStateHorizontalUIContainer != null ) { nodeStateHorizontalUIContainer.style.backgroundColor = BTGraphUtilitiesEditor.GetColorByNodeState(NodeData.NodeState); } } public void UpdateNodeStateLabel () { var nodeStateLabel = this .Q<Label>(BTGraphElementNames.NodeStateLabelName); if (nodeStateLabel != null ) { var stateDes = NodeData.NodeState.ToString(); if (NodeData.IsEnteredAbort) { stateDes = $"{stateDes} (打断)" ; } nodeStateLabel.text = stateDes; } } ****** }
EdgeView.cs
1 2 3 4 5 6 7 8 9 10 11 12 13 14 15 16 17 18 19 20 21 22 23 24 25 26 27 28 29 30 31 32 33 34 35 36 37 38 39 40 41 42 43 public class EdgeView : Edge { ****** protected EdgeView CreateEdgeView (EdgeData edgeData, Port inputPort, Port outputPort ) { var edgeView = new EdgeView() { input = inputPort, output = outputPort, }; edgeView.Init(SourceGraphData, edgeData); edgeView.UpdateEdgeControlStateColor(); return edgeView; } ****** public void UpdateEdgeControlStateColor () { var edgeInputNode = OwnerGraphData.GetNodeByGUID(EdgeData.InputNodeGUID); var edgeInputColor = BTGraphUtilitiesEditor.GetEdgeColorByNodeState(edgeInputNode.NodeState); var edgeOutputColor = BTGraphUtilitiesEditor.GetEdgeColorByNodeState(edgeInputNode.NodeState); edgeControl.inputColor = edgeInputColor; edgeControl.outputColor = edgeOutputColor; } ****** }
BTGraphUtilitiesEditor.cs
1 2 3 4 5 6 7 8 9 10 11 12 13 14 15 16 17 18 19 20 21 22 23 24 25 26 27 28 29 30 31 32 33 34 35 36 37 38 39 40 41 42 43 44 45 46 47 48 49 50 51 52 53 54 55 public static class BTGraphUtilitiesEditor { ****** private static readonly Dictionary<NodeState, Color> NodeStateColorMap = new Dictionary<NodeState, Color> { {NodeState.Suspend, Color.grey}, {NodeState.Running, Color.yellow}, {NodeState.Abort, Color.magenta}, {NodeState.Success, Color.green}, {NodeState.Failed, Color.red}, }; ****** public static Color GetColorByNodeState (NodeState nodeState ) { Color nodeStateColor; if (NodeStateColorMap.TryGetValue(nodeState, out nodeStateColor)) { return nodeStateColor; } Debug.LogError($"未配置节点状态:{nodeState} 的颜色!" ); return Color.grey; } public static Color GetEdgeColorByNodeState (NodeState nodeState ) { if (nodeState == NodeState.Suspend || nodeState == NodeState.Running || nodeState == NodeState.Abort) { return GetColorByNodeState(nodeState); } return Color.green; } ****** }
从上面的代码可以看到通过EditorWindow的Update驱动BehaviourTreeGraphView.Update去每帧更新一些运行时动态变化的数据显示
Note:
编辑器的运行时数据更新显示(e.g 运行节点,边颜色,打断状态等)是通过Update驱动更新的 运行时黑板数据不是通过属性绑定显示的,所以采用通过更新刷新的方式确保黑板UI实时显示
事件驱动行为树实战 TODO
未来计划
支持行为树引用方式的重用而非复制的方式(这种方式修改原树已经复制的树数据无法跟着变化导致重用性效率大打折扣)
个人心得
事件驱动行为树相比传统行为树最大的优势就是树更新的开销,前者基于定时器可以做到通知打断+子节点通知父节点运行结果的单向执行(不用每帧从根节点开始),后者是每次都从根节点开始的遍历执行,后者每帧都会从根节点再走一遍流程到之前的节点继续运行(同时打断设计不好设计成基于定时器减少更新频率) UIElement的GraphView把逻辑节点(Node)和边(Edge)数据和节点(NodeView)和边(NodeView)显示抽象分离的很好,可以高度自由的编写显示节点(NodeView)和边(EdgeView)
GitHub EventBehaviourTree
Reference NPBehave
USS properties reference
IStyle
UXML现有可用Element查询
USS built-in variable references
Event Reference
UNITY DIALOGUE GRAPH TUTORIAL - Setup