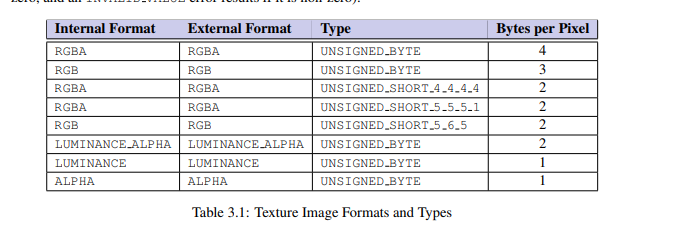
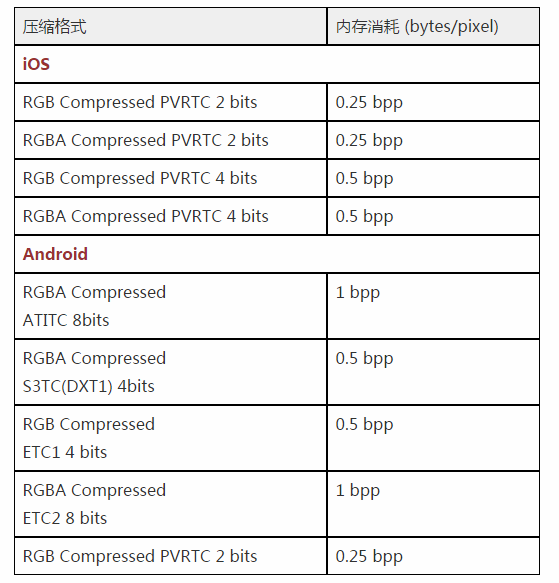
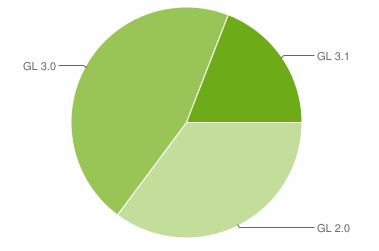
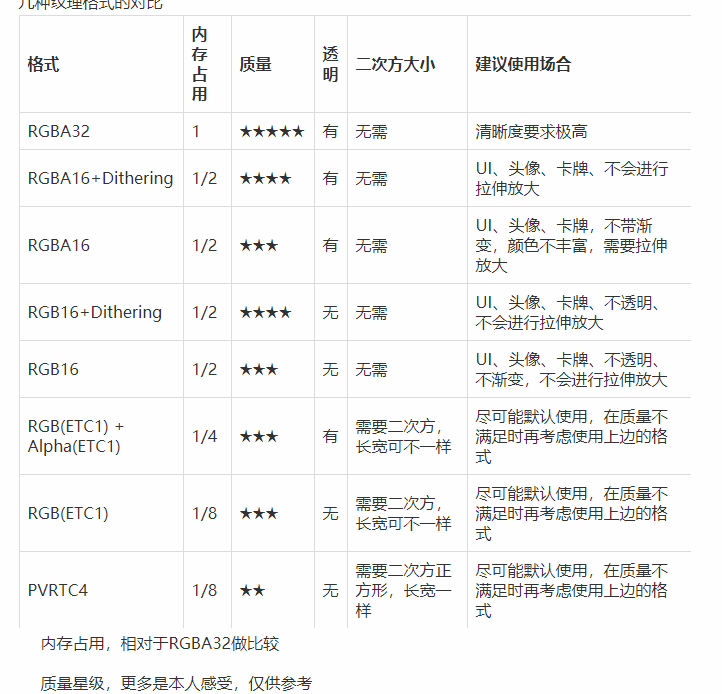
前言

写这一篇文章的目的是出于自己一直以来基础都比较弱,特别是数据结构和算法,但数据结构和算法确实程序里很核心的部分,只有了解各种数据结构和算法的基本思想,才能针对实际问题做出最好的选择,写出最优的程序。工作两年多了,但感觉自己再这方面还是依然原地踏步,了解的一知半解。为了避免多年以后还来学习这些本应该在学校学好的知识,从而有了这一次学习计划。

在看了这位博主的我的算法学习之路之后,深深的感受到了数据结构和算法的魅力和重要性。虽然不知道自己还能为游戏梦想坚持多久,但当下,制定一个完整的数据结构和算法的学习计划是当务之急。

现在有点理解别人说过的”编程语言只是工具,编程思想,数据结构和算法才是核心。”

以下学习主要是对于数据结构和算法的回顾和进阶学习计划。准备用C++来写。

参考书籍:
编程语言:
《C++ Primer》Fifth Edition – Stanley B.Lippman Josee Lajoie Barbara E.Moo
《Effective C++》Third Edition – Scott Meyers
最初学习C++是看的《Thinking in C++》和《Professional C++》,但后来看了部分《C++ Primer》之后觉得,这本书在细节方面讲解的更细致到位。而《Effective C++》是从我们平时容易忽略或错误理解的点,以一条条规则的形式,讲述背后的道理,可以作为C++编程指南。

数据结构和算法:
《数据结构与算法 - C语言描述》 – Mark Allen Weiss
数据结构与算法 - C语言描述课后习题在线答案参考
《算法设计与分析》 Third Edition – 王晓东
《Introduction To Algorithm》(算法导论) Third Edition– Thomas H.Cormen & ……
Introduction To Algorithm MIT课程视频

前两者是我在大学时候学习的关于数据结构和算法的书籍,作为基础知识回顾来学习。
第三个在网络上的评价褒贬不一,但作为国外的优秀教材来使用,可以看出是很有分量的,作为进阶学习书籍。最后一个是麻省理工对于算法导论教材的上课视频可以作为学习《Introduction To Algorithm》的学习资料。

编程艺术和思考:
《The Progmatic Programmer》(程序员修炼之道) – Andrew Hunt & David Thomas
此书并非将编程技巧而是讲程序员应该如何去思考,如何高效的开发。

STL深入学习:
《C++标准程序库》
此书虽然比较老,但貌似是C++标准库学习的经典书籍,里面对STL进行基本的讲解学习。
《STL源码剖析》
此书乃侯捷所著,对于STL进行了深入的讲解学习,属于对STL的深入学习的一本参考书籍。

欲善其事必先利其器

单纯学习数据结构和算法是比较枯燥的,算法可视化的神奇网站,这个网站可以让我们在学习数据结构和算法的时候可视化的看到每一步的变化,更加形象生动。

数学知识

指数

Power(X,A) X Power(X,B) = Power(X,A+B)
Power(X,A) / Power(X,B) = Power(X,A-B)

对数

LogA(B) = LogC(B) / LogC(A); C > 0
Log(AB) = Log(A) + Log(B)
Log(A/B) = Log(A) - Log(B)
Log(Power(A,B)) = B X Log(A)
Log(X) < X(X > 0)

级数

1
2
3
4
5
6
 N
∑ (Power(2, i)) = Power(2, N+1) - 1;
i=0
N
∑ (Power(A, i)) = (Power(2, N+1) - 1) / (A - 1)
i=0

模运算

如果N整除A-B,那么A与B模N同余,记为A≡B(mod N)

证明方法

  1. 归纳法
    第一步证明基准情形(对于某些小的值的正确性,比如1)
    第二步,假设直到k也成立
    最后,证明k+1的时候也成立即可
  2. 反证法
    首先假设定力不成立
    然后证明该假设导致的某个已知的性质不成立,从而证明原假设是错误的。

递归简论

基本法则:

  1. 基准情形
    必须要有某些基准的情形,它们不用递归就能求解
  2. 不断推进
    对于那些递归求解的情形,递归调用必须总能够朝着产生基准情形的方向推进
  3. 设计法则
    假设所有的递归调用都能运行
  4. 合成效益法则
    在求解一个问题的同一个实例时,切勿在不同的递归调用中做重复性的工作

数据结构

抽象数据类型(Abstract data type, ADT)是一些操作的集合。

链表

链表是由一系列不必在内存中相邻的结构组成。每一个结构均含有表元素和指向包含该元素后下一个元素的结构的指针。最后一个单元的后继元指向NULL。

链表分类:

  1. 单向链表
    只能从前往后访问节点
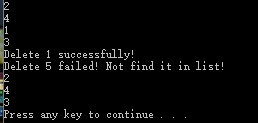
    以下实现了简单的单向链表,允许头插入Node,删除第一个满足条件的Node,打印所有成员,判断是否为空,得到Node节点数等。
1
2
3
4
5
6
7
8
9
10
11
12
13
14
15
16
17
18
19
20
21
22
23
24
25
26
27
28
29
30
31
32
33
34
35
36
37
38
39
40
41
42
43
44
45
46
47
48
49
50
51
52
53
54
55
56
57
58
59
60
61
62
63
64
65
66
67
68
69
70
71
72
73
74
75
76
77
78
79
80
81
82
83
84
85
86
87
88
89
90
91
92
93
94
95
96
97
98
99
100
101
102
103
104
105
106
107
108
109
110
111
112
113
114
115
116
117
118
119
120
121
122
123
124
125
126
127
128
129
130
131
132
133
134
135
136
137
138
139
140
141
142
143
144
145
146
147
148
149
150
151
152
153
154
155
156
157
158
159
160
161
162
163
164
165
166
#include "stdafx.h"

template<typename T>
struct SingleLinkNode
{
T mElement;
SingleLinkNode* Next;
};

template<typename T>
class SingleLinkList
{
public:
SingleLinkList()
{
mHeadNode = NULL;

mLength = 0;
}

~SingleLinkList()
{
SingleLinkNode<T> *tempnode;
while (mHeadNode != NULL)
{
tempnode = mHeadNode->Next;
delete mHeadNode;
mLength--;
mHeadNode = tempnode;
}
}

//ADT
void FrontInsert(T v)
{
SingleLinkNode<T> *tempnode = new SingleLinkNode<T>();

tempnode->mElement = v;

tempnode->Next = mHeadNode;

mHeadNode = tempnode;

mLength++;
}

bool IsEmpty()
{
return mLength;
}


void Delete(T v)
{
if (mHeadNode == NULL)
{
return;
}

SingleLinkNode<T> *tempnode = mHeadNode;

SingleLinkNode<T> *prenode = NULL;

bool find = false;

while (tempnode != NULL)
{
//remove first v element
if (tempnode->mElement == v)
{
//when remove first node, move forward mHeadNode
if (tempnode == mHeadNode)
{
mHeadNode = tempnode->Next;
}
else
{
prenode->Next = tempnode->Next;
}
delete tempnode;
mLength--;
find = true;
break;
}
//Record pre node for later operation
prenode = tempnode;
tempnode = tempnode->Next;
}

if (find)
{
cout << "Delete " << v << " successfully!" << endl;
}
else
{
cout << "Delete " << v << " failed! Not find it in list!" << endl;
}
}

int Find(T v)
{
int position = 0;
SingleLinkNode<T> *tempnode = mHeadNode;
while (tempnode != NULL)
{
position++;
if (tempnode->mElement == v)
{
return position;
}
else
{
tempnode = tempnode->Next;
}
}
return -1;
}

SingleLinkNode<T>* GetNodeAt(int position)
{
if (position < 1 || position > mLength)
{
cout << position << " Out of range of link list!" << endl;
cout << "Current length of link list = " << mLength << endl;
cout << "Insert failed!" << endl;
return NULL;
}
else
{
//链表是非连续的存储方式,所以需要通过循环访问到特定位置
SingleLinkNode<T> *tempnode = mHeadNode;

if (position == 1)
{
return mHeadNode;
}
else
{
for (int i = 1; i < position; i++)
{
tempnode = tempnode->Next;
}
return tempnode;
}
}
}

void TraversAll()
{
SingleLinkNode<T> *tempnode = mHeadNode;
while (tempnode != NULL)
{
cout << tempnode->mElement << endl;
tempnode = tempnode->Next;
}
}

int Length()
{
return mLength;
}
private:
SingleLinkNode<T> *mHeadNode;

int mLength;
};
测试程序:
1
2
3
4
5
6
7
8
9
10
11
12
13
14
15
16
17
18
19
20
21
22
23
24
25
26
27
#include "stdafx.h"
#include <vld.h>

#include "SingleLinkList.h"

int _tmain(int argc, _TCHAR* argv[])
{
//Single Link List part
SingleLinkList<int> *singlelinklist = new SingleLinkList<int>();

singlelinklist->FrontInsert(3);
singlelinklist->FrontInsert(1);
singlelinklist->FrontInsert(4);
singlelinklist->FrontInsert(2);

singlelinklist->TraversAll();

singlelinklist->Delete(1);
singlelinklist->Delete(5);

singlelinklist->TraversAll();

delete singlelinklist;

system("pause");
return 0;
}
可以看到链表的节点是通过SingleLinkNode抽象出来。

SingleLinkList

  1. 双向链表
    可以从前往后也可以从后往前访问节点
    为了从后往前访问,我们需要改写SingleLinkNode支持从当前Node访问前一Node
1
2
3
4
5
6
7
8
9
template<typename T>
struct DoubleLinkNode
{
T mElement;

DoubleLinkNode *Pre;

DoubleLinkNode *Next;
};
同时为了快速从尾部访问,SingleLinkList需要增加mTailNode去指向链表尾部Node,同时支持从尾部插入
1
2
3
4
5
6
7
8
9
10
11
12
13
14
15
16
17
18
19
20
21
22
23
24
25
26
27
28
29
30
31
32
33
34
35
36
37
38
39
40
41
42
43
44
45
46
47
48
49
50
51
52
53
54
55
56
57
58
59
60
61
62
63
64
65
66
67
68
69
70
71
72
73
74
75
76
77
78
79
80
81
82
83
84
85
86
87
88
89
90
91
92
93
94
95
96
97
98
99
100
101
102
103
104
105
106
107
108
109
110
111
112
113
114
115
116
117
118
119
120
121
122
123
124
125
126
127
128
129
130
131
132
133
134
135
136
137
138
139
140
141
142
143
144
145
146
147
148
149
150
151
152
153
154
155
156
157
158
159
160
161
162
163
164
165
166
167
168
169
170
171
172
173
174
175
176
177
178
179
180
181
182
183
184
185
186
187
188
189
190
191
192
193
194
195
196
197
198
199
200
201
202
203
204
205
206
207
208
209
210
211
212
213
214
215
216
217
218
219
220
221
222
223
224
225
226
227
228
229
230
231
232
233
234
235
236
237
238
239
240
241
242
243
244
245
246
247
248
249
250
251
252
253
254
255
256
257
258
259
260
261
262
263
264
265
266
267
268
269
270
271
272
273
274
275
276
277
278
#include "stdafx.h"

//DoubleLinkNode definition
//.....

template<typename T>
class DoubleLinkList
{
public:
DoubleLinkList()
{
mHeadNode = NULL;

mTailNode = NULL;

mLength = 0;
}

~DoubleLinkList()
{
DoubleLinkNode<T> *tempnode;
while (mHeadNode != NULL)
{
tempnode = mHeadNode->Next;
delete mHeadNode;
mLength--;
mHeadNode = tempnode;
}
}

//ADT
void FrontInsert(T v)
{
DoubleLinkNode<T> *tempnode = new DoubleLinkNode<T>();

tempnode->mElement = v;

//when insert first element, tail node equals to head node
if (mLength == 0)
{
tempnode->Pre = NULL;
tempnode->Next = NULL;
mHeadNode = tempnode;
mTailNode = mHeadNode;
}
else
{
mHeadNode->Pre = tempnode;
tempnode->Next = mHeadNode;
mHeadNode = tempnode;
}

mLength++;
}

void InsertAtPosition(int position, T v)
{
if (position < 1 || position > mLength + 1)
{
cout << position << " Out of range of link list!" << endl;
cout << "Current length of link list = " << mLength << endl;
cout << "Insert failed!" << endl;
}
//when insert element as first element.
else if (position == 1)
{
FrontInsert(v);
}
//when insert at final position
//when position is larger than length of link list,
//we insert it at the end of the link list
else if (position == mLength + 1)
{
TailInsert(v);
}
//insert element between head and last element
else
{
DoubleLinkNode<T> *tempnode = new DoubleLinkNode<T>();

tempnode->mElement = v;

DoubleLinkNode<T> *prenode = GetNodeAt(position - 1);

if (prenode != NULL)
{
tempnode->Pre = prenode;

tempnode->Next = prenode->Next;

prenode->Next->Pre = tempnode;

prenode->Next = tempnode;

mLength++;
}
}
}

void TailInsert(T v)
{
DoubleLinkNode<T> *tempnode = new DoubleLinkNode<T>();

tempnode->mElement = v;

//when insert first element, tail node equals to head node
if (mLength == 0)
{
tempnode->Pre = NULL;

tempnode->Next = NULL;

mHeadNode = tempnode;

mTailNode = mHeadNode;
}
else
{
tempnode->Pre = mTailNode;

tempnode->Next = NULL;

mTailNode->Next = tempnode;

mTailNode = tempnode;
}

mLength++;
}

DoubleLinkNode<T>* GetNodeAt(int position)
{
if (position < 1 || position > mLength)
{
cout << position << " Out of range of link list!" << endl;
cout << "Current length of link list = " << mLength << endl;
cout << "Insert failed!" << endl;
return NULL;
}
else
{
//链表是非连续的存储方式,所以需要通过循环访问到特定位置
DoubleLinkNode<T> *tempnode = mHeadNode;

if (position == 1)
{
return mHeadNode;
}
else if (position == mLength)
{
return mTailNode;
}
else
{
for (int i = 1; i < position; i++)
{
tempnode = tempnode->Next;
}
return tempnode;
}
}
}

bool IsEmpty()
{
return mLength;
}

void Delete(T v)
{
if (mHeadNode == NULL)
{
return;
}

DoubleLinkNode<T> *tempnode = mHeadNode;

DoubleLinkNode<T> *prenode = NULL;

bool find = false;

while (tempnode != NULL)
{
//remove first v element
if (tempnode->mElement == v)
{
//when remove first node, move forward mHeadNode
if (tempnode == mHeadNode)
{
if (mLength <= 1)
{
mHeadNode = NULL;
mTailNode = NULL;
}
else
{
mHeadNode = tempnode->Next;
mHeadNode->Pre = NULL;
}
}
else if (tempnode == mTailNode)
{
if (mLength <= 1)
{
mHeadNode = NULL;
mTailNode = NULL;
}
else
{
mTailNode = prenode;
mTailNode->Next = NULL;
}
}
else
{
prenode->Next = tempnode->Next;
tempnode->Next->Pre = prenode;
}
delete tempnode;
mLength--;
find = true;
break;
}
//Record pre node for later operation
prenode = tempnode;
tempnode = tempnode->Next;
}

if (find)
{
cout << "Delete " << v << " successfully!" << endl;
}
else
{
cout << "Delete " << v << " failed! Not find it in list!" << endl;
}
}

int Find(T v)
{
int position = 0;
DoubleLinkNode<T> *tempnode = mHeadNode;
while (tempnode != NULL)
{
position++;
if (tempnode->mElement == v)
{
return position;
}
else
{
tempnode = tempnode->Next;
}
}
return -1;
}

void TraversAll()
{
DoubleLinkNode<T> *tempnode = mHeadNode;
while (tempnode != NULL)
{
cout << tempnode->mElement << endl;
tempnode = tempnode->Next;
}
}

int Length()
{
return mLength;
}
private:
DoubleLinkNode<T> *mHeadNode;

DoubleLinkNode<T> *mTailNode;

int mLength;
};
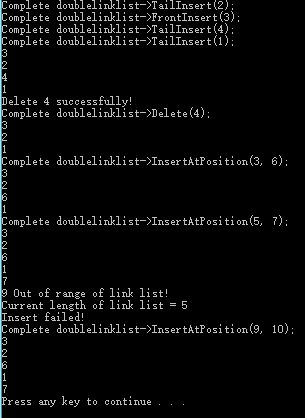
测试程序
1
2
3
4
5
6
7
8
9
10
11
12
13
14
15
16
17
18
19
20
21
22
23
24
25
26
27
28
29
30
31
32
33
34
35
36
37
38
39
40
41
42
43
44
45
46
#include "stdafx.h"
#include <vld.h>

#include "SingleLinkList.h"

int _tmain(int argc, _TCHAR* argv[])
{
//Double link list part
DoubleLinkList<int> *doublelinklist = new DoubleLinkList<int>();

doublelinklist->TailInsert(2);
doublelinklist->FrontInsert(3);
doublelinklist->TailInsert(4);
doublelinklist->TailInsert(1);

doublelinklist->TraversAll();

doublelinklist->Delete(4);

cout << "Complete doublelinklist->Delete(4);" << endl;

doublelinklist->TraversAll();

doublelinklist->InsertAtPosition(3, 6);

cout << "Complete doublelinklist->InsertAtPosition(3, 6);" << endl;

doublelinklist->TraversAll();

doublelinklist->InsertAtPosition(5, 7);

cout << "Complete doublelinklist->InsertAtPosition(5, 7);" << endl;

doublelinklist->TraversAll();

doublelinklist->InsertAtPosition(9, 10);

cout << "Complete doublelinklist->InsertAtPosition(9, 10);" << endl;

doublelinklist->TraversAll();

delete doublelinklist;

system("pause");
return 0;
}
测试结果:

DoubleLinkList

  1. 循环链表
    双向链表的基础上,可以从头直接访问尾也可以从尾直接访问头
    出于测试目的,为了验证是否至此从尾访问到头部,在TraversAll的方法里,我从第二个节点开始访问进行打印数据直到回到头节点
1
2
3
4
5
6
7
8
9
10
11
void TraversAll()
{
CircleLinkNode<T> *tempnode = mHeadNode;
tempnode = tempnode->Next;
cout << mHeadNode->mElement << endl;
while (tempnode != mHeadNode)
{
cout << tempnode->mElement << endl;
tempnode = tempnode->Next;
}
}
因为Head节点的Pre指向Tail节点,Tail节点的Next指向Head,所以这里在析构释放内存的时候需要注意判断条件:
1
2
3
4
5
6
7
8
9
10
11
~CircleLinkList()
{
CircleLinkNode<T> * tempnode = mHeadNode;
while (mLength != 0)
{
mHeadNode = mHeadNode->Next;
delete tempnode;
tempnode = mHeadNode;
mLength--;
}
}
其他情况主要注意在Head和Tail的极端顶点时的判断处理:
1
2
3
4
5
6
7
8
9
10
11
12
13
14
15
16
17
18
19
20
21
22
23
24
25
26
27
28
//ADT
void FrontInsert(T v)
{
CircleLinkNode<T> *tempnode = new CircleLinkNode<T>();

tempnode->mElement = v;

//when insert first element, tail node equals to head node
if (mLength == 0)
{
tempnode->Pre = tempnode;
tempnode->Next = tempnode;
mHeadNode = tempnode;
mTailNode = mHeadNode;
}
else
{
mHeadNode->Pre = tempnode;
tempnode->Pre = mTailNode;
tempnode->Next = mHeadNode->Next;
mHeadNode = tempnode;
mTailNode->Next = mHeadNode;
}

mLength++;
}

//......
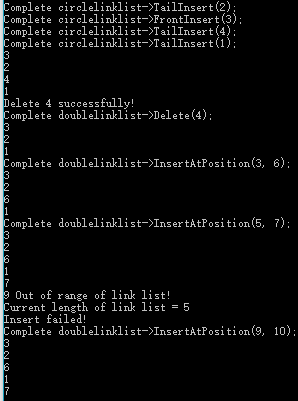
测试结果:

CircleLinkList

栈是限制插入和删除只能在一个位置上进行的表,该位置是表的末端,叫做栈的顶。
栈的ADT:
Push(进栈)
Pop(出栈)

栈是LIFO(后进先出)

栈的实现:
栈是一个表,因此任何实现表的方法都能实现栈(比如数组,链表)。
下面以前面实现的链表为例来实现栈:
因为栈只允许顶端Push,Pop以及Top查看顶端元素并返回值,所以这里采用单向链表即可。

待续……

算法

算法与程序

算法是由若干条指令组成的又有穷序列,且满足下述4条性质:

  1. 输入:有零个或多个由外部提供的量作为算法的输入。
  2. 输出:算法产生至少一个量作为输出。
  3. 确定性:组成算法的每条指令是清晰的,无歧义的。
  4. 有限性:算法中每条指令的执行次数是有限的,执行每条指令的时间也是有限的。

区分程序和算法:
程序与算法不同。程序是算法用某种程序设计语言的具体实现。

算法复杂性

算法复杂性体现在运行该算法所需的计算机资源(时间和空间)的多少上。

所以算法复杂性主要是体现的时间复杂度和空间复杂度上。
C表示复杂度,N表示问题的规模,I表示算法的输入,A表示算法本身。
C = F(N,I,A)
T表示时间复杂度,S表示空间复杂度。
T = F(N,I,A)
S = F(N,I,A)

时间复杂度

时间复杂度 — 指执行算法所需要的计算工作量
时间复杂度分为下列三种:

  1. 平均时间复杂度 — 理论上一般情况的时间复杂度
  2. 最坏时间复杂度 — 特殊情况下(导致时间耗费最多的数据输入)
  3. 最优时间复杂度 — 特殊情况下(导致时间耗费最少的数据输入)

空间复杂度

空间复杂度 — 指执行算法所需要的内存空间

程序算法思想

递归

定义:
直接或间接地调用自身的算法称为递归算法。
用函数自身给出定义的函数称为递归函数。

基本思想:
每个递归函数都必须有非递归定义的初始值,否则,递归函数就无法计算。
递归式的第二式用较小自变量的函数值来表示较大自变量的函数值的方式来定义。

事例:
无穷数列1,1,2,3,5,8,13,,2,34,55……,称为Fibonacci数列。

1
2
3
       {  1                         n = 0
F(n) = { 1 n = 1
{ F(n - 1) + F(n - 2) n > 1

代码实现:

1
2
3
4
5
6
7
8
9
10
11
12
13
14
15
16
17
18
19
20
21
22
23
24
25
26
27
28
29
30
// AlgorithmStudy.cpp : 定义控制台应用程序的入口点。
//

#include "stdafx.h"
#include <iostream>

using namespace std;

int Fibonacci(int n)
{
if( n <= 2)
{
return 1;
}
else
{
return Fibonacci(n - 1) + Fibonacci(n - 2);
}
}

int _tmain(int argc, _TCHAR* argv[])
{
int n;
cout<<"Please Enter the Fibonacci's n:"<<endl;
cin>>n;
cout<<"Fibonacci("<<n<<") = "<<Fibonacci(n)<<endl;

system("pause");
return 0;
}

FabonacciRecursion

还有一个典型的问题,汉诺塔问题。
问题描述:
a,b,c三个塔座。塔座a上共n个圆盘,圆盘至下而上从大到小的叠放在一起,圆盘编号从小到大为1,2,3……n。要求将塔座a上的这一叠圆盘移动到塔座b上,并按同样顺序叠放。移动规则如下:

  1. 每次只能移动一个圆盘
  2. 任何时时刻都不允许将较大的圆盘压在较小的圆盘会上
  3. 在满足移动规则1和2的前提下,将圆盘至a,b,c中任意塔座上。

解题思想:
若是奇数次移动,则将最小的圆盘移到顺时针方向的下一座塔上。若是偶数次移动,则保持最小的圆盘不动,而在其他两个塔座之间,将较小的圆盘移动到另一个塔座上。

那么如何用递归来实现这个解题思想了。
当n = 1时,将编号1的圆盘从塔座a移动到塔座b即可。
当n > 1时,需要利用塔座c作为辅助塔座。此时要设法将n - 1个较小的圆盘依照移动规则从塔座a移至塔座c上,然后,将剩下的最大圆盘从塔座a移至塔座b上,最后,再设法将n - 1个较小的圆盘你依照移动规则从塔座c移至塔座b上。(由此可见,n个圆盘的移动问题分解成为了两次n - 1个圆盘的移动问题,这就可以通过递归的方式解决)

1
2
3
4
5
6
7
8
9
void Hanoi(int n, int a, int b, int c)
{
if(n > 0)
{
Hanoi(n - 1, a, c, b); // 将n - 1个圆盘按移动规则从a移动到c
move(a,b); // 将圆盘n从a移动到b
Hanoi(n -1, c, b, a); // 将n - 1个圆盘按移动规则从c移动到b
}
}

递归算法好处:
结构清晰,可读性强,且容易用数学归纳法证明算法的正确性,方便调试。

递归算法坏处:
运行效率低,时间复杂度和空间复杂度都很大。

针对Fabonacci方法,我们可以写一个非递归的方法,

1
2
3
4
5
6
7
8
9
10
11
12
13
14
15
16
17
18
19
20
int FibonacciNoRecursion(int n)
{
int temp[2];
temp[0] = 1;
temp[1] = 1;
if(n <= 2)
{
return 1;
}
else
{
for(int i = 2; i < n; i++)
{
int tp = temp[0] + temp[1];
temp[1]= temp[0];
temp[0] = tp;
}
}
return temp[0];
}

这样一来,递归调用导致的调用栈深度问题就没有了,而是通过临时变量把数据存储了起来。

分治

基本思想:
将一个规模为n的问题分解为k个(一般划分成n/2 – 二分细分)规模较小的子问题,这些子问题互相独立且与原问题相同。递归的解这些子问题,然后将各子问题的解合并得到原问题的解。

在排序算法学习中,快速排序(Quick Sort)和归并排序(Merge Sort)就用到了分治的思想。

动态规划

基本思想:
动态规划与分治思想类似,但动态规划里经分解得到的子问题往往不是互相独立的。如果我们能够保存已解决的子问题的答案,而在需要时再找出已求得的答案,会这样就可以避免大量的重复计算,从而得到多项式时间算法。

动态规划适用于解最优化问题。一般有4个步骤设计:

  1. 找出最优解的性质,并刻画其结构特征。
  2. 递归地定义最优值。
  3. 以自底向上的方式计算出最优值。
  4. 根据计算最优值时得到的信息,构造最优解。

动态规划的基本要素:

  1. 最优子结构
    当问题的最优解包含其子问题的最优解时,称该问题具有最优子结构性质
  2. 重叠子问题
    在递归算法自顶向下解此问题时,每次产生的子问题并不总是新问题,有些子问题被反复运算。
  3. 备忘录方法
    备忘录方法是动态规划的变形,唯一不同的是递归方式是至顶向下。

接下来以求解最长公共子序列来分析动态规划算法。
问题描述:
X = {x1, x2, x3,…..xn}
Z = {z1, z2, z3,…..zn}
存在一个递增序列,即Z是X的子序列。

X = {x1, x2, x3,….. xm}
Y = {y1, y2, y3,….. yn}
求解X和Y的最长公共子序列Z:
Z = {z1, z2, z3,…zk}

分析最优子结构性质:
若X(m) = Y(n),则Z(k) = X(m) = Y(n),且Z(k-1)是X(m-1)和Y(n-1)的最长公共子序列
若X(m) != Y(n)且Z(k) != X(m),则Z是X(m-1)和Y的最长公共子序列
若X(m) != Y(n)且Z(k) != Y(n),则Z是X和Y(n-1)的最长公共子序列

c[i][j]记录序列X(i)和Y(j)的最长公共子序列的长度
从上面的最优子结构性质我们可以得出下列结论:

1
2
3
          {         0                       i = 0, j = 0
c[i][j] = { c[i-1][j-1] + 1 i,j > 0; X(i) = Y(j)
{ Max(c[i][j-1], c[i-1][j]) i,j > 0; X(i) != Y(j)

从上面而已看出,在递归求的时候,很多子问题是重叠的。

b[i][j]用于记录c[i][j]的值是由哪一个子问题的解得到的。b最后会用于构建最优解。
我们把上面的情况分别分为1,2,3。在递归求解的时候存储的b[i][j]里。

1
2
3
4
5
6
7
8
9
10
11
12
13
14
15
16
17
18
19
20
21
22
23
24
25
26
27
28
29
30
31
32
33
34
35
36
37
38
39
40
41
42
43
44
45
46
47
48
49
50
51
52
53
54
55
56
57
58
59
60
61
62
63
64
65
66
67
68
69
70
71
72
73
74
75
76
77
78
79
80
81
82
83
84
85
86
87
88
89
90
91
92
93
94
#include "stdafx.h"
#include <iostream>
using namespace std;

template<typename T>
int GetArrayLength(T &array)
{
return sizeof(array) / sizeof(array[0]);
}

void LCSLength(int m, int n, char *x, char *y, int **c, int **b)
{
int i,j;
// i = 0, j = 0的情况
c[0][0] = 0;

for(i = 1; i <= m; i++)
{
c[i][0] = 0;
}

for(i = 1; i <= n; i++)
{
c[0][i] = 0;
}
//自底向上的填充最优解
for(i = 1; i <= m; i++)
{
for(j = 1; j <= n; j++)
{
// X(i) == Y(j)的情况
if(x[i] == y[j])
{
c[i][j] = c[i-1][j-1] + 1;
b[i][j] = 1;
}
// X(i) != Y(j) 且 Max{}取c[i][j-1]
else if(c[i-1][j] >= c[i][j - 1])
{
c[i][j] = c[i-1][j];
b[i][j] = 2;
}
// X(i) != Y(j) 且 Max{}取c[i-1][j]
else
{
c[i][j] = c[i][j-1];
b[i][j] = 3;
}
}
}
}

void LCS(int i, int j, char *x, int **b)
{
if(i == 0 || j == 0)
{
return ;
}
//根据前面LCSLength的分解情况,自底向上的递归构建最长公共子序列
if(b[i][j] == 1)
{
LCS(i-1, j-1, x, b);
cout<<x[i]<<endl;
}
else if(b[i][j] == 2)
{
LCS(i-1, j, x, b);
}
else
{
LCS(i, j-1, x, b);
}
}

int _tmain(int argc, _TCHAR* argv[])
{
//LCS,因为LCSLength里面都是以1作为索引来访问x和y的第一个字母,
//所以这里增加一个额外的" "便于1作为第一个字母的索引
char x[] = {' ', 'A', 'B', 'D', 'B', 'C', 'A', 'E', 'F'};
char y[] = {' ', 'A', 'C', 'B', 'A', 'F'};
int **c = new int*[GetArrayLength(x)];
int **b = new int*[GetArrayLength(x)];
for(int i = 0; i < GetArrayLength(x); i++)
{
c[i] = new int[GetArrayLength(y)];
b[i] = new int[GetArrayLength(y)];
}
//因为前面我们额外增加了一个" ",所以这里要减少一个长度计算
LCSLength(GetArrayLength(x) - 1, GetArrayLength(y) - 1, x, y, c, b);
LCS(GetArrayLength(x) - 1, GetArrayLength(y) - 1, x, b);

system("pause");
return 0;
}

LCSLength

算法时间复杂度分析:
计算最长公共序列的LCSLength耗时O(m x n);
构建最长公共序列的LCS递归调用自身使i和j - 1,时间复杂度为O(m + n)

算法改进:
c[i][j]可以由c[i-1][j-1],c[i-1][j]和c[i][j-1]推断出来,所以可以节省数组b的空间,但数组c仍需要m x n的空间,所以空间复杂度仍然是O(m x n)

另一个很典型的动态规划事例是0-1背包问题:
问题描述:
给定n种物品和一背包。物品i的重量是w(i),其价值为v(i),背包容量为c。应如何选择装入背包中的物品,使得装入背包中物品的总价值最大?

形式化描述:
给定c > 0,w(i) > 0, v(i) > 0, i <= i <=n,要求找出一个n元0-1向量(x1,x2,x3…..,xn), x(i) ∈ {0, 1}, 1 <= i <= n,使得∑(i= 1 - n)(w(i) x x(i)) <= c,而且∑(i= 1 - n)(v(i) x x(i))达到最大。
转换成式子如下:
max(∑( 1 <= i <= n)(v(i) x x(i)))
{ ∑(i= 1 - n)(w(i) x x(i)) <= c
{ x(i) ∈ {0, 1}, 1 <= i <= n

分析:
最优子结构性质:
设(y1,y2……yn)是所给0-1背包问题的一个最优解,则(y2,y3…..yn)是下面相应子问题的一个最优解:
max(∑(2 <= i <= n)(v(i) x x(i)))
{ ∑(2 <= i <= n)(w(i) x x(i)) <= c - w(1) x y(1)
{ x(i) ∈ {0, 1}, 2 <= i <= n

递归关系:
0-1背包问题的子问题:
max(∑(i <= k <= n)(v(k) x x(k)))
{ ∑(i <= k <= n)(w(k) x x(k)) <= j
{ x(k) ∈ {0, 1}, i <= k <= n
m(i,j)是背包容量为j,可选物品为i,i+1…..n时0-1背包问题的最优解。
x(i)表示背包i的选择∈ {0, 1}
根据最优子结构性质,可以建立就按m(i,j)的递归式如下:
{ max{m((i+1,j), m(i+1, j - w(i)) + v(i))} j >= w(i)
m(i,j) = {
{ m(i+1,j) 0 <= j <= w(i)

     {  v(n)   j >= w(n)

m(n,j) = {
{ 0 0 <= j < w(n)

计算出所有m[i][j]后,我们可以通过判断m[i][c]和m[i+1]c是否相同来判断x(i)的值。

算法:

1
2
3
4
5
6
7
8
9
10
11
12
13
14
15
16
17
18
19
20
21
22
23
24
25
26
27
28
29
30
31
32
33
34
35
36
37
38
39
40
41
42
43
44
45
46
47
48
49
50
51
52
53
54
55
56
57
58
59
60
61
62
63
64
65
66
67
68
69
70
71
72
73
74
75
76
77
78
79
80
81
82
83
84
85
86
87
88
89
90
91
92
93
94
95
96
97
98
99
100
101
102
103
104
105
106
#include "stdafx.h"
#include <vld.h>
#include <iostream>
#include <math.h>
using namespace std;

template<typename T>
int GetArrayLength(T &array)
{
int length = sizeof(array) / sizeof(array[0]);
return length;
}

void Knapsack(float *v, int *w, int c, int n, float **m)
{
int jmax = fmin(w[n] - 1,c);
//根据最优子结构性质,m[n - 1][j]的最优解是m[n][j]最优解的子集,
//我们先构建出m[n][j]时的数据,然后利用m[n][j]的数据去构建m[i][c] 1 <= i < n
for (int j = 0; j <= jmax; j++)
{
m[n][j] = 0;
}

for (int j = w[n]; j <= c; j++)
{
m[n][j] = v[n];
}

//利用m[n][j]去构建m[i][j] 1 <= i < n
for (int i = n - 1; i > 1; i--)
{
jmax = fmin(w[i] - 1, c);
for (int j = 0; j <= jmax; j++)
{
m[i][j] = m[i + 1][j];
}

for (int j = w[i]; j <= c; j++)
{
m[i][j] = fmax(m[i + 1][j], m[i + 1][j - w[i]] + v[i]);
}
}

//Finally, we can get m[1][c] from c[2][c]
m[1][c] = m[2][c];
if (c >= w[1])
{
m[1][c] = fmax(m[2][c], m[2][c - w[1]] + v[1]);
}
}

void Traceback(float **m, int *w, int c, int n, int *x)
{
for (int i = 1; i < n; i++)
{
if (m[i][c] == m[i + 1][c])
{
x[i] = 0;
}
else
{
x[i] = 1;
c -= w[i];
cout << "Put " << i << " into the bag!" << endl;
}
}
//check for last one
x[n] = m[n][c] ? 1 : 0;
if (x[n] == 1)
{
cout << "Put " << n << " into the bag!" << endl;
}
}

int _tmain(int argc, _TCHAR* argv[])
{
//0-1背包问题
//因为我们从v[1]开始访问当做第一个背包的价值,
//所以这里加一个0在最前面方便从1开始索引
float v[] = { 0, 1, 5, 2, 3, 6, 8, 3 };
int w[] = { 0, 4, 3, 6, 7, 2, 3, 1 };
int c = 20;
//减掉我们额外增加的第一个
int n = GetArrayLength(v) - 1;
float **m = new float*[GetArrayLength(v)];
//为了从1开始索引
int *x = new int[n + 1];
for (int i = 0; i < GetArrayLength(v); i++)
{
//m[i][j] 1 <= j <= n用于表示背包容量为j,可选物品为i,i+1....n是0-1背包问题的最优解
//为了m[i][c]来访问背包重量为c的时候的最优解,这里需要额外增加数组长度1
m[i] = new float[c + 1];
}
Knapsack(v, w, c, n, m);
Traceback(m, w, c, n, x);

for (int i = 0; i < GetArrayLength(v); i++)
{
delete m[i];
}

delete x;

system("pause");
return 0;
}

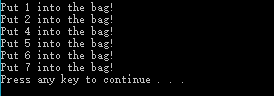
01Knapsack

算法复杂度分析:
计算m[i][j]的递归式可以看出,算法Knapsack需要O(nc)计算时间,Traceback需要O(n)计算时间

算法缺点:

  1. w[i]要求是整数
  2. 当c很大的时候,算法Knapsack时间复杂度很大

算法改进:
详情参考计算机算法设计与分析(第3版)

贪心算法

基本思想:
贪心算法通过一系列的选择来得到问题的解。它所做的每一个选择都是当前状态下局部最好选择,即贪心选择。

基本要素:

  1. 贪心选择性质
    贪心选择性质是指所求问题的整体最优解可以通过一系列局部最优的选择,即贪心选择来达到。(贪心算法以自顶向下的方式进行,以迭代的方式做出相继的贪心选择,每做一次贪心选择就将所求问题简化为规模更小的子问题)
  2. 最优子结构性质
    最优解包含其子问题的最优解时,称此问题具有最优子结构性质。

下面结合背包问题来区分动态规划和贪心算法在实际应用中的区别:
问题描述:
背包问题与0-1背包问题类似,所不同的是在选择物品i装入背包时,可以选择物品i的一部分,而不一定要全部装入背包,1 <= i <= n。

最优子结构性质分析:
若它的一个最优解包含物品j,则从该最优解中拿出所含的物品j的那部分重量w,剩余的将是n-1个原重量物品1,2,…,j-1,j+1,…,n及重为w(j)-w的物品j中可装入容量为c-w的背包且具有最大价值的物品。

贪心选择性质分析:
按单位价值为依据(局部最优)进行选择(贪心选择),可使最终装满背包时,价值最大。

贪心算法解背包问题的基本步骤:

  1. 计算每种物品单位重量的价值v(i)/w(i)
  2. 依贪心选择策略,将尽可能多的单位重量价值最高的物品装入背包。
  3. 若将这种物品全部装入背包后,背包内的物品总重量未超过c,则选择单位重量价值次高的物品并尽可能多的装入背包。
  4. 依次策略,直到背包装满为止。

贪心选择对于0-1背包问题就不能得到最优解,因为它无法保证最终背包能装满,部分闲置的背包空间使每千克背包空间的价值降低了。所以在考虑0-1背包问题时,应比较选择该物品和不选择该物品所导致的最终方案,然后做出最好选择,而不是按最优单位价值(局部最优)来选。

回溯法算法

回溯法的算法框架:

  1. 问题的解空间
    解空间包含所有可能的答案
  2. 回溯法的基本思想
    在问题的解空间树种,按深度优先策略,从根节点触发搜索解空间树。算法搜索到任一节点时,先判断该节点是否包含问题的解,如果不包含,则以该节点为根节点以深度优先搜索。直到搜索到叶节点也没找到问题解时,回溯到最近一个非叶节点继续搜索,知道所有节点都搜索完成为止。

接下来以0-1背包问题为例来学习理解回溯法:
假设0-1背包n = 3,w = [16, 15, 15] v = [45, 25, 25] c= 30
解空间为:
{(0,0,0), (0,1,0), (0,0,1), (1,0,0), (0,1,1), (1,0,1), (1,1,0), (1,1,1)}
Backtracking
因为是以深度优先搜索,所以是延A -> B -> D -> H -> D -> I -> D -> B -> E -> J -> K的顺序来搜索,直到回溯完所有的解空间节点或找到答案为止。

问题:
上述回溯法把所有的解空间都搜索了一遍,时间和空间复杂度大。

优化:
回溯法通常采用两种策略避免无效搜索,提高回溯法的搜索效率:

  1. 用约束函数在扩展结点处剪去不满足约束条件的子树。
  2. 用限界函数剪去得不到最优解的子树。(两个函数统称为剪枝函数)

在0-1背包里左子树表示装载当前背包,右子树表示不装载当前背包。
所以在针对剪枝函数的优化上,我们可以在判断只有在右子树中有可能包含最优解时才进入。设r是当前剩余物品价值总和;cp是当前价值;bestp是当前最优价值。当cp + r <= bestp时,可剪去右子树。

正确的选取r是优化的关键之一:
我们可以通过按背包问题里贪心算法的方式计算出当前剩余物品的最优值(算出当前剩余物品最多还能增加的价值)作为上界剪枝。

代码实现:
Utilites.h

1
2
3
4
5
6
7
8
#include "stdafx.h"

template<typename T>
static int GetArrayLength(T &array)
{
int length = sizeof(array) / sizeof(array[0]);
return length;
}

Knap.h

1
2
3
4
5
6
7
8
9
10
11
12
13
14
15
16
17
18
19
20
21
22
23
24
25
26
27
28
29
30
31
32
33
#include "stdafx.h"

class Knap
{
public:
Knap(float *v, int *w, int c, int n);

~Knap();

void Backtrack(int i);

float GetBestp();

private:
float Bound(int i);

//把物品按单位价值降序排列
void Sort();

int mC; //背包容量

int mN; //物品数量

int *mW; //物品重量

float *mV; //物品价值

int mCW; //当前重量

float mCV; //当前价值

float mBestp; //当前最优价值
};

Knap.cpp

1
2
3
4
5
6
7
8
9
10
11
12
13
14
15
16
17
18
19
20
21
22
23
24
25
26
27
28
29
30
31
32
33
34
35
36
37
38
39
40
41
42
43
44
45
46
47
48
49
50
51
52
53
54
55
56
57
58
59
60
61
62
63
64
65
66
67
68
69
70
71
72
73
74
75
76
77
78
79
80
81
82
83
84
85
86
87
88
89
90
91
92
93
94
95
96
97
98
99
100
101
102
103
104
105
106
107
108
#include "stdafx.h"
#include "Knap.h"
#include "Utilties.h"

Knap::Knap(float *v, int *w, int c, int n)
{
assert(c > 0);
assert(n > 0);
mC = c;
mN = n;
mW = w;
mV = v;
mCW = 0;
mCV = 0;
mBestp = 0;
Sort();
}

void Knap::Backtrack(int i)
{
//到达叶节点
if (i > mN)
{
//到了叶节点后记录最优值
mBestp = mCV;
return;
}

//进入左子树
if (mCW + mW[i] <= mC)
{
mCW += mW[i];
mCV += mV[i];
//深度优先扩张
Backtrack(i + 1);
//回溯到i时,我们需要在判断是否进入右子树之前把mCW和mCV的值回复到正确的值。
mCW -= mW[i];
mCV -= mV[i];
}

//进入右子树
if (Bound(i + 1) > mBestp)
{
//继续深度优先扩张
Backtrack(i + 1);
}
}

float Knap::GetBestp()
{
return mBestp;
}

//计算cp + r <= bestp中r的值
//通过把剩余物品按贪心算法的背包问题来计算出最优值上界
float Knap::Bound(int i)
{
int cleft = mC - mCW; //剩余容量

float b = mCV; //当前价值

//以物品单位重量价值递减序装入物品
while (i <= mN && mW[i] <= cleft)
{
cleft -= mW[i];
b += mV[i];
i++;
}

//装满背包
if (i <= mN)
{
b += mV[i] * cleft / mW[i];
}

return b;
}

void Knap::Sort()
{
assert(mN > 0);
float *pervalue = new float[mN];
pervalue[0] = 0;
for (int i = 1; i <= mN; i++)
{
pervalue[i] = mV[i] / mW[i];
}

//双重循环都跟数据大小有关
//所以冒泡排序平均时间复杂度是O(square(n))
for (int i = 1; i <= mN; i++)
{
for (int j = i + 1; j <= mN; j++)
{
if (pervalue[i] < pervalue[j])
{
swap(mV[i], mV[j]);
swap(mW[i], mW[j]);
swap(pervalue[i], pervalue[j]);
}
}
}
}

Knap::~Knap()
{

}

main.cpp

1
2
3
4
5
6
7
8
9
10
11
12
13
14
15
16
17
18
19
20
21
int _tmain(int argc, _TCHAR* argv[])
{
//0-1背包回溯算法
//因为我们从v[1]开始访问当做第一个背包的价值,
//所以这里加一个0在最前面方便从1开始索引
float v[] = { 0, 1, 5, 2, 3, 6, 8, 3 };
int w[] = { 0, 4, 3, 6, 7, 2, 3, 1 };
int c = 20;
//减掉我们额外增加的第一个
int n = GetArrayLength(v) - 1;
Knap *knap = new Knap(v, w, c, n);

knap->Backtrack(1);

cout << "knap->GetBestp() = " << knap->GetBestp() << endl;

delete knap;

system("pause");
return 0;
}

BacktrackingResult

时间复杂度分析:
Knap::Sort()排序采用冒泡排序,时间复杂度为:
平均时间复杂度:O(square(n))
最坏时间复杂度:O(square(n)) (每一次比较都需要交换)
最优时间复杂度:O(n) (第一次循环就完成所有排序而无需进行后面的,需要判断结束条件)

Knap::Bound()计算上界剪枝需要O(n)
最坏情况下有O(Pow(2,n))个右节点,所以回溯算法的最坏时间复杂度为O(n x Pow(2,n))
跟动态规划解0-1背包的O(nc)时间复杂度相比,回溯算法的时间复杂度大得多。

Note:
剪枝函数(约束函数和上界函数)的选取是回溯法性能的关键。

分支限界法

待续…..

STL

C++里将数据结构和算法运用的比较好的就不得不提STL了。

STL

STL(标准模板库)是C++标准程序库的核心,是一个泛型程序库,利用先进,高效的算法来管理数据。

STL组件

  1. 容器(Containers)
    用来管理某类对象的集合。
  2. 迭代器(Iterators)
    用来在一个对象群集(Collection of objects)的元素上进行遍历动作
  3. 算法(Algorithoms)
    用来处理群集内的元素。(比如搜寻,排序,修改,使用等)

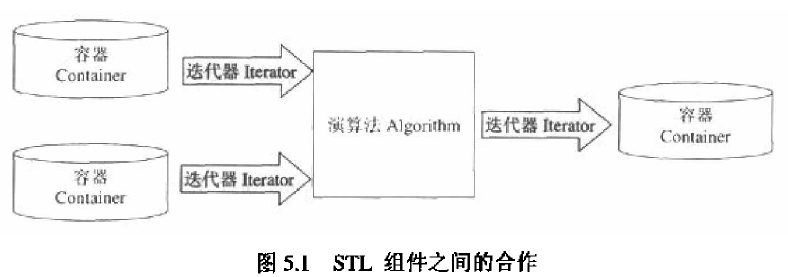
“STL的基本观念就是将数据和操作分离。数据由容器类加以管理,操作则由可定制的算法定义。迭代器在两者之间充当粘合剂是的任何算法都可以和任何容器运作。”
STLComponentsRelationship

STL将数据和算法分开对待,这和面向对象设计(OOP)的思想是矛盾的。
但这么做的好处是:
可以将各容器与各算法结合起来。

STL的特性一:
泛型,可以针对任意类型运作

Note:
“STL甚至提供更泛型化的组件。通过特定的适配器(adapters)和仿函数(functors),你可以补充,约束或定制算法,以满足特别需求。”

容器(Containers)

容器可分为两类:

  1. Sequence Containers
    “可序(ordered)群集,每个元素均有固定位置–取决于插入时机和地点,和元素值无关。”
    vector,deque,list
    Vectors特点(Vector将其元素置于一个dynamic array):
    1. 允许随机存储。
    2. 非尾部插入会比较费时(要保持原本的相对次序,导致元素移动)
    3. 动态扩容
      Deques特点(double-ended queue是一个dynamic array,可以向两端发展):
    4. 允许随机存储
    5. 头部和尾部插入迅速
    6. 中间部分插入费时(导致元素移动)
    7. 动态扩容
      Lists特点(doubly linked list,分散存储内存):
    8. 不提供随机存取(因为是分散存储的)
    9. 访问元素费时(沿着链表节点访问)
    10. 插入和删除快速(因为只需要改变链接点即可)
    11. 动态扩容
  2. Associative Containers
    “已序(sorted)群集,元素位置取决于特定的排序准则。”
    set,multiset,map,multimap
    Sets特点:
    1. 依据值自动排序
    2. 每个元素值只允许出现一次
    3. 动态扩容
      Multisets特点:
    4. 依据值自动排序
    5. 允许重复元素
    6. 动态扩容
      Maps特点:
    7. 采用键值对存储,根据键值排序
    8. 键值不允许重复
    9. 动态扩容
      Multimaps特点:
    10. 采用键值对存储,根据键值排序
    11. 允许键值重复
    12. 动态扩容

除了上述容器,C++标准成宿还提供了一些特别的Container Adapters。
Container Adapaters:

  1. Stacks
    LIFO(后进先出)
  2. Queues
    FIFO(先进先出)
  3. Priority Queues
    元素按优先级排序

Note:
“通常关联式容器由二叉树(binary tree)实现。”

容器的共同能力:

  1. 所有容器提供的都是“Value语意”而非“Reference语意”
    Value语意 VS Reference语意
    “STL只支持value语意,不支持reference语意”
    好处:
    1. 元素拷贝简单
    2. 使用references时容易导致错误
      缺点:
    3. “拷贝元素”可能导致不好的性能
    4. 无法在数个不同的容器中管理同一份对象
  2. 所有元素形成一个次序(返回iterator的接口用于访问所有元素)
  3. 各项操作并非绝对安全。调用者必须确保传给操作函数的参数符合需求。

Note:
实现Reference语意需要通过智能指针(e.g. share_ptr)

容器的共同操作:

  1. 初始化
  2. 大小相关操作函数(size(),empty(),max_size())
  3. 比较(==,!=,<,<=,>,>=)

Value语意也就引出了容器元素的条件:

  1. 必须可透过copy构造函数进行复制
  2. 必须可以透过assignment操作符完成赋值动作
  3. 必须可以透过析构函数完成销毁动作

如何选择合适的Container?
根据以下规则:

  1. 缺省情况下使用vector,vector内部结构简单,支持随机存储
  2. 如果经常要在头部和尾部安插和移除元素,采用deque
  3. 如果需要经常在容器的中段执行元素的插入,移除和移动,可以考虑使用list
  4. 如果经常需要根据某个准则来搜寻元素,那么应当使用“以该排序准则对元素进行排序”的set或multiset(hash table比二叉树更快,对于无需排序的元素,推荐用hash table)
  5. 如果想处理key/value pair,采用map或multimap
  6. 如果需要关联式数组,应用map
  7. 如果需要字典结构,应用multimap

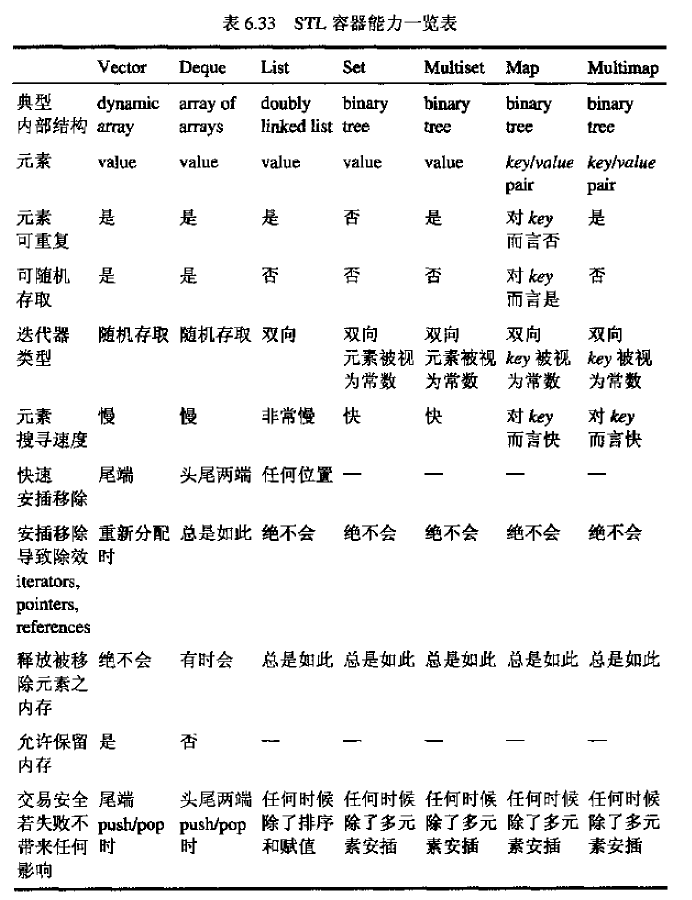
STL Container能力详情参见:
STLContainerCapabilities

容器内的类型和成员

容器内的类型:
container::value_type – 元素类型
container::reference –元素的引用类型
container::const_reference – 常数元素的引用类型
container::iterator – 迭代器类型
container::const_iterator – 常数迭代器的类型
container::const_reverse_iteator – 常数反向迭代器的类型
container::size_type – 无符号整数类型,用以定义容器大小
container::difference_type – 正整数类型,用以定义距离
container::key_type – 用以定义关联式容器的元素内的key类型
container::mapped_type – 用以定义关联式容器的元素内的value类型
container::key_compare – 关联式容器内的“比较准则”的类型
container::value_compare – 整个元素”比较准则”的类型
container::allocator_type – 配置器类型

生成,复制,销毁,非变动性操作,赋值,元素存储,返回迭代器操作,元素insert和remove:
……
……

迭代器(Iterators)

什么是迭代器(Iteratos)?
“迭代器是一个“可遍历STL容器内全部或部分元素”的对象。”

Note:
“迭代器奉行一个村抽象概念:任何东西,只要行为类似迭代器,就是一种迭代器。不同的迭代器具有不同的“能力”(指行进和存储能力)”

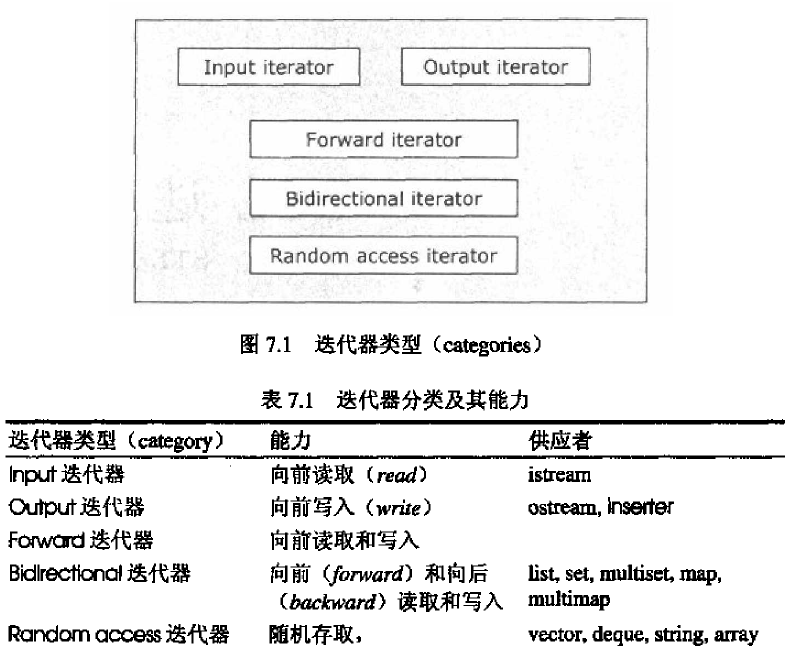
迭代器分类:
STLIteratorClassification

迭代器的能力取决于容器的内部结构,所以根据能力来分类的话:

  1. 双向迭代器(Bidirectional iterator)
    支持双向行进(++ –)(list, set, multiset, map, multimap)
  2. 随机存取迭代器(Random access iterator)
    支持双向行进同时具备随机访问(< >等)(vector, deque)

“为了编写与容器类型无关的泛型程序编码,最好不要使用随机存取迭代器。(因为不是所有的容器都支持随机迭代器)”

比如如下代码:

1
2
3
4
for(pos = coll.begin(); pos < col.end(); ++pos)
{
.......
}

上面使用的<就是随机存储迭代器才支持的。

Note:
是否支持特定迭代器跟迭代器的能力和容器的内部结构挂钩(比如List因为是链接形式所以肯定不支持Random access iterator的随机访问的)。

迭代器操作:

  1. Operator *
    返回当前元素值
  2. Operator ++
    访问下一个元素
  3. Operators ==
    判断迭代器是否指向同一位置
  4. Operators !=
    判断迭代器是否指向同一位置
  5. Operator =
    为迭代器赋值

“迭代器是个所谓的smart pointers,具有遍历复杂数据结构的能力。其下层运行机制取决于其所遍历的数据结构。因此,每一种容器类型都必须提供自己的迭代器。”

容器类提供的迭代器访问相关函数:

  1. begin()
    返回一个迭代器,指向容器的起始点
  2. end()
    返回一个迭代器,指向容器结束点(最后一个元素之后)

读写方式区分:

  1. iterator
    支持读/写模式
  2. const_iterator
    只读模式

这里通过简单的使用Set container为例,对iterator和自定义比较函数做个了解:

1
2
3
4
5
6
7
8
9
10
11
12
13
14
15
16
17
18
19
20
21
22
23
24
25
26
27
28
29
30
31
32
33
34
// STLStudy.cpp : Defines the entry point for the console application.
//

#include "stdafx.h"

template<typename T>
bool Greater(const T& p1, const T& p2)
{
return p1 > p2;
}

int _tmain(int argc, _TCHAR* argv[])
{
//Associative Container
bool(*fn_pt)(const int&,const int&) = Greater<int>;
set<int, bool(*)(const int&,const int&)> s(fn_pt);

s.insert(4);
s.insert(3);
s.insert(2);
s.insert(6);
s.insert(5);
s.insert(1);

set<int>::const_iterator set_const_iterator;
for (set_const_iterator = s.begin(); set_const_iterator != s.end(); ++set_const_iterator)
{
cout << *set_const_iterator<<endl;
}

system("pause");

return 0;
}

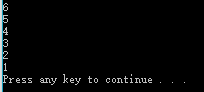
SetIteratorAndCompareFunction
从上面可以看到set有自己对应的iterator去访问set container里的元素,同时我们也可以传递一个自定义的比较函数作为set container排序的依据。

迭代器相关辅助函数:

  1. advance() – 可令迭代器前进
  2. distance() – 计算两个迭代器之间的距离
  3. iter_swap() – 交换两个迭代器所指内容

Iterator Adapter:

  1. Insert iterators
    使算法以安插(insert)方式而非覆写(overwrite)方式运作
    1. Back inserters(安插于容器最尾端)
    2. Front inserters(安插于容器最前端)
    3. General inserters(安插到指定位置)
  2. Stream iterators
    用于读写stream的迭代器。
  3. Reverse iterators
    以逆方向进行所有操作(++相当于– –相当于++)
    通过容器的rbegin(),rend()可以获得Reverse iterators

迭代器特性(Iterator Traits):
“迭代器可以区分为不同类型,每个类型都具有特定的迭代器功能。如果能根据不同的迭代器类型,将操作行为重载,将会很有用,甚至很必要。透过迭代器标记(tags)和特性(traits)可以实现这样的重载。”

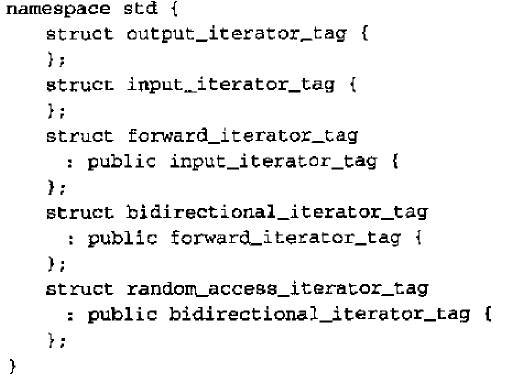
首先来看看迭代器标志的定义:
STLIteratorTags

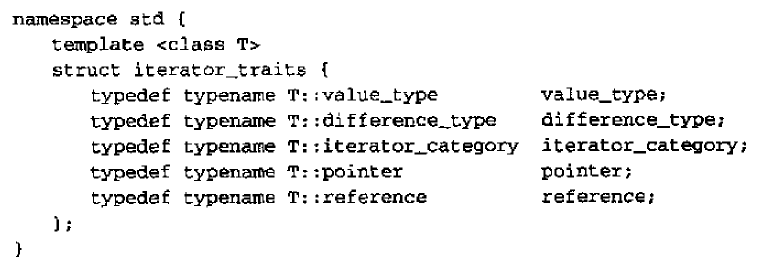
接下来是迭代器特性(包含迭代器相关的所有信息)的定义:
STLIteratorTraits
“有了上面这个template,T表示迭代器类型,我们就可以撰写任何运用“迭代器类型或其元素类型”等特征的泛型程序代码”

iterator_traits结构描述了迭代器相关的类型信息。
针对特定的迭代器(一般指针作为迭代器时)需要特化版本:

1
2
3
4
5
6
7
8
9
10
11
12
namespace std{
template <class T>
struct iterator_traits<T*>{
typedef T value_type;
typedef ptrdiff_t difference_type;
typedef random_access_iterator_tag iterator_category
typedef T* pointer;
typedef T& reference;
}
}

}

比如元素环形移动:

1
2
3
4
5
6
7
8
9
10
11
12
13
14
15
template<class Forwarditerator>
void shift_left(Forwarditerator beg, Forwarditerator end)
{
//temporary variable for first element
typedef typename std::iterator_traits<Forwarditerator>::value_type value_type;

if(beg != end)
{
//save value of first element
value_type temp(*beg);

//shift following values
......
}
}

通过把迭代器类型作为模板参数通过iterator_traits访问该迭代器类型的value_type。

iterator_traits里的iterator_category可以帮助我们写出针对不同迭代器类型的函数。
接下来结合distance()的实现来学习理解

1
2
3
4
5
6
7
8
9
10
11
12
13
14
15
16
17
18
19
20
21
22
23
template<class iterator>
typename std::iterator_traits<iterator>::difference_type distance(iterator pos1, iterator pos2)
{
return distance(pos1, pos2, std::iterator_traits<iterator>::iterator_category());
}

template<class Raiterator>
typename std::iterator_traits<Raiterator>::difference_type foo(Raiterator pos1, Raiterator pos2, std::random_access_iterator_tag)
{
return pos2 - pos1;
}

template<class Initerator>
typename std::iterator_traits<Initerator>::difference_type foo(Initerator pos1, Initerator pos2, std::input_iterator_tag)
{
typename std::iterator_traits<Initerator>::difference_type d;
for(d = 0; pos1 != pos2; ++pos1, ++d)
{
;
}

return d;
}

根据传递迭代器类型iterator_category()作为第三个参数,我们可以写出针对不同迭代器类型的distance方法实现。根据迭代器是否支持随机访问,我们写出了不同的distance计算实现。
Note:
difference_type代表迭代器距离类型。同时std::tag对于子类同时有效。

如何自定义迭代器?
可以看出迭代器必须具有iterator_traits结构所描述的类型定义,用于描述迭代器相关类型信息。

  1. 提供必要的五种类型定义(iterator_traits里定义的)
  2. 提供一个特化版本(用于一般指针迭代器)的iterator_traits结构
1
2
3
4
5
6
7
8
9
10
11
12
13
14
15
16
17
18
19
20
21
22
23
24
25
26
27
28
29
30
31
32
33
34
35
36
37
38
39
40
41
42
#include "stdafx.h"

template<typename Container>
class MyInsertIterator : public std::iterator<std::output_iterator_tag, void, void, void, void>
{
protected:
Container& container;

public:
explicit MyInsertIterator(Container& c) : container(c)
{

}

MyInsertIterator<Container>& operator= (const typename Container::value_type& value)
{
container.insert(value);
return *this;
}

MyInsertIterator<Container>& operator* ()
{
return *this;
}

MyInsertIterator<Container>& operator++ ()
{
return *this;
}

MyInsertIterator<Container>& operator++ (int)
{
return *this;
}
};

//convenience function to create the MyInsertIterator
template<class Container>
inline MyInsertIterator<Container> MyInsert(Container& c)
{
return MyInsertIterator<Container>(c);
}

测试程序

1
2
3
4
5
6
7
8
9
10
11
12
13
14
15
16
17
18
19
20
21
22
23
24
25
26
27
#include "stdafx.h"
#include "MyInsertIterator.h"

int _tmain(int argc, _TCHAR* argv[])
{
//My own Iterator part
set<int> coll;

//create MyInsertIterator for coll
MyInsertIterator<set<int>> iter(coll);
*iter = 1;
iter++;
*iter = 2;
iter++;
*iter = 3;

PrintAll(coll);

MyInsert(coll) = 44;
MyInsert(coll) = 55;

PrintAll(coll);

system("pause");

return 0;
}

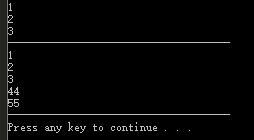
STLOwnIterator
把iterator作为父类,通过设定模板参数设置iterator_traits里需要设定的类型相关信息。
通过重载各个运算符实现我们自己的迭代器支持的操作。

Note:
“Iterator traits是掌握STL编程技术的关键。”

算法(Algorithms)

“算法并非容器类的成员函数,而是一种搭配迭代器使用的全局函数。”

这样做的好处:
“不必为每一种容器量身定制算法,所有算法只需一份。”

先来看看实战使用:

1
2
3
4
5
6
7
8
9
10
11
12
13
14
15
16
17
18
19
20
21
22
23
24
25
26
#include "stdafx.h"

int _tmain(int argc, _TCHAR* argv[])
{
//cout << MyClass::mID << endl;

//Sequence container
vector<int> v;

for (int i = 0; i < 10; i++)
{
v.push_back(i);
}

reverse(v.begin(), v.end());

vector<int>::const_iterator vector_const_iterator;
for (vector_const_iterator = v.begin(); vector_const_iterator != v.end(); ++vector_const_iterator)
{
cout << *vector_const_iterator << endl;
}

system("pause");

return 0;
}

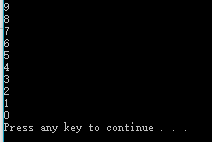
STLAlgorithems
从上面reverse的调用可以看出,用户需要负责传入两个iterator作为访问区间。
但这样做的话接口虽然灵活,但是确需要用户去保证传入的两个iterator的有效性。

算法分类:

  1. Manipulating Algorithms
    是指会“删除或重排或修改元素”的算法
    remmove,resort,modify……
    下面以remove算法为例:
1
2
3
4
5
6
7
8
9
10
11
12
13
14
15
16
17
18
19
20
21
22
23
24
25
26
27
28
29
30
31
32
33
34
35
36
37
38
39
40
41
42
43
44
45
46
47
48
49
50
51
52
53
#include "stdafx.h"


template<typename T>
void PrintAll(T container)
{
typename T::const_iterator const_iterator;
for (const_iterator = container.begin(); const_iterator != container.end(); ++const_iterator)
{
cout << *const_iterator << endl;
}

cout << "-------------------------------------" << endl;
}

int _tmain(int argc, _TCHAR* argv[])
{
//cout << MyClass::mID << endl;

//Sequence container
vector<int> v;
vector<int> v2;

for (int i = 0; i < 10; i++)
{
v.push_back(i);
}

reverse(v.begin(), v.end());

//PrintAll<vector<int>::const_iterator>(v.begin(), v.end());

copy(v.begin(), v.end(), inserter(v2, v2.begin()));

//PrintAll<vector<int>::const_iterator>(v2.begin(), v2.end());

//注意remove不会改变container数量,只是用后面的覆盖符合规则的元素
//同时返回新的最尾端元素iterator
vector<int>::iterator v2end = remove(v2.begin(), v2.end(), 3);

PrintAll<vector<int>>(v2);

PrintAll<vector<int>>(v2);

//要想删除container里的元素,需要使用容器的erase
v2.erase(v2end, v2.end());

PrintAll<vector<int>>(v2);

system("pause");

return 0;
}

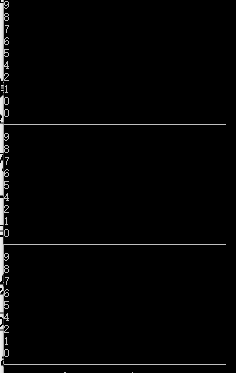
STLRemove
从上面看到,我们无法通过迭代器本身去删除容器的元素而需要通过容器本身去删除。
为什么会这样了?
“STL将数据结构和算法分离开来。然而,迭代器只不过是“容器中某一位置”的抽象概念而已。一般来说,迭代器对自己所属容器一无所知。任何“以迭代器访问容器元素”的算法,都不得透过迭代器条用容器类提供的任何成员方法。”
但正因为这样的设计,算法只需要操作与迭代器上而不需要了解容器细节。
那么这里有一个问题,Manipulating Algorithms会修改或移除或重排容器元素,那么他们可以作用于Associative Containers(按特定规则对元素进行了排序)上吗?
答案是不能,为了保证Associative Containers已序的特性,Associative Containers只提供了const_iterator的迭代器,从而防止了Manipulating Algorithms的使用。
算法 VS 容器成员函数?
算法只是做一些通用的工作,本不能完美针对各个容器使用最优的方式。
比如针对list,如果采用算法remove,会导致删除第一个元素后,后面所有的元素都分别设给前一个元素,这就违背了list的通过修改链接而非实值来安插,移动,移除元素的优点。在这种情况下,使用list自身的成员函数更优于通用算法。

自定义泛型函数:
参见前面我们自定义的PrintAll泛型模板函数,把container作为参数传递,从而打印出所有元素。

以函数作为算法的参数:
一些算法可以接受用户定义的辅助性函数,由此提高其灵活性和能力。这些函数将在算法内部被调用。
下面以for_each为例:
1
2
3
4
5
6
7
8
9
10
11
12
13
14
15
16
17
18
19
#include "stdafx.h"

template<typename T>
void Print(T elem)
{
cout << elem << endl;
}

int _tmain(int argc, _TCHAR* argv[])
{
......

cout << "foreach-------------------------" << endl;
for_each(v2.begin(), v2.end(), Print<int>);

system("pause");

return 0;
}

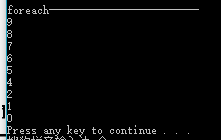
STLForEach
“运用这些辅助函数,我们可以指定搜寻准则,排序准则或定义某种操作等。”
Predicates:
“Predicates是一种特殊的辅助函数。返回bool的函数,通常被用来指定排序准则和搜寻准则。(STL要求,面对相同的值,predicates必须得出相同的结果)”
下面以find_if为例:

1
2
3
4
5
6
7
8
9
10
11
12
13
14
15
16
17
18
19
20
21
22
23
24
25
26
27
28
29
30
31
32
33
34
35
36
37
38
#include "stdafx.h"

template<typename T>
bool IsEven(T number)
{
number = abs(number);

if (number % 2 == 0)
{
return true;
}
else
{
return false;
}
}

int _tmain(int argc, _TCHAR* argv[])
{
......

for_each(v2.begin(), v2.end(), Print<int>);

vector<int>::iterator pos = find_if(v2.begin(), v2.end(), IsEven<int>);

if (pos != v2.end())
{
cout << *pos << " is first even number in v2!" << endl;
}
else
{
cout << "No even number found!" << endl;
}

system("pause");

return 0;
}

STLPredicates
更多的predicates参考STL Algorithms的使用。
2. Nonmodifying Algorithms
是指不会变动元素值,也不会改变元素次序的算法。
e.g. count, min_element, max_element, find……

仿函数(Functors):
什么是Functors?
“Functors是泛型编程强大为例和纯粹抽象概念的又一个例证。你可以说,任何东西,只要其行为像函数,它就是函数。因此,如果你定义了一个对象,行为像函数,它就可以被当做函数来用。”

那么什么才算是具备函数行为了?
“是指可以“使用小括号传递参数,籍以调用某个东西”。”
e.g.
function(arg1,arg2);

如何实现?
通过自定义operator()即可

1
2
3
4
5
6
7
8
9
10
11
12
13
14
15
16
17
18
19
20
21
22
23
24
#include "stdafx.h"

//functors
template<typename T>
class FunctorClass
{
public:
void operator()(T elem) const{
cout << elem << endl;
}
};

int _tmain(int argc, _TCHAR* argv[])
{
......

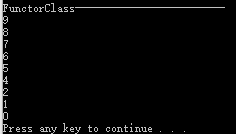
FunctorClass<int> func;

for_each(v2.begin(), v2.end(), func);

system("pause");

return 0;
}

STLFunctors
让我们看看for_each源码:

1
2
3
4
5
6
7
8
9
template<class InputIterator, class Function>
Function for_each(InputIterator first, InputIterator last, Function fn)
{
while (first!=last) {
fn (*first);
++first;
}
return fn; // or, since C++11: return move(fn);
}

可以看出我们传递的FunctorClass实例对象通过fn(*first)的方式调用了我们定义的operator()函数

Functor好处:

  1. smart functions(智能型函数)
    ““行为类似指针”的对象。拥有成员函数和成员变量,意味着functor拥有状态。”
  2. 每个functor都有自己的类型
  3. functor通常比一般函数速度快
    “就template概念而言,由于更多细节在编译器就已确定,所以通常可能进行更好的最佳化。”

预定义的Functor:
C++标准库里包含了一些预先定义的仿函数:
less<>,negate<>……

什么是Function Adaptors?
所谓的Function Adaptors是指能够将仿函数和另一个仿函数(或某个值,或某个一般函数)结合起来的仿函数。
比如:
bind2nd(greater(),42) – 检查某个int值大于42.bind2nd把二元仿函数转换为一元仿函数。
“通过Function Adaptors,我们可以把多个仿函数结合起来,形成强大的表达式,这种编程方式称为functional composition。”

那么成员函数能当做Function Adaptors使用吗?
答案是可以。C++里提供了将成员函数转换成Function Adaptors的方法(mem_fun_ref()和mem_fun())
Note:
mem_fun_ref和mem_fun调用的成员函数必须是const。

那么非成员函数是否能当做Function Adaptors了?
答案是可以的。C++里提供了ptr_fun将非成员函数转换为Functor Object。
详细内容参见《C++标准程序库》第8章

接下来让我们看看如何使自定义的Functor也可以使用Function Adaptors。
要想使自定义Functor使用Function Adaptors需要满足下列条件:

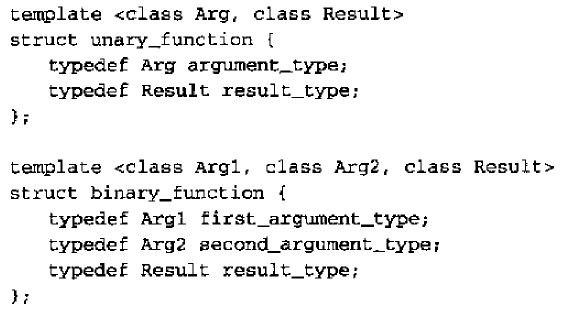
  1. 必须提供一些类型成员来反映其参数和返回值的类型。
    C++标准程序库提供了一些结构如下:
    STLFunctionAdaptorsStructor
    如果自定义Functor想要支持Functor Adaptors,我们只需要定义struct继承至unary_function或binary_function,同时定义operator()的Functor行为即可。

更多一元,二元组合函数配接器参见《C++标准程序库》第8章

Note:
算法参数传递的区间是半开区间[begin, end)(包含begin,不包含end)

STL内部的错误处理和异常处理

错误处理

“STL的设计原则是效率优先,安全次之。错误检查相当花时间,所以几乎没有。”
原因:

  1. 错误检验会降低效率,而速度始终是程序的总体目标。
  2. 不加入的话,用户可以通过封装自己写错误检查的版本,但反过来却不行。

使用STL需要注意的点:

  1. 迭代器务必合法而有效
  2. 一个迭代器如果只想”end”位置,它并不指向任何对象,因而不能对它调用operator*或operator->
  3. 区间必须是合法的
  4. 如果涉及的区间不止一个,第二区间及后继各区间必须拥有“至少和第一区间一样多”的元素
  5. 覆盖动作中的“目标区间”必须拥有足够的元素,否则就必须采用insert iterators

Note:
含错误处理版本的STL,STLport

异常处理

……

扩展STL

“STL被涉及成一个框架,可以向任何方向扩展。你可以提供自己的容器,迭代器,算法,Functor…..,只要你满足条件即可。”

待续……

前言

在最初学习Unity的时候,对于资源管理没有系统的概念,只知道放到Assets下即可。
本章节主要是对于Unity在资源管理方面的进一步学习了解。

这里简单提及正确的利用Unity资源管理的好处:

  1. 高效的管理资源
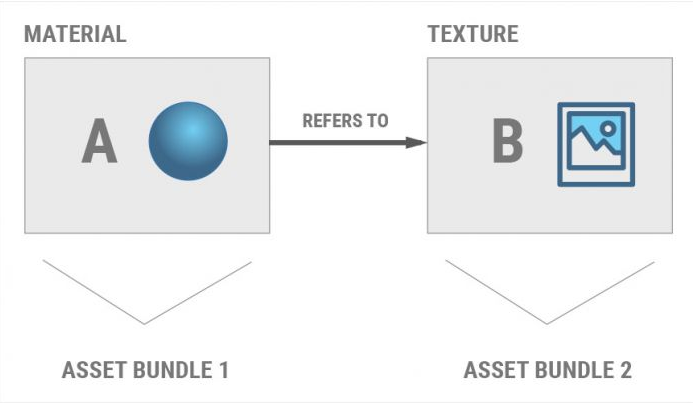
  2. 合理的分配内存(避免不必要的内存开销 – 比如同一个Asset被打包到多个AssetBundle里,然后分别被游戏加载)
  3. 做到增量更新(无需下载更新整个游戏程序,通过Patch的形式动态更新部分游戏内容)
  4. 以最少及最合理的方式减少程序大小(避免所有资源一次性打到游戏程序里)
  5. 帮助快速开发(动态和静态的资源方式合理利用,高效开发)

资源管理

资源形式

Asset

在Unity里所有我们使用的资源都是以Asset的形式存在的。
我们要想在Unity里使用特定的资源文件(比如.ogg .png .fbx等(Unity支持的资源格式)),我们需要放到Assets目录下。
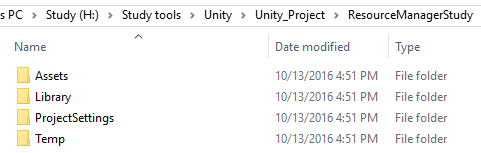
见下图:
AssetsDirectory

在进一步了解我们导入Assets的时候,会发生些什么之前,先让我们来学习了解一些相关的概念。
首先,什么是Asset?
Asset – “An Asset is a file on disk, stored in the Assets folder of a Unity Project. e.g. texture files, material files and FBX files……”(Asset代表的所有存储在Assets目录下的文件资源)

Unity如何区分每一个Asset?
Unity通过赋予每一个Asset一个Unique ID来区分每一个Asset。
每一个放在Asset目录下的资源都会对应生成一个同样名字的.meta文件,前面提到的Unique ID就被存储在这里。
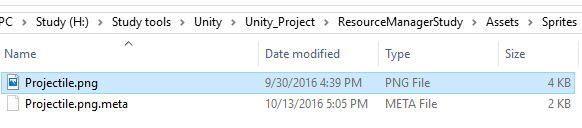
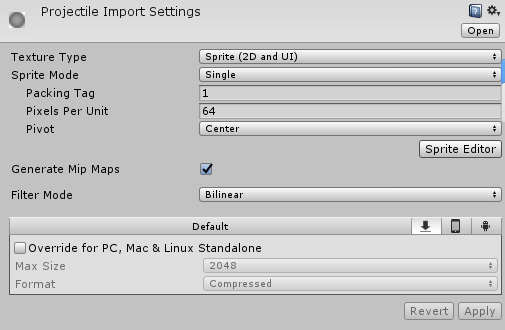
下面我已导入一张Projectile.png并设置导入设置为Sprite等相关信息为例。
ImportProjectilePNG
ProjectilePNGImportSetting
Projectile.png.meta

1
2
3
4
5
6
7
fileFormatVersion: 2
guid: 8764571b0416f90488390d0114c49afd
timeCreated: 1476349445
licenseType: Free
TextureImporter:
fileIDToRecycleName: {}
......

可以看到对应生成了一个叫Projectile.png.meta的文件,里面存储了guid(前面提到的那个Unique ID)和资源导入配置的数据。
这样一来无论我们如何移动Asset(在Assets目录下),我们都不会影响其他资源对该Asset的引用(因为Unity通过Unique ID去标识该Asset)
Note:
所以我们一旦在Unity外部移动或改名Asset文件,一定要把对应的Asset.meta文件名也对应移动和改名。(在Unity窗口修改可以不必管这些,因为Unity会对应生成新的.meta文件)
如果script脚本的.meta文件丢失,那么所有挂载了该script的GameObject都会显示unassaigned script(因为找不到该Script Asset的ID标识)

知道了Asset在Unity是如何区分的,那么接下来的问题是,Unity是直接使用这些Asset资源文件作为游戏资源吗?
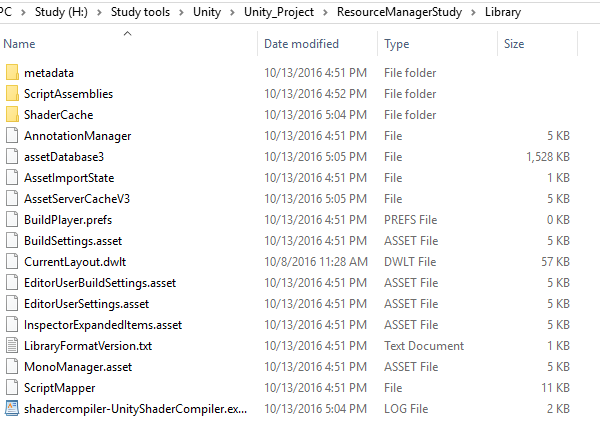
答案是否定的,所有导入的Asset都会被Unity转化成特定的格式在游戏中使用,被存储在Library目录下,而原有资源保持不变,依然放在原始位置。(这样一来,我们可以通过修改原始文件,快速的在Unity中看到变化。比如.png作为UI,我们在Photoshop里修改源文件,直接就能在Unity看到变化)
UnityAssetInternalFormatInLibraryFolder
Note:
因为Library目录是通过动态转换Asset资源成Unity识别的数据,所以我们不会去主动修改该目录文件,同时也不会对该目录做版本控制,我们放心的删除该目录(但会导致所有Asset重新导入声称一次Unity识别的数据)

知道了Unity如何利用原始文件生成最终的可利用的资源数据,那么是不是所有的Asset都是通过直接放置在Assets目录下得到的了?
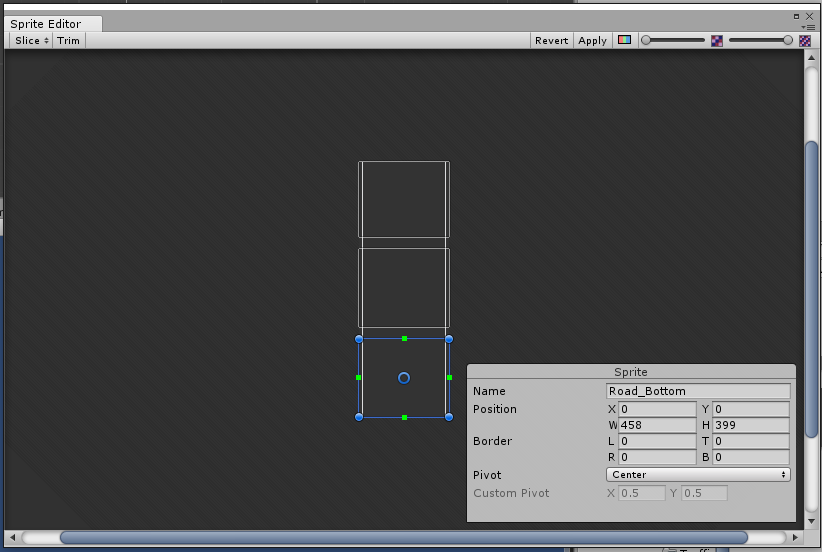
答案是否定的,Unity支持从一些资源文件里细分出多个Assets。(比如.png文件可以作为Multiple Sprite导入到Unity里,然后通过Sprite Editor细分出多个Sprite,然后每一个Sprite都作为Asset存在于Unity里)

知道了Asset在Unity里的概念以及存储方式,那么Unity支持哪些常见的Asset格式了?

  1. Image File(e.g. .bmp, .tif, .tga, .jpg, .psd……)
  2. 3D Model Files(.fbx)
  3. Meshes & Animations
  4. Audio files
  5. Other Asset Types

遇到Unity不支持的格式,Unity需要通过import process导入资源文件(e.g. PNG, JPG)
“The import process converts source Assets into formats suitable for the target platform selected in the Unity Editor.”(Import process主要是为了将不支持的资源格式转换到Unity对应平台设置的对应格式)

Unity不可能每一次都去重新Import这些资源,那么Unity是如何将import结果存储在哪里了?
为了避免重复的import导入,” the results of Asset importing are cached in the Library folder.”(Asset导入的结果被缓存在了library folder – 我想这也就是为什么每次删掉Library文件会导致一些asset重新导入的原因)

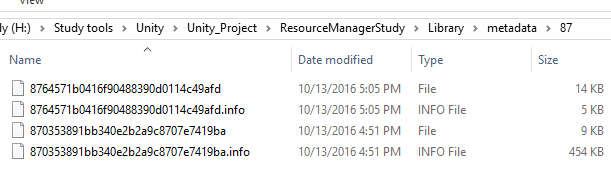
“the results of the import process are stored in a folder named for the first two digits of the Asset’s File GUID. This folder is stored inside the Library/metadata/ folder. The individual Objects are serialized into a single binary file that has a name identical to the Asset’s File GUID.”(可以看出import的结果存储在Library/metadata/文件夹下,并且把File GUID的前两位bit作为文件夹名,以File GUID作为文件名字)
以前面Projectile.png导入为例:
因为Projectile.png.meta的File ID为8764571b0416f90488390d0114c49afd
所以导入的结果就存储在Library\metadata\87\文件夹下,文件名为8764571b0416f90488390d0114c49afd(由于是二进制文件,无法查看具体内容)
AssetImportResult
Note:
Non-Native asset type需要通过asset importer去导入Unity。(自动调用,也可以通过AssetImporter API去调用)

明白了Asset在Unity里的概念和存储方式,那么我们如何去访问,使用,创建Asset了?
在了解如何访问Asset之前,我们需要明确的是,我们访问的目的是什么。
如果只是在编辑器里单纯访问Asset去创建和删除一些Asset,那么通过AssetDatabase就可以实现。

先来看看什么是AssetDatabase:
“AssetDatabase is an API which allows you to access the assets contained in your project. Among other things, it provides methods to find and load assets and also to create, delete and modify them. The Unity Editor uses the AssetDatabase internally to keep track of asset files and maintain the linkage between assets and objects that reference them.”(可以看出,AssetDatabase在Unity对于Asset管理上起了关键性作用,AssetDatabase里存储了Asset相关的很多信息(e.g. Asset Depedency, Asset Path…..))

所以如果我们想通过代码去实现一些关于Assset的操作,我们应该使用AssetDatabase而非Filesystem(Filesystem只是单纯的删除或移动文件,但对于Asset在Unity里的导入设置,Asset访问等还是得通过AssetDatabase的接口来操作)

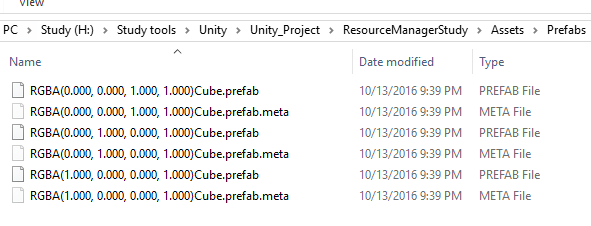
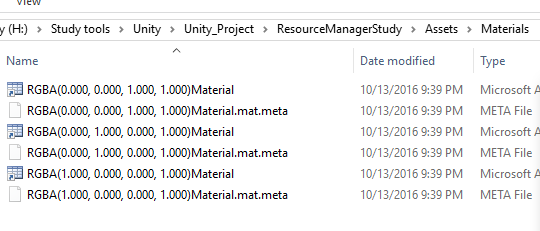
这里我以之前导入的Projectile.png为纹理图片,通过程序创建3个颜色分别是Red,Blue,Green的Material和分别使用其作为材质的3个Cude Prefab为例:
先看一下效果图:
CreateCubePrefabs
CreateCubeMaterials

1
2
3
4
5
6
7
8
9
10
11
12
13
14
15
16
17
18
19
20
21
22
23
24
25
26
27
28
29
30
31
32
33
34
35
36
37
38
39
40
41
42
43
44
45
46
47
48
49
50
51
52
53
54
55
56
57
58
59
60
61
62
63
64
65
66
67
68
69
70
71
72
73
74
using UnityEngine;
using System.Collections;
#if UNITY_EDITOR
using UnityEditor;
#endif

public class CreateCubeAssetMenu {
//Only works under editor
#if UNITY_EDITOR
[MenuItem("AssetDatabase/CreateCubeAsset")]
static void CreateCudeAsset()
{
//load Projectile.png as texture
Texture2D texture = (Texture2D)AssetDatabase.LoadAssetAtPath("Assets/Sprites/Projectile.png", typeof(Texture2D));

//create material and cube assets
string matassetname;
string cubename;
string materialfoldername = "Materials";
string cubefoldername = "Prefabs";

Color[] colors = { Color.red, Color.blue, Color.green };
for (int i = 0; i < colors.Length; i++)
{
//Create material first
Material mat = new Material(Shader.Find("Transparent/Diffuse"));
mat.mainTexture = texture;
mat.color = colors[i];

//create a new cube and set material for it
GameObject obj = GameObject.CreatePrimitive(PrimitiveType.Cube);
MeshRenderer meshrender = obj.GetComponent<MeshRenderer>();
if (meshrender != null)
{
meshrender.material = mat;
}
else
{
Debug.Log("meshrender == null!");
break;
}

matassetname = mat.color.ToString() + "Material.mat";
cubename = mat.color.ToString() + "Cube.prefab";
//create material folder
//check whether material folder exist
if (AssetDatabase.Contains(mat))
{
Debug.Log("Material asset has been created before!");
}
else
{
if (!AssetDatabase.IsValidFolder("Assets/" + materialfoldername))
{
AssetDatabase.CreateFolder("Assets", materialfoldername);
}

if (!AssetDatabase.IsValidFolder("Assets/" + cubefoldername))
{
AssetDatabase.CreateFolder("Assets", cubefoldername);
}

AssetDatabase.CreateAsset(mat, "Assets/" + materialfoldername + "/" + matassetname);

//Create prefab
PrefabUtility.CreatePrefab("Assets/" + cubefoldername + "/" + cubename, obj);

//inform the change
AssetDatabase.Refresh();
}
}
}
#endif
}

Note:
AssetDatabase只适用于Editor,所以上述代码都用#if UNITY_EDITOR #endif判断了平台

那么是不是只需存储Asset的.meta文件(Unique ID和导入配置信息)就足够了了?
答案是否定的,要知道在Unity里很多Asset不只是单纯的通过原始资源导入构成的(比如一个Bullet Prefab,上面会挂载Component,我们不仅要去标识Asset,我们还需要对Asset上的各个Component进行标识和相关信息存储,这样Unity才能正确的找到特定Asset上的特定Component的)。

Object

在进一步了解还应该存储哪些信息之前,这里需要理解一个概念UnityEngine.Object
那么Object在Unity里是什么概念了?
UnityEngine.Object – “Object with a capitalized ‘O’, is a set of serialized data collectively describing a specific instance of a resource. This can be any type of resource which the Unity Engine uses, such as a mesh, a sprite, and AudioClip …..”(Object是指描述了Asset上使用的所有resources的序列化数据。比如制作一个2D Bullet Prefab,上面会挂载Transform,Sprite Renderer,Box Collider 2D,Rigidbody 2D, Bullet Script,Animator等Object,这里我们需要分别标识和记录这些Object的信息)

前面我们提到了Asset是通过Unique ID(File GUID)来标识,那么这里的Object用什么来标识了?并且又存储在哪里了?
答案是使用Local ID来标识并存储在Asset文件里(需要设置Asset Serialization到Force Text才能查看(默认是Mixed(Text和Binary)))
Local ID – identifies each Object within an Asset file because an Asset file may contain multiple Objects.

那么Asset和Object之间是什么样的关系了?
“There is a one-to-many relationship between Assets and Objects: that is, any given Asset file contains one or more Objects.”(Asset file可以包含一个或多个Objects)

那么如何查看Object的具体信息了?
通过设置Edit -> Project Setting -> Editor -> Asset Serialization -> Force Text
我们可以去查看所有Object索引的相关信息。
这里我们以一个创建一个Bullet Prefab的Asest file为例(Bullet Prefab包含很多Component):
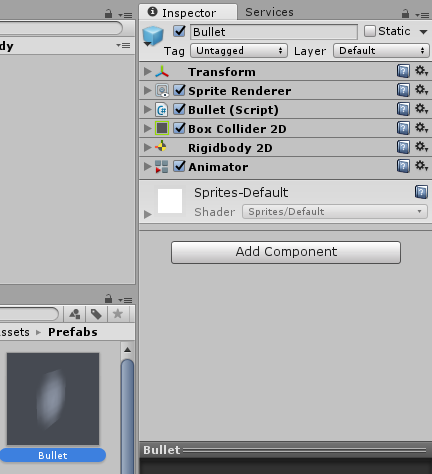
当创建一个Bullet Prefab的时候,我在上面挂载了Transform,Sprite Renderer,Box Collider 2D,Rigidbody 2D, Bullet Script,Animator等Object。
BulletInspector
这里的Bullet.prefab文件就是我们说的Asset File。
而上述挂载的所有Components就是之前说的Object。(这就印证了Asset File和Object一对多的关系)
下面让我们看看在包含多个Obejct的Prefab里是如何通过File GUID和Local ID来定位各个Object的。
Bullet.prefab

1
2
3
4
5
6
7
8
9
10
11
12
13
14
15
16
17
18
19
20
21
22
23
24
25
26
%YAML 1.1
%TAG !u! tag:unity3d.com,2011:
--- !u!1001 &100100000
Prefab:
......
--- !u!1 &1000012041017010
GameObject:
......
--- !u!4 &4000011268538122
Transform:
......
--- !u!50 &50000011296845006
Rigidbody2D:
......
--- !u!61 &61000010120606286
BoxCollider2D:
......
--- !u!95 &95000013277359834
Animator:
......
--- !u!114 &114000011185120874
MonoBehaviour:
......
--- !u!212 &212000011673545760
SpriteRenderer:
......

Bullet.prefab.meta

1
2
3
4
5
6
7
8
fileFormatVersion: 2
guid: 9c4834a7b611ce848b2d182d5057bcbb
timeCreated: 1476367984
licenseType: Free
NativeFormatImporter:
userData:
assetBundleName:
assetBundleVariant:

从Bullet.prefab里可以看出每一个Object都有定义对应的Local ID
而在Bullet.prefab.meta里定义了Bullet Prefab这个Asset File的File GUID
结合File GUID和Local ID我们就能定位到Bullet Prefab Asset File里的某某Object

那么为什么要采用File GUID和Local ID了?
“The File GUID provides an abstraction of a file’s specific location. As long as a specific File GUID can be associated with a specific file, that file’s location on disk becomes irrelevant. The file can be freely moved without having to update all Objects referring to the file.”(通过指定唯一个File GUID和Local ID,使文件的位置变的无关紧要,我们可以随意的移动文件位置而无需更新所有的Object reference信息)

所以一旦File GUID丢失,那么所有引用该文件里的Object的引用都会丢失,因为无法定位位于哪一个Asset File里。(所以不要随意乱改.meta文件)

File GUID和Local ID虽然好,但是一味的比较File GUID和Local ID会导致slow performance,所以Unity为了快速访问标识的各个Asset,内部维护了一个Instance ID的映射缓存(通过File GUID和Local ID计算得出的唯一的integer)来标识各个Asset。
通过Instance ID Unity可以快速的访问到被加载了的对应的Object。(如果target object还没被加载,那么通过File GUID和Local ID,Unity会去把Object加载进来)

那么Instance ID是如何运作的了?
“At startup, the Instance ID cache is initialized with data for all Objects that are built-in to the project (i.e. referenced in Scenes), as well as all Objects contained in the Resources folder. Additional entries are added to the cache when new assets are imported at runtime(3) and when Objects are loaded from AssetBundles. Instance ID entries are only removed from the cache when they become stale. This happens when an AssetBundle providing access to a specific File GUID and Local ID is unloaded.”(当游戏启动的时候,Instance ID的cache开始初始化所有在项目场景里引用到的Object。额外的Instance ID Cache只有在通过运行时导入或则AssetBundle动态加载Object的时候添加。Instance ID只有在Instance ID标识的Object被Unloaded的时候才会被removed from cache)

那么什么时候Object才会被Unloaded了?Object的Instance ID与AssetBundle之间又是如何关联起来的了?
“When the unloading of an AssetBundle causes an Instance ID to become stale, the mapping between the Instance ID and its File GUID and Local ID is deleted to conserve memory. If the AssetBundle is re-loaded, a new Instance ID will be created for each Object loaded from the re-loaded AssetBundle.”(当AssetBundle(后面会详细讲到)被unload后,通过AssetBundle加载的Object的Instance ID会被删除以节约内存。当AssetBundle再次加载进来后,当AssetBundel里的Obejct被再次加载时,会为该Object生成新的Instance ID到cache里)

上面算是提到了Resource(Asset里的Object)的lifecycle。关于Resource Lifecycle和Instance ID相关的学习在了解了Unity里与资源加载相关的Resource和AssetBundle后会再次讨论,见后面。

Note:
Implementation note: At runtime, the above control flow is not literally accurate. Comparing File GUIDs and Local IDs at runtime would not be sufficiently performant during heavy loading operations. When building a Unity project, the File GUIDs and Local IDs are deterministically mapped into a simpler format. However, the concept remains identical, and thinking in terms of File GUIDs and Local IDs remains a useful analogy during runtime.

接下来看看两种特殊的Object类型:

  1. ScriptableObject
    “Provides a convenient system for developers to define their own data types.”(用于定义自定义类型数据)
  2. MonoBehaviour
    “Provides a wrapper that lins to a MonoScript. A MonoScript is an internal data type that Unity uses to hold a reference to a specific scripting class within a specific assembly and namespace. The MonoScript does not contain any actual executable code.”

Monoscripts:
“a MonoBehaviour has a reference to a MonoScript, and MonoScripts simply contain the information needed to locate a specific script class. Neither type of Object contains the executable code of script class.”
“A MonoScript contains three strings: an assembly name, a class name, and a namespace.”(正如前面MonoBehavior提到的,MonoScript包含了定位script class需要的信息。 e.g. assembly name, class name, namspace……)

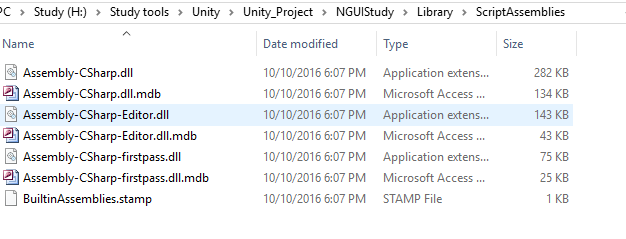
我们编写的scripts最终会被Unity编译到Assembly-CSharp.dll里。
在Plugins目录下的插件会被编译到Assembly-CSharp-firstpass.dll里。
UnityAssembly

那么我们的Asset资源被打包到哪里去了了?
接下来我们设置场景如下:

  1. 放置一个Bullet.prefab实例(上面挂载了Bullet script和一系列Component,使用Assets/Sprites/Projectile.png作为sprite(设置了打包到图集1里))
  2. 创建一个Cude的3D GameObject(Unity Primitive Cube)
  3. 创建UI Image使用Background.png作为Sprie(/Assets/Resources/Textures/UI/Background.png)
  4. 放置一张未使用的AddImage.png在Assets/Sprites下,并设置打包到图集2里。
  5. 放置一张未使用的Coin.png在Assets/Resources/Textures/UI下,并设置打包到图集3里。

然后通过Unity提取查看IOS打包后的各个资源分别存储在哪里。
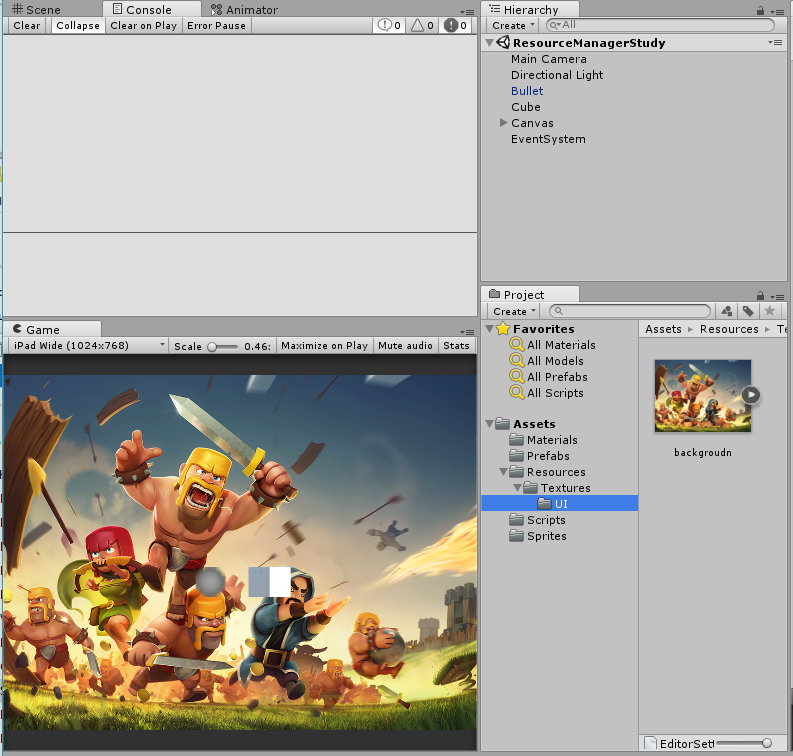
首先看看我们在场景里创建的GameObject情况:
ResourceManagerStudyScene
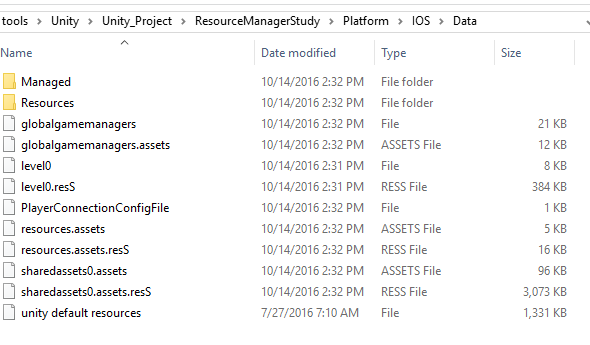
接下来查看下打包的IOS的资源文件夹下的.asset文件:
ResourceManagerStudyIOSResource
可以看到Data下有三个.assets文件(globalgamemanager.assets和sharedassets0.assets和resources.assets)
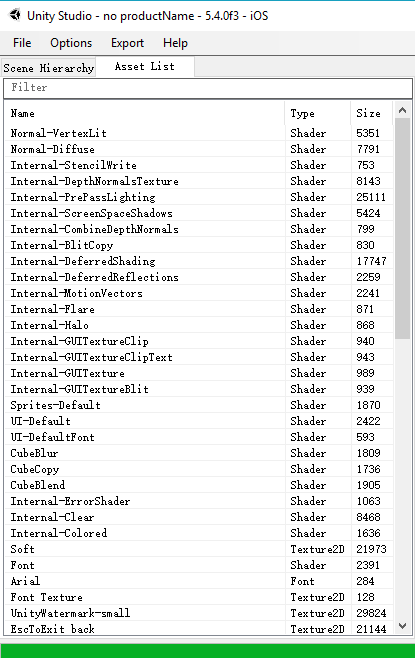
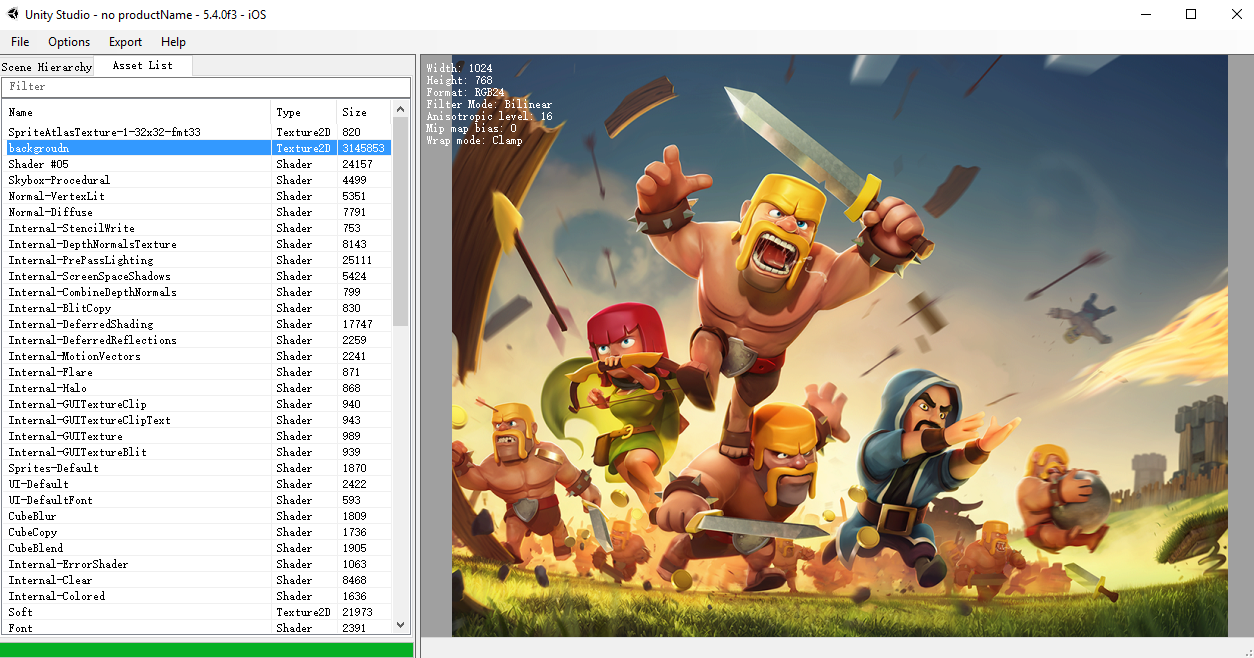
然后通过UnityStudio我们分别打开这三个文件进行查看:
globalgamemanager.assets
globalgamemanagerassets
sharedassets0assets
resourcesassets
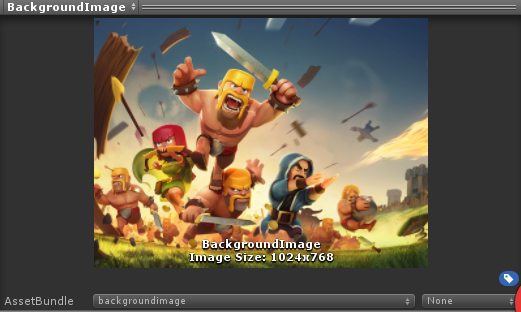
通过查看里面的资源可以发现,我们放在Assets/Sprites下的Projectile.png被打包到了SpriteAtlasTexture-1-32x32-fmt33(Texture2D)图集里,而作为UI背景放置在Assets/Resoures/Textures/UI下的backgroudn.png被单独打包在了名为backgroudn(Texture2D)里
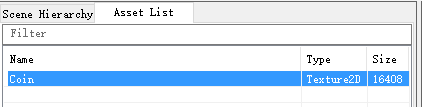
而没有在游戏里使用且放置在Assets/Resources/Textures/UI下的Coin.png被单独打包到了名为resources.assets的资源文件里。

从上面可以看出Resources下的资源文件并没有被打包到图集里,而是作为单独的Texture2D资源存在。同时没有放置在Resources目录下的资源,如果没有被游戏使用,最终是不会被打包到游戏里(反之放在Resources目录下即使未被使用也会被打包到游戏里)。

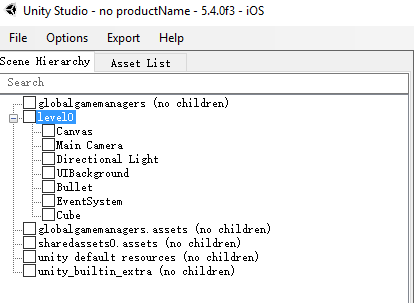
如果我们使用UnityStudio加载整个Data文件夹,我们还能查看到场景Level里的树状结构:
SeneHierarchy

说了这么多Asset和Object相关的知识和概念,下面提一个与之相关却又常常遇到的问题。
Unity Store可以下载很多Asset Package资源,那么这里的问题就是,Asset Package是个什么概念?为什么通过导入Asset Package我们就能导入别人做好的Asset资源?如何制作自己的Asset Package?
Asset Package概念:
“Packages are collections of files and data from Unity projects, or elements of projects, which are compressed and stored in one file, similar to Zip files.”(可以看出Asset Package只是相当于Unity对于一系列Assets的打包,单记录了Assets原始的目录结构和Asset信息,好比压缩包)

正如我们前面学习理解的,要想使Asset能够使用,我们需要把Asset源文件和Asset.meta文件一起保存下来(为了确保原始的Asset和Object引用正确)。那么Asset Package是否保存了Asset源文件和Asset.meta文件了?接下来通过自制Asset Package我们来验证这个问题。

如何制作自己的Asset Package:
这里以导出前面制作的Bullet.prefab(Bullet.prefab以Projectile.png作为Sprite,同时挂载了Rigidbox 2D,Boxcollider 2D,Bullet script……)为例:
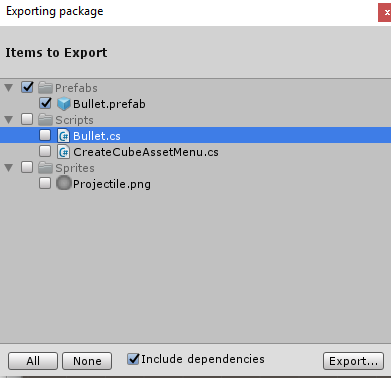
Asset -> Export Package -> 只勾选Bullet.prefab -> Export
不勾选Include Dependencies:
ExportPackageWithoutDependency
勾选Include Dependencies:
ExportPackageWithDependency
这里不知道为什么CreateCubeAssetMenu.cs会作为Bullet.prefab的dependencies!
接下来在新的项目里导入该Asset Package:
Assets -> Import Package -> custom package
这样一来就得到了我们所导出的Assets Package
AssetPackageCompare
可以看出Bullet.prefab和Bullet.meta原封不动的以原始的形式保留了下来。
Note:
当导出Asset Package的时候,勾选Include dependencies,那么所有Asset依赖的Asset都会被导出到最终的Package

资源来源

Unity自动打包

Unity自动打包资源是指在Unity场景中直接使用到的资源会随着场景被自动打包到游戏中,这些资源会在场景加载的时候由unity自动加载。这些资源只要放置在Unity工程目录的Assets文件夹下即可,程序不需要关心他们的打包和加载,这也意味着这些资源都是静态加载的。但在实际的游戏开发中我们一般都是会动态创建GameObject,资源是动态加载的,因此这种资源其实不多

Resources

所有放在Assets/Resources目录下的资源都当做Resources。无论游戏是否使用,都会被打包到最终的程序里。(这也就说明为什么前面的例子在Resources下没有被使用的Coin.png最终被打包到了resources.assets里)
那么如何判断Resources下的资源是被打包到resources.assets里还是其他的assets里了?
答案取决于我们是否在Unity对Resources目录下的资源进行了索引引用。
正如前面我们测试的结果一样,同样是放在Resources目录下的backgroudn.png和Coin.png,前者因为在游戏里有引用,所以被打包到了sharedassets0.assets里,后者因为无人使用,而打包到了resources.assets里。(Resources下被引用的资源是存储在.sharedAsseets file里,而没被引用的是存储在resources.assets里)

那么为什么我们需要把资源放置在Resources下了?放在Assets下单独去引用使用不就可以了吗?
Resources主要是为了帮助我们去动态加载一些资源去创建Asset。(通过Resource API可以动态加载Resource里的资源)

但Unity官网讲解提到的我们应该尽量去避免使用Resources。
原因如下:

  1. Use of the Resources folder makes fine-grained memory management more difficult.(使用Resources folder会使内存管理更困难)
  2. Improper use of Resources folders will increase application startup time and the length of builds.(不合理的使用Resources folders会使程序启动和编译时间变长)
    As the number of Resources folders increases, management of the Assets within those folders becomes very difficult.(随着Resources folders数量的增加,Assets管理越来越困难)
  3. The Resources system degrades a project’s ability to deliver custom content to specific platforms and eliminates the possibility of incremental content upgrades.(Resources System降低了项目对于各平台和资源的动态更新能力,因为Resources目录下的资源无论如何都会被打包到游戏程序里)
    AssetBundle Variants are Unity’s primary tool for adjusting content on a per-device basis.(AssetBundle是Unity针对设备动态更新的主要工具)

正确的使用Resources system就显得尤为重要:
以下两种情况比较适合使用Resource System:

  1. Resources is an excellent system for during rapid prototyping and experimentation because it is simple and easy to use. However, when a project moves into full production, it is strongly recommended to eliminate uses of the Resources folder.(快速开发,但到了真正发布还是应该减少Resources Folder的使用)
  2. The Resources folder is also useful in trivial cases, when all of the following conditions are met(当下列情况都满足的时候,Resource folder比较有用):
    1. The content stored in the Resources folder is not memory-intense
    2. The content is generally required throughout a project’s lifetime(该资源在项目生命周期里都需要)
    3. The content rarely requires patching(很少需要改动patch)
    4. The content does not vary across platforms or devices.(在各个平台设备都一致)
      比如一些第三方配置文件等asset。

那么接下来让我们了解下Resources是如何被保存到Unity里的:
Serialization of resources:
“The Assets and Objects in all folders named “Resources” are combined into a single serialized file when a project is built.”(当项目编译的时候,所有放到Resources目录下的Assets和Object最终会被序列化到一个单独的文件,根据前面的测试应该是resources.assets)

“This file also contains metadata and indexing information, similar to an AssetBundle. This indexing information includes a serialized lookup tree that is used to resolve a given Object’s name into its appropriate File GUID and Local ID. It is also used to locate the Object at a specific byte offset in the serialized file’s body.”(Resource会去维护一个映射表,用于查询特定Object

“As the lookup data structure is (on most platforms) a balanced search tree(1), its construction time grows at an O(N log(N)) rate.”(Lookup是通过平衡二叉树来查找,所以时间复杂度为N x Log(N))

“This operation is unskippable and occurs at application startup time while the initial non-interactive splash screen is displayed.”(在程序启动的时候会去初始化index info(Lookup data)的时候,Resources里assets数量过多的话会导致花费大量时间)

AssetBundle

接下来让我们前面一直提到的一个很重要的点AssetBundle。
什么是AssetBundle?
The AssetBundle system provides a method for storing one or more files in an archival format that Unity can index. The purpose of the system is to provide a data delivery method compatible with Unity’s serialization system. AssetBundles are Unity’s primary tool for the delivery and updating of non-code content after installation.(AssetBundle system提供了一个被Unity支持索引的格式文件(被Unity serialization system支持)。主要用于非代码资源的动态更新。)

为什么需要AssetBundle?
This permits developers to reduce shipped asset size, minimize runtime memory pressure, and selectively load content that is optimized for the end-user’s device.(AssetBundle的好处是减少了发布的Asset大小,降低了运行时内存压力,动态更新非代码资源)

AssetBundle包含些什么信息?
主要包含两部分信息:

  1. A header
    The header is generated by Unity when the AssetBundle is built.(header是在Unity编译AssetBundle的时候生成)主要包含下列内容:
    1. The AssetBundle’s identifier
    2. Whether the AssetBundle is compressed or uncompressed
    3. A manifest(“The manifest is a lookup table keyed by an Object’s name. Each entry provides a byte index that indicates where a given Object can be found within the AssetBundle’s data segment.”(manifest把Object的名字作为key,用于查询特定object是否存在于AssetBundle的数据字段里))
      (manifest里通过std::multimap实现,不同平台multimap的实现有些许差别,Windows和OSX采用red-black tree,所以在构造manifest的时候,时间复杂度是N x Log(N))
  2. A data segment.
    “Contains the raw data generated by serializing the Assets in the AssetBundle.”(data segment包含了序列化Assets的原始数据)
    data segment最后还会通过LZMA algorithm压缩。
    “Prior to Unity 5.3, Objects could not be compressed individually inside an AssetBundle. “(Unity 5.3之前Object不支持被单独压缩到AssetBundle里,所以在去访问一个被包含在压缩了的AssetBundle里的Object时,Unity需要去解压整个AssetBundle)
    “Unity 5.3 added a LZ4 compression option. AssetBundles built with the LZ4 compression option will compress individual Objects within the AssetBundle, allowing Unity to store compressed AssetBundles on disk.”(Unity 5.3加入了LZ4压缩选项,支持单独的Object压缩到AssetBundle里,这样一来就可以通过单独解压特定的Object来实现访问该Object)

AssetBundle能包含哪些Assets?
Models,Materials,textures and secenes.AssetBundle can not contain scripts.

如何去加载AssetBundles?
下列四种方式主要是根据AssetBundle的压缩算法和平台支持来划分。
API加载AssetBundles:

  1. AssetBundle.LoadFromMemoryAsync(Unity’s recommendation is not use this API)
    AssetBundle.LoadFromMemoryAsync详情
  2. AssetBundle.LoadFromFile
    “A highly-efficient API intended for loading uncompressed AssetBundle from local storage, such as a hard disk or an SD card.”(可以高效的加载本地未压缩的AssetBundle,也支持加载LZ4压缩的AssetBundle,但不支持LZMA压缩的AssetBundle)
    Mobile和Editor表现不一样,详情参见
  3. WWW.LoadFromCacheOrDownload
    “A useful API for loading Objects both from remote servers and from local storage.”(主要用于加载远程服务器端和本地的Object)
    使用建议:
    “Due to the memory overhead of caching an AssetBundle’s bytes in the WWW object, it is recommended that all developers using WWW.LoadFromCacheOrDownload ensure that their AssetBundles remain small”(尽量保证AssetBundle很小,避免内存消耗过大)
    “Each call to this API will spawn a new worker thread. Be careful of creating an excessive number of threads when calling this API multiple times.”(避免同时调用多次,导致大量的Thread执行,确保同一时间很少的thread执行)
  4. UnityWebRequest’s DonwloadHandleAssetBundle(on Unity 5.3 or newer)
    “UnityWebRequest allows developers to specify exactly how Unity should handle downloaded data and allows developers to eliminate unnecessary memory usage.”(UnityWebRequest支持更细致的AssetBundle加载的内存使用,可以通过配置UnityWebRequest达到使用最少内存的目的得到我们想要加载的Obejct)
    “Note: Unlike WWW, the UnityWebRequest system has an internal pool of worker threads and an internal job system to ensure that developers cannot start an excessive number of simultaneous downloads. The size of the thread pool is not currently configurable.”(UnituWebRequest system内部有自身的线程管理,避免同一时间大量的线程同时加载)

使用建议:
尽可能的使用AssetBundle.LoadFromFile(使用异步版本LoadFromFileAsync)
当项目需要下载和patch AssetBundle时,尽量使用UnityWebRequest(Unity 5.3),老版本的话使用WWW.LoadFromCacheOrDownload.
可能的话最好在项目安装的时候,预先缓存AssetBundle

Loading Assets from AssetBundles:
Synchronous API:

  1. LoadAsset
  2. LoadAllAssets
  3. LoadAssetWithSubAsset

Asynchronous API:

  1. LoadAssetAsync
  2. LoadAllAssetsAsync
  3. LoadAssetWithSubAssetAsync

使用建议:
“LoadAllAssets should be used when loading multiple independent UnityEngine.Objects.”(当需要加载大量独立的Objects的时候,使用LoadAllAssets。当需要加载的Object数量很多,又少于AssetBundle里的2/3的时候,我们可以采用制作多个小的AssetBundle,然后再通过LoadAllAssets加载)
“LoadAssetWithSubAssets should be used when loading a composite Asset which contains multiple embedded Objects. If the Objects that need to be loaded all come from the same Asset, but are stored in an AssetBundle with many other unrelated Objects.”(当加载由多个obejct构成的Object的时候,建议使用LoadAssetWithSubAssets。当加载的Objects都来之同一个Asset,但存储的AssetBundle里包含很多其他无关的Obejcts时,采用LoadAssetWithSubAssets)
“For any other case, use LoadAsset or LoadAssetAsync.”(其他情况都是用LoadAsset和LoadAssetAsync)

Low-Level Loading details:
“UnityEngine.Object loading is performed off the main thread: an Object’s data is read from storage on a worker thread. Anything which does not touch thread-sensitive parts of the Unity system (scripting, graphics) will be converted on the worker thread.”(Object的加载是在main thread上,而object data的数据读取是在worker thread。所有线程不敏感的数据都是在worker thread进行。)

加载AssetBundle里的Object需要注意些什么?
“An Object is assigned a valid Instance ID when its AssetBundle is loaded, the order in which AssetBundles are loaded is not important. Instead, it is important to load all AssetBundles that contain dependencies of an Object before loading the Object itself. Unity will not attempt to automatically load any child AssetBundles when a parent AssetBundle is loaded.”(当AssetBundle被加载的时候,Object会被assigned一个valide instance ID,因为这个instance ID是唯一的,所以AssetBundle的加载顺序并不重要,重要的是我们要确保所有Object依赖的Objects都被加载(Unity不会自动加载所有Child AssetBundles当Parent AssetBundle被加载的时候))
下面以Material A引用Texture B为例。Material A被Packaged到了AssetBundle1,而Texture B被packaged到了AssetBundle2。
AssetBundleDependencies
所以我们要使用Material A,我们不仅要加载AssetBundle1,还得确保在此之前我们加载了AssetBundle2里的Texture B

AssetBundle的dependencies信息存储在哪里?
AssetBundleManifest存储了AssetBundle’s dependency information(AssetBundle里的依赖关系信息)

AssetBundleManifest存放在哪里?
This Asset will be stored in an AssetBundle with the same name as the parent directory where the AssetBundles are being built.(AssetBundleManifest存放在AssetBundle同级目录,并且包含一样的名字)

Note:
The AssetBundle containing the manifest can be loaded, cached and unloaded just like any other AssetBundle.(AssetBundleManifest可以像AssetBundle一样被加载,缓存,释放)

如何查询AssetBundle里的Dependecy信息?
Depending on the runtime environmen:

  1. Editor
    AssetDatabase API(Query AssetBundle dependencies)
    AssetImporter API(Access and change AssetBundle assignments and dependencies)
  2. Runtime
    AssetBundleManifest API(load the dependency information of AssetBundle)
    AssetBundleManifest.GetAllDependencies
    AssetBundleManifest.GetDirectDependencies
    Note:
    “Both of these APIs allocate arrays of strings. Use them sparingly, and preferably not during performance-sensitive portions of an application’s lifetime.”(因为上述API会分配大量的string字符串,所以要尽量少用并且避开性能敏感的时期)

接下来通过制作2个UI prefab:
一个包含全屏显示的Background image(打到uitextures AssetBundle里)
一个包含Backgroundimage但大小只有背景的一半(打到backgroundimage AssetBundle里)
同时设置background图片都打包到uitextures AssetBundle里
通过AssetBundleManifest API查询两个AssetBundle里的Dependencies信息。
首先如何制作AssetBundle?

  1. 选择需要制作成AssetBundle的资源(Texture,Prefab),设置相应的AssetBundle名字
    AssetBundleUIBackground1
    BackgroundImagePrefabAssetBundle
    UIBackgroundPrefabAssetBundle
  2. 调用BuildPipeline.BuildAssetBundles()打包AssetBundle
    Unity5.4官网给出了两个方法:
1
2
3
public static AssetBundleManifest BuildAssetBundles(string outputPath, BuildAssetBundleOptions assetBundleOptions, BuildTarget targetPlatform); 

public static AssetBundleManifest BuildAssetBundles(string outputPath, AssetBundleBuild[] builds, BuildAssetBundleOptions assetBundleOptions, BuildTarget targetPlatform);
前者是以UnityEditor设置的AssetBundle name为准进行所有AssetBundle打包,后者是根据自定义的打包规则打包特定AssetBundle。
这里我尝试使用前者针对PC进行测试。
1
2
3
4
5
6
7
8
9
10
11
12
13
14
15
16
17
using UnityEngine;
using System.Collections;
using UnityEditor;

public class AssetBundleMenu {
[MenuItem("Assets/Build AssetsBundle")]
static void BuildAllAssetBundles()
{
if (!AssetDatabase.IsValidFolder("Assets/StreamingAssets"))
{
AssetDatabase.CreateFolder("Assets", "StreamingAssets");
}

Caching.CleanCache();
BuildPipeline.BuildAssetBundles("Assets/StreamingAssets", BuildAssetBundleOptions.None, BuildTarget.StandaloneWindows);
}
}
第一个参数是输出目录
第二参数控制AssetBundle打包设定,比如是否压缩等
第三个参数可设置打包平台
打包AssetBundle之后的目录结构:
![AssetBundleFolder](/img/Unity/AssetBundleFolder.PNG)
.manifest文件里存储了dependencies信息和AssetBundle里所打包的Assets相关信息
StreamingAssets.manifest
1
2
3
4
5
6
7
8
9
10
11
ManifestFileVersion: 0
CRC: 931964529
AssetBundleManifest:
AssetBundleInfos:
Info_0:
Name: uitextures
Dependencies: {}
Info_1:
Name: backgroundimage
Dependencies:
Dependency_0: uitextures
uibackground.manifest
1
2
3
4
5
6
7
8
9
10
11
12
13
14
15
16
17
18
ManifestFileVersion: 0
CRC: 1667709317
Hashes:
AssetFileHash:
serializedVersion: 2
Hash: 452c307ebc11a6155a4bdc61d8a0e39f
TypeTreeHash:
serializedVersion: 2
Hash: a13e216067ae14bd74f1f5dcc7c211d7
HashAppended: 0
ClassTypes:
- Class: 1
Script: {instanceID: 0}
......
Assets:
- Assets/Resources/Textures/UI/backgroudn.png
- Assets/Prefabs/UIBackground.prefab
Dependencies: []
backgroundimage.manifest
1
2
3
4
5
6
7
8
9
10
11
12
13
14
15
16
17
18
ManifestFileVersion: 0
CRC: 4279971007
Hashes:
AssetFileHash:
serializedVersion: 2
Hash: c15d1d4fd0fc89ad672fd6a94e16d981
TypeTreeHash:
serializedVersion: 2
Hash: 4583000a582d4aadcaf8400b20641bd6
HashAppended: 0
ClassTypes:
- Class: 1
Script: {instanceID: 0}
......
Assets:
- Assets/Prefabs/BackgroundImage.prefab
Dependencies:
- Assets/ABs/uitextures
从StreamingAssets.manifest可以看出,我们总共制作了两个AssetBundle,名字分别为uitextures和backgroundimage,并且backgroundimage AssetBundle依赖于uitextures。
从uibackground.manifest和backgroundimage.manifest中可以看出,uibackground AssetBundle里包含了UIBackground.prefab和backgroudn.png,而backgroundimage AsssetBundle只包含BackgroundImage.prefab。
由于BackgroundImage.prefab使用background.png作为背景,但backgroundimage被打包到了uitextures AssetBundle里,所以backgroundimage AssetBundle是依赖于uitextures AssetBundle的。
  1. 通过AssetBundle API下载并加载主AssetBundle,然后通过AssetBundleManifest API查看所有AssetBundle的依赖信息并加载依赖的AssetBundle,最后通过AssetBundle API加载AssetBundle里的特定资源并实例化
1
2
3
4
5
6
7
8
9
10
11
12
13
14
15
16
17
18
19
20
21
22
23
24
25
26
27
28
29
30
31
32
33
34
35
36
37
38
39
40
41
42
43
44
45
46
47
48
49
50
51
52
53
54
55
56
57
58
59
60
61
62
63
64
65
66
67
68
69
70
71
72
73
74
75
76
77
78
79
80
81
82
83
84
85
86
87
88
89
90
91
92
93
94
95
96
97
98
99
100
101
102
103
104
105
106
107
108
109
using UnityEngine;
using System.Collections;
#if UNITY_EDITOR
using UnityEditor;
#endif
using System.IO;

public class AssetBundleLoad : MonoBehaviour {

// Use this for initialization
void Start () {
StartCoroutine(LoadAssetBundles());
}

IEnumerator LoadAssetBundles()
{
#if UNITY_EDITOR
var names = AssetDatabase.GetAllAssetBundleNames();

foreach (string name in names)
{
Debug.Log("Current Alive Asset Bundle name: " + name);
}
#endif

string bundlename = "StreamingAssets";
var assetbundlerequest = AssetBundle.LoadFromFileAsync(Path.Combine(Application.streamingAssetsPath, bundlename));
yield return assetbundlerequest;

var assetbundle = assetbundlerequest.assetBundle;
if (assetbundle == null)
{
Debug.Log("Failed to load " + bundlename);
yield break;
}

AssetBundleManifest manifest = assetbundle.LoadAsset<AssetBundleManifest>("AssetBundleManifest");

if (manifest == null)
{
Debug.Log(string.Format("Failed to load {0}.manifest!", bundlename));
yield break;
}

//try to instantiate backgroundimage assetbundle
//but need to load dependencies assetbundle first
Debug.Log("Instantiate BackgroundImage.prefab");

var backgroundbundlename = "backgroundimage";
var backgroundimagerequest = AssetBundle.LoadFromFileAsync(Path.Combine(Application.streamingAssetsPath, backgroundbundlename));

yield return backgroundimagerequest;

if (backgroundimagerequest == null)
{
Debug.Log(string.Format("Load {0} falied!", "backgroundimagerequest"));
}

var backgroundimageassetbundle = backgroundimagerequest.assetBundle;
if(backgroundimageassetbundle == null)
{
Debug.Log(string.Format("Load {0} falied!", backgroundimageassetbundle));
yield break;
}

var backgrounddependencies = manifest.GetAllDependencies(backgroundbundlename);
if (backgrounddependencies.Length == 0)
{
Debug.Log("dependencies.length == 0");
}

//Load dependencies assetbundle first
foreach (string dependency in backgrounddependencies)
{
Debug.Log("Dependency : " + dependency);
var dependencyabrequest = AssetBundle.LoadFromFileAsync(Path.Combine(Application.streamingAssetsPath, dependency));
yield return dependencyabrequest;
AssetBundle dependencyab = dependencyabrequest.assetBundle;
if (dependencyab == null)
{
Debug.Log(string.Format("Load {0} failed!", dependency));
yield break;
}
}

//Once load all dependencies assetbundle, we can instantiate the gameobject in assetbundle
var backgroundprefabrequest = backgroundimageassetbundle.LoadAssetAsync("BackgroundImage.prefab");
yield return backgroundprefabrequest;
if(backgroundprefabrequest == null)
{
Debug.Log(string.Format("Load {0} faled!", "BackgroundImage.prefab"));
}

GameObject backgroundimage = backgroundprefabrequest.asset as GameObject;
if(backgroundimage == null)
{
Debug.Log("backgroundimage == null");
}
else
{
GameObject bggo = Instantiate(backgroundimage);
bggo.transform.SetParent(gameObject.transform, false);
}

//After complete using AssetBundle, always remember unload it,
//otherwise you can not load it again due to it has exists in memory
assetbundle.Unload(false);
}
}

从上面可以看出,通过主的StreamingAssets,我们获取到了里面所包含的所有AssetBundle信息。然后通过加载指定AssetBundle以及dependencies AssetBundle后,我们就能成功初始化出AsestBundle里的资源。
上述代码实例化了Background.prefab(使用的backgroudn.png存储在uitextures AssetBundle里)
效果图:
BackgroundImageAssetBundleLoad

上面使用的CreateFromFile后续Unity更新成了LoadFromFile,这个方法只支持uncompressed asset bundles,这里主要是因为利用了streaming assets,所以直接用这个方法可以加载本地的AssetBundle。
官方的建议在正式的时候是使用UnityWebRequest。
Note:
Note that bundles built for standalone platforms are not compatible with those built for mobiles and so you may need to produce different versions of a given bundle. (针对不同平台打包的AssetBundle不通用,需要各自打包对应平台的版本)

上面仅仅是以本地读取作为事例,了解了如何去访问AssetBundle以及manifest里的信息以及如何实例化AssetBundle里的资源。
那么如何判断AssetBundle是否需要更新了?
这里我们可以利用Built-in caching去实现版本更新判断。
“AssetBundle caching system that can be used to cache AssetBundles downloaded via the WWW.LoadFromCacheOrDownload or UnityWebRequest APIs.”(AssetBundle caching system可以帮助我们缓存加载了的AssetBundle而无需每次都重新加载)
而AssetBundle caching system是根据AssetBundle的version number来决定时是否下载新的AssetBundle。(AssetBundleManifest API支持通过MD5算法去计算出AssetBundle的version
number,这样一来每次AssetBundle有变化都会得到一个新的Hash version number)

“AssetBundles in the caching system are identified only by their file names, and not by the full URL from which they are downloaded.”(AssetBundles在Caching system里是通过文件名来标识的跟URL无关,所以无论AssetBundle放在服务器哪里都没有关系)

Cach相关的API控制:

  1. Caching.expirationDelay
    “The minimum number of seconds that must elapse before an AssetBundle is automatically deleted. If an AssetBundle is not accessed during this time, it will be deleted automatically.”(AssetBundle可允许被删除的未使用时间,只有未被使用的时间达到了才能才被删除)
  2. Caching.maximumAvailableDiskSpace
    “The amount of space on local storage that the cache may use before it begins deleting AssetBundles that have been used less recently than the expirationDelay. It is counted in bytes.”(Caching内存使用上限)

Note:
“As of Unity 5.3, control over the built-in Unity cache is very rough. It is not possible to remove specific AssetBundles from the cache. They will only be removed due to expiration, excess disk space usage, or a call to Caching.CleanCache. (Caching.CleanCache will delete all AssetBundles currently in the cache.) “(Caching System还不完善,所以还不允许删除特定AssetBundle,而只能通过Caching.CleanCache去删除所有的AssetBundle)

Cache Priming:
Steps:

  1. Store the initial or base version of each AssetBundle in /Assets/StreamingAssets/
  2. Loading AssetBundles from Application.streamingAssetsPath the first time the application is run
  3. Call WWW.LoadFromCacheOrDownload or UnityWebRequest normally.

Custom downloaders:
Custom downloaders More
……

一般AssetBundle都是通过WWW.LoadFromCacheOrDownload(老版本)或者UnityWebRequest指定url和版本号信息去决定是否下载更新到本地。
然后我们利用AssetBundle.CreateFromFile()去读取AssetBundle,从而实现动态更新AssetBundle。

那么在使用AssetBundle的过程中,我们应该遵循后续讲到的内容(大部分翻译至官网,翻译不太对的地方欢迎指出):
Managing Loaded Assets:
“If an AssetBundle is unloaded improperly, it can cause Object duplication in memory. Improperly unloading AssetBundles can also result in undesirable behavior in certain circumstances.”(不合理的释放Object会导致在内存中重复创建Object。同时也可能导致非预期的问题(比如texture丢失))

对于AssetBundle里Assets管理,这里需要强调的一个API是AssetBundle.Unload(bool);
Unloads all assets in the bundle.
Unload frees all the memory associated with the objects inside the bundle.
当传递true的时候所有从AssetBundle里实例化的Object都会被unload。传递false则只释放AssetBundle资源。

那么这里释放的AssetBundle资源是哪些了?
还记得之前提到的AssetBundle的组成吗(header & data segment)

下面通过AssetBundleAB里的Material Object M实例化的M为例:
AssetBundleUnload
AssetBundleAfterUnloadFalse
AssetBundleReload
AssetBundleLoadObjectAgain
如果AB.Unload(true),那么实例化的M会被destroyed。
如果AB.Unload(false),那么AB里的信息会被unloaded,但M还存在于Scene里,但M和AB之间关联就断开了。
当我们重新加载AB后,我们只是再次加载了AB里的信息,但M和AB还是没有关联。
当我们通过重新加载的AB再去实例化Material Object M的时候,我们是创建了一个关联到当前AB的新的M而非把就的关联到AB(Scene里当前存在两个M)

当我们想unloaded旧的M的时候,只能通过下列方式:

  1. Eliminate all references to an unwanted Object, both in the scene and in code. After this is done, call Resources.UnloadUnusedAssets.(取消所有引用,并调用Resources.UnloadUnusedAssets)
  2. Load a scene non-additively. This will destroy all Objects in the current scene and invoke Resources.UnloadUnusedAssets automatically.(切换Scene,触发Resources.UnloadUnusedAssets)

“Another problem can arise if Unity must reload an Object from its AssetBundle after the AssetBundle has been unloaded. In this case, the reload will fail and the Object will appear in the Unity Editor’s hierarchy as a (Missing) Object.”(当AssetBundle被释放后,如果再从该AssetBundle里加载Object会加载失败,出现missing object)

Distribution:
Two basic ways to distribute a project’s AssetBundles to clients:

  1. Installing them simultaneously with the project
  2. Downloading them after installation.
    使用哪一种方式,主要取决于平台需求。
    “Mobile projects usually opt for post-install downloads to reduce initial install size and remain below over-the-air download size limits. Console and PC projects generally ship AssetBundles with their initial install.”(手机上为了减少安装程序大小,通常选择post-installation。而PC不担心硬盘不够,所以通常选择initial install)

Shipped with Project:
“To reduce project build times and permit simpler iterative development. If these AssetBundles do not need to be updated separately from the application itself, then the AssetBundles can be included with the application by storing the AssetBundles in Streaming Assets.”(和程序一起更新的AssetBundle可以放在streaming assets伴随程序一起打包发布)

Streaming Assets:
“The easiest way to include any type of content within a Unity application at install time is to build the content into the /Assets/StreamingAssets/ folder, prior to building the project. Anything contained in the StreamingAssets folder at build time will be copied into the final application. This folder can be used to store any type of content within the final application, not just AssetBundles.”(可以看出Streaming Assets被存放在/Assets/StreamingAssets/目录下,最终会被打包到应用程序里)

Note:
“Android Developers: On Android, Application.streamingAssetsPath will point to a compressed .jar file, even if the AssetBundles are compressed. In this case, WWW.LoadFromCacheOrDownload must be used to load each AssetBundle.”(在Android上,streamingAssetsPath指向的是压缩后的.jar文件,所以我们需要采用LoadFromCacheOrDonwload去解压读取(5.3及以后可以采用UnityWebRequest’s DonwloadHandleAssetBundle))

“Streaming Assets is not a writable location on some platforms. If a project’s AssetBundles need to be updated after installation, either use WWW.LoadFromCacheOrDownload or write a custom downloader. “(因为Streaming Assets在一些平台上是一个不可写的位置,所以我们如果还需要更新该AssetBundle,我们而已通过WWW.LoadFromCacheOrDonwload或则自己编写custom downloader)

Donwloaded post-install:
手机上出于程序安装大小考虑多采用这个方案。
同时AssetBundle通过WWW.LoadFromCacheOrDownload or UnityWebRequest的更新可以快速方便的更新一些经常变化的资源。
更多内容参见

Asset Assignment Strategies:
The key decision is how to group Objects into AssetBundles. The primary strategies are:

  1. Logical entities
  2. Object Types
  3. Concurrent content
    详情参见

Guidelines to follow:

  1. Split frequently-updated Objects into different AssetBundles than Objects that usually remain unchanged
  2. Group together Objects that are likely to be loaded simultaneously

Patching with AssetBundles:
“Patching AssetBundles is as simple as downloading a new AssetBundle and replacing the existing one.”(Patching AssetBundles用于实现动态替换一些资源很方便)

AssetBundle Variants:
什么是AssetBundle Variants?
AssetBundle Variants可以指定AssetBundle里Asset的别名。(两个不同的名字可以指代同一个Asset)

AssetBundle Variants可以用来做什么?
[The purpose of Variants is to allow an application to adjust its content to better suit its runtime environment. Variants permit different UnityEngine.Objects in different AssetBundle files to appear as being the “same” Object when loading Objects and resolving Instance ID references.It permits two UnityEngine.Objects to appear to share the same File GUID & Local ID, and identifies the actual UnityEngine.Object to load by a string Variant ID.(AssetBundle Variants的主要目的是用于动态适应一些运行时的设置。AssetBundle Variants允许两个Asset Object拥有同样的File GUID …& Local ID,但可以通过string Variant ID加载特定的Asest Object)

什么情况下适合使用AssetBundle Variants?

  1. Variants simplify the loading of AssetBundles appropriate for a given platform(用于加载特定平台的对应AssetBundle)
  2. Variants allow an application to load different content on the same platform, but with different hardware.(针对不同硬件相同平台加载对应的content资源)

那么AssetBundle Variants有哪些限制?
A key limitation of the AssetBundle Variant system is that it requires Variants to be built from distinct Assets.(最大的限制就是AssetBundle Variant要求不同的Variants必须编译到不同的Asset。这样一来会导致重复的资源打包(e.g比如两个不同的Texture Variant只是import设置不一样也必须编译两份))

另一个AssetBundle需要关注的点就是Compressed or Uncompressed?
那么如何在Compressed和Uncompressed之间抉择了?主要关注以下几点:

  1. 加载速度。
    压缩与否影响AssetBundle的资源大小,同时也影响加载的时候的加载速度。
  2. AssetBundle编译时间。
    同时压缩的话也会导致Build AssetBundle的时间变长。
  3. 程序大小
    一些AssetBundle是伴随Application打包发布,会影响程序初始大小
  4. 内存使用
    不同的压缩算法对加载时对内存的影响也不一样,LZ4压缩算法和未压缩的方式允许AssetBundle无需解压缩就能访问使用(节约内存)。
  5. AssetBundle下载时间
    AssetBundle资源的大小也同时影响AssetBundle的下载时间。

更多学习参考
AssetBundles

具体现有的完美AssetBundle使用方案,AssetBundle Manager on Bitbucket
接下来以学习使用AssetBundle Manager来理解AssetBundle里的一些相关知识和概念。
首先来看看什么是AssetBundle Manager?
The AssetBundle Manager is a downloadable package that can be installed in any current Unity project and will provide a High-level API and improved workflow for managing AssetBundles.(可以看出AssetBundle Manager为我们提供了更高层的AssetBundle管理的抽象,更方便使用和管理AssetBundle,作为免费的第三方插件在Unity Asset Store可以下载使用)
AssetBundle Manager Download

那么AssetBundle Manager能做到什么?
The AssetBundle Manager helps manage the key steps in building and testing AssetBundles. The key features provided by the AssetBundle Manager are a Simulation Mode, a Local AssetBundle Server and a quick menu item to Build AssetBundles to work seamlessly with the Local AssetBundle Server.(在AssetBundle里,最令人头疼的是编译和测试(需要不断编译然后上传然后测试)。AsestBundle Manager为我们提供了本地AssetBundle Server模拟的方案,还有快速编译打包AssetBundle的菜单,让我们可以快速的编译测试AssetBundle)
AssetBundleManagerQuickMenu
Simulation Mode:
When enabled, allows the editor to simulate AssetBundles without having to actually build them. The editor looks to see which Assets are assigned to AssetBundles and uses these Assets directly from the Project’s hierarchy as if they were in an AssetBundl.(当模拟模式开启的时候,editor可以通过不编译AssetBundle就能模拟AssetBundles的使用(直接使用指定了AssetBundle name的Assets),这样一来在Editor下就能快速的修改测试,无需每次编译AssetBundle)

Local Asset Server:
作为AssetBundle里重要的功能之一: AsssetBundle Variant
AssetBundle Manager也支持了快速方便的AssetBundle Variant测试。
通过Local Asset Server的本地模拟方式测试。(同时Local Asset Server还支持真机测试)
Note:
When Local Asset Server is enabled, AssetBundles must be built and placed in a folder explicitly called “AssetBundles” in the root of the Project, which is on the same level as the “Assets” folder.(当Local Asest Server开启的时候,AssetBundles必须编译放置在Assets/AssetBundles目录下)

Build AssetBundles:
快速编译打包AssetBundles。

实战学习使用AssetBundle Manager:
首先粗略的了解下AssetBundle Manager提供的一些API:
Initialize() – Initializes the AssetBundle manifest object.(初始化AssetBundle Manifest Object)
LoadAssetAsync() – Loads a given asset from a given AssetBundle and handles all the dependencies.(加载特定Asset,并负责处理器所有的dependencies)
LoadLevelAsync() – Loads a given scene from a given AssetBundle and handles all the dependencies.(加载特定scene,并负责处理所有的dependencies)
LoadDependencies() – Loads all the dependent AssetBundles for a given AssetBundle.(加载AssetBundle所依赖的所有dependencies)
BaseDownloadingURL – Sets the base downloading url which is used for automatic downloading dependencies.(设置dependencies下载url)
SimulateAssetBundleInEditor – Sets Simulation Mode in the Editor.(设置editor的模拟模式)
Variants – Sets the active variant.(设置激活的variants)
RemapVariantName() – Resolves the correct AssetBundle according to the active variant.

Loading Assets(AssetLoader.unity):
待续……

Resource LifeCycle

在得出如何利用Resources和AsetBundle高效管理资源方案之前,我们需要了解Resource的Lifecycle。
还记得前面提到的Asset和Obejct是如何被Unity记录下来的吗?
通过File GUID进行Asset标识(存储在.meta文件里,还存储了导入配置信息),通过Local ID对Object标识(存储在Asset文件自身,还存储了Object具体的配置信息)。
然后Unity通过Instance ID cache system管理着Instance ID到File GUID和Local ID(用于标识Asset的Obejct)的映射去查询访问每一个Object。

那么Resources Lifecycle(UnityEngine.Object)具体是怎样的了?
程序启动时会去加载所有场景里引用的Object的Instance ID,后续程序动态加载或则通过AssetBundle加载资源的时候会去更新新的Instance ID。

Two ways to load UnityEngine.Objects(加载Object):

  1. Automatically – An Object is loaded automatically whenever the instance ID mapped to that Object is dereferenced(间接引用)
  2. Explicitly – Resource-loading API(e.g. AssetBundle.LoadAsset)

那么Object什么情况下才会被加载到游戏里了?
An Object will be loaded on-demand the first time its Instance ID is dereferenced if two criteria are true:(当Instance ID被间接引用同时满足以下两个条件的时候,Object会被加载)

  1. The Instance ID references an Object that is not currently loaded(Instance ID引用的Object还没加载)
  2. The Instance ID has a valid File GUID and Local ID registered in the cache(Instance ID拥有的File GUID和Local ID已经存在于cache里)

什么情况下,Object会被unloaded了?
Objects are unloaded in three specific scenarios(Object被Unloaded的三种情况):

  1. Objects are automatically unloaded when unused Asset cleanup occurs.(比如Application.LoadLevel() Rersources.UnloadUnusedAssets()调用的时候,Object会被自动unloaded)
  2. Objects sourced from the Resources folder can be explicitly unloaded by invoking the Resource.UnloadAsset API.(主动调用Resource API去unload resoures下的object)
  3. Objects source from Asset Bundles are automatically and immediately unloaded when invoking the AssetBundle.Unload(true) API.(这样会导致AssetBundle里的Objects InstanceID的引用无效)
    具体Resource API如何影响Object的的生命周期,还需进一步学习,参考文档AssetBundle

知道了Resources的生命周期和如何被映射缓存的,那么如何才能以高效的方式存储resources了?
Loading Large Hierarchies(当我们制作一个复杂的Resources时):
“When serializing hierarchies of Unity GameObjects (such as when serializing prefabs), it is important to remember that the entire hierarchy will be fully serialized.”(当序列化Unity GameObject的时候,所有存在于hierarchy下的GameObject都会被一一序列化。)

When creating any GameObject hierarchy, CPU time is spent in several different ways:

  1. Time to read the source data (from storage, from another GameObject, etc.)
  2. Time to set up the parent-child relationships between the new Transforms
  3. Time to instantiate the new GameObjects and Components
  4. Time to awaken the new GameObjects and Components
    我们的关注点放到第一点上,数据的读写方式对后面三点影响不大,第一点跟数据的读写方式和数据的大小紧密相关。
    “On all current platforms, it is considerably faster to read data from elsewhere in memory rather than loading it from a storage device. “(所有平台上,从内存中读取都比从存储设备去读取快,当然不同的平台的读取速度会有一些差别)

我们前面提到当由复杂结构的GameObject的时候,所有对象都会被单独序列化(无论是否重复),这样一来会导致数据量很大,在加载的时候很慢。为了提高速度,我们可以通过把复杂的GameObject划分为多个单独的小的Prefab,然后通过实例化多个Prefab来构建我们的GameObject而非完全依赖于Unity的Serialization和prefab system。(减少了数据量。同时一旦Prefab被加载后,从内存中读取就比从硬件设备读取快多了)

内置资源

内置资源是指Unity默认自带的一些资源(e.g. 默认的图标资源,默认的材质资源,默认的天空盒资源,默认的Shader资源等)

为什么要了解内置资源了?

因为内置资源我们没法显示指定AB名字,容易造成打包冗余。所以在了解特定资源打包之前,我们来学习了解下如何避免内置资源造成的打包冗余。

详情参考:

Unity 5.x AssetBundle零冗余解决方案

要想避免内置资源的打包冗余,我们需要把内置资源提取出来使用。结合上面的文章的学习,可以理解成如下几步:

  1. 提取内置资源
  2. 修改内置资源引用(手动)
  3. 检查内置资源引用

本人尝试了前面文章提到的 AssetDataBase.LoadAllAssetsAtPath(“Resources/unity_builtin_extra”)的方式,发现并不能得到内置资源(AssetDataBase.LoadAllAssetsAtPath(“Resources/unity_builtin_extra”)此路不通后,暂时只想到从使用内置资源的对象上复制内置资源进行提取了。)

修改内置资源的引用比较麻烦,需要修改相关文件里对内置资源引用的guid和fieldID等来实现串改内置资源引用的目的。这样做实现起来比较困难,所以这里并不打算使用此方案。

新方案:

直接收集所有使用了内置资源的资源然后结合内置资源引用统计分析来进行时侯东替换来实现内质资源的引用替换

实现上述功能我们需要做到如下两点:

  1. 提取内置资源
  2. 结合内置资源引用分析替换对应内置资源成提取出来的资源

资源辅助工具三件套:

  • 资源依赖查看工具

    AssetDependenciesBrowser

  • 内置资源依赖统计工具(只统计了*.mat和*.prefab,场景建议做成Prefab来统计)

    BuildInResourceReferenceAnalyze

  • 内置资源提取工具

    BuildInResourceExtraction

至此,我们完成了依赖Asset统计,内置资源引用分析,内置资源提取和内置资源引用替换(手动)。

详细代码:

AssetBundleLoadManager

解决了内置Shader的引用打包问题,后面在专门讲Shader的小节会提到如何使用ShaderVariantsCollection解决变体预加载问题。

Note:

  1. 内置Shader可直接官网下载
  2. 复制提取资源引用的Shader需要重新指定一次才能正确引用本地下载的Shader
  3. 一开始导入下载好的内置Shader后,经过代码统计原来引用内置Shader的还是引用的内置的,但我将一个导入的内置Shader改名(这里指的改Shader “Mobile/Diffuse” 后再改回来发现引用内置Shader的资源变成了引用最新导入的内置Shader了。

Unity AB实战

以Unity5.0以后的版本作为学习对象。
打包以及加载管理这一套实战,单独提了一篇文章来写,详情查看:
AssetBundle-Framework

特定资源打包

这里针对不同的资源类型进行深度学习了解,理解项目中为什么不同的资源格式不同的平台为什么要设置特定的格式或者导入设定等信息,从而优化资源的内存占用以及相关不必要的开销。

纹理贴图

纹理贴图是游戏内存占用中的一个很大板块(含纹理,图集等)。

首先让我们理解一下,纹理贴图里一些重要的概念:

  1. GPU与纹理
  2. 文件格式
  3. 纹理格式
  4. 压缩算法

移动GPU

  1. Imagination Techniologies(PowerVR)
    代表作: Apple Iphone,Ipad系列

  2. Qualcomm(高通 Adreno系列)
    代表作:小米部分手机

  3. ARM(Mali系列)
    代表作:三星部分手机

  4. NVIDIA(英伟达 Tegre系列)
    代表作:Google Nexus部分手机

文件格式

文件格式是图像为了存储信息而使用的对信息的特殊编码方式,它存储在磁盘中,或者内存中,但是并不能被GPU所识别,因为以向量计算见长的GPU对于这些复杂的计算无能为力。这些文件格式当被游戏读入后,还是需要经过CPU解压成R5G6B5,A4R4G4B4,A1R5G5B5,R8G8B8, A8R8G8B8等像素格式,再传送到GPU端进行使用。

常用的图像文件格式有BMP,TGA,JPG,GIF,PNG等;

文件格式主要决定了原数据是有损还是无损的以及数据存储方式。
这里主要提两个常见的文件格式:

  1. PNG
    便携式网络图形(Portable Network Graphics,PNG)是一种无损压缩的位图图形格式,支持索引、灰度、RGB三种颜色方案以及Alpha通道等特性。
  2. JPG
    JPEG是一种针对照片视频而广泛使用的有损压缩标准方法。JPEG不适合用来存储企业Logo、线框类的图。因为有损压缩会导致图片模糊

详情参考:图片格式 jpg、png、gif各有什么优缺点?什么情况下用什么格式的图片呢?

Note:
考虑到Unity最终进游戏是源文件经过Unity压缩后的形式,所以个人觉得采用不压缩的PNG作为源文件相比JPG更好(1. 无损压缩 2. 支持Alpha通道)。

纹理格式

在了解纹理格式之前,我先了解下纹理格式能带来什么好处?
纹理格式是能被GPU所识别的像素格式,能被快速寻址并采样。
简而言之无需CPU解压即可被GPU读取,节省CPU时间和带宽。

了解了纹理格式的好处,让我们看看不同的纹理格式的内存占用情况。
OpenGL ES 2.0支持以上提到的R5G6B5,A4R4G4B4,A1R5G5B5,R8G8B8,A8R8G8B8等纹理格式,其中 R5G6B5,A4R4G4B4,A1R5G5B5每个像素占用2个字节(BYTE),R8G8B8每个像素占用3个字节,A8R8G8B8每个像素占用 4个字节。
OpenGLES2TextureFormatDisplay

查了半天OpenGL ES 2.0的纹理格式支持,官方找到的,见下图:
OpenGLES2TextureFormat

es_cm_spec_2.0.pdf

如何查询Android GPU是否支持OpenGL ES3.0我也没找到单个比较全面的网站,所以只找到各自GPU的官网或者wiki上有描述。
参考:
Adreno
Mali (GPU)
Qualcomm GPU规格

比如我们要查小米3是否支持OpenGL ES3.0,我们可以现在小米官网查到小米3使用的是Adreno 800 GPU,系统是>4.3的。
那么我们去查adreno 800支不支持OpenGL ES3.0即可,然后发现在Qualcomm官网查到adreno 800系列全部都支持OpenGL ES3.0。

如何查询IOS GPU是否支持OpenGL ES3.0:
参考:
IOS device Graphics Processors

至于代码层面如何判定是否支持OpenGL 3.0:
参考UWA的一个问答:
如何判断硬件支持GpuInstance

Note:

  1. ETC1不支持Alpha,ETC2支持Alpha,但ETC2需要OpenGL ES 3.0支持。
  2. ETC2不仅需要Android 4.3以上,还要硬件GPU支持OpenGL ES3.0才行。
  3. IOS5s(含5s)以后使用A7 GPU(含A7)以后的GPU才支持OpenGL ES3.0。

压缩压缩格式

通过纹理格式,我们已经使得GPU能够直接读取纹理,为什么还需要纹理压缩了?
纹理压缩的主要作用是为了压缩数据,减少内存开销。

常见的纹理压缩格式:

  1. ETC(Erricsson texture compression)
    这里的ETC主要分为ETC1和ETC2.

    • ETC1主要是用于RGB的24-bit数据压缩(Note:不包含Alpha通道,在OpenGL ES 2.0就要求支持,所以基本是所有Android机型通用。参考:GL_OES_compressed_ETC1_RGB8_texture。ETC1想要配合使用Alpha信息需要拆成两张图,一张RGB,一张A。)
    • ETC2在兼容ETC1的基础上支持了Alpha通道的压缩(Note:ECT2至少要OpenGL ES 3.0 参考:ETC2 Compression)
  2. PVRTC(PowerVR texture compression)
    PowerVR主要用于苹果的压缩格式

  3. ATITC(ATI texture compression)
    Qualcomm Adreno系列。

  4. S3TC(也叫作DXT)
    PC的NVIDIA Tegra系列。

  5. ASTC(Adaptive Scalable Texture Compression)
    ASTC Texture Compression
    从wiki来看,ASTC是一个更高效,希望能统一移动端压缩格式的一个新兴压缩格式,要求至少OpenGL ES 3.0,且大部分手机现在并不支持ASTC(2018/05/28,当前只有少部分Mali的机器支持)。

移动平台各种压缩格式像素数据信息(以下信息来源:移动设备的纹理压缩方案):
CompresssionFormatSizeComparision

移动端平台压缩格式选择:
Android:

  1. ECT1是被OpenGL ES 2.0支持,适合大部分Android机器。
  2. 同时ASTC看起来离普及还有段时间。
  3. 随着OpenGL ES 3.0机器的普及,ETC2被大部分手机支持。

综上看来ECT2将会成为近期不错的选择(2018/05/28)

下图为Google给出的OpenGL ES版本占比图:
OpenGLESOccupation

IOS:
IOS支持的纹理压缩格式不多,通常采用PVRTC。PVRTC 2bit显示效果并不好,所以一般采用PCRTC 4bit。

Note:

  1. Google给出的是全球收集的数据信息,并不一定完全适合国内情况。
  2. PVRTC 4bit里A占比较少,半透明效果不是很好
  3. 不同的压缩算法对原始图形的宽高像素有要求
    详情参考,下图来源干货:Unity游戏开发图片纹理压缩方案:
    TextureFormatComparision2

纹理内存大小占用

通过前面我们学习了解了什么是纹理格式以及什么是纹理压缩。

说了那么多,我们最终的目标其实是为了在内存和显示效果之间选择一个比较合适的折中点。

内存占用和显示效果主要取决于纹理压缩算法。
首先让我们来看看,纹理的内存大小是如何计算的?
Texture Size(纹理大小) = Texture Pixel Width(宽像素数量) * Texture Pixel Height(高像素数量) * Bytes Per Pixel(每个像素数据大小)

假设一张1024 * 1024的R8G8B8A8纹理格式的贴图在不压缩的情况下:
1024 * 1024 * 4byte = 4.0M

假设一张1024 * 1024的R8G8B8A8纹理格式的贴图采用ETC2 4bit压缩:
1024 * 1024 * 4bit = 0.5M

相同的纹理贴图压缩后的内存占用明显降低,具体显示效果跟压缩算法有关,这里暂时不深入学习讨论。
进阶学习理解:
几种主流贴图压缩算法的实现原理

这里我们结合Unity实战学习一番:
首先这里我准备了三张不同大小的UI图,然后复制了多份,分别设置不同的压缩格式(为了方便的比较显示不同贴图大小对于不同压缩格式时的纹理内存占用大小):
TextureCompressionSprites

可以看到我准备的三张分别是128 * 256, 200 * 200和256 * 256,大小都是特地准备的,为了说明后面针对不同大小的原图设置不同压缩格式会导致最终内存纹理贴图大小占用不一样。

这里也贴一下UI图的导入设置:
UITextureImporterSetting

通过挂在测试脚本(TextureDetailInfoDisplay.cs),得到我们想要查看的数据:
TextureDetailInfoDisplay.cs

1
2
3
4
5
6
7
8
9
10
11
12
13
14
15
16
17
18
19
20
21
22
23
24
25
26
27
28
29
30
31
32
33
34
35
36
37
38
39
40
41
42
43
44
45
46
47
48
49
50
51
52
53
54
55
56
57
58
59
60
61
62
63
64
65
66
67
68
69
70
/*
* Description: TextureDetailInfoDisplay.cs
* Author: TONYTANG
* Create Date: 2018//08/02
*/

using System.Collections;
using System.Collections.Generic;
using UnityEngine;
using UnityEngine.UI;

using System.Text;
using System;

/// <summary>
/// TextureDetailInfoDisplay.cs
/// 用于计算显示当前Image使用的纹理贴图格式以及所占用的内存大小等信息
/// </summary>
public class TextureDetailInfoDisplay : MonoBehaviour {

/// <summary>
/// 图片显示组件
/// </summary>
private Image mImgSpriteDisplay;

/// <summary>
/// 显示纹理信息的文本节点
/// </summary>
private Text mTxtTexturueInfoDisplay;

public void Start()
{
mImgSpriteDisplay = transform.GetComponent<Image>();
mTxtTexturueInfoDisplay = transform.GetChild(0).GetComponent<Text>();

var sb = new StringBuilder();

if (mImgSpriteDisplay != null && mImgSpriteDisplay.sprite != null)
{
var texture = mImgSpriteDisplay.sprite.texture;
sb.Append("Name: ");
sb.Append(texture.name);
sb.Append(Environment.NewLine);
sb.Append("Texture Size: ");
sb.Append(texture.width);
sb.Append(" * ");
sb.Append(texture.height);
sb.Append(Environment.NewLine);
sb.Append("Format: ");
sb.Append(texture.format.ToString());
sb.Append(Environment.NewLine);
sb.Append("Bits Per Pixel: ");
sb.Append(TextureUtilities.GetTextureFormatBitsPerPixel(texture.format));
sb.Append(" bits");
sb.Append(Environment.NewLine);
sb.Append("Memory Size: ");
sb.Append(TextureUtilities.GetTextureMemorySize(texture));
sb.Append(" KBs");
}
else
{
sb.Append("No Image or Sprite!");
}

if (mTxtTexturueInfoDisplay != null)
{
mTxtTexturueInfoDisplay.text = sb.ToString();
}
}
}

TextureUtilities.cs

1
2
3
4
5
6
7
8
9
10
11
12
13
14
15
16
17
18
19
20
21
22
23
24
25
26
27
28
29
30
31
32
33
34
35
36
37
38
39
40
41
42
43
44
45
46
47
48
49
50
51
52
53
54
55
56
57
58
59
60
61
62
63
64
65
66
67
68
/*
* Description: TextureUtilities.cs
* Author: TONYTANG
* Create Date: 2018//08/05
*/

using System.Collections;
using System.Collections.Generic;
using UnityEngine;

/// <summary>
/// TextureUtilities.cs
/// 纹理相关辅助工具
/// </summary>
public static class TextureUtilities {

/// <summary>
/// 获取指定纹理图片内存占用大小
/// Note:
/// 这里是没有考虑mipmap的计算方法
/// Texture Size = width * height * Bits Per Pixels / 8 /1024 = * KB
/// </summary>
/// <param name="texture"></param>
/// <returns></returns>
public static int GetTextureMemorySize(Texture2D texture)
{
if (texture != null)
{
return texture.width * texture.height * GetTextureFormatBitsPerPixel(texture.format) / 8 / 1024;
}
else
{
return 0;
}
}

/// <summary>
/// 获取指定纹理压缩格式的Bits Per Pixel(多少bit每像素)
/// </summary>
/// <param name="textureformat"></param>
/// <returns></return>s
public static int GetTextureFormatBitsPerPixel(TextureFormat textureformat)
{
switch(textureformat)
{
case TextureFormat.ETC_RGB4:
return 4;
case TextureFormat.ETC2_RGB:
case TextureFormat.ETC2_RGBA8:
return 8;
case TextureFormat.PVRTC_RGB4:
case TextureFormat.PVRTC_RGBA4:
return 4;
case TextureFormat.ARGB4444:
case TextureFormat.RGBA4444:
case TextureFormat.RGB565:
return 16;
case TextureFormat.RGB24:
return 24;
case TextureFormat.RGBA32:
case TextureFormat.ARGB32:
return 32;
default:
Debug.LogErrorFormat("没有被包含的纹理压缩格式:{0},无法返回对应BitsPerPixel信息,请自己添加。", textureformat);
return 0;
}
}
}

输出结果:
TextureComppresionSizeInfoDisplay

从上面我们可以看出以下几个结论:

  1. 纹理的大小主要取决于纹理压缩格式和自身宽高,纹理压缩格式所占的Bits Per Pixel越大,纹理内存占用越大。
    TextureMemorySizeIncreasing

  2. 当不满足纹理压缩格式要求时,纹理会被Unity压缩成其他纹理格式导致内存增大。
    NPOT_PVRTC
    NPOT_ETC1

  3. ETC1本来是不支持Alpha的,但Unity 5.3以后,Unity支持通过设置Compress using ETC1(split alpha channel)并设置Packing Tag来支持ETC1自动分离Alpha的实现(否则需要我们自己分离以后在代码里融合ETC1和Alpha图)。ETC1 + Alpha Split直接在预览那里看不到真实大小,所以下面我是在Profile里查看的确认的。
    ETC1AlphaSplit
    手动分离Alpha + ETC1,参考:
    如何在ETC1压缩方式中添加Alpha通道?

  4. 清晰度一般来说是伴随着Bit Per Pixel的增加而增加(所以一般需要在内存和清晰度之间抉择)
    详细参考:
    移动设备的纹理压缩方案

未来更多学习:
待续……

注意要点:

  1. ETC1要求长宽都POT(Power Of Two),且ETC1不支持Alpha。
  2. PVRTC要求长宽都POT且宽高要一致。
  3. ETC2支持Alpha,但需要Android 4.3以上,还要硬件GPU支持OpenGL ES3.0才行。
  4. 根据前面的学习,我们知道ASTC格式支持要求高(OpenGL ES3.0)且还不普及,所以这里暂时只讨论ECT1,ETC2,PVRTC,RGB,RGBA这几种格式选择。(2018/08/03)。
  5. ASTC从IOS9(A8架构)开始支持,压缩效果相比PVRTC更好且不需要设置正方形。
  6. 上面主要是针对移动设备来分析,所以没有考虑PC Windows平台比如DXT等压缩格式。

疑问:
ETC2不要求宽高Power Of Two吗?(希望知道的朋友告知一下)
首先我确认ETC1是要求宽高必须POT的,不然会被强制转成其他格式:
NPOT_ETC1
但上述测试过程中我发现ETC2即使是NPOT也没有被转成其他格式:
NPOT_ETC2
后来测试加上查询资料(但是是从一篇博客上看到的)得知,ETC2要求宽高是4的倍数即可,所以200*200也没有转换成其他格式:
ETC2SizeRequirement
参考:
移动端纹理压缩格式

纹理总结

简单理一下Unity处理纹理,在游戏里使用的流程:
原图(PNG,JPG…..) –> Texture2D(压缩后的纹理图片,无需CPU解压,能被GPU识别的像素格式) –> 游戏内Texture2D(看硬件是否支持,不支持会被硬件转换成其他格式,比如RGBA32)

纹理压缩格式的选择:
Android:
ETC1(需要POT,不支持Alpha) > ETC1 + Alpha Split(需要配合大于Unity 5.3的Sprite Packer使用) > ETC2(需要Android 4.3且OpenGL ES3.0) > RGB16 > RGBA16 > RGB24 > RGBA32

IOS:
PVRTC(需要POT且宽高一样) > RGB16 > RGBA16 > RGB24 > RGBA32

未来ETC2普及了,可能普遍是设置ETC2格式。至于ASTC也是未来的一个趋势,ASTC从IOS9(A8架构)开始支持(Android也还不普及),但压缩效果相比PVRTC更好且不需要设置正方形。。(2018/08/05)

Note:
Unity3D引擎对纹理的处理是智能的:不论你放入的是PNG,PSD还是TGA,它们都会被自动转换成Unity自己的Texture2D格式。

网格

动画

材质

特效

Shader

这一小节主要是针对Shader的变体打包相关知识进行学习,之前打包Shader的AB都是简单的全部标打包到一个AB里,所以没有关注Shader细节方面的优化问题。

这一小节通过学习Shader变体相关知识,来优化Shader打包和加载方面的问题。

还是先从What,Why,How三个方面来循序渐进

  1. 什么是Shader?

    结合以前学习OpenGL和Unity Shader,Shader在我的理解里就是GPU(从以前的固定管线到现在的可编程管线)处理图形图像相关数据(定点,像素,纹理等)的程序。

  2. 为什么需要Shader?

    结合模型和纹理数据等,我们可以通过Shader程序去实现更多更酷炫的效果,而不是简单的模型纹理展示。而图形图像的处理上,正式GPU的特长,也就是为什么引入Shader程序的原因。

  3. Shader是如何被程序加载使用的?

    真正被真机使用的Shader还需要通过加载,解析,编译三个过程。以Shader被我们打包成AB为例。加载是指我们把Shader AB加载进内存。解析是指我们读取分析我们的Shader代码。编译是指将Shader代码编译成GPU特定的格式(而这一步是最耗时的,也是后面我们优化的关键部分)。加载解析编译完成后Shader才被真正的作用于我们的游戏里。

  4. 如何优化Shader打包加载?

    这个问题是本小节的重点,得出这个问题答案之前,我们需要了解其他相关知识

Shader预加载

老版本的时候我们通过加载所有Shader后调用Shader.WarmupAllShaders()来触发所有Shader变体的预加载编译,从而避免运行时Shader的解析卡顿开销。

但随着项目越来越大,使用的Shader越来越多,变体数也越来越多,粗暴的全部预加载编译变得不合适了,这也正是我们需要搜集需要用到的变体按需预编译加载变体的原因。

变体

什么是Shader变体(Shader Variants)?

In Unity, many shaders internally have multiple “variants”, to account for different light modes, lightmaps, shadows and so on. These variants are indentified by a shader pass type, and a set of shader keywords.

从上面的介绍可以看出Shader变体是因为Shader宏,渲染状态等原因造成需要编译出多种不同的Shader代码,不同效果要想起作用都必须被打包进游戏里,不然就会出现Shader失效(实际为变体丢失)。

Shader里面的宏主要是通过multi_compile和shader_feature来定义。

PassType主要是跟光照渲染管线相关,详情参考:

PassType

详细的区别参考:

一种Shader变体收集和打包编译优化的思路

Shader变体收集与打包

Making multiple shader program variants

对于预编译宏来说,这里我们主要要知道multi_compile会默认生成所有的变体(导致变体数激增),而shader_feature要如何生成变体需要我们自定义(这里就引出了官方的ShaderVaraintCollection,用于控制自定义的Shader变体打包以及预加载编译等问题)

查看单个Shader的变体数量?

ShaderVaraintNumber

查看材质用到哪些变体?

我们可以在编辑器模式下把材质设置成Debug模式查看使用的变体

MaterialDebugInspector

变体搜集

ShaderVariantCollection is an asset that is basically a list of Shaders
, and for each of them, a list of Pass types and shader keyword combinations to load.

通过介绍,可以看出ShaderVariantCollection是一种Asset资源,这个资源记录了我们需要包含的Shader变体相关数据。

Edit -> Project Settings -> Graphics

ShaderVariantAssetInspector

从ShaderVariantsCollection资源Asset里可以看到,里面列举了我们自定义包含的Shader变体信息。

通过ShaderVariantsCollection我们可以手动打开指定Shader的变体添加操作面板:

ShaderVariantsChoiceDetail

从上面可以看到默认创建的ShaderVariantsCollection里的Rim Lit Bumped Specular只包含了两个变体:

ShaderCustomVaraints

这里就引出了一个疑问,为什么不是前面单个Shader下显示的52个变体了?

这里猜测是因为Unity默认创建的ShaderVariantsCollection是经过裁剪优化的。

既然Unity会自动分析哪些变体用到了才打进ShaderVariantsCollection里,那为什么我们还是会出现打包后变体丢失了?

前面提到了shader_feature定义的变体需要自定义是否参与打包,如果没有显示的使用,Unity自带的ShaderVariantsCollection也不会把它打包进去。

同时参考这篇文章:Shader变体收集与打包

可以得知Shader的宏是支持控制的(e.g. Material.EnableKeyword() Shader.EnableKeyword()……),这样一来Unity的静态分析就没有办法正确得出结论了,我想这就是为什么我们需要自行分析需要打包的变体的原因(shader_feature+宏动态控制)。

实战

参考这篇文章:对Shader Variant的研究(概念介绍、生成方式、打包策略)

Shader的搜集策略有点复杂,本人并没有完全看明白,只是结合自定义Shader和材质理解了一下Shader宏和PassType对Shader变体的影响。测试了BDFramework里现成的Shader变体收集方案,发现跟Unity自带搜集的变体差异比较大。

这里只放几张简单的测试图来对比自定义Shader宏+PassType在Unity Shader变体搜集功能下和自定义的Shader变体搜集的结果。

自定义Shader和材质:

DIYShaderList

DIYMaterialList

Unity自带变体搜集:

UnityShaderVariantsCollection

自定义变体搜集:

CustomShaderVariantsCollection

最后还是打算采用UWA上的一个方案:一种Shader变体收集和打包编译优化的思路

针对UWA方案还有一个疑问就是,单纯的把所有用到的材质渲染一次,能保证那些动态切换(e.g. Material.EnableKeyword() Shader.EnableKeyword())的变体被搜集到吗?毕竟Unity的ShaderVariantsCollection有裁剪策略,忘知道的朋友告知

接下来主要是结合Profiler来查看ShaderVariantsCollection对于预编译带来的实际用处:

先看一下自定义搜集到的ShaderVariantsCollection变体文件信息:

ShaderVariantsCollectionAsset

只加载Shader不预编译(指LoadAllAsset)然后加载实体对象:

PreloadAllShaderNoWarmUp

LoadActorWithoughtWarmUp

从上面可以看到加载Shader但不WarmUp,等到加载实体对象时还是会触发Shader编译(CreateGPUProgram)

不加载Shader直接预编译之后加载实体对象:

WarmUpShaderWithoughtLoadShader

LoadActorAfterWarmUpShader

从上面可以看出WarmUp会直接触发所有ShaderVariantsCollection里相关的Shader的预编译,等到加载实体对象时不会再有Shader编译开销(CreateGPUProgram)

Shader变体搜集工具:

ShaderVariantsCollection

详细代码:

AssetBundleLoadManager

Tools->Assets->Asset相关处理工具

TODO:

现阶段只实现自动收集那一步,UsePass问题看起来比较复杂,暂时不考虑。具体请参考:一种Shader变体收集和打包编译优化的思路

Shader总结

  1. 为了避免内置Shader带来的一些不必要问题(打包加载等问题),建议直接把内置Shader导入到项目工程使用。
  2. 移动端尽量避免使用Standard Shader使用Mobile Shader替代,Standard Shader过于笨重以及变体数量庞大。
  3. ShaderVariantsCollection和Shader打包到一起,一开始就加载并调用ShaderVariantsCollect:WarmUp()触发变体预编译,减少使用到Shader时实时编译的卡顿问题,触发预编译之后再加载剩余Shader Asset确保Shader都加载进来即可。
  4. Shader的变体数量主要和Shader宏(multi_compile和shader_feature以及PassType有关),multi_compile会默认生成所有相关变体,尽量使用shader_feature来实现自定义宏功能。
  5. ShaderVariantsCollection主要解决的是shader_feature的变体搜集预加载问题。

引用

Unity Conception Part

Assets, Objects and serialization
A guide to AssetBundles and Resources
The Resources folder
AssetBundle fundamentals
AssetBundle usage patterns

AssetBundle Part

Unity5的AssetBundle的一点使用心得
Unity3D中Assetbundle技术使用心得
关于Unity中的资源管理,你可能遇到这些问题
Asset Workflow
Behind the Scenes
Unity5 如何做资源管理和增量更新
Unity3D研究院之提取游戏资源的三个工具支持Unity5
Unity3D研究院之Assetbundle的原理(六十一)
Unity3D研究院之Assetbundle的实战(六十三)

Texture Compression Part

干货:Unity游戏开发图片纹理压缩方案
各种移动GPU压缩纹理的使用方法
移动设备的纹理压缩方案
几种主流贴图压缩算法的实现原理
Adreno
Mali (GPU)
Qualcomm GPU规格
IOS device Graphics Processors
如何判断硬件支持GpuInstance
移动端纹理压缩格式
如何在ETC1压缩方式中添加Alpha通道?

Shadere Part

Unity Shader加载性能消耗问题

Unity3D Shader加载时机和预编译

Shader变体收集与打包

Optimizing Shader Load Time

Making multiple shader program variants

一种Shader变体收集和打包编译优化的思路

对Shader Variant的研究(概念介绍、生成方式、打包策略)

BDFramework

Introduction

这一章节主要是为了实战学习Unity和NGUI的使用而写的。

Game Introduction

开发环境:
游戏引擎:Unity
UI插件:NGUI 2.7

游戏内容:
容纳多个经典2D红白机和手机游戏:

  1. 2D赛车躲避(原始名字想不起来了)
  2. 贪吃蛇
  3. 坦克大战
    待添加

平台:
支持Android,IOS多设备。

Preparation

关于IOS打包准备工作参见:
IOS打包准备

Unity IOS build process

  1. XCode project is generated by Unity with all the required libraries, precompiled .NET code and serialized assets.(打包所有需要的库和资源生成XCode项目)
    第一步是通过Unity的Building Settings设定IOS平台点击Build生成
  2. XCode project is built by XCode and deployed and run on the actual device.(编译Xcode项目安装到设备上)
    第二部必须在Mac上执行(或者黑苹果),因为需要用到IOS SDK和XCode编译器

Cloud Build

关于Cloud Build让我们直接看看官网的介绍吧:
What is Unity Cloud Build?
A service that automates the build pipeline for Unity games.(自动化编译打包服务 – Build Machine)

Why Should I Use Cloud Build?
By using Cloud Build automation services, you will - Save Time. Builds are compiled and distributed automatically, minimizing manual work and intervention. Games with multiple platforms can be consolidated into a single build process.

  • Improve Quality. Games are built continuously as changes are detected (“Continuous Integration”), enabling detection of issues as they are introduced to the project. - Distribute Faster. Cloud-based infrastructure compiles builds; in parallel if for multi platform projects. Completed builds are available to download by anyone on the team through Cloud Build’s website.(快捷方便,自动化检测变化进行编译打包。每个人都可以自己去下载安装对应的版本)

How does Unity Cloud Build work?
Unity Cloud Build monitors your source control repository (e.g. Git, Subversion, Mercurial, Perforce). When a change is detected, a build is automatically generated by Cloud Build. When the build is completed, you and your team are notified via email. Your build is hosted by Unity for you and your team mates. If the build is not successful, you’re also notified and provided with logs to begin troubleshooting.(通过检测Git等工具上传变化,自动触发编译打包流程,完成或出错的时候有邮件提醒和log)

What do I need to use Unity Cloud Build?
使用Unity Cloud Build我们必须先选择一个版本管理器
Git, Subversion, Mercurial, Perforce
这里我使用Git。

  1. github上创建Repository
  2. Clone到本地目录(git clone repo)
  3. 上传XCode项目
    创建Cloud Build Project:
    Unity Cloud Build
  4. Create New Project
  5. 添加Git repository地址
  6. 选择platform(这里我选的IOS)
  7. 最后设置项目打包发布相关的Certificate,bundle ID, Xcode版本设置等(注意Provision Profile里的Certificate和我们导出上传的Certificate要一致),后续还有一堆关于Build的控制(比如定义宏,编译Development版本)
    这样一来就可以通过访问Unity Cloud Build去查看自动化打包编译的详细情况了。
    UnityCloudBuild
    这样一来每一次提交Git后只需在Cloud Build点击build就会触发更新编译打包了。
    如果打包没有错误的话,我们只需去Cloud Buid上取打包好的包安装即可。

UI库选择

在Unity 4.6以后UI主要是有两种选择:

  1. UGUI(Unity 自带UI)
  2. NGUI(成熟的第三方UI插件)
    这里处于学习NGUI目的,我选择采用NGUI 2.7版本作为UI库。

游戏实战开发

赛车躲避

游戏说明

这是一款在2D竖版的赛车躲避类游戏,场景里有三条道可供行驶,玩家操控当前赛车(上下左右移动以及跳跃来躲避迎面而来的赛车)来回在三条道之间切换以躲避随机从三条道上出现的赛车,每躲过一个赛车就会增加得分,赛车移动游戏速度会随着游戏的进行越来越快已达到更快速度,最终躲避最多赛车得分最高者创造新纪录。

操控:
上下左右移动,圆形按钮跳跃(通过单独制作的控制面板,通过点击对应按钮响应)

相关概念学习

首先作为2D游戏,这里要讲一下Project 2D Mode和Editor 2D Mode这两个概念。
Project 2D Mode:
Project 2D Mode会去决定Unity Editor的一些设置。
Unity Editor Settings influence by mode settings
下列以官网将的2D Mode为例,看看分别会影响些什么?

  1. Any images you import are assumed to be 2D images (Sprites) and set to Sprite mode.(2D模式下默认导入的图片都是2D Sprite而不是Texture)
  2. The Sprite Packer is enabled.(Sprite Packer默认开启,Sprite Packager是为了高效的渲染并节约内存,用于打包图集(Atlas)的工具)
  3. The Scene View is set to 2D.(默认设置Scene view为2D mode,当然也可以切到Scene 3D mode)
  4. The default game objects do not have real time, directional light.(默认不创建方向光)
  5. The camera’s default position is at 0,0,–10. (It is 0,1,–10 in 3D Mode.)(Camera默认位置0,0,-10)
  6. The camera is set to be Orthographic. (In 3D Mode it is Perspective.)(Camera默认是Orthographic(正交)投影)
  7. Skybox is disabled for new scenes.(天空盒默认disable)
  8. Ambient Source is set to Color. (With the color set as a dark grey: RGB: 54, 58, 66.)(环境光默认设置为54,58,66)
  9. Precomputed Realtime GI is set to off.(预计算的全局光默认关闭)
  10. Baked GI is set to off.(烘焙全局观默认关闭)
  11. Lighting Auto-Building set to off.(光照的自动编译默认关闭)
    Editor 2D Mode:
    Editor 2D Mode只是决定了Scene窗口是以2D还是3D的形式显示。
    从上面可以看出Project的2D Mode会帮助我们设置一些对于2D游戏不需要或重要的设定,帮助我们快速开发2D游戏。

在2D游戏里,有个很重要的概念就是Sprite:
Sprite – Sprites are 2D Graphic objects.
提到Sprite就不得不提Sprite制作,优化相关的工具和一些相关的重要概念:

  1. Sprite Editor
    主要用于指明Sprite的一些重要属性,比如:
    Texture Type – 指明纹理类型(Sprite 2D)
    Sprite Mode – 指明这个Sprite是单独显示还是和其他Sprite一起显示(有利于Texture Packer去做图集的切割)
    Packing Tag – 指明Sprite所在图集
    …….
  2. Sprite Creator
    Unity提供的创建临时的sprite placeholder.(后期替换成我们想要的Sprite)
    也可以帮助我们去切割包含多个Sprite的图片到多个单独的Sprite(前提是包含多个Sprite的图片Sprite Mode要设置成Multiple。通过设置Slice或者Grid方式,可以快速帮助我们切割包含多个图片的Sprite)
    SpriteEditor
  3. Sprite Packer
    Unity提供的自动制作图集(Atlas)的工具,为了节约内存高效渲染,把多个Sprite打包到一个大的纹理图片里,然后通过记录对应的UV信息去访问,这样只需加载一张纹理图片就能去渲染多个Sprite。
    Edit -> Project Settings -> Editor -> Sprite Packer Mode
  4. Sprite Renderer
    这里需要区别一下Sprite Renderer和Mesh Renderer。
    Sprite Renderer是以2D Sprite作为输入通过Color,Material等属性去渲染出最终颜色。(默认的Sprite-Default Material是不计算光照的,因为2D游戏一般不考虑光照,当然我们也可用其他的Material去计算光照的影响)
    Mesh Renderer是以geometry from the Mesh Filter(模型数据)作为输入通过Material和光照方面的设置渲染出最终颜色。
    Sprite Renderer里值得一提的是Layer,因为2D游戏里没有深度的概念,所以通过Layer和Layer Order去决定Sprite的渲染顺序,同时Layer属性也被Camera和Ray Cast用作过滤的条件之一。(我们可以自定义Layer且设定Layer所处顺序(Edit -> Project Setting -> Tags and Layers),然后通过设定Sprite在Layer里的Layer Order去决定在同一Layer里的顺序)
    TagsAndLayers

游戏制作过程

Project Mode选择

通过上面概念学习,我们知道了设置Project Mode 2D会帮助我们快速开发2D游戏,所以这里我们选择2D Mode。
Edit->Project Settings->Editor->Default Behavior Mode -> 2D
然后再创建我们的CarDodge Scene:
File -> New Scene

美术图片分辨率选择

每个游戏制作都需要指定美术图片大小标准。
考虑到不同屏幕分辨率适应的问题,结合Unity Study里NGUI 2.7屏幕自适应的学习,我选择了1024*768也就是4:3的比例作为标准,这样一来在高分辨率的机器上(大部分主流机器都高于4:3),只是两边会多显示一部分而不至于背景或游戏场景被裁减,多出来的一部分我们可以把背景放大来覆盖。(作为2D竖版游戏这样是完全可以接受的)
为了使我们的Sprite的像素完美显示在屏幕上(1个Sprite像素对应屏幕的一个pixel),要做到这一点我们只需保证Screen.height/2/Size = PPU(Pixel Per Unit)即可,所以因为我们设定Sprite的100 Pixel对应一个Unit,Size = 768/2/100 = 3.84,所以我们把Orthographic Camera的Size设置为3.84,这样一来Sprite的像素就和屏幕意义对应了。

游戏背景循环移动实现方式选择

通过官网2D Scrolling Backgrounds的学习,了解到有下列两种方式可以实现背景循环移动。

  1. 用一张Sprite作为背景,通过动态计算(循环)transform.position的值去实现背景移动。
    这种方式的缺点是多分辨率适应问题,且当我们循环的时候,Sprite明显衔接不对,出现画面跳动。
  2. 设置3D Quad,添加Material去控制显示,通过动态控制(循环texture offset)Texture的显示实现背景移动。
    这种方式的好处是可以通过Tile Texture和设置Offset实现不拉伸背景实现铺满屏幕的效果。
    第一种方式游戏体验明显不行,所以这里我们采取第二种方式实现背景循环滚动。(这里使用的是Texture而非Sprite)
    OffsetScroller.cs
1
2
3
4
5
6
7
8
9
10
11
12
13
14
15
16
17
18
19
20
21
22
23
24
25
26
27
28
29
30
31
32
33
34
35
36
37
38
39
40
41
42
using UnityEngine;
using System.Collections;

public class OffsetScroller : MonoBehaviour {

public float mScrollSpeed = 0.2f;

private Vector2 mStartOffset;

private MeshRenderer mBackgroundMeshRender;

public void Awake()
{
mBackgroundMeshRender = gameObject.GetComponent<MeshRenderer>();
if(mBackgroundMeshRender != null)
{
mStartOffset = mBackgroundMeshRender.material.mainTextureOffset;
}
}

// Update is called once per frame
void Update () {
float y = Mathf.Repeat(Time.time * mScrollSpeed, 1);
Vector2 offset = new Vector2(0.0f, y);
if(mBackgroundMeshRender != null)
{
mBackgroundMeshRender.material.mainTextureOffset = offset;
}
else
{
Debug.Log("This script only works with Gameobject that contains MeshRenderer and Material.");
}
}

void OnDisable()
{
if(mBackgroundMeshRender != null)
{
mBackgroundMeshRender.material.mainTextureOffset = mStartOffset;
}
}
}

OffsetScrollBackground
上述代码实现了通过根据时间和设定的速度来调整Background Material的Offset值实现背景循环滚动效果。

游戏控制方式选择

Assets Store有一些付费的成熟控制插件,但考虑到控制上没太大的需求(上下左右和个别按钮即可),这里选择自己制作。(提供上下左右和一个单独的按钮交互界面)
InputPanelHierachy
InputPanelUI
我在Panel上挂载了UIAnchor和InputControlerManager脚本,前者用于在场景里设置位置,后者是我自己写来用于通过单一接口去传递相应回调。
InputControllerManager.cs

1
2
3
4
5
6
7
8
9
10
11
12
13
14
15
16
17
18
19
20
21
22
23
24
25
26
27
28
29
30
31
32
33
34
35
36
37
38
39
40
41
42
43
44
45
46
47
48
49
50
51
52
53
54
55
56
57
58
59
60
61
62
63
64
65
66
67
68
69
70
71
72
73
74
75
76
77
78
79
80
81
82
83
84
85
86
87
88
89
90
91
92
93
94
95
96
97
98
99
100
101
102
103
104
105
106
107
108
109
110
111
112
113
114
115
116
117
118
119
120
121
122
123
124
125
126
127
128
129
130
131
132
133
134
135
136
137
138
139
140
141
142
143
144
145
146
147
148
149
150
151
152
using UnityEngine;
using System.Collections;

public class InputControllerManager : MonoBehaviour {

public static InputControllerManager mInputControllerManager = null;

public GameObject mControlButton;

public GameObject mLeftButton;

public GameObject mRightButton;

public GameObject mUpButton;

public GameObject mDownButton;

private UIEventListener mControlButtonUIEL;

private UIEventListener mLeftButtonUIEL;

private UIEventListener mRightButtonUIEL;

private UIEventListener mUpButtonUIEL;

private UIEventListener mDownButtonUIEL;

private InputControllerManager()
{

}

public void Awake()
{
if(mInputControllerManager == null)
{
mInputControllerManager = this;
}
else if (mInputControllerManager != this)
{
Destroy(mInputControllerManager);
}
}

void Start()
{
if (mControlButton != null)
{
mControlButtonUIEL = mControlButton.GetComponent<UIEventListener>();
}

if (mLeftButton != null)
{
mLeftButtonUIEL = mLeftButton.GetComponent<UIEventListener>();
}

if (mRightButton != null)
{
mRightButtonUIEL = mRightButton.GetComponent<UIEventListener>();
}

if (mUpButton != null)
{
mUpButtonUIEL = mUpButton.GetComponent<UIEventListener>();
}

if (mDownButton != null)
{
mDownButtonUIEL = mDownButton.GetComponent<UIEventListener>();
}
}

public void ControlButtonClickDelegate(UIEventListener.VoidDelegate oncontrolbuttonclick)
{
if (mControlButtonUIEL != null)
{
mControlButtonUIEL.onClick = oncontrolbuttonclick;
}
}

public void ControlButtonOnPressDelegat(UIEventListener.BoolDelegate oncontrolbuttononpress)
{
if (mControlButtonUIEL != null)
{
mControlButtonUIEL.onPress = oncontrolbuttononpress;
}
}

public void LeftButtonClickDelegate(UIEventListener.VoidDelegate onleftbuttonclick)
{
if (mLeftButtonUIEL != null)
{
mLeftButtonUIEL.onClick = onleftbuttonclick;
}
}

public void LeftButtonOnPressDelegat(UIEventListener.BoolDelegate onleftbuttononpress)
{
if(mLeftButtonUIEL != null)
{
mLeftButtonUIEL.onPress = onleftbuttononpress;
}
}

public void RightButtonClickDelegate(UIEventListener.VoidDelegate onrightbuttonclick)
{
if(mRightButtonUIEL != null)
{
mRightButtonUIEL.onClick = onrightbuttonclick;
}
}

public void RightButtonOnPressDelegat(UIEventListener.BoolDelegate onrightbuttononpress)
{
if (mRightButtonUIEL != null)
{
mRightButtonUIEL.onPress = onrightbuttononpress;
}
}

public void UpButtonClickDelegate(UIEventListener.VoidDelegate onupbuttonclick)
{
if(mUpButtonUIEL != null)
{
mUpButtonUIEL.onClick = onupbuttonclick;
}
}

public void UpButtonOnPressDelegat(UIEventListener.BoolDelegate onupbuttononpress)
{
if (mUpButtonUIEL != null)
{
mUpButtonUIEL.onPress = onupbuttononpress;
}
}

public void DownButtonClickDelegate(UIEventListener.VoidDelegate ondownbuttonclick)
{
if(mDownButtonUIEL != null)
{
mDownButtonUIEL.onClick = ondownbuttonclick;
}
}

public void DownButtonOnPressDelegat(UIEventListener.BoolDelegate ondownbuttononpress)
{
if (mDownButtonUIEL != null)
{
mDownButtonUIEL.onPress = ondownbuttononpress;
}
}
}

然后把做好的InputPanel作为Prefab存起来。上述代码只提供了按钮的OnClick和OnPress回调设置。
当前游戏界面如下:
InputControlWithScrollBackground
游戏完成时只会有三条道会显示,但玩家需要移动8次来实现从最左边移动到最右边,这里显示九条是为了方便确认位置。

可视化重要信息

这里主要是为了可视化的看出我们在制作游戏的过程中是否用了一些导致性能或内存消耗很高的方法。
关于性能消耗:
我们采用在Unity_COC_Study里打印FPS的方式来可视化。
关于内存消耗:
之前使用过Memroy Profiler,很直观的显示了各方面的内存消耗和运行时间,性能消耗也能在这里看的一清二楚。
这里为了不每次都链接电脑开Memory Profiler,我采用打印FPS的方式查看性能上的消耗。
FPSDisplay.cs

1
2
3
4
5
6
7
8
9
10
11
12
13
14
15
16
17
18
19
20
using UnityEngine;
using System.Collections;
using UnityEngine.UI;

public class FPSDisplay : MonoBehaviour
{
public UILabel mFPSText;

private float mDeltaTime = 0.0f;

private float mFPS = 0.0f;

void Update()
{
mDeltaTime += (Time.deltaTime - mDeltaTime) * 0.1f;
float msec = mDeltaTime * 1000.0f;
mFPS = 1.0f / mDeltaTime;
mFPSText.text = string.Format("{0:0.0} ms ({1:0.} fps)", msec, mFPS);
}
}

FPSDisplay

2D动画抉择

一个游戏如果都是静态的图片移动,那么看起来肯定很无聊。
所以这里我们必须知道如何去制作动画。
首先我们确定的是我们使用的是2D Sprite,那么这里就确定了我们需要制作Sprite Animation。
在执着2D Sprite Animation之前,我们需要了解一些重要的概念:

  1. Animation – 基于关键帧的动画
  2. Animation Controller — 动画管理,通过给物体添加Animator并设定动画状态机之间的切换规则来实现动画状态切换管理(通过给UI添加Animator我们也可以在Anmation面板设置简单动画)
    接下来看看制作2D Animation步骤:
    这里由于我下载的资源都只有一整张赛车的Sprite,见下图:
    PlayerCarSprite
    因为原始图片是463*1010的,对于我们来说像素太大了,需要缩小,所以我首先通过PS把图片缩小。
    如果要想做更细致的动画,比如控车里的人做动画,轮子转弯的时候做动画,那么我就需要制作多张关键帧的Sprite。
    关键帧图片制作(下面只列举最后一帧,就不多放图片了这里):
    PlayerCarTurnLeft4
    PlayerCarTurnRight4
    接下来我们把制作好的关键帧图片导入Unity作为2D Sprite。
    然后在Animation面板创建并制作Turn Right,Turn Left,Normal和Crash四种动画。
    NormalAnimation
    TurnLeftAnimation
    TurnRightAnimation
    CrashAnimator
    动画制作完成后,我们需要通过Animation Controller去控制四个动画之间的状态转换规则(Unity里可视化的状态机)。(除了默认的Sprite创建的动画,我们还可以在Aniamtor里通过修改scale,position等属性制作帧动画)
    首先在Animation Controller里我的赛车有四中状态,Normal,TurnRight,TurnLeft,Crash:
    AnimationController
    设置了四种状态之间的转换后,我们需要添加转换条件,添加转换条件,需要通过Animator->Parameters面板添加,这里我添加了四个trigger类型的条件变量(Trigger的设置只会触发一次状态):
    AnimatorParameters
    创建了状态切换条件后我们需要在状态切换的条件那里设置触发条件:
    首先选中特定状态切换的带三尖角的线,然后在Inspector设置触发条件和一些状态转换之间的设置,见下图:
    StateTranslationConditionSetting
    这样一来我们在代码里只需获取特定对象身上的Animator,然后调用Animator.SetTrigger(“IsTurningNormal”)就能触发到Normal的状态切换了,同时触发动画效果。

除了Unity自带的帧动画,我们还可以通过Animation插件去实现一些动画效果。
让我们来看看下面DOTween官网对于各个Tween插件的比较Comparison with other engines
因为我一个都没有用过,就直接按上面的理论使用方便快速的DOTween作为这一次学习使用的对象。
具体的DOTween学习参见Unity_Study_Plugins_DOTween

这样一来车子的左右平滑移动和Jump动画效果就通过DOTween实现了。
而车子的上下移动结合Coroutine来实现(使用Coroutine的好处是可以实现避免每帧都判断是否需要向上或向下移动)。
具体代码如下:
PlayerCarController.cs

1
2
3
4
5
6
7
8
9
10
11
12
13
14
15
16
17
18
19
20
21
22
23
24
25
26
27
28
29
30
31
32
33
34
35
36
37
38
39
40
41
42
43
44
45
46
47
48
49
50
51
52
53
54
55
56
57
58
59
60
61
62
63
64
65
66
67
68
69
70
71
72
73
74
75
76
77
78
79
80
81
82
83
84
85
86
87
88
89
90
91
92
93
94
95
96
97
98
99
100
101
102
103
104
105
106
107
108
109
110
111
112
113
114
115
116
117
118
119
120
121
122
123
124
125
126
127
128
129
130
131
132
133
134
135
136
137
138
139
140
141
142
143
144
145
146
147
148
149
150
151
152
153
154
155
156
157
158
159
160
161
162
163
164
165
166
167
168
169
170
171
172
173
174
175
176
177
178
179
180
181
182
183
184
185
186
187
188
189
190
191
192
193
194
195
196
197
198
199
200
201
202
203
204
205
206
207
208
209
210
211
212
213
214
215
216
217
218
219
220
221
222
223
224
225
226
227
228
229
230
231
232
233
234
235
236
237
238
239
240
241
242
243
244
245
246
247
248
249
250
251
252
253
254
255
256
257
258
259
260
261
262
263
264
265
266
267
268
269
270
271
272
273
274
275
276
277
278
279
280
281
using UnityEngine;
using System.Collections;
using DG.Tweening;
using UnityEngine.SceneManagement;

public class PlayerCarController : MonoBehaviour {

public float mMoveTweenTime = 0.3f;

public float mIntervalTimeToKeepMovingUPOrDown = 0.025f;

public Vector3 mHorizontalOffset = new Vector3(0.9f, 0.0f, 0.0f);

public Vector3 mVerticalOffset = new Vector3(0.0f, 0.08f, 0.0f);

public LayerMask mBolockingLayer;

private const int mLimitTopDownMoving = 10;

private Vector3 mTargetPosition;

private bool mIsTweenComplete = true;

private bool mIsJumpComplete = true;

private bool mIsKeepMovingUp = false;

private bool mIsKeepMovingDown = false;

private bool mUpdateJumpAnimationLater = false;

private Animator mPlayerCarAnimator;

private bool mIsCrash = false;

//Jump tween
public float mJumpDuration = 0.4f;

private float mOriginalJumpDuration;

public Vector3 mJumpEndScale = new Vector3(0.6f, 0.6f, 1.0f);

private Vector3 mOriginalScale;

private Sequence mJumpSequence;

//Box2D
private BoxCollider2D mPlayerCarBox2D;

void Awake()
{
mTargetPosition = gameObject.transform.position;

mPlayerCarAnimator = gameObject.GetComponent<Animator>();

mOriginalScale = transform.localScale;

mPlayerCarBox2D = gameObject.GetComponent<BoxCollider2D>();

mOriginalJumpDuration = mJumpDuration;

mJumpSequence = DOTween.Sequence();

mJumpSequence.Append(transform.DOScale(mJumpEndScale, mJumpDuration));
mJumpSequence.Append(transform.DOScale(mOriginalScale, mJumpDuration));
mJumpSequence.SetAutoKill(false);
mJumpSequence.OnComplete(OnJumpComplete);
mJumpSequence.Pause();
}

// Use this for initialization
void Start () {
InputControllerManager.mInputControllerManager.RightButtonClickDelegate(MoveRight);
InputControllerManager.mInputControllerManager.LeftButtonClickDelegate(MoveLeft);
InputControllerManager.mInputControllerManager.UpButtonClickDelegate(MoveUp);
InputControllerManager.mInputControllerManager.UpButtonOnPressDelegat(KeepMoveUp);
InputControllerManager.mInputControllerManager.DownButtonClickDelegate(MoveDown);
InputControllerManager.mInputControllerManager.DownButtonOnPressDelegat(KeepMoveDown);
InputControllerManager.mInputControllerManager.ControlButtonClickDelegate(Jump);

StartCoroutine(MoveUpCoroutine());
StartCoroutine(MoveDownCoroutine());
}

// Update is called once per frame
void Update () {

}

private void MoveRight(GameObject go)
{
if (mIsTweenComplete == true && mIsCrash == false)
{
Vector2 start = new Vector2(transform.position.x, transform.position.y);
mTargetPosition = transform.position + mHorizontalOffset;
Vector2 end = new Vector2(mTargetPosition.x, mTargetPosition.y);
RaycastHit2D hit = Physics2D.Linecast(start, end, mBolockingLayer);
if(hit.transform == null)
{
if (mPlayerCarAnimator != null)
{
mPlayerCarAnimator.SetTrigger("IsTurningRight");
}
mIsTweenComplete = false;
transform.DOMove(mTargetPosition, mMoveTweenTime).OnComplete(OnTweenComplete);
}
}
}

private void MoveLeft(GameObject go)
{
if (mIsTweenComplete == true && mIsCrash == false)
{
Vector2 start = new Vector2(transform.position.x, transform.position.y);
mTargetPosition = transform.position - mHorizontalOffset;
Vector2 end = new Vector2(mTargetPosition.x, mTargetPosition.y);
RaycastHit2D hit = Physics2D.Linecast(start, end, mBolockingLayer);
if (hit.transform == null)
{
if (mPlayerCarAnimator != null)
{
mPlayerCarAnimator.SetTrigger("IsTurningLeft");
}
mIsTweenComplete = false;
mTargetPosition = transform.position - mHorizontalOffset;
transform.DOMove(mTargetPosition, mMoveTweenTime).OnComplete(OnTweenComplete);
}
}
}

private void MoveUp(GameObject go)
{

}

private void KeepMoveUp(GameObject go, bool state)
{
if(state)
{
mIsKeepMovingUp = true;
}
else
{
mIsKeepMovingUp = false;
}
}

IEnumerator MoveUpCoroutine()
{
while (true)
{
if (mIsKeepMovingUp && mIsCrash == false && mIsJumpComplete == true)
{
Vector2 start = new Vector2(transform.position.x, transform.position.y);
mTargetPosition = transform.position + mVerticalOffset * mLimitTopDownMoving;
Vector2 end = new Vector2(mTargetPosition.x, mTargetPosition.y);
RaycastHit2D hit = Physics2D.Linecast(start, end, mBolockingLayer);
if (hit.transform == null)
{
mTargetPosition = transform.position + mVerticalOffset;
transform.position = mTargetPosition;
}
}
yield return new WaitForSeconds(mIntervalTimeToKeepMovingUPOrDown);
}
}

private void MoveDown(GameObject go)
{

}


private void KeepMoveDown(GameObject go, bool state)
{
if (state)
{
mIsKeepMovingDown = true;
}
else
{
mIsKeepMovingDown = false;
}
}

IEnumerator MoveDownCoroutine()
{
while (true)
{
if (mIsKeepMovingDown && mIsCrash == false && mIsJumpComplete == true)
{
Vector2 start = new Vector2(transform.position.x, transform.position.y);
mTargetPosition = transform.position - mVerticalOffset * mLimitTopDownMoving;
Vector2 end = new Vector2(mTargetPosition.x, mTargetPosition.y);
RaycastHit2D hit = Physics2D.Linecast(start, end, mBolockingLayer);
if (hit.transform == null)
{
mTargetPosition = transform.position - mVerticalOffset;
transform.position = mTargetPosition;
}
}
yield return new WaitForSeconds(mIntervalTimeToKeepMovingUPOrDown);
}
}

private void Jump(GameObject go)
{
if (mIsJumpComplete == true)
{
mIsJumpComplete = false;
mPlayerCarBox2D.enabled = false;
mJumpSequence.Restart();
}
}

private void CrashCallBack()
{
SceneManager.LoadScene("Game");
}

public void OnTriggerEnter2D(Collider2D collision)
{
if(collision.tag == "EnemyCar")
{
Debug.Log(string.Format("Collision with EnemyCar.name {0}",collision.name));
mIsCrash = true;
mPlayerCarAnimator.SetTrigger("IsCrash");
}
}

public void OnTriggerExit2D(Collider2D collision)
{
if (collision.tag == "EnemyCar")
{
Debug.Log(string.Format("Collision with EnemyCar.name {0}", collision.name));
mIsCrash = true;
mPlayerCarAnimator.SetTrigger("IsCrash");
}
}

private void OnTweenComplete()
{
mIsTweenComplete = true;
if(mIsCrash == false)
{
mPlayerCarAnimator.SetTrigger("IsTurningNormal");
}
}

private void OnJumpComplete()
{
mIsJumpComplete = true;
mPlayerCarBox2D.enabled = true;
if(mUpdateJumpAnimationLater)
{
mUpdateJumpAnimationLater = false;
UpdateJumpAnimation();
}
}

public void UpdateJumpAnimation()
{
if (mIsJumpComplete == false)
{
mUpdateJumpAnimationLater = true;
}
else
{
//Reset Sequence to adjust tween's duration
mJumpSequence.Kill(true);
mJumpSequence = DOTween.Sequence();
mJumpDuration = mOriginalJumpDuration - CarDodgeGame.mCarDodgeGameInstance.GameLevel / 15.0f;
Debug.Log("mJumpDuration = " + mJumpDuration);
mJumpSequence.Append(transform.DOScale(mJumpEndScale, mJumpDuration));
mJumpSequence.Append(transform.DOScale(mOriginalScale, mJumpDuration));
mJumpSequence.SetAutoKill(false);
mJumpSequence.OnComplete(OnJumpComplete);
mJumpSequence.Pause();
}
}
}

通过调节给出的public变量,可控制movetween的duration时间和coroutine的执行时间间隔,还有垂直和水平方向的移动位移等。

游戏内GameObject数量的思考

因为2D赛车躲避小游戏同一时间不会有太多的GameObject处于场景里,通过Unity_COC_Study的学习,我知道了我们可以通过Object Pool的方式来预创建一定数量的GameObject,然后在适当的时机active or deactive他们来减少Instantiate的调用,即节约内存又性能损耗低。
ObjectPoolManager .cs

1
2
3
4
5
6
7
8
9
10
11
12
13
14
15
16
17
18
19
20
21
22
23
24
25
26
27
28
29
30
31
32
33
34
35
36
37
38
39
40
41
42
43
44
45
46
47
48
49
50
51
52
53
54
55
56
57
58
59
60
61
62
63
64
65
66
using UnityEngine;
using System.Collections;
using System.Collections.Generic;

public class ObjectPoolManager : MonoBehaviour
{
public static ObjectPoolManager mObjectPoolManagerInstance = null;

public GameObject[] mEnemyCar;

public int mAmountForEachEnemyCar = 4;

private List<List<GameObject>> mEnemyCarTwoDimensionList;

public bool mWillGrow = true;

void Awake()
{
if (mObjectPoolManagerInstance == null)
{
mObjectPoolManagerInstance = this;
}
else if (mObjectPoolManagerInstance != this)
{
Destroy(gameObject);
}
}

void Start()
{
mEnemyCarTwoDimensionList = new List<List<GameObject>>();

for (int i = 0; i < mEnemyCar.Length; i++)
{
List<GameObject> enemycarlist = new List<GameObject>(mAmountForEachEnemyCar);
for(int j = 0; j < mAmountForEachEnemyCar; j++)
{
GameObject enemycarobj = Instantiate(mEnemyCar[i]) as GameObject;
enemycarobj.SetActive(false);
enemycarlist.Add(enemycarobj);
}
mEnemyCarTwoDimensionList.Add(enemycarlist);
}
}

public GameObject GetEnemyCarObject(int carindex)
{
for (int i = 0; i < mEnemyCarTwoDimensionList[carindex].Count; i++)
{
if (!mEnemyCarTwoDimensionList[carindex][i].activeInHierarchy)
{
mEnemyCarTwoDimensionList[carindex][i].SetActive(true);
return mEnemyCarTwoDimensionList[carindex][i];
}
}

if (mWillGrow)
{
GameObject enemycar = Instantiate(mEnemyCar[carindex]) as GameObject;
mEnemyCarTwoDimensionList[carindex].Add(enemycar);
return enemycar;
}

return null;
}
}

上述代码写的比较死,是针对CarDodge这个游戏而言,因为有多种车子,所以用到了List<List>这样的双重List来存储对应车子所与生成的GameObject。

最终游戏截图(大部分游戏UI素材选至COC):
LoginUI
出于是学习使用旧版的NGUI,所以上述UI并没有实际的账号注册检查,只实现了简单的输入文字要求和账号对错(账号暂时是硬代码写的,PC上是通过读取Excel(使用的是ExcelReader,参考ExcelRead website),真机对应功能还没做)检查。
LoadingUI
这一个主要是尝试Scroll Bar
GameSetting1
GameSetting2
GameSetting3
这三个主要是尝试UIBUtton,UIPopupList,UIISlider,UIDraggable Panel的使用和TweenPosition制作简单UI动画(包含了对背景音乐和音量的设置功能,存储采取PlayerPrefs写入程序文件)。
IpadScreenShot
最后这一个是本章2D赛车躲避的最终真机(Ipad mini 1)游戏截图,主要实现了赛车跳跃,前后左右移动,随着赛车数量躲避增加游戏速度增加,限制了移动范围。

贪吃蛇

游戏说明

这个游戏我想没什么好说的了,直接移步贪吃蛇维基百科

游戏要点思考

  1. 2D or 3D?
    标准的传统2D游戏,所以这里可以用纯2D来做(这里采用纯NGUI来做,看看NGUI的自适应效果)。
  2. 游戏素材大小
    依然以1024768(4:3)为标准,因为之前在NGUI 2.7屏幕自适应已经提到了,把UIRoot的Scaling Style设置为Fixed Size,然后通过动态修改ManuaHeight已经实现了基于高度的自适应,所以我们在创建地图的时候只需考虑把Grid创建在基于1024768的分辨率对应位置即可(当然这样会出现在不同分辨率机器上自适应后铺不满屏幕,但这样做我们可以无需考虑机器分辨率)。准备设计宽4030(4:3)个单元格,单元格以20乘以20像素为基准,这样一来游戏地图占据800600像素,高度腾出来的像素768-600=168用于控制UI面板显示。
    这个游戏实现没什么特别的,这里主要看看不同分辨率的显示情况。
    1024-768:
    SnakeGame1024768
    960-640:
    Snake960640
    800-800:
    Snake800800

坦克大战

游戏说明

坦克大战(英语:Battle City)是一款平面射击游戏

游戏要点思考

  1. 2D or 3D?
    以纯2D的形式来制作坦克大战游戏。

  2. UI选择
    这里为了熟悉UGUI,进而和NGUI相比较,这里采用UGUI来学习。
    UGUI相关知识学习

  3. UI自适应
    UI Render Space – Screen Space(Camera)(设置Main Camera作为渲染Camera)
    UI Scale Mode – Scale With Screen Size(设置MatchWidthOrHeight = 0.5确保按宽度和高度变化同时变化去适应)
    Background UI Scale Mode – Scale with Screen Size(设置MatchWidthOrHeight = 1确保游戏背景是高度铺满,Anchor设置在中心保持1:1比例)

  4. Pixel Perfect 2D?素材选择?地图大小?地图在不同分辨率上的显示?
    为了实现Pixel Perfect 2D,我们需要确保1 Unit所代表的像素 = PPU。
    我以1024 X 768为基准,Orthographic Size设置为6,PPU为64。(这样一来屏幕高度被分为12 Unit,每个Unit代表768 / 2 / 6 = 64 pixel)
    2D素材采用64 X 64的Tile(每一个Tile占一个Unit)
    游戏区域为704 X 704大小(占11 X 11个Unit,四周多出来的用于UI显示)
    UI Sprite采用64 X 64。
    因为地图是基于Tile的,所以在不同分辨率上,地图的大小(Tile数量)应该是一致的,这里地图大小默认设定为11 X 11个Tile(704 X 704)(基于1024 X 768,高度顶部留1个Unit)。
    要想Tile在不同分辨率机器上都Pixel Perfect显示,动态修改Orthographic Size会导致Size Change(屏幕高度的Unit数量也会改变),以PPU = 64且Tile像素为64 * 64去显示12个Tile是没法恰好铺满屏幕高度的。所以这里采用保持Orthographic Size不变保持6,制作多套PPU去适应屏幕分辨率的方案(通过Assetbundle动态替换)。(出于学习目的这里只针对1024 X 768(PPU = 64)和1920 X 1080(PPU = 1080 / 2 / 6 = 90)来做两套PPU实验)
    Note:
    这方案会导致做很多套不同PPU的资源去适应不同屏幕分辨率。

  5. Sprite Setting?
    Sprite Type – Sprite(2D and UI) 因为用于纯2D游戏
    Sprite Mode – Single or Multiple 根据我们的图片是否需要切割成单独的Sprite而定
    Packing Tag – 用于Unity Sprite Packer打包Spite图集
    Pixels Per Unit – 64(Pixel Perfect显示,PPU = Screen.height / Orthographic Size(6) / 2)。
    Generate Mip Maps – No(因为是纯2D游戏,摄像机与Sprite距离保持不变(当然其实Camera设置成Screen Space(Camera)而言是可以变的,但这里我们设置Orthographic投影,所以距离对于显示大小没有意义,并且我们还保证了Pixel Perfet显示,所以就游戏里的Sprite而言Mipmap是没有必要的。(前面的前提是使用多套Asset资源并保证Pixel Perfect显示))
    后面三个参数学习参考调整画质(贴图)质量
    Filter Mode – Bilinear(Filter Mode用于纹理图片这里的Sprite拉伸后如何插值计算(抗锯齿计算),Bilinear会进行双线性插值,效果和运算开销在Point,Biinear,Trilinear里最能够接受。)
    Max Size – 2048(导入纹理的最大尺寸,默认2048,设置过小会导致大图片被压缩,质量变得很差(当然也要考虑内存的使用降低了))
    Format – Compressed(纹理压缩格式,大小和质量的权衡。采用默认的Compressed即可。)

  6. 物理?
    不使用物理控制(Transform移动),使用Trigger做触发,纯2D游戏,使用Physical2D和Rigibody2D。
    平滑移动思考:
    需求:
    保持匀速移动,固定时间内完成
    方案一:
    DoTwen
    使用DoTween会导致需要初始化大量的Tween(假设地图是11 X 11,每次移动的offset是0.5,那么我们会需要创建(11 / 0.5 ) X (11 / 0.5) = 484个Tween)
    方案二:
    Vector3.Lerp(Vector3 a, Vector3 b, float t);
    Interpolates between the vectors a and b by the interpolant t. The parameter t is clamped to the range [0, 1].
    Using Vector3.Lerp() correctly in Unity
    参考上述博文,我们会发现,平时大部分的用法是如下:

1
transform.position = Vector3.Lerp(transform.position, _endPosition, speed*Time.deltaTime);
这样的用法其实会导致非线性的移动速度,因为每一次transform.position的位置在变(离终点越来越近),假设Time.deltaTime是固定时间间隔,那么就会出现前半段移动的快,后半段移动的慢的效果。
为了保证正真的平滑移动(匀速移动),我们需要保证初始位置和结束位置不变,然后调整t参数,所以这里把t参数设定为timepassed(从开始Lerp计时) / timetocomplete(总共完成Lerp的用时。通过在Update或FixedUpdate里每隔一段时间更新Lerp的t参数,我们可以实现跟帧率挂钩的匀速移动效果(帧率高,移动的平滑。帧率低,移动的跳跃。但都能在固定时间内达到终点)。
1
2
3
4
5
6
7
8
9
10
11
12
13
14
15
16
17
18
19
IEnumerator MovingCoroutine()
{
while (true)
{
if (mIsMoving == true)
{
float timesincestarted = Time.time - mTimeStartMoving;
float percentagecomplete = timesincestarted / mTimeToCompleteMove;
transform.position = Vector3.Lerp(mStartPosition, mDestinationPosition, percentagecomplete);

if (percentagecomplete >= 1.0f)
{
mIsMoving = false;
}
}

yield return new WaitForSeconds(mKeepMoveIntervalTime / 10);
}
}
  1. 控制方式
    因为之前的控制面板是基于NGUI制作的,所以这里就混合UGUI和NGUI来作为控制面板。

  2. 游戏特性
    坦克特性:
    1. 占据一个Tile,1 Unit(1 Tile被细分成16 * 16的网格)
    2. Tank以0.5个Unit的单位的移动,只要前方0.5 Unit单位内有不可通行物,就不能前进
    3. 多个Tank不能占据同一位置
    4. Tank只能上下左右移动
    5. 坦克只能发射出有限数量的子弹,在子弹数量达到上限时需要等待子弹消失。
    6. 不同的坦克的移动速度和子弹数量上限和子弹速度不一样
    子弹特性:
    1. 子弹拥有不同等级的威力,根据威力不同可消灭的小块数量和小块类型不同
    2. 子弹不能击中友方队员(友方队员子弹也不行)
    3. 子弹只有上下左右四个固定的方向,一旦射出子弹,方向不会改变
    Tile特性:
    1. Tile可以被攻击切割成多个小块(Normal Tile这里假设可切割成16),
    每个小块具备完整的特性(占据单元格阻碍前进,能被攻击)。
    2. 小块Tile被子弹击中会根据子弹伤害和周围Tile小块情况来决定是消灭单独一个小块还是2个或多个。
    3. 不同类型的Tile有不同的特性(能否通过,能否破坏等)

  3. 敌人AI
    敌军坦克特性:
    1. 移动方向只有上下左右
    2. 单次移动单位0.5 Unit
    3. 撞到障碍物(不可通行的地方(不包括友军坦克))后重新选择方向
    4. 方向选择(避开之前行进方向随机选取一个方向,为了保证坦克不至于一直一左一右,这里需要采用[Shuffle Bag]而非完全随机的方式选取新移动方向,Shuffle Bag可以保证特定事件发生的概率从而保证各个方向的选择都能平摊,比如4次里面肯定会有上下左右而非左右左右)
    5. 多个坦克相遇的时候不立刻重新选择方向而是开始累计坦克无法移动的时间
    (直到坦克达到坦克停止时间限制时重新选择,这里不同速度的坦克所忍耐的停止时间不一样,这样一来就可以实现,速度快的追着速度慢的跑)
    6. 子弹随机隔一段时间发射,但不会发射超过子弹数量上限。
    Shuffle Bag
    Shuffle Bag代码:

1
2
3
4
5
6
7
8
9
10
11
12
13
14
15
16
17
18
19
20
21
22
23
24
25
26
27
28
29
30
31
32
33
34
35
36
37
38
39
40
41
42
43
44
45
46
47
48
49
50
51
52
53
54
55
56
57
58
59
60
61
62
63
64
65
66
67
68
69
70
71
72
73
74
75
76
77
78
79
80
81
82
83
84
85
86
87
88
89
90
91
92
93
94
95
96
97
98
99
100
101
102
103
104
105
106
107
108
109
110
111
112
113
114
115
116
117
118
119
120
121
122
123
124
125
126
127
128
129
using UnityEngine;
using System.Collections;
using System.Collections.Generic;

public class ShuffleBag<T> : ICollection<T>, IList<T>
{
private List<T> mData = new List<T>();

private int mCursor = 0;

private T last;

public T Next()
{
if (mData.Count == 0)
{
return default(T);
}

if (mCursor < 1)
{
mCursor = mData.Count - 1;
if (mData.Count < 1)
{
return default(T);
}
return mData[0];
}

int grab = Mathf.FloorToInt(Random.value * (mCursor + 1));
T temp = mData[grab];
mData[grab] = mData[mCursor];
mData[mCursor] = temp;
mCursor--;
return temp;
}

//IList[T] implementation
public int IndexOf(T item)
{
return mData.IndexOf(item);
}

public void Insert(int index, T item)
{
mData.Insert(index, item);
mCursor = mData.Count - 1;
}

public void RemoveAt(int index)
{
mData.RemoveAt(index);
mCursor = mData.Count - 1;
}

public T this[int index]
{
get
{
return mData[index];
}
set
{
mData[index] = value;
}
}

//IEnumerable[T] implementation
IEnumerator<T> IEnumerable<T>.GetEnumerator()
{
return mData.GetEnumerator();
}

//ICollection[T] implementation
public void Add(T item)
{
mData.Add(item);
mCursor = mData.Count - 1;
}

public int Count
{
get
{
return mData.Count;
}
}

public void Clear()
{
//mCursor = 0;
mData.Clear();
}

public bool Contains(T item)
{
return mData.Contains(item);
}

public void CopyTo(T[] array, int arrayindex)
{
foreach (T item in mData)
{
array.SetValue(item, arrayindex);
arrayindex++;
}
}

public bool Remove(T item)
{
bool removesuccess = mData.Remove(item);
mCursor = mData.Count - 1;
return removesuccess;
}

public bool IsReadOnly
{
get
{
return false;
}
}

//IEnumerable implementation
IEnumerator IEnumerable.GetEnumerator()
{
return mData.GetEnumerator();
}
}
  1. 地图编辑器制作
    做一个地图编辑模式,提供多种Tile模型选择,通过序列化存储起来。(可用于制作关卡)

  2. 多人网络游戏(学习多人网络游戏开发)
    暂不支持多人联网进行(通过Unity High Level API去开发 – 待深入学习)

  3. 地图存储方式
    地图信息很简单,主要存储地图里每一个Tile的类型信息(同时存储地图名称,坦克出生地点信息),这里采用序列化的方式。(因为我们保持了Orthographic Size为6,通过动态切换不同PPU的Assets去保证Pixel Perfect显示,所以Screen高度一直都是12个Unit,同时设置了PPU = Screen.height / 2 / 6,Tile素材PPU * PPU,所以1个Tile对应1个Unit。地图存储的信息是11 * 11(704 * 704)个Tile相关的信息(高度顶部留3个Unit用作UI显示)。

  4. 地图数据加密
    待思考

  5. 游戏地图数据结构?如何实现Tile可以被多个方向打击切割成小块效果?
    地图存储数据信息(MapInfo):
    1. 地图被细分成多个Tile(MapSize.Row * MapSize.Column大小),存储所有Tile相关信息(用于构建地图)
    2. 记录玩家Tank出生点和敌军坦克出生点信息。(用于获取Spawn玩家坦克和敌军坦克的位置信息)
    3. 记录是否包含基地和基地位置信息。(用于确保只有一个基地)
    4. 存储地图名字(用于地图存储)
    游戏地图数据(TankMap):
    1. 记录所有细分后是否被占用信息(用于Tank移动判断)
    同时记录是否被Tank占用(用于Tank移动的时候判断前方是Tank还是Tile)
    同时记录细分后占用的类型信息(Tile Type,用于子弹撞击后检测周边Tile类型信息)
    地图应该被细分成所有 Tile数量 * Tile最小切割数的网格
    (这里假设Tile最多被切割成16,那么地图应该被细分到MapSize.Row * MapSize.Column * 16的BitArray)
    2. 每个细分的Tile记录自身包含细分后的索引信息
    (e.g. 最大细分16,Iron Tile细分为2 * 2 = 4,那么每个细分的Iro Tile所记录的细分后的索引信息数量为16 / 4 = 4个)
    这样一来每个小的Tile被破坏后支持快速改写该小块占有地图网格的占用信息)。
    3. 坦克存储自身所占用的所有indexs作为移动索引信息
    3. 包含前面地图存储的信息(用于构建游戏地图数据)

Note:
不同类型的Tile的细分程度不同(16 * 16 or 4 * 4 or 2 * 2 or 1 * 1),但游戏地图数据细分以细分程度最大的为准。(细分程度不同会影响Tile在子弹撞击时的效果判定)

实现功能:

  1. 地图编辑存储和读取(支持原始的那些Tile选择)
  2. 敌军坦克简单AI(基本无AI,主要是随机的方向选择,但通过Shuffle Bag来避免了过于随机的选择方式)
  3. 我方坦克控制和子弹射击
  4. 子弹打击效果

暂时效果:
TankScreenShot
具体视频效果参见

因为只上传了IOS打包后的XCode项目等文件作为Unity Icloud Build的地址,所以这里没有源代码地址。

待续……

问题记录

  1. 编译打包XCode项目出问题
    Failed to Copy File / Directory from ‘**\Unity\Editor\Data\Tools/MapFileParser/MapFileParser’ to ‘Temp/StagingArea\Trampoline\MapFileParser’.
    这是Unity 5.1版本的一个bug。
    解决方案
    修改.\Unity\Editor\Data\Tools\MapFileParser\MapFileParser.exe到MapFileParser然后打包XCode项目,然后在XCode项目里把MapFileParser改回MapFileParser.exe
    或者使用新版本Unity
  2. 编译打包XCode项目时库找不到的问题
    ArgumentException: The Assembly System.Configuration is referenced by System.Data. But the dll is not allowed to be included or could not be found.
    解决方案
    Change it from .NET sub 2.0 to .NET
  3. Git不支持超过100M文件上传
    解决方案Git Large File Storage (LFS)
  4. Cloud Build显示Bitcode错误
    又是Unity5.1.1的一个bug
    解决方案:
    可以打开XCode项目,项目属性设置bitcode enale
    由于遇到太多Unity bug,个人建议采用新版本Unity为佳。我个人最后去下载了最新版本的Unity5.4.0版本。
  5. MapParser.sh acess Permission denied
    貌似又是Unity bug,Unity 5.4.0
    解决方案:
    需要在Mac电脑上修改MapParser.sh的执行权限(chmod +x MapParser.sh),然后提交到Git后再触发编译。然后用修改后的MapParser.sh覆盖引擎目录下的Editor\Data\PlaybackEngines\iOSSupport\Trampoline\MapParser.sh以确保每次生成的XCode Project里的MapParser.sh有可执行权限。
  6. 指定Android NDK的时候报错”Unable to detect NDK version, please pick a different folder”
    解决方案:
    需要下载特定版本的NDK 10r
    Edit -> Preference -> External Tool -> NDK download
    或者
    自己去下载后指定目录
  7. XCode编译项目报错:MapParser.sh: bin/sh^M: bad interpreter: no such file or directory
    解决方案
    这是不同系统编码格式引起的:在windows系统中编辑的.sh文件可能有不可见字符,所以在Linux系统下执行会报以上异常信息。
    使用dos2unix工具转换字符编码后放到Xcode项目里。(为了避免XCode生成每次都出这个问题,我们替换字符编码为Unix位于Unity引擎里的Editor->Data->PlaybackEngines->iOSSupport->Trampoline->MapFileParser.sh)
  8. Unity Cloud Build error:”2015-12-10 17:21:27.407 xcodebuild[7363:75765] Failed to locate a valid instance of CoreSimulatorService in the bootstrap. Adding it now.
    Could not find service “com.apple.CoreSimulator.CoreSimulatorService” in domain for uid: 502
    2015-12-10 17:21:27.431 xcodebuild[7363:75765] launchctl print returned an error code: 28928”
    解决方案
    从上面链接发现这是Xcode 7.2的一个bug,我们需要用Xcode 7.3,所以我们只需要把Unity Cloud Build设置到Xcode 7.3即可。
  9. Unity Icloud Build打包出来的.ipa文件很大
    一. 关闭Bitcode
    关闭Bitcode
    Bitcode好像是Apple提交App后用于帮助优化的数据,IOS上是optional的,但watchOS and tvOS apps是必须的。
1
2
3
4
5
6
7
8
9
10
11
12
13
14
15
16
17
18
19
20
21
22
23
24
25
26
27
28
29
30
using UnityEngine;
using System.Collections;

using UnityEditor;
using UnityEditor.Callbacks;
using System.Collections;
using UnityEditor.iOS.Xcode;
using System.IO;

public class BuildSetting {

[PostProcessBuild]
public static void OnPostprocessBuild(BuildTarget buildTarget, string path)
{
Debug.Log(string.Format("OnPostprocessBuild({0},{1}) called!", buildTarget.ToString(), path));
if (buildTarget == BuildTarget.iOS)
{
string projPath = path + "/Unity-iPhone.xcodeproj/project.pbxproj";
PBXProject proj = new PBXProject();
proj.ReadFromString(File.ReadAllText(projPath));

string nativeTarget = proj.TargetGuidByName(PBXProject.GetUnityTargetName());
string testTarget = proj.TargetGuidByName(PBXProject.GetUnityTestTargetName());
string[] buildTargets = new string[] { nativeTarget, testTarget };

proj.SetBuildProperty(buildTargets, "ENABLE_BITCODE", "NO");
File.WriteAllText(projPath, proj.WriteToString());
}
}
}

二. 不使用的资源不要放在Resources目录下,避免被打包到resources.assets里
三. 打包编译Release版本而非Debug版

Shader Toy Introduction

之前就听别人提起过这个网站,上面有各式各样只通过Pixel Shader编写绚丽的效果(里面包含了很多数学和算法)。
而且作者编写的代码在网站上一目了然,让你知道这个效果是如何计算得出的。
看一下下面这一张效果:
ShaderToyExmaple
第一眼看到的时候,我很难相信这是通过简单纹理贴图输入加上数学运算得出的图案。

那么我们首先要知道什么是Pixel Shader?
Pixel Shader在OpenGL里也叫做Fragment Shader,可以简单的理解成针对每一个pixel做处理的Shader。

在这个网站上编写Pixel Shader还有一个好处就是快速方便的看到效果,当你要去测试一些数学算式算法的时候,很容易可视化的在上面编写并测试。

Shader Toy Study

接下来是基于ShaderToy上”GLSL 2D Tutorials”教程学习的一些事例。

fragColor

fragColor就是我们在GLSL的fragment shader里最后代表像素颜色的最后输出变量,他控制着我每一个像素最终的颜色值

1
2
3
4
void mainImage( out vec4 fragColor, in vec2 fragCoord )
{
fragColor = vec4(0.0,1.0,1.0,1.0);
}

mainImage(…)是我们的Pixel Shader的函数路口,每一帧都会对每一像素进行调用。
Final Effect:
ShaderToyfragColor

fragCoord

fragCoord是针对像素坐标而言的,因为mainImage会针对每一个像素执行一次,而fragCoord就给出了像素的坐标位置(左下角为原点)。
iResolution是ShaderToy里给出的关于frame的宽高像素信息(主要用于适应屏幕的大小变化,做到按比例而非特定像素值)

1
2
3
4
5
6
7
8
9
10
11
12
13
14
15
16
17
18
19
20
21
22
23
24
void mainImage( out vec4 fragColor, in vec2 fragCoord )
{
// fragcoord通过使用像素的fragCoord位置除以iResolution的宽高像素信息,
// 成功将像素位置的width和heigth都映射到了[0.0,1.0]
vec2 fragcoord = vec2(fragCoord.xy / iResolution.xy);
vec3 backgroundcolor = vec3(1.0,1.0,1.0);
vec3 pixelcolor = backgroundcolor;
vec3 gridcolor = vec3(0.5,0.5,0.5);
vec3 axescolor = vec3(0.0,0.0,1.0);
const float thickwidth = 0.1;
for(float i = 0.0; i < 1.0; i+=thickwidth)
{
if(mod(fragcoord.x, thickwidth) < 0.008 || mod(fragcoord.y, thickwidth) < 0.008)
{
pixelcolor = gridcolor;
}
}

if(abs(fragcoord.x ) < 0.006 || abs(fragcoord.y) < 0.006)
{
pixelcolor = axescolor;
}
fragColor = vec4(pixelcolor,1.0);
}

Final Effect:
ShaderToyfragCoord

Own Coordinate System

前一节讲到的把像素坐标映射到了[0.0,1.0],那么如果我们想把坐标信息映射到[-1.0,1.0]并且把屏幕中点作为(0.0,0.0)改如何映射了
而且前一节有一个问题需要注意,我们绘制出的grid是长方形而不是正方形(这主要是由于我们屏幕宽高是不一样,但我们都把x,y映射到了[0.0,1.0]并且用相同的interval即thickwidth去做等分导致的)

1
2
3
4
5
6
7
8
9
10
11
12
13
14
15
16
17
18
19
20
21
22
23
24
25
26
27
void mainImage( out vec4 fragColor, in vec2 fragCoord )
{
// 这里值得注意一下,因为一般情况都是屏幕宽大于高,
// 所以我们在映射宽高的时候,只需把高映射到[-1.0,1.0],
// 宽保持和高的比例差即可,即映射到[-width/height, width/height]
// 这样一来,同一个interval对于宽和高来说就一样了
vec2 r = vec2( fragCoord.xy - 0.5*iResolution.xy );
r = 2.0 * r.xy / iResolution.y;
vec3 backgroundcolor = vec3(1.0,1.0,1.0);
vec3 pixelcolor = backgroundcolor;
vec3 gridcolor = vec3(0.5,0.5,0.5);
vec3 axescolor = vec3(0.0,0.0,1.0);
const float thickwidth = 0.1;
for(float i = 0.0; i < 1.0; i+=thickwidth)
{
if(mod(r.x, thickwidth) < 0.008 || mod(r.y, thickwidth) < 0.008)
{
pixelcolor = gridcolor;
}
}

if(abs(r.x ) < 0.006 || abs(r.y) < 0.006)
{
pixelcolor = axescolor;
}
fragColor = vec4(pixelcolor,1.0);
}

Final Effect:
ShaderToyOwnCoordinateSystem

Cicle Demo

接下来我们即将看实现以下功能:

  1. 绘制圆
    针对绘制圆,我们主要是通过判断像素到圆心的位置的距离来决定是否处于圆内。
  2. 让圆之间的颜色实现叠加计算
    针对叠加运算的判断,我们主要是通过一个smoothstep的函数去得出像素在圆内和圆外所参与颜色计算的比例(这里是院内1.0,圆外0.0)
    这里要介绍一下smoothstep函数。
    函数原型:
    float smoothstep(float edge0, float edge1, float x)
    如果我们传递x<edge0则返回0.0,x>edge1则返回1.0,如果在中间则返回edge0-edge1的interpolation值(这里我们主要用来实现判断像素是在圆内还是圆外来决定是否参与叠加运算)
  3. 使圆做周期性运动。
    圆做周期性运动主要是通过iGlobalTime(Pixel Shader运行后的一个动态时间)来计算得出圆心的位置来实现的。
1
2
3
4
5
6
7
8
9
10
11
12
13
14
15
16
17
18
19
20
21
22
23
24
25
26
27
28
29
30
31
32
33
34
35
36
37
38
39
#define PI 3.14159265359
// 绘制圆并返回是否改圆的该像素是否应该参与像素叠加计算
float disk(vec2 r, vec2 center, float radius, vec3 color, inout vec3 pixel)
{
float rtoclength = length(r - center);
float inside = 0.0;
if(rtoclength < radius)
{
//pixel = vec3(clamp(rtoclength, radius / 4.0,radius / 2.0));
inside = 1.0 - smoothstep(radius - 0.005,radius + 0.005, rtoclength);
}
return inside;
}

void mainImage( out vec4 fragColor, in vec2 fragCoord )
{
vec2 p = vec2(fragCoord.xy / iResolution.xy);
vec2 r = vec2( fragCoord.xy - 0.5*iResolution.xy );
r = 2.0 * r.xy / iResolution.y;
vec3 backgroundcolor = vec3(0.0, 0.0, 0.0);
vec3 color1 = vec3(1.0, 0.0,0.0);
vec3 color2 = vec3(0.0, 1.0, 0.0);
vec3 color3 = vec3(0.0, 0.0, 1.0);
vec2 circle1center1 = vec2(sin(iGlobalTime / 1.0), cos(iGlobalTime / 1.0));
vec2 circle1center2 = vec2(cos(iGlobalTime / 2.0), sin(iGlobalTime / 2.0));
vec2 circle1center3 = vec2(-sin(iGlobalTime / 3.0), -cos(iGlobalTime / 3.0));

vec3 resultcolor = vec3(0.0,0.0,0.0);

vec3 pixel = backgroundcolor;

resultcolor += disk(r, circle1center1, 0.6, color1, pixel) * color1;

resultcolor += disk(r, circle1center2, 0.6, color2, pixel) * color2;

resultcolor += disk(r, circle1center3, 0.6, color3, pixel) * color3;

fragColor = vec4(resultcolor, 1.0);
}

Final Effect:
ShaderToyCircleDemo

Plasma Effect

Plasma Effect
关于这一节还有很多相关知识需要学习理解,暂时只贴代码和效果,后续会进一步深入了解。

1
2
3
4
5
6
7
8
9
10
11
12
13
14
15
16
17
18
19
20
21
22
23
24
25
26
27
28
29
30
31
32
33
34
35
36
37
38
39
40
41
42
43
44
45
void mainImage( out vec4 fragColor, in vec2 fragCoord )
{
vec2 p = vec2(fragCoord.xy / iResolution.xy);
vec2 r = vec2( fragCoord.xy - 0.5*iResolution.xy );
r = 2.0 * r.xy / iResolution.y;
vec3 ret = vec3(1.0, 1.0, 1.0);
float t = iGlobalTime;
r = r * 8.0;
float v1 = sin(r.x + t);
float v2 = sin(r.y + t);
float v3 = sin(r.x + r.y + t);
float v4 = sin(sqrt(r.x * r.x + r.y * r.y) + t);
float v5 = v1 + v2 + v3 + v4;

if( p.x < 1.0 / 10.0 )
{
ret = vec3(v1);
}
else if( p.x < 2.0 / 10.0)
{
ret = vec3(v2);
}
else if( p.x < 3.0 / 10.0)
{
ret = vec3(v3);
}
else if( p.x < 4.0 / 10.0)
{
ret = vec3(v4);
}
else if( p.x < 5.0 / 10.0)
{
ret = vec3(v5);
}
else if( p.x < 6.0 / 10.0)
{
ret = vec3(sin(v5));
}
else
{
ret *= vec3(sin(v5), cos(v5), tan(v5));
}

fragColor = vec4(ret, 1.0);
}

Final Effect:
ShaderToyPlasmaEffect

Texture & Video as Input

下面这个效果比较有趣,是通过把两个视频作为输入,通过把其中一个视频作为背景,把另一个含绿色背景的颜色出掉后合二为一实现的效果。
在Shader Toy里,我们可以设置几个Texture到iChannel上,然后通过texture2D(iChannel,*)去访问纹理值。
参考至A Beginner’s Guide to Coding Graphics Shaders

1
2
3
4
5
6
7
8
9
10
11
12
13
14
void mainImage( out vec4 fragColor, in vec2 fragCoord )
{
vec4 backgroundtexture = texture2D(iChannel0, p);
vec4 fronttexture = texture2D(iChannel2, p);

if(fronttexture.r + fronttexture.b > fronttexture.g)
{
fragColor = fronttexture;
}
else
{
fragColor = backgroundtexture;
}
}

Final Effect:
ShaderToyTextureAndVideoInput
ShaderToyTextureAndVideoInput2

Mouse Input

这一节讲到ShaderToy里关于如何响应Mouse Input。
ShaderToy里给了一个iMouse变量,用于得到Mouse输入的信息,我们可以通过iMouse变量的值去做出对应的响应效果。

1
2
3
4
5
6
7
8
9
10
11
12
13
14
15
16
17
18
19
20
21
22
23
24
float disk(vec2 r, vec2 center, float radius, vec3 color, inout vec3 pixel)
{
float rtoclength = length(r - center);
float inside = 0.0;
if(rtoclength < radius)
{
//pixel = vec3(clamp(rtoclength, radius / 4.0,radius / 2.0));
inside = 1.0 - smoothstep(radius - 0.005,radius + 0.005, rtoclength);
}
return inside;
}

void mainImage( out vec4 fragColor, in vec2 fragCoord )
{
vec2 r = vec2( fragCoord.xy - 0.5*iResolution.xy );
r = 2.0 * r.xy / iResolution.y;
vec3 backgroundcolor = vec3(iMouse.x / iResolution.x);
vec3 resultcolor = backgroundcolor;
// 这里值得注意的一点是,因为我们把高映射到[-1.0,1.0],但宽是[-aspect, aspect]
// 我们必须把mouse的x也映射到一样的比例才能正确显示在以r为坐标系的位置
vec2 center = 2.0 * vec2(iMouse.xy - 0.5 * iResolution.xy) / iResolution.y;
resultcolor += disk(r, center, 0.3, vec3(1.0,0.0,0.0), resultcolor) * vec3(1.0,0.0,0.0);
fragColor = vec4(resultcolor, 1.0);
}

Final Effect:
ShaderToyMouseInput1
ShaderToyMouseInput2

Random Noise

这一章讲关于OpenGL Shader里随机数的生成,这里还了解的不清晰,暂时只贴出代码和效果,后续会进一步学习修改。

1
2
3
4
5
6
7
8
9
10
11
12
13
14
15
16
17
18
19
20
21
22
23
24
25
26
27
28
29
30
31
32
float disk(vec2 r, vec2 center, float radius, vec3 color, inout vec3 pixel)
{
float rtoclength = length(r - center);
float inside = 0.0;
if(rtoclength < radius)
{
//pixel = vec3(clamp(rtoclength, radius / 4.0,radius / 2.0));
inside = 1.0 - smoothstep(radius - 0.005,radius + 0.005, rtoclength);
}
return inside;
}

void mainImage( out vec4 fragColor, in vec2 fragCoord )
{
vec2 p = vec2(fragCoord.xy / iResolution.xy);
vec2 r = vec2( fragCoord.xy - 0.5*iResolution.xy );
r = 2.0 * r.xy / iResolution.y;
vec3 backgroundcolor = vec3(0.0,0.0,0.0);
vec3 resultcolor = backgroundcolor;
float widthratio = iResolution.x / iResolution.y;
vec2 center;
vec2 pos;
for(float i = 0.0; i < 6.0; i++)
{
// 这里有一点要注意,
// 我们需要将随机数映射到正确的宽高映射值才能正确随机显示在整个屏幕上
pos = vec2(2.0 * widthratio * hash(i) - widthratio, 2.0 * hash(i + 0.5) - 1.0);
center = pos;
resultcolor += disk(r, center, hash(i * 5.0 + 10.0) / 5.0, vec3(1.0, 0.0, 0.0), resultcolor) * vec3(1.0, 0.0, 0.0);
}
fragColor = vec4(resultcolor, 1.0);
}

Final Effect:
ShaderToyRandomNumber

更多学习待更新

……

Shader Toy Relative Knowledge

Shader Toy Inputs

ShaderToyInputs

总的来说ShaderToy是一个很好的Shader学习网站,让我们可以在上面方便可视化的测试一些数学算式和算法效果。

Preface(序言)

What is COC?

COC(Clash of Clans) is a freemium mobile MMO strategy video game developed and published by Supercell.The game was released for iOS platforms on 2 August, 2012,[1] and on Google Play for Android on 7 October, 2013
(from wiki)

My COC Experience

我第一次接触COC大概是在2014年2月份,当时被朋友拉着一起玩这个游戏,三个人建立了自己的小部落,后来陆陆续续拉了不少朋友加入,口口相传,部落成长到40人的部落,从此以后就一发不可收拾。
这款游戏最吸引我的地方有以下几点:

  1. 游戏时间碎片化(采用真实时间计时),不需要玩家长时间在线。
  2. 线上进攻布局,线下防守的玩法。
  3. 不同兵种和法术的不同特性使得玩家的手法和路线规划显得尤为重要(后来出的部落战尤其体现了这一点)。
  4. 部落的概念,增强了集体的概念和玩家间的互动(分享进攻防守记录,打部落战,聊天,捐兵等)
  5. 资深COC玩家来说,游戏的种树文化也不得不说是一种游戏乐趣。

贴一张我的COC图已做留念
My COC

为了这个游戏还买过COC模型
COC Model

经历了两年多的COC洗礼,经历了部落解散,部落合并,到现在最后一起坚持到最后的7,8个小伙伴(基本都满防满王了),感慨万千(此处省略一万字)。

出于自己是做游戏开发的缘故,刚开始学习Unity(同时学习C#),所以决定以COC为模板来制作学习Unity。就这样我的Unity COC计划就这样开始了,虽然最后只实现了很小一部分东西(而且很不完美,但学到很多东西),所以写下这个篇文章来总结自己学到的一些东西。

COC Project(Unity)

Preparation

Unity

(Unity Study)

Programming Language(C#)

(C# Study)

参考书籍:
C#入门经典第五版
CLR Via C# Fourth Edition - Jeffrey Richter

AI

(Artificial-Inteligence-Study)

Knowledge

Is COC a 2D game or 3D game?

The answer is 2D game,actually we should call 2.5D.
第一眼看到COC里面的所有动画人物给人的感觉都是3D的,但后来知道了Isometric Tileset Engine的概念。

Isometric Tileset Engine

What is Isometric Tileset Engine?

(斜视角游戏的地图渲染)
(Isometric Tiles Introduction)
结合上述文章,我们可以知道,Isometric Tileset Engine主要是通过美术制作出Isometric Projection(we angle our camera along two axes (swing the camera 45 degrees to one side, then 30 degrees down))的2D图片来实现游戏的3D效果(2.5D)。

What does game with isometric projection look like?

典型的Isometric Projection游戏有:
Age of Empires
Age of Empires
Diablo 2
Diablo2

How to make game work under isometric projection?

(参考:Creating Isometric Worlds: A Primer for Game Developers)
从标准的2D游戏到isometric projection的2.5D注意事项

  1. Coordinates Transformation – From Cartesian to isometric coordiates
  2. Creating the Art – isometric projection art
  3. Collision Detection – based on rectangle that is caculated from isometric projection

Searching

How to develope COC like game?

云风参与开发的陌陌争霸
(参考:COC Like 游戏中的寻路算法)
从上面我们可以看出通过对不同建筑队不同兵种的路径的预算,我们可以在在城墙未被破坏的前提下实现O(1)的速度查询建筑距离信息。(但这里我没明白云风大哥所说的”如果下一个行军路线是城墙就攻打城墙” – 这个前提下怎么实现远距离攻打城墙的效果,所以最终并未采取这种方式实现)。

Project

Game Engine

Unity

Programming Language

C#

Developer Tool

Unity
VS2013 / VS2010 (IDE)
ILDissembler – 反编译工具
Blender – 建模工具(本来打算学习并使用这个,但由于游戏最终并未做出来,都只是使用Unity官网的一些现有模型)
Git – 版本控制
项目地址

Basic Setting with Scene

Scene – 3D Scene(考虑2.5D素材的缘故,直接采用3D场景来学习制作2.5D游戏)
Camera – Orthographic Projection(通过采用正交投影并旋转摄像机X轴35度,Y轴45度来模拟Isometric Projection)

Camera Control & Input

PC

PC主要通过GetAxis()来针对用户的上下左右控制

1
2
float moveHorizontal = Input.GetAxis ("Horizontal") * mMoveSpeed * Time.deltaTime;
float moveVertical = Input.GetAxis ("Vertical") * mMoveSpeed * Time.deltaTime;

Mobile

Mobile主要通过Input.touch来获取屏幕点击事件信息
遇到得问题:
点击到UI上的时候touch事件并未被吞噬
Solved – 通过UnityEngine.EventSystems.EventSystem.current.IsPointerOverGameObject(Input.touches[0].fingerId)来判断是否点击到UI上
e.g.

1
f (!UnityEngine.EventSystems.EventSystem.current.IsPointerOverGameObject (Input.touches[0].fingerId));
  1. 单指和多指的处理
    通过Input.touchCount分别作处理,多指的处理主要通过遍历Input.touches来判断多指的具体行为
    遇到的问题:
    单指相应速度过快
    Solved – 通过定义一个有效的单指响应时间,只有当每帧DeltaTime时间叠加超过有效响应时间的时候才响应输入
    e.g.
1
2
3
4
5
6
7
8
9
10
void Update()
{
mInputTimer += Time.deltaTime;
if (Input.touchCount == 1) {
if(Input.touches[0].phase == TouchPhase.Ended && (mInputTimer > mValidInputDeltaTime))
{
......
}
}
}

两根手指如何判断是拉远还是缩近地图
Solved – 主要通过判断两根手指每一帧的距离是变大还是变小来判断
e.g.

1
2
3
4
5
6
7
8
9
10
11
12
13
14
15
16
17
18
19
20
21
22
23
24
25
26
27
28
29
30
31
32
33
34
for(int i = 0; i < 2; i++)
{
if (Input.touches[i].phase == TouchPhase.Began)
{
mCurrentTouchFingerPos[i] = Input.touches[0].position;
mPreTouchFingerPos[i] = Input.touches[0].position;
mTouchFingerDeltaPos[i] = Vector2.zero;
if (i == 1)
{
mPreTwoFingersDistance = mCurrentTwoFingersDistance;
mCurrentTwoFingersDistance = Vector2.Distance(mCurrentTouchFingerPos[0], mCurrentTouchFingerPos[1]);
}
}
else if (Input.touches[i].phase == TouchPhase.Moved)
{
mPreTouchFingerPos[i] = mCurrentTouchFingerPos[i];
mCurrentTouchFingerPos[i] = Input.touches[i].position;
mTouchFingerDeltaPos[i] = Input.touches[i].deltaPosition;
if (i == 1)
{
mPreTwoFingersDistance = mCurrentTwoFingersDistance;
mCurrentTwoFingersDistance = Vector2.Distance(mCurrentTouchFingerPos[0], mCurrentTouchFingerPos[1]);
}
}
else if (Input.touches[i].phase == TouchPhase.Ended)
{
mCurrentTouchFingerPos[i] = Vector2.zero;
mPreTouchFingerPos[i] = Vector2.zero;
mTouchFingerDeltaPos[i] = Vector2.zero;
mCurrentTwoFingersDistance = 0.0f;
mPreTwoFingersDistance = 0.0f;
return;
}
}

UI

UI主要使用Unity自带的UI,主要以一个按钮一个方法响应的基本方式。

UI有几个重要的概念:

  1. Unity里所有的UI elements都是包含在Canvas里。
  2. UI的Render Mode主要分为三种
    2.1 Screen Space – Overlay(Rendered on top of the secene)
    2.2 Screen Space – Camera(有距离感的UI,受摄像机设置影响)
    2.3 World Space(3D UI,有深度概念,会被3D物体遮挡)

UI自适应里的重要概念:

  1. UI Scale Mode
    1.1 Constant Pixel Size
    1.2 Scale With Screen Size(自适应里比较重的一种,会根据设定分辨率比例自动扩大或缩小UI)
    1.3 Constant Physical Size
  2. Anchors – 这个我的理解是根据锚点的四个点相对父节点位置的设置,会决定子节点UI如何针对父节点的变化而变化
    比如锚点的四个点分别位于父节点的四个角落,那就表示子节点UI会根据父节点的放大缩小做出一致的变化。
    比如锚点的四个点都在父节点的四个角落中的一个角落,就表示,无论父节点如何变化,子节点UI都不会变化并且相对于父节点锚点的那个点的相对位置是不变的。

更多的UI概念参考官网学习

Map

Map Type

Tile Map
地图是基于一块一块的Tile构成,默认40 * 40

Map Save

C# System.Runtime.Serialization – 序列化来存储Map数据
Unity [System.Serializable] – 支持在编辑器可视化

遇到的问题:

  1. Unity一些自带的基础类型不支持Serializable
    e.g. UnityEngine.Vector3(is not marked as Serializable)
    Solved – 需要自定义Seralizable的Struct来封装Vector3数据
1
2
3
4
5
6
7
[Serializable]
public struct BuildingPosition
{
public float mX;
public float mY;
public float mZ;
}
  1. Unity挂载和类继承问题
    Unity要挂载到GameObject上必须继承至MonoBehaviour,但C#不支持多重继承
    Solved – 定义interface,通过extends interface来实现C#中的多重继承(这一点和Java很像)
1
2
3
4
5
6
7
8
9
10
11
12
public interface GameObjectType {
ObjectType GameType
{
get;
set;
}
}

[Serializable]
public class Building : MonoBehaviour, GameObjectType {
.......
}

Event Manager

主要用于事件监听。(UnityAction是无参并返回void类型的的Delegate)
遇到的问题:

  1. 对于带参数的事件监听
    Solved – 通过继承UnityEvent实现带特定参数的Delegate监听
1
2
3
4
5
6
7
8
9
10
11
12
13
14
15
16
17
18
19
20
21
22
23
24
25
26
27
28
29
30
31
32
33
34
35
36
37
38
39
40
41
42
43
44
45
46
47
48
49
50
51
52
53
54
55
56
57
58
59
60
61
62
63
64
65
66
67
68
69
70
71
72
73
74
75
76
77
78
79
80
81
82
83
84
85
86
87
88
89
90
91
92
93
94
95
96
97
98
99
100
101
102
103
104
105
106
107
108
109
110
111
112
113
114
115
116
117
118
119
120
121
122
123
124
125
126
127
128
129
130
131
132
133
134
135
136
137
using UnityEngine;
using System.Collections;
using System.Collections.Generic;
using UnityEngine.Events;

public class MyIntEvent : UnityEvent<int>
{

}

public class EventManager : MonoBehaviour {

private Dictionary<string, UnityEvent> mEventDictionary;

private Dictionary<string, MyIntEvent> mIntEventDictionary;

public static EventManager mEMInstance = null;

void Awake()
{
if (mEMInstance == null) {
mEMInstance = this;
mEMInstance.Init();
} else if (mEMInstance != this) {
Destroy(gameObject);
}
}

void Init()
{
if (mEventDictionary == null) {
mEventDictionary = new Dictionary<string, UnityEvent>();
}
if (mIntEventDictionary == null)
{
mIntEventDictionary = new Dictionary<string, MyIntEvent>();
}
}

public void StartListening(string eventname, UnityAction listener)
{
UnityEvent evt = null;
if (mEMInstance.mEventDictionary.TryGetValue (eventname, out evt)) {
evt.AddListener (listener);
} else {
evt = new UnityEvent();
evt.AddListener(listener);
mEMInstance.mEventDictionary.Add(eventname, evt);
}
}

public void StopListening(string eventname, UnityAction listener)
{
if (mEMInstance == null) {
return ;
}
UnityEvent thisevent = null;
if (mEMInstance.mEventDictionary.TryGetValue (eventname, out thisevent)) {
thisevent.RemoveListener(listener);
}
}

public void StartListening(string eventname, UnityAction<int> listener)
{
MyIntEvent evt = null;
if (mEMInstance.mIntEventDictionary.TryGetValue(eventname, out evt))
{
evt.AddListener(listener);
}
else
{
evt = new MyIntEvent();
evt.AddListener(listener);
mEMInstance.mIntEventDictionary.Add(eventname, evt);
}
}

public void StopListening(string eventname, UnityAction<int> listener)
{
if (mEMInstance == null)
{
return;
}
MyIntEvent thisevent = null;
if (mEMInstance.mIntEventDictionary.TryGetValue(eventname, out thisevent))
{
thisevent.RemoveListener(listener);
}
}

public bool HasListening(string eventname)
{
if (mEMInstance == null)
{
return false;
}
UnityEvent thisevent = null;
MyIntEvent intevent = null;
if (mEMInstance.mEventDictionary.TryGetValue(eventname, out thisevent))
{
if(thisevent != null)
{
return true;
}
}

if (mEMInstance.mIntEventDictionary.TryGetValue(eventname, out intevent))
{
if (intevent != null)
{
return true;
}
}

return false;
}

public void TriggerEvent(string eventname, int p = 0)
{
UnityEvent thisevent = null;
if (mEMInstance.mEventDictionary.TryGetValue (eventname, out thisevent)) {
if(thisevent != null)
{
thisevent.Invoke();
}
}

MyIntEvent intevent = null;
if (mEMInstance.mIntEventDictionary.TryGetValue(eventname, out intevent))
{
if (intevent != null)
{
intevent.Invoke(p);
}
}
}
}

Object Pool

主要为了重用GameObject,减少Instantiate的调用。

1
2
3
4
5
6
7
8
9
10
11
12
13
14
15
16
17
18
19
20
21
22
23
24
25
26
27
28
29
30
31
32
33
34
35
36
37
38
39
40
41
42
43
44
45
46
47
48
49
50
51
52
53
54
55
56
57
58
59
60
61
62
63
64
65
66
67
68
69
70
71
72
73
74
75
76
77
78
79
80
81
82
83
84
85
86
87
88
89
90
91
92
93
94
95
96
using UnityEngine;
using System.Collections;
using System.Collections.Generic;

public class ObjectPoolManager : MonoBehaviour{

public static ObjectPoolManager mObjectPoolManagerInstance = null;

public GameObject mBuildingBullet;

public int mBBulletPoolAmount = 20;

private List<GameObject> mBBulletsList;

public GameObject mSoldierBullet;

public int mSBulletPoolAmount = 50;

private List<GameObject> mSBulletsList;

public bool mWillGrow = true;

void Awake()
{
if (mObjectPoolManagerInstance == null)
{
mObjectPoolManagerInstance = this;
}
else if (mObjectPoolManagerInstance != this)
{
Destroy(gameObject);
}
}

void Start()
{
mBBulletsList = new List<GameObject>();
mSBulletsList = new List<GameObject>();

for (int i = 0; i < mBBulletPoolAmount; i++)
{
GameObject bbulletobj = Instantiate(mBuildingBullet) as GameObject;
bbulletobj.SetActive(false);
mBBulletsList.Add(bbulletobj);
}

for (int j = 0; j < mSBulletPoolAmount; j++)
{
GameObject sbulletobj = Instantiate(mSoldierBullet) as GameObject;
sbulletobj.SetActive(false);
mSBulletsList.Add(sbulletobj);
}
}

public GameObject GetBuildingBulletObject()
{
for (int i = 0; i < mBBulletsList.Count; i++)
{
if (!mBBulletsList[i].activeInHierarchy)
{
mBBulletsList[i].SetActive(true);
return mBBulletsList[i];
}
}

if (mWillGrow)
{
GameObject bbulletobj = Instantiate(mBuildingBullet) as GameObject;
mBBulletsList.Add(bbulletobj);
return bbulletobj;
}

return null;
}

public GameObject GetSoldierBulletObject()
{
for (int i = 0; i < mSBulletsList.Count; i++)
{
if (!mSBulletsList[i].activeInHierarchy)
{
mSBulletsList[i].SetActive(true);
return mSBulletsList[i];
}
}

if (mWillGrow)
{
GameObject sbulletobj = Instantiate(mSoldierBullet) as GameObject;
mSBulletsList.Add(sbulletobj);
return sbulletobj;
}

return null;
}
}

Utilities

  1. FPS Display(用于显示FPS)
1
2
3
4
5
6
7
8
9
10
11
12
13
14
15
16
17
18
19
20
21
using UnityEngine;
using System.Collections;
using UnityEngine.UI;

public class FPSDisplay : MonoBehaviour
{
public Text mFPSText;

private float mDeltaTime = 0.0f;

private float mFPS = 0.0f;

void Update()
{
mDeltaTime += (Time.deltaTime - mDeltaTime) * 0.1f;
float msec = mDeltaTime * 1000.0f;
mFPS = 1.0f / mDeltaTime;
mFPSText.text = string.Format("{0:0.0} ms ({1:0.} fps)", msec, mFPS);

}
}
  1. Time Counter(用于计算时间消耗 – 比如A Star运算时间)
1
2
3
4
5
6
7
8
9
10
11
12
13
14
15
16
17
18
19
20
21
22
23
24
25
26
27
28
29
30
31
32
33
34
35
36
37
38
39
40
41
42
43
44
45
46
47
48
49
50
51
52
53
54
55
56
57
58
59
60
61
62
using UnityEngine;
using System.Collections;
using System.Diagnostics;

public class TimerCounter{

private static TimerCounter TCInstance = null;

private Stopwatch mTimer;

private string mName;

public float TimeSpend
{
get
{
return mTimer.ElapsedMilliseconds;
}
}
private float mTimeSpend;

public static TimerCounter CreateInstance()
{
if (TCInstance == null) {
TCInstance = new TimerCounter();
}
return TCInstance;
}

public static void DestroyInstance()
{
if (TCInstance != null) {
TCInstance = null;
}
}

private TimerCounter()
{
mTimer = new Stopwatch ();
mName = "Default";
}

public void Start(string name)
{
mName = name;
mTimer.Start ();
}

public void Restart(string name)
{
mTimer.Reset ();
mTimer.Start ();
mName = name;
}

public void End()
{
mTimer.Stop ();

mTimeSpend = mTimer.ElapsedMilliseconds;
}
}

AI

  1. FSM(Finite State Machine – 有限状态机)
    通过把行为体的行为细分到几种状态来抽象行为体行为,不同状态的AI逻辑在对应的状态去编写。
    下图来源:《Artificial Intelligence for Game》 – Ian Millington
    FSM
    游戏里把士兵的状态分为三种,MoveState, AttackState, IdleState。
1
2
3
4
5
6
7
8
9
10
11
12
13
14
15
16
17
18
19
20
21
22
23
24
25
26
27
28
29
30
31
32
33
34
35
36
37
38
39
40
41
42
43
44
45
46
47
48
49
50
51
52
53
54
55
56
57
58
59
60
61
62
63
64
65
66
67
68
69
70
71
public class SoldierAttackState : SoldierState {

private Soldier mSoldier;

......
}

public class SoldierAttackState : SoldierState {

private Soldier mSoldier;

......
}

public class SoldierAttackState : SoldierState {

private Soldier mSoldier;

......
}

[Serializable]
public class Soldier : MonoBehaviour, GameObjectType
{
public SoldierState SCurrentState
{
set
{
if (mSCurrentState != null)
{
mSCurrentState.ExitState();
}
mSCurrentState = value;
mSCurrentState.EnterState();
}
}
[HideInInspector]
private SoldierState mSCurrentState;

[HideInInspector]
public SoldierAttackState mSAttackState;

[HideInInspector]
public SoldierDeadState mSDeadState;

[HideInInspector]
public SoldierMoveState mSMoveState;

......

public virtual void Awake()
{
mSAttackState = new SoldierAttackState(this);

mSMoveState = new SoldierMoveState(this);

mSDeadState = new SoldierDeadState(this);

......
}

public virtual void Update()
{
if (gameObject)
{
mSCurrentState.UpdateState();
}
}

......
}
  1. Decision Trees(决策树 – 用于简单的AI(Decision making))
    Decision Trees主要用于AI体做决策,通过对已知数据的分析判断,根据Decision Tree抉择出最终的决定(即AI行为)。(项目里我主要使用FSM而非Decision Trees)
    下图来源:《Artificial Intelligence for Game》 – Ian Millington
    Decision Tree
  2. A Star(A Star是 Dijkstra(著名的最短路径算法)基础上通过一个启发因子来预估给定节点到目标节点的距离来使得路径节点搜索是向目标节点方向逼近不至于出现搜索大量无效节点的情况)
    (AI相关学习)

A Star

Searching

通过搜索,我发现网络上有现成的很完善的A Star的版本
A Star Pathfinding Project(Asset)
但通过使用后发现,里面所支持的Four,Six and Eight connections都不符合我的需求(每个点都和周围的八个点连通),所以最终放弃了A Star Pathfinding Project而决定自己实现自己的A Star Pathfinding

Create Myself A Star
A Star Preperation

结合Artificial-Inteligence-Study的学习,让我们了解下A Star里的一些基本概念和核心思想:
A Star属于什么图?
A Star里的图属于导航图(Navigation Graph),是基于开销的图搜索(cost-based graph searches)

导航图信息的数据存储?
邻接矩阵:
![Adjacency _Matrix](/img/AI/Adjacency _Matrix.PNG)
邻接表:
Adjacency_List
邻接表用于存储稀疏图非常有效,不会浪费空间来存储空链接。(邻接矩阵会存储大量无效数据(没有连接的边))
这里我们只需要每个点和周边的8个点相连接,所以可以定位成稀疏图。
当我们初始化地图数据的时候,会把所有的点和边以及点和周边相连接边等信息存储起来。
大部分操作都是插入和查询(一般不涉及删除,一旦地图创建好,一般只是修改节点信息而非删除节点(如果真要删除可以通过设定节点信息为INVALID_INDEX来实现而非真正删除))。
为了快速查询我们采用C#里的List < Node > 和List < List < Edge > >来存储节点信息和边连接信息。因为我们会用一个唯一的index去标识节点,所以当我们用节点index去访问节点数据的时候是O(1)的时间复杂度,添加节点到List里也是O(1)。同理,当我们用List < List < Edge > >来存储边连接信息(邻接表)的时候,我们可以通过List[index]去访问特定节点的边连接信息(O(1),对于边连接信息的添加和删除(这里不是O(1)主要是因为添加的时候我们需要确保不会重复添加同一个边连接信息,删除的时候要去查询找到该边连接信息)
这样一来所有的节点和边链接信息就都存储起来了。

图搜索(寻路)是怎样基于图实现的了?
首先我们要明确我们的搜索目的,为什么这样说了,只有明确了搜索目的我们才能制定合理的搜索策略。
在之前的学习Artificial-Inteligence-Study中提到了盲目搜索(基于广度(Stack来模拟FILO)或者深度的搜索策略(Queue来模拟FIFO))和基于开销的搜索(最短路径开销的策略)。
因为这里我是为了找到最短路径,所以肯定采用的是基于开销的搜索策略。
基于开销的搜索策略的一个重要思想是边放松,边放松的核心思想是通过存储源节点到其他节点的最短路径信息,一边探索新边一边更新该最短路径信息(如果新的边加入导致A节点到B节点有更优的最短路径,那么就更新该A节点到B节点的最短路径信息。直到找到从源节点到目标节点的最短路径信息为止。)

SPT(Shortest Path Tree – 最短路径树)存储的就是源节点到其他节点的最短路径信息(只存储了搜索过的)。(List的方式存储起来,比如源节点是0,目标节点是8,那么最短路径存储即为List[0] = Edge(0,x) List[x] = Edge(x,y) …. List[8] = Edge(y,8))
Edge的抽象Edge(From,To),From表示初始点,To表示结束点。

知道了最短路径的存储,那么更重要的问题来了,这个最短路径是怎么推导出来的?
这里不得不提Dijstra算法和A Star算法。
Dijstra步骤 :

  1. 从源节点开始搜索,利用优先队列对在搜索的节点的GCost(源节点到搜索节点的距离)进行排序
  2. Pop出到当前所有搜索过的节点里GCost最小的节点
  3. 添加到该节点的行进边作为抵达该节点的最短路径边(包含在SPT里)
  4. 基于该节点进行扩展搜索
  5. 如果在扩展搜索时有到该节点更短(GCost)的路线边出现就更新该点的GCost以及行进边信息
  6. 继续弹出搜索节点里GCost最小的节点
  7. 直到搜索到目标节点为止
  8. 最后通过最短路径树(SPT)从目标节点反推得出源节点到目标节点的最短路径行进路线

Dijstra算法的缺点:
Dijkstra算法检查了太多的边。

Dijstra算法改进:
A Star – 和Dijkstra算法的唯一区别是对搜索边界上的点的开销(GCost)的计算。因为Dijstra的搜索扩展方向是由GCost决定的,所以A Star算法通过给GCost添加一个启发因子(H)来确保搜索行进方向。
F的计算:
F = G + H
G是到达一个节点的累计开销, H是一个启发因子,它给出的是节点到目标节点的估计距离。

1
2
3
4
5
6
7
8
9
10
11
12
13
14
15
16
17
18
19
20
21
22
23
24
25
26
27
28
29
30
31
32
33
34
35
36
37
38
39
40
41
42
43
44
45
46
47
48
49
50
51
52
53
54
55
56
57
58
59
60
61
62
63
64
65
66
67
68
69
//伪代码如下
//添加源节点开始Dijstra算法搜索
mPQ.Clear();
mPQ.Push(mFCosts[mISource]);
//Pop出所有搜索过的节点到目标节点FCost最小的节点
while (!mPQ.Empty())
{
int nextclosestnode = mPQ.Pop().Key;

//添加当前搜索节点里FCost最小的行进边作为最短路径的边之一
if (mSearchFrontier[nextclosestnode] != null && mSearchFrontier[nextclosestnode].IsValidEdge())
{
mShortestPathTree[nextclosestnode] = mSearchFrontier[nextclosestnode];
}
//直到找到目标节点为止
if (nextclosestnode == mITarget)
{
return;
}

//以当前搜索节点里到目标节点最近的点为基准进行边扩展搜索
List<GraphEdge> edgelist = mGraph.EdgesList[nextclosestnode];
GraphEdge edge;
for (int i = 0; i < edgelist.Count; i++)
{
edge = edgelist[i];
//计算该节点到目标节点的H值,用于控制搜索行进方向(A*对Dijstra算法的改进)
float hcost = Heuristic_Euclid.Calculate(mGraph, mITarget, edge.To) * mHCostPercentage;

//算出到该节点的路径GCost
//GCost是源节点到特定节点的实际距离(用于判断是否是源节点到特定节点更近的路线)
//G+H是源节点通过特定节点到目标节点的预估距离(用于控制行进方向)
float gcost = mGCosts[nextclosestnode] + edge.Cost;

//判断搜索行进的节点是否已经有任何搜索边抵达过
//如果没有抵达过,添加该边到搜索列表里(mSearchFrontier),并添加更新到该新节点的最短距离GCost和预估距离FCost(GCost+H)
//同时把该FCost作为该节点通过特定节点到目标节点的估算距离添加到队列里进行排序,
//用于得出搜索节点里下一个离目标节点最近的节点index
if (mSearchFrontier[edge.To] != null && !mSearchFrontier[edge.To].IsValidEdge())
{
mFCosts[edge.To].Value = gcost + hcost;
mGCosts[edge.To] = gcost;
//添加的是特定节点到目标节点的估算距离G+H来作为排序的依据
mPQ.Push(mFCosts[edge.To]);

mSearchFrontier[edge.To] = edge;

mAStarPathInfo.EdgesSearched++;

if (mBDrawExplorePath)
{
Debug.DrawLine(mGraph.Nodes[edge.From].Position, mGraph.Nodes[edge.To].Position, Color.yellow, mExplorePathRemainTime);
}
}
//如果抵达过,那么就去判断当前路线(通过当前边到该节点的路线)的GCost是否比之前记录在GCost里到达该节点的GCost更小
//如果更小就说明有新的更短的路径可以抵达该节点
//更新到该节点的GCost,FCost用于下一次Pop当前搜索节点里里目标节点最近(FCost)的节点
//同时更新到该节点的最短路径边
else if (gcost < mGCosts[edge.To])
{
mFCosts[edge.To].Value = gcost + hcost;
mGCosts[edge.To] = gcost;

mPQ.ChangePriority(edge.To);

mSearchFrontier[edge.To] = edge;
}
}
}

上面有一个关键的点(PriorityQueue),用于得到所有搜索节点到目标节点的FCost最小的节点。
这里对于节点的操作主要是插入和修改。
为了快速得到当前搜索节点里里目标节点的估算距离最近的节点,我们需要对当前所有的搜索节点进行排序。
而这里每一次排序的时间复杂度很大程度就决定了A Star的时间消耗。
参考排序算法概念的学习
可以知道借助堆的特性,我们可以很容易的得到最大最小值。
原本堆排序要经历下列步骤:

  1. Init heap(创建最大堆(Build_Max_Heap):初始化堆数据)
  2. Adjust heap(最大堆调整(Max_Heapify):将堆的末端子节点作调整,使得子节点永远小于父节点) – O(Log(n))
  3. Sort heap(堆排序(HeapSort):移除位在第一个数据的根节点,并做最大堆调整的递归运算) – O(n)
    但这里我们并不需要对堆进行完整的排序,我们只需每次插入或删除或修改的时候能得到最大或最小值即可(即只需要Adjust Heap即可)
    这样一来每一次插入,删除或修改都只需O(Log(n))的时间复杂度。

了解了理论,接下来一步一步看一下如何实现A Star算法的:
首先我们需要抽象出导航图里的节点和边
NavGraphNode里的mIsWall和mIsJumpable后续会讲到为什么会有这两个成员变量
e.g.

1
2
3
4
5
6
7
8
9
10
11
12
13
14
15
16
17
18
19
20
21
22
23
24
25
26
27
28
29
30
31
32
33
34
35
36
37
38
39
40
41
42
43
44
45
46
47
48
49
50
51
52
53
54
55
56
57
58
59
60
61
62
63
64
65
66
67
68
69
70
71
72
73
74
75
76
77
78
79
80
81
82
83
84
85
86
87
88
89
90
91
92
93
94
95
96
97
98
99
100
101
102
103
104
105
106
107
108
109
110
111
112
113
114
115
116
117
118
119
120
121
122
123
124
125
126
127
128
129
130
131
132
133
public class GraphEdge
{
public GraphEdge()
{
mFrom = (int)E_NODE_INDEX.INVALID_NODE;
mTo = (int)E_NODE_INDEX.INVALID_NODE;
mCost = 0.0f;
}

public int From
{
get
{
return mFrom;
}
set
{
Debug.Assert(value >= 0, "mFrom must great or equal to 0");
mFrom = value;
}
}
private int mFrom;

public int To
{
get
{
return mTo;
}
set
{
Debug.Assert(value >= 0, "mTo must great or equal to 0");
mTo = value;
}
}
private int mTo;

public float Cost
{
get
{
return mCost;
}
set
{
Debug.Assert(value >= 0, "mCost must great or equal to 0");
mCost = value;
}
}
private float mCost;
}

public class NavGraphNode : GraphNode {

private NavGraphNode()
{

}

public NavGraphNode(int index,Vector3 pos, float weight, bool iswall)
{
Index = index;
mPosition = pos;
mWeight = weight;
mIsWall = iswall;
mIsJumpable = false;
}

public int Index
{
get
{
return mIndex;
}
set
{
mIndex = value;
}
}
private int mIndex;

public Vector3 Position
{
get
{
return mPosition;
}
set
{
mPosition = value;
}
}
private Vector3 mPosition;

public float Weight
{
get
{
return mWeight;
}
set
{
mWeight = value;
}
}
private float mWeight;

public bool IsWall
{
get
{
return mIsWall;
}
set
{
mIsWall = value;
}
}
private bool mIsWall;

public bool IsJumpable
{
get
{
return mIsJumpable;
}
set
{
mIsJumpable = value;
}
}
private bool mIsJumpable;
}

抽象了节点和边后,我们就可以初始化我们的地图数据了

1
2
3
4
5
6
7
8
9
10
11
12
13
14
15
16
17
18
19
20
21
22
23
24
25
26
27
28
29
public void CreateGraph()
{
mNavGraph = new SparseGraph<NavGraphNode, GraphEdge> (mRow * mColumn);

mNavGraph.BDrawMap = mBDrawMap;

Vector3 nodeposition = new Vector3 ();
int nextindex = 0;
//SparseGraph nodes data
for (int rw = 0; rw < mRow; rw++) {
for (int col = 0; col < mColumn; col++) {
nodeposition = new Vector3 (rw, 0.0f, col);
nextindex = mNavGraph.NextFreeNodeIndex;
mNavGraph.AddNode (new NavGraphNode (nextindex, nodeposition, 0.0f, false));
}
}

//SparseGraph edges data
for (int rw = 0; rw < mRow; rw++)
{
for (int col = 0; col < mColumn; col++)
{
CreateAllNeighboursToGridNode(rw, col, mRow, mColumn);
}
}

mTotalNodes = mNavGraph.NumNodes();
mTotalEdges = mNavGraph.NumEdges ();
}

这样一来我们的地图基本数据就都创建完成了。
在实现A Star之前,我们需要一个优先队列来排序我们所搜索的所有边的优先级。

PriorityQueue

通过Search我发现C#没有自带的优先队列,所以需要自己实现
这里的优先队列主要要实现排第一位的永远是cost最低的(其他并不需要有序,因为A Star里面是通过pop出cost最低的边来进行搜索行进的)
这里我用到了堆排序(Heap Sort)
平均时间复杂度:O(n log(n))
最坏时间复杂度:O(n log(n))
最优时间复杂度:O(n log(n)) (时间复杂度都跟堆的深度和数据长度相关,无可避免的需要去做堆调整和堆排序
所以最坏时间复杂度和最优时间复杂度都是O(nlog(n)
因为我们只需要确保第一个是cost最低的,所以我们并不需要每一次都完整的排序整个堆(完整排序的时间复杂度是n * Log(n)),我们只需要在每一次insert和pop的时候重新掉整一下堆即可(这样一来就可以在Log(n)的时间内保证第一个是cost最低的)

1
2
3
4
5
6
7
8
9
10
11
12
13
14
15
16
17
18
19
20
21
22
23
24
25
26
27
28
29
30
31
32
33
34
35
36
37
38
39
40
41
42
43
44
45
46
47
48
49
50
51
52
53
54
55
56
57
58
59
60
61
62
63
64
65
66
67
68
69
70
71
72
73
74
75
76
77
78
79
80
81
82
83
84
85
86
87
88
89
90
91
92
93
94
95
96
97
98
99
100
101
102
103
104
105
106
107
108
109
110
111
112
113
114
115
116
117
118
119
120
121
122
123
124
125
126
127
128
129
130
131
132
133
134
135
136
137
138
139
140
141
142
143
144
145
146
147
148
149
150
151
152
153
154
155
156
157
158
159
160
161
162
163
164
165
166
167
168
169
170
171
172
173
174
175
176
177
178
179
180
181
182
183
184
185
186
187
188
189
190
191
192
193
194
195
196
197
198
199
200
201
202
203
204
205
206
207
208
209
210
211
212
213
214
215
216
217
218
219
220
221
222
223
224
225
226
227
228
229
230
231
232
233
234
235
236
237
238
239
240
241
242
243
244
245
246
247
248
249
250
251
252
253
254
255
256
257
258
259
260
261
262
263
264
265
266
267
268
269
270
271
272
273
274
275
276
277
278
279
280
281
282
283
284
285
286
287
288
289
290
291
292
293
294
295
296
297
298
299
300
301
302
303
304
305
306
307
308
309
310
311
312
using UnityEngine;
using System;
using System.Collections;
using System.Collections.Generic;
using UnityEngine.Assertions;

public class PriorityQueue<T1, T2>
{
public PriorityQueue()
{
mHeap = new Heap<T1, T2>();
}

public PriorityQueue(int size)
{
mHeap = new Heap<T1, T2> (size);
}

public PriorityQueue(Heap<T1, T2> heap)
{
mHeap = heap;
}

public PriorityQueue(List<Pair<T1,T2>> key)
{
mHeap = new Heap<T1, T2> (key);
}

public bool Empty()
{
return (mHeap.Size() == 0);
}

public void Clear()
{
mHeap.Clear();
}

public void Push(Pair<T1, T2> kvp)
{
mHeap.Insert(kvp);
}

public Pair<T1, T2> Pop()
{
Pair<T1,T2> result = mHeap.Top();
mHeap.RemoveTop();
return result;
}

public int Size()
{
return mHeap.Size();
}

public Pair<T1, T2> Top()
{
return mHeap.Top(); ;
}

public void ChangePriority(T1 index)
{
//Assert.IsTrue (index >= 0 && index < mHeap.Size ());
int i = 0;
i = mHeap.FindSpecificKeyIndex(index);
mHeap.HeapifyFromEndToBeginning (i);
}

public void PrintOutAllMember()
{
mHeap.PrintOutAllMember();
}

private Heap<T1, T2> mHeap;
}

public class Heap<T1, T2>
{
private List<Pair<T1, T2>> mList;
private IComparer<T2> mComparer;
private IComparer<T1> mCompareKey;
private int mCount;

public Heap()
{
mList = new List<Pair<T1, T2>>();
mComparer = Comparer<T2>.Default;
mCompareKey = Comparer<T1>.Default;
mCount = 0;
}

public Heap(int size)
{
mList = new List<Pair<T1, T2>>(size);
mComparer = Comparer<T2>.Default;
mCompareKey = Comparer<T1>.Default;
mCount = 0;
}

public Heap(List<Pair<T1, T2>> list)
{
mList = list;
mCount = list.Count;
mComparer = Comparer<T2>.Default;
mCompareKey = Comparer<T1>.Default;
BuildingHeap();
}

public void Clear()
{
mList.Clear();
mCount = 0;
}

public int Size()
{
if (mList != null)
{
return mCount;
}
else
{
return 0;
}
}

//O(Log(N))
public void RemoveTop()
{
if (mList != null)
{
mList[0] = mList[mCount - 1];
mList.RemoveAt(mCount-1);
mCount--;
HeapifyFromBeginningToEnd(0,mCount - 1);
}
}

public Pair<T1, T2> Top()
{
if (mList != null)
{
return mList[0];
}
else
{
//No more member
throw new InvalidOperationException("Empty heap.");
}
}

public int FindSpecificKeyIndex(T1 key)
{
return mList.FindIndex (x => mCompareKey.Compare (x.Key, key) == 0);
}

public void PrintOutAllMember()
{
Pair<T1, T2> valuepair;
for (int i = 0; i < mList.Count; i++)
{
valuepair = mList[i];
Debug.Log(valuepair.ToString());
}
}

//O(Log(N))
public void Insert(Pair<T1, T2> valuepair)
{
mList.Add(valuepair);
mCount++;
HeapifyFromEndToBeginning(mCount - 1);
}

//调整堆确保堆是最大堆,这里花O(log(n)),跟堆的深度有关
public void HeapifyFromBeginningToEnd(int parentindex, int length)
{
int max_index = parentindex;
int left_child_index = parentindex * 2 + 1;
int right_child_index = parentindex * 2 + 2;

//Chose biggest one between parent and left&right child
if (left_child_index < length && mComparer.Compare(mList[left_child_index].Value, mList[max_index].Value) < 0)
{
max_index = left_child_index;
}

if (right_child_index < length && mComparer.Compare(mList[right_child_index].Value, mList[max_index].Value) < 0)
{
max_index = right_child_index;
}

//If any child is bigger than parent,
//then we swap it and do adjust for child again to make sure meet max heap definition
if (max_index != parentindex)
{
Swap(max_index, parentindex);
HeapifyFromBeginningToEnd(max_index, length);
}
}

//O(log(N))
public void HeapifyFromEndToBeginning(int index)
{
if(index >= mCount)
{
return;
}
while (index > 0)
{
int parentindex = (index - 1) / 2;
if(mComparer.Compare(mList[parentindex].Value,mList[index].Value) > 0)
{
Swap(parentindex, index);
index = parentindex;
}
else
{
break;
}
}
}

//通过初试数据构建最大堆
////O(N*Log(N))
private void BuildingHeap()
{
if (mList != null)
{
for (int i = mList.Count / 2 - 1; i >= 0; i--)
{
//1.2 Adjust heap
//Make sure meet max heap definition
//Max Heap definition:
// (k(i) >= k(2i) && k(i) >= k(2i+1)) (1 <= i <= n/2)
HeapifyFromBeginningToEnd(i, mList.Count);
}
}
}

////O(N*log(N))
private void HeapSort()
{
if (mList != null)
{
//Steps:
// 1. Build heap
// 1.1 Init heap
// 1.2 Adjust heap
// 2. Sort heap

//1. Build max heap
// 1.1 Init heap
//Assume we construct max heap
BuildingHeap();
//2. Sort heap
//这里花O(n),跟数据数量有关
for (int i = mList.Count - 1; i > 0; i--)
{
//swap first element and last element
//do adjust heap process again to make sure the new array are still max heap
Swap(i, 0);
//Due to we already building max heap before,
//so we just need to adjust for index 0 after we swap first and last element
HeapifyFromBeginningToEnd(0, i);
}
}
else
{
Debug.Log("mList == null");
}
}

private void Swap(int id1, int id2)
{
Pair<T1, T2> temp;
temp = mList[id1];
mList[id1] = mList[id2];
mList[id2] = temp;
}
}

public class Pair<T1, T2>
{
public Pair()
{

}

public Pair(T1 k, T2 v)
{
Key = k;
Value = v;
}

public override string ToString()
{
return String.Format("[{0},{1}]",Key,Value);
}

public T1 Key
{
get;
set;
}

public T2 Value
{
get;
set;
}
}

这样一来我们所需要的优先队列就完成了。

A Star
1
2
3
4
5
6
7
8
9
10
11
12
13
14
15
16
17
18
19
20
21
22
23
24
25
26
27
28
29
30
31
32
33
34
35
36
37
38
39
40
41
42
43
44
45
46
47
48
49
50
51
52
53
54
55
56
57
58
59
60
61
62
63
64
65
66
67
68
69
70
71
72
73
74
75
76
77
78
79
80
81
82
83
84
85
86
87
88
89
90
91
92
93
94
95
96
97
98
99
100
101
102
103
104
105
106
107
108
109
110
111
112
113
114
115
116
117
118
119
120
121
122
123
124
125
126
127
128
129
130
131
132
133
134
135
136
137
138
139
140
141
142
143
144
145
146
147
148
149
150
151
152
153
154
155
156
157
158
159
160
161
162
163
164
165
166
167
168
169
170
171
172
173
174
175
176
177
178
179
180
181
182
183
184
185
186
187
188
189
190
191
192
193
194
195
196
197
198
199
200
201
202
203
204
205
206
207
208
209
210
211
212
213
214
215
216
217
218
219
220
221
222
223
224
225
226
227
228
229
230
231
232
233
234
235
236
237
238
239
240
241
242
243
244
245
246
247
248
249
250
251
252
253
254
255
256
257
258
259
260
261
262
263
264
265
266
267
268
269
270
271
272
273
274
275
276
277
278
279
280
281
282
283
284
285
286
287
288
289
290
291
292
293
294
295
296
297
298
299
300
301
302
303
304
305
306
307
308
309
310
311
312
313
314
315
316
317
318
319
320
321
322
323
324
325
326
327
328
329
330
331
332
333
334
335
336
337
338
339
340
341
342
343
344
345
346
347
348
349
350
351
352
353
354
355
356
357
358
359
360
361
362
363
364
365
366
367
368
369
370
371
372
373
374
375
376
377
378
379
380
381
382
383
384
385
386
387
388
389
390
391
392
393
394
395
396
397
398
399
400
401
402
403
404
405
406
407
408
409
410
411
412
413
414
415
416
417
418
419
420
421
422
423
424
425
426
427
428
429
430
431
432
433
434
435
436
437
438
439
440
441
442
443
444
445
446
447
448
449
450
451
452
453
454
455
456
457
458
459
460
461
462
463
464
465
466
467
468
469
470
471
472
473
474
475
476
477
478
479
480
481
482
483
484
485
486
487
488
489
490
491
492
493
494
495
496
497
498
499
500
501
502
503
504
505
506
507
508
509
510
511
512
513
514
515
516
517
518
519
520
521
522
523
524
525
526
527
528
529
530
531
532
533
534
535
536
537
538
539
540
541
542
543
544
545
546
547
548
549
550
551
552
553
554
555
556
557
558
559
560
561
562
563
564
565
566
567
568
569
570
571
572
573
574
575
576
577
578
579
580
581
582
583
584
585
586
587
588
589
590
591
592
593
594
595
596
597
598
599
600
601
602
603
604
605
606
607
608
609
610
611
612
613
614
615
616
617
618
619
620
621
622
623
624
625
626
627
628
629
630
631
632
633
634
635
636
637
638
639
640
641
642
643
644
645
646
647
648
649
650
651
652
653
654
655
656
657
658
659
660
661
662
663
664
665
666
667
668
669
670
671
672
673
674
675
676
677
678
679
680
681
682
683
684
685
686
687
688
689
690
691
692
693
694
695
696
697
698
699
700
701
702
703
704
705
706
707
708
709
710
711
712
713
714
715
716
717
718
719
720
721
722
723
724
725
726
using UnityEngine;
using System.Collections;
using System.Collections.Generic;
using System;
using UnityEngine.Assertions;

public class SearchAStar
{
public struct PathInfo
{

public List<int> PathToTarget
{
get
{
return mPathToTarget;
}
set
{
mPathToTarget = value;
}
}
private List<int> mPathToTarget;

public List<Vector3> MovementPathToTarget
{
get
{
return mMovementPathToTarget;
}
set
{
mMovementPathToTarget = value;
}
}
private List<Vector3> mMovementPathToTarget;

public bool IsWallInPathToTarget
{
get
{
return mIsWallInPathToTarget;
}
set
{
mIsWallInPathToTarget = value;
}
}
private bool mIsWallInPathToTarget;

public int WallInPathToTargetIndex
{
get
{
return mWallInPathToTargetIndex;
}
set
{
mWallInPathToTargetIndex = value;
}
}
private int mWallInPathToTargetIndex;

public float CostToTarget
{
get
{
return mCostToTarget;
}
set
{
mCostToTarget = value;
}
}
private float mCostToTarget;

public int ITarget
{
set
{
mITarget = value;
}
get
{
return mITarget;
}
}
private int mITarget;

public int OriginalTarget
{
get
{
return mOriginalTarget;
}
set
{
mOriginalTarget = value;
}
}
private int mOriginalTarget;

public int NodesSearched
{
get
{
return mNodesSearched;
}
set
{
mNodesSearched = value;
}
}
private int mNodesSearched;

public int EdgesSearched
{
get
{
return mEdgesSearched;
}
set
{
mEdgesSearched = value;
}
}
private int mEdgesSearched;

//this list of edges is used to store any subtree returned from any of the graph algorithms
/*
public List<GraphEdge> SubTree
{
get
{
return mSubTree;
}
set
{
mSubTree = value;
}
}
private List<GraphEdge> mSubTree;
*/
/*
public PathInfo()
{
ResetPathInfo();
}
*/

public PathInfo DeepCopy()
{
PathInfo pi = (PathInfo)this.MemberwiseClone();
pi.PathToTarget = new List<int>(mPathToTarget);
pi.MovementPathToTarget = new List<Vector3>(mMovementPathToTarget);

return pi;
}

public void ResetPathInfo()
{
mIsWallInPathToTarget = false;

mWallInPathToTargetIndex = -1;

if (mPathToTarget != null)
{
mPathToTarget.Clear();
}
else
{
mPathToTarget = new List<int>();
}

if (mMovementPathToTarget != null)
{
mMovementPathToTarget.Clear();
}
else
{
mMovementPathToTarget = new List<Vector3>();
}

mNodesSearched = 0;

mEdgesSearched = 0;

mCostToTarget = 0.0f;
}
}

private SearchAStar()
{

}

public SearchAStar(SparseGraph<NavGraphNode, GraphEdge> graph
, int source
, int target
, bool isignorewall
, float strickdistance
, float hcostpercentage
, bool drawexplorepath
, float explorepathremaintime)
{
mGraph = graph;
mPQ = new PriorityQueue<int, float>((int)Mathf.Sqrt(mGraph.NumNodes()));
mGCosts = new List<float>(graph.NumNodes());
mFCosts = new List<Pair<int, float>>(graph.NumNodes());
mShortestPathTree = new List<GraphEdge>(graph.NumNodes());
mSearchFrontier = new List<GraphEdge>(graph.NumNodes());
//Init G cost and F cost and Cost value
for (int i = 0; i < graph.NumNodes(); i++)
{
mGCosts.Add(0.0f);
mFCosts.Add(new Pair<int, float>(i, 0.0f));
mShortestPathTree.Add(new GraphEdge());
mSearchFrontier.Add(new GraphEdge());
}
mISource = source;
mITarget = target;
mOriginalTarget = target;

Assert.IsTrue(hcostpercentage >= 0);
mHCostPercentage = hcostpercentage;

mBDrawExplorePath = drawexplorepath;

mExplorePathRemainTime = explorepathremaintime;

mAStarPathInfo = new PathInfo();

mIsIgnoreWall = isignorewall;

mStrickDistance = strickdistance;

//Search(mStrickDistance, mIsIgnoreWall);

//GeneratePathToTargetInfo();
}

public void UpdateSearch(int sourceindex, int targetindex, float strickdistance)
{
Assert.IsTrue(mISource >= 0 && mISource < mGraph.NumNodes());
Assert.IsTrue(mITarget >= 0 && mITarget < mGraph.NumNodes());

AstarReset(sourceindex, targetindex, strickdistance);

Search(mStrickDistance, mIsIgnoreWall);

GeneratePathToTargetInfo();
}

private void AstarReset(int sourceindex, int targetindex, float strickdistance)
{
mISource = sourceindex;

mITarget = targetindex;

mOriginalTarget = targetindex;

mStrickDistance = strickdistance;

for (int i = 0; i < mGraph.NumNodes(); i++)
{
mGCosts[i] = 0.0f;
mFCosts[i].Value = 0.0f;
mShortestPathTree[i].Reset();
mSearchFrontier[i].Reset();
}

mAStarPathInfo.ResetPathInfo();
}

private bool mIsIgnoreWall;

public float StrickDistance
{
set
{
mStrickDistance = value;
}
}
private float mStrickDistance;

public PathInfo AStarPathInfo
{
get
{
return mAStarPathInfo;
}
set
{
mAStarPathInfo = value;
}
}
private PathInfo mAStarPathInfo;

private void GeneratePathToTargetInfo()
{
mAStarPathInfo.PathToTarget.Clear();
mAStarPathInfo.MovementPathToTarget.Clear();

if (mITarget < 0)
{
return;
}

int nd = mITarget;

mAStarPathInfo.PathToTarget.Add(nd);

mAStarPathInfo.MovementPathToTarget.Add(mGraph.Nodes[nd].Position);

while ((nd != mISource) && (mShortestPathTree[nd] != null) && mShortestPathTree[nd].IsValidEdge())
{
//Debug.DrawLine(mGraph.Nodes[mShortestPathTree[nd].From].Position,mGraph.Nodes[nd].Position,Color.green, Mathf.Infinity);

if (!mIsIgnoreWall)
{
//No matter the wall in path is jumpable or not, we should record it as useful information
if (mGraph.Nodes[nd].IsWall /*&& !mGraph.Nodes[nd].IsJumpable*/)
{
mAStarPathInfo.IsWallInPathToTarget = true;
mAStarPathInfo.WallInPathToTargetIndex = nd;
}
}

nd = mShortestPathTree[nd].From;

mAStarPathInfo.PathToTarget.Add(nd);

mAStarPathInfo.MovementPathToTarget.Add(mGraph.Nodes[nd].Position);
}

mAStarPathInfo.CostToTarget = GetCostToTarget();

mAStarPathInfo.ITarget = mITarget;

mAStarPathInfo.OriginalTarget = mOriginalTarget;
}

public List<GraphEdge> GetSPT()
{
return mShortestPathTree;
}

private float GetCostToTarget()
{
return mGCosts[mITarget];
}

private SparseGraph<NavGraphNode, GraphEdge> mGraph;

private PriorityQueue<int, float> mPQ;

private List<float> mGCosts;

private List<Pair<int, float>> mFCosts;

public List<GraphEdge> SPT
{
get
{
return mShortestPathTree;
}
}
private List<GraphEdge> mShortestPathTree;

/*
public List<float> CostToTargetNode
{
get {
return mCostToTargetNode;
}
set
{
mCostToTargetNode = value;
}
}
private List<float> mCostToTargetNode;
*/
private List<GraphEdge> mSearchFrontier;

public int ISource
{
set
{
mISource = value;
}
}
private int mISource;

public int ITarget
{
set
{
mITarget = value;
}
get
{
return mITarget;
}
}
private int mITarget;

public int OriginalTarget
{
get
{
return mOriginalTarget;
}
set
{
mOriginalTarget = value;
}
}
private int mOriginalTarget;

private float mHCostPercentage;

private bool mBDrawExplorePath;

private float mExplorePathRemainTime;

//The A* search algorithm
private void Search()
{
mPQ.Clear();

mPQ.Push(mFCosts[mISource]);

//mSearchFrontier [mISource] = new GraphEdge (mISource, mISource, 0.0f);
mSearchFrontier[mISource].From = mISource;
mSearchFrontier[mISource].To = mISource;
mSearchFrontier[mISource].Cost = 0.0f;

while (!mPQ.Empty())
{
//Get lowest cost node from the queue
int nextclosestnode = mPQ.Pop().Key;

mAStarPathInfo.NodesSearched++;

//move this node from the frontier to the spanning tree
if (mSearchFrontier[nextclosestnode] != null && mSearchFrontier[nextclosestnode].IsValidEdge())
{
mShortestPathTree[nextclosestnode] = mSearchFrontier[nextclosestnode];
}
//If the target has been found exit
if (nextclosestnode == mITarget)
{
return;
}

//Now to test all the edges attached to this node
List<GraphEdge> edgelist = mGraph.EdgesList[nextclosestnode];
GraphEdge edge;
for (int i = 0; i < edgelist.Count; i++)
{
edge = edgelist[i];
//calculate the heuristic cost from this node to the target (H)
float hcost = Heuristic_Euclid.Calculate(mGraph, mITarget, edge.To) * mHCostPercentage;

//calculate the 'real' cost to this node from the source (G)
float gcost = mGCosts[nextclosestnode] + edge.Cost;

//if the node has not been added to the frontier, add it and update the G and F costs
if (mSearchFrontier[edge.To] != null && !mSearchFrontier[edge.To].IsValidEdge())
{
mFCosts[edge.To].Value = gcost + hcost;
mGCosts[edge.To] = gcost;

mPQ.Push(mFCosts[edge.To]);

mSearchFrontier[edge.To] = edge;

mAStarPathInfo.EdgesSearched++;

if (mBDrawExplorePath)
{
Debug.DrawLine(mGraph.Nodes[edge.From].Position, mGraph.Nodes[edge.To].Position, Color.yellow, mExplorePathRemainTime);
}
}

//if this node is already on the frontier but the cost to get here
//is cheaper than has been found previously, update the node
//cost and frontier accordingly
else if (gcost < mGCosts[edge.To])
{
mFCosts[edge.To].Value = gcost + hcost;
mGCosts[edge.To] = gcost;

//Due to some node's f cost has been changed
//we should reoder the priority queue to make sure we pop up the lowest fcost node first
//compare the fcost will make sure we search the path in the right direction
//h cost is the key to search in the right direction
mPQ.ChangePriority(edge.To);

mSearchFrontier[edge.To] = edge;

mAStarPathInfo.EdgesSearched++;
}
}
}
}

//The A* search algorithm with strickdistance
private void Search(float strickdistance)
{
float currentnodetotargetdistance = Mathf.Infinity;

mPQ.Clear();

mPQ.Push(mFCosts[mISource]);

//mSearchFrontier [mISource] = new GraphEdge (mISource, mISource, 0.0f);
mSearchFrontier[mISource].From = mISource;
mSearchFrontier[mISource].To = mISource;
mSearchFrontier[mISource].Cost = 0.0f;

while (!mPQ.Empty())
{
//Get lowest cost node from the queue
int nextclosestnode = mPQ.Pop().Key;

mAStarPathInfo.NodesSearched++;

//move this node from the frontier to the spanning tree
if (mSearchFrontier[nextclosestnode] != null && mSearchFrontier[nextclosestnode].IsValidEdge())
{
mShortestPathTree[nextclosestnode] = mSearchFrontier[nextclosestnode];
}

currentnodetotargetdistance = Heuristic_Euclid.Calculate(mGraph, mITarget, nextclosestnode);

if (nextclosestnode == mITarget || currentnodetotargetdistance <= strickdistance)
{
mITarget = nextclosestnode;
return;
}

//Now to test all the edges attached to this node
List<GraphEdge> edgelist = mGraph.EdgesList[nextclosestnode];
GraphEdge edge;
for (int i = 0; i < edgelist.Count; i++)
{
edge = edgelist[i];
//calculate the heuristic cost from this node to the target (H)
float hcost = Heuristic_Euclid.Calculate(mGraph, mITarget, edge.To) * mHCostPercentage;

//calculate the 'real' cost to this node from the source (G)
float gcost = mGCosts[nextclosestnode] + edge.Cost;

//if the node has not been added to the frontier, add it and update the G and F costs
if (mSearchFrontier[edge.To] != null && !mSearchFrontier[edge.To].IsValidEdge())
{
mFCosts[edge.To].Value = gcost + hcost;
mGCosts[edge.To] = gcost;

mPQ.Push(mFCosts[edge.To]);

mSearchFrontier[edge.To] = edge;

mAStarPathInfo.EdgesSearched++;

if (mBDrawExplorePath)
{
Debug.DrawLine(mGraph.Nodes[edge.From].Position, mGraph.Nodes[edge.To].Position, Color.yellow, mExplorePathRemainTime);
}
}

//if this node is already on the frontier but the cost to get here
//is cheaper than has been found previously, update the node
//cost and frontier accordingly
else if (gcost < mGCosts[edge.To])
{
mFCosts[edge.To].Value = gcost + hcost;
mGCosts[edge.To] = gcost;

//Due to some node's f cost has been changed
//we should reoder the priority queue to make sure we pop up the lowest fcost node first
//compare the fcost will make sure we search the path in the right direction
//h cost is the key to search in the right direction
mPQ.ChangePriority(edge.To);

mSearchFrontier[edge.To] = edge;

mAStarPathInfo.EdgesSearched++;
}
}
}
}

//The A* search algorithm with strickdistance with wall consideration
private void Search(float strickdistance, bool isignorewall)
{
float currentnodetotargetdistance = Mathf.Infinity;

mPQ.Clear();

mPQ.Push(mFCosts[mISource]);

//mSearchFrontier [mISource] = new GraphEdge (mISource, mISource, 0.0f);
mSearchFrontier[mISource].From = mISource;
mSearchFrontier[mISource].To = mISource;
mSearchFrontier[mISource].Cost = 0.0f;
GraphEdge edge = new GraphEdge();
int nextclosestnode = -1;

while (!mPQ.Empty())
{
//Get lowest cost node from the queue
nextclosestnode = mPQ.Pop().Key;

mAStarPathInfo.NodesSearched++;

//move this node from the frontier to the spanning tree
if (mSearchFrontier[nextclosestnode] != null && mSearchFrontier[nextclosestnode].IsValidEdge())
{
mShortestPathTree[nextclosestnode] = mSearchFrontier[nextclosestnode];
}

currentnodetotargetdistance = Heuristic_Euclid.Calculate(mGraph, mITarget, nextclosestnode);

if (nextclosestnode == mITarget || (currentnodetotargetdistance <= strickdistance && !mGraph.Nodes[nextclosestnode].IsWall))
{
mITarget = nextclosestnode;
return;
}

//Now to test all the edges attached to this node
List<GraphEdge> edgelist = mGraph.EdgesList[nextclosestnode];
for (int i = 0; i < edgelist.Count; i++)
{
//Avoid pass refrence
edge.Reset();
edge.From = edgelist[i].From;
edge.To = edgelist[i].To;
edge.Cost = edgelist[i].Cost;
//calculate the heuristic cost from this node to the target (H)
float hcost = Heuristic_Euclid.Calculate(mGraph, mITarget, edge.To) * mHCostPercentage;

//calculate the 'real' cost to this node from the source (G)
float gcost = 0.0f;
if (isignorewall)
{
gcost = mGCosts[nextclosestnode] + edge.Cost;

if (mGraph.Nodes[edge.From].IsWall)
{
gcost -= mGraph.Nodes[edge.From].Weight;
}
if (mGraph.Nodes[edge.To].IsWall)
{
gcost -= mGraph.Nodes[edge.To].Weight;
}
}
else
{
gcost = mGCosts[nextclosestnode] + edge.Cost;
if (mGraph.Nodes[edge.From].IsJumpable)
{
gcost -= mGraph.Nodes[edge.From].Weight;
}
if (mGraph.Nodes[edge.To].IsJumpable)
{
gcost -= mGraph.Nodes[edge.To].Weight;
}
}

//if the node has not been added to the frontier, add it and update the G and F costs
if (mSearchFrontier[edge.To] != null && !mSearchFrontier[edge.To].IsValidEdge())
{
mFCosts[edge.To].Value = gcost + hcost;
mGCosts[edge.To] = gcost;

mPQ.Push(mFCosts[edge.To]);

mSearchFrontier[edge.To].ValueCopy(edge);

mAStarPathInfo.EdgesSearched++;

if (mBDrawExplorePath)
{
Debug.DrawLine(mGraph.Nodes[edge.From].Position, mGraph.Nodes[edge.To].Position, Color.yellow, mExplorePathRemainTime);
}
}

//if this node is already on the frontier but the cost to get here
//is cheaper than has been found previously, update the node
//cost and frontier accordingly
else if (gcost < mGCosts[edge.To])
{
mFCosts[edge.To].Value = gcost + hcost;
mGCosts[edge.To] = gcost;

//Due to some node's f cost has been changed
//we should reoder the priority queue to make sure we pop up the lowest fcost node first
//compare the fcost will make sure we search the path in the right direction
//h cost is the key to search in the right direction
mPQ.ChangePriority(edge.To);

mSearchFrontier[edge.To].ValueCopy(edge);

mAStarPathInfo.EdgesSearched++;
}
}
}
}
}

class Heuristic_Euclid
{
public static float Calculate(SparseGraph<NavGraphNode, GraphEdge> g, int nd1, int nd2)
{
//Manhattan distance heuritic
//Vector2 v1 = Utility.ConvertIndexToRC (nd1);
//Vector2 v2 = Utility.ConvertIndexToRC (nd2);
//float dis = v1.x - v2.x + v1.y - v2.y;
//Debug.Log("dis = " + dis);
//return dis;
//Caculation distance takes much time
return Vector3.Distance(g.Nodes[nd1].Position, g.Nodes[nd2].Position);
}
}

从上面可以看出我写了三个Search的版本:
第一个没有参数是最初的A Star Search,用于普通的寻路。
第二个带有float strickdistance的参数,是由于后来为了实现兵种间不同攻击距离下的寻路,只要达到攻击范围就算寻路完成。
第三个参数带了float strickdistance和bool isignorewall两个参数,还记得之前在GraphNode里写到的由于游戏里有城墙的概念,所以我在NavGraphNode里加入的mIsWall和mIsJumpable变量,用于判断节点是否是城墙并且是否可以直接越过。而这里的第二个参数isignorewall主要是用于判断当前兵种是否支持跳跃城墙(比如COC里的野猪),如果可以忽略城墙,那么寻路的时候就不会加入城墙的考虑。
后续我都会一一展示。

注意: A算法和Dijkstra算法的唯一区别是对搜索边界上的点的开销的计算。被修正的到节点的开销F用来决定节点在优先队列中的位置。
F的计算:
F = G + H
G是到达一个节点的累计开销, H是一个启发因子,它给出的是节点到目标节点的估计距离。

1
float hcost = Heuristic_Euclid.Calculate(mGraph, mITarget, edge.To) * mHCostPercentage;

这里算的是两点之间的实际距离,通过设定一个mHCostPercentage来实现对启发因子数值的控制。

让我们看看mHCostPercentage不同值时的效果:
黄色为寻路过程中探测的路线,绿色是最终路线。
mHCostPercentage = 1,即以两点之间的实际距离为H值的寻路的效果:
mHCostPercentage1

mHCostPercentage = 1.5,即以两点之前的实际距离的1.5倍为H值得寻路效果:
mHCostPercentage1point5

从上图可以看出H的值会使得A Star的搜索方向尽可能的往正确的方向搜索,从而避免不必要的边搜索。
上图由于绘制了搜索路径,所以实际上的Search Time没有那么高,如果mHCostPercentage设置成1.5一般都在2ms以内。

让我们看看加入城墙以后的效果:
注意,这里城墙的权值是设的4,即经过城墙相当于多走4的距离
mHCostPercentage = 1
mHCostPercentage1withWall

mHCostPercentage = 1.5
mHCostPercentage1point5withWall

从上图可以看出通过探索,士兵选择了最近的路线是绕过城墙,同时mHCostPercentage越大使得搜索的边减少了。

接下来看看当建筑被城墙大量包围时的寻路效果:
mHCostPercentage = 1
mHCostPercentage1withMoreWall

mHCostPercentage = 1.5
mHCostPercentage1point5withMoreWall

通过上面可以看出,由于建筑被城墙幅度包围,士兵的最终路线选择是经过城墙。
让我们来看一张有城墙的和无城墙的权值图:
有城墙:
WithWallWeightValue

无城墙:
WithoutWallWeightValue

NavGraphNode里加入的mIsJumpable变量将用于对城墙是否可跳跃的状态进行了抽象(实现COC里的弹跳法术)。

最终这个游戏实现了如下功能:

  1. 地图的存储
  2. 地图的编辑(建造和删除)
  3. 游戏进攻AI(包括对特有类型建筑有限攻击(好比COC里胖子优先攻击防御建筑))
  4. 存档清除
  5. PC和Mobile控制
  6. A Star调试信息面板
  7. 调整兵种信息调整(对优先攻击进行设定,行进速度设定,攻击距离设定,攻击伤害,血量是否可跳墙等属性设定等)
  8. 对建筑物信息调整(所占格子22 or 33等设定(暂时只支持11,22,3*3),攻击距离,攻击伤害,血量等信息)
  9. 法术信息调整(法术范围,法术持续时间等信息)

兵种支持:

  1. 近战型优先攻击防御建筑 – 好比COC的胖子
  2. 远程,无特定攻击对象 – 好比COC的弓箭手

建筑支持:

  1. 攻击建筑 – 好比COC里的箭塔
  2. 不可攻击建筑 – 好比COC里的兵营
  3. 城墙 – 好比COC里的城墙

法术支持:
弹跳法术

所有功能都会在最后的视频一一展示。

Optimization

  1. Rendering
    最初是绘制了40*40,1600个带Sprite图案的Tile,后来改为用一张整的Ground和只带Collider的1600个Tile。

  2. GC
    A Star最初写的时候是每一次运算都申请新的内存(每一次都New上百k的内存),后来改为通用数据保留下来,每次只重新申请需要返回的A Star Path的数据(大概几K)

  3. Physics
    最初是打开了所有Layer之间的碰撞检测,后来改为只打开需要碰撞检测的Layer之间的碰撞检测(Edit -> Project Settings -> Physics)

  4. Memory
    避免不必要的内存开销(比如box会在堆上申请额外的内存)
    项目里用Dictionary而不要用Hashtable,因为Dictionary是基于模板的,在针对ValueType的时候不会触发box和unbox。
    Unity里foreach会触发box,所以在Unity里尽量避免使用foreach,用while or for代替。

Sumary

在这次尝试制作和学习的过程中,学习了解了Unity和C#的一些基本概念。
巩固学习了AI寻路方面的知识。
对于炸弹人的AI,虽然云风大哥说大概是“寻找附近封闭空间中最近目标”,对于如何实现这一点没有头绪。(未来AI学习书籍 – 《Artificial Intelligence for Game》 — Ian Millington)
通过这一次的实践学习,我明白了,好的数据结构设计才是性能的关键所在。我的实现依赖于A Star的实时运算,即使每次运算时1ms级别,但数量一旦达到成百上千,A Star是无法保证帧率的。尽量做到预算和O(1)时间的查找或者运用更好的数据结构解决问题才是提升性能的关键。
最后再贴一个没有解决的真机bug(相对严重的,PC上没有),暂时未能解决的。
Unity 的提问

Final Effect

视频

Programming Game AI by Example

图的秘密

图的术语

路径节点叫做节点(node)
连接节点的路线被叫做边(edge)
权包含了从一个节点移动到另一个节点所需要的开销信息

图的分类:

  1. 连通图 (途中任何一个节点都可以找到一条路径到达所有其他的节点)
  2. 不连通图

图的定义:

图G的规范化的定义:通过边的集合E,节点的集合N来定义
G = {N , E}

注意:树是图的一个子集,树包含了所有的无环图

图密度:
边与节点的比率决定了一个图是稀疏还是致密的

有向图:
一个有向图的边是有方向的。

游戏AI中的图:

  1. 导航图(Navigation Graph) (包含了在一个游戏环境中智能体可能访问的所有的位置和这些位置之间的所有连接)

  2. 依赖图(Dependency Graph) (被用来秒速玩家可以利用的不同的建筑物,材料,单元以及技术之间的依赖关系)

  3. 状态图(State Graph) (用来表示一个系统的每一个可能的状态以及状态之间的转换关系)

两种数据结构被用来表示图:

  1. 邻接矩阵 (用一个二维的矩阵来表示图的链接关系,矩阵的每一个元素可以使布尔类型的,也可以是浮点类型的)
    优缺点:
    直观
    但对于大的稀疏图来说,这种表示方法不经济,大部分矩阵元素被用来存储0

  2. 邻接表
    优缺点:
    对于存储稀疏图是非常有效的,不会浪费空间来存储空连接
    例子:
    有向图:
    Digraph

邻接矩阵:
![Adjacency _Matrix](/img/AI/Adjacency _Matrix.PNG)

邻接表:
Adjacency_List

图的搜索算法:

  1. 盲目搜索(Uniformed Graph Searches) (在搜索一个图时不考虑相关的边的开销)
    a. 深度优先搜索(DFS: Depth First Search) (搜索时尽可能地深入一个图。在搜索时,当它走入死胡同时,才会回溯,以回到上一个较浅的节点,在那里继续深度搜索)
    注意: 使用Stack来模拟,先进后出(FILO)的原则
    DFS优化:
    一些图可能非常深,深度优先便可能非常容易地就在错误的路径上陷得很深,因而延误了搜索。
    限制深度的搜索(Limited Search): 限制深度优先搜索算法在开始回溯之前可以进行多少步的深度搜索
    缺点: 如何设置最大搜索深度
    迭代加深深度优先搜索(Iterative Deepending Depth First Search)
    b. 广度优先搜索(BFS:Breadth First Search) (从源节点展开以检查从它出发的边指向的每一个节点,然后再从那些刚检查过的节点继续展开)
    注意: 使用Queue来模拟,先进先出(FIFO)的原则
    BFS缺点:
    如果搜索的图非常大而且分支数很高,那么BFS就会浪费大量的内存并且表现出很低的效率。

  2. 基于开销的图搜索(cost-based graph searchs)
    a. 边放松(Edge Relaxation) (从源节点到抵达目标节点的路径上的所有其他节点中搜集当前最优路径(BPFSF: Best Path Found So Far)信息。这个信息在检查新的边时得到更新。如果刚检查的边表明,如果用通过此边到达一个节点的路径取代现有的最优路径会使路程更短,那么,这条边就 被加入,而路径也相应地更新)
    b. 最短路径树(SPT: Short Path Tree) (从任何节点到达源节点的最短路径)
    SPT_Short_Path_Tree
    c. Dijkstra算法(Dijkstra Algorithm) (教授Edsger Wybe Dijkstra著名的寻找带全图的最短路径算法)
    注意: 使用一个索引的优先队列(Indexed Priority Queue)来实现。
    缺点:
    Dijkstra算法检查了太多的边。
    d. Dijkstra算法的一个改进:A算法 (Dijkstra算法通过最小化开销进行搜索。在处理搜索边界上的点时,如果估计一下他们距离目标节点的开销,并将这个信息考虑进去,那么算法的效率就可以大大提高。这个估计值被称为启发因子。)
    注意: A
    算法和Dijkstra算法的唯一区别是对搜索边界上的点的开销的计算。被修正的到节点的开销F用来决定节点在优先队列中的位置。
    F的计算:
    F = G + H
    G是到达一个节点的累计开销, H是一个启发因子,它给出的是节点到目标节点的估计距离。
    通过用这种方法使用一个启发因子,被修正的开销会指引搜索逼近目标节点,而不是在各个可能的方向发散的搜索。这也使需要检查的边更少。因此搜索的加速是Disjkstra算法和A算法的最主要区别。
    A
    算法的实现需要维护两个用来存储开销的std::vector,一个用来保存每一个节点的F开销,作为优先队列的索引,另一个是每一个节点的G开销。

《Artificial Intelligence for Game》 – Ian Millington
1. Introduction
1.1 What is AI?
Artificial intelligence is about making computers able to perform the thinking tasks that humans and animals are capable of

1.1.2 Game AI
Pacman [Midway Games West, Inc, 1979] – state machine
Warcraft –[Blizzard Entertainment, 1994] – Path finding

AI three basic needs:
1. Move
Movement refers to algorithms that turn decisions into some kind of motion
2. Decision making
Decision making involves a characterworking out what to do next
3. Strategy
Strategy refers to an overall approach used by a group of characters – e.g. Harf-Life
Note:
Not all game applications require all levels of AI

1.2.5 Agent-Based AI
Agent-based AI is about producing autonomous characters that take in information from the game data, determine what actions to take based on the information, and carry out those actions

1.3 Algorithms, Data Structures, and Representations
1.3.1 Algorithms

  1. Tactical and Strategic AI
    6.1 Waypoint Tactics
    6.1.1 Tactical Locations

12.4 Real-Time Strategy
待续……

AI

前面提到的图主要是用于寻路方面(e.g. A*)的知识储备。

接下来要提到的AI主要是涉及到角色AI行为决策的实现,本章主要以学习状态机,分层状态机以及行为树来理解AI中行为决策的几个常用实现方式加深AI行为决策学习理解,更多更深入的学习可参考《Artificial.Intelligence.for.Games》书籍。

状态机

游戏中,一般人物或者游戏的状态都是有限的,这里我们可以使用状态机把这些有限的状态抽象出来,然后把各自的逻辑写在对应的状态中。一来逻辑清晰,二来各状态之间的关系也清晰。

打个比方:

游戏状态划分:

  • 游戏初始状态(刚进游戏的第一个状态,负责初始化所有模块引导进入游戏)
  • 游戏更新状态(热更新的一个状态,负责处理热更新相关)
  • 游戏UI状态(游戏玩法外的一个状态,比如游戏主城时候)
  • 游戏Loading状态(切换场景加载显示Loading图的过渡状态)
  • 游戏GamePlay状态(具体的某个玩法状态,比如选择关卡后进去的具体玩游戏状态)
  • 游戏暂停状态(顾名思义暂停游戏的一个状态)
  • 游戏退出状态(关闭退出游戏时的一个状态,可以做一些游戏清除保存工作)

GameStateMachine

这里就只放几个核心代码:

StateMachine.cs(状态机管理类)

1
2
3
4
5
6
7
8
9
10
11
12
13
14
15
16
17
18
19
20
21
22
23
24
25
26
27
28
29
30
31
32
33
34
35
36
37
38
39
40
41
42
43
44
45
46
47
48
49
50
51
52
53
54
55
56
57
58
59
60
61
62
63
64
65
66
67
68
69
70
71
72
73
74
75
76
77
78
79
80
81
82
83
84
85
86
87
88
89
90
91
92
93
94
95
96
97
98
99
100
101
102
103
104
105
106
107
108
109
110
111
112
113
114
115
116
117
118
119
120
121
122
123
124
125
126
127
128
129
130
131
132
133
134
135
136
137
138
139
140
141
142
143
144
145
146
147
148
149
150
151
152
153
154
155
156
157
158
159
160
161
162
163
164
165
166
using UnityEngine;
using System.Collections;
using System.Collections.Generic;

public class StateMachine<T> where T : class {

/// <summary>
/// 状态机拥有者
/// </summary>
protected T mOwner;

/// <summary>
/// 当前游戏状态
/// </summary>
private StateTemplate<T> mCurrentState;

/// <summary>
/// 当前游戏状态的int值(为了状态机通用这里没有写成特定Enum)
/// </summary>
public int CurrentStateValue
{
get
{
return mCurrentStateValue;
}
}
private int mCurrentStateValue;

/// <summary>
/// 游戏状态机Map
/// </summary>
private Dictionary<int, StateTemplate<T>> mStatesMap;

public StateMachine(T owner)
{
mOwner = owner;
mCurrentState = null;
mCurrentStateValue = -1;
mStatesMap = new Dictionary<int, StateTemplate<T>>();
}

/// <summary>
/// 设置拥有者
/// </summary>
/// <param name="owner"></param>
public void setOwner(T owner)
{
mOwner = owner;
}

/// <summary>
/// 消息响应处理
/// </summary>
/// <param name="message"></param>
public void handleMessage(MessageData message)
{
if(mCurrentState != null)
{
mCurrentState.onMessage(message);
}
}

/// <summary>
/// 游戏更新
/// </summary>
public void update()
{
if (mCurrentState != null)
{
mCurrentState.executeState();
}
}

/// <summary>
/// 注册游戏状态
/// </summary>
/// <param name="state"></param>
/// <returns></returns>
public bool registerState(int stateenum, StateTemplate<T> state)
{
if (mStatesMap.ContainsKey(stateenum))
{
Debug.LogError(string.Format("已经注册过状态:{0}", stateenum));
return false;
}
else
{
mStatesMap.Add(stateenum, state);
return true;
}
}

/// <summary>
/// 是否已经注册过特定状态
/// </summary>
/// <param name="stateenum"></param>
/// <returns></returns>
public bool hasRegisterSpecificState(int stateenum)
{
return mStatesMap.ContainsKey(stateenum);
}

/// <summary>
/// 移除状态
/// </summary>
/// <param name="stateenum"></param>
/// <returns></returns>
public bool removeState(int stateenum)
{
if (mStatesMap.ContainsKey(stateenum))
{
mStatesMap.Remove(stateenum);
return true;
}
else
{
Debug.LogError(string.Format("状态:{0}未注册,无法移除!", stateenum));
return false;
}
}

/// <summary>
/// 清除所有注册的游戏状态
/// </summary>
public void clearAllStates()
{
mStatesMap.Clear();
}

/// <summary>
/// 切换游戏状态
/// </summary>
/// <param name="stateenum"></param>
/// <param name="param">状态切换参数</param>
/// <returns></returns>
public bool changeToState(int stateenum, params object[] param)
{
if (mStatesMap.ContainsKey(stateenum))
{
if (mCurrentState != null)
{
mCurrentState.exitState();
}
mCurrentState = mStatesMap[stateenum];
mCurrentStateValue = stateenum;
mCurrentState.setOwner(mOwner);
mCurrentState.enterState(param);
return true;
}
else
{
Debug.LogError(string.Format("未注册游戏状态:{0}", stateenum));
return false;
}
}

/// <summary>
/// 清除所有数据状态
/// </summary>
public void clearAll()
{
mCurrentState = null;
mStatesMap.Clear();
mOwner = null;
}
}

StateTemplate.cs(状态模板类)

1
2
3
4
5
6
7
8
9
10
11
12
13
14
15
16
17
18
19
20
21
22
23
24
25
26
27
28
29
30
31
32
33
34
35
36
37
38
39
40
41
42
43
44
45
46
47
48
49
50
51
52
53
54
55
using UnityEngine;
using System.Collections;

/// <summary>
/// 游戏物体状态抽象基类
/// </summary>
public class StateTemplate<T> where T : class {

/// <summary>
/// 状态拥有者
/// </summary>
protected T mOwner;

/// <summary>
/// 设置状态拥有者
/// </summary>
/// <param name="owner"></param>
public void setOwner(T owner)
{
mOwner = owner;
}

/// <summary>
/// 获取状态拥有者
/// </summary>
public T getOwner()
{
return mOwner;
}

/// <summary>
/// 进入当前状态
/// </summary>
/// <param name="param">状态运行参数</param>
public virtual void enterState(params object[] param)
{

}

/// <summary>
/// 执行当前状态
/// </summary>
public virtual void executeState()
{

}

/// <summary>
/// 退出当前状态
/// </summary>
public virtual void exitState()
{

}
}

GameBaseState.cs(游戏状态基类)

1
2
3
4
5
6
7
8
9
10
11
12
13
14
15
16
17
18
19
20
21
22
23
24
25
26
27
28
29
30
31
32
33
34
35
36
37
38
39
40
41
42
43
44
45
46
47
48
49
50
51
52
53
54
55
/*
* Description: GameBaseState.cs
* Author: TONYTANG
* Create Date: 2018/12/09
*/

using UnityEngine;
using System.Collections;

/// <summary>
/// 游戏状态基类
/// </summary>
public class GameBaseState : StateTemplate<GameManager>
{
/// <summary>
/// 进入当前状态
/// </summary>
/// <param name="param">状态运行参数</param>
public override void enterState(params object[] param)
{
loadRes(param);
}

/// <summary>
/// 执行当前状态
/// </summary>
public override void executeState()
{

}

/// <summary>
/// 退出当前状态
/// </summary>
public override void exitState()
{
unloadRes();
}

/// <summary>
/// 加载相关资源
/// </summary>
protected virtual void loadRes(params object[] param)
{

}

/// <summary>
/// 释放所有资源
/// </summary>
protected virtual void unloadRes()
{

}
}

代码就不详细说明了,看一眼大概就能明白了。

优点:

  1. 对于状态不多不复杂的来说,可以把状态逻辑划分很清晰,易于维护

缺点:

  1. 对于复杂拥有过多状态的情况来说,维护成本高不方便管理(横向扩展不利于维护)

针对缺点1的方案可以考虑HFSM(分层状态机),通过细分大小状态机来进行更加细致的状态机分类。

结论:

FSM(有限状态机)更适合于状态数量不多不复杂的情况(e.g. 游戏状态分类)

分层状态机

详细HFSM参考

行为树

行为树是本章AI决策的重点,考虑到篇幅过长,所以另起一篇博客来详解行为树在Unity里的实战学习。

详情参考:

行为树-Unity

行为树实战

目标:

  1. 实现一个简易的行为树,深入理解行为树的原理和实现
  2. 配套一个简易的节点编辑器(支持可视化编辑和调试)

实现:

  1. 目标1通过自行实现一个简易版
  2. 目标2基于Unity原生GUI API来实现可视化节点编辑器

数据管理

黑板模式

可以简单的理解成一个共享数据的地方。

抽象行为树

待添加……

行为中断

待添加……

节点编辑器

待添加……

参考书籍

《Programming Game AI by Example》 – Mat Buckland
《Artificial Intelligence for Game》 – Ian Millington

Reference

FSM(状态机)、HFSM(分层状态机)、BT(行为树)的区别

装机相关知识

组装电脑组要的配件:
主板,CPU,显卡,内存,硬盘,外设,机箱,电源组成。

接下来就各个模块的相关概念参数进行学习了解,最后结合网上的经验之谈和自己的理论知识用于实践组机参考。

装机模块

主板

首先了解下主板在电脑中的作用:
典型的主板能提供一系列接合点,供处理器、显卡、声卡、硬盘驱动器、内存、对外设备等设备接合。它们通常直接插入有关插槽,或用线路连接。

主板上最重要的构成组件是芯片组(Chipset)。而芯片组通常由北桥和南桥组成,也有些以单片机设计,增强其性能。

可以看出主板是让所有电脑组件组合运行起来的关键,起到了模块连接,数据传递,提供硬件接口等重要作用。

主板购买装机需要考虑的点:

  1. 兼容
  2. 稳定性
  3. 扩展

以下主要是针对主板上的各个接口进行学习了解,了解他们每一个模块是负责做什么,所有模块是怎么整合运行起来的。后面会针对主要组件进行深入学习了解用于判断怎样的组件才是高性能更优的,帮助我们组装时购买各个组件提供理论知识。

首先让我们先看看主板的构成和架构图:
MainBoard
MainboardDiagram

以下只列出了几个重要的模块进行了解:

  1. CPU插槽 – CPU插槽接口(CPU主要分为Intel和AMD,注意接口标准兼容问题)
  2. 芯片组 – CPU与其他组件沟通的桥梁,分为北桥(Normal Bridge)和南桥(South Bridge)
    图二可以看出,北桥(NB)主要是负责CPU与RAM(内存),AGP,PCI Express还有南桥的通信。
    南桥主要是负责和外设,多媒体,通信接口等通信。
    Note:
    北桥随着发展被整合到CPU里了。
  3. AGP插槽(根据Wiki的说法被PCI Express取代了) – 显卡插槽专用接口
    PCI Express性能参考表
    当然最好的是PCI Express 3.0 x16。区分是x1,x4,x8,x16看针脚数量。
    PCI Express总线对显卡传输的瓶颈暂时不考虑,情况比较复杂。尽量买支持PCI Express 3.0 x16插槽的主板就好。
    PCI Express信息查看
    GPU-Z里的Bus Interface显示的就是PCI Express的版本和带宽数。
  4. 内存插槽 – 内存条插槽接口(多个内存插槽方便以后内存扩展)
  5. PCI扩展插槽 – 外设(e.g. 网卡,声卡,调制解调器……)扩展插槽接口(被PCI Express慢慢取代)
  6. mSATA(结合下面的图查看) – 安装我们平时说的SSD(固态硬盘)的插槽接口(推荐使用固态硬盘)
    mSATA插槽位置
  7. BIOS – 基本输入、输出系统)是一块装入了启动和自检程序的EPROM 或EEPROM 集成电路。

主板决定了我们其他组件的选择范围(比如CPU必须和主板CPU插槽一致),不然出现不兼容或者不允许安装就尴尬了。
Intel和AMD的CPU插槽详解参见下面链接:
电脑主板有哪些插槽详细介绍

CPU

中央处理器(Central Processing Unit),是计算机的主要设备之一,功能主要是解释计算机指令以及处理计算机软件中的数据。

CPU的好坏决定了运算速度。那么是什么决定了CPU性能好坏的了?
在了解决定因素之前,我们需要了解学习几个概念:

  1. 主频 – CPU正常运行时的工作频率(一个时钟周期能完成的指令数是固定的,所以工作频率越高性能越高)

  2. 外频 – 系统总线的工作频率

  3. 倍频 – CPU外频与主频相差的倍数

  4. 超频 – 过人为的方式将CPU、显卡等硬件的工作频率提高,让它们在高于其额定的频率状态下稳定工作(通过改变CPU的倍频或者外频来实现)

  5. 前端总线 – CPU和北桥芯片间总线的速度。数据传输的速度,即每秒钟CPU可接受的数据传输量。

  6. 系统总线 – 创建在数字脉冲信号震荡速度基础之上的,也就是说,100MHz系统总线(BusSpeed)特指数字脉冲信号在每秒钟震荡一亿次,它更多的影响了PCI及其他总线的频率
    [CPU与主板之间同步运行的速度,是指数字脉冲信号在每秒钟震荡的次数;

    ](http://www.cnblogs.com/spinsoft/archive/2012/08/02/2619982.html)

公式:
CPU主频=CPU外频(系统总线)×CPU倍频系数

不同的CPU(Intel or AMD),CPU外频(系统总线)和前端总线频率关系不一样:
Intel CPU来说,前端总线=系统总线*4

超频会带来影响CPU的稳定性,更发热,需要更大供电等问题。

了解了上述概念,不难看出,CPU的性能好坏主要是由主频和超频能力决定的。
通过CPU-Z工具,我们可以看到CPU相关的详细信息:
CPU-Z信息查看
结合我在Intel官网查到的CPU信息:
我的CPU信息
从上面可以看出,我的电脑CPU基本频率2.3GHz,超频最高达到3.3GHz,倍频是在12-33之间变化。

组装购买CPU时,不仅要考虑CPU的性能好坏,还要考虑前端总线的传输能力,如果前端总线远远小于CPU的频率那么性能就受限于前端总线,反之亦然。

其次CPU还要考虑一个很重要的点:
多核,多核能提升多线程并行处理运算的能力,特别是很多大型游戏都会利用CPU的多核运算能力去利用加开运算速度。后端服务器尤其看重多核,个人认为也是为了提高并行运算能力。。所以除了看CPU主频多核也是一个很重要的参考点。

CPU性能比较参考CPU天梯图:
CPU 2017年9月天梯图

Note:
超频是一个广义的概念,它是指任何提高计算机某一部件工作频率而使之工作在非标准频率下的行为及相关行动都应该称之为超频,其中包括CPU超频、主板超频、内存超频、显示卡超频和硬盘超频等等很多部分
外频 == 系统总线频率 外频 != 前端总线频率

显卡

显卡这里就不详细重复讲解了,详情参考本文前面关于GPU的知识学习。
这里只写几个结论总结:

  1. 显存带宽=显存频率×显存位宽/8
  2. 一款显卡的性能由“像素填充率”和“显存带宽”两个部分构成。“像素填充率”衡量的是显卡的图形运算能力,“显存带宽”衡量的是显卡的数据传输能力。
  3. GDDR5一般比GDDR3提供的频率更高(显卡性能要求高的优先考虑GDR5)

所以买显卡主要看中的是“像素填充率”和“显存带宽”。
GPU性能比较参考GPU天梯图:
GPU 2017年9月天梯图

内存

内存条是CPU可通过总线寻址,并进行读写操作的电脑部件。所有外存上的内容必须通过内存才能发挥作用。

可以看出内存的读写速度和CPU的运行速度是相辅相成的,一旦某一个速度跟不上都会造成性能上的瓶颈。

现在主流的内存采用的是DDR(Double Data Rate)技术,通过在一次系统时钟的上升沿和下降沿都可以进行数据传输实现双倍率传输。

DDR的内存速度计算公式:
内存实际频率 = 内存频率 * 2(DDR技术,倍增系数)
带宽=内存时钟频率×内存总线位数(多通道技术会提升理论内存位宽)×2(DDR技术,倍增系数)/8

现在主流的内存是DDR3,DDR4还没有普及性价比不高而且需要特定的主板支持。需要注意的一点就是因为内存和CPU是相辅相成的,但内存与CPU之间的桥梁是前端总线,所以为了确保内存得到充分利用同时也不受限于前段总线频率,我们应该尽量选择前端总线频率和内存频率(这里的内存频率是指计算DDR技术和多通道技术之后的一个内存频率)相近的。

那么内存的读写速度由什么决定了?
跟显卡,CPU差不多,主要看频率和位宽,前者受DDR技术影响提高一倍,后者会受多通道技术影响。

Note:
这里的内存指的是CPU所使用的内存而非GPU的显存。
DDR3和DDR4不兼容,不支持混用。

硬盘

硬盘有机械硬盘(HDD)和固态硬盘(SSD)之分。
推荐使用固态硬盘的原因:

  1. 比机械硬盘读写速度快
  2. 虽然擦写次数寿命比机械硬盘少,但理论上足够在几十年内使用
  3. 价格比机械硬盘贵,但在容量比较小的情况下还能够接受(推荐C盘系统盘弄个64G或者128G的SSD)

这里要注意的是支持SSD的标准现在有很多,现在比较常见和流行的是SATA 3.0 6G。
其他还有PCL-E 3.0,mSATA,SATA Express,M.2等。
SSD接口全解析

外设(鼠标,键盘,显示器)

键盘

普通键盘和机械键盘之分
看个人需求,机械键盘多用于专业人员(比如程序员)
机械键盘比普通键盘贵上很多倍,个人衡量价格。

鼠标

省略

显示器

显示质量:
屏幕显示技术(IPS,PLS,TN)影响显示器显示效果。
详情参考:
显示器的 VGA、HDMI、DVI 和DisplayPort接口有什么区别?

接口:
接口影响传输效率。

Note:
注意主板支持的VGA,DVI,HDMI,DP接口与显示器支持的接口一致。

分辨率选择:
分辨率除了考虑接口传输速度的支持,还要考虑线的传输速度限制(比如HDMI 1.4和HDMI 2.0所支持的传输速度就有很大区别,2K,4K对线的要求参考下方连接)。
详情参考:
4K、2K超清显示器普及了 可高清线你会选吗?

机箱

注意买与主板大小相匹配的机箱(比如 ATX大板,ATX小板等)。
考虑到铺线的问题,提前了解下机箱内部结构是否分布合理。

电源

保证电源稳定,且瓦数满足主板供电需求。(普通配置500W应该都能满足,高配置参考各配件的功耗来决定最终电源瓦数)

其他

USB接口

USB 3.0比USB 2.0高的不是一个数量级(理论上传输速度相差10倍以上),能支持USB 3.0最好。

Note:
要想使用USB 3.0除了接口要支持,插入的USB设备也要支持USB 3.0才行。

注意事项

装机

  1. 主板与CPU以及GPU
    主板会决定是支持Intel CPU还是AMD CPU,同时主板会决定是支持NVIDA还是AMD显卡。

CPU:
Intel CPU主要看是支持LGA ***多少,不一样的话会导致无法支持。
AMD CPU主要是看支持FX,AM2还是AM3,还是AM4标准等。

GPU:
显卡两大生产商NVIDA和AMD,两者一般不会同时支持,所以选主板和GPU的时候要注意。GPU主要是要注意主板支持的显卡插槽是PCLE 2.0还是PCLE 3.0,显卡GPU和主板的插槽要支持同样的PCLE版本,推荐选择最新的PCLE版本。

  1. 主板与SSD
    选主板的时候会决定所支持的SSD接口标准,确定了支持的SSD标准,我们才能买到正确可以插上使用的SSD型号。现在流行的性价比高的就是比较普通的SATA 3.0接口。

尺寸

  1. 机箱和主板尺寸
    机箱尺寸要和主板大小配合,有ATX,M-ATX等主板大小

硬件以及性能检测工具

CPU-Z

免费的检测硬件信息的一款软件(但在GPU方面还不是很足,所以下面有GPU-Z互补)
下载链接:
CPU-Z Download

GPU-Z

免费的检测GPU硬件方面信息的一款软件
下载链接:
GPU-Z

AS SSD Benchmark

一款免费的检测硬盘速度以及SSD 4K对齐的软件。

鲁大师

这个不用介绍了,检测跑分(CPU, GPU, 硬盘等)。
鲁大师

装机相关参考网站

Conception Part

主板
北桥
南桥
超频技术
cpu性能指标
多通道内存技术

Knowledge Part

计算机主板的组成部分及芯片介绍
PCI-E 总线对GPU性能的影响
DDR3和DDR4内存的区别
CPU主频,倍频,外频,系统总线频率,前端总线频率
电脑主板有哪些插槽详细介绍

Performance Comparision Part

CPU,GPU,RAM等Benchmark
2017年9月 GPU天梯图
2017年9月 CPU天梯图

参考书籍:
《OpenGL Programming Guide 8th Edition》 – Addison Wesley
《Fundamentals of Computer Graphics (3rd Edition)》 – Peter Shirley, Steve Marschnner
《Real-Time Rendering, Third Edition》 – Tomas Akenine-Moller, Eric Haines, Naty Hoffman

Rendering Knowledge

在进入书籍内容的学习之前,先了解一些必要的知识

What is Rendering?

“Rendering is a process that takes as its input a set of objects and produces as its output an array of pixels.” – 《Fundamentals of Computer Graphics (3rd Edition)》

既然Rendering是通过处理一系列的对象数据最终输出成一组一组的像素呈现出来,那接下来的问题就是What is the rendering process(Graphic Pipeline)?

What is the rendering process(Graphic Pipeline)?

首先我们来看看wiki上对pipieline的解释
the sequence of steps used to create a 2D raster representation of a 3D scene.
那么结合Rendering的定义,不难看出Rendering pipeline就是一系列的操作(把前一个操作的输出当做输入)使得输入的对象数据最终以像素的形式输出到屏幕上

Note:
“A chain is no stronger than its weakest link.”
—Anonymous
渲染的速度是由最慢的阶段决定的。

图形渲染和GPU的是密不可分的。
渲染管线最大的变化就是从传统的固定渲染管线转变到了可编程的渲染管线。

在了解固定渲染管线和可编程渲染管线之前,先让我们来了解一下什么是Rendering Pipeline。

Rendering Pipeline Stages

Rendering_Stages

  1. Application
    e.g collision detection, global acceleration algorithms, animation, physics simulation….. (On CPU)
    Acceleration algorithms, such as hierarchical view frustum culling, are also implemented in this stage. – 《Real-Time Rendering, Third Edition》
    可以看出Application阶段主要是做一些非渲染相关的一些计算,但部分计算也可以帮助我们减少渲染数量提高渲染效率(比如:hierachical view frustum culling)

  2. Geometry
    Geometry_Stage
    Deal with transforms, projection. Computes what is to be draw, how it should be drawn, and where it should be drawn (On GPU)
    e.g. model and view transform, vertex shading, projection, clipping, and screen mapping – 《Real-Time Rendering, Third Edition》
    可以看出Geometry阶段主要是负责3D到2D Screen的顶点运算和顶点剔除

  3. Rasterizer
    Rasterize_Stage
    Conversion from two-dimensional vertices in screen space – each with a z-value (depth value), and various shading information associated with each vertex – into pixels on the screen (On GPU) – 《Real-Time Rendering, Third Edition》
    可以看出Rasterizer阶段主要是负责2D Screen的顶点像素运算(包括Z-Buffer test, Color computation, Alpha test, Stencil buffer等)

Accumulation Buffer – Images can be accumulated using a set of operators. E,g, motion blur……

让我们结合OpenGL Rendering Pipeline来学习理解:
OpenGL_Rendering_Pipeline
从上图可以看出,OpenGL的第一个阶段Vertex Data相当于Application阶段所收集的数据

不难看出从Vertex Shader到Clipping都属于从3D到2D Screen的顶点运算和顶点剔除,所以这一部分处于Geometry阶段(由于后来统一架构的(US)原因,Vertex Shader, Geometry Shader, Pixel Shader很多)

而从Rasterization到最后的屏幕输出都是对像素的运算,所以是Rasterizer阶段
OpenGL更多的学习了解

了解了什么是Rendering Pipeline之后,让我们来看看什么是固定管线和可编程管线?他们之间的关系是怎样的?

传统的固定渲染管线

什么叫做“像素渲染管线”了?
传统的一条渲染管线是由包括Pixel Shader Unit(像素着色单元)+ TMU(纹理贴图单元) + ROP(光栅化引擎)三部分组成的。用公式表达可以简单写作:PS=PSU+TMU+ROP 。从功能上看,PSU完成像素处理,TMU负责纹理渲染,而ROP则负责像素的最终输出。所以,一条完整的像素管线意味着在一个时钟周期完成至少进行1个PS运算,并输出一次纹理。

那么什么是PSU(像素着色器单元)?什么是TMU(纹理贴图单元)?什么是ROP(光栅化引擎)了?
在统一渲染架构(US(Unified Shader))出现之前有单独的顶点着色器单元像素着色器单元,分别负责顶点数据和像素处理。

TMU(纹理贴图单元 – Texture Mapping Unit)
归根到底就是对材质的贴图和过滤操作。根据程序的需要,在完成几何处理和光栅化之后,TMU单元会从材质库中找出合适的纹理贴在对应的位置上以实现模型的外形完整化
在可编程渲染管线(Shader)出现后,程序员可以实现对像素级别上的操作,可以实现更加真实的效果(预先烘焙的材质无法真实的实时渲染)。Vertex Texture Fetch(顶点纹理拾取)的出现允许Vertex Shader直接访问材质的一些信息,这也算是TMU进军GPGPU的一个契机。
从DirectX 9.0C开始,TMU单元正式分割成了TA和TF两个部分,TA单元专门负责材质的定址操作,在完成定址之后,TF单元根据定址结果对材质进行拾取并完成贴图作业。
后续改进纹理阵列(处理材质操作的纹理单元阵列)以及Gather指令(Gather指令的作用,在于允许单元从非连续存储器地址中直接读取数据。)
Computer Shader的出现也使得纯数学的纹理计算成为了可能。

ROP(光栅化引擎 – Render Output Units)
The render output unit, often abbreviated as “ROP”, and sometimes called (perhaps more properly) raster operations pipeline.
Conversion from two-dimensional vertices in screen space – each with a z-value (depth value), and various shading information associated with each vertex – into pixels on the screen (On GPU) – 《Real-Time Rendering, Third Edition》

可编程渲染管线

为什么会有可编程渲染管线了?
由于传统的渲染管线不可编辑性,实现的图像效果受到很大限制,Shader(着色器)的引入就替代了传统的固定渲染管线,实现了可编程的渲染管线,各个Shader(着色器)替代了固定渲染管线中相应的功能。

那么什么是Shader(着色器)?Shader(着色器)和GPU硬件的关系是怎样的了?
“Shaders are programmed using C-like shading languages such as HLSL, Cg and GLSL. These are compiled to a machine-independent assembly language, also called the intermediate language(IL). This assembly language is converted to the actual machine language in a separate step, usually in the drivers. This arrangement allows compatibility across different hardware implementations.” – Real-Time Rendering, Third Edition》
GPU的像素着色器单元和顶点着色器单元就对应了Shader里面的Pixel Shader和Vertex Shader。由于像素在计算机都是以RGB三种颜色构成,加上Alpha总共4个通道,所以GPU的像素着色器单元和顶点着色器单元一开始就被设计成为同时具备4次运算能力的算数逻辑运算器(ALU)

从上面可以看出Shader是machine-independent的,因为事先被编译成了与机器无关的intermediate language(This intermediate language can be seen as defining a virtual machine, which is targeted by the shading language compiler – 《Real-Time Rendering, Third Edition》), 最后才会被机器转换成机器码来运行.

可编程Shading进化史可参考
3.3 The Evolution of Programmable Shading – 《Real-Time Rendering, Third Edition》

计算机架构与Shader的关系

非同一架构

那么影响Pixel Shader和Vertex Shader速度的因素又是什么了?
数据流处理速度。

我们都知道计算机是通过发送指令来对数据进行处理的,而计算机架构则是对指令流和数据处理的设计,是影响数据流处理速度的关键。

根据Flynn分类法,计算机架构分为:

  1. SISD(Single Instruction Signle Data Stream) – 单指令单数据流
    传统的顺序执行的计算机在同一时刻只能执行一条指令(即只有一个控制流)、处理一个数据(即只有一个数据流),因此被称为单指令单数据流计算(Single Instruction Single Data Stream,SISD)
  2. MIMD(Multiple Instruction Multiple Data Stream) – 多指令多数据流
    MIMD
    而对于大多数并行计算机而言,多个处理单元都是根据不同的控制流程执行不同的操作,处理不同的数据,因此,它们被称作是多指令流多数据流计算机,即MIMD(Multiple Instruction Stream Multiple Data Stream,简称MIMD)计算机,它使用多个控制器来异步地控制多个处理器,从而实现空间上的并行性。
  3. SIMD(Single Instruction Multiple Data Stream) – 单指令多数据流
    SIMD
  4. MISD(Multiple Instruction Single Data Stream) – 多指令多数据流

那么各个计算机架构设计之间的优势和劣势分别是什么了?
还记得我们之前说的像素着色单元和顶点着色单元已开被设计成具备4次运算能力的算数逻辑运算器(ALU)吗?
因为数据的基本单元是Scalar(标量),GPU的ALU一个时钟周期可进行四次这种变量并行运算。
那么如果我们传入4D标量进行运算,SIMD可以最大程度满足我们的需求,达到GPU利用率100%。但如果我们传入1D标量进行运算,SIMD的效率就会下降到原来的四分之一(随着API的更新,1D/2D/3D等混合指令开始大幅出现),固传统的SIMD架构效率开始降低。而3D+1D/2D+2D等混合架构设计也并不能最大限度利用ALU运算能力,这也是统一架构出现的契机。

统一架构

为了解决ALU利用率的问题,微软在Direct X 10提出了统一渲染架构的概念。
核心思想是:将Vertex Shader(顶点着色器)和Pixel Shader(像素着色器)单元合并成一个具备完整执行能力的US(Unified Shader,统一渲染)单元,指令直接面向底层的ALU而非过去的特定单元,所以在硬件层面US可以同时吞吐一切shader指令,同时并不会对指令进行任何修改,也不会对shader program的编写模式提出任何的强迫性的改变要求。

US

统一架构出来以后,因为有了US(Unified Shader)单元,指令直接面向底层的ALU而非特定单元,所以后来的N卡统一架构把原来的4D着色器单元完全打散,流处理器(SP)统统由矢量设计改为了标量运算单元(由4D矢量运算器改为了1D标量运算器),采用的是MIMD架构。

MIMD架构相比SIMD架构需要占用更多的晶体管数,因为4个1D标量ALU和一个4D矢量ALU的运算能力是相当的,但前者需要4个指令发射端和4个控制单元,而后者只需要1个

而A卡的流处理器(SPU)依然采用的是SIMD(单指令多数据流)架构,每个SPU内包含了5个ALU。

N卡A卡对比总结:英伟达的所采用的MIMD(多指令流多数据流)标量架构的G80核心需要占用不少额外的晶体管,所以在流处理器数量和理论运算能力方面稍显吃亏,但优点是GPU Shader执行效率很高;而AMD所采用的SIMD(单指令多数据流)超标量架构的R600核心则用较少的晶体管数实现了更多的流处理器数量和更高的理论运算能力,不过在执行效率方面则需要视情况而定了

N卡的第二次革新引入的atomic单元以及SIMT(Single Instruction Multiple Thread)特性对N卡并行化设计起到了先到作用。

N卡的第三次革新引入了四大块就是GPC(Graphics Processing Cluster,图形处理器簇),每个GPC单元包含独立的集合引擎以及光栅化流水线,GPC模块之间透过新加入的L2 cache进行通讯,kernel和Thread的协调以及数据共享。这无疑使得GF100的三角形吞吐量有了将近300%的提升,也实现了并行的分块化渲染动作,更使得DirectX 11所要求的TS单元直接融入到了整个光栅化流水线内部。
N_Third
N_PE_RE

A卡第二第三次革新

Shader Virtual Machine (Shader Model)

了解了计算机架构与Shader的关系,让我们来看看Common-shader core virtual machine architecture and register layout吧
Shader_Core_Virtual_Machine_Architecture_And_Register_Laout

Input Type

  1. Uniform inputs
    With values that remain constant throughout a draw call(but can be changed between draw calls) – accessed via read-only constant registers or constant buffers

  2. Varying inputs
    Which are different for each vertex or pixel processed by the shader – accessed via varying input registers

Shader Knowledge

Shader

Shader programs can be compiled offline before program load or during run time. As with any compiler, there are options for generating different output files and for using different optimization levels. A compiled shader is stored as a string of text, which is passed to the GPU via the driver.

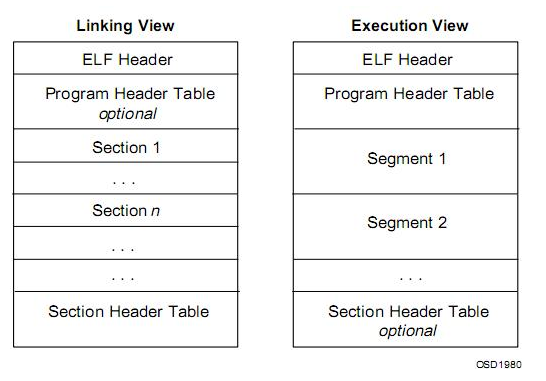
MRT(Multiple Render Target)

MRT is a feature of modern graphics processing units, that allows the programmable rendering pipeline to render images to multiple render target textures at once. These textures can then be used as inputs to other shaders or as texture maps applied to 3D models.
?不是非常明白这里。大概是一次渲染可以对象信息存储在多个buffer里,然后以texture的形式交给后续pass的pixel shader做处理
wiki上提到MRT的一个使用deferred shading
在first pass的时候收集相应信息存储在特定buffer里,在second pass(真正的渲染绘制是在这里)的时候Pixel shader把这些信息用作渲染数据,把整个场景一次性渲染出来而不是针对每个空间物体进行光照,材质等渲染

Effects

什么是Effects文件了?

A DirectX effect is a collection of pipeline state, set by expressions written in HLSL and some syntax that is specific to the effect framework

可以看出Effects文件主要是记录一系列的渲染状态和固定信息用于特定渲染流程里。

为什么需要Effects文件了?

在我们事先特定效果的渲染时,不仅需要一系列的shader文件,我们同时会设定相应的渲染状态和一些固定的渲染信息,这些状态和信息对于特定效果来说是固定不变的,所以通过Effects文件可以有效的帮助我们记录特定效果所需的渲染状态等信息,方便重复使用。

Effects Languages

Such as HLSL FX, CgFX, and COLLADA FX

Shader Models Comparision

Shader_Models_Comparision

渲染总结

可编程管线的出现主要是由于固定管线能实现的渲染效果有限不够灵活,Shader的出现象征着可编程管线的诞生。

统一渲染架构主要是为了提高ALU(算数逻辑运算器)利用率的问题。US(Unified Shader)单元的出现象征则统一渲染架构的开始,指令直接面向底层的ALU而非特定单元,流处理器的数量成为了性能的关键,流处理器的设计和架构紧密相关。(并行分块花渲染也随之出现)

DX9到DX10是一大转折点:结束管线时代,开启GPU统一渲染架构时代。在DX9时代,大家都是通过“(像素)管线”来衡量显卡的性能等级,而到了DX10时代,统一渲染架构的引入使得显卡不再区分“像素”和“顶点”,因此“管线”这种说法逐渐淡出了大家的视野,取而代之的是全新统一渲染架构的“流处理器”,“流处理器”的数量直接影响着显卡的性能。

OpenGL更多的学习了解

时隔将近一年了,再次拾起了还未学完的OpenGL,这一年工作生活学习状态都不好,希望这一次能重新好好的把OpenGL学好,把图形渲染的基础知识掌握好 – 游戏梦

参考书籍:
《OpenGL Programming Guide 8th Edition》 – Addison Wesley
《Fundamentals of Computer Graphics (3rd Edition)》 – Peter Shirley, Steve Marschnner
《Real-Time Rendering, Third Edition》 – Tomas Akenine-Moller, Eric Haines, Naty Hoffman

旧博客地址

渲染相关概念学习

OpenGL

Introdction to OpenGL

What is OpenGL?

  1. OpenGL is an application programming interface – “API” for short – which is merely a software library for accessing features in graphics hardware.(访问图形硬件设备功能的API)
  2. OpenGL is a “C” language library(OpenGL是一个C语言库)

History

It was first developed at Silicon Graphics Computer Systems with Version 1,0 released in July of 1994(wiki)

Next Generation OpenGL

Vulkan

OpenGL relative knowledge

OpenGL render pipeline

OpenGL Render Pipeline

  1. Vertex Data
    Sending Data to OpenGL

  2. Vertex Shader
    Process the data associated with that vertex

  3. Tessellation Shader
    Tessellation uses patchs to describe an object’s shape, and allows relatively simple collections of patch geometry to be tessellated to increase the number of geometric primitives providing better-looking models (eg: LOD)

  4. Geometry Shader
    Allows additional processing of individual geometric primitives, including creating new ones, before rasterization

  5. Primitive Assembly
    Organizes the vertices into their associated geometric primitives in preparation for clipping and rasterization

  6. Clipping
    Clip the vertex and pixels are outside of the viewport – this operation is handled automatically by OpenGL

  7. Rasterization
    Fragment generation. Pixels have a home in the framebuffer, while a fragment still can be rejected and never update its associated pixel location.

  8. Fragment Shading
    Use a fragment shading to determine the fragment’s final color, and potentially its depth value

  9. Per-Fragment Operations
    If a fragment successfully makes it through all of the enabled tests (eg: depth testing, stencil testing), it may be written directly to the framebuffer, updating the color of its pixel, or if blending is enabled, the fragment’s color will be combined with the pixel’s current color to generate a new color that is written into the framebuffer

Note:
Fragment’s visibility is determined using depth testing and stencil testing
Pixel data is usually stored in texture map for use with texture mapping, which allows any texture stage to look up data values from one or more texture maps.

OpenGL Shader Language (GLSL)

GLSL - OpenGL Shading Language 也称作 GLslang,是一个以C语言为基础的高阶着色语言。它是由 OpenGL ARB 所建立,提供开发者对绘图管线更多的直接控制,而无需使用汇编语言或硬件规格语言。

编译和执行
GLSL 着色器不是独立的应用程式;其需要使用 OpenGL API 的应用程式。C、C++、C#、Delphi 和 Java 皆支援 OpenGL API,且支援 OpenGL 着色语言。
GLSL 着色器本身只是简单的字串集,这些字串集会传送到硬件厂商的驱动程式,并从程式内部的 OpenGL API 进入点编译。着色器可从程式内部或读入纯文字档来即时建立,但必须以字串形式传送到驱动程式。

工具
GLSL 着色器可以事先建立和测试,现有以下 GLSL 开发工具:
RenderMonkey - 这个软件是由 ATI 制作的,提供界面用以建立、编译和除错 GLSL 着色器,和 DirectX 着色器一样。仅能在 Windows 平台上执行。
GLSLEditorSample - 在 Mac OS X 上,它是目前唯一可用的程式,其提供着色器的建立和编译,但不能除错。它是 cocoa 应用程式,仅能在 Mac OS X 上执行。
Lumina - Lumina 是新的 GLSL 开发工具。其使用 QT 界面,可以跨平台。

The color space in OpenGL

In OpenGL, colors are represented in what’s called the RGB color space

.obj and .mtl file format

参考文章:
obj文件基本结构及读取 - 计算机图形学
3D模型-OBJ材质文件 MTL格式分析
.mtl文件格式解析 - [建模]

“OBJ文件不包含面的颜色定义信息,不过可以引用材质库,材质库信息储存在一个后缀是”.mtl”的独立文件中。关键字”mtllib”即材质库的意思。 材质库中包含材质的漫射(diffuse),环境(ambient),光泽(specular)的RGB(红绿蓝)的定义值,以及反射(specularity),折射(refraction),透明度(transparency)等其它特征。 “usemtl”指定了材质之后,以后的面都是使用这一材质,直到遇到下一个”usemtl”来指定新的材质。”

.obj的一些基本内容格式描述:

‘#’ 这个就相当于C++代码里面的//,如果一行开始时#,那么就可以理解为这一行完全是注释,解析的时候可以无视

g 这个应该是geometry的缩写,代表一个网格,后面的是网格的名字。

v v是Vertex的缩写,很简单,代表一个顶点的局部坐标系中的坐标,可以有三个到四个分量。我之分析了三个分量,因为对于正常的三角形的网格来说,第四个分量是1,可以作为默认情况忽略。如果不是1,那可能这个顶点是自由曲面的参数顶点,这个我们这里就不分析了,因为大部分的程序都是用三角形的。

vn 这个是Vertex Normal,就是代表法线,这些向量都是单位的,我们可以默认为生成这个obj文件的软件帮我们做了单位化。

vt  这个是Vertex Texture Coordinate,就是纹理坐标了,一般是两个,当然也可能是一个或者三个,这里我之分析两个的情况。

mtllib <matFileName> 这个代表后面的名字是一个材质描述文件的名字,可以根据后面的名字去找相应的文件然后解析材质。

usemtl <matName> 这里是说应用名字为matName的材质,后面所有描述的面都是用这个材质,直到下一个usemtl。

f 这里就是face了,真正描述面的关键字。后面会跟一些索引。一般索引的数量是三个,也可能是四个(OpenGL里面可以直接渲染四边形,Dx的话只能分成两个三角形来渲染了)。每个索引数据中可能会有顶点索引,法线索引,纹理坐标索引,以/分隔。

.mtl文件(Material Library File)是材质库文件,描述的是物体的材质信息,ASCII存储,任何文本编辑器可以将其打开和编辑。一个.mtl文件可以包含一个或多个材质定义,对于每个材质都有其颜色,纹理和反射贴图的描述,应用于物体的表面和顶点。”
.mtl的一些基本内容格式描述:

以下是一个材质库文件的基本结构:
newmtl mymtl_1
材质颜色光照定义
纹理贴图定义
反射贴图定义
……

注释:每个材质库可含多个材质定义,每个材质都有一个材质名。用newmtl mtlName来定义一个材质。对于每个材质,可定义它的颜色光照纹理反射等描述特征。主要的定义格式如下文所示:

////////////////////////////////////////////////
材质颜色光照
1。环境反射有以下三种描述格式,三者是互斥的,不能同时使用。
Ka r g b ——用RGB颜色值来表示,g和b两参数是可选的,如果只指定了r的值,则g和b的值都等于r的值。三个参数一般取值范围为0.0~1.0,在此范围外的值则相应的增加或减少反射率;
Ka spectral file.rfl factor ——用一个rfl文件来表示。factor是一个可选参数,表示.rfl文件中值的乘数,默认为1.0;
Ka xyz x y z ——用CIEXYZ值来表示,x,y,z是CIEXYZ颜色空间的各分量值。y和z两参数是可选的,如果只指定了x的值,则y和z的值都等于r的值。三个参数一般取值范围为0~1。

2。漫反射描述的三种格式:
Kd r g b
Kd spectral file.rfl factor
Kd xyz x y z

3。镜反射描述的三种格式:
Ks r g b
Ks spectral file.rfl factor
Ks xyz x y z

4。滤光透射率描述的三种格式:
Tf r g b
Tf spectral file.rfl factor
Tf xyz x y z

5。光照模型描述格式:

illum illum_#
指定材质的光照模型。illum后面可接0~10范围内的数字参数。各个参数代表的光照模

从上面的内容可以看出,.obj是描述关于顶点,法线,面,纹理坐标和材质引用等相关的数据的集合,而.mtl是用于定义实际材质信息的文件。

了解了.obj和.mtl文件里面的内容描述方式,让我们来看看在实际中.obj和.mtl文件内容来学习理解一下,以下内容来源于Modern OpenGL Tutorials – 3D Picking 的spider.obj和spider.mtl```CPP
spider.obj

Wavefront OBJ exported by MilkShape 3D

mtllib spider.mtl

v 1.160379 4.512684 6.449167
…..

762 vertices

vt 0.186192 0.222718
…..

302 texture coordinates

vn -0.537588 -0.071798 0.840146
……

747 normals

g HLeib01
usemtl HLeibTex
s 1
f 1/1/1 2/2/2 3/3/3
……

80 triangles in group

……

1368 triangles total

1
2
3
4
5
6
7
8
9
10
11
12
13
14
15
16
17
18
19
20
21
22
23
24
25
26
27
28
29
30
31
32
33
34
35
36
37
38
39
40
41
42
43
从第二行mtllib spider.mtl可以看出spider.obj指定了纹理材质的描述文件是spider.mtl。
后续的v, vn, vt, f, g描述了所有的关于顶点,顶点法线,顶点纹理坐标,face, geometry相关的数据信息。
而紧跟着g后面usemtl Augentex则描述了该geometry所使用的材质名字是Augentex(这里的材质的具体信息在前面指定的spider.mtl文件中)。

```CPP
#
# spider.mtl
#

newmtl Skin
Ka 0.200000 0.200000 0.200000
Kd 0.827451 0.792157 0.772549
Ks 0.000000 0.000000 0.000000
Ns 0.000000
map_Kd .\wal67ar_small.jpg

newmtl Brusttex
Ka 0.200000 0.200000 0.200000
Kd 0.800000 0.800000 0.800000
Ks 0.000000 0.000000 0.000000
Ns 0.000000
map_Kd .\wal69ar_small.jpg

newmtl HLeibTex
Ka 0.200000 0.200000 0.200000
Kd 0.690196 0.639216 0.615686
Ks 0.000000 0.000000 0.000000
Ns 0.000000
map_Kd .\SpiderTex.jpg

newmtl BeinTex
Ka 0.200000 0.200000 0.200000
Kd 0.800000 0.800000 0.800000
Ks 0.000000 0.000000 0.000000
Ns 0.000000
map_Kd .\drkwood2.jpg

newmtl Augentex
Ka 0.200000 0.200000 0.200000
Kd 0.800000 0.800000 0.800000
Ks 0.000000 0.000000 0.000000
Ns 0.000000
map_Kd .\engineflare1.jpg

第五行newmtl Skin定义了一个材质的名字,后面Ka, Kd, Ks, Ns, map_Kd分别是对该材质的环境反射,漫反射,镜面反射,高光系数,纹理图片的配置。

综合上述的理解,可以看出,当我们通过assimp引用加载spider.obj这个文件的时候,我们会去使用spider.mtl作为材质配置文件去作为读取到的材质相关的信息,从而我们知道了我们需要spider.obj,spider.mtl,wal67ar_small.jpg,wal69ar_small.jpg,SpiderTex.jpg,drkwood2.jpg,engineflare1.jpg这些文件提供我们完整的mesh渲染相关的数据。

OpenGL learning journal

API

  1. 查看哪些错误标志位被设置
    了解:
    OpenGL在内部保留了一组错误标志位(共4个),其中每一个标志位代表一种不同类型的错误。当错误一个发生时,与这个错误对应的标志就会被设置。如果被设置的标志不止一个,glGetError仍然只返回一个唯一的值。当glGetError函数被调用时,这个值随后被清除,然后在glGetError再次被调用时将返回一个错误标志或GL_NO_ERROR为止
    函数:
    Glenum glGetError(void);

  2. 查询OpenGL的渲染引擎(OpenGL驱动程序)的生产商和版本号
    了解:
    OpenGL允许提供商通过它的扩展机制进行创新。为了使用特定供应商所提供的一些特定扩展功能,我们希望限制这个特定供应商所提供驱动程序的最低版本号。
    函数:
    const Glubyte *glGetString(GLenum name);

  3. 设置和查询管线的状态
    了解:
    OpenGL使用状态模型来跟踪所有的OpenGL状态变量来实现对OpenGL渲染状态的控制
    函数:
    void glEnable(GLenum capability);
    void glDisable(GLenum capability);
    void glGet*(Type)v(GLenum pname, GLboolean *params);

  4. 查询program的一些相关信息和一些错误信息
    了解:
    OpenGL的pragram链接可能由于GLSL里面的一些错误导致出错,我们需要知道关于program object的一些相关错误信息,同时我们也想知道我们现有的program相关的一些信息
    函数:
    void glGetProgramiv(GLuint program, GLenum pname, GLint *params);

  5. 得到shader链接出错的log信息
    了解:
    OpenGL的shader object可能链接失败,我们需要知道shader里面出错的信息
    函数:
    void glGetProgramInfoLog(GLuint program, GLsizei maxLength, GLsizei *length, GLchar *infoLog);

注意:
可以通过glGetProgramiv()去得到program的一些log相关信息,比如GL_INFO_LOG_LENGTH

OpenGL Knowledge:

  1. “OpenGL Execute Model:
    The model for interpretation of OpenGL commands is client-server. An application (the client) issues commands, which are interpreted and processed by OpenGL (the server). The server may or may not operate on the same computer as the client. In this sense, OpenGL is network-transparent. “

  2. “client-server 模式:
    OpenGL 是一种 client-server 模式,当你的应用程序调用 OpenGL 函数时, 它将告诉OpenGL client, 然后 client 将渲染命令传送给 server. 这里client 和 server可能是不同的计算机,或是同一台计算机上的不同进程。一般来说 server 是在 GPU上处理的, 而 client 是在 CPU 上处理的,这样分担了 CPU 的负担, 同时高效利用了GPU.”
但如果Client和Server没在同一个机器上,我们就需要一种一种网络传输协议框架来实现他们之间的交流:
X Window System

但X Window System里的client和server与传统的C/S模式相反,client是负责运算的,server是负责显示的。
但OpenGL的client和server的交流原理是与X Window System相似的

OpenGL Practice

Check supported OpenGL version

  1. Install the appropriate graphic driver which enables usage of the functionality provided.
    check the graphic drive update.(更新显卡驱动获得最新的OpenGL版本支持)
  2. Using OpenGL extensions viewer to check which OpenGL version is supported(查看当前硬件所支持的OpenGL版本)
    download website

OpenGL_Viewer_Info
从上图可以看出我当前的电脑和显卡驱动支持最高4.4,所以在使用学习OpenGL之前一定要确认好自己电脑所能支持的版本,避免后续不必要的问题。

检查完所支持的OpenGL版本后,下面我们需要介绍两个在学习OpenGL时为了帮助快速学习使用OpenGL的两个重要库(Glut & Glew)

Know what Glut and Glew are, and how to use them

  1. Glut (OpenGL Utility Toolkit)
    GLUT(英文全写:OpenGL Utility Toolkit)是一个处理OpenGL程式的工具库,负责处理和底层操作系统的呼叫以及I/O,并包括了以下常见的功能:

    1. 定义以及控制视窗
    2. 侦测并处理键盘及鼠标的事件
    3. 以一个函数呼叫绘制某些常用的立体图形,例如长方体、球、以及犹他茶壶(实心或只有骨架,如glutWireTeapot())
    4. 提供了简单选单列的实现

    GLUT是由Mark J. Kilgard在Silicon Graphics工作时所写,此人同时也是OpenGL Programming for the X Window System以及The Cg Tutorial: The Definitive Guide to Programmable Real-Time Graphics两书的作者。

    GLUT的两个主要目的是建立一个跨平台的函式库(事实上GLUT就是跨平台的),以及简化学习OpenGL的条件。透过GLUT编写OpenGL通常只需要增加几行额外GLUT的程式码,而且不需要知道每个不同操作系统处理视窗的API。

    所有的GLUT函数都以glut作为开头,例如glutPostRedisplay()。

  2. Glew ( OpenGL Extension Wrangler Library)
    The OpenGL Extension Wrangler Library (GLEW) is a cross-platform C/C++ library that helps in querying and loading OpenGL extensions. GLEW provides efficient run-time mechanisms for determining which OpenGL extensions are supported on the target platform. All OpenGL extensions are exposed in a single header file, which is machine-generated from the official extension list.(Glew是一个支持跨平台的C/C++库,用于运行时鉴别OpenGL扩展所支持的版本)
    more info for extention tools

    How to use Glu & Glew?

    1. add glu.lib & glew.lib into additional dependencies
    2. add the directory that includes glu.h & glew.h into include dirctory
    3. Include GL/freeglut.h & GL/glew.h in source file
      Note:
      if you use static link, #define FREEGLUT_STATIC before you include GL/freeglut.h, otherwise it will look for freeglut.lib. #define GLEW_STATIC for Glew.

    include GL/glew.h before GL/freeglut.h, otherwise, it will through “fatal error C1189: #error : gl.h included before glew.h”

Note:
后续的学习都是基于Modern OpenGL Tutorials,后续提到的一些库的源码从该网站下载

Open a Window

IncludeFiles.h

1
2
3
4
5
6
7
8
#include <iostream>

using namespace std;

#define FREEGLUT_STATIC

//Glut part
#include <GL/freeglut.h>

OpenGLWindow.h

1
2
3
4
5
6
7
8
9
10
11
12
13
14
15
16
17
18
19
20
21
22
23
24
25
26
27
28
29
30
31
32
33
34
35
36
37
38
#include "IncludeFiles.h"

static void RenderCallback()
{
glClear(GL_COLOR_BUFFER_BIT);
//Swap buffer
glutSwapBuffers();
}

static void InitializeGlutCallback()
{
//sets the display callback for the current window
glutDisplayFunc(&RenderCallback);
}

int main(int argc, char** argv)
{
//Initializes GLUT
glutInit(&argc, argv);

//GLUT_DOUBLE -- double buffer rendering
glutInitDisplayMode(GLUT_DOUBLE | GLUT_RGBA);

//Initializa Windows info
glutInitWindowSize(1024, 768);
glutInitWindowPosition(100,100);
glutCreateWindow("OpenGLWindow");

InitializeGlutCallback();

//Clear framebuffer before new draw call
glClearColor(0.0f,0.0f,0.0f,0.0f);

//enable program to enter the window event loop
glutMainLoop();

return 0;
}

final result:
OpenGL_Window

从上面可以看出我们主要是通过调用glut来初始化创建windows窗口
通过glut里的API我们可以去设置回调,去实现我们在渲染时期需要设置的OpenGL状态
上述主要有四个重要的glut API:

  1. glutInitDisplayMode(GLUT_DOUBLE | GLUT_RGBA) – GLUT_DOULBE开启了双buffer渲染,这样效率更高,一个buffer用于渲染,一个buffer用于填充下一帧数据
  2. glutDisplayFunc – 设置glut里的渲染回调
  3. glutMainLoop – 开启glut里的window event监听
  4. glutCreateWindow – 设定完相关参数后,通过此方法我们能够创建出我们想要的Windows窗口,同时OpenGL Context也在这时候被创建出来

Glut还提供了更多的关于Window的功能,后续会学习使用到

Using OpenGL

上一章节只是用到了glut去初始化我们最基本的Window窗口,还没真正大量用到OpenGL里API,在使用OpenGL API之前我们需要通过Glew这个工具去检查当前所支持的OpenGL版本,然后才能正确的调用对应的API。

使用Glew的准备工作在How to use Glu & Glew?时已经提到,这里不重述了

因为Glew需要通过context去查找对应所支持的OpenGL版本调用,所以初始化Glew必须在创建OpenGL Context之后。

Note:
Call glewInit after glutCreateWindow call successfully

那这里就不得不先了解一下什么是OpenGL Context了?
“”OpenGL Context””
OpenGL context, which is essentially a state machine that stores all data related to the rendering of your application. When your application closes, the OpenGL context is destroyed and everything is cleaned up.

结合wikiCreating an OpenGL Context (WGL)的介绍,这里我理解的不是很清晰,大概是OpenGL的Context相当于Device Context(DC)相对于Windows的概念一样。Context会设定很多跟渲染相关的状态(比如是否使用双buffer,depthbuffer占多少字节,颜色模式,窗口大小等渲染需要的信息)

这里我们只需要知道初始化Glut和调用glutCreateWindow创建窗口后,我们的OpenGL Context就生成了.

这也就是为什么在初始化glew之前必须先初始化Glut和创建Windows窗口的原因。

进一步了解参考:
Creating an OpenGL Context (WGL)

Using Glew
接下来回到Glew的使用去绘制我们的第一个OpenGL圆点
IncludeFiles.h

1
2
3
4
5
6
7
8
9
10
11
12
13
14
#include <stdio.h>
#include <iostream>

using namespace std;

//Glew part
#define GLEW_STATIC
#include <GL/glew.h>

//Glut part
#define FREEGLUT_STATIC
#include <GL/freeglut.h>

#include "ogldev_math_3d.h"

UsingOpenGL.h

1
2
3
4
5
6
7
8
9
10
11
12
13
14
15
16
17
18
19
20
21
22
23
24
25
26
27
28
29
30
31
32
33
34
35
36
37
38
39
40
41
42
43
44
45
46
47
48
49
50
51
52
53
54
55
56
57
58
59
60
61
62
63
64
65
66
67
68
69
70
71
72
73
74
75
76
77
78
79
80
81
82
#include "IncludeFiles.h"

GLuint VBO;

static void RenderCallback()
{
glClear(GL_COLOR_BUFFER_BIT);

glEnableVertexAttribArray(0);

glBindBuffer(GL_ARRAY_BUFFER, VBO);
//Tells the how to interpret the data inside the buffer
glVertexAttribPointer(0, 3, GL_FLOAT, GL_FALSE, 0, 0);

//Draw call
glDrawArrays(GL_POINTS, 0,1);

//Disable the vertex that is not used anymore after draw call
glDisableVertexAttribArray(0);

//Swap buffer
glutSwapBuffers();
}

static void InitializeGlutCallback()
{
//sets the display callback for the current window
glutDisplayFunc(&RenderCallback);
}

static void CreateVertexBuffer()
{
Vector3f vertices[1];
vertices[0] = Vector3f(0.0f,0.0f,0.0f);

/*
/ Apply a buffer handles
/ Bind buffer handle to specific buffer target
/ Filling the data for buffer target
*/
glGenBuffers(1, &VBO);
glBindBuffer(GL_ARRAY_BUFFER, VBO);
glBufferData(GL_ARRAY_BUFFER, sizeof(vertices), vertices, GL_STATIC_DRAW);
}

static void InitializeGlutAndWindow(int argc, char** argv, const char* windowsname)
{
//Initializes GLUT
glutInit(&argc, argv);

//GLUT_DOUBLE -- double buffer rendering
glutInitDisplayMode(GLUT_DOUBLE | GLUT_RGBA);

//Initializa Windows info
glutInitWindowSize(1024, 768);
glutInitWindowPosition(100,100);

glutCreateWindow(windowsname);

InitializeGlutCallback();

//Initialize glew
GLenum res = glewInit();
if(res != GLEW_OK)
{
cout<<"Error: "<<glewGetErrorString(res)<<endl;
}

//Clear framebuffer before new draw call
glClearColor(0.0f,0.0f,0.0f,0.0f);

CreateVertexBuffer();

//enable program to enter the window event loop
glutMainLoop();
}

int main(int argc, char** argv)
{
InitializeGlutAndWindow(argc, argv, "UsingOpenGL");
return 0;
}

从上面可以看出,我们初始化glew只是调用了glewInit()方法,但主要一定要在OpenGL context创建完成后调用(即glutCreateWindow窗口创建之后)

我们创建并使用vertext buffer主要由5个步骤:

  1. glGenBuffers() – 创建一个可用的buffer obejct
  2. glBindBuffer() – 绑定buffer object到指定的target类型,target类型代表我们的buffer object包含什么样的数据用于什么样的用途
  3. glBufferData() – 填充buffer数据
  4. glVertexAttribPointer() – 指明如何去解析buffer里的数据,同时这里也指明了如何在shader里面访问这些数据(至于如何编写,编译,链接和使用Shader,后续会讲到。)
  5. glDrawArrays() – 调用draw指明如何使用并绘制buffer里面的数据

Note:
这里需要注意的一点,要想在Shader里访问buffer里面的attribute数据,我们需要在调用draw之前调用glEnableVertexAttribArray()来激活特定的attribute

final result:
OpenGL_Window

Using Shader

In the field of computer graphics, a shader is a computer program that is used to do shading: the production of appropriate levels of color within an image, or, in the modern era, also to produce special effects or do video post-processing.

上述是Wiki上Shader的定义。Shader是在可编程管线出现后,以程序的形式对渲染的各个阶段进行图形图像上的处理,使渲染变得更加灵活,主要作用于GPU上。

Shader作用于渲染的各个阶段:
之前在“Understand OpenGL render pipeline”有讲到各个渲染管线,这里就不再重述。可见Shader作用于大部分管线,比如:Vertex Shader(负责vertex数据处理),Tessellation Shader(负责以图形patch为单位的处理,用于描述物体形状数据,LOD就是在这个阶段实现的),Geometry Shader(以整个图形原件数据作为输入做处理,好比batch rendering可在这个阶段实现),Fragment Shading(以fragment(片元)数据作为输入做处理)

Shader Language在前面的“Understand OpenGL Shader Language”有讲到,这里就不重述了。

从上可见Shader在可编程管线的今天有着多么重要的作用。
接下来让我们看看在OpenGL中如何使用Shader吧。

使用Shader主要有下列几个步骤:

  1. Create a shader object – glCreateShader(GLenum type)(创建shader对象)
  2. Compile your shader source into the object – glShaderSource(******) glCompileShader(***)(编译shader文件,存储到shader对象中)
  3. Verify that your shader compiled successfully – glGetShaderInfoLog(***)(检查shader编译是否成功并获取错误信息)
  4. Create a shader program – glCreateProgram(void)(创建shader程序)
  5. Attach the appropriate shader objects to the shader program – glAttachShader(GLuint program, Gluint shader)(附加多个shader对象到shader程序中)
  6. Link the shader program – glLinkProgram(GLuint program)(链接shader程序)
  7. Verify that the shader link phase completed successfully – glGetProgramiv() & glGetProgramInfoLog(****)(检查shader程序链接是否成功并获取错误信息)
  8. Use the shader for vertex or fragment processing – glUseProgram(GLuint program)(使用shader程序做顶点处理或片元处理)

Shader出错后因为我们快速退出了程序,所以很难看到console的错误信息,所以最好的方式是把错误信息写入文本文件以供后续查看。Utils.h是关于编译和使用Shader并打印错误信息到文本的实现。
IncludeFiles.h

1
2
3
4
5
6
7
8
9
10
11
12
13
14
15
16
17
18
#include <iostream>

#include <fstream>

#include <stdio.h>

using namespace std;

//Glew part
#define GLEW_STATIC
#include <GL/glew.h>

//Glut part
#define FREEGLUT_STATIC
#include <GL/freeglut.h>

#include "ogldev_util.h"
#include "ogldev_math_3d.h"

Utils.h

1
2
3
4
5
6
7
8
9
10
11
12
13
14
15
16
17
18
19
20
21
22
23
24
25
26
27
28
29
30
31
32
33
34
35
36
37
38
39
40
41
42
43
44
45
46
47
48
49
50
51
52
53
54
55
56
57
58
59
60
61
62
63
64
65
66
67
68
69
70
71
72
73
74
75
76
77
78
79
80
81
82
83
84
85
86
87
88
89
90
91
92
93
94
95
96
97
98
99
100
101
102
103
104
105
106
107
108
109
110
111
112
113
114
115
116
117
118
119
120
121
122
123
124
125
126
127
128
129
130
131
132
133
134
135
136
137
138
139
140
141
142
143
144
145
146
147
148
149
150
151
152
153
154
155
156
157
158
159
160
161
162
163
164
165
166
167
168
169
170
171
172
173
174
175
176
177
178
179
#include "IncludeFiles.h"

void serializationShaderCompileLog(GLuint prog, GLuint shader, GLenum type, char *log)
{
char *stage_name = new char[50];
char temp[50];
switch(type)
{
case 0x8B31:
sprintf(temp, "program%d-shader%d-%s", prog, shader, "GL_VERTEX_SHADER");
strcpy(stage_name,temp);
break;
case 0x8DD9:
sprintf(temp, "program%d-shader%d-%s", prog, shader, "GL_GEOMETRY_SHADER");
strcpy(stage_name,temp);

//strcpy(stage_name,"program:" + prog + "shader:" + shader + "stage:" + "GL_GEOMETRY_SHADER");
break;
case 0x8B30:
sprintf(temp, "program%d-shader%d-%s", prog, shader, "GL_FRAGMENT_SHADER");
strcpy(stage_name,temp);

//strcpy(stage_name,"program:" + prog + "shader:" + shader + "stage:" + "GL_FRAGMENT_SHADER");
break;
}
cout<<"program:"<<prog<<"-shader:"<<shader<<"-stage:"<<stage_name<<" compile log:"<<endl;
cout<<log<<endl;

char *file_name = new char[50];

strcpy(file_name,stage_name);

strcat(file_name,".txt");

ofstream write_to_file;
write_to_file.open(file_name,ios::out);

write_to_file<<stage_name;
write_to_file<<" compiled log info;\n";
write_to_file<<log;
write_to_file.close();

delete []stage_name;
delete []file_name;

stage_name = nullptr;
file_name = nullptr;
}


void program_log_serialization(unsigned int program,char const *program_name,bool is_console_print)
{
GLchar *program_linked_log = NULL;
GLint log_length = 0;
glGetProgramiv(program, GL_INFO_LOG_LENGTH, &log_length);
program_linked_log = new char[log_length];

GLsizei program_linked_log_real_length;
glGetProgramInfoLog(program, log_length, &program_linked_log_real_length, program_linked_log);
if(is_console_print)
{
cout<<program_name<<" linked log info:"<<endl;
cout<<program_linked_log<<endl;
}

const int file_name_length = strlen(program_name);

char *log_file_whole_name = new char[file_name_length + 10];

strcpy(log_file_whole_name,const_cast<char*>(program_name));

strcat(log_file_whole_name,".txt");

ofstream write_to_file;
write_to_file.open(log_file_whole_name,ios::out);

write_to_file<<*program_name + " linked log info;\n";
write_to_file<<program_linked_log;
write_to_file.close();

delete []program_linked_log;
delete []log_file_whole_name;

program_linked_log = nullptr;
log_file_whole_name = nullptr;
}

static void AddShader(GLuint shaderprogram, const char* pshadertext, GLenum shadertype)
{
GLuint shaderobj = glCreateShader(shadertype);

if(shaderobj == 0)
{
cout<<"Error create shader type "<<shadertype<<endl;
exit(0);
}

const GLchar *p[1];
p[0] = pshadertext;
GLint lengths[1];
lengths[0] = strlen(pshadertext);

glShaderSource(shaderobj, 1, p, lengths);
glCompileShader(shaderobj);

GLint success;
glGetShaderiv(shaderobj, GL_COMPILE_STATUS, &success);
if(!success)
{
GLchar infolog[1024];
glGetShaderInfoLog(shaderobj, 1024, NULL, infolog);
cout<<"Error compiling shader type "<<shadertype<<endl;

serializationShaderCompileLog(shaderprogram, shaderobj, shadertype, infolog);

exit(1);
}

glAttachShader(shaderprogram, shaderobj);
}

static void CompileShader(GLuint shaderprogram, const char* psfilename, GLenum shadertype)
{
if(shaderprogram == 0)
{
cout<<"Error creating shader program"<<endl;
exit(1);
}

string s;

if(!ReadFile(psfilename, s))
{
cout<<psfilename<<" is not exit"<<endl;
exit(1);
}

switch(shadertype)
{
case 0x8B31:
AddShader(shaderprogram, s.c_str(), GL_VERTEX_SHADER);
break;
case 0x8DD9:
AddShader(shaderprogram, s.c_str(), GL_GEOMETRY_SHADER);
break;
case 0x8B30:
AddShader(shaderprogram, s.c_str(), GL_FRAGMENT_SHADER);
break;
}
}

static void LinkAndUseShaderProgram(GLuint shaderprogram)
{
GLint success = 0;
GLchar errorlog[1024] = {0};

glLinkProgram(shaderprogram);

glGetProgramiv(shaderprogram, GL_LINK_STATUS, &success);

if(success == 0)
{
glGetProgramInfoLog(shaderprogram, sizeof(errorlog), NULL, errorlog);
cout<<"Error linking shader program "<<errorlog<<endl;
program_log_serialization(shaderprogram, "LinkStatus", true);
exit(1);
}

glValidateProgram(shaderprogram);
glGetProgramiv(shaderprogram, GL_VALIDATE_STATUS, &success);
if(!success)
{
glGetProgramInfoLog(shaderprogram, sizeof(errorlog), NULL, errorlog);
cout<<"Invalid shader program "<<errorlog<<endl;
exit(1);
}

glUseProgram(shaderprogram);
}

UsingShader.cpp

1
2
3
4
5
6
7
8
9
10
11
12
13
14
15
16
17
18
19
20
21
22
23
24
25
26
27
28
29
30
31
32
33
34
35
36
37
38
39
40
41
42
43
44
45
46
47
48
49
50
51
52
53
54
55
56
57
58
59
60
61
62
63
64
65
66
67
68
69
70
71
72
73
74
75
76
77
78
79
80
81
82
83
84
85
86
87
88
89
90
91
92
93
94
95
96
97
98
99
100
#include "IncludeFiles.h"

#include "Utils.h"

GLuint VBO;

GLuint ShaderProgram;

const char* pVSFileName = "vsshader.vs";

const char* pFSFileName = "fsshader.fs";

static void RenderCallback()
{
glClear(GL_COLOR_BUFFER_BIT);

glEnableVertexAttribArray(0);

glBindBuffer(GL_ARRAY_BUFFER, VBO);
//Tells the how to interpret the data inside the buffer
glVertexAttribPointer(0, 3, GL_FLOAT, GL_FALSE, 0, 0);

//Draw call
glDrawArrays(GL_TRIANGLES, 0,3);

//Disable the vertex that is not used anymore after draw call
glDisableVertexAttribArray(0);

//Swap buffer
glutSwapBuffers();
}

static void InitializeGlutCallback()
{
//sets the display callback for the current window
glutDisplayFunc(&RenderCallback);
}

static void CreateVertexBuffer()
{
Vector3f vertices[3];
vertices[0] = Vector3f(-1.0f,-1.0f,0.0f);
vertices[1] = Vector3f(1.0f, -1.0f, 0.0f);
vertices[2] = Vector3f(0.0f, 1.0f, 0.0f);

/*
/ Apply a buffer handles
/ Bind buffer handle to specific buffer target
/ Filling the data for buffer target
*/
glGenBuffers(1, &VBO);
glBindBuffer(GL_ARRAY_BUFFER, VBO);
glBufferData(GL_ARRAY_BUFFER, sizeof(vertices), vertices, GL_STATIC_DRAW);
}

static void InitializeGlutAndWindow(int argc, char** argv, const char* windowsname)
{
//Initializes GLUT
glutInit(&argc, argv);

//GLUT_DOUBLE -- double buffer rendering
glutInitDisplayMode(GLUT_DOUBLE | GLUT_RGBA);

//Initializa Windows info
glutInitWindowSize(1024, 768);
glutInitWindowPosition(100,100);

glutCreateWindow(windowsname);

InitializeGlutCallback();

//Initialize glew
GLenum res = glewInit();
if(res != GLEW_OK)
{
cout<<"Error: "<<glewGetErrorString(res)<<endl;
}

//Clear framebuffer before new draw call
glClearColor(0.0f,0.0f,0.0f,0.0f);

CreateVertexBuffer();

ShaderProgram = glCreateProgram();

CompileShader(ShaderProgram, pVSFileName, GL_VERTEX_SHADER);

CompileShader(ShaderProgram, pFSFileName, GL_FRAGMENT_SHADER);

LinkAndUseShaderProgram(ShaderProgram);

//enable program to enter the window event loop
glutMainLoop();
}

int main(int argc, char** argv)
{
InitializeGlutAndWindow(argc, argv, "UsingOpenGL");
return 0;
}

vsshader.vs

1
2
3
4
5
6
7
8
#version 330

layout (location = 0) in vec3 Position;

void main()
{
gl_Position = vec4(Position.x,Position.y,Position.z, 1.0);
}

fsshader.fs

1
2
3
4
5
6
7
8
#version 330

out vec4 FragColor;

void main()
{
FragColor = vec4(1.0, 0.0, 0.0, 1.0);
}

final effect:
UsingShader

上述只使用到了Vertex Shader和Framgment Shader, 后续还会讲到其他Shader的使用。

Uniform Variables

Uniform variables are used to communicate with your vertex or fragment shader from “outside”.

Uniform variables are read-only and have the same value among all processed vertices. You can only change them within your C++ program.

从上面可以看出Uniform变量主要用于Vertex和Fragment Shader,并且对于所有传入的顶点值都不变,只能通过C++一侧去改变Uniform Variable的值。

接下来我们看看Uniform Variable是如何应用在Shader中的:
使用Uniform Variable主要有以下几个步骤:

  1. Obtain uniform variable location after Link Shader Program
1
2
3
gScaleLocation = glGetUniformLocation(ShaderProgram, "gScale");

assert(gScaleLocation != 0xFFFFFFFF);
  1. Set uniform variable value
    
1
2
3
gScale += 0.01f;

glUniform1f(gScaleLocation, sinf(gScale));
  1. Define uniform variable in Shader
1
2
3
4
5
6
7
8
9
10
#version 330

uniform float gScale;

layout (location = 0) in vec3 Position;

void main()
{
gl_Position = vec4(gScale * Position.x,gScale * Position.y,Position.z, 1.0);
}

final result:
UniformVariable

Interpolation

the interpolation that the rasterizer performs on variables that come out of the vertex shader.
在OpenGL的渲染管线里,在Fragment Shader执行之前会进行rasterizer,rasterizer会计算出各个三角形顶点之间的像素颜色数据,然后我们可以通过Fragment Shader对于光栅化的后颜色数据做进一步的处理。

这一章节主要看看我们是如何在Vertex Shader和Fragment Shader中如何对顶点数据和各像素信息做处理和数据传递的。(这里我们直接在VS中算出颜色信息直接传递到FS中去做处理)
要想从VS传递数据到FS,我们需要在Vertex Shader中定义关键词out的变量,并在Fragment Shader定义对应的关键词in的变量。

vsshader.vs

1
2
3
4
5
6
7
8
9
10
11
12
13
14
#version 330

uniform float gScale;

layout (location = 0) in vec3 Position;

out vec4 Color;

void main()
{
gl_Position = vec4(gScale * Position.x,gScale * Position.y,Position.z, 1.0);

Color = abs(gl_Position);
}

fsshader.fs

1
2
3
4
5
6
7
8
9
10
#version 330

out vec4 FragColor;

in vec4 Color;

void main()
{
FragColor = Color;
}

final result:
Interpolation

从上面可以看出在VS中算出颜色信息后,经过光栅化,三角形顶点之间的颜色信息被计算出来,最终传到FS中并作为最终颜色信息输出到屏幕上。

Coordinate Transformations & Perspective Projection

这一章主要是学习矩阵在3D图形中的使用和了解物体时怎样被显示到正确的屏幕位置的。
Note:
下列推导是基于OpenGL的列向量而非DX的行向量

在解释如何使用矩阵去进行向量变换之前,我们先来看看为什么矩阵可以实现向量变换?
下列学习参考《3D 数学基础:图形与游戏开发》
一个3维向量可以解释成3个基向量上平移后的组合(p,q,r为三个基向量):
V = x × p + y × q + z × r;

当一个向量乘以矩阵的时候:

1
2
3
4
5
6
7
8
9
    [ p ]   [px  py  pz]
M = [ q ] = [qx qy qz]
[ r ] [rx ry rz]

V = [x y z]

[px py pz]
V * M = [x y z] [qx qy qz] = [x*px + y*qx + z*rx x*py + y*qy + z*ry x*pz + y*qz + z*rz] = x*p + y*q + z*r
[rx ry rz]

“如果把矩阵的行解释为坐标系的基向量,那么乘以该矩阵就相当于执行了一次坐标系转换。若有a*M = b,我们就可以说,M将a转换到b。”

从上面我们可以看出矩阵是如何做到对于向量的坐标系转换的。

那么为什么我们后面用到的矩阵都是4×4而不是3×3的了?
44的矩阵我们叫做齐次矩阵。齐次矩阵出现的原因主要是除了记法方便,更重要的是因为33的变换矩阵只能表示线性变换,而4*4齐次矩阵能够表示线性变换和非线性变换。

那么这里我们来了解下什么是线性变换?
线性变换的满足下列公式:
F(a+b) = F(a) + F(b)
F(ka) = k × F(a)

因为线性变换不包含平移,所以这也是4×4齐次矩阵的出现的原因。

了解了使用矩阵的原因和为什么使用4×4齐次矩阵的原因后,让我们来看看,我们是如何通过矩阵来实现3D图形里的实现物体的坐标系变换的。
M(m-w) – 物体坐标系到世界坐标系
M(w-v) – 世界坐标系到观察坐标系
M(v-p) – 投影变换

V’ = V × M(m-w) × M(w-v) × M(v-p)

因为矩阵乘法满足结合律
N = M(m-w) × M(w-v) × M(v-p)
V’ = V × (M(m-w) × M(w-v) × M(v-p)) = V * N
所以我们只需要求出所有坐标系变换矩阵的乘积后再对V进行操作即可。

因为单个矩阵存储着一系列的变换,而这些变换可以通过多个单个变换组合而成,所以下列式子是成立的
M = S(scale) × R(rotation) × T(translation)

但这里有个比较关键的点,S,R,T直接的乘法顺序,矩阵是不满足交换律的,我们必须按S * R * T的顺序,原因参考下面:
One reason order is significant is that transformations like rotation and scaling are done with respect to the origin of the coordinate system. Scaling an object that is centered at the origin produces a different result than scaling an object that has been moved away from the origin. Similarly, rotating an object that is centered at the origin produces a different result than rotating an object that has been moved away from the origin.

从上面可以看出,之所必须按S * R * T的顺序是因为S和R都是针对坐标系原点进行的,一旦先执行T,那么相对于坐标系原点的位置就会有所变化,这之后再做S和R就会出现不一样的表现。

因为OpenGL是列向量是左乘,所以在OpenGL中顺序如下:
V’ = T × R × S × V

DX中顺序如下:
V’ = V × S × R × T

获取最终的M(m-w)的代码实现如下:

1
2
3
4
5
6
7
8
9
10
11
const Matrix4f& Pipeline::GetWorldTrans()
{
Matrix4f ScaleTrans, RotateTrans, TranslationTrans;

ScaleTrans.InitScaleTransform(m_scale.x, m_scale.y, m_scale.z);
RotateTrans.InitRotateTransform(m_rotateInfo.x, m_rotateInfo.y, m_rotateInfo.z);
TranslationTrans.InitTranslationTransform(m_worldPos.x, m_worldPos.y, m_worldPos.z);

m_Wtransformation = TranslationTrans * RotateTrans * ScaleTrans;
return m_Wtransformation;
}

V’ = V × M(m-w) × M(w-v) × M(v-p)
我们知道了M(m-w)是如何计算出来的了,接下来我们要了解M(w-v) – 世界坐标系到观察坐标系
在了解如何从世界坐标系转换到观察坐标系之前我们先来看看摄像机的定义:
位置 – (x,y,z)
N – The vector from the camera to its target.(look at 朝向)
V – When standing upright this is the vector from your head to the sky.(垂直于N向上的向量)
U – This vector points from the camera to its “right” side”.(在N和V定了之后可以算出Camera的向右的向量)

摄像机坐标系和世界坐标系:
CameraCoordinateTranslation

要想得到物体从世界坐标系转换到摄像机坐标系,其实就是个坐标系转换的问题。
我们首先把摄像机移动到世界坐标原点(移动摄像机位置即可):
[ 1 0 0 -x ]
[ 0 1 0 -y ]
[ 0 0 1 -z ]
[ 0 0 0 1 ]

这样一来考虑如何变化坐标系即可:
CameraCoordinate2
通过N,V,U,我们已经能够得出X(camera),Y(camera),Z(camera)3个基向量了。
还记得我们之前说的 – “如果把矩阵的行解释为坐标系的基向量,那么乘以该矩阵就相当于执行了一次坐标系转换。若有a*M = b,我们就可以说,M将a转换到b。”
所以:

1
2
3
4
[ Ux Uy Uz 0 ]    [X(world)]    [X(camera)]
[ Vx Vy Vz 0 ] [Y(world)] [Y(camera)]
[ Nx Ny Nz 0 ] * [Z(world)] = [Z(camera)]
[ 0 0 0 1 ] [ 1 ] [ 1 ]

结合前面提到的先把摄像机移动到世界原点,得出:

1
2
3
4
         [ Ux Uy Uz 0 ]   [ 1 0 0 -x ]
M(w-v) = [ Vx Vy Vz 0 ] * [ 0 1 0 -y ]
[ Nx Ny Nz 0 ] [ 0 0 1 -z ]
[ 0 0 0 1 ] [ 0 0 0 1 ]

M(w-v)的代码实现如下:

1
2
3
4
5
6
7
8
9
10
11
12
13
14
15
16
17
18
19
20
21
22
23
24
25
26
27
28
29
30
31
32
33
34
void Matrix4f::InitTranslationTransform(float x, float y, float z)
{
m[0][0] = 1.0f; m[0][1] = 0.0f; m[0][2] = 0.0f; m[0][3] = x;
m[1][0] = 0.0f; m[1][1] = 1.0f; m[1][2] = 0.0f; m[1][3] = y;
m[2][0] = 0.0f; m[2][1] = 0.0f; m[2][2] = 1.0f; m[2][3] = z;
m[3][0] = 0.0f; m[3][1] = 0.0f; m[3][2] = 0.0f; m[3][3] = 1.0f;
}

void Matrix4f::InitCameraTransform(const Vector3f& Target, const Vector3f& Up)
{
Vector3f N = Target;
N.Normalize();
Vector3f U = Up;
U.Normalize();
U = U.Cross(N);
Vector3f V = N.Cross(U);

m[0][0] = U.x; m[0][1] = U.y; m[0][2] = U.z; m[0][3] = 0.0f;
m[1][0] = V.x; m[1][1] = V.y; m[1][2] = V.z; m[1][3] = 0.0f;
m[2][0] = N.x; m[2][1] = N.y; m[2][2] = N.z; m[2][3] = 0.0f;
m[3][0] = 0.0f; m[3][1] = 0.0f; m[3][2] = 0.0f; m[3][3] = 1.0f;
}

const Matrix4f& Pipeline::GetViewTrans()
{
Matrix4f CameraTranslationTrans, CameraRotateTrans;

CameraTranslationTrans.InitTranslationTransform(-m_camera.Pos.x, -m_camera.Pos.y, -m_camera.Pos.z);
CameraRotateTrans.InitCameraTransform(m_camera.Target, m_camera.Up);

m_Vtransformation = CameraRotateTrans * CameraTranslationTrans;

return m_Vtransformation;
}

这样一来M(w-v)也就实现了,接下来让我们看看M(v-p)是如何计算出来的吧。
M(v-p)这的p有多种投影方式,这里我只以Perspective Projection为例。
在转换到Camera坐标系后,我们还需要通过透视投影才能将3D物体映射到2D平面上。
Perspective Projection主要由下列四部分决定:

  1. The aspect ratio - the ratio between the width and the height of the rectangular area which will be the target of projection.
  2. The vertical field of view.
  3. The location of the near Z plane.
  4. The location of the far Z plane.

这一章的推导可以参考透视投影详解
一开始推导过程中不明白的一点是:

1
2
3
           1
Z'' = a * --- + b
Pz

后来看了《Mathematics for 3D Game Programming and Computer Grahpics 3rd section》的5.4.1 Depth Interpolation后明白了,光栅化的时候对于深度的运算证明了是对Z的倒数进行插值来得到Z的值的。
所以上述公式是成立的。

经过一系列推导后,我们得出了:
PerspectiveProject1
PerspectiveProject2
PerspectiveProject3
PerspectiveProject4

Note:
上述推导是针对DX而言的,DX和OpenGL在透视投影矩阵推导上面有一个很重要的不同,那就是DX变换后z坐标范围是[0,1],而OpenGL的z坐标范围是[-1,1]

所以如果我们把z坐标[-1,1]带入下式推导:

1
2
3
           1
Z'' = a * --- + b
Pz

我们将得出OpenGL的透视投影矩阵如下(下面的θ = FOV/2):

1
2
3
4
    [cotθ/Aspect        0               0                  0     ]
[ 0 cotθ 0 0 ]
M = [ 0 0 (-n-f)/(n-f) 2*f*n/(n-f)]
[ 0 0 1 0 ]

所以OpenGL里M(v-p)的代码实现如下:

1
2
3
4
5
6
7
8
9
10
11
void Matrix4f::InitPersProjTransform(const PersProjInfo& p)
{
const float ar = p.Width / p.Height;
const float zRange = p.zNear - p.zFar;
const float tanHalfFOV = tanf(ToRadian(p.FOV / 2.0f));

m[0][0] = 1.0f/(tanHalfFOV * ar); m[0][1] = 0.0f; m[0][2] = 0.0f; m[0][3] = 0.0;
m[1][0] = 0.0f; m[1][1] = 1.0f/tanHalfFOV; m[1][2] = 0.0f; m[1][3] = 0.0;
m[2][0] = 0.0f; m[2][1] = 0.0f; m[2][2] = (-p.zNear - p.zFar)/zRange ; m[2][3] = 2.0f*p.zFar*p.zNear/zRange;
m[3][0] = 0.0f; m[3][1] = 0.0f; m[3][2] = 1.0f; m[3][3] = 0.0;
}

Keyboard && Mouse Control

这一章节主要是讲通过Glut提供的API如何去响应键盘和鼠标的控制。
本章节里面主要用到了两个类:

  1. Pipeline
  2. Camera

Pipeline主要是针对上一章节我们对于如何通过矩阵变化把物体显示到2D平面上的抽象:
M(m-w) – 物体坐标系到世界坐标系
M(w-v) – 世界坐标系到观察坐标系
M(v-p) – 投影变换

N = M(m-w) × M(w-v) × M(v-p)
V’ = V × M(m-w) × M(w-v) × M(v-p) = V × N

Pipeline只要知道了物体S,R,T信息就可以得出M(m-w),知道了Camera信息就可以得出M(w-v),知道了透视投影信息就可以得出M(v-p)。

我们通过修改摄像机的相关信息得出在移动摄像机后的N,并作用于物体,这样一来就能使物体显示在正确位置了。

而Camera类是对摄像机的抽象。

Pipeline和Camera的源代码可在Modern OpenGL Tutorials下载

这里我只关心针对键盘和鼠标的响应的相关代码:
Glut里针对键盘和鼠标的API主要是下列几个:

  1. glutSpecialFunc() – 主要是针对特殊按键比如F1
  2. glutKeyboardFunc() – 主要是针对普通按键比如A,B,C……
  3. glutPassiveMotionFunc() – 主要是针对在没有鼠标按键被按下的情况下,鼠标在窗口内移动的情况
  4. glutMotionFunc() – 主要是针对在鼠标按键被按下的情况下,鼠标在窗口内移动的情况

相关代码:

1
2
3
4
5
6
7
8
9
10
11
12
13
14
15
16
17
18
19
20
21
22
23
24
25
26
static void SpecialKeyboardCB(int Key, int x, int y)
{
OGLDEV_KEY OgldevKey = GLUTKeyToOGLDEVKey(Key);
pGameCamera->OnKeyboard(OgldevKey);
}

static void KeyboardCB(unsigned char Key, int x, int y)
{
switch (Key) {
case 'q':
glutLeaveMainLoop();
}
}

static void PassiveMouseCB(int x, int y)
{
pGameCamera->OnMouse(x, y);
}

static void InitializeGlutCallbacks()
{
......
glutSpecialFunc(SpecialKeyboardCB);
glutPassiveMotionFunc(PassiveMouseCB);
glutKeyboardFunc(KeyboardCB);
}

final result:
MouseAndKeyboardStudy

Texture Mapping

“Textures are composed of texels, which often contain color values.”

“Textures are bound to the OpenGL context via texture units, which are represented as binding points named GL_TEXTURE0 through GL_TEXTUREi where i is one less than the number of texture units supported by the implementation.”

The textures are accessed via sampler variables which were declared with dimensionality that matches the texture in shader

在真正接触Texutre之前,让我们理解下下列几个重要的概念:

  1. Texture object – contains the data of the texture image itself, i.e. the texels(可以看出Texture object才是含有原始数据信息的对象)

  2. Texture unit – texture object bind to a ‘texture unit’ whose index is passed to the shader. So the shader reaches the texture object by going through the texture unit.(我们访问texture数据信息并不是通过texture object,而是在shader里通过访问特定索引的texture unit去访问texture object里的数据)
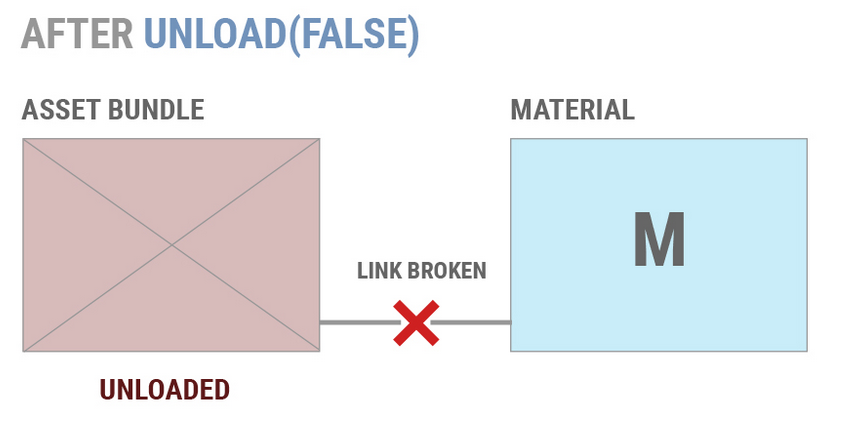
  3. Sampler Object – configure it with a sampling state and bind it to the texture unit. When you do that the sampler object will override any sampling state defined in the texture object.(Sampler Object一些sampling的配置信息,当用于texture object时会覆盖texture object里的原始sampler设定)

  4. Sampler uniform – corresponding to handle of texture unit(用于在Shader里访问texture unit,texture unit和texture object绑定,也就间接的访问了texture的原始数据)

Relationship between texture object, texture unit, sampler object and sampler uniform
RelationshipBetweenThem

因为OpenGL没有提供从图片加载texture的API,所以这里我们需要使用第三方库来完成这项工作,这里教程上使用的是ImageMagick。
ImageMagick主要是为了从多种格式的资源文件中读取原始数据,在我们指定glTexImage2D()的原始数据的时候提供所在内存地址。

Steps to use texture mapping:

  1. Create a texture object and load texel data into it
    glGenTextures() – gen texture object
    glBindTexture() – Tells OpenGL the texture object we refer to in all the following texture related calls, until a new texture object is bound.
    glTexImage2D() – load texel data into texture object

  2. Include texture coordinates with your vertices

1
2
3
4
5
6
7
8
9
10
11
12
13
14
15
16
17
Vertex Vertices[4] = { Vertex(Vector3f(-1.0f, -1.0f, 0.5773f), Vector2f(0.0f, 0.0f)),
Vertex(Vector3f(0.0f, -1.0f, -1.15475f), Vector2f(0.0f, 0.0f)),
Vertex(Vector3f(1.0f, -1.0f, 0.5773f), Vector2f(0.0f, 0.0f)),
Vertex(Vector3f(0.0f, 1.0f, 0.0f), Vector2f(0.5f, 1.0f)) };
glGenBuffers(1, &VBO);
glBindBuffer(GL_ARRAY_BUFFER, VBO);
glBufferData(GL_ARRAY_BUFFER, sizeof(Vertices), Vertices, GL_STATIC_DRAW);

//我们把顶点对应的纹理坐标信息写到vertex数据里
//说道纹理坐标就不得不提一下Texture UV纹理坐标了,Texture的图片被映射到0-1的二维坐标,图见后面:

glEnableVertexAttribArray(0);
glEnableVertexAttribArray(1);
glVertexAttribPointer(0, 3, GL_FLOAT, GL_FALSE, sizeof(Vertex), 0);
glVertexAttribPointer(1, 2, GL_FLOAT, GL_FALSE, sizeof(Vertex), (const GLvoid*)12);

//然后通过指定如何解析顶点数据里面的的数据在Shader里访问vertex的texture纹理坐标信息去sample出texture数据信息
  1. Associate a texture sampler with each texture map you intend to use in your shader
    glTexParameterf() – Texture采样方式的配置
    还记得我们之前讲到的Sampler object吗?这里的配置就好比我们在sampler object里配置后再作用于特定的texture object
    这里我就不说关于采样方式配置相关的内容了(采样方式会决定最终像素的计算方式),这里值得一提的是mipmap的概念。
    mipmap主要是由于物体在场景中因为距离的缘故会在屏幕显示的大小有变化,如果我们在物体很远,只需要显示很小一块的时候还依然采用很大的纹理贴图,最终显示在屏幕上的纹理会很不清晰(失真)。为了解决这个问题,mipmap应运而生,通过事先生成或指定多个级别的同一纹理贴图,然后在程序运作的过程中通过计算算出应该使用哪一个等级的纹理贴图来避免大纹理小色块失真的问题。
    我们可以手动通过:
    glTexStorage2D() && glTexSubImage2D() 去手动指定各级纹理贴图
    也可以通过:
    glGenerateMipmap() – 自动去生成对应的mipmap纹理贴图
    而程序在实际运作过程中如何去计算Mipmap Level这里就不做介绍了,详细参考《OpenGL Programming Guide 8th Edition》的Calculating the Mipmap章节
    相关函数:
    textureLod()
    textureGrad()

  2. Active texture unit and bind texture object to it
    glActiveTexture() – 激活特定的texture unit然后绑定特定texture object到特定texture unit上
    glBindTexture() – 绑定特定的texture object到texture unit上

  3. Retrieve the texel values through the texture sampler from your shader
    首先我们在程序中指定了我们即将访问的Texture unit

1
2
3
4
gSampler = glGetUniformLocation(ShaderProgram, "gSampler");
assert(gSampler != 0xFFFFFFFF);

glUniform1i(gSampler, 0);

Note:
“The important thing to note here is that the actual index of the texture unit is used here, and not the OpenGL enum GL_TEXTURE0 (which has a different value).”

vsshader.vs

1
2
3
4
5
6
7
8
9
10
11
12
13
14
15
#version 330

uniform mat4 gWVP;

layout (location = 0) in vec3 Position;
layout (location = 1) in vec2 TexCoord;

out vec2 TexCoord0;

void main()
{
gl_Position = gWVP * vec4(Position, 1.0);

TexCoord0 = TexCoord;
}

fsshader.fs

1
2
3
4
5
6
7
8
9
10
11
12
#version 330

in vec2 TexCoord0;

out vec4 FragColor;

uniform sampler2D gSampler;

void main()
{
FragColor = texture2D(gSampler, TexCoord0.xy);
}

从上面可以看出我们在fragment shader里,通过传入的gSampler确认了使用哪一个texture unit,通过传入的TexCoord0确认了对应的纹理坐标信息去获取对应的texture信息,然后最终通过texture2D从texture里取得了特定的颜色信息作为输出,就这样纹理图片的信息就作用在了三角形上并显示出来。

TextureCoordinate

final result:
BasicTexture

下面我简单测试了下两个Texture计算出最终纹理信息:
TextureStudy.cpp

1
2
3
4
5
6
7
8
9
10
11
12
13
14
15
16
17
18
19
20
21
22
23
24
25
26
27
28
29
30
31
32
33
34
35
36
37
38
static void InitializeTextureInfo()
{
gSampler = glGetUniformLocation(ShaderProgram, "gSampler");
assert(gSampler != 0xFFFFFFFF);

gSampler2 = glGetUniformLocation(ShaderProgram, "gSampler2");
assert(gSampler2 != 0xFFFFFFFF);

//Specify the inder of texture unit we will use in shader
glUniform1i(gSampler, 0);

glUniform1i(gSampler2, 1);

pTexture = new Texture(GL_TEXTURE_2D, "../Content/texture1.png");

if(!pTexture->Load())
{
return ;
}

pTexture2 = new Texture(GL_TEXTURE_2D, "../Content/texture2.jpg");

if(!pTexture2->Load())
{
return ;
}
}

static void RenderCallbackCB()
{
......

pTexture->Bind(GL_TEXTURE0);

pTexture2->Bind(GL_TEXTURE1);

......
}

fsshader.fs

1
2
3
4
5
6
7
8
9
10
11
12
13
14
#version 330

in vec2 TexCoord0;

out vec4 FragColor;

uniform sampler2D gSampler;

uniform sampler2D gSampler2;

void main()
{
FragColor = 0.5 * texture2D(gSampler, TexCoord0.xy) + 0.5 * texture2D(gSampler2, TexCoord0.xy);
}

原始图片分别为:
Texture1
Texture2

final result:
MultipleTexture

Point Sprites:
待理解学习……

Rendering to Texture Maps:
待理解学习……

Sumary:

  1. Use immutable texture storage for textures wherever possible – When a texture is marked as immutable, the OpenGL implementation can make certain assumptions about the validity of a texture object (尽量使用不可变的texture storage, 这样OpenGL可以确保texture的有效性)

  2. Create and initialize the mipmap chain for textures unless you have a good reason not to – improve the image quality of your program’s rendering, but also will make more efficient use of the caches in the graphics processor (为了渲染效率,减轻GPU负担,尽可能为texture创建mipmap)

  3. Use an integer sampler in your shader when your texture data is an unnormalized integer and you intend to use the integer values it contains directly in the shader (尽量在shader里使用integer类型的sampler)

Note:
“The maximum number of texture units supported by OpenGL
can be determined by retrieving the value of the GL_MAX_COMBINED_
TEXTURE_IMAGE_UNITS constant, which is guaranteed to be at least 80 as
of OpenGL 4.0.”

Proxy texture – used to test the capabilities of the OpenGL implementation when certain limits are used in combination with each other.
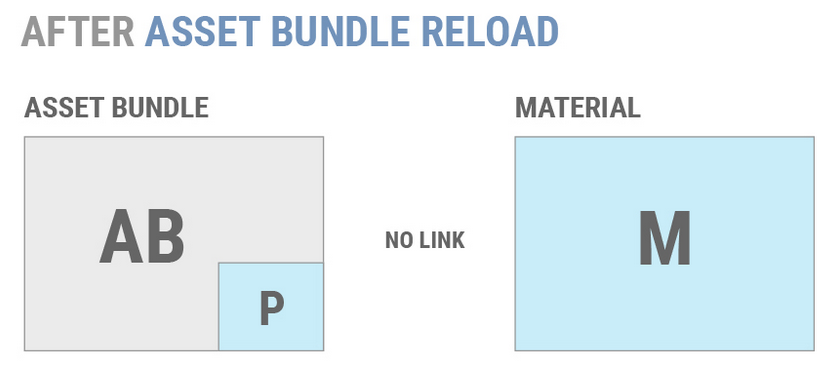
Light and Shadow

光源类型:

  1. Ambient Light (环境光) – 环境光只影响ambient
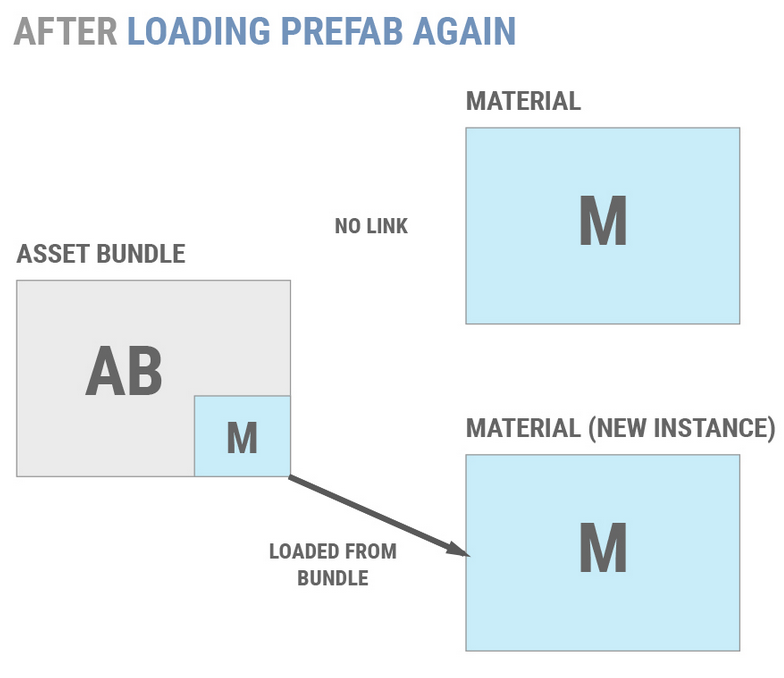
  2. Directional Light (方向光) – 方向光会影响diffuse & specular
  3. Point Light (点光源) – 与方向光的区别是有attenuation(衰弱)而且点光源照射物体的表面的方向不一样,同样会影响diffuse & specular

传统的光照组成:
Ambient (环境光) – 与光照的方向无关

1
2
3
FragColor = texture2D(gSampler, TexCoord0.xy) *
vec4(gDirectionalLight.Color, 1.0f) *
gDirectionalLight.AmbientIntensity;

因为环境光与光照方向无关,只需考虑方向光的颜色和方向光所占比重,所以基本上主要计算归结于上述运算。

final effect:
Ambient

Note:
这里源代码里有个错误,在子类重写虚函数的KeyboardCB的时候,由于参数写的不对,没能正确重写该虚函数而没有被调到。
错误:
virtual void KeyboardCB(OGLDEV_KEY OgldevKey);
正确:
virtual void KeyboardCB(OGLDEV_KEY OgldevKey, OGLDEV_KEY_STATE OgldevKeyState = OGLDEV_KEY_STATE_PRESS)

Diffuse (漫反射光) – 与光照的方向和顶点normal有关
因为漫反射光要考虑光照的方向和物体的顶点法线,所以我们需要在shader里进行计算之前要把顶点的法线算出来然后传入Shader进行计算。

1
2
3
4
5
6
7
8
9
10
11
12
13
14
15
16
17
18
19
20
void CalcNormals(const unsigned int* pIndices, unsigned int IndexCount, Vertex* pVertices, unsigned int VertexCount)
{
for (unsigned int i = 0 ; i < IndexCount ; i += 3) {
unsigned int Index0 = pIndices[i];
unsigned int Index1 = pIndices[i + 1];
unsigned int Index2 = pIndices[i + 2];
Vector3f v1 = pVertices[Index1].m_pos - pVertices[Index0].m_pos;
Vector3f v2 = pVertices[Index2].m_pos - pVertices[Index0].m_pos;
Vector3f Normal = v1.Cross(v2);
Normal.Normalize();

pVertices[Index0].m_normal += Normal;
pVertices[Index1].m_normal += Normal;
pVertices[Index2].m_normal += Normal;
}

for (unsigned int i = 0 ; i < VertexCount ; i++) {
pVertices[i].m_normal.Normalize();
}
}

vsshader.vs

1
2
3
4
5
6
7
8
9
10
11
12
13
14
15
16
17
18
#version 330

layout (location = 0) in vec3 Position;
layout (location = 1) in vec2 TexCoord;
layout (location = 2) in vec3 Normal;

uniform mat4 gWVP;
uniform mat4 gWorld;

out vec2 TexCoord0;
out vec3 Normal0;

void main()
{
gl_Position = gWVP * vec4(Position, 1.0);
TexCoord0 = TexCoord;
Normal0 = (gWorld * vec4(Normal, 0.0)).xyz;
}

注意“Normal0 = (gWorld * vec4(Normal, 0.0)).xyz;” – 因为我们对于顶点法线的计算是基于物体没有移动变化之前的,所以我们真正计算所用的顶点法线需要通过世界坐标系矩阵的转换。

fsshader.fs

1
2
3
4
5
6
7
8
9
10
11
12
13
14
15
16
17
18
19
20
21
22
23
24
25
26
27
28
29
30
31
32
33
34
35
36
37
38
39
#version 330

in vec2 TexCoord0;
in vec3 Normal0;

out vec4 FragColor;

struct DirectionalLight
{
vec3 Color;
float AmbientIntensity;
float DiffuseIntensity;
vec3 Direction;
};

uniform DirectionalLight gDirectionalLight;
uniform sampler2D gSampler;

void main()
{
vec4 AmbientColor = vec4(gDirectionalLight.Color, 1.0f) *
gDirectionalLight.AmbientIntensity;

float DiffuseFactor = dot(normalize(Normal0), -gDirectionalLight.Direction);

vec4 DiffuseColor;

if (DiffuseFactor > 0) {
DiffuseColor = vec4(gDirectionalLight.Color, 1.0f) *
gDirectionalLight.DiffuseIntensity *
DiffuseFactor;
}
else {
DiffuseColor = vec4(0, 0, 0, 0);
}

FragColor = texture2D(gSampler, TexCoord0.xy) *
(AmbientColor + DiffuseColor);
}

从“float DiffuseFactor = dot(normalize(Normal0), -gDirectionalLight.Direction);”可以看出,光照的方向和顶点法线之间的角度直接决定了漫反射光所占的比重。
参见Lambert’s cosine law

final effect:
Diffuse

Note:
这里我按照官网和源代码的方式按自己的方式写了,但不知道为何DiffuseFactor得出的值当我去做if else判断等,无论是>0,<0,==0都不会进去,都只会进入最终的else。
我通过gDEBugger查看了uniform的值没有问题,C++那一侧所有的相关计算的值也都正确,这里弄了半天也没有解决,本来准备用Nsight调试GLSL的,发现我的笔记本好像不被支持。
个人最终认为是顶点的法线在传递给Shader的时候出问题了,导致dot之后计算DiffuseFactor出问题,虽然在VS一侧下的断点查看normal是正确的,但不确定为什么shader一侧获得的值会有问题。(这一结论主要是因为同样的shader代码在加载现有模型的时候起作用发现的)

Specular (镜面反射光) – 与光照的方向和eye观察还有顶点normal有关
Specular在Diffuse的基础上,还要多考虑一个因素(观察者所在位置,如果观察者正好在反光处,那么该观察点就会比在其他位置的观察点观察同一位置的看起来更亮)。但现实中并不是所有物体都有这一特性,所以Specular更针对物体材质而言而非光线本身。

看一下下图:
SpecularModle
I是光线入射方向
N是平面法线
R是完美反射后的光线
V是观察者观察方向
a是观察者方向与完美反射光线的夹角
从上图可以看出当观察者所在观察角度V与R越接近时,我们可以理解为观察者观察该点会达到最大量值

我们计算出R主要是通过I和N和-N之间的计算:
详情见下图:
SpecularModle2
R = I + V
V = 2 * N * dot(-N,I)
这里值得一提的是OpenGL里提供了reflect方法,通过光线和平面法线就能直接算出反射R

让我们直接看一下Specular的计算公式:
SpecularCalculation
M – 是跟物体材质有关的,材质决定了specular的反光系数
p
(R.V) – 是指观察者所在位置和完美反射光线之间夹角的P次方,P是shininess factor(発光系数之类的)
上述换成代码如下:

1
2
3
4
5
6
7
8
9
10
vec3 VertexToEye = normalize(gEyeWorldPos - WorldPos0);                     
vec3 LightReflect = normalize(reflect(gDirectionalLight.Direction, Normal));
float SpecularFactor = dot(VertexToEye, LightReflect);
if (SpecularFactor > 0) {
SpecularFactor = pow(SpecularFactor, gSpecularPower);
SpecularColor = vec4(gDirectionalLight.Color * gMatSpecularIntensity * SpecularFactor, 1.0f);
}

FragColor = texture2D(gSampler, TexCoord0.xy) *
(AmbientColor + DiffuseColor + SpecularColor);

Limitations of the Classic Lighting Model: (传统光源的不足之处)
Big Missing:

  1. Assume no other objects blocking the path of the lights to the surface (假设光不会被物体遮挡)
  2. Accurate ambient lighting (统一固定精确的环境光,现实中是由削弱的(attenuation))

了解了光源的三个组成,也了解了传统光源的不足,让我们来看看另一种光照Point Light:
Point Light是有伴随距离而削弱(attenuation)的光源
公式如下:
PointLightFormulation

在实现Point Light的计算的时候,我们只需要把光照的方向根据Point Light位置算一下,并在最后除以根据物体位置与Point Light的光源位置算出的attenuation即可、

1
2
3
4
5
6
7
8
9
10
11
12
13
vec4 CalcPointLight(int Index, vec3 Normal)                                                 
{
vec3 LightDirection = WorldPos0 - gPointLights[Index].Position;
float Distance = length(LightDirection);
LightDirection = normalize(LightDirection);

vec4 Color = CalcLightInternal(gPointLights[Index].Base, LightDirection, Normal);
float Attenuation = gPointLights[Index].Atten.Constant +
gPointLights[Index].Atten.Linear * Distance +
gPointLights[Index].Atten.Exp * Distance * Distance;

return Color / Attenuation;
}

接下来我们看一下Spot Light:
Spot Light和Point Light的主要区别在于,Spot Light定义了一个可影响的范围Cone和其垂直照射的方向。
而这个Cone通过Cutoff来定义:
Cutoff – “ The cutoff value represents the maximum angle between the light direction and the light to pixel vector for pixels that are under the influence of the spot light.”
见下图:
SpotLight

通过计算出所在点是否在Spot Light的Cone里去决定是否影响该颜色值。
这里需要关注的一点是关于如何映射Cutoff值到[0,1],因为一般来说Cutoff的值不可能设置到0(即90度),所以我们要想计算边缘化削弱效果,我们需要对Cutoff的值进行线性插值。
推导见如下(来源之OpenGL Tutorial 21):
SpotLightCutoffMapping

知道了怎么确认是否影响该点颜色,以及如何插值获取影响值,那么最终归结代码见如下:

1
2
3
4
5
6
7
8
9
10
11
12
13
14
vec4 CalcSpotLight(struct SpotLight l, vec3 Normal)
{
vec3 LightToPixel = normalize(WorldPos0 - l.Base.Position);
float SpotFactor = dot(LightToPixel, l.Direction);
//计算所在点是否在Spot Light的Cone里去决定是否影响该颜色值。
if (SpotFactor > l.Cutoff) {
vec4 Color = CalcPointLight(l.Base, Normal);
//插值计算影响值
return Color * (1.0 - (1.0 - SpotFactor) * 1.0/(1.0 - l.Cutoff));
}
else {
return vec4(0,0,0,0);
}
}

More Advanced Lighting Model:
Hemisphere Lighting:
The idea behind hemisphere lighting is that we model the illumination as two hemispheres. The upper hemisphere represents the sky and the lower hemisphere represents the ground

Imaged-Based Lighting:
“It is often easier and much more efficient to sample the lighting in such environments and store the results in one or more environment maps”

Lighting with Spherical Harmonics:
“This method reproduces accurate diffuse reflection, based on the content of a light probe image, without accessing the light probe image at runtime”

详情参考

总结:
Ambient (环境光) – 与光照的方向无关
环境光不会削弱不考虑方向,所以只需考虑光照颜色和平面颜色即可
Diffuse (漫反射光) – 与光照的方向和顶点normal有关
光照的方向和顶点法线之间的角度直接决定了漫反射光所占的比重。
Specular (镜面反射光) – 与光照的方向和eye观察还有顶点normal有关
观察者所在位置和光照方向和法线会决定观察者所在位置的Specular反射比例,物体材质会决定Specular反射系数。
最终通过计算环境中所有光源对物体的ambient, diffuse, specular影响计算出物体的最终color

接下来我们看一个真实渲染过程中比较重要的技术 – Shadow Mapping
Shadow Mapping – Uses a depth texture to determine whether a point is lit or not.

Shadow mapping is a multipass technique that uses depth textures to provide a solution to rendering shadows (核心思想是通过比较通过光源点观察保存的深度信息(depth texture)和从观察点观察的深度信息来判断哪些点是shadowed,哪些是unshadowed – 注意比较的是通过映射到2D depth texture后的信息)
A key pass is to view the scene from the shadow-casting light source rather than from the final viewpoint
Two passes:

  • First Pass
    Shadow map – by rendering the scene’s depth from the point of the light into a depth texture, we can obtain a map of the shadowed and unshadowed points in the scene
    在第一个pass中,我按照事例代码中写了,但发现最后显示的是纯白色的图像。
    后来就不断去查问题。
    ShaowMapFirstPassFailed
    首先,我怀疑depth texture是不是没有生成成功?
1
2
3
4
5
6
7
8
9
10
11
12
13
14
15
16
17
18
19
20
21
22
23
24
25
// Create the FBO
glGenFramebuffers(1, &m_fbo);

// Create the depth buffer
glGenTextures(1, &m_shadowMap);
glBindTexture(GL_TEXTURE_2D, m_shadowMap);
glTexImage2D(GL_TEXTURE_2D, 0, GL_DEPTH_COMPONENT, WindowWidth, WindowHeight, 0, GL_DEPTH_COMPONENT, GL_FLOAT, NULL);
glTexParameterf(GL_TEXTURE_2D, GL_TEXTURE_MIN_FILTER, GL_LINEAR);
glTexParameterf(GL_TEXTURE_2D, GL_TEXTURE_MAG_FILTER, GL_LINEAR);
glTexParameterf(GL_TEXTURE_2D, GL_TEXTURE_WRAP_S, GL_CLAMP_TO_EDGE);
glTexParameterf(GL_TEXTURE_2D, GL_TEXTURE_WRAP_T, GL_CLAMP_TO_EDGE);

glBindFramebuffer(GL_FRAMEBUFFER, m_fbo);
glFramebufferTexture2D(GL_DRAW_FRAMEBUFFER, GL_DEPTH_ATTACHMENT, GL_TEXTURE_2D, m_shadowMap, 0);

// Disable writes to the color buffer
glDrawBuffer(GL_NONE);
glReadBuffer(GL_NONE);

GLenum Status = glCheckFramebufferStatus(GL_FRAMEBUFFER);

if (Status != GL_FRAMEBUFFER_COMPLETE) {
printf("FB error, status: 0x%x\n", Status);
return false;
}

但上述代码没有报任何错误,通过gDebugger查看Texture的时候发现depth texture是生成成功了的。
ShaowMapFirstPassCreate
从上图仔细看,模型的深度信息时被生成到了FBO 1所绑定的Depth Texture中了的。

那么接下来,我就怀疑是不是我激活的Texture unit有错误?
以下是将Depth Texture渲染到一个平面上的代码。

1
2
3
4
5
6
7
8
9
10
11
12
13
14
15
16
17
18
19
20
21
22
23
24
void ShadowMapFBO::BindForReading(GLenum TextureUnit)
{
glActiveTexture(TextureUnit);
glBindTexture(GL_TEXTURE_2D, m_shadowMap);
}

static void RenderPass()
{
glClear(GL_COLOR_BUFFER_BIT | GL_DEPTH_BUFFER_BIT);

glUniform1i(gTextureLocation, 0);

gShadowMapFBO.BindForReading(GL_TEXTURE0);

Pipeline p;
p.Scale(5.0f, 5.0f, 5.0f);
p.WorldPos(0.0f, 0.0f, 10.0f);
p.SetCamera(pGameCamera->GetPos(), pGameCamera->GetTarget(), pGameCamera->GetUp());
p.SetPerspectiveProj(gPersProjInfo);

glUniformMatrix4fv(gWVPLocation, 1, GL_TRUE, (const GLfloat*)p.GetWVPTrans());

gPQuade->Render();
}

MyTextureList
DemoTextureList
通过上图,我发现我自己的代码有三个Texture被生成,但Demo只有两个,并且我自己写的代码Enable的并非FBO 1绑定生成的Texture而是第三个Texture,所以这是我怀疑我在加载Mesh的时候加载了第三个Texture并将其绑定在了Texture unit 0,而我碰巧激活了这一个Texture unit。

由于我的mesh.cpp是沿用上一个tutorial的代码,所以我没有更新到最新教程的mesh代码。
下面是我所用的mesh.cpp的一个加载Texture的方法和Texture源代码加载的时候的方法

1
2
3
4
5
6
7
8
9
10
11
12
13
14
15
16
17
18
19
20
21
22
23
24
25
26
27
28
29
30
31
32
33
34
35
36
37
38
39
40
41
42
43
44
45
46
47
48
49
50
51
52
bool Mesh::InitMaterials(const aiScene* pScene, const std::string& Filename)
{
......

// Load a white texture in case the model does not include its own texture
if (!m_Textures[i]) {
m_Textures[i] = new Texture(GL_TEXTURE_2D, "../Content/white.png");

Ret = m_Textures[i]->Load();
}

......
}


void Mesh::Render()
{
.....

if (MaterialIndex < m_Textures.size() && m_Textures[MaterialIndex]) {
m_Textures[MaterialIndex]->Bind(GL_TEXTURE0);
}

.......
}
bool Texture::Load()
{
try {
m_image.read(m_fileName);
m_image.write(&m_blob, "RGBA");
}
catch (Magick::Error& Error) {
std::cout << "Error loading texture '" << m_fileName << "': " << Error.what() << std::endl;
return false;
}

glGenTextures(1, &m_textureObj);
glBindTexture(m_textureTarget, m_textureObj);
glTexImage2D(m_textureTarget, 0, GL_RGBA, m_image.columns(), m_image.rows(), 0, GL_RGBA, GL_UNSIGNED_BYTE, m_blob.data());
glTexParameterf(m_textureTarget, GL_TEXTURE_MIN_FILTER, GL_LINEAR);
glTexParameterf(m_textureTarget, GL_TEXTURE_MAG_FILTER, GL_LINEAR);
glBindTexture(m_textureTarget, 0);

return true;
}

void Texture::Bind(GLenum TextureUnit)
{
glActiveTexture(TextureUnit);
glBindTexture(m_textureTarget, m_textureObj);
}

从上面可以看出如果我加载的mesh没有含有贴图的话,我会指定他去默认加载white.png作为贴图,并且渲染的时候激活Texture unit 0并将该纹理绑定到Texture unit 0

这也就是为什么我后来调用下列代码出现了Active错误的texture的原因。

1
2
3
glUniform1i(gTextureLocation, 0);

gShadowMapFBO.BindForReading(GL_TEXTURE0);

所以在不改Texture和Mesh源代码的情况下,我只需要将生成的Texture unit绑定到GL_TEXTURE2并指定Shader去访问Texture unit 2即可。
将上述代码改为如下即可:

1
2
3
glUniform1i(gTextureLocation, 2);

gShadowMapFBO.BindForReading(GL_TEXTURE2);

ShadowMapFirstPassSuccessful

在渲染到Depth Texture的时候,主要是通过以下步骤:

  1. 创建新的FBO和Texture object
1
2
3
4
5
6
7
8
9
10
11
// Create the FBO
glGenFramebuffers(1, &m_fbo);

// Create the depth texture
glGenTextures(1, &m_shadowMap);
glBindTexture(GL_TEXTURE_2D, m_shadowMap);
glTexImage2D(GL_TEXTURE_2D, 0, GL_DEPTH_COMPONENT, WindowWidth, WindowHeight, 0, GL_DEPTH_COMPONENT, GL_FLOAT, NULL);
glTexParameterf(GL_TEXTURE_2D, GL_TEXTURE_MIN_FILTER, GL_LINEAR);
glTexParameterf(GL_TEXTURE_2D, GL_TEXTURE_MAG_FILTER, GL_LINEAR);
glTexParameterf(GL_TEXTURE_2D, GL_TEXTURE_WRAP_S, GL_CLAMP_TO_EDGE);
glTexParameterf(GL_TEXTURE_2D, GL_TEXTURE_WRAP_T, GL_CLAMP_TO_EDGE);
  1. 激活新的FBO并绑定Texture object到FBO的Depth buffer上
1
2
glBindFramebuffer(GL_FRAMEBUFFER, m_fbo);
glFramebufferTexture2D(GL_DRAW_FRAMEBUFFER, GL_DEPTH_ATTACHMENT, GL_TEXTURE_2D, m_shadowMap, 0);
  1. 关闭颜色写入到新的FBO。因为我们只需要Depth信息,所以我们不需要写入颜色信息到新的FBO里。
1
glDrawBuffer(GL_NONE);
  1. 检查新的FBO的状态是否完整
1
2
3
4
5
6
GLenum Status = glCheckFramebufferStatus(GL_FRAMEBUFFER);

if (Status != GL_FRAMEBUFFER_COMPLETE) {
printf("FB error, status: 0x%x\n", Status);
return false;
}
  1. 激活新的FBO并清除Depth信息后以光线来源的角度draw call写入depth信息到新的FBO和绑定的depth texture里
1
2
3
4
5
6
7
8
9
10
11
12
13
14
15
16
17
18
19
20
static void ShadowMapPass()
{
gShadowMapFBO.BindForWriting();

glClear(GL_DEPTH_BUFFER_BIT);

Pipeline p;
p.Scale(0.1f, 0.1f, 0.1f);
p.Rotate(0.0f, gScale, 0.0f);
p.WorldPos(0.0f, 0.0f, 5.0f);
p.SetCamera(gSpotLight.Position, gSpotLight.Direction, Vector3f(0.0f, 1.0f, 0.0f));
p.SetPerspectiveProj(gPersProjInfo);

//Set uniform variable value
glUniformMatrix4fv(gWVPLocation, 1, GL_TRUE, (const GLfloat*)p.GetWVPTrans());

gPTank->Render();

glBindFramebuffer(GL_FRAMEBUFFER, 0);
}
  • Second Pass
    Rendering the scene from the point of view of the viewer. Project the surface coordinates into the light’s reference frame and compare their depths to the depth recorded into the light’s depth texture. Fragments that are further from the light than the recorded depth value were not visible to the light, and hence in shadow

第二个pass的关键有下列几个点:

  1. 正常方式渲染时,通过传递Light的MVP去计算每一个顶点在光源角度观察时的投影位置信息。
1
2
3
4
5
6
7
8
9
10
11
12
13
14
15
16
17
18
19
20
21
22
23
24
25
26
27
28
29
30
31
32
33
34
35
36
37
38
39
40
41
42
43
44
45
46
47
48
49
50
51
52
53
54
55
56
57
58
void RenderPass()
{
glClear(GL_COLOR_BUFFER_BIT | GL_DEPTH_BUFFER_BIT);

m_pLightingEffect->Enable();

m_pLightingEffect->SetEyeWorldPos(m_pGameCamera->GetPos());

m_shadowMapFBO.BindForReading(GL_TEXTURE1);

Pipeline p;
p.SetPerspectiveProj(m_persProjInfo);

p.Scale(10.0f, 10.0f, 10.0f);
p.WorldPos(0.0f, 0.0f, 1.0f);
p.Rotate(90.0f, 0.0f, 0.0f);
p.SetCamera(m_pGameCamera->GetPos(), m_pGameCamera->GetTarget(), m_pGameCamera->GetUp());
m_pLightingEffect->SetWVP(p.GetWVPTrans());
m_pLightingEffect->SetWorldMatrix(p.GetWorldTrans());
p.SetCamera(m_spotLight.Position, m_spotLight.Direction, Vector3f(0.0f, 1.0f, 0.0f));
m_pLightingEffect->SetLightWVP(p.GetWVPTrans());
m_pGroundTex->Bind(GL_TEXTURE0);
m_pQuad->Render();

p.Scale(0.1f, 0.1f, 0.1f);
p.Rotate(0.0f, m_scale, 0.0f);
p.WorldPos(0.0f, 0.0f, 3.0f);
p.SetCamera(m_pGameCamera->GetPos(), m_pGameCamera->GetTarget(), m_pGameCamera->GetUp());
m_pLightingEffect->SetWVP(p.GetWVPTrans());
m_pLightingEffect->SetWorldMatrix(p.GetWorldTrans());
p.SetCamera(m_spotLight.Position, m_spotLight.Direction, Vector3f(0.0f, 1.0f, 0.0f));
m_pLightingEffect->SetLightWVP(p.GetWVPTrans());
m_pMesh->Render();
}

lighting.vs
#version 330

layout (location = 0) in vec3 Position;
layout (location = 1) in vec2 TexCoord;
layout (location = 2) in vec3 Normal;

uniform mat4 gWVP;
uniform mat4 gLightWVP;
uniform mat4 gWorld;

out vec4 LightSpacePos;
out vec2 TexCoord0;
out vec3 Normal0;
out vec3 WorldPos0;

void main()
{
......
//这里就是转换到以光源为摄像机角度的透视投影后的坐标信息
LightSpacePos = gLightWVP * vec4(Position, 1.0);
......
}
  1. 然后通过把光源角度下投影的位置信息转换到NDC space(设备坐标系,光栅化后xyz都映射到[-1,1]),这时就得到了顶点在光源角度下NDC的坐标信息。
1
2
3
4
5
6
7
//lighting.fs                                                 
float CalcShadowFactor(vec4 LightSpacePos)
{
//通过除以w我们可以得到NDC space的信息
vec3 ProjCoords = LightSpacePos.xyz / LightSpacePos.w;
......
}
  1. 最后通过转换纹理坐标映射到[0,1]去查询Depth texture中的深度信息和自身的z深度信息作比较,如果depth texture中值更小说明改点处于被遮挡区域应该是阴影部分。
1
2
3
4
5
6
7
8
9
10
11
12
13
float CalcShadowFactor(vec4 LightSpacePos)                                                 
{
......
vec2 UVCoords;
UVCoords.x = 0.5 * ProjCoords.x + 0.5;
UVCoords.y = 0.5 * ProjCoords.y + 0.5;
float z = 0.5 * ProjCoords.z + 0.5;
float Depth = texture(gShadowMap, UVCoords).x;
if (Depth < z + 0.00001)
return 0.5;
else
return 1.0
}

因为原本x,y,z在NDC space下是[-1,1],为了映射到[0,1],我们只需要按上述方法即可。
这样一来就得到NDC space下的纹理坐标信息和深度z信息,然后通过查询depth texture获取光源角度的深度信息和现有顶点在光源角度的深度信息做比较得出是否处于阴影的结论。

这里实现相当复杂就没有自己再去写一遍,具体参考Tutorial 24的源代码。
最终效果:
ShadowMap

Skybox

A skybox is a method of creating backgrounds to make a computer and video games level look bigger than it really is. When a skybox is used, the level is enclosed in a cuboid. (From wiki)
SkyboxTexture

在OpenGL中实现Skybox是通过Cubemap。

In order to sample from the cubemap we will use a 3D texture coordinate instead of the 2D coordinate

Skydome – A skybox which uses a sphere is sometimes called a skydome.

实现skybox主要有下列几点需要注意:

  1. 生成Cubemap texture,分别指定6个对应skybox的六个面类型的纹理数据
1
2
3
4
5
6
7
8
9
10
11
12
13
14
15
16
17
18
19
20
static const GLenum types[6] = {  GL_TEXTURE_CUBE_MAP_POSITIVE_X,
GL_TEXTURE_CUBE_MAP_NEGATIVE_X,
GL_TEXTURE_CUBE_MAP_POSITIVE_Y,
GL_TEXTURE_CUBE_MAP_NEGATIVE_Y,
GL_TEXTURE_CUBE_MAP_POSITIVE_Z,
GL_TEXTURE_CUBE_MAP_NEGATIVE_Z };

bool CubemapTexture::Load()
{
//生成cubemap texture
glGenTextures(1, &m_textureObj);
glBindTexture(GL_TEXTURE_CUBE_MAP, m_textureObj);

......

//指定对应skybox六个面类型的纹理数据
glTexImage2D(types[i], 0, GL_RGB, pImage->columns(), pImage->rows(), 0, GL_RGBA, GL_UNSIGNED_BYTE, blob.data());

......
}
  1. 渲染skybox的时候,需要把glCullFace和glDepthFunc设置成GL_FRONT和GL_LEQUAL(因为camera是放在skybox sphere内部的,而sphere的triangle是front face, 所以针对skybox sphere我们需要cull的是front而非back。为了使得skybox永远不会被clip掉,我们需要修改默认的glDepthFunc到GL_LEQUAL来确保在Z = 1的far平面也不会被clip。)
1
2
3
4
5
6
7
8
9
10
11
12
13
14
15
16
17
18
19
20
void SkyBox::Render()
{
m_pSkyboxTechnique->Enable();

GLint OldCullFaceMode;
glGetIntegerv(GL_CULL_FACE_MODE, &OldCullFaceMode);
GLint OldDepthFuncMode;
glGetIntegerv(GL_DEPTH_FUNC, &OldDepthFuncMode);

//确保skybox sphere不被clip掉并且显示出正确的一面
glCullFace(GL_FRONT);
glDepthFunc(GL_LEQUAL);

.......

m_pMesh->Render();

glCullFace(OldCullFaceMode);
glDepthFunc(OldDepthFuncMode);
}
  1. 确保skybox深度检测时值永远在Z = 1的far平面(这样一来确保skybox深度检测永远失败,因为我们吧glDepthFunc设置成了GL_LEQUAL)
1
2
3
4
5
6
7
8
9
10
11
12
13
14
15
16
skybox.vs
#version 330

layout (location = 0) in vec3 Position;

uniform mat4 gWVP;

out vec3 TexCoord0;

void main()
{
vec4 WVP_Pos = gWVP * vec4(Position, 1.0);
//通过把gl_Position的z设置成w,在光栅化进入fragment shader之前,skybox的z值会永远映射到1(即远平面),确保skybox深度检测永远fail但永远不被clip(因为我们吧glDepthFunc设置成了GL_LEQUAL)
gl_Position = WVP_Pos.xyww;
TexCoord0 = Position;
}
  1. 把object space的3D坐标当做3D texture坐标的索引值去查询纹理信息
1
2
3
4
5
6
7
8
9
10
11
12
13
14
15
16
17
18
19
20
21
22
23
24
25
26
27
28
29
30
skybox.vs
#version 330

layout (location = 0) in vec3 Position;

uniform mat4 gWVP;

out vec3 TexCoord0;

void main()
{
......
//因为cubemap这里默认cube和sphere都是以自身中心作为基准(个人认为这里的基准是可变的(建模工具可设定)),这样一来把object space的坐标信息通过光栅化后传递到fs中就可以作为texture coordinate来查询纹理信息
TexCoord0 = Position;
}

skybox.fs
#version 330

in vec3 TexCoord0;

out vec4 FragColor;

uniform samplerCube gCubemapTexture;

void main()
{
//这里的TexCoord0是经过光栅化后映射到了[-1,1]
FragColor = texture(gCubemapTexture, TexCoord0);
}

Skybox

Note:
“An interesting performance tip is to always render the skybox last (after all the other models). The reason is that we know that it will always be behind the other objects in the scene.”

Normal Mapping

在了解Normal Mapping之前不得不提Bump Mapping
下列关于Bump Mapping大部分内容来源:
OpenGL 法线贴图 切线空间 整理
Bump mapping
关于法线贴图, 法线, 副法线, 切线 的东东,看了很容易理解

What is Bump Mapping?
Bump mapping[1] is a technique in computer graphics for simulating bumps and wrinkles on the surface of an object. This is achieved by perturbing the surface normals of the object and using the perturbed normal during lighting calculations.

可以看出Bump Mapping是通过改变物体顶点法线来影响光照的效果,最终看起来有凹凸的效果(而非顶点之间真实的深度差),是一种欺骗眼睛的技术。

“Jim Blinn在1978发表了一篇名为:“Simulation of Wrinkled Surfaces”,提出了Bump Mapping这个东东。Bump Mapping通过一张Height Map记录各象素点的高度信息,有了高度信息,就可以计算HeightMap中当前象素与周围象素的高度差,这个高度差就代表了各象素的坡度,用这个坡度信息去绕动法向量,得到最终法向量,用于光照计算。坡度越陡,绕动就越大。”

Why Bump Mapping?
“如果要在几何体表面表现出凹凸不平的细节,那么在建模的时候就会需要很多的三角面,如果用这样的模型去实时渲染,出来的效果是非常好,只是性能上很有可能无法忍受。Bump Mapping不需要增加额外的几何信息,就可以达到增强被渲染物体的表面细节的效果,可以大大地提高渲染速度,因此得到了广泛的应用。”

What is Normal Mapping?
“Normal Mapping也叫做Dot3 Bump Mapping,它也是Bump Mapping的一种,区别在于Normal Mapping技术直接把Normal存到一张NormalMap里面,从NormalMap里面采回来的值就是Normal,不需要像HeightMap那样再经过额外的计算。”

“值得注意的是,NormalMap存的Normal是基于切线空间的,因此要进行光照计算时,需要把Normal,Light Direction,View direction统一到同一坐标空间中。”

这里不得不提的一个点就是切线空间(tangent space)
What is tangent space?
“ Tangent Space与World Space,View Space其实是同样的概念,均代表三维坐标系。在这个坐标系中,X轴对应纹理坐标的U方向,沿着该轴纹理坐标U线性增大。Y轴对应纹理坐标的V方向,沿着该轴纹理坐标V线性增大。Z轴则是UXV,垂直于纹理平面。”

Why do we need tangent space?
“为什么normal map里面存的法线信息是基于tangent sapce而不是基于local space呢?基于local space理论上也是可以的,但是这样的normal map只能用于一个模型,不同把这个normal map用于其他模型。比如说建模了一个人,并且生成了该模型基于local space的normal map, 如果我们建模同一个人,但是放的位置和角度和之前的不一样,那么之前的normal map就不能用了,因为local Space并不一样,但如果我们normal map里存的是tangent space的normal的话,就不存在这个问题,因为只要模型一样,模型上每个点的tangent space就是一样的,所谓以不变应万变。”

可以看出tangent space是针对顶点而言的。

How to get tangent space?
让我们看一下下图:
TangentSpaceCaculation
以下推导来源于:
Tutorial 26:Normal Mapping
TangentSpaceDeduce
TangentSpaceDeduce2
从上面而已看出通过三角形的顶点和纹理信息可以算出T和B

Note:
在实际开发中我们并非一定要手动写代码运算,比如”Open Asset Import Library就支持flag called ‘aiProcess_CalcTangentSpace’ which does exactly that and calculates the tangent vectors for us”

Normal Map也通过工具可以生成,比如3D Max, Maya, 教程里用的GNU Image Manipulation Program (GIMP)…….

当我们通过Normap Map获取得到normal值时,因为该normal值时位于tangent space下,所以我们必须对其进行坐标系转换,必须转换到world space后才参与光照计算。

而这个变换到世界坐标系的矩阵,可以通过tangent这个向量和顶点法线信息推导出来。

  1. 加载mesh时生成tangent数据,渲染时指定tangent数据位置
1
2
3
4
5
6
7
8
9
10
11
12
bool Mesh::LoadMesh(const std::string& Filename)
{
......

Assimp::Importer Importer;
//aiProcess_CalcTangentSpace指定生成tangent数据
const aiScene* pScene = Importer.ReadFile(Filename.c_str(), aiProcess_Triangulate |
aiProcess_GenSmoothNormals |
aiProcess_FlipUVs |
aiProcess_CalcTangentSpace);
......
}
1
2
3
4
5
6
7
8
void Mesh::Render()
{
......
//指定tangent数据读取方式
glVertexAttribPointer(3, 3, GL_FLOAT, GL_FALSE, sizeof(Vertex), (const GLvoid*)32); // tangent

......
}
  1. 将tangent和顶点法线转换到世界坐标系
1
2
3
4
5
6
7
8
9
10
11
12
13
14
15
16
17
18
19
20
21
22
23
layout (location = 0) in vec3 Position;
layout (location = 1) in vec2 TexCoord;
layout (location = 2) in vec3 Normal;
layout (location = 3) in vec3 Tangent;

uniform mat4 gWVP;
uniform mat4 gLightWVP;
uniform mat4 gWorld;

out vec4 LightSpacePos;
out vec2 TexCoord0;
out vec3 Normal0;
out vec3 WorldPos0;
out vec3 Tangent0;

void main()
{
......
//将tangent和顶点法线转换到世界坐标系
Normal0 = (gWorld * vec4(Normal, 0.0)).xyz;
Tangent0 = (gWorld * vec4(Tangent, 0.0)).xyz;
......
}
  1. 通过转换到世界坐标系的tangent和normal计算出bitangent(转换到世界坐标系后的B)(下面T代表tangent, N代表normal, B代表bitangent)

  2. 逆算出tangent space下normal map里的顶点法线值

  3. 通过算出的位于世界坐标系的TBN去转换tangent space下逆算后的normal map的顶点法线值,最终得到位于世界坐标的顶点法线

  4. 算出位于世界坐标系的顶点法线后,最后正常参与diffuse光照计算即可

1
2
3
4
5
6
7
8
9
10
11
12
13
14
15
16
17
18
19
20
21
22
(lighting.fs:132)
vec3 CalcBumpedNormal()
{
vec3 Normal = normalize(Normal0);
vec3 Tangent = normalize(Tangent0);
//得到位于TN平面且垂直于N的向量
Tangent = normalize(Tangent - dot(Tangent, Normal) * Normal);
//通过叉乘得出垂直于T和N的B
vec3 Bitangent = cross(Tangent, Normal);
vec3 BumpMapNormal = texture(gNormalMap, TexCoord0).xyz;
//这里需要注意一点:
//"我们在描述色彩的时候,RGB三个通道的取值范围都是从零开始的。可是当我们尝试把一个任意的法线保存在一张纹理中的时候,会面临取负值的问题。因此我们要把法线做压缩。方法很简单,把XYZ每个轴上的法线投影长度进行N+1/2的运算。这样就把所有的法线压缩到了0和1的范围里。"
//所以这里通过列方法算回原有的顶点法线值
BumpMapNormal = 2.0 * BumpMapNormal - vec3(1.0, 1.0, 1.0);
vec3 NewNormal;
//由于位于世界坐标系的T,N,B都算出来了,所以可以构建一个TBN的矩阵去把normal map里的法线值转换到世界坐标系
mat3 TBN = mat3(Tangent, Bitangent, Normal);
NewNormal = TBN * BumpMapNormal;
//最后归一化算出来的顶点法线既得到了我们需要的位于世界坐标系的顶点法线,最后正常参与diffuse光照计算即可
NewNormal = normalize(NewNormal);
return NewNormal;
}

让我们看看Normal Map Texture
NormalMapTexture

See Normal Mapping(left) and Regular Mapping(right)
NormalMappingAndRegularMapping

Note:
A common use of this(normal mapping) technique is to greatly enhance the appearance and details of a low polygon model by generating a normal map from a high polygon model or height map.

高模normal map用于低模模型上,即不增加渲染负担又能增加渲染细节。

More:
下面内容来源
Parallax Mapping
当使用Normal Mapping技术时,并没有把视线方向考滤进去。在真实世界中,如果物体表面高低不平,当视线方向不同时,看到的效果也不相同。Parallax Mapping就是为了解决此问题而提出的。

Parallax Mapping首先在一篇名为“Detailed Shape Representation with Parallax Mapping”的文章中提出。它的基本思想如下图示(本图来自Parallax Mapping with Offset Limiting: A PerPixel Approximation of Uneven Surfaces)。在图示的视线方向,如果表面是真正的凹凸不平的,如real surfacer所示,那么能看到的是B点,因此用于采样法线的正确纹理坐是TB而不是TA。
ParallaxMappinge
因此,我们需要对纹理坐标作偏移,为了满足实时渲染的要求,采用了取近似偏移的方法(如下图示),这种近似的算法已经可以达到比较好的效果。具体的offset计算可以参考:“Parallax Mapping with Offset Limiting: A PerPixel Approximation of Uneven Surface”,里面有详细的讲解。
ParallaxMappinge2

Parallax Occlusion Mapping
Parallax Occlusion Mapping是对Parallax Mapping的改进,DirectX SDK中有个Sample专门讲这个,相关细节可以参看此Sample. Parallax Occlusion Mapping中实现了Self Shadow,还计算了比较精确的offset,复杂度比Parallax Mapping大,但是实现效果更好。

BillBoard And Geometry Shader

Geometry shader(Optional)
“The geometry shader sits logically right before primitive assembly and fragment shading.”

Receives as its input complete primitives as a collection of vertices, and these inputs are represented as array (Geometry shader接收完整图形的顶点集合,这些顶点集合在geometry shader中通过gl_in[]数组的方式访问)

gl_in的声明:

1
2
3
4
5
in gl_PerVertex {
vec4 gl_Position;
float gl_PointSize;
float gl_ClipDistance[];
}gl_in[];

Geometry Features:

  1. Producing Primitives
    They can have a different primitive type for their output than they do for their input. (EG: wireframe rendering, billboards and even interesting instancing effects)(Billboard效果见后面)

  2. Culling Geometry
    Selective culling (geometry shader通过对特定的gl_PrimitiveIDIn进行生成特定的primitive实现selective culling)
    “gl_PrimitiveIDIn is a geometry language input variable that holds the number of primitives processed by the shader since the current set of rendering primitives was started.”

  3. Geometry Amplification
    Produces more primitives on its output than it accepts on its input
    (can be used to implement fur shells or moderate tessellation – 因为可以对传入的primitive数据进行处理并生成多个primitive,所以能通过复制并改变primitive的信息数据来实现毛发等效果)
    Gl_MaxGeometryOutputVertices & glGetIntegerv(GL_MAX_GEOMETRY_OUTPUT_VERTICES)
    毛发效果(来源OpenGL红宝书第八版):
    Geometry_Shader_Fur

  4. Geometry Shader Instance
    Only runs the geometry shader and subsequent stages (rasterization) multiple times, rather than the whole pipeline (Geometry shader instancing draw call是通过运行多次geometry和rasterization和fragment来实现的)
    Geometry shader instancing is enabled in the shader by specifying the invocations layout qualifier

1
2
//gl_InvocationID identifies the invocation number assigned to the geometry shader invocation.
layout (triangles, invocations = 4) in; //invocations = 4 indicates that the geometry shader will be called 4 times for each input primitives
  1. Multiple Viewport Rendering
    gl_ViewportIndex (output variables available in the geometry shader that can redirect rendering into different regions of the framebuffer)
    gl_ViewportIndex is used to specify which set of viewport parameters will be used to perform the viewport transformation by OpenGL
    “ (Multiple viewport concept (多个视图窗口) – 这里主要是通过gl_ViewportIndex访问多个viewport,然后在geometry shader中通过指定primitive输出到特定的viewport来实现多个视图窗口)
    glViewportIndexedf() or glViewportIndexedfv() – specify how window x and y coordinates are generated from clip coordinates
    glDepthRangeIndexed() – specify how the window z coordinate is generated
    效果展示(这里展示的OpenGL红宝书第八版的例子):
    Multiple_Viewports

  2. Layer Rendering
    It is also possible to use a 2D array texture as a color attachment and render into the slices of the array using a geometry shader (传入2D的纹理数组数据当做color attachment,通过geometry shader把传入的2D纹理数组信息去渲染多个slices)
    A restriction exits when using layered attachments to framebuffer: (使用layered attachment到framebuffer的规则):
    All the attachments of that framebuffer must be layered (framebuffer的所有attachment都必须是layered)
    Also, all attachments of a layered framebuffer must be of the same type (所有attach到layered framebuffer的attachment必须是同样类型)
    gl_Layer – built in variable in geometry shader – that is used to specify the zero-based index of the layer into which rendering will be directed
    可实现的效果好比:
    Cube-Map
    添加cube_map texture为color attachment到framebuffer中
    cube-map texture(2D texture)这里会被划分成六个layer的array texture
    通过instanced geometry shader生成六个faces(对应六个layer),通过gl_InvocationID和gl_Layer访问六个faces并做相应的projection matrices运算实现Cube_Map Face的效果

  3. Advanced Transform Feedback
    这里首先要了解下什么是Transform Feeback?
    Transform feedback can be considered a stage of the OpenGL pipeline that sits after all of the vertex-processing stages and directly before primitive assembly and rasterization. Transform feedback captures vertices as they are assembled into primitives and allow some or all of their attributes to be recorded into buffer objects. (Transform feedback发生在所有顶点运算阶段之后(所以如果geometry shader打开了,transform feedback就发生在geometry shader之后,相反是在vertex shader之后),在primitive assembly和光栅化之前。Transform feedback可以保存顶点的一些属性信息用于下一次的运算。)

Why do we need transform feedback?
“DirectX10 introduced a new feature known as Stream Output that is very useful for implementing particle systems. OpenGL followed in version 3.0 with the same feature and named it Transform Feedback. The idea behind this feature is that we can connect a special type of buffer (called Transform Feedback Buffer right after the GS (or the VS if the GS is absent) and send our transformed primitives to it. In addition, we can decide whether the primitives will also continue on their regular route to the rasterizer. The same buffer can be connected as a vertex buffer in the next draw and provide the vertices that were output in the previous draw as input into the next draw. This loop enables the two steps above to take place entirely on the GPU with no application involvement (other than connecting the proper buffers for each draw and setting up some state).”

从上面可以看出,transform feedback可以帮助我们在构建primitive之前保存顶点相关的一些信息参与到下一次draw的运算且不用参与到Clipping,rasterizer和FS。最重要的是所有这一切都发生在GPU上,不需要从GPU上copy数据到CPU上做运算。

大致情况如下图:
TransformFeedbackFlowchart

了解一些相关概念:
Transform Feedback Objects:
“The state required to represent transform feedback is encapsulated into a
transform feedback object.”(transform feedback objects主要是存储跟transform feedback相关的一些状态。比如:哪一个buffer绑定到了transform feedback buffer的binding point)

Transform Feedback Buffer:
vertex shader或geometry shader中获取来的信息,这里的TFB是指通过glBindBufferBase之类方法后被绑定到Tansform Feedback Objects上的buffer

glBindBufferBase调用的时候需要指定index作为binding point,如果我们想要把Transform Feedback Buffer的数据存储在多个buffer的时候我们可以把多个buffer绑定到不同的binding point上,然后通过glTransformFeedbackVaryings传入的参数格式决定我们生成的数据是如何写入到各个buffer里的。

具体的glTransformFeedbackVaryings如何配置决定数据是如何写入到各个buffer的参见OpenGL红宝书Configuring Transform Feedback Varyings

因为粒子效果用到了Billboard来展示,所以在了解Particle System之前,我们先来看看Billboard是如何通过GS实现的:
Billboard - “A billboard is a quad which always faces the camera. “

  1. Before a geometry shader may be linked, the input primitive type, output primitive type, and the maximum number of vertices that is might produce must be specified (在链接geometry shader之前,我们必须先定义geometry shader的输入输出类型)
1
2
3
4
5
6
7
8
9
10
11
12
13
14
15
16
version 330                                                                        
//指明GS中传入的数据是以点为单位 layout(points) in;
//指明GS将输出的primitive是triangle_strip
layout(triangle_strip) out;
//指明GS生成的最大顶点数量是4,因为这里我们只需4个顶点组成一个quad即可
layout(max_vertices = 4) out;

......

void main()
{
......
}
//e.g:
//layout (input primitive type) in;
//layout (output primitive type, max_vertices = number) out; (这里的max_//vertices会遇到一个硬件限制所支持的max_vertices的最大值--超出最大值后program //link会出错,通过在program link后调用glGetProgramiv() with GL_INFO_LOG_LENGTH //parameter可以得program link的出错信息,shader compile的log同理)
  1. 利用传递进来的顶点primitive数据生成新的面向camera的primitive数据
1
2
3
4
5
6
7
8
9
10
11
12
13
14
15
16
17
18
19
20
21
22
23
24
25
26
27
28
29
30
31
32
33
34
35
36
37
38
39
40
41
42
43
44
45
46
47
48
49
50
51
52
53
54
55
56
57
58
59
#version 330                                                                        

layout(points) in;
layout(triangle_strip) out;
layout(max_vertices = 4) out;

uniform mat4 gVP;
uniform vec3 gCameraPos;

out vec2 TexCoord;

void main()
{
//通过gl_in我们可以在GS中访问传入的primitive的顶点数据,这里因为我们指定了传入的layout(points) in,所以这里只需访问gl_in[0]即可
//通过计算出面向camera时quad所在的物体坐标系信息,我们在这基础上对顶点数据做偏移,这样算出来的顶点数据生成的primitive始终面向Camera
vec3 Pos = gl_in[0].gl_Position.xyz;
vec3 toCamera = normalize(gCameraPos - Pos);
vec3 up = vec3(0.0, 1.0, 0.0);
vec3 right = cross(toCamera, up);

Pos -= (right * 0.5);
//这里之所以只传gVP而非gMVP是因为我们在创建顶点数据的时候就是传递的世界坐标信息
gl_Position = gVP * vec4(Pos, 1.0);
TexCoord = vec2(0.0, 0.0);
EmitVertex();

Pos.y += 1.0;
gl_Position = gVP * vec4(Pos, 1.0);
TexCoord = vec2(0.0, 1.0);
//通过调用EmitVertex指定利用上面的数据生成新的vertex加入到最终的primitive构造中
EmitVertex();

Pos.y -= 1.0;
Pos += right;
gl_Position = gVP * vec4(Pos, 1.0);
TexCoord = vec2(1.0, 0.0);
EmitVertex();

Pos.y += 1.0;
gl_Position = gVP * vec4(Pos, 1.0);
TexCoord = vec2(1.0, 1.0);
EmitVertex();
//通过调用EndPrimitive指定前面生成的顶点数据作为一个新的primitive
EndPrimitive();
}

void BillboardList::CreatePositionBuffer()
{
Vector3f Positions[NUM_ROWS * NUM_COLUMNS];
//创建顶点数据的时候即传递的世界坐标
for (unsigned int j = 0 ; j < NUM_ROWS ; j++) {
for (unsigned int i = 0 ; i < NUM_COLUMNS ; i++) {
Vector3f Pos((float)i, 0.0f, (float)j);
Positions[j * NUM_COLUMNS + i] = Pos;
}
}

......
}
EmitVertex() - produces a new vertex at the output of the geometry shader. Each time it is called, a vertex is appended to the end of the current strip (将新的vertex加入到primitive的队列)
EndPrimitive() - breaks the current strip and signals OpenGL that a new strip should be started the next time EmitVertex() is called (将之前所加入的vertex算作一个primitive的信息,通知OpenGL开始下一个primitive的构造)
Note:
When the geometry shader exits, the current primitive is ended implicitly (如果geometry shader结束了,那么当前还没有调用EndPrimitive()的primitive将视作结束)
When EndPrimitive() is called, any incomplete primitives will simply be discarded (当EndPrimitive()被调用的时候,数据不完全的primitive将被抛弃 -- 不调用这个方法的primitive相当于culling掉)
  1. 在FS中利用GS中生成的纹理坐标映射纹理信息并Cull掉纹理图片中黑色的部分
1
2
3
4
5
6
7
8
9
10
11
12
13
14
15
#version 330                                                                        

uniform sampler2D gColorMap;

in vec2 TexCoord;
out vec4 FragColor;

void main()
{
FragColor = texture2D(gColorMap, TexCoord);
//Cull掉纹理图片中黑色的部分
if (FragColor.r == 0 && FragColor.g == 0 && FragColor.b == 0) {
discard;
}
}

Final Effect:
GSBillboard

接下来我们看看通过Transform Feedback实现Particle System的步骤:

  1. 生成Transform Feedback Objets和用于存储数据的buffer,并将buffer绑定到特定Transform Feedback Objects上
1
2
3
4
5
6
7
8
9
10
11
12
13
14
15
16
17
18
19
20
21
22
23
24
25
26
27
28
29
30
bool ParticleSystem::InitParticleSystem(const Vector3f& pos)
{
Particle Particles[MAX_PARTICLES];
ZERO_MEM(Particles);
//Particle System最初的那个发射点信息
Particles[0].Type = PARTICLE_TYPE_LAUCHER;
Particles[0].Pos = pos;
Particles[0].Vel = Vector3f(0.0f, 0.0001f, 0.0f);
Particles[0].LifetimeMillis = 0.0f;
//生成2个transform feedback object和两个buffer
//"OpenGL enforces a general limitation that the same resource cannot be bound for both input and output in the same draw call. //This means that if we want to update the particles in a vertex buffer we actually need two transform feedback buffers and toggle between them. //On frame 0 we will update the particles in buffer A and render the particles from buffer B and on frame 1 we will update the particles in buffer B and render the particles from buffer "
//从上面可以看出我们之所以生成两个Transform Feedback Object和两个buffer是因为OpenGL要求我们不能在一次draw call里把同一个resource(这里指TFB和buffer)即作为输入也作为输出
//所以我们想要通过fist pass去记录一些数据信息,然后再将其渲染到屏幕上,我们必须通过切换两个TFO和buffer来实现
//记录到A的时候用B数据渲染,记录到B的时候通过A数据来渲染
glGenTransformFeedbacks(2, m_TransformFeedback);

glGenBuffers(2, m_ParticleBuffer);

for(unsigned int i = 0; i < 2; i++)
{
//绑定TFO,使得接下来在TFB上的操作是跟特定TFO(transform feedback object)挂钩的
glBindTransformFeedback(GL_TRANSFORM_FEEDBACK, m_TransformFeedback[i]);
glBindBuffer(GL_ARRAY_BUFFER, m_ParticleBuffer[i]);
glBufferData(GL_ARRAY_BUFFER, sizeof(Particles), Particles, GL_DYNAMIC_DRAW);
//绑定对应buffer的对应的TFO上
glBindBufferBase(GL_TRANSFORM_FEEDBACK_BUFFER, 0, m_ParticleBuffer[i]);
}

.......
}
  1. 配置Transform Feedback Varyings(指定我们会如何在GS中去如何记录和存储哪些信息)
1
2
3
4
5
6
7
8
9
10
11
12
13
14
15
16
17
18
19
20
21
22
bool PSUpdateTechnique::Init()
{
......

const GLchar* Varyings[4];
Varyings[0] = "Type1";
Varyings[1] = "Position1";
Varyings[2] = "Velocity1";
Varyings[3] = "Age1";
//在链接Update Shader之前,我们需要指明TFB会如何去记录和存储数据信息
//这里指明了我们会在GS中去记录Varyings中四个变量的数据信息到TFB中
//GL_INTERLEAVED_ATTRIBS表示我们会把所有的attribute数据都记录到一个buffer里
glTransformFeedbackVaryings(m_shaderProg, 4, Varyings, GL_INTERLEAVED_ATTRIBS);

if (!Finalize()) {
return false;
}

......

return true;
}
  1. 配置设定一些Update Shader和Billboard Shader的一些数据信息
1
2
3
4
5
6
7
8
9
10
11
12
13
14
15
16
17
18
19
20
21
22
23
24
25
26
27
28
29
30
31
32
33
34
35
36
37
38
39
40
41
42
43
44
45
46
47
bool ParticleSystem::InitParticleSystem(const Vector3f& pos)
{
......

if(!m_UpdateTechnique.Init())
{
assert(false);
return false;
}

m_UpdateTechnique.Enable();

m_UpdateTechnique.SetRandomTextureUnit(RANDOM_TEXTURE_UNIT_INDEX);
m_UpdateTechnique.SetLauncherLifetime(100.0f);
m_UpdateTechnique.SetShellLifetime(10000.0f);
m_UpdateTechnique.SetSecondaryShellLifetime(2500.0f);

if(!m_RandomTexture.InitRandomTexture(1000))
{
assert(false);
return false;
}

m_RandomTexture.Bind(RANDOM_TEXTURE_UNIT);

if(!m_BillboardTechnique.Init())
{
assert(false);
return false;
}

m_BillboardTechnique.Enable();

m_BillboardTechnique.SetColorTextureUnit(COLOR_TEXTURE_UNIT_INDEX);

m_BillboardTechnique.SetBillboardSize(0.01f);

m_PTexture = new Texture(GL_TEXTURE_2D, "../Content/fireworks_red.jpg");

if(!m_PTexture->Load())
{
assert(false);
return false;
}

return GLCheckError();
}
  1. 一次Draw Call,两个Pass,一个Pass去更新TFB里的数据,一个Pass去渲染TFB里的数据
1
2
3
4
5
6
7
8
9
10
11
12
13
14
15
16
17
18
19
20
21
22
23
24
25
26
27
28
29
30
31
32
33
34
35
36
37
38
39
40
41
42
43
44
45
46
47
48
49
50
51
52
53
54
55
56
57
58
59
60
61
62
63
64
65
66
67
68
69
70
71
72
73
74
75
76
77
78
79
80
81
82
83
84
85
86
87
88
89
90
static void RenderPass()
{
......
gParticleSystem.Render(deltatimemillis, p.GetVPTrans(), pGameCamera->GetPos());
......
}

void ParticleSystem::Render(int deltatimemillis, const Matrix4f& vp, const Vector3f& camerapos)
{
m_Time += deltatimemillis;
//因为Shader里会去模拟真实重力和粒子移动效果,所以Update的时候需要delta time
UpdateParticles(deltatimemillis);

RenderParticles(vp, camerapos);
//这里就是我们之前说的通过切换两个TFO和buffer来实现一边更新TFB一边渲染TFB的效果
m_CurrVB = m_CurrTFB;
m_CurrTFB = (m_CurrTFB + 1) & 0x1;
}


void ParticleSystem::UpdateParticles(int deltamillis)
{
m_UpdateTechnique.Enable();
m_UpdateTechnique.SetTime(m_Time);
m_UpdateTechnique.SetDeltaTimeMillis(deltamillis);

m_RandomTexture.Bind(RANDOM_TEXTURE_UNIT);
//这里之所以调用glEnable(GL_RASTERIZER_DISCARD)是因为在Update Pass时,我们不需要进入RS阶段,所以这里关闭了Rasterizer
glEnable(GL_RASTERIZER_DISCARD);
//Update Pass的时候,我们把m_ParticleBuffer[m_CurrVB]作为数据输入
glBindBuffer(GL_ARRAY_BUFFER, m_ParticleBuffer[m_CurrVB]);
//通过绑定m_TransformFeedback[m_CurrTFB]到GL_TRANSFORM_FEEDBACK,我们把GS里生成的数据存储到绑定了m_TransformFeedback[m_CurrTFB]的m_ParticleBuffer[m_CurrTFB] buffer里
//这里就是我们说的A作为输入,B作为输出
glBindTransformFeedback(GL_TRANSFORM_FEEDBACK, m_TransformFeedback[m_CurrTFB]);

glEnableVertexAttribArray(0);
glEnableVertexAttribArray(1);
glEnableVertexAttribArray(2);
glEnableVertexAttribArray(3);

glVertexAttribPointer(0, 1, GL_FLOAT, GL_FALSE, sizeof(Particle), 0); // type
glVertexAttribPointer(1, 3, GL_FLOAT, GL_FALSE, sizeof(Particle), (const GLvoid*)4); // position
glVertexAttribPointer(2, 3, GL_FLOAT, GL_FALSE, sizeof(Particle), (const GLvoid*)16); // velocity
glVertexAttribPointer(3, 1, GL_FLOAT, GL_FALSE, sizeof(Particle), (const GLvoid*)28); // lifetime
//激活Transform Feedback,指明GS输出的primitive type
glBeginTransformFeedback(GL_POINTS);

if(m_IsFirst)
{
//只有第一次我们是知道我们会draw的Point数量(因为particle发射器只有一个)
glDrawArrays(GL_POINTS, 0, 1);

m_IsFirst = false;
}
else
{
//第二次以后,顶点数量是未知的,因为GS是可以生成多个顶点数据的。
//"The system automatically tracks the number of vertices for us for each buffer and later uses that number internally when the buffer is used for input. "
//从上面可知,transfor feedback buffer里的顶点数量系统会自己去track
//我们只需通知用哪一个TFB绑定的buffer作为数据输入即可
glDrawTransformFeedback(GL_POINTS, m_TransformFeedback[m_CurrVB]);
}

glEndTransformFeedback();

glDisableVertexAttribArray(0);
glDisableVertexAttribArray(1);
glDisableVertexAttribArray(2);
glDisableVertexAttribArray(3);
}

void ParticleSystem::RenderParticles(const Matrix4f& vp, const Vector3f& camerapos)
{
m_BillboardTechnique.Enable();
m_BillboardTechnique.SetCameraPosition(camerapos);
m_BillboardTechnique.SetVP(vp);
m_PTexture->Bind(COLOR_TEXTURE_UNIT);
//第二Pass的时候,我们需要渲染出图像,所以需要开启Rasterizer
glDisable(GL_RASTERIZER_DISCARD);
//这里通过使用之前记录到m_ParticleBuffer[m_CurrTFB]的数据作为输入进行渲染
glBindBuffer(GL_ARRAY_BUFFER, m_ParticleBuffer[m_CurrTFB]);

glEnableVertexAttribArray(0);

glVertexAttribPointer(0, 3, GL_FLOAT, GL_FALSE, sizeof(Particle), (const GLvoid*)4); // position
//绘制并渲染m_TransformFeedback[m_CurrTFB]所绑定的m_ParticleBuffer[m_CurrTFB]里的数据
glDrawTransformFeedback(GL_POINTS, m_TransformFeedback[m_CurrTFB]);

glDisableVertexAttribArray(0);
}
  1. 接下来就是看Update Shader是如何去更新模拟粒子的生成和重力效果的,billboard Shader是如何将生成的顶点粒子数据渲染到屏幕上的
1
2
3
4
5
6
7
8
9
10
11
12
13
14
15
16
17
18
19
20
21
22
23
24
25
26
27
28
29
30
31
32
33
34
35
36
37
38
39
40
41
42
43
44
45
46
47
48
49
50
51
52
53
54
55
56
57
58
59
60
61
62
63
64
65
66
67
68
69
70
71
72
73
74
75
76
77
78
79
80
81
82
83
84
85
86
87
88
89
90
91
92
93
94
95
96
97
98
99
100
101
102
103
104
105
106
107
108
109
110
111
112
113
114
115
116
117
118
119
120
121
122
123
124
125
126
127
128
129
130
131
132
133
134
135
136
137
138
139
140
141
142
143
144
145
146
147
148
149
150
151
152
153
154
155
156
157
158
159
160
161
162
163
164
165
166
167
168
169
170
171
172
173
174
175
176
177
178
179
180
181
182
183
184
185
186
187
188
189
190
191
192
193
194
195
196
197
198
199
200
201
202
203
204
205
206
207
ps_update.vs
#version 330

layout (location = 0) in float Type;
layout (location = 1) in vec3 Position;
layout (location = 2) in vec3 Velocity;
layout (location = 3) in float Age;

out float Type0;
out vec3 Position0;
out vec3 Velocity0;
out float Age0;

//VS里我们只是正常获取传入的顶点相关信息
void main()
{
Type0 = Type;
Position0 = Position;
Velocity0 = Velocity;
Age0 = Age;
}

ps_update.gs
#version 330

layout(points) in;
layout(points) out;
layout(max_vertices = 30) out;

in float Type0[];
in vec3 Position0[];
in vec3 Velocity0[];
in float Age0[];

out float Type1;
out vec3 Position1;
out vec3 Velocity1;
out float Age1;

uniform float gDeltaTimeMillis;
uniform float gTime;
uniform sampler1D gRandomTexture;
uniform float gLauncherLifetime;
uniform float gShellLifetime;
uniform float gSecondaryShellLifetime;

#define PARTICLE_TYPE_LAUNCHER 0.0f
#define PARTICLE_TYPE_SHELL 1.0f
#define PARTICLE_TYPE_SECONDARY_SHELL 2.0f

//获取随机方向的方法,我们在gRandomTexture里随机写入了1D的数据信息
vec3 GetRandomDir(float TexCoord)
{
vec3 Dir = texture(gRandomTexture, TexCoord).xyz;
Dir -= vec3(0.5, 0.5, 0.5);
return Dir;
}

void main()
{
float Age = Age0[0] + gDeltaTimeMillis;

if (Type0[0] == PARTICLE_TYPE_LAUNCHER) {
//如果粒子发射器life time达到,我们在粒子发射器的位置生成新的粒子(随机方向)
if (Age >= gLauncherLifetime) {
Type1 = PARTICLE_TYPE_SHELL;
Position1 = Position0[0];
vec3 Dir = GetRandomDir(gTime/1000.0);
Dir.y = max(Dir.y, 0.5);
Velocity1 = normalize(Dir) / 20.0;
Age1 = 0.0;
EmitVertex();
EndPrimitive();
Age = 0.0;
}
//重置并生成新的粒子发射器使其持续生成粒子
Type1 = PARTICLE_TYPE_LAUNCHER;
Position1 = Position0[0];
Velocity1 = Velocity0[0];
Age1 = Age;
EmitVertex();
EndPrimitive();
}
else {
//当当前粒子不是粒子发射器的时候,我们通过传入的delta time去更新粒子的位置持续时间等相关信息
float DeltaTimeSecs = gDeltaTimeMillis / 1000.0f;
float t1 = Age0[0] / 1000.0;
float t2 = Age / 1000.0;
vec3 DeltaP = DeltaTimeSecs * Velocity0[0];
vec3 DeltaV = vec3(DeltaTimeSecs) * (0.0, -9.81, 0.0);
if (Type0[0] == PARTICLE_TYPE_SHELL) {
//若当前粒子是第一次粒子发射器发散出的粒子
//我们通过粒子的持续时间决定是否进入第二次粒子炸裂阶段
if (Age < gShellLifetime) {
//还没达到炸裂时间点,我们仅仅更新该粒子的位置持续时间等相关信息
Type1 = PARTICLE_TYPE_SHELL;
Position1 = Position0[0] + DeltaP;
Velocity1 = Velocity0[0] + DeltaV;
Age1 = Age;
EmitVertex();
EndPrimitive();
}
else {
//当由粒子发射器发散出的粒子达到炸裂时间点的时候,我们通过该粒子所在位置随机生成10个随机方向的粒子
for (int i = 0 ; i < 10 ; i++) {
Type1 = PARTICLE_TYPE_SECONDARY_SHELL;
Position1 = Position0[0];
vec3 Dir = GetRandomDir((gTime + i)/1000.0);
Velocity1 = normalize(Dir) / 20.0;
Age1 = 0.0f;
EmitVertex();
EndPrimitive();
}
}
}
else {
//进入到第二次发散阶段的粒子,如果还在生命时间内,我们就更新起位置持续时间等相关信息,否则直接略过该粒子(即粒子消亡)
if (Age < gSecondaryShellLifetime) {
Type1 = PARTICLE_TYPE_SECONDARY_SHELL;
Position1 = Position0[0] + DeltaP;
Velocity1 = Velocity0[0] + DeltaV;
Age1 = Age;
EmitVertex();
EndPrimitive();
}
}
}
}

ps_update.fs
#version 330
//因为Update Shader只负责update粒子信息,不许要渲染,所以这里ps_update.fs为空
void main()
{
}

//最终的通过transform feedback生成的粒子信息会通过billboard一一渲染出来
billboard.vs
#version 330
//这里只需要粒子的位置信息即可
layout (location = 0) in vec3 Position;

void main()
{
gl_Position = vec4(Position, 1.0);
}

billboard.gs
#version 330

layout(points) in;
layout(triangle_strip) out;
layout(max_vertices = 4) out;

uniform mat4 gVP;
uniform vec3 gCameraPos;
uniform float gBillboardSize;

out vec2 TexCoord;

void main()
{
vec3 Pos = gl_in[0].gl_Position.xyz;
vec3 toCamera = normalize(gCameraPos - Pos);
vec3 up = vec3(0.0, 1.0, 0.0);
vec3 right = cross(toCamera, up) * gBillboardSize;

Pos -= right;
gl_Position = gVP * vec4(Pos, 1.0);
TexCoord = vec2(0.0, 0.0);
EmitVertex();

Pos.y += gBillboardSize;
gl_Position = gVP * vec4(Pos, 1.0);
TexCoord = vec2(0.0, 1.0);
EmitVertex();

Pos.y -= gBillboardSize;
Pos += right;
gl_Position = gVP * vec4(Pos, 1.0);
TexCoord = vec2(1.0, 0.0);
EmitVertex();

Pos.y += gBillboardSize;
gl_Position = gVP * vec4(Pos, 1.0);
TexCoord = vec2(1.0, 1.0);
EmitVertex();

EndPrimitive();
}

billboard.fs
#version 330

uniform sampler2D gColorMap;

in vec2 TexCoord;
out vec4 FragColor;

void main()
{
FragColor = texture2D(gColorMap, TexCoord);
//过滤掉粒子纹理图片里较白的部分
if (FragColor.r >= 0.9 && FragColor.g >= 0.9 && FragColor.b >= 0.9) {
discard;
}
}

通过glDEBugger我们可以查看到Transform Feedback生成的数据信息:
TransformFeedbackBufferData

Final Effect:
ParticleSystem

接下来让我们来看看Transform Feedback的更多高级使用:
Multiple Output Steams
Multiple streams of vertices can be declared as outputs in the geometry shader (通过stream我们可以把一些额外需要保存的信息保存到特定的stream里便于transform feedback buffer去访问并进行进一步的处理)

Using the stream layout qualifier – this layout qualifier may be applied globally, to an interface block, or to a single output declaration

Each stream is numbered, starting from zero, max number of streams – GL_MAX_VERTEX_STREAMS

When the stream number is given at global scope, all subsequently declared geometry shader outputs become members of that stream until another output stream layout qualifier is specified
See how to declaration stream:
StreamDeclaration

Multiple output stream’s built in GLSL functions:
EmitStreamVertex(int stream)
EndStreamVertex(int stream)

glTransformFeedbackVaryings() – tell OpenGL how those streams are mapped into transform feedback buffer (告诉OpenGL各个stream是怎么映射到transform feedback buffer的)

When multiple streams are active, it is required that variables associated with a single stream are not written into the same buffer binding point as those associated with any other stream(当多个stream声明激活的时候,我们必须将每一个stream写到不同的buffer binding point里)

gl_NextBuffer is used to signal that the following output variables are to be recorded into the buffer object bound to the next transform feedback binding point (gl_NexBuffer告诉OpenGL后面的数据将绑定到下一个transform feedback buffer)

if rasterization & fragment shader are enabled, the output variables belonging to stream 0 will be used to form primitives for rasterization and will be passed into the fragment shader. Output variables belonging to other streams will not be visible in the fragment shader and if transform feedback is not active, they will be discarded (这里需要注意,一旦rasterization 和 fragment shader被开启或者transform feedback没有被开启,那么geometry shader里面指定的out变量只有属于stream 0的才会被进行处理,其他都会被抛弃)

Note:
When multiple output streams are used in a geometry shader, they must all have points as the primitive type (注意,当multiple output streams被开启时,geometry shader必须指定输出类型为point,当first pass的时候geometry shader指定输出类型为point,second pass的时候geometry shader可以针对第一次transform feedback记录的point数据进行处理输出triangle等)

Primitive Queries
Reason:
Geometry shader can emit a variable number of vertices per invocation (因为geometry shader会扩展出很多primitive和vertices,我们在访问一些跟transform feedback buffer相关的数据的时候就不那么直接 – 这里要提一下没有geometry shader,vertex shader结合transform feeback buffer的使用是一对一的输出,而geometry shader不一样,会有一堆多的primitive,vertices的输出)

Problem:
The number of vertices recorded into transform feedback buffers when a geometry shader is present may not be easy to infer

Solution:
Two types of queries are available to count both the number of primitives the geometry shader generates, and the number of primitives actually written into the transform feedback buffers(通过Primitive Queries我们可以得知geometry shader的primitives,vertices生成数量和实际被写入transform feedback buffer的primitive,vertices数量)

GL_PRIMITIVES_GENERATED – query counts the number of vertices output by the geometry shader – valid at any time
&
GL_TRANSFORM_FEEDBACK_PRIMITIVES_WRITTEN – query counts the number of vertices actually written into a transform feedback buffer – only valid when transform feedback is active

Due to geometry shader supports multiple transform feedback streams, primitive queries are indexed (因为geometry shader支持multiple transform feedback streams,所以primitive queries也是indexed的)

3D Picking

“The ability to match a mouse click on a window showing a 3D scene to the primitive (let’s assume a triangle) who was fortunate enough to be projected to the exact same pixel where the mouse hit is called 3D Picking.”

3D Picking实现的关键在于通过类似Shadow map的方式,把所有的primitive信息写入到一张picking texture里,当mouse点击的时候我们去查询所点击的primitive信息然后把该primitive渲染成我们想要的颜色即可。

实现步骤:
First pass(picking pass) – 利用gDrawIndex, gObjectIndex, Primitive Index生成picking texture

1
2
3
4
5
6
7
8
9
10
11
12
13
14
15
16
17
18
19
20
21
22
23
24
25
26
27
28
29
30
31
32
33
34
35
36
37
38
39
40
41
42
43
44
45
46
bool PickingTexture::Init(unsigned int WindowWidth, unsigned int WindowHeight)
{
// Create the FBO
glGenFramebuffers(1, &m_fbo);
glBindFramebuffer(GL_FRAMEBUFFER, m_fbo);

// Create the texture object for the primitive information buffer
glGenTextures(1, &m_pickingTexture);
glBindTexture(GL_TEXTURE_2D, m_pickingTexture);
glTexImage2D(GL_TEXTURE_2D, 0, GL_RGB32F, WindowWidth, WindowHeight,
0, GL_RGB, GL_FLOAT, NULL);
glFramebufferTexture2D(GL_FRAMEBUFFER, GL_COLOR_ATTACHMENT0, GL_TEXTURE_2D,
m_pickingTexture, 0);

// Create the texture object for the depth buffer
glGenTextures(1, &m_depthTexture);
glBindTexture(GL_TEXTURE_2D, m_depthTexture);
glTexImage2D(GL_TEXTURE_2D, 0, GL_DEPTH_COMPONENT, WindowWidth, WindowHeight,
0, GL_DEPTH_COMPONENT, GL_FLOAT, NULL);
glFramebufferTexture2D(GL_FRAMEBUFFER, GL_DEPTH_ATTACHMENT, GL_TEXTURE_2D,
m_depthTexture, 0);

// Disable reading to avoid problems with older GPUs
glReadBuffer(GL_NONE);

glDrawBuffer(GL_COLOR_ATTACHMENT0);

// Verify that the FBO is correct
GLenum Status = glCheckFramebufferStatus(GL_FRAMEBUFFER);

if (Status != GL_FRAMEBUFFER_COMPLETE) {
printf("FB error, status: 0x%x\n", Status);
return false;
}

// Restore the default framebuffer
glBindTexture(GL_TEXTURE_2D, 0);
glBindFramebuffer(GL_FRAMEBUFFER, 0);

return GLCheckError();
}

void PickingTexture::EnableWriting()
{
glBindFramebuffer(GL_DRAW_FRAMEBUFFER, m_FBO);
}

通过类似生成Shaow map的方式,我们生成一个FRAMEBUFFER m_fbo,然后通过分别attach m_depthTexture和m_pickingTexture到GL_COLOR_ATTACHMENT0和GL_DEPTH_COMPONENT上,紧接着我们通过指定绘制到m_fbo的GL_COLOR_ATTACHMENT0(即我们attach的那个)上,这样一来当我们渲染到m_fbo的时候,attach到GL_COLOR_ATTACHMENT0的那个color texture就会得到渲染的picking texture,最后在我们我们在渲染之前需要指定m_fbo作为渲染到的FRAMEBUFFER。这样一来我们通过Picking Technique就能得到Picking texture。
这里也会生成depth texture,但我们并不会用到,指定生成depth texture的原因如下:
“By combining a depth buffer in the process we guarantee that when several primitives are overlapping the same pixel we get the index of the top-most primitive (closest to the camera). “(注意我们需要结合depth buffer来保证我们生成的picking texture保存的primitive信息是离摄像机最近的)

1
2
3
4
5
6
7
8
9
10
11
12
13
14
15
16
17
18
19
20
21
22
23
24
25
26
27
28
29
30
31
32
33
34
35
36
37
38
39
40
41
42
43
44
45
46
47
picking_technique.cpp
#include "picking_technique.h"
#include "ogldev_util.h"

......

void PickingTechnique::SetWVP(const Matrix4f& WVP)
{
glUniformMatrix4fv(m_WVPLocation, 1, GL_TRUE, (const GLfloat*)WVP.m);
}

void PickingTechnique::DrawStartCB(uint DrawIndex)
{
glUniform1ui(m_drawIndexLocation, DrawIndex);
}

void PickingTechnique::SetObjectIndex(uint ObjectIndex)
{
GLExitIfError;
glUniform1ui(m_objectIndexLocation, ObjectIndex);
// GLExitIfError;
}

picking.vs
#version 330

layout (location = 0) in vec3 Position;

uniform mat4 gWVP;

void main()
{
gl_Position = gWVP * vec4(Position, 1.0);
}

picking.fs
#version 330

uniform uint gDrawIndex;
uniform uint gObjectIndex;

out vec3 FragColor;

void main()
{
FragColor = vec3(float(gObjectIndex), float(gDrawIndex),float(gl_PrimitiveID + 1));
}

理解上述代码,我们首先需要看看我们存储在picking texture里的信息组成。
从picking.fs中可以看出我们存储在piking texture里的颜色信息主要是由gObjectIndex,gDrawIndex,gl_PrimitiveID组成。
当我们去渲染spider mesh的时候,我们通过调用void Mesh::Render(IRenderCallbacks* pRenderCallbacks)传入了实现了DrawStartCB回调方法的类传入了shader里gObjectIndex的值。

1
2
3
4
5
6
7
8
9
10
11
12
13
14
15
16
17
18
19
20
21
void Mesh::Render(IRenderCallbacks* pRenderCallbacks)
{
......

for (unsigned int i = 0 ; i < m_Entries.size() ; i++) {
glBindBuffer(GL_ARRAY_BUFFER, m_Entries[i].VB);
.......
glBindBuffer(GL_ELEMENT_ARRAY_BUFFER, m_Entries[i].IB);

.......

if (pRenderCallbacks) {
pRenderCallbacks->DrawStartCB(i);
}

GLExitIfError;
glDrawElements(GL_TRIANGLES, m_Entries[i].NumIndices, GL_UNSIGNED_INT, 0);
}

......
}

这里传入的是spider mesh count的索引,即gObjectIndex代表mesh count的索引(这里的spider由19个mesh组成,通过open3mod可以查看到)。
SpiderMeshTree
接下来当我们渲染两个spider的时候,我们把Object index(即这里spider的数量)作为了gDrawIndex传入了shader。

1
2
3
4
5
6
7
8
9
10
11
12
13
14
15
16
17
18
19
static void PickingPhase()
{
.......

gPickingTexture.EnableWriting();

glClear(GL_COLOR_BUFFER_BIT | GL_DEPTH_BUFFER_BIT);

gPickingEffect.Enable();

for (uint i = 0 ; i < (int)ARRAY_SIZE_IN_ELEMENTS(gWorldPos) ; i++) {
p.WorldPos(gWorldPos[i]);
gPickingEffect.SetObjectIndex(i);
gPickingEffect.SetWVP(p.GetWVPTrans());
gPSpider->Render(&gPickingEffect);
}

gPickingTexture.DisableWriting();
}

最后gl_PrimitiveID是OpenGL build-in的变量,”This is a running index of the primitives which is automatically maintained by the system.”(代表我们绘制的primitive索引值,每一次draw都会从0开始。)
这里就引出了一个问题。我们如何得知我们渲染到picking texture里的primitive值0是指background还是被object遮挡的primitive了。
这也就是为什么我们在写入picking texture的时候,gl_PrimitiveID + 1的原因了。这样一来凡是primitive为0的都是background。
PickingTexture

Render pass – 通过映射mouse click的pixel到picking texture,会得到鼠标点击到的gObjectIndex,gDrawIndex,gl_PrimitiveID信息,然后通过这些信息,我们把该点击的primitive通过simple color shader渲染成红色,然后再正常渲染两个spider即可。

1
2
3
4
5
6
7
8
9
10
11
12
13
14
15
16
17
18
19
20
21
22
23
24
25
26
27
28
29
30
31
32
33
34
35
36
37
38
39
40
41
42
43
44
45
46
47
48
49
50
51
52
53
54
55
56
57
58
59
60
61
62
63
64
65
66
67
68
69
70
71
72
73
74
75
76
77
78
79
80
81
82
83
84
85
86
void Mesh::Render(unsigned int DrawIndex, unsigned int PrimID)
{
assert(DrawIndex < m_Entries.size());

......

glBindBuffer(GL_ARRAY_BUFFER, m_Entries[DrawIndex].VB);

......

glBindBuffer(GL_ELEMENT_ARRAY_BUFFER, m_Entries[DrawIndex].IB);

glDrawElements(GL_TRIANGLES, 3, GL_UNSIGNED_INT, (const GLvoid*)(PrimID * 3 * sizeof(GLuint)));

......
}

PickingTexture::PixelInfo PickingTexture::ReadPixel(unsigned int x, unsigned int y)
{
glBindFramebuffer(GL_READ_FRAMEBUFFER, m_FBO);
glReadBuffer(GL_COLOR_ATTACHMENT0);
PixelInfo pixel;
glReadPixels(x, y, 1, 1, GL_RGB, GL_FLOAT, &pixel);
glReadBuffer(GL_NONE);

glBindFramebuffer(GL_READ_FRAMEBUFFER, 0);

return pixel;
}

void RenderPhase()
{
glClear(GL_COLOR_BUFFER_BIT | GL_DEPTH_BUFFER_BIT);

Pipeline p;
p.Scale(0.1f, 0.1f, 0.1f);
p.SetCamera(m_pGameCamera->GetPos(), m_pGameCamera->GetTarget(), m_pGameCamera->GetUp());
p.SetPerspectiveProj(m_persProjInfo);

// If the left mouse button is clicked check if it hit a triangle
// and color it red
if (m_leftMouseButton.IsPressed) {
PickingTexture::PixelInfo Pixel = m_pickingTexture.ReadPixel(m_leftMouseButton.x,
WINDOW_HEIGHT - m_leftMouseButton.y - 1);
if (Pixel.PrimID != 0) {
m_simpleColorEffect.Enable();
p.WorldPos(m_worldPos[(uint)Pixel.ObjectID]);
m_simpleColorEffect.SetWVP(p.GetWVPTrans());
// Must compensate for the decrement in the FS!
m_pMesh->Render((uint)Pixel.DrawID, (uint)Pixel.PrimID - 1);
}
}

// render the objects as usual
m_lightingEffect.Enable();
m_lightingEffect.SetEyeWorldPos(m_pGameCamera->GetPos());

for (unsigned int i = 0 ; i < ARRAY_SIZE_IN_ELEMENTS(m_worldPos) ; i++) {
p.WorldPos(m_worldPos[i]);
m_lightingEffect.SetWVP(p.GetWVPTrans());
m_lightingEffect.SetWorldMatrix(p.GetWorldTrans());
m_pMesh->Render(NULL);
}
}

simple_color.vs
#version 330

layout (location = 0) in vec3 Position;

uniform mat4 gWVP;

void main()
{
gl_Position = gWVP * vec4(Position, 1.0);
}

simple_color.fs
#version 330

layout(location = 0) out vec4 FragColor;

void main()
{
FragColor = vec4(1.0, 0.0, 0.0, 1.0);
}

这里去读取picking texture里的信息的时候,要注意的一点是,鼠标获取得到的坐标信息和我们去查询texture的坐标系是不一致的,这里需要转换。
一下来源于Glut Mouse Coordinates
“In “window” coordinate, the origin (0,0) is top left of the viewport.In OpenGL the origin is bottom left of the viewport. When you click glut give you the window coordinate. All you have to do is calculate this: y = height_of_viewport - y - 1.

Edit: Notice that you compare a screen coordinate (mouse click) with an object coordinate (your rectangle). This is fine if you use a perspective projection like this glOrtho(0,0,viewport_width,viewport_height). If not you need to call gluProject to map each corner of your rectangle in screen coordinate. “
从上面可以看出,glut获取的mouse坐标系是以左上角为(0,0)点。而OpenGL viewport的(0,0)点时左下角,所以我们需要通过下列方式去转换映射点:

1
PickingTexture::PixelInfo Pixel = m_pickingTexture.ReadPixel(m_leftMouseButton.x, WINDOW_HEIGHT - m_leftMouseButton.y - 1);

在得到正确的映射值后,我们将查询到的gObjectIndex,gDrawIndex,gl_PrimitiveID当做信息传入void Mesh::Render(unsigned int DrawIndex, unsigned int PrimID)去指定渲染特定mesh的特定primitive成红色。这里要注意的一点是因为mesh里的primitive索引是从0开始的,但我们之前存储的primitive index是+1的,所以这里我们需要恢复原有正确的值去指定渲染正确的primitive。

1
2
// Must compensate for the decrement in the FS!
m_pMesh->Render((uint)Pixel.DrawID, (uint)Pixel.PrimID - 1);

这里有一个疑问没有想通,写在这里,如果有人知道答案,希望不腻赐教。第一次把特定primitive渲染成红色后再通过正常渲染渲染两个spider,那么按理,那个特定的primitve会被再次绘制渲染(正常渲染的时候),那么深度信息应该是和前一次一致的,为什么最终却显示的红色而不是模型纹理的颜色了?
3DPicking

Basic Tessellation

The tessellation process doesn’t operate on OpenGL’s classic geometric primitives: points, lines, and triangles, but uses a new primitive called a patch (Tessellation shader就是针对patch来进行处理的而并非点,线,三角形)

Patch is just an ordered list of vertices (在tessellation shader里面比较重要的概念就是这个patch,patch是一系列的顶点,OpenGL规定patch的vertex数量必须至少大于等于3)。这里的Patch我们可以理解为一个包含了几何图形的所有Control Points(CP)的集合。Control Points会决定这个几何图形最终的形态。

让我们来看看Tessellation Shader在OpenGL Pipeline里的执行顺序(下图来源
TessellationShaderProcess

Two Shader Stage, One fixed function:

  1. Tessellation Control Shader(TCS)
    “The control shader calculates a set of numbers called Tessellation Levels (TL). The TLs determine the Tessellation level of detail - how many triangles to generate for the patch.”
    可以看出TCS并不是负责顶点的细分而是负责指定细分的规则(如何细分,细分程度)。

    上述Tessellation Levels(TL)的计算就比较灵活,可以根据摄像机距离也可以根据屏幕最终所在像素多少来决定细分方式。

    Note:
    “It is executed once per CP in the output patch”

  2. Primitive Generator (Fixed function)
    “OpenGL passes the output of the tessellation control shader to the primitive generator, which generates the mesh of geometric primitives and tessellation coordinates that the tessellation evaluation shader stage uses.”(PG之后会输出domain细分后的顶点和顶点纹理坐标信息,通过顶点纹理信息TES会算出对应的顶点位置信息)

    通过TCS指定的规则去细分。
    这里需要理解一个概念 - Domain
    细分的规则跟Domain的类型有关
    下面我们来看看Quad Domain和Triangle Domain:
    Domains

    不同类型的domain – 会决定我们inner和outer的具体含义:
    Quad Tessellation:
    ……

    Isoline Tessellation:
    Use only two of the outer-tessellation levels to determine the amount of subdivision

    Triangle Tessellation:
    Triangular domains use barycentric coordinates to specify their Tessellation coordinates

    从上面可以看出三中不同的Domain有不同的细分规则。
    三角形是通过质心去做细分的。
    下面来看看三角形细分后的结果:
    TriangleDomainSubdivision

  3. Tessellation Evaluation Shader(TES)
    The TES is executed on all generated domain locations.Positions each of the vertices in the final mesh (TES是针对从tessellation control shader和Primitive Generator通过细分后所有patch相关的顶点来进行运算,通过各顶点的gl_TessCoord(顶点在patch里的相对坐标信息)按不同Domain的纹理坐标计算方式计算出相应的纹理坐标,位置信息和法线信息,从而实现细分多边形和修改顶点信息效果)

    接下来让我们结合事例学习理解:
    Basic Tessellation Tutorial
    该Tutorial实现下列几个功能:

    1. 根据quad.obj模型三角形边与camera的距离去决定LOD的细分程度

    2. 通过读取高度图去作为对应顶点的高度信息,且实现通过+-控制高度图的所占比例

    3. 可以通过z键开启wireframe模式查看细分情况

      接下来看看主要的实现步骤:

      1. 加载并设置height map和color map作为高度图和纹理图
1
2
3
4
5
6
7
8
9
10
11
12
13
14
15
16
17
18
19
20
21
22
23
24
25
26
27
28
29
30
31
32
33
34
35
36
37
38
39
40
41
static bool InitializeTesselationInfo()
{
......
//加载height map和color map
gPDisplacementMap = new Texture(GL_TEXTURE_2D, "../Content/heightmap.jpg");

if(!gPDisplacementMap->Load())
{
assert(false);
return false;
}

gPDisplacementMap->Bind(DISPLACEMENT_TEXTURE_UNIT);

glActiveTexture(GL_TEXTURE0);

gPColorMap = new Texture(GL_TEXTURE_2D, "../Content/diffuse.jpg");

if(!gPColorMap->Load())
{
assert(false);
return false;
}

gPColorMap->Bind(COLOR_TEXTURE_UNIT);

......
}

static bool InitializeLight()
{
......

//设置之前加载的height map和color map作为高度图和纹理图
gLightingTechnique.Enable();
gLightingTechnique.SetDirectionalLight(gDirLight);
gLightingTechnique.SetColorTextureUnit(COLOR_TEXTURE_UNIT_INDEX);
gLightingTechnique.SetDisplacementMapTextureUnit(DISPLACEMENT_TEXTURE_UNIT_INDEX);
gLightingTechnique.SetDispFactor(gDisFactor);
......
}
	2. 编译连接含TCS和TES的Shader
1
2
3
4
5
6
7
8
9
10
11
12
13
14
15
16
17
18
19
20
21
22
23
24
25
26
27
28
bool LightingTechnique::Init()
{
if (!Technique::Init()) {
return false;
}

if (!AddShader(GL_VERTEX_SHADER, "lighting.vs")) {
return false;
}

if (!AddShader(GL_TESS_CONTROL_SHADER, "lighting.cs")) {
return false;
}

if (!AddShader(GL_TESS_EVALUATION_SHADER, "lighting.es")) {
return false;
}

if (!AddShader(GL_FRAGMENT_SHADER, "lighting.fs")) {
return false;
}

if (!Finalize()) {
return false;
}

......
}
	3. 以GL_PATCHES方式绘制quad,触发Tessellation Shader
1
2
3
4
5
6
7
8
void Mesh::Render(IRenderCallbacks* pRenderCallbacks)
{
......
//通过设置绘制类型是GL_PATCHES触发Tessellation Shader
glDrawElements(GL_PATCHES, m_Entries[i].NumIndices, GL_UNSIGNED_INT, 0);

......
}
	4. 延迟VP坐标转换(因为Tessellation Shader会细分出更多的顶点,所以这一步从VS延迟到了TES)
1
2
3
4
5
6
7
8
9
10
11
12
13
14
15
16
17
18
19
lighting.vs
#version 410 core
layout (location = 0) in vec3 Position_VS_in;
layout (location = 1) in vec2 TexCoord_VS_in;
layout (location = 2) in vec3 Normal_VS_in;
uniform mat4 gWorld

out vec3 WorldPos_CS_in;
out vec2 TexCoord_CS_in;
out vec3 Normal_CS_in;

void main()
{
//注意这里我们没有像平时一样对世界坐标系下的顶点信息进行观察坐标系和投影转换
//因为Tessellation Shader会细分出更多的顶点,所以这一步从VS延迟到了TES
WorldPos_CS_in = (gWorld * vec4(Position_VS_in, 1.0)).xyz;
TexCoord_CS_in = TexCoord_VS_in;
Normal_CS_in = (gWorld * vec4(Normal_VS_in, 0.0)).xyz;
}
	5. TCS,指定patch顶点数量和细分方式(这里实现了细分程度跟patch各顶点到camera的距离有关)
1
2
3
4
5
6
7
8
9
10
11
12
13
14
15
16
17
18
19
20
21
22
23
24
25
26
27
28
29
30
31
32
33
34
35
36
37
38
39
40
41
42
43
44
45
46
47
48
49
50
51
52
53
54
55
56
57
58
59
lighting.cs
#version 410 core
// 指定patch的顶点组成数
// 我们也可以通过在程序里调用glPatchParameteri() -- 告诉程序我们定义多少个顶点为一个patch
layout (vertices = 3) out;
uniform vec3 gEyeWorldPos;

// attributes of the input CPs
in vec3 WorldPos_CS_in[];
in vec2 TexCoord_CS_in[];
in vec3 Normal_CS_in[];

// attributes of the output CPs
out vec3 WorldPos_ES_in[];
out vec2 TexCoord_ES_in[];
out vec3 Normal_ES_in[];
// 根据patch各顶点到camera的距离决定patch的细分程度
float GetTessLevel(float Distance0, float Distance1)
{
float AvgDistance = (Distance0 + Distance1) / 2.0;
if (AvgDistance <= 2.0) {
return 10.0;
}
else if (AvgDistance <= 5.0) {
return 7.0;
}
else {
return 3.0;
}
}
void main()
{
// Set the control points of the output patch
// 记录下patch的control point的原始顶点信息,在TES中会参与就算,算出细分的顶点的位置信息
// **gl_InvocationID** is used to access the specific vertex of a patch (gl_InvocationID 用于访问传入patch里的特定顶点)
// 之前我们指定patch的顶点数量是3,TCS是针对patch的顶点来执行的,所以每一个patch会执行3次TCS
TexCoord_ES_in[gl_InvocationID] = TexCoord_CS_in[gl_InvocationID];
Normal_ES_in[gl_InvocationID] = Normal_CS_in[gl_InvocationID];
WorldPos_ES_in[gl_InvocationID] = WorldPos_CS_in[gl_InvocationID];

// Calculate the distance from the camera to the three control points
// 算出patch各顶点到camera的距离
float EyeToVertexDistance0 = distance(gEyeWorldPos, WorldPos_ES_in[0]);
float EyeToVertexDistance1 = distance(gEyeWorldPos, WorldPos_ES_in[1]);
float EyeToVertexDistance2 = distance(gEyeWorldPos, WorldPos_ES_in[2]);

// Calculate the tessellation levels
// 根据patch各顶点到camera的距离设置细分方式和细分程度
// **gl_TessLevelInner**
// Specify how the interior of the domain is subdivided and stored in a two element array named gl_TessLevelInner(指定多边形内部如何细分)
// **gl_TessLevelOuter**
// Control how the perimeter of the domain is subdivided, and is stored in an implicitly declared four-element array named gl_TessLevelOuter(指定多边形边界上的边被如何细分)
// gl_TessLevelInner & gl_TessLevelOuter 根据Domain的类型不同会有不同的含义,参见前面提到的Domain
// 我们也可以在程序里通过调用glPatchParameterfv()指定inner和outer的数值
gl_TessLevelOuter[0] = GetTessLevel(EyeToVertexDistance1, EyeToVertexDistance2);
gl_TessLevelOuter[1] = GetTessLevel(EyeToVertexDistance2, EyeToVertexDistance0);
gl_TessLevelOuter[2] = GetTessLevel(EyeToVertexDistance0, EyeToVertexDistance1);
gl_TessLevelInner[0] = gl_TessLevelOuter[2];
}
	6. TES,利用细分出的所有相关patch顶点的gl_TessCoord(顶点在patch里的相对位置信息),算出各顶点的纹理坐标信息,位置信息,法线信息(这里通过读取高度图的值参与顶点的高度计算实现动态控制高度值运算),然后转换所有patch相关的顶点位置信息到投影坐标系
1
2
3
4
5
6
7
8
9
10
11
12
13
14
15
16
17
18
19
20
21
22
23
24
25
26
27
28
29
30
31
32
33
34
35
36
37
38
39
40
41
42
43
44
45
lighting.es
#version 410 core
// layout (quads, equal_spacing, ccw) in; (指定新生成的多边形类型等相关信息)
layout(triangles, equal_spacing, ccw) in;

uniform mat4 gVP;
uniform sampler2D gDisplacementMap;
uniform float gDispFactor;

in vec3 WorldPos_ES_in[];
in vec2 TexCoord_ES_in[];
in vec3 Normal_ES_in[];

out vec3 WorldPos_FS_in;
out vec2 TexCoord_FS_in;
out vec3 Normal_FS_in;

vec2 interpolate2D(vec2 v0, vec2 v1, vec2 v2)
{
return vec2(gl_TessCoord.x) * v0 + vec2(gl_TessCoord.y) * v1 + vec2(gl_TessCoord.z) * v2;
}

vec3 interpolate3D(vec3 v0, vec3 v1, vec3 v2)
{
// 因为前面我们指定了生成的多边形类型是triangle,所以这里按照triangle domian的计算方式去计算位置信息
// **gl_TessCoord**包含了当前顶点的在patch里的坐标信息
return vec3(gl_TessCoord.x) * v0 + vec3(gl_TessCoord.y) * v1 + vec3(gl_TessCoord.z) * v2;
}

void main()
{
// Interpolate the attributes of the output vertex using the barycentric coordinates
// 通过细分后得到的各patch顶点的相对坐标信息gl_TessCoord,用对应Domain的计算方式算出各顶点的位置,法线,纹理信息
TexCoord_FS_in = interpolate2D(TexCoord_ES_in[0], TexCoord_ES_in[1], TexCoord_ES_in[2]);
Normal_FS_in = interpolate3D(Normal_ES_in[0], Normal_ES_in[1], Normal_ES_in[2]);
Normal_FS_in = normalize(Normal_FS_in);
WorldPos_FS_in = interpolate3D(WorldPos_ES_in[0], WorldPos_ES_in[1], WorldPos_ES_in[2]);

// Displace the vertex along the normal
// 这里主要是读取之前加载的高度图信息,通过顶点法线方向运算作用于顶点位置信息,实现动态控制顶点高度信息
float Displacement = texture(gDisplacementMap, TexCoord_FS_in.xy).x;
WorldPos_FS_in += Normal_FS_in * Displacement * gDispFactor;
// 最后针对所有的顶点做观察坐标系投影和透视投影,使其正确映射到屏幕位置
gl_Position = gVP * vec4(WorldPos_FS_in, 1.0);
}
	7. 存储所有细分的顶点位置信息(世界坐标系),顶点法线信息(世界坐标系)和顶点纹理坐标信息参与正常的光照计算得出最后的纹理颜色
1
2
3
4
5
6
7
8
9
10
11
12
13
14
15
16
17
18
19
20
21
22
23
24
25
26
27
28
29
30
#version 410 core                                                                           

const int MAX_POINT_LIGHTS = 2;
const int MAX_SPOT_LIGHTS = 2;

// 这是在TES中存储下来的位于世界坐标系的顶点位置信息和顶点法线信息
in vec2 TexCoord_FS_in;
in vec3 Normal_FS_in;
in vec3 WorldPos_FS_in;

out vec4 FragColor;
......

void main()
{
// 用位于世界坐标系的顶点位置信息和法线信息参与光照运算,得出最后的纹理颜色信息
vec3 Normal = normalize(Normal_FS_in);
vec4 TotalLight = CalcDirectionalLight(Normal);

for (int i = 0 ; i < gNumPointLights ; i++) {
TotalLight += CalcPointLight(gPointLights[i], Normal);
}

for (int i = 0 ; i < gNumSpotLights ; i++) {
TotalLight += CalcSpotLight(gSpotLights[i], Normal);
}

// 这里读取的是我们之前加载的color map
FragColor = texture(gColorMap, TexCoord_FS_in.xy) * TotalLight;
}
	8. 相关控制(高度图对顶点位置生成的控制,wireframe控制)
1
2
3
4
5
6
7
8
9
10
11
12
13
14
15
16
17
18
19
20
21
22
23
24
25
26
27
28
29
30
31
32
33
34
35
36
37
38
39
40
static void KeyboardCB(unsigned char key, int x, int y)
{
switch(key)
{
case 'q':
glutLeaveMainLoop();
break;
case OGLDEV_KEY_PLUS:
gDisFactor += 0.01f;
break;

case OGLDEV_KEY_MINUS:
if (gDisFactor >= 0.01f) {
gDisFactor -= 0.01f;
}
break;

case 'z':
gIsWireFrame = !gIsWireFrame;
// 这里是wireframe的开关控制
if (gIsWireFrame) {
glPolygonMode(GL_FRONT, GL_LINE);
}
else {
glPolygonMode(GL_FRONT, GL_FILL);
}
break;
}
}

static void RenderPass()
{
......
// 这里就是我们动态控制高度图对生成顶点的位置信息的影响参数的传递
// 具体运算参见lighting.es
// WorldPos_FS_in += Normal_FS_in * Displacement * gDispFactor;
gLightingTechnique.SetDispFactor(gDisFactor);

gQuad->Render(NULL);
}

Final Effect:
TessellationFill
TessellationClose
TessellationFar
TessellationHeightMap

总结:
tessellation shader是可选的shader,不是必须的

tessellation shader与vertex shader不一样,tessellation shader是针对patch(一系列顶点)来处理而不是一个顶点 (因为tessellation shader需要通过传入的patch(一系列顶点)来生成新顶点的位置信息)

tessellation control shader负责对patch的细分设定(通过指定细分的计算方式可以实现LOD(level of detail – 根据与camera的距离不同而细分程度不同)等效果)

primitive generator负责对domian的细分

tessellation evaluation shader负责通过PG细分出来的顶点在patch里的坐标信息去计算顶点位置,纹理,法线信息

Bezier曲线在这里是一种细分后位置的计算方法来实现曲面的平滑效果

还有一个应用叫displacement mapping,在tessellation evaluation shader里面通过tessellation coordinate的值来映射纹理(sample a texture)

关于Bezier曲线学习,参考PN Triangles Tessellation

Vertex Array Objects

“The Vertex Array Object (a.k.a VAO) is a special type of object that encapsulates all the data that is associated with the vertex processor. Instead of containing the actual data, it holds references to the vertex buffers, the index buffer and the layout specification of the vertex itself.”

“VAOs store all of the links between the attributes and your VBOs with raw vertex data.”

从上面的定义来看,可以看出,Vertex Array Object(VAO) 主要是用于存储关联的顶点buffer索引,顶点buffer定义的数据访问格式等信息而非真正的顶点数据。当我们需要去绘制某个特定的顶点buffer的时候,我们只需要指定好该顶点buffer的数据访问格式和数据内容,然后绑定到特定的VAO,最后激活该VAO并进行会绘制即可。

让我们来看看两种存储数据的格式AOS(Array Of Structure),SOA(Structure Of Arrays):
AOSAndSOA

事例是采取了SOA的形式存储数据。

  1. 在定义VBO之前,我们需要生成VAO,并绑定到该VAO上(这样一来后续的VBO操作都会绑定到该VAO上被记录下来(比如顶点buffer索引,buffer数据的访问方式等))
1
2
3
4
5
6
7
8
9
10
11
12
13
14
15
16
17
18
19
20
21
22
23
24
#define INDEX_BUFFER 0
#define POS_VB 1
#define NORMAL_VB 2
#define TEXCOORD_VB 3

bool BasicMesh::LoadMesh(const string& Filename)
{
// Release the previously loaded mesh (if it exists)
Clear();

// Create the VAO
glGenVertexArrays(1, &m_VAO);
glBindVertexArray(m_VAO);

// Create the buffers for the vertices attributes
glGenBuffers(ARRAY_SIZE_IN_ELEMENTS(m_Buffers), m_Buffers);

......

// Make sure the VAO is not changed from the outside
glBindVertexArray(0);

return Ret;
}
  1. 采取SOA的方式存储顶点相关数据(下面定义了4个vector用于存储Positions,Normals,TexCoords,Indices),并绑定到Array Buffer,指明访问方式
1
2
3
4
5
6
7
8
9
10
11
12
13
14
15
16
17
18
19
20
21
22
23
24
25
26
27
28
29
30
31
32
33
34
35
36
37
38
39
40
41
42
43
44
45
46
47
48
49
50
51
52
53
54
55
56
57
58
59
60
61
62
63
64
65
66
67
68
69
70
71
72
73
74
75
76
77
78
79
80
81
82
83
84
85
86
87
88
89
90
91
bool BasicMesh::InitFromScene(const aiScene* pScene, const string& Filename)
{
m_Entries.resize(pScene->mNumMeshes);
m_Textures.resize(pScene->mNumMaterials);

vector<Vector3f> Positions;
vector<Vector3f> Normals;
vector<Vector2f> TexCoords;
vector<unsigned int> Indices;

unsigned int NumVertices = 0;
unsigned int NumIndices = 0;

// Count the number of vertices and indices
for (unsigned int i = 0 ; i < m_Entries.size() ; i++) {
m_Entries[i].MaterialIndex = pScene->mMeshes[i]->mMaterialIndex;
m_Entries[i].NumIndices = pScene->mMeshes[i]->mNumFaces * 3;
m_Entries[i].BaseVertex = NumVertices;
m_Entries[i].BaseIndex = NumIndices;

NumVertices += pScene->mMeshes[i]->mNumVertices;
NumIndices += m_Entries[i].NumIndices;
}

// Reserve space in the vectors for the vertex attributes and indices
Positions.reserve(NumVertices);
Normals.reserve(NumVertices);
TexCoords.reserve(NumVertices);
Indices.reserve(NumIndices);

// Initialize the meshes in the scene one by one
for (unsigned int i = 0 ; i < m_Entries.size() ; i++) {
const aiMesh* paiMesh = pScene->mMeshes[i];
InitMesh(paiMesh, Positions, Normals, TexCoords, Indices);
}

if (!InitMaterials(pScene, Filename)) {
return false;
}

// Generate and populate the buffers with vertex attributes and the indices
// 下面就是存储成SOA的格式
glBindBuffer(GL_ARRAY_BUFFER, m_Buffers[POS_VB]);
glBufferData(GL_ARRAY_BUFFER, sizeof(Positions[0]) * Positions.size(), &Positions[0], GL_STATIC_DRAW);
glEnableVertexAttribArray(POSITION_LOCATION);
glVertexAttribPointer(POSITION_LOCATION, 3, GL_FLOAT, GL_FALSE, 0, 0);

glBindBuffer(GL_ARRAY_BUFFER, m_Buffers[TEXCOORD_VB]);
glBufferData(GL_ARRAY_BUFFER, sizeof(TexCoords[0]) * TexCoords.size(), &TexCoords[0], GL_STATIC_DRAW);
glEnableVertexAttribArray(TEX_COORD_LOCATION);
glVertexAttribPointer(TEX_COORD_LOCATION, 2, GL_FLOAT, GL_FALSE, 0, 0);

glBindBuffer(GL_ARRAY_BUFFER, m_Buffers[NORMAL_VB]);
glBufferData(GL_ARRAY_BUFFER, sizeof(Normals[0]) * Normals.size(), &Normals[0], GL_STATIC_DRAW);
glEnableVertexAttribArray(NORMAL_LOCATION);
glVertexAttribPointer(NORMAL_LOCATION, 3, GL_FLOAT, GL_FALSE, 0, 0);

glBindBuffer(GL_ELEMENT_ARRAY_BUFFER, m_Buffers[INDEX_BUFFER]);
glBufferData(GL_ELEMENT_ARRAY_BUFFER, sizeof(Indices[0]) * Indices.size(), &Indices[0], GL_STATIC_DRAW);

return GLCheckError();
}

void BasicMesh::InitMesh(const aiMesh* paiMesh,
vector<Vector3f>& Positions,
vector<Vector3f>& Normals,
vector<Vector2f>& TexCoords,
vector<unsigned int>& Indices)
{
const aiVector3D Zero3D(0.0f, 0.0f, 0.0f);

// Populate the vertex attribute vectors
for (unsigned int i = 0 ; i < paiMesh->mNumVertices ; i++) {
const aiVector3D* pPos = &(paiMesh->mVertices[i]);
const aiVector3D* pNormal = &(paiMesh->mNormals[i]);
const aiVector3D* pTexCoord = paiMesh->HasTextureCoords(0) ? &(paiMesh->mTextureCoords[0][i]) : &Zero3D;

Positions.push_back(Vector3f(pPos->x, pPos->y, pPos->z));
Normals.push_back(Vector3f(pNormal->x, pNormal->y, pNormal->z));
TexCoords.push_back(Vector2f(pTexCoord->x, pTexCoord->y));
}

// Populate the index buffer
for (unsigned int i = 0 ; i < paiMesh->mNumFaces ; i++) {
const aiFace& Face = paiMesh->mFaces[i];
assert(Face.mNumIndices == 3);
Indices.push_back(Face.mIndices[0]);
Indices.push_back(Face.mIndices[1]);
Indices.push_back(Face.mIndices[2]);
}
}
  1. 最后绘制的时候,调用glBindVertexArray绑定到特定VAO上,然后调用glDrawElementsBaseVertex指明如何利用VAO绑定的buffer去绘制即可
1
2
3
4
5
6
7
8
9
10
11
12
13
14
15
16
17
18
19
20
21
22
23
24
25
26
27
28
29
30
31
32
33
34
35
36
37
38
39
40
41
42
43
void BasicMesh::Render()
{
glBindVertexArray(m_VAO);

for (unsigned int i = 0 ; i < m_Entries.size() ; i++) {
const unsigned int MaterialIndex = m_Entries[i].MaterialIndex;

assert(MaterialIndex < m_Textures.size());

if (m_Textures[MaterialIndex]) {
m_Textures[MaterialIndex]->Bind(COLOR_TEXTURE_UNIT);
}

//这里绘制的参数需要理解一下
/*
// Count the number of vertices and indices
for (unsigned int i = 0 ; i < m_Entries.size() ; i++) {
m_Entries[i].MaterialIndex = pScene->mMeshes[i]->mMaterialIndex;
m_Entries[i].NumIndices = pScene->mMeshes[i]->mNumFaces * 3;
m_Entries[i].BaseVertex = NumVertices;
m_Entries[i].BaseIndex = NumIndices;

NumVertices += pScene->mMeshes[i]->mNumVertices;
NumIndices += m_Entries[i].NumIndices;
}
*/
// 因为我们在array buffer里存储数据是采用了SOA的格式,所以在调用glDrawElementsBaseVertex的时候,我们需要指明正确的indices和basevertex索引才能正确绘制
// 在前面的代码我们m_Entries[i].BaseIndex记录下了到该Entries时所有Indices累加数量,
// 这里因为Assimp提供的indice索引是从0开始的,但我们存储了所有Entries的indices到index buffer里,
// 所以我们需要存储的是绘制该Entries时所累加的indices值作为正确索引
// m_Entries[i].BaseVertex记录下了到该Entries时所有已绘制的顶点累加的数量,
// 这里同理,为了找到正确的base index,我们需要指明累加后的顶点数量作为offset
// 调用glDrawElementsBaseVertex绘制每一个Entries时,我们需要指明正确的indices索引才能正确绘制
glDrawElementsBaseVertex(GL_TRIANGLES,
m_Entries[i].NumIndices,
GL_UNSIGNED_INT,
(void*)(sizeof(unsigned int) * m_Entries[i].BaseIndex),
m_Entries[i].BaseVertex);
}

// Make sure the VAO is not changed from the outside
glBindVertexArray(0);
}

Final Effect(由于第三个模型数据加载出了问题,这里只加载显示了两个):
VAOFinalEffect

更多学习参考Drawing polygons & OpenGL-Draw-Call-Code-Study-Analysis

Instanced Rendering

“Instanced rendering means that we can render multiple instances in a single draw call and provide each instance with some unique attributes.”(在一次draw call里绘制多个同一个instance)

Using the Instance Counter in Shaders:
The index of the current instance is available to the vertex shader in the built-in variable gl_InstanceID. This variable is implicitly declared as an integer. It starts counting from zero and counts up one each time an instance is rendered.

Instancing Redux:
Steps:

  1. Create some vertex shader inputs that you intend to be instanced
  2. Set the vertex attribute divisors with glVertexAttribDivisor()
  3. Use the gl_InstanceID built-in variable in the vertex shader
  4. Use the instanced versions of the rendering functions such as glDrawArraysInstanced() ……
1
2
3
4
5
6
7
8
9
10
11
12
13
14
15
16
17
18
19
20
21
22
23
24
25
26
27
28
29
30
31
32
33
34
35
36
37
38
39
40
41
42
43
44
45
46
47
48
49
50
51
52
53
54
55
56
57
58
59
60
61
62
63
64
65
66
67
68
69
70
71
72
73
74
75
76
77
78
79
80
81
82
83
84
85
86
87
88
89
90
91
92
93
94
95
96
97
98
99
100
101
102
103
104
105
106
107
108
109
110
111
112
113
114
115
116
117
118
#define WVP_LOCATION 3
#define WORLD_LOCATION 7

bool Mesh::InitFromScene(const aiScene* pScene, const string& Filename)
{
......

glBindBuffer(GL_ARRAY_BUFFER, m_Buffers[WVP_MAT_VB]);

for (unsigned int i = 0; i < 4 ; i++) {
glEnableVertexAttribArray(WVP_LOCATION + i);
// Note: "A vertex attribute can contain no more than 4 floating points or integers."
// 因为vertex attribute不能超过4个float或integers,所以我们需要针对mat4每一行进行指定访问方式
glVertexAttribPointer(WVP_LOCATION + i, 4, GL_FLOAT, GL_FALSE, sizeof(Matrix4f),
(const GLvoid*)(sizeof(GLfloat) * i * 4));
// 这里是"makes this an instance data rather than vertex data."
// 第一个参数指明特定attribute是instance data而非vertex data,
// 第二个参数指明instance data的使用频率,比如1表示每一个instance渲染后就访问下一个atrribute值,2表示每两个
glVertexAttribDivisor(WVP_LOCATION + i, 1);
}

glBindBuffer(GL_ARRAY_BUFFER, m_Buffers[WORLD_MAT_VB]);

for (unsigned int i = 0; i < 4 ; i++) {
glEnableVertexAttribArray(WORLD_LOCATION + i);
glVertexAttribPointer(WORLD_LOCATION + i, 4, GL_FLOAT, GL_FALSE, sizeof(Matrix4f),
(const GLvoid*)(sizeof(GLfloat) * i * 4));
glVertexAttribDivisor(WORLD_LOCATION + i, 1);
}

return GLCheckError();
}

void Mesh::Render(unsigned int NumInstances, const Matrix4f* WVPMats, const Matrix4f* WorldMats)
{
// 传递instance data的动态数据
glBindBuffer(GL_ARRAY_BUFFER, m_Buffers[WVP_MAT_VB]);
glBufferData(GL_ARRAY_BUFFER, sizeof(Matrix4f) * NumInstances, WVPMats, GL_DYNAMIC_DRAW);

glBindBuffer(GL_ARRAY_BUFFER, m_Buffers[WORLD_MAT_VB]);
glBufferData(GL_ARRAY_BUFFER, sizeof(Matrix4f) * NumInstances, WorldMats, GL_DYNAMIC_DRAW);

glBindVertexArray(m_VAO);

for (unsigned int i = 0 ; i < m_Entries.size() ; i++) {
const unsigned int MaterialIndex = m_Entries[i].MaterialIndex;

assert(MaterialIndex < m_Textures.size());

if (m_Textures[MaterialIndex]) {
m_Textures[MaterialIndex]->Bind(GL_TEXTURE0);
}
// 调用glDrawElementsInstanceBaseVertex来渲染多个instance
glDrawElementsInstancedBaseVertex(GL_TRIANGLES,
m_Entries[i].NumIndices,
GL_UNSIGNED_INT,
(void*)(sizeof(unsigned int) * m_Entries[i].BaseIndex),
NumInstances,
m_Entries[i].BaseVertex);
}

// Make sure the VAO is not changed from the outside
glBindVertexArray(0);
}


virtual void RenderSceneCB()
{
.......

Matrix4f WVPMatrics[NUM_INSTANCES];
Matrix4f WorldMatrices[NUM_INSTANCES];

for (unsigned int i = 0 ; i < NUM_INSTANCES ; i++) {
Vector3f Pos(m_positions[i]);
Pos.y += sinf(m_scale) * m_velocity[i];
p.WorldPos(Pos);
// 这里需要注意,这里之所以要转置之后再传递的原因如下:
// 在Shader里定义mat4时,OpenGL传递mat4时会以去构造列向量为主的mat4
// 即把传递的mat4的行作为列去构造mat4
// 因为我们这里定义的mat4本来就是基于OpenGL的列向量构造的,
// 所以在传递过去的时候为了保证正确,我们需要先进行转置
// 如果我们的mat4本来就是基于DX的列向量,那么就不需要转置
WVPMatrics[i] = p.GetWVPTrans().Transpose();
WorldMatrices[i] = p.GetWorldTrans().Transpose();
}

m_pMesh->Render(NUM_INSTANCES, WVPMatrics, WorldMatrices);

......
}

lighting.vs
#version 330

layout (location = 0) in vec3 Position;
layout (location = 1) in vec2 TexCoord;
layout (location = 2) in vec3 Normal;
// 这里注意因为vertex attribute不能超过4个float或integers,我们前面指定了每一个mat4四次vertex attribute
// 所以这里WVP location = 3 而 World location = 7
layout (location = 3) in mat4 WVP;
layout (location = 7) in mat4 World;

out vec2 TexCoord0;
out vec3 Normal0;
out vec3 WorldPos0;
// "Since integers cannot be interpolated by the rasterizer we have to mark the output variable as 'flat' (forgetting to do that will trigger a compiler error)."
// 因为integers不能被rasterizer interpolated,所以我们需要使用'flat'关键词避免编译错误
flat out int InstanceID;

void main()
{
gl_Position = WVP * vec4(Position, 1.0);
TexCoord0 = TexCoord;
Normal0 = (World * vec4(Normal, 0.0)).xyz;
WorldPos0 = (World * vec4(Position, 1.0)).xyz;
InstanceID = gl_InstanceID;
}

Final Effect:
InstancedRendering

Note:
gl_InstanceID is always present in the vertex shader, even when the current drawing command is not one of the instanced ones.

GLFX - An OpenGL Effect Library

首先让我们了解一下,什么是Effect file?
“An effect is a text file that can potentially contain multiple shaders and functions and makes it easy to combine them together into programs. This overcomes the limitation of the glShaderSource() function that requires you to specify the text of a single shader stage.”
可以看出,通过effect file,我们可以把所有shader写到一个文件里,不用再创建针对各个stage的shader的文件。这样一来我们在shader里定义的结构体就能在多个shader共用。

那什么是GLFX了?
“Effects system for OpenGL and OpenGL ES”
GLFX提供了方便的接口去转换effect file到GLSL program.

GLFX源码下载地址

接下来让我们看看,如何使用GLFX支持effect file。

  1. 编译生成并添加glfx.lib到引用
  2. 包含glfx.h头文件
1
#include <glfx.h>
  1. 解析effect file
1
2
3
4
5
6
7
8
9
10
11
if (!glfxParseEffectFromFile(effect, "effect.glsl")) {
#ifdef __cplusplus // C++ error handling
std::string log = glfxGetEffectLog(effect);
std::cout << "Error parsing effect: " << log << std::endl;
#else // C error handling
char log[10000];
glfxGetEffectLog(effect, log, sizeof(log));
printf("Error parsing effect: %s:\n", log);
#endif
return;
}
  1. 编译并启用Effect program
1
2
3
4
5
6
7
int shaderProg = glfxCompileProgram(effect, "ProgramName");

if (shaderProg < 0) {
// same error handling as above
}

glUseProgram(shaderProg);
  1. Release effect file after we no longer use it
1
glfxDeleteEffect(effect); 

接下来看看编写Effect file有哪些不同于GLSL Shader的地方

  1. 使用’program’ key word去定义一个program,并在其中包含各Shader的调用路口
1
2
3
4
5
6
program Lighting
{
//VSmain() 和 FSmain()分别定义了vs和fs的人口函数
vs(410)=VSmain();
fs(410)=FSmain();
};
  1. 使用’shader’ key word去定义各shader stage的函数入口而非void
1
2
3
4
shader VSmain()
{
calculate_something();
}
  1. 可以定义多个program在Effect file中,只需通过glfxCompileProgram()去指定编译特定program即可
  2. 因为所有shader内容都写在一个文件里了,所以支持共用struct定义,不用再定义一个个in or out variables
1
2
3
4
5
6
7
8
9
10
11
12
13
14
15
16
17
18
struct VSoutput
{
vec2 TexCoord;
vec3 Normal;
};

shader VSmain(in vec3 Pos, in vec2 TexCoord, in vec3 Normal, out VSOutput VSout)
{
// do some transformations and update 'VSout'
VSout.TexCoord = TexCoord;
VSout.Normal = Normal;
}

shader FSmain(in VSOutput FSin, out vec4 FragColor)
{
// 'FSin' matches 'VSout' from the VS. Use it
// to do lighting calculations and write the final output to 'FragColor'
}
  1. 可以在Effect file里直接包含其他Effect file(但新包含的文件并不参与GLFX Parse,并且该文件是以直接插入的形式,所以该文件只能包含pure GLSL不能包含GLFX里的一些定义方式)
1
#include "another_effect.glsl" 
  1. 通过:后缀,快速定义attribute的位置而不是通过一个个layout(location=……)
1
2
3
4
5
6
7
struct VSInput2
{
vec3 Normal;
vec3 Tangent;
};

shader VSmain(in vec3 Pos : 5, in vec2 TexCoord : 6, in float colorScale : 10)
  1. 一些关键词如’flat’,‘noperspective’修饰的变量不能放在Effect file定义的struct里,只能通过interface去定义,而interface又必须通过再次拷贝内容到struct才能在Effect里使用
1
2
3
4
5
6
7
8
9
10
11
12
13
14
15
16
17
18
19
20
21
22
23
24
25
26
27
28
29
30
31
be passed between shader stages. If you need to pass it as a whole to another function you will need to copy the contents to a struct. For example:
interface foo
{
flat int a;
noperspective float b;
};

struct bar
{
int a;
float b;
}

shader VSmain(out foo f)
{
// ...
}

void Calc(bar c)
{
// ...
}

shader FSmain(in foo f)
{
struct bar c;
c.a = f.a;
c.b = f.b;

Calc(c);
}
  1. glfxc工具,可以用于外部单独解析编译Effect file,提前查看是否有问题(这个本人没有试,因为我没有编译出glfxc。)
    glfxc

Final Effect:
GLFX

Note:
“GLFX is dependant on GLEW(注意GLFX是依赖于GLEW的,编译GLFX的时候会需要指定GLEW的路径)”

Deferred Shading

在了解什么是Deferred Shading之前,我们需要了解与之对应的Forward Rendering。
What is forward rendering?
Forward Rendering就是我们之前一直采用的,给GPU传入geometry,texture数据,然后每一个vertex通过pipeline(VS,GS,FS……)得出最后的render target显示在screen上。
下图来源
ForwardRendering

既然有了Forward Rendering,为什么我们还需要Deferred Shading了?

  1. Since each pixel of every object gets only a single FS invocation we have to provide the FS with information on all light sources and take all of them into account when calculating the light effect per pixel. This is a simple approach but it has its downsides. If the scene is highly complex (as is the case in most modern games) with many objects and a large depth complexity (same screen pixel covered by several objects) we get a lot of wasted GPU cycles. (第一个问题大量无用的光照计算。简单的说就是传统的Forward Rendering是针对每一个传入的顶点都会经历一套完整的Pipeline(包含参与光照计算)。但在大型游戏里,会有很多物体(顶点数据),但最终只有离camera最近或者透明的一部分物体会显示在屏幕上,这样一来,针对每一个顶点都计算光照就会做很多无用功。)

  2. When there are many light sources, forward rendering simply doesn’t scale well with many light sources.(因为Forward Redenring每一个pixel都会参与光照计算,当场景里光照很多的时候,无论光源对物体的影响有多微弱或多强,Forward Rendering都会一一计算这些光照对物体的影响,这样会导致大量的光照计算。)

而Deferred Shading却没有上述问题。
那么让我们来了解一下什么是Deferred Shading
deferred shading is a screen-space shading technique. It is called deferred because no shading is actually performed in the first pass of the vertex and pixel shaders: instead shading is “deferred” until a second pass.
下图来源
DeferredShading

从上面我们只能看出,Deferred Shading是针对scree-space而非每一个物体的vertex。并且deferred shading是由两个pass构成,第二个pass才是真正的shading。
接下来让我们看看这两个pass:

  1. Geometry Pass. Data that is required for shading computation is gathered. Positions, normals, and materials for each surface are rendered into the geometry buffer (G-buffer) using “render to texture.(Multiple Render Targets (MRT)(在第一个pass我们并不像Forward Rendering把所有光照计算相关的数据传入FS而是存入geometry buffer(G-buffer)用于第二个pass进行真正的Shading。因为我们存储在G-buffer里的数据都是经过rasterizer的,所以在G-buffer里我们只存储了通过depth test的pixel,这样一来我们在第二次用G-buffer数据计算光照的时候就避免了无谓的光照计算(这里指没通过depth test的pixel))
    让我们来看看G-buffer都存储些什么数据,下图来源
    G-Buffer
    可以看出,我们存储了所有参与光照计算所需要的数据。
    Geometry Pass的主要目的是生成4个关于Position,Diffuse,Normal,TexCoord的纹理贴图和一个关于Depth的纹理贴图。
    Geometry Pass主要由以下几个步骤:
    1. 创建m_FBO
1
2
3
4
5
6
7
8
bool GBuffer::Init(unsigned int windowwidth, unsigned int windowheight)
{
//Create the FBO
glGenFramebuffers(1, &m_FBO);
glBindFramebuffer(GL_FRAMEBUFFER, m_FBO);

......
}
2. 创建4个纹理贴图分别Attach到m_FBO的GL_COLOR_ATTACHMENT*上。单独创建1个纹理贴图Attach到m_FBO的GL_DEPTH_ATTACHMENT上
1
2
3
4
5
6
7
8
9
10
11
12
13
14
15
16
17
18
19
20
21
22
23
24
25
26
27
28
bool GBuffer::Init(unsigned int windowwidth, unsigned int windowheight)
{
//Create the FBO
......

//Create the gbuffer textures
glGenTextures(ARRAY_SIZE_IN_ELEMENTS(m_Textures), m_Textures);
glGenTextures(1, &m_DepthTexture);

for(unsigned int i = 0; i < ARRAY_SIZE_IN_ELEMENTS(m_Textures); i++)
{
glBindTexture(GL_TEXTURE_2D, m_Textures[i]);
glTexImage2D(GL_TEXTURE_2D, 0, GL_RGB32F, windowwidth, windowheight, 0, GL_RGB, GL_FLOAT, 0);
glFramebufferTexture2D(GL_DRAW_FRAMEBUFFER, GL_COLOR_ATTACHMENT0 + i, GL_TEXTURE_2D, m_Textures[i], 0);
}

//depth texture
glBindTexture(GL_TEXTURE_2D, m_DepthTexture);
glTexImage2D(GL_TEXTURE_2D, 0, GL_DEPTH_COMPONENT32, windowwidth, windowheight, 0, GL_DEPTH_COMPONENT, GL_FLOAT, NULL);
glFramebufferTexture2D(GL_DRAW_FRAMEBUFFER, GL_DEPTH_ATTACHMENT, GL_TEXTURE_2D, m_DepthTexture, 0);

GLenum drawbuffers[] = { GL_COLOR_ATTACHMENT0,
GL_COLOR_ATTACHMENT1,
GL_COLOR_ATTACHMENT2,
GL_COLOR_ATTACHMENT3};

.......
}
3. 指定需要从FS中输出的Position,Diffuse,Normal,TexCoord绘制的color buffer
1
2
3
4
5
6
7
8
9
10
11
12
13
14
15
16
17
18
19
20
21
22
23
24
25
26
27
28
29
30
31
32
33
34
35
36
37
38
39
40
41
42
43
44
45
46
47
48
49
50
51
52
53
54
55
56
57
58
59
bool GBuffer::Init(unsigned int windowwidth, unsigned int windowheight)
{
......

// specify the color buffer to be drawn into, we will output buffer data for each color buffer in FS with out key word variable
// 这里应对的是FS里指定的out输出
glDrawBuffers(ARRAY_SIZE_IN_ELEMENTS(drawbuffers), drawbuffers);

......

return true;
}

geometry_pass.vs
// VS没什么变化,只是把我们需要保存的Position,TexCoord,Normal分别转换透视投影坐标系和世界坐标系里
#version 330

layout (location = 0) in vec3 Position;
layout (location = 1) in vec2 TexCoord;
layout (location = 2) in vec3 Normal;

uniform mat4 gWVP;
uniform mat4 gWorld;

out vec2 TexCoord0;
out vec3 Normal0;
out vec3 WorldPos0;


void main()
{
gl_Position = gWVP * vec4(Position, 1.0);
TexCoord0 = TexCoord;
Normal0 = (gWorld * vec4(Normal, 0.0)).xyz;
WorldPos0 = (gWorld * vec4(Position, 1.0)).xyz;
}

geometry_pass.fs
// FS负责把转换后的Position,Diffuse,Normal,TexCoordOut输出到我们之前绑定的GL_COLOR_ATTACHMENT*上
#version 330

in vec2 TexCoord0;
in vec3 Normal0;
in vec3 WorldPos0;

layout (location = 0) out vec3 WorldPosOut;
layout (location = 1) out vec3 DiffuseOut;
layout (location = 2) out vec3 NormalOut;
layout (location = 3) out vec3 TexCoordOut;

uniform sampler2D gColorMap;

void main()
{
WorldPosOut = WorldPos0;
DiffuseOut = texture(gColorMap, TexCoord0).xyz;
NormalOut = normalize(Normal0);
TexCoordOut = vec3(TexCoord0, 0.0);
}
4. 调用Geometry Pass生成对应的纹理贴图信息
1
2
3
4
5
6
7
8
9
10
11
12
13
14
15
16
17
18
19
20
21
static void DSGeometryPass()
{
gDSGeomPassTech.Enable();
// 输出到Color Texture里之前,
// 我们需要指定我们需要绘制到的FrameBuffer是我们Color Texture所绑定的m_FBO
gGbuffer.BindForWriting();

glClear(GL_COLOR_BUFFER_BIT | GL_DEPTH_BUFFER_BIT);

Pipeline p;
p.Scale(0.1f, 0.1f, 0.1f);
p.Rotate(0.0f, gScale, 0.0f);
p.WorldPos(-0.8f, -1.0f, 12.0f);
p.SetCamera(pGameCamera->GetPos(), pGameCamera->GetTarget(), pGameCamera->GetUp());
p.SetPerspectiveProj(gPersProjInfo);

gDSGeomPassTech.SetWVP(p.GetWVPTrans());
gDSGeomPassTech.SetWorldMatrix(p.GetWorldTrans());

gMesh.Render();
}
5. 将生成的4个Color Texture复制到FrameBuffer 0里,然后渲染到屏幕上
1
2
3
4
5
6
7
8
9
10
11
12
13
14
15
16
17
18
19
20
21
22
23
24
25
26
27
28
29
30
31
32
33
34
35
36
37
static void DSLightPass()
{
// Bound frame buffer target 0 to draw state, we will copy four color buffer to this buffer later
// 因为glBlitFramebuffer()函数是把GL_READ_FRAMEBUFFER的target copy到GL_DRAW_FRAMEBUFFER的target上,
// 所以我们要声明Frame buffer 0作为我们最终的目的地
glBindFramebuffer(GL_DRAW_FRAMEBUFFER, 0);

glClear(GL_COLOR_BUFFER_BIT | GL_DEPTH_BUFFER_BIT);

// Bound frame buffer m_FBO to reading state,
// we will copy four color buffer that attach to m_FBO to frame buffer target 0 later
// BindForReading()就是设置m_FBO作为glBlitFramebuffer()里的copy来源,
// 所以需要设置成GL_READ_FRAMEBUFFER
gGbuffer.BindForReading();

GLint halfwidth = (GLint)(WINDOW_WIDTH / 2.0f);
GLint halfheight = (GLint)(WINDOW_HEIGHT / 2.0f);

// Color buffer for position
// Set color buffer source for copying
// 因为一次只能从一个texture里copy,所以我们需要指定是copy哪一个
gGbuffer.SetReadBuffer(GBuffer::GBUFFER_TEXTURE_TYPE_POSITION);
// Set buffer copy info
glBlitFramebuffer(0, 0, WINDOW_WIDTH, WINDOW_HEIGHT, 0, 0, halfwidth, halfheight, GL_COLOR_BUFFER_BIT, GL_LINEAR);

// Color buffer for diffuses
gGbuffer.SetReadBuffer(GBuffer::GBUFFER_TEXTURE_TYPE_DIFFUSE);
glBlitFramebuffer(0, 0, WINDOW_WIDTH, WINDOW_HEIGHT, 0,halfheight, halfwidth, WINDOW_HEIGHT, GL_COLOR_BUFFER_BIT, GL_LINEAR);

// Color buffer for normal
gGbuffer.SetReadBuffer(GBuffer::GBUFFER_TEXTURE_TYPE_NORMAL);
glBlitFramebuffer(0, 0, WINDOW_WIDTH, WINDOW_HEIGHT, halfwidth,halfheight, WINDOW_WIDTH, WINDOW_HEIGHT, GL_COLOR_BUFFER_BIT, GL_LINEAR);

// Color buffer for TexCoor
gGbuffer.SetReadBuffer(GBuffer::GBUFFER_TEXTURE_TYPE_TEXCOORD);
glBlitFramebuffer(0, 0, WINDOW_WIDTH, WINDOW_HEIGHT, halfwidth,0, WINDOW_WIDTH, halfheight, GL_COLOR_BUFFER_BIT, GL_LINEAR);
}
	Final Effect:

DeferredShading_GeometryPass
在真正的Deferred Shading中,有几个需要注意的点。
第一个点,我们不需要讲生成的四个Color Texture显示在屏幕上,所以最后一步是可以省去的。
第二个点因为Geometry Pass只需要存储closest pixel,所以我们需要开启GL_DEPTH_TEST,并且设置glDepthMask(GL_TRUE)来防止其他pass写入我们的fbo的depth buffer。
最终geometry pass代码如下:

1
2
3
4
5
6
7
8
9
10
11
12
13
14
15
16
17
18
19
20
21
22
23
void DSGeometryPass()
{
m_DSGeomPassTech.Enable();

m_gbuffer.BindForWriting();

// Only the geometry pass updates the depth buffer
glDepthMask(GL_TRUE);

glClear(GL_COLOR_BUFFER_BIT | GL_DEPTH_BUFFER_BIT);

glEnable(GL_DEPTH_TEST);

glDisable(GL_BLEND);

......

// When we get here the depth buffer is already populated and the stencil pass
// depends on it, but it does not write to it.
glDepthMask(GL_FALSE);

glDisable(GL_DEPTH_TEST);
}
	第三个点,因为Lighting Pass里参与计算的的TexCoordnate信息可以通过下列算式计算出来,所以出于节约内存,我们可以不必生成TexCoordnate的Texture(即只需要Position,Diffuse,Normal和Depth(这个后续会用到)四个贴图)。
1
2
3
4
5
vec2 CalcTexCoord()
{
return gl_FragCoord.xy / gScreenSize;
}

	第四个点,因为我们生成的Texture最终会用于Screen的1对1映射计算,所以我们需要把我们生成的Texture指定filter。
1
2
3
4
5
6
7
8
9
10
11
bool GBuffer::Init(unsigned int WindowWidth, unsigned int WindowHeight)
{
...
for (unsigned int i = 0 ; i < ARRAY_SIZE_IN_ELEMENTS(m_textures) ; i++) {
...
glTexParameterf(GL_TEXTURE_2D, GL_TEXTURE_MIN_FILTER, GL_NEAREST);
glTexParameterf(GL_TEXTURE_2D, GL_TEXTURE_MAG_FILTER, GL_NEAREST);
...
}
...
}
  1. Lighting Pass. A pixel shader computes the direct and indirect lighting at each pixel using the information of the texture buffers in screen space.
    在第二个Lighting Pass里我们只需要用我们在Geometry Pass存储的数据来进行pixel by pixel的光照计算即可,因为我们存储的texture是针对screen space的,所有存储的pixel都是通过了depth test的,所以在Deferred Shading里,我们只针对通过了depth test的pixel进行了光照计算。
    下面我们来看看如何通过已经存储的Position,Diffuse,Normal,Depth信息来得出最终的光照颜色。首先让我们看看整体的轮廓。
1
2
3
4
5
6
7
8
9
10
11
12
13
14
15
16
17
static void RenderCallbackCB()
{
pGameCamera->OnRender();

gScale += 0.05f;

DSGeometryPass();

BeginLightPasses();

DSPointLightPass();

DSDirectionalLightPass();

//Swap buffer
glutSwapBuffers();
}
1. 开启混合模式,因为Deferred Shading现在是每一个pixel都会针对所有相关的光照进行计算,最终的结果将有所有光照计算叠加而成。(因为我们不需要再从我们生成的fbo读取数据了(直接从生成的texture里去读),所以不需要再绑定到生成的fbo上,而是绑定到默认的fbo上,这样一来我们只需设置并绑定我们对应的Texture即可)
1
2
3
4
5
6
7
8
9
10
11
12
13
14
15
16
17
18
19
void GBuffer::BindForReading()
{
glBindFramebuffer(GL_DRAW_FRAMEBUFFER, 0);

for (unsigned int i = 0 ; i < ARRAY_SIZE_IN_ELEMENTS(m_textures); i++) {
glActiveTexture(GL_TEXTURE0 + i);
glBindTexture(GL_TEXTURE_2D, m_textures[GBUFFER_TEXTURE_TYPE_POSITION + i]);
}
}

void BeginLightPasses()
{
glEnable(GL_BLEND);
glBlendEquation(GL_FUNC_ADD);
glBlendFunc(GL_ONE, GL_ONE);

m_gbuffer.BindForReading();
glClear(GL_COLOR_BUFFER_BIT);
}
2. 每一个Pixel针对场景里的Point, Direction, Spot Light进行计算得出最终颜色。这里要针对每一种光照进行说明,如何触发正确的计算。

Direction Light因为是全局光,所以我们需要针对每一个Pixel进行计算,这里我们通过一个铺满屏幕的Quad Mesh来触发计算。
Direction Light:

1
2
3
4
5
6
7
8
9
10
11
12
13
14
15
16
17
18
19
20
21
22
23
24
25
26
27
28
29
30
31
32
33
34
35
36
37
38
39
40
41
42
43
44
45
46
light_pass.vs
#version 330

layout (location = 0) in vec3 Position;

uniform mat4 gWVP;

void main()
{
gl_Position = gWVP * vec4(Position, 1.0);
}

dir_light_pass.fs
// 这个和之前大部分一样,唯一的区别就是从对应的Texture读取需要参与计算的信息
......

vec2 CalcTexCoord()
{
return gl_FragCoord.xy / gScreenSize;
}

out vec4 FragColor;

void main()
{
vec2 TexCoord = CalcTexCoord();
vec3 WorldPos = texture(gPositionMap, TexCoord).xyz;
vec3 Color = texture(gColorMap, TexCoord).xyz;
vec3 Normal = texture(gNormalMap, TexCoord).xyz;
Normal = normalize(Normal);

FragColor = vec4(Color, 1.0) * CalcDirectionalLight(WorldPos, Normal);
}

void DSDirectionalLightPass()
{
m_DSDirLightPassTech.Enable();
m_DSDirLightPassTech.SetEyeWorldPos(m_pGameCamera->GetPos());
Matrix4f WVP;
// 这里我们使用的quad是(-1,1)to(1,1),通过设置WVP为单位矩阵,这样一来经过rasterizer后,
// (-1,-1)to(1,1)就会被映射到(0,0)to(SCREEN_WIDTH,SCREEN_HEIGHT)即铺满全屏
// 其他都和之前Dir Light计算一样,只是这里有多少个Dir Light就要针对每个Pixel计算多少次
WVP.InitIdentity();
m_DSDirLightPassTech.SetWVP(WVP);
m_quad.Render();
}

Point Light因为是范围光,所以我们需要知道Point Light所影响的范围去触发对应Pixel的光照计算。这里涉及到一个Point Light的Point Light光照削弱方程。这里我也没详细看了,想了解的可以去看一下。通过方程我们得出了Point Light的有效范围,这样一来我们只需要以Point Light所在位置为圆心绘制一个Sphere就能触发正确的Point Light光照计算了。
Point Light:

1
2
3
4
5
6
7
8
9
10
11
12
13
14
15
16
17
18
19
20
21
22
23
24
25
26
27
28
29
30
31
32
33
34
35
// Shader没什么变化,只是通过Texture去读取相关数据,这里就不重复了。
......

// 光照削弱计算
float CalcPointLightBSphere(const PointLight& Light)
{
float MaxChannel = fmax(fmax(Light.Color.x, Light.Color.y), Light.Color.z);

float ret = (-Light.Attenuation.Linear + sqrtf(Light.Attenuation.Linear * Light.Attenuation.Linear -
4 * Light.Attenuation.Exp * (Light.Attenuation.Exp - 256 * MaxChannel * Light.DiffuseIntensity)))
/
(2 * Light.Attenuation.Exp);
return ret;
}

void DSPointLightsPass()
{
m_DSPointLightPassTech.Enable();
m_DSPointLightPassTech.SetEyeWorldPos(m_pGameCamera->GetPos());

Pipeline p;
p.SetCamera(m_pGameCamera->GetPos(), m_pGameCamera->GetTarget(), m_pGameCamera->GetUp());
p.SetPerspectiveProj(m_persProjInfo);

// 这里也一样,有多少个Point Light就要触发多少次光照运算
for (unsigned int i = 0 ; i < ARRAY_SIZE_IN_ELEMENTS(m_pointLight); i++) {
m_DSPointLightPassTech.SetPointLight(m_pointLight[i]);
p.WorldPos(m_pointLight[i].Position);
// 绘制指定半径大小的Sphere触发光照计算
float BSphereScale = CalcPointLightBSphere(m_pointLight[i]);
p.Scale(BSphereScale, BSphereScale, BSphereScale);
m_DSPointLightPassTech.SetWVP(p.GetWVPTrans());
m_bsphere.Render();
}
}

实现的过程中我遇到点问题,所以也没有去实现Spot Light,个人认为应该是通过cone(圆锥体)去模拟Spot Light的范围,通过光照削弱方程去计算有效范围。

这里说一下我遇到的问题(没有解决),如果大家有什么头绪,欢迎提出来。
描述上来说,我通过官网的教程根据source code编写后,发现我的只有当camera离的很近的时候才会显示一个box(最初怀疑是PersProjInfo设置的zFar导致的,后来查看是一模一样的。但通过修改源代码的zFar=2.0我得到了相同的结果,但这里无论我如何修改zFar,我的示例始终只有靠近box的时候才显示一部分。)
DS一开始截图
DS靠近后

1
2
3
4
5
6
7
8
9
10
11
12
13
// Source Code
m_persProjInfo.FOV = 60.0f;
m_persProjInfo.Height = WINDOW_HEIGHT;
m_persProjInfo.Width = WINDOW_WIDTH;
m_persProjInfo.zNear = 1.0f;
m_persProjInfo.zFar = 100.0f;

// My Code
gPersProjInfo.FOV = 60.0f;
gPersProjInfo.Height = WINDOW_HEIGHT;
gPersProjInfo.Width = WINDOW_WIDTH;
gPersProjInfo.zNear = 1.0f;
gPersProjInfo.zFar = 100.0f;

通过上述方法计算后,我们得出了我们Deferred Shading后的效果
DS源代码效果

但上述方法还有一些问题:

  1. 当我们靠近Point Light的时候,Point Light光照消失了(这是因为我们之渲染front face,当Camera进入Light Sphere的时候Sphere被cull away了,所以也就不会触发Point Light的计算了。)

  2. 因为Sphere是针对我们生成的Screen Space的Texture而言的,所以有时候有些object其实不在sphere内但在sphere所在的screen space上就参与了计算,这样就错误的给某些object计算了point light。
    解决第二个问题,需要用到Stencil Buffer。
    在此之前让我们先来了解下什么是Stencil Buffer?
    A stencil buffer is an extra buffer, in addition to the color buffer and depth buffer (z-buffering) found on modern graphics hardware. The buffer is per pixel, and works on integer values, usually with a depth of one byte per pixel.
    简单的想,可以把Stencil Buffer理解成PS里面的模板,只有Stencil Buffer里面的数据(数据可以修改)不为0的时候特定像素才能通过。真是因为这个特性我们可以控制哪些pixel参与Point Light光照计算。

Stencil Buffer用于Stencil Test,Stencil Test是针对每一个像素调用,就像我之前说的类似PS的模板。

来我们来看个简单的Stencil Buffer效果,下图来源:
StencilBufferEffect

我们可以指定Stencil Buffer里的值如何修改,什么时候修改。

接下来让我们来看看如何通过Stencil Buffer来解决第二个问题:
以下引用至

  1. Render the objects as usual into the G buffer so that the depth buffer will be properly populated.
  2. Disable writing into the depth buffer. From now on we want it to be read-only
  3. Disable back face culling. We want the rasterizer to process all polygons of the sphere.
  4. Set the stencil test to always succeed. What we really care about is the stencil operation.
  5. Configure the stencil operation for the back facing polygons to increment the value in the stencil buffer when the depth test fails but to keep it unchanged when either depth test or stencil test succeed.
  6. Configure the stencil operation for the front facing polygons to decrement the value in the stencil buffer when the depth test fails but to keep it unchanged when either depth test or stencil test succeed.
  7. Render the light sphere.(only when the stencil value of the pixel is different from zero)

关键思想是通过判断object的front和back face是否在sphere的front和back的前面或后面来修改stencil buffer的值,然后通过该值得出我们所需绘制的pixel。
请看下图:
DeferredShadingStencilBufferUsing
sphere的front和back face都在物体A的后面,物体C的前面,就物体B而言,front face在物体B之前,back face在物体B之后。

所以通过5,6步骤设定的规则,只有物体B所在的所在的pixel的stencil buffer值大于0

上面的2-6算作Stencil Pass,用于得到哪些物体参与Point Light Sphere的计算。

第7步才是真正光照计算。

接下来让我们看看代码实现:

  1. 针对每一个Point Light开启stencil test并在进行关照计算之前调用stencil pass得出需要参与计算的pixel
1
2
3
4
5
6
7
8
9
10
11
12
13
14
15
16
17
18
19
20
21
22
23
24
25
26
27
28
29
30
31
32
33
34
35
36
37
38
39
40
41
42
43
44
45
46
47
48
49
50
51
52
53
54
55
56
57
58
59
60
61
62
63
64
65
66
67
68
69
70
71
72
73
74
75
76
77
78
79
80
81
82
83
84
85
86
87
88
89
90
91
92
93
94
95
96
97
98
99
100
101
102
103
104
105
106
107
108
109
110
111
112
113
114
null_technique.vs
#version 330

layout (location = 0) in vec3 Position;

uniform mat4 gWVP;

void main()
{
gl_Position = gWVP * vec4(Position, 1.0);
}

null_technique.fs
// 这个为空,因为在stencil pass我们不需要填充color buffer,我们只需要触发rasterizer即可

// 因为最终pixel会被绘制到G buffer的GL_COLOR_ATTACHMENT4上,
// 所以我们要在每次渲染之前清除GL_COLOR_ATTACHMENT4
void GBuffer::StartFrame()
{
glBindFramebuffer(GL_DRAW_FRAMEBUFFER, m_fbo);
glDrawBuffer(GL_COLOR_ATTACHMENT4);
glClear(GL_COLOR_BUFFER_BIT);
}


// 在初始化G buffer的时候需要注意,因为我们需要存储stencil值
// 这里depth texture格式变为GL_DEPTH32F_STENCIL8,并且attach到GL_DEPTH_STENCIL_ATTACHMENT上
bool GBuffer::Init(unsigned int WindowWidth, unsigned int WindowHeight)
{
...

// depth
glBindTexture(GL_TEXTURE_2D, m_depthTexture);
glTexImage2D(GL_TEXTURE_2D, 0, GL_DEPTH32F_STENCIL8, WindowWidth, WindowHeight, 0, GL_DEPTH_STENCIL,
GL_FLOAT_32_UNSIGNED_INT_24_8_REV, NULL);
glFramebufferTexture2D(GL_FRAMEBUFFER, GL_DEPTH_STENCIL_ATTACHMENT, GL_TEXTURE_2D, m_depthTexture, 0);

...
}

void GBuffer::BindForStencilPass()
{
// must disable the draw buffers
glDrawBuffer(GL_NONE);
}

void DSStencilPass(unsigned int PointLightIndex)
{
m_nullTech.Enable();

// Disable color/depth write and enable stencil
// 这里使用我们之前创建的fbo(存储了之前object渲染后depth buffer的fbo)
m_gbuffer.BindForStencilPass();
// 因为stencil buffer的值更新跟depth test有关,所以需要开启GL_DEPTH_TEST
glEnable(GL_DEPTH_TEST);

// 为了得到正确的stencil buffer值,我们需要针对sphere进行front和back face渲染
glDisable(GL_CULL_FACE);

// 归零stencil buffer,用于下一个point light
glClear(GL_STENCIL_BUFFER_BIT);

// We need the stencil test to be enabled but we want it
// to succeed always. Only the depth test matters.
// 指定stencil text always success,
// 因为这里我只需要通过设定stencil buffer修改规则就能得到我们要的值了
glStencilFunc(GL_ALWAYS, 0, 0);

// 为stencil buffer指定修改方式,即我们之前提到的6和7步骤
glStencilOpSeparate(GL_BACK, GL_KEEP, GL_INCR_WRAP, GL_KEEP);
glStencilOpSeparate(GL_FRONT, GL_KEEP, GL_DECR_WRAP, GL_KEEP);

Pipeline p;
p.WorldPos(m_pointLight[PointLightIndex].Position);
float BBoxScale = CalcPointLightBSphere(m_pointLight[PointLightIndex]);
p.Scale(BBoxScale, BBoxScale, BBoxScale);
p.SetCamera(m_pGameCamera->GetPos(), m_pGameCamera->GetTarget(), m_pGameCamera->GetUp());
p.SetPerspectiveProj(m_persProjInfo);

m_nullTech.SetWVP(p.GetWVPTrans());
// 这样一来我们就得到了针对特定光照sphere的stencil buffer值了
m_bsphere.Render();
}

virtual void RenderSceneCB()
{
......

// 清除G buffer的GL_COLOR_ATTACHMENT4
m_gbuffer.StartFrame();

// We need stencil to be enabled in the stencil pass to get the stencil buffer
// updated and we also need it in the light pass because we render the light
// only if the stencil passes.
glEnable(GL_STENCIL_TEST);

for (unsigned int i = 0 ; i < ARRAY_SIZE_IN_ELEMENTS(m_pointLight); i++) {
DSStencilPass(i);
DSPointLightPass(i);
}

// The directional light does not need a stencil test because its volume
// is unlimited and the final pass simply copies the texture.
glDisable(GL_STENCIL_TEST);

DSDirectionalLightPass();

DSFinalPass();

RenderFPS();

glutSwapBuffers();
}
  1. 调用Point Light Pass通过stencil buffer对特定pixel进行光照计算
1
2
3
4
5
6
7
8
9
10
11
12
13
14
15
16
17
18
19
20
21
22
23
24
25
26
27
28
29
30
31
32
33
34
35
36
37
38
39
40
41
42
43
44
45
46
47
48
void GBuffer::BindForLightPass()
{
glDrawBuffer(GL_COLOR_ATTACHMENT4);

for (unsigned int i = 0 ; i < ARRAY_SIZE_IN_ELEMENTS(m_textures); i++) {
glActiveTexture(GL_TEXTURE0 + i);
glBindTexture(GL_TEXTURE_2D, m_textures[GBUFFER_TEXTURE_TYPE_POSITION + i]);
}
}

void DSPointLightPass(unsigned int PointLightIndex)
{
// 指定参与光照计算的texture
m_gbuffer.BindForLightPass();

m_DSPointLightPassTech.Enable();
m_DSPointLightPassTech.SetEyeWorldPos(m_pGameCamera->GetPos());

// 设置当stencil buffer value不等于0的时候才通过,
// 这样一来就只有通过stencil pass即在光照sphere内的物体才参与计算
glStencilFunc(GL_NOTEQUAL, 0, 0xFF);

// 计算光照不需要Delpth test,只需要叠加计算光照效果即可
glDisable(GL_DEPTH_TEST);
glEnable(GL_BLEND);
glBlendEquation(GL_FUNC_ADD);
glBlendFunc(GL_ONE, GL_ONE);

// 这里很重要,当我们去计算光照的时候,我们需要开启GL_FRONT Cull,
// 这样一来可以避免camera位于sphere内的时候无法计算光照
// (确保了sphere back face的片面渲染,但如果是GL_BACK,这一部分是会被CULL掉)
// 这样一来就解决了之前说的当camera位于sphere内,无法计算光照的问题
glEnable(GL_CULL_FACE);
glCullFace(GL_FRONT);

Pipeline p;
p.WorldPos(m_pointLight[PointLightIndex].Position);
float BBoxScale = CalcPointLightBSphere(m_pointLight[PointLightIndex]);
p.Scale(BBoxScale, BBoxScale, BBoxScale);
p.SetCamera(m_pGameCamera->GetPos(), m_pGameCamera->GetTarget(), m_pGameCamera->GetUp());
p.SetPerspectiveProj(m_persProjInfo);
m_DSPointLightPassTech.SetWVP(p.GetWVPTrans());
m_DSPointLightPassTech.SetPointLight(m_pointLight[PointLightIndex]);
m_bsphere.Render();
glCullFace(GL_BACK);

glDisable(GL_BLEND);
}
  1. 最后渲染G buffer里计算得出的图像(之前我们绘制到了G buffer的GL_COLOR_ATTACHMENT4里)
1
2
3
4
5
6
7
8
9
10
11
12
13
14
15
void GBuffer::BindForFinalPass()
{
glBindFramebuffer(GL_DRAW_FRAMEBUFFER, 0);
glBindFramebuffer(GL_READ_FRAMEBUFFER, m_fbo);
glReadBuffer(GL_COLOR_ATTACHMENT4);
}

void DSFinalPass()
{
// 这里我之所以不直接渲染到default FBO的原因是因为,
// 在Point Light Pass的时候我们需要知道depth buffer里的值来决定那些pixel应该参与光照计算
m_gbuffer.BindForFinalPass();
glBlitFramebuffer(0, 0, WINDOW_WIDTH, WINDOW_HEIGHT,
0, 0, WINDOW_WIDTH, WINDOW_HEIGHT, GL_COLOR_BUFFER_BIT, GL_LINEAR);
}

Final Effect:
DeferredShadingFinalEffect

Note:
The key point behind deferred shading is the decoupling of the geometry calculations (position and normal transformations) and the lighting calculations.

OpenGL Utility

Open Asset Import Library

“Open Asset Import Library is a portable Open Source library to import various well-known 3D model formats in a uniform manne”

官方网站

assimp

“assimp is a library to load and process geometric scenes from various data formats. It is tailored at typical game scenarios by supporting a node hierarchy, static or skinned meshes, materials, bone animations and potential texture data. The library is not designed for speed, it is primarily useful for importing assets from various sources once and storing it in a engine-specific format for easy and fast every-day-loading. “

官方文档

Note:
个人理解,assimp主要是提供了对多种格式模型的数据解析,并抽象了所有数据到aiScene这个类里。
通过aiScene我们可以去访问模型数据里的顶点数据,纹理数据,材质数据等。
我们通过这些数据最终去作为我们的顶点数据创建顶点buffer,作为纹理数据创建纹理贴图,最终绘制出我们的模型。

源代码参考OpenGL Tutorial 22

open3mod

“open3mod is a Windows-based model viewer. It loads all file formats that Assimp supports and is perfectly suited to quickly inspect 3d assets.”

主要用于快速查看各种资源格式的模型。
Open3modUsing

GIMP

GNU Image Manipulation Program (GIMP) is a cross-platform image editor available for GNU/Linux, OS X, Windows and more operating systems.
GIMPDownloadLink

gimp-normalmap plugin that supports to export normal map from texture
gimp-normalmapDownloadLink

通过GIMP和gimp-normalmap插件,我们可以从texture中导出normal map使用。

GLSL Debuger

Nsight

NVIDIA® Nsight™ is the ultimate development platform for heterogeneous computing. Work with powerful debugging and profiling tools that enable you to fully optimize the performance of the CPU and GPU. - See more at: http://www.nvidia.com/object/nsight.html#sthash.Hc8TfPMs.dpuf
Nsight是NVIDIA开发的一套协助GPU开发的工具。
优点:

  1. 支持直接调试GLSL和HLSL等着色器语言
  2. 和VS完美集成

缺点:

  1. 硬件限制比较多(比如主要针对NVIDIA公司的显卡)
    Nsight Visual Studio Edition Requirements

OpenGL proiler, debugger

gDEBugger

gDEBugger是一个针对OpenGL和OpenCL开发的一套调试器,分析器和内存分析器等协助工具。
通过gDEBugger我们可以查看在某一贞关于OpenGL相关的大量信息(比如Uniform值,OpenGL的各个状态,Draw call次数等)
可以查看到OpenGL的一些状态,比如GL_CULL_FACE:
gDEBuggerCapture

可以查看Shader的一些信息,并且可以编译Shader等:
gDEBuggerShaderInfo

Reference Website:

OpenGL 4 reference page
client-server 模式
OpenGL Execute Model
X Window System
OpenGL Tutorial
OpenGL Windows & Context
Creating an OpenGL Context (WGL)
OpenGL Context
Window and OpenGL context
OpenGLBook.com Getting Started

Note:
OpenGL uses right-handed coordinate system (OpenGL使用右手坐标系)

.Net Framework

Introduction

.Net Framework是Microsoft为开发应用程序而创建创的一个具有革命意义的平台。

Content

.Net Framework主要包含一个非常大的代码库,可以在客户语言中通过面向对象编程技术来使用这些代码。这个库分为多个不同的模块。

.Net Framework还包含.NET公共语言运行库(Common Language Runtime, CLR),它负责管理用.NET库开发的所有应用程序的执行

Using .NET Framework

Tools

  1. Visual Studio
  2. VCE(for C#)

相关概念

FCL(Framework Class Library)

“The FCL is a set of DLL assemblies that contain several thousand type definitions in which each type exposes some functionality.”(提供了大量功能的现有DLL库)

Metadata

“There are two main types of tables: tables that describe the types and members defined in your source code and tables that describe the types and members referenced by your source code.”(包含了源代码里类型的定义,对象的索引等信息)

IL(Intermediate Language)

“IL is a CPU-independent machine language created by Microsoft after consultation with several external commercial and academic language/compiler writers.”(CPU无关的中间语言,用来抽象编译后的高阶语言,在JIT中会被编译成特定OS和目标机器架构的机器代码)

CLI(Common Language Infrastructure)

The Common Language Infrastructure (CLI) is an open specification developed by Microsoft and standardized by ISO[1] and ECMA[2] that describes executable code and a runtime environment that allow multiple high-level languages to be used on different computer platforms without being rewritten for specific architectures.(通用语言基础架构定义了可执行码以及代码的运行时环境的规范,使得高级语言编写的软件无需重新编写就可以运行在不同的计算机体系结构上)

Note:
The .NET Framework and the free and open source Mono and Portable.NET are implementations of the CLI.

CLR(Common Language Runtime)

“The common language runtime (CLR) is just what its name says it is: a runtime that is usable by different and varied programming languages. The core features of the CLR (such as memory management, assembly loading, security, exception handling, and thread synchronization) are available to any and all programming languages that target it” – 《CLR Via C# Fourth Edition - Jeffrey Richter》(公共语言运行库提供了内存管理,异常处理,线程同步等功能)

CTS(Common Type System)

“Describes how types are defined and how they behave. Defines the rules governing type inheritance, virtual methods, object lifetime, and so on.”

CLS(Common Language Specification)

“Details for compiler vendors the minimum set of features their compilers must support if these compilers are to generate types compatible with other components written by other CLS-compliant languages on top of the CLR.”(通用语言规范定义了通用语言之间类型交互的基本规范)
CTSAndCLS

Compile process

  1. CIL(Common Intermediate Language)
    首先把代码编译成通用中间语言(Common Intermediate Language, CIL)代码
    编译到程序集

Compile Source Into Managed Modules
从上面可以看出CLR支持的语言都被编译成Managed module(IL and metadata)

Managed Module

Managed Module由两部分组成:

  1. Metadata
  2. IL(Intermediate Language)
    ManagedModulesComponents
    可以看出Metadata是负责记录类型信息。
    IL是通过CLR编译后的CPU-independent的中间语言。
    CLR支持的语言都会编译成IL和Metadata存储在Managed Module里。
    但我们最终在程序里加载的不是Module而是Assebmlies。下面来看看Module和Assebmly之间的关系。
    RelationshipBetweenModulesAndAssemblies
    可以看出Assembly是由多个Module组成。
    而CLR是负责管理Assebmlies里的代码执行。
    所以才有了多种CLR支持的语言在CLR内可以互相调用。

Executing Assembly Code

  1. JIT(Just-In-Time)
    把CIL编译为专用于OS和目标机器结构的机器代码
    编译为本机代码
    e.g.
    CodeExecutionExample1
    CodeExecutionExample2
    从上面可以看出,之前生成的IL会被JIT在运行时编译成对应的本地机器代码。当同样的方法再次调用时,就不需要JIT进行IL到本地机器代码的编译,直接调用之前编译好的机器代码即可。

这里有个Unsafe code的概念值得注意。
Unsafe code is allowed to work directly with memory addresses and can manipulate bytes at these addresses.
/unsafe compiler switch to control whether allow to executing unsafe code(只有编译器开启了/unsafe标志才允许执行unsafe code(e.g. 直接操作内存地址进行修改))
PEVerify.exe可用不查看Assembly里是否有unsafe code。

程序集

编译程序时所创建的CIL代码存储在一个程序集中(e.g. .exe .dll)
程序集包含程序用到的相关数据信息(Assemblies contains all module’s Metadata and IL)

Note:
PDB(program Database) file helps the debugger find local variables and map the IL instructions to the source code.
NGen.exe tool can compiles all of an assembly’s IL code into native code and saves the resulting native code to a file on disk.(avoid compilation at run time)

托管代码

CLR管理着应用程序,其方式是管理内存,处理安全性以及允许进行跨语言调试等。相反,不受CLR控制运行着的应用程序属于非托管类型。
托管到CLR运行

Note:
“C++ is unique in that it is the only compiler that allows the developer to write both managed and unmanaged code and have it emitted into a single module.”

垃圾回收

托管代码中的一个功能GC(garbage collection)

链接

模块化

CSharp(CLR Via C#)

Introduction

C#是可用于创建要运行在.NET CLR上的应用程序的语言之一,它从C和C++语言演化而来,是Microsoft专门为使用.NET平台而创建的。

Features

  1. 语法简单
  2. 类型安全
  3. 为.NET Framework设计的语言

Development

Application Type

  1. Windows Appliaction Program
  2. Web Application Program
  3. Web Service

Language Study

Only record some difference between C# and C++/Java

delegate

delegates – type-safe
Unmanaged C/C++ callback functions are not type-safe
首先要知道的是delegate在C#里类型安全的(即有有编译时的类型检查)
C++里是不是类型安全的

在调用delegate的时候,CLR提供了当reference type绑定方法到delegate的时covariance和contra-variance的支持。
Covariance means that a method can return a type that is derived from the delegate’s return type.(reference type的方法的返回类型可以是delegate指定返回类型的子类)
Contra-variance means that a method can take a parameter that is a base of the delegate’s parameter type.(reference type的方法的参数可以是delegate指定参数类型的父类)
The reason why value types and void cannot be used for covariance and contra-variance is because the memory structure for these things varies, whereas the memory structure for reference type is always a pointer.(value type和void不支持上述功能)

接下来让我们看看Delegate背后的故事:

1
2
3
4
5
6
7
8
9
10
11
12
13
14
15
16
17
18
19
20
21
22
23
24
25
26
27
28
29
30
31
32
33
34
35
36
37
38
39
40
41
42
43
44
45
46
47
48
49
50
51
52
53
54
55
56
using System;
using System.Collections.Generic;
using System.Linq;
using System.Text;
using System.Collections;

namespace CSharpDeepStudy
{
#region Delegate Study
internal delegate void DelegateStudy(int value);
#endregion

class Program
{
#region Delegate Study
private static void StaticDelegateDemo(int value)
{
Console.WriteLine("StaticDelegateDemo({0})", value);
}

private void InstanceDelegateDemo(int value)
{
Console.WriteLine("InstanceDelegateDemo({0})",value);
}

private static void ChainDelegateDemo(Program p)
{
DelegateStudy cdd = null;
cdd += Program.StaticDelegateDemo;
cdd += p.InstanceDelegateDemo;
cdd.Invoke(3);
}
#endregion

static void Main(string[] args)
{
#region Delegate Study
Program p = new Program();
DelegateStudy sdd = Program.StaticDelegateDemo;
DelegateStudy idd = p.InstanceDelegateDemo;
sdd.Invoke(1);
idd.Invoke(2);
Program.ChainDelegateDemo(p);
#endregion

#region Dynamic Study
//Dynamic delegate part
MethodInfo mi = typeof(Program).GetMethod("InstanceDelegateDemo");
Delegate d = Delegate.CreateDelegate(typeof(DelegateStudy), p, mi);
d.DynamicInvoke(4);
#endregion

Console.ReadKey();
}
}
}

反编译后:
DelegateStudy
从上面可以看到,当我们定义一个delegate的时候CLR会给我们生成一个继承至System.MulticastDelegate的类,上面是DelegateStudy Class。
而MulticastDelegate是我们去累加delegate的关键。
MulticastDelegate
从上面可以看出,MulticastDelegate包含了三个关键成员:

  1. _target
    用于保存delegate的实例对象,如果是全局static的回调则为null
  2. _methodPtr
    用于识别回调方法
  3. _invocationList
    这个是用于delegate chain的关键,用于保存array of delegate objects
    下面我们看看_invocationList是如何完成delegate chain的:
    MultipleDelegatePart1
    MultipleDelegatePart2
    MultipleDelegatePart3
    MultipleDelegatePart4
    可以看出当我们chain delegate的时候_invocationList存储了delegate的指针到_invocationList里,从而实现了multiple delegate chain的效果。
    最后要讲的一点是关于反射动态创建delegate:
    通过System.Reflection.MethodInfo.CreateDelegate()方法我们可以实现动态创建delegate。
    最终上面的代码会输出如下:
    DelegateStudyOutput

(C++里用函数指针实现,Java里通过内部类的闭包和interface去实现)
最后我们还可以通过lambda表达式和匿名方法去定义delegate

1
2
3
4
5
6
7
8
9
10
11
12
13
14
15
16
17
18
19
20
21
22
23
24
25
26
27
28
29
30
31
32
33
34
35
36
37
38
39
40
41
42
43
using System;
using System.Collections.Generic;
using System.Linq;
using System.Text;

namespace CSharpStudy
{
class Program
{
delegate void testDelegate(string para);

static void doSomething(string para)
{
Console.WriteLine("doSomething:" + para);
}

static void Main(string[] args)
{
#region method 1 to use delegate
testDelegate delegate1;
delegate1 = new testDelegate(doSomething);
#endregion
delegate1("delegate1");

#region method 2 to use delegate(lambda expression)
testDelegate delegate2 = s =>
{
Console.WriteLine("doSomething:" + s);
};
#endregion
delegate2("delegate2");

#region method 3 to use delegate(anonymous method)
testDelegate delegate3 = delegate(string para)
{
Console.WriteLine("delegate3's para = " + para);
};
#endregion
delegate3("delegate3");
Console.ReadKey();
}
}
}

Output:
CSharp_Delegate

详细比较Delegate和函数指针,参见C# VS C++之一: 委托 vs 函数指针

这里只写最后的总结:
1.C#委托对象是真正的对象,C/C++函数指针只是函数入口地址
2.C++的委托对象:functor
3.C++的静多态:模版

Class & interface

  1. Class qualifier
    internal class – only code in current project can access (default)
    public class – other project code can access

abstract class – abstract class
sealed class – cant not be inheritated

Note:
Compiler is not allowed derived class’s access privileges higher than parent class

e.g.

1
2
3
4
5
6
7
8
9
10
11
12
13
14
15
16
internal class MyBase
{
public MyBase()
{

}
}
//Cant do like this due to Child class access previlage is higher than parent class
public class MyChild /*: MyBase*/
{
public MyChild()
{


}
}

support extends multiple interface
Note:
base class must be write down first when we inherites from one class and extends several interface
abstract & sealed can not be used by interface due to no implementation in interface (abstract & sealed qualifier are meaningless)

  1. Static constructor & Static class
    静态构造函数只会被调用一次且属于整个类
    静态类不能拥有实例构造函数且只能有static成员
1
2
3
4
5
6
7
8
9
10
11
12
13
14
15
16
17
18
19
20
21
22
23
24
25
26
27
28
29
30
31
32
33
34
35
36
37
38
39
40
41
42
43
44
45
46
47
48
49
50
51
52
53
54
55
56
using System;
using System.Collections.Generic;
using System.Linq;
using System.Text;

namespace CSharpStudy
{
class Program
{
class StaticConstructor
{
static StaticConstructor()
{
Console.WriteLine("Static StaticConstructor()");
m_ID = 1;
}

public StaticConstructor()
{
Console.WriteLine("Normal StaticConstructor()");
}

public static int m_ID;
}

static class StaticClass
{
/*
//Cant have instance constructor (do not know why static constructor neither)
static StaticClass()
{
Console.WriteLine("StaticClass()");
m_ID = 2;
m_Type = "Static";
}
*/
//Can not non static member
//public int m_Test = 3;
public static int m_ID = 2;

public static string m_Type = "Static";
}


static void Main(string[] args)
{
StaticConstructor sc = new StaticConstructor();
Console.WriteLine("StaticConstructor::m_ID = " + StaticConstructor.m_ID);

Console.WriteLine("StaticClass::m_ID = " + StaticClass.m_ID);
Console.WriteLine("StaticClass::m_Type = " + StaticClass.m_Type);

Console.ReadKey();
}
}
}

Output:
Static_Constructor_And_Static_Class

Not supported multiple inherit

C++支持多重继承,Java和C#通过extend多个Interface来实现多重继承

1
2
3
4
5
6
7
8
9
10
11
12
13
14
15
16
17
18
19
20
21
22
23
class Base1
{
public Base1()
{
Console.WriteLine("Base1()");
}
}
class Base2
{
public Base2()
{
Console.WriteLine("Base1()");
}
}
class Child : Base1/*, Base2*///Not support multiple inherit
{
public Child()
{
Console.WriteLine("Child()");
}
}

Child c = new Child();

Class member

access qualifier
public, private, internal, protected

readonly – only can be initilized in constructor or declaration

property & field
property gives more control to field access

accessor privilege – can not be higher than the access privilege that it is belonged to

1
2
3
4
5
6
7
8
9
10
11
12
13
14
15
16
17
18
19
20
21
22
class Accessor
{
public Accessor()
{
m_A = 0;
}

private int IntA
{
get
{
return m_A;
}
//Can not be public due to IntA's access privilege is lower than public
//public set
set
{
m_A = value;
}
}
private int m_A;
}
  1. member function
    override key word can hide base function(works with polymorphism)
    Access base function that has been hiden uses base key word in child class

  2. Interface member
    all interface member must be public
    can not use static, virtual, abstract, sealed

  3. Interface implementation
    explicit implementation – only can be accessed through interface (return type interface.functionanme(para))
    implicit implementation – can be accessd through both interface and class

  4. partial class definition & partial property
    can put class member, property, method, field into several files(partial key word)
    Partial property is always static and withought return value

Struct & Class

Struct is value type
在栈上分配内存
栈回收快速
传递的是值
转换为reference type会触发boxing引发堆上的额外内存分配
Class is reference type
在堆上分配内存
GC管理
传递的是索引
那么什么时候定义struct,什么时候定义class了?
一下来至MSDNChoosing Between Class and Struct
✓ CONSIDER defining a struct instead of a class if instances of the type are small and commonly short-lived or are commonly embedded in other objects.
如果生命周期短,并被包含在其他类里而已考虑使用struct

X AVOID defining a struct unless the type has all of the following characteristics:
It logically represents a single value, similar to primitive types (int, double, etc.).
It has an instance size under 16 bytes.
It is immutable.
It will not have to be boxed frequently.
In all other cases, you should define your types as classes.
可以看出只有在数据简单,不可变,不需要频繁boxing的时候才会选择定义struct。

Shallow copy & Deep copy
Shallow copy will only copy value type member, reference type member will use original one(System.Object.MemberwiseClone())

Deep copy will copy all member value instead of reference(implememnt ICloneable::Clone())

Collection class (System.Collection)

好比C++里的STL里的container
Our own collection (extends CollectionBase Class || DictionaryBase)

因为C#没有自带PriorityQueue而是通过基本的List等数据结构来实现,下面是自己实现PriorityQueue,主要是通过堆排序用List来模拟优先队列。

1
2
3
4
5
6
7
8
9
10
11
12
13
14
15
16
17
18
19
20
21
22
23
24
25
26
27
28
29
30
31
32
33
34
35
36
37
38
39
40
41
42
43
44
45
46
47
48
49
50
51
52
53
54
55
56
57
58
59
60
61
62
63
64
65
66
67
68
69
70
71
72
73
74
75
76
77
78
79
80
81
82
83
84
85
86
87
88
89
90
91
92
93
94
95
96
97
98
99
100
101
102
103
104
105
106
107
108
109
110
111
112
113
114
115
116
117
118
119
120
121
122
123
124
125
126
127
128
129
130
131
132
133
134
135
136
137
138
139
140
141
142
143
144
145
146
147
148
149
150
151
152
153
154
155
156
157
158
159
160
161
162
163
164
165
166
167
168
169
170
171
172
173
174
175
176
177
178
179
180
181
182
183
184
185
186
187
188
189
190
191
192
193
194
195
196
197
198
199
200
201
202
203
204
205
206
207
208
209
210
211
212
213
214
215
216
217
218
219
220
221
222
223
224
225
226
227
228
229
230
231
232
233
234
235
236
237
238
239
240
241
242
243
244
245
246
247
248
249
250
251
252
253
254
255
256
257
258
259
260
261
262
263
264
265
public class PriorityQueue<T1, T2>
{
public PriorityQueue()
{
mHeap = new Heap<T1, T2>();
}

public PriorityQueue(Heap<T1, T2> heap)
{
mHeap = heap;
}

public bool Empty()
{
return (mHeap.Size() == 0);
}

public void Push(KeyValuePair<T1, T2> kvp)
{
mHeap.Insert(kvp);
}

public KeyValuePair<T1, T2> Pop()
{
KeyValuePair<T1, T2> result = mHeap.Top();
mHeap.RemoveTop();
return result;
}

public int Size()
{
return mHeap.Size();
}

public KeyValuePair<T1, T2> Top()
{
return mHeap.Top(); ;
}

public void PrintOutAllMember()
{
mHeap.PrintOutAllMember();
}

private Heap<T1, T2> mHeap;
}

public class Heap<T1, T2>
{
private List<KeyValuePair<T1, T2>> mList;
private IComparer<T2> mComparer;
private int mCount;

public Heap()
{
mList = new List<KeyValuePair<T1, T2>>();
mComparer = Comparer<T2>.Default;
mCount = 0;
}

public Heap(List<KeyValuePair<T1, T2>> list)
{
mList = list;
mCount = list.Count;
mComparer = Comparer<T2>.Default;
BuildingHeap();
}

public int Size()
{
if (mList != null)
{
return mCount;
}
else
{
return 0;
}
}

//O(Log(N))
public void RemoveTop()
{
if (mList != null)
{
mList[0] = mList[mCount - 1];
mList.RemoveAt(mCount - 1);
mCount--;
HeapifyFromBeginningToEnd(0, mCount - 1);
}
}

public KeyValuePair<T1, T2> Top()
{
if (mList != null)
{
return mList[0];
}
else
{
//No more member
throw new InvalidOperationException("Empty heap.");
}
}

public void PrintOutAllMember()
{
foreach (KeyValuePair<T1, T2> valuepair in mList)
{
Console.WriteLine(valuepair.ToString());
}
}

//O(Log(N))
public void Insert(KeyValuePair<T1, T2> valuepair)
{
mList.Add(valuepair);
mCount++;
HeapifyFromEndToBeginning(mCount - 1);
}

//调整堆确保堆是最大堆,这里花O(log(n)),跟堆的深度有关
private void HeapifyFromBeginningToEnd(int parentindex, int length)
{
int max_index = parentindex;
int left_child_index = parentindex * 2 + 1;
int right_child_index = parentindex * 2 + 2;

//Chose biggest one between parent and left&right child
if (left_child_index < length && mComparer.Compare(mList[left_child_index].Value, mList[max_index].Value) < 0)
{
max_index = left_child_index;
}

if (right_child_index < length && mComparer.Compare(mList[right_child_index].Value, mList[max_index].Value) < 0)
{
max_index = right_child_index;
}

//If any child is bigger than parent,
//then we swap it and do adjust for child again to make sure meet max heap definition
if (max_index != parentindex)
{
Swap(max_index, parentindex);
HeapifyFromBeginningToEnd(max_index, length);
}
}

//O(log(N))
private void HeapifyFromEndToBeginning(int index)
{
if (index >= mCount)
{
return;
}
while (index > 0)
{
int parentindex = (index - 1) / 2;
if (mComparer.Compare(mList[parentindex].Value, mList[index].Value) > 0)
{
Swap(parentindex, index);
index = parentindex;
}
else
{
break;
}
}
}

//通过初试数据构建最大堆
////O(N*Log(N))
private void BuildingHeap()
{
if (mList != null)
{
for (int i = mList.Count / 2 - 1; i >= 0; i--)
{
//1.2 Adjust heap
//Make sure meet max heap definition
//Max Heap definition:
// (k(i) >= k(2i) && k(i) >= k(2i+1)) (1 <= i <= n/2)
HeapifyFromBeginningToEnd(i, mList.Count);
}
}
}

////O(N*log(N))
private void HeapSort()
{
if (mList != null)
{
//Steps:
// 1. Build heap
// 1.1 Init heap
// 1.2 Adjust heap
// 2. Sort heap

//1. Build max heap
// 1.1 Init heap
//Assume we construct max heap
BuildingHeap();
//2. Sort heap
//这里花O(n),跟数据数量有关
for (int i = mList.Count - 1; i > 0; i--)
{
//swap first element and last element
//do adjust heap process again to make sure the new array are still max heap
Swap(i, 0);
//Due to we already building max heap before,
//so we just need to adjust for index 0 after we swap first and last element
HeapifyFromBeginningToEnd(0, i);
}
}
else
{
Console.Write("mList == null");
}
}

private void Swap(int id1, int id2)
{
KeyValuePair<T1, T2> temp;
temp = mList[id1];
mList[id1] = mList[id2];
mList[id2] = temp;
}
}

static void Main(string[] args)
{
List<KeyValuePair<int, float>> list = new List<KeyValuePair<int, float>>();
list.Add(new KeyValuePair<int, float>(3, 1.0f));
list.Add(new KeyValuePair<int, float>(2, 5.0f));
list.Add(new KeyValuePair<int, float>(1, 3.0f));
list.Add(new KeyValuePair<int, float>(6, 4.0f));
list.Add(new KeyValuePair<int, float>(5, 2.0f));
list.Add(new KeyValuePair<int, float>(4, 6.0f));

Heap<int,float> heap = new Heap<int,float>(list);

PriorityQueue<int,float> pq = new PriorityQueue<int,float>(heap);

pq.PrintOutAllMember();

Console.WriteLine("------------------------pq.Push(new KeyValuePair<int, float>(0, 0.0f));");

pq.Push(new KeyValuePair<int, float>(0, 0.0f));

pq.PrintOutAllMember();

Console.WriteLine("------------------------pq.Pop();");

pq.Pop();

pq.PrintOutAllMember();

Console.WriteLine("------------------------pq.Top();");

Console.WriteLine(pq.Top().ToString());

#endregion

Console.ReadKey();
}

Output:
PriorityQueue_Study

堆排序构造有序堆的时间复杂度是O(N * Log(N))
但插入和移除操作都是O(Log(N))

排序算法参考

Method

关于Method这里主要讲两点:

  1. Extension Methods
    “It allows you to define a static method that you can invoke using instance method syntax.”(Extension Methods最主要的好处就在于当你无法给特定类或结构定义方法的时候,你可以通过定义extension method来为该类或结构添加方法,使用的时候就跟在类里定义方法一样,通过实例就能调用。)
    定义Extension Method首先必须定义在一个静态类里,且方法为静态方法,并且第一个参数类型前要加this关键词,this后面跟的就是我们要extension的类。
1
2
3
4
5
6
7
8
9
10
11
12
13
14
15
16
17
18
19
20
21
public static class StringBuilderExtensions
{
public static Int32 Indexof(this StringBuilder sb, Char value)
{
for (Int32 index = 0; index < sb.Length; index++)
{
if (sb[index] == value)
{
return index;
}
}
return -1;
}
}

static void Main(string[] args)
{
StringBuilder sb = new StringBuilder("Hello. My name is Tony.");
Int32 index = sb.Indexof('T');
Console.WriteLine("sb.Indexof('T') = " + index);
}

Output:
ExtensionMethods
调用Extension method跟Compiler如何去寻找方法编译有关,具体见《CLR via C#》 – Methods的Extension Methods章节
定义Extension Methods需要注意一下几点:
1. 只能定义在非模板静态类里。
2. 定义Extension Methods的类必须位于file scope(不能被其他类包含)
3. 必须包含添加Extension Methods的类的namespace(为了避免检查所有文件去找extension methods)
4. Extension Methods应该少用,会造成versioning problem(未来可能添加相同方法到类里,不同版本的调用会出现不同的表现)。
2. Partial Methods
首先得知道我们为什么需要Partial Methods?
1. Override去重写virtual方法的时候要求父类不能是Sealed,不能为sealed class或value type重写方法
2. 无需为了重写个别方法而单独定义一个类
使用Partial Methods在partial class里定义partial方法前加partial关键字

1
2
3
4
5
6
7
8
9
10
11
12
13
14
15
16
17
18
19
20
21
22
23
24
25
26
27
28
29
30
31
32
33
internal sealed partial class Base
{
public String Name
{
get
{
return mName;
}
set
{
OnNameChanging(value.ToUpper());
mName = value;
}
}
private String mName;

//This defining-partial-method-declaration is called before changing the mName field
partial void OnNameChanging(String value);
}

internal sealed partial class Base
{
partial void OnNameChanging(string value)
{
Console.WriteLine("Base::OnNameChanging({0})", value);
}
}

static void Main(string[] args)
{
Base bs = new Base();
bs.Name = "Tony";
}

Output:
PartialMethods
使用Partial Methods需要注意以下几点:
1. 只能在Partial class or Struct里定义
2. Partial Method必须返回void,并且不能有parameter有out关键词修饰
3. Partial Method必须和原方法签名一样
4. 如果Partial Method没有实现,Delegate不能指向该partial method
5. Partial Methods永远是private的

Comparasion

  1. Type comparasion
    System.Object.GetType()
    &&
    typeof()
    &&
    is operator – is specific type or type can be cast

    1. boxing – cast value type into System.Object type(shollow copy) or interface type that is implemented by value type
    2. unboxing – boxing reverse process
  2. Value comparasion
    operator overloading – must be static
    IComparable – compare object’s data with the same type
    &&
    IComparer – compare two object with different type or the same type

Conversion

Conversion operator
implici
explicit
e.g.

1
2
3
4
5
6
7
8
9
10
11
12
13
14
15
class A
{
public static implicit operator B(A a)
{
......
}
}

class B
{
public static explicit operator A(B b)
{
......
}
}

as operator
as
Suit case

  1. operand type is type
  2. operand type can be casted into type implicitly
  3. operand can be boxing into type

Generics

C++里是template实现
System.Collections.Generic
value type can not be initilized with null
Problem

  1. null (value type or reference type)
    1. default key word – if it is reference type, initilized with null. otherwise use default value
  2. type
    1. constraining
      where key words
      e.g.
      class A: where T:B 9( T must inherite from B)

Code e.g.

1
2
3
4
5
6
7
8
9
10
11
12
13
14
15
16
17
18
19
20
21
22
23
24
25
26
27
28
29
30
31
32
33
34
35
36
37
38
39
40
41
42
43
44
45
46
47
48
49
50
51
52
53
54
55
56
57
58
59
60
61
62
63
64
65
66
67
68
69
70
71
72
73
74
75
76
77
78
79
80
81
82
83
84
85
86
87
88
89
90
91
92
93
94
95
96
97
98
99
100
101
102
103
104
105
   using System;
using System.Collections.Generic;
using System.Linq;
using System.Text;
using System.Collections;

namespace CSharpStudy
{
class Program
{
//Can not instantiation with int when where T1 : class
//public class GenericClass<T1> where T1 : class
public class GenericClass<T1> : IEnumerable<T1> where T1 : struct
{
private List<T1> m_Member = new List<T1>();

public GenericClass()
{
//use T1's default value
//m_Member.Add(default(T1));
}
public List<T1> GetMember
{
get
{
return m_Member;
}
}
public IEnumerator<T1> GetEnumerator()
{
return m_Member.GetEnumerator();
}

IEnumerator IEnumerable.GetEnumerator()
{
return m_Member.GetEnumerator();
}

public static implicit operator List<T1>(GenericClass<T1> gc)
{
List<T1> result = new List<T1>();
foreach (T1 i in gc)
{
result.Add(i);
}
return result;
}

public static GenericClass<T1> operator +(GenericClass<T1> gc, List<T1> l)
{
GenericClass<T1> result = new GenericClass<T1>();
foreach (T1 m in gc)
{
result.GetMember.Add(m);
}
foreach (T1 m in l)
{
if (!result.GetMember.Contains(m))
{
result.GetMember.Add(m);
}
}
return result;
}
};

static void Main(string[] args)
{
//Nullable problem,
//value type can not be initiated with null
//int normalint = null;
System.Nullable<int> nullableint = null;
//nullable
int? nullalbleint = null;
int? result = nullalbleint ?? 5;
Console.WriteLine("result = " + result);
List<int> list = new List<int>(2);
list.Add(1);
list.Add(2);
foreach (int i in list)
{
Console.WriteLine("list value = " + i);
}

GenericClass<int> gc = new GenericClass<int>();
Console.WriteLine("gc.m_Member = " + gc.GetMember);

GenericClass<int> gc2 = new GenericClass<int>();
gc2.GetMember.Add(11);
gc2.GetMember.Add(111);
GenericClass<int> gc3 = new GenericClass<int>();
gc3.GetMember.Add(11);
gc3.GetMember.Add(22);
gc3.GetMember.Add(222);

gc = gc2 + gc3;
foreach (int i in gc)
{
Console.WriteLine("gc member = " + i);
}

Console.ReadKey();
}
}
}

Output:
Generic

Variance (变体)

  1. Convariance – 协变 out key word
    主要用于Interface和delegate的返回类型或者参数类型的隐士转换(子类到父类)
  2. Contravariance – 抗变 int key word
    与协变相反(父类到子类)
    Code e.g.
1
2
3
4
5
6
7
8
9
10
11
12
13
14
15
16
17
18
19
20
21
22
23
24
25
26
27
28
29
30
31
32
33
34
35
36
37
38
39
40
41
42
43
44
45
46
47
48
49
50
51
//Covariance
static void ListAnimals(IEnumerable<Animal> animals)
{
foreach (Animal animal in animals)
{
Console.WriteLine(animal.ToString());
}
}

static void FeeAnimal(Func<Animal> animalCreator)
{
var animal = animalCreator();
Console.WriteLine("animal.name = " + animal.Name);
}

static void FeeAnimal(Func<Cow> animalCreator)
{
var animal = animalCreator();
Console.WriteLine("animal.name = " + animal.Name);
}

static Cow CreateCow()
{
return new Cow("DelegateCow");
}

//Contravariance
static void FeeAnimal(Animal animal)
{
Console.WriteLine("FeeAnimal:" + animal.Name);
}

static void Execute(Action<Cow> cact)
{
cact(new Cow("ExecuteCow"));
}

//Covariance
List<Cow> cows = new List<Cow>();
cows.Add(new Cow("Cow1"));
ListAnimals(cows);

FeeAnimal(CreateCow);
Func<Cow> cFunc = CreateCow;
Func<Animal> aFunc = cFunc;

//Contravariance
Action<Animal> aAct = FeeAnimal;
Action<Cow> cAct = aAct;

Execute(aAct);

Output:
Variance_Contravariance

Note:
C++是通过编译器检测出模板使用的特定类型
C#是运行时进行

Hosting, AppDomain, Assembly, Reflection

这一章节主要是学习关于Assembly Loading和Reflection技术。
在学习Assembly Loading和Reflection之前,我们需要了解Hosting,AppDomain的概念。

Hosting

以下英文内容来至《CLR via C#》
Hosting allows any application to use the features of the common language runtime(CLR). Furthermore, hosting allows applications the ability to offer customization and extensibility via programming.
Extensibility means that third-party code will be running inside your process.

The hosting application can call methods defined by ICLRMetaHost interface to:

  1. Set Host managers. Tell the CLR that the host wants to be involved in making decisions related to memory allocations, thread scheduling/synchronization, assembly loading, and more. The host can also state that it wants notifications of garbage collection starts and stops and when certain operations time out.
  2. Get CLR managers. Tell the CLR to prevent the use of some classes/members. In addition, the host can tell which code can and can’t be debugged and which methods in the host should be called when a special event—such as an AppDomain unload, CLR stop, or stack overflow exception—occurs.
  3. Initialize and start the CLR.
  4. Load an assembly and execute code in it.
  5. Stop the CLR, thus preventing any more managed code from running in the Windows process.

Hosting(allows any application to offer CLR features) Benifits:

  1. Programming can be done in any programming language.
  2. Code is just-in-time (JIT)–compiled for speed (versus being interpreted).
  3. Code uses garbage collection to avoid memory leaks and corruption.
  4. Code runs in a secure sandbox.
  5. The host doesn’t need to worry about providing a rich development environment. The
    host makes use of existing technologies: languages, compilers, editors, debuggers, profilers, and more.
    从上面所有内容可以看出Hosting可以让我们去利用CLR的特性,我们而已通过Host去设定很多CLR相关的设定(比如GC,Memory Manager……),初始化CLR,创建出默认的AppDomain,通过CLR去加载Assemly到AppDomain然后执行。

AppDomain

AppDomain allows third-party untrusted code to run in an existing proceess, and the CLR guarantees that the data structures, code, and security context will not be exploited or compromised.(AppDomain允许不可信的代码在当前进程执行,CLR会去确保数据结构,代码等安全问题)
AppDomain和CLR的关系:
“AppDomains are a CLR feature.”

“When the CLR COM server initializes, it creates an AppDomain. An AppDomain is a logical container for a set of assemblies. The first AppDomain created when the CLR is initialized is called the default AppDomain; this AppDomain is destroyed only when the Windows process terminates.”(AppDomain是一个assemblies集合的容器,当CLR初始化的时候会创建默认的AppDOmain,这个AppDomain只能在程序结束的时候被终止)

The whole purpose of an AppDomain is to provide isolation. Here are the specific features offered by an AppDomain(AppDomain的主要目的是为了实现程序隔离):

  1. Objects created by code in one AppDomain cannot be accessed directly by code in another AppDomain When(确保不同AppDomain里的Object不会被其他AppDomain访问)
  2. AppDomains can be unloaded(AppDomain可以被unload)
  3. AppDomains can be individually secured(通过设定AppDomain的permission用于确保assembly的一些权限)
  4. AppDomains can be individually configured(设置AppDomian的配置,影响如何去加载Assemlies等)

这里提到AppDomain的程序隔离功能,那就不得不说一下Process了。
“Process isolation prevents security holes, data corruption, and other
unpredictable behaviors from occurring, making Windows and the applications running
on it robust.”
这里Process可以理解为进程面上的程序隔离,而AppDomain可以理解为进程内的程序隔离(一个进程可以创建多个AppDomain)
让我们看一下程序是如何在Process,AppDomain还有CLR下工作的:
CLRAppDomainProcessRelationship
可以看出一个Process下创建了多个AppDomain,每一个AppDomain加载了特定的Assembly,每一个AppDomain有自己的LoaderHeap,每一个LoaderHeap记录了该AppDomain所访问过的type,当调用type的method的时候,IL code会被JIT运行时编译到对应的机器代码执行。
普通的AppDomain之间的Assembly是完全隔离的,所以就算多个AppDomain引用了同一个Assembly,他们也不会共享数据和内存。
但上图有一个比较特殊的AppDomain,叫做Domain-Neutrl Assemblies。
这个Domain的主要目的是共享一些通用的Assemblys,加载在这个AppDomian下的Assemblys可以被所有的AppDomains访问。
虽然Assembly在AppDomain之间是完全隔离的,但不同AppDomain创建的objects还是可以相互访问的。
让我们看看不同AppDomain创建的objeccts如何相互访问的:

1
2
3
4
5
6
7
8
9
10
11
12
13
14
15
16
17
18
19
20
21
22
23
24
25
26
27
28
29
30
31
32
33
34
35
36
37
38
39
40
41
42
43
44
45
46
47
48
49
50
51
52
53
54
55
56
57
58
59
60
61
62
63
64
65
66
67
68
69
70
71
72
73
74
75
76
77
78
79
80
81
82
83
84
85
86
87
88
89
90
91
92
93
94
95
96
97
98
99
100
101
102
103
104
105
106
107
108
109
110
111
112
113
114
115
116
117
118
119
120
121
122
123
124
125
126
127
128
129
130
131
132
133
134
135
136
137
138
139
140
141
142
143
144
145
146
147
148
149
150
151
152
153
154
155
156
157
158
159
using System;
using System.Collections.Generic;
using System.Linq;
using System.Text;
using System.Collections;
using System.Reflection;

using System.Runtime.InteropServices;
using System.Threading;
using System.Runtime;
using System.Runtime.Remoting;

namespace CSharpDeepStudy
{
class Program
{
#region Hosting and AppDomain Study
// Instances can be marshaled-by-reference across AppDomain boundaries
[Serializable]
public sealed class MarshalByRefType : MarshalByRefObject
{
public MarshalByRefType()
{
Console.WriteLine("{0} ctor running in {1}", this.GetType().ToString(), Thread.GetDomain().FriendlyName);
}

public void SomeMethod()
{
Console.WriteLine("Executing in " + Thread.GetDomain().FriendlyName);
}

public MarshalByValType MethodWithReturn()
{
Console.WriteLine("Executing in " + Thread.GetDomain().FriendlyName);
MarshalByValType t = new MarshalByValType();
return t;
}

public NonMarshalableType MethodArgAndReturn(String callingdomainname)
{
Console.WriteLine("Calling from {0} to {1}", callingdomainname, Thread.GetDomain().FriendlyName);
NonMarshalableType t = new NonMarshalableType();
return t;
}
}

// Instances can be marshaled-by-value across AppDomain boundaries
[Serializable]
public sealed class MarshalByValType : Object
{
private DateTime m_CreationTime = DateTime.Now;

public MarshalByValType()
{
Console.WriteLine("{0} ctor running in {1}, Created on {2:D}", this.GetType().ToString(), Thread.GetDomain().FriendlyName, m_CreationTime);
}

public override String ToString()
{
return m_CreationTime.ToLongDateString();
}
}

// Instances cannot be marshaled across AppDomain boundaries
// [Serializable]
public sealed class NonMarshalableType : Object
{
public NonMarshalableType()
{
Console.WriteLine("Excuting in " + Thread.GetDomain().FriendlyName);
}
}
#endregion

private static void Marshalling()
{
//Obtain current thread AppDomain
AppDomain currentthreadappdomian = Thread.GetDomain();
String callingdomainname = currentthreadappdomian.FriendlyName;
Console.WriteLine("currentthreadappdomian.name = " + callingdomainname);

//Get the assembly that contains the main method
Assembly mainassembly = Assembly.GetEntryAssembly();
String exeassembly = mainassembly.FullName;
Console.WriteLine("Assembly's that contains main method name is " + exeassembly);

//Accessing Objects Across AppDomain Boundaries
//Cross-AppDomain Communication using marshal-by-reference
AppDomain ad2 = null;
ad2 = AppDomain.CreateDomain("AD2", null, null);
MarshalByRefType mbrt = null;
mbrt = (MarshalByRefType)ad2.CreateInstanceAndUnwrap(exeassembly, typeof(MarshalByRefType).FullName);
Console.WriteLine("Type = {0}", mbrt.GetType());
//Prove that we got a reference to a proxy object
Console.WriteLine("Is proxy = {0}", RemotingServices.IsTransparentProxy(mbrt));
//Call method in the AppDomain owning the objects
mbrt.SomeMethod();
//Unload the new AppDomian
AppDomain.Unload(ad2);
//try access mbrt after we unload AppDomain it owned
try
{
mbrt.SomeMethod();
Console.WriteLine("Successful call SomeMehtod()");
}
catch (AppDomainUnloadedException)
{
Console.WriteLine("Failed call SomeMethod()");
}

//Cross-AppDomain Communication using Marshal-by-value
//Create new AppDomain
ad2 = AppDomain.CreateDomain("AD3", null, null);
mbrt = (MarshalByRefType)ad2.CreateInstanceAndUnwrap(exeassembly, typeof(MarshalByRefType).FullName);

MarshalByValType mbvt = mbrt.MethodWithReturn();
//Prove that we did NOT get a reference to a proxy object
Console.WriteLine("Is Proxy={0}", RemotingServices.IsTransparentProxy(mbvt));
//Try call method on real object
Console.WriteLine("Returned object created " + mbvt.ToString());
//Unload AppDomain again
AppDomain.Unload(ad2);
//try access method on real object again
try
{
Console.WriteLine("Returned object created " + mbvt.ToString());
Console.WriteLine("Successful call.");
}
catch (AppDomainUnloadedException)
{
Console.WriteLine("Failed call.");
}

//Cross-AppDomain Communication Using non-marshalable type
ad2 = AppDomain.CreateDomain("AD4", null, null);
//Load assembly into the new AppDoamin
mbrt = (MarshalByRefType)ad2.CreateInstanceAndUnwrap(exeassembly, typeof(MarshalByRefType).FullName);

//call the object method to get non-marshalable object
try
{
NonMarshalableType nmt = mbrt.MethodArgAndReturn(callingdomainname);
}
catch (System.Exception e)
{
Console.WriteLine(e.ToString());
}
}

static void Main(string[] args)
{
#region Hosting and AppDomain Study
Marshalling();
#endregion

Console.ReadKey();
}
}
}

CrossAppDomainCommunicationOutPut
上面的测试主要是针对下面三种情况:

  1. Cross-AppDomain Communication Using Marshal-by-Reference
    从上面可以看出当我们Marshal-by-Reference between AppDomain的时候,我们需要继承至MarshalByRefObject。(通过RemotingServices.IsTransparentProxy检查是否是Proxy)
    底层是通过在Destination AppDomain生成的Proxy Type信息,其中还生成了instane fields去记录了哪一个AppDomain真正拥有这个type,如何在该AppDomain下找到这个real object去实现Reference的。
    这样就说得通当我们关掉创建Prox Type的AppDomain后,再次通过Prox Type调用就无法通过了,因为通过调用AppDomain.Unload(),所有在该AppDomain里的assemblies和通过assemblies里的信息创建的对象都被释放回收了。
    Note:
    “although you can access fields of a type derived from MarshalByRefObject, the performance is particularly bad because the CLR really ends up calling methods to perform the field access.”
  2. Cross-AppDomain Communication Using Marshal-by-Value
    当我们Marshal-by-Value时不需要继承至MarshalByRefObject,但需要确保MarshalByValType是[Serializable]的。
    因为底层实现是通过序列化和反序列化实现Destination AppDomain加载并生成对应type信息。
  3. Cross-AppDomain Communication Using Non-Marshalable Types
    最后一个是因为我们采用Marshal-by-Value但却没有把NonMarshalableType设置成[Serializable]导致在Serialize NonMarshalableType到Destination AppDomain的时候抛异常。
    针对AppDomain问题我没有深入学习,如有不对之处欢迎指出,详情请参考《CLR via C#》
    Hosting,CLR,AppDomain,Process,Assemly关系作用总结:
    Hosting使我们可以去利用CLR的特性,通过Host可以设定很多CLR相关的设定(比如GC,Memory Manager……)。
    当CLR初始化完成后,会创建出默认的AppDomain。
    通过CLR去加载Assemly到AppDomain然后执行。
    一个Process可以有多个AppDomian。
    每个AppDomain有自己的Loader Heap去记录加载到AppDomain里的Type信息。
    当调用Type的method的时候,IL code会被JIT运行时编译到对应的机器代码执行。
    普通的AppDomain之间的Assembly是完全隔离的,所以就算多个AppDomain引用了同一个Assembly,他们也不会共享数据和内存。
    但加载在这个Domain-Neutrl Assemblies AppDomian下的Assemblys可以被所有的AppDomains访问。
    虽然Assembly在AppDomain之间是完全隔离的,但不同AppDomain创建的objects还是可以通过Marshal-by-Value和Marshal-by-Reference方式相互访问的。
    关于AppDomain的更多内容参考《CLR via C#》 – CLR Hosting and AppDomains章节(e.g. AppDomain Monitoring, How Hosts Use AppDomians……)
    Note:
    在Windows上默认的AppDomain的名字是是***.exe(执行的程序)

了解了AppDomain的基本概念,接下来让我们看看关于Assembly Loading:

Assembly Loading

Assembly是一个包含类型信息,方法信息,成员信息,程序名称,版本号,自我描述,文件关联关系和文件位置等信息的一个集合。
System.Reflection.Assembly.Load – 加载Assembly到AppDomain。(相比System.AppDomain.Load, Prefer use System.Reflection.Assembly)
System.Reflection.Assembly.LoadFrom – 加载指定路径的Assembly到AppDomain,这里也可以指定URL
System.Reflection.Assembly.ReflectionOnlyLoad or ReflectionOnlyLoadFrom – 确保只加载Assembly不会去执行里面的任何代码(只用于获取Assembly里的一些相关信息)。用这两个方法需要注册AppDomain’s ReflectionOnlyAssemblyResolve
event去手动加载索引的assemblies
既然我们知道了如何加载Assembly,也知道了Assembly包含了我们程序去创建实例所需要的所有信息,那么我们如何动态的使用Assembly里的信息去创建实例了,答案是反射。
System.Reflection给我们提供了很多方法可以去访问Assembly里的fields,methods,properties等信息。
通过这些信息,我们可以制作像ILDasm.exe这样的反编译工具,因为通过有些类我们可以得到方法的IL指令数据。
这也就是我们为什么能通过System.Reflection.Emit去动态创建类的原因(使用IL指令反向构建方法,类等)。参见AOT & JIT
那么接下来让我们看看Reflection:

Reflection

这里不得不提一个Reflection使用的典型案列,那就是Serialization,序列化反序列是通过reflection去获取类型信息去存储和构建实例的。
具体关于Serialization后续后讲到。
反射最强大的地方就在于可以在运行时动态创建和使用一些类型,但这些类型我们在编译时期是不可知的。
但缺点如下:

  1. Reflection prevents type safety at compile time(因为是运行时才动态创建,所以编译时期就无法确保类型安全)
  2. Reflection is slow(反射很慢,因为我们需要在运行时动态去获取类型信息去动态创建)
    反射慢的主要原因就在于运行时去访问获取类型信息,所以我们应该尽可能的使用在编译时期就能知道类型信息的方式。
    比如:
    通过实现一个继承至父类或接口的类,通过多态的方式去调用方法。(编译时期就知道该调用哪个方法)
    那么接下来让我们看看如何使用反射去访问类型信息并调用里面的方法。
    首先我们看看如何去获取Assembly里的一些类型信息:
    首先我们创建一个只包含了几个类信息的dll
1
2
3
4
5
6
7
8
9
10
11
12
13
14
15
16
17
18
19
20
21
22
23
24
25
26
27
using System;
......

namespace CSharpDLL
{
public class Program
{
public class CSharpDLLPublicClass1
{
......
}

public class CSharpDLLPublicClass2
{
......
}

sealed class CSharpDLLSealedClass
{
......
}

static void Main(string[] args)
{
}
}
}

然后通过Assembly.Load去加载并查看里面的Type信息

1
2
3
4
5
6
7
8
9
10
11
12
13
14
15
private static void LoadAssemAndShowPublicTypes(string assemblename)
{
Assembly a = Assembly.LoadFrom(assemblename);
foreach (Type t in a.GetExportedTypes())
{
Console.WriteLine(t.FullName);
}
}

static void Main(string[] args)
{
LoadAssemAndShowPublicTypes("CSharpDLL.dll");

Console.ReadKey();
}

ExportPublicAssemblyType
可以看出除了sealed的CSharpDLLSealedClass都成功打印出来了。
那么这里就有个疑问了,Type是个什么类型?
“Represents type declarations: class types, interface types, array types……A System. Type object represents a type reference”
A TypeInfo instance contains the definition for a Type, and a Type now contains only reference data.
可以看出TypeInfo包含类型定义,Type只存储类型定义的索引。
我么可以通过以下方法获取Type:

  1. System.Type.GetType
  2. System.Type.ReflectionOnlyGetType – 只能通过reflect调用里面的方法
  3. System.Reflection.TypeInfo.GetDeclaredNestedType
  4. System.Reflection.Assemly.GetType or ExportedTypes or DefinedTypes
  5. typeof operator – early-bound
    TypeInfo包含了类型的大量信息,我们可以通过System.Reflection.TrospectionExtensions的GetTypeInfo去转换Type到TypeInfo(TypeInfo在.NET 4.5才开始支持),然后通过TypeInfo去获取Type的相关信息。
    也可以通过调用AsType把TypeInfo转回Type。

现在我们得到了Type,我们而已通过一下方法使用Type去构建一个实例对象:

  1. System.Activator.CreateInstance
  2. System.Activator.CreateInstanceFrom
  3. System.AppDomain.CreateInstance or ……
  4. System.Reflection.ConstructorInfo.Invoke
    上述方法不能用于创建array和delegate:
    创建array使用Array.CreateInstance
    创建delegate使用MethodInfo.CreateDelegate
    当创建泛型实例的时候,我们需要先调用Type.MakeGenericType去设置泛型类的T参数,然后返回的Type是泛型类的Type了,然后通过前面讲到的方法就能创建出泛型类实例了。
    一下是创建一个泛型类实例的过程:
1
2
3
4
Type closedtype = opentype.MakeGenericType(typeof(string), typeof(int));
Object o = Activator.CreateInstance(closedtype);

Console.WriteLine(o.GetType());

CreateGenericInstance
知道了如何通过Type创建实例对象,接下来让我们看看如何通过反射去访问Type里的所有信息:
在开始之前让我们先来看看Reflection里的类是如何应对到Type里的各个信息里的(e.g. Method, Field, Property, Event……)
ClassHierchyOfReflection
MemberInfo代表了Type里的所有成员信息,FieldInfo,PropertyInfo,EventInfo,MethodBase等都分别对应了类定义里的成员,属性,事件,方法等信息
接下来让我们修改一下之前定义的CSharpDLL.dll里的代码:

1
2
3
4
5
6
7
8
9
10
11
12
13
14
15
16
17
18
19
20
21
22
23
24
25
26
27
28
29
30
31
32
33
34
35
36
37
using System;

namespace CSharpDLL
{
public class Program
{
public class CSharpDLLPublicClass1
{
public CSharpDLLPublicClass1()
{
mPublicClass1ID = 0;
}

public void CSharpDLLPublicClass1Method()
{
Console.WriteLine("CSharpDLLPublicClass1Method() called");
}

public int PublicCLass1ID
{
get
{
return mPublicClass1ID;
}
set
{
mPublicClass1ID = value;
}
}
private int mPublicClass1ID;
}

static void Main(string[] args)
{
}
}
}

然后通过Reflection里的方法,把CSharpDLL.dll里的所有public的类型定义信息打印出来
因为Type.GetTypeInfo()在.NET 4.5才开始支持,所以这里我通过Type.GetMembers()去访问public的成员信息并打印而非所有的成员信息

1
2
3
4
5
6
7
8
9
10
11
12
13
14
15
16
17
18
19
20
21
22
23
24
25
26
27
28
29
30
31
32
33
34
35
36
37
38
39
40
41
42
43
private static void PritAllTypeInfoInAssembly(string assemblename)
{
Assembly a = Assembly.LoadFrom(assemblename);
Console.WriteLine(string.Format("{0}.Fullname = {1}",assemblename,a.FullName));
foreach (Type t in a.GetExportedTypes())
{
Console.WriteLine(string.Format("Type = {0}", t));
foreach (MemberInfo mi in t.GetMembers())
{
String typename = String.Empty;
if (mi is Type)
{
typename = "Type";
}
else if (mi is FieldInfo)
{
typename = "FieldInfo";
}
else if (mi is MethodInfo)
{
typename = "MethodInfo";
}
else if (mi is ConstructorInfo)
{
typename = "ConstructorInfo";
}
else if (mi is PropertyInfo)
{
typename = "PropertyInfo";
}
else if (mi is EventInfo)
{
typename = "EventInfo";
}
Console.WriteLine(string.Format("{0} : {1}", typename, mi.ToString()));
}
}
}

static void Main(string[] args)
{
PritAllTypeInfoInAssembly("CSharpDLL.dll");
}

PrintOutPublicMemberInfo
这样一来就打印出了所有public的MemberInfo
下面是Reflection访问程序信息的层次结构图:
ReflectionClassHierarchical
既然能够访问特定的类型信息了,那么通过reflection去访问调用就易如反掌了:
我们只需通过构造函数构建一个实例,然后通过Invoke方法传递实例对象就能调用对应方法了。

1
2
3
4
5
6
7
8
9
10
11
12
13
14
15
16
17
18
19
20
21
22
23
private static void ReflectionInvoke(string assemblename, string classname, string methodname)
{
Assembly a = Assembly.LoadFrom(assemblename);
Console.WriteLine(string.Format("{0}.Fullname = {1}",assemblename,a.FullName));
foreach (Type t in a.GetExportedTypes())
{
if (t is Type)
{
if (t.Name == classname)
{
ConstructorInfo constructor = t.GetConstructor(Type.EmptyTypes);
object instance = constructor.Invoke(new object[] { });
MethodInfo methods = t.GetMethod(methodname);
methods.Invoke(instance, new object[]{});
}
}
}

}
static void Main(string[] args)
{
ReflectionInvoke("CSharpDLL.dll", "CSharpDLLPublicClass1","CSharpDLLPublicClass1Method");
}

ReflectionMethodInvoke
这样一来我们就实现了动态加载Assemble,然后通过反射调用里面特定类的特定方法。
关于反射使用Event并动态创建Delegate参考《CLR vir C#》 – Assembly Loading and Reflection章节

注意下面讲到的内容和书上的测试结果不一致,暂时不知道为什么。结论对错暂时不予置评。
如果我们要频繁的通过反射去访问特定类里的方法和成员,我们会采用存储Type,MemberInfo-derived Object到collection的方式,然后再通过collection去访问。
“Type and MemberInfo-derived objects require a lot of memory.”
但Type,MemberInfo及子类存储了大量的类型信息,会耗费大量的内存。
如何解决这个问题了?
“Developers who are saving/caching a lot of Type and MemberInfoderived
objects can reduce their working set by using run-time handles instead of objects.”
通过存储run-time handles而非Type,MemberInfo object本身可以节约大量内存,然后通过run-time handles转换到对应Type/MemberInfo去访问类型信息。

  1. RuntimeTypeHandle
  2. RuntimeFieldHandle
  3. RuntimeMethodHandle
    “All of these types are value types that contain just one field, an IntPtr. The IntPtr field is a handle that refers to a type, field, or method in an AppDomain’s loader heap.”
    Run-time handles只包含一个成员,那就是IntPtr,这里存储的相当于类型信息的索引或指针。而真正的类型信息是存储在AppDomain的Loader heap上。
    所以我们只需要通过去构造run-time handles指向AppDomain loader heap上特定type,field,method,然后通过转换handle到对应Type/MemberInfo去访问类型信息就能避免存储大量的Type,MemberInfo对象,从而达到节约内存的目的。
    那么我们来看看如何通过run-time handle到底能节约多少内存?如何通过转换run-time handle去访问类型信息:
1
2
3
4
5
6
7
8
9
10
11
12
13
14
15
16
17
18
19
20
21
22
23
24
25
26
27
28
29
30
31
32
33
34
35
36
37
38
39
40
41
42
43
44
45
46
47
48
49
50
private static void ShowHeapMemoryUsing(string postfix)
{
Console.WriteLine(string.Format("Heap Memory Size = {0} -- {1}",GC.GetTotalMemory(true), postfix));
}

private static void RuntimeTypeHandleAccessObjectTypeInfo()
{
ShowHeapMemoryUsing("Before do anything!");

List<MethodBase> methodinfos = new List<MethodBase>();
foreach (Type t in typeof(Object).Assembly.GetExportedTypes())
{
//skip over any generic types
if(t.IsGenericTypeDefinition) continue;

MethodBase[] mb = t.GetMethods();
methodinfos.AddRange(mb);
}

Console.WriteLine(string.Format("Methods Number in Object : {0}",methodinfos.Count));

ShowHeapMemoryUsing("After building cache of MethodInfo objects!");

//Build cache of RuntimeMethodHandles for all MethodInfo objects in class.name = classname
List<RuntimeMethodHandle> methodhandles = methodinfos.ConvertAll<RuntimeMethodHandle>(mb => mb.MethodHandle);

ShowHeapMemoryUsing("Holding MethodInfo and RuntimeMethodHandle cache!");

//Prevent cache from being GC'd early
GC.KeepAlive(methodinfos);

//Allow cache from being GC's now
methodinfos = null;

ShowHeapMemoryUsing("After freeing MethodInfo Objects!");

//Obtain methodinfos from methodhandle
methodinfos = methodhandles.ConvertAll<MethodBase>(rmh => MethodBase.GetMethodFromHandle(rmh));

ShowHeapMemoryUsing("Size of heap after re-creating MethodInfo objects!");

GC.KeepAlive(methodhandles);
GC.KeepAlive(methodinfos);

//Alow cache to be GC'd now
methodhandles = null;
methodinfos = null;

ShowHeapMemoryUsing("After freeing MethodInfos and RuntimeMethodHandles!");
}

RuntimeHandlesUsing
上述测试结果和《CLR via C#》测试结果完全不一致:
RuntimeHandlesTestInBook
对于释放之后methodinfos后,内存没有减少,重新转换run-time handle到
当我们得到run-time handles后,我们可以通过转换run-time handle到MethodBase后反倒内存使用减少。(对于run-time handles是否能够减少内存使用,这里表示疑问)

1
2
3
4
5
Object objinstance = typeof(Object).GetConstructor(new Type[] { }).Invoke(new Object[]{});

MethodBase migethashcode = methodinfos.Find( mi=> mi.Name == "GetHashCode");

Console.WriteLine(string.Format("objinstance.GetHashCode = {0}",migethashcode.Invoke(objinstance, new Object[]{})));

Note:
“The CLR doesn’t support the ability to unload individual assemblies.you want to unload an assembly, you must unload the entire AppDomain that contains it.”(CLR不支持unload单独的assembly,如果需要unload assembly只能通过unload加载了该assembly的AppDomian来实现)
“avoid using reflection to access a field or invoke a method property.”(
尽量避免使用反射去调用方法和访问属性成员,因为很慢)

在学习了Hosting,AppDomain,Assembly,Reflection相关知识后,让我们看看Serialization是如何实现的。

Runtime Serialization

“Serialization is the process of converting an object or a graph of connected objects into a stream of
bytes. Deserialization is the process of converting a stream of bytes back into its graph of connected objects.”
序列化和反序列化支持我们把对象信息存储到bytes里,然后通过bytes去构建对象。

“When serializing an object, the full name of the type and the name of the type’s defining assembly are written to the stream.When deserializing an object, the formatter first grabs the assembly identity and ensures that the assembly is loaded into the executing AppDomain by calling System.Reflection.Assembly’s Load method.”
从上面可以看出来,序列化和反序列化的关键技术是通过写入类型信息和类型数据到byte里,然后通过反射实例化出对象。
反序列化的时候一定要确保正确的Assembly被加载,并且类型信息要和序列化时候使用的类型信息对应上。

那么怎么样才是使得类型信息支持序列化了?
我们需要在支持序列化的类型的定义前面加上flag:
[Serializable]]
“the SerializableAttribute attribute is not inherited by derived types.”
序列化的flag只对父类有效。
既然可以指定可序列化,那么当然也可以指定不支持序列化的flag:
[NonSerialized]
那么这些不支持反序列化的成员信息,如何确保在反序列化的时候初始化到正确的值了?
这里就需要一个flag:
[OnDeserialized]
OnDeserialized标记的方法会在反序列化该类型的时候被调用,用于初始化那些NonSerialized的成员信息。
那么如果我们在将来添加了类型信息里的成员定义,反序列化的时候需要怎样才能保证不出错了?
只需要在新添加的成员定义前添加下面这个flag:
[OptionalFieldAttribute]
Specifies that a field can be missing from a serialization stream so that the BinaryFormatter and the SoapFormatter does not throw an exception.
标记该成员可以在序列化的时候缺失,不抛出异常。
更多的序列化相关控制标记参见如下:
[OnSerializing] – called during serialization of an object
[OnSerialized] – called after serialization of an object
[OnDeserializing] – called during deserialization of an object
[OnDeserialized] – called immediately after deserialization of an object
Note:
定义了以上flag的方法必须带一个StreamingContext的参数

接下来让我们详细看看Serialize的过程:
先大概了解下Serialization和Deserialization的使用

1
2
3
4
5
6
7
8
9
10
11
12
13
14
15
16
17
[Serializable]
publci class Map
{
......
}

//Serialization
BinaryFormatter bf = new BinaryFormatter ();
FileStream fs = File.Open (mMapSavePath, FileMode.Open);
bf.Serialize (fs, mMap);
fs.Close ();

//Deserialization
BinaryFormatter bf = new BinaryFormatter ();
FileStream fs = File.Open (mMapSavePath, FileMode.Open);
mMap = (Map)bf.Deserialize (fs);
fs.Close ();

以下内容源于《CLR via C#》
Serialize Steps:

  1. The formatter calls FormatterServices’s GetSerializableMembers method.
    public static MemberInfo[] GetSerializableMembers(Type type, StreamingContext context);
    首先获取所有需要Serialize的成员信息(MemberInfo),返回MemberInfo[]
  2. The object being serialized and the array of System.Reflection.MemberInfo objects are then passed to FormatterServices’ static GetObjectData method.
    通过MemberInfo去获取Object里成员信息的值,存储在Object[]里
  3. The formatter writes the assembly’s identity and the type’s full name to the stream.
    把相关的assembly identity,type名字写入stream
  4. The formatter then enumerates over the elements in the two arrays, writing each member’s name and value to the stream.
    最后把所有MemberInfo名字(MemberInfo[]里)和实际Object成员值(Objectp[]里)分别对应写入stream。

Deserialize Steps:

  1. 首先通过写入stream的assembly identity和type name去判断对应的Assembly是否已经加载。
    如果加载了就通过FormatterServices::GetTypeFromAssembly去获取需要deserialize的type信息
  2. 然后通过FormatterServices::GetUninitializedObject去预分配内存但不调用构造函数,所有成员数据为null or 0
  3. 然后利用FormatterSerices::GetSerializableMembers得到支持序列化的类型成员信息用于构建和初始化
  4. 读取之前序列化保存成员数据信息
  5. 利用前面得到的支持序列化的成员信息和读取出的成员数据信息去初始化Object。FormatterServices::PopulateObjectMembers方法负责填充数据。

因为序列化底层是通过反射来实现的,但反射是很慢的,如何高效的序列化数据了?
前面我们提到,序列化和反序列化真正去填充或读取的序列化和反序列数据是在调用FormatterServices::GetObjectData方法里。而默认的GetObjectData的数据填充是通过反射来实现的,所以我们只要使支持序列化的类实现ISerializaable的GetObjectData去自定义数据填充就能避免数据填充式reflection的使用。
确保传入GetObjectData的数据安全,在GetObjectData定义前加上:
[SecurityPermissionAttribute(SecurityAction.Demand, SerializationFormatter = true)]
还有就是需要定义一个特殊的构造函数,在Deserialization之前会被调用,这里会传入我们反序列化的SerializationInfo数据,然后我们通过IDeserializationCallback.OnDeserialization(Object sender)去填充数据完成反序列化。

1
2
3
4
5
6
7
8
9
10
11
12
13
14
15
16
17
18
19
20
21
22
23
24
25
26
27
28
29
30
31
32
33
34
35
36
37
38
39
40
41
42
43
44
45
46
47
48
49
50
51
52
53
54
55
56
57
58
59
60
61
62
63
64
65
66
67
68
69
70
71
72
73
74
75
76
77
78
79
80
81
82
83
84
85
86
87
88
89
90
91
92
93
94
95
[Serializable]
public class Map : ISerializable, IDeserializationCallback
{
//Special construct(required by ISerializable) to control deserialization
[SecurityPermissionAttribute(SecurityAction.Demand, SerializationFormatter = true)]
protected Map(SerializationInfo info, StreamingContext context)
{
Console.WriteLine("protected Map(SerializationInfo info, StreamingContext context) called!");
m_SiInfo = info;
}

[SecurityPermissionAttribute(SecurityAction.Demand, SerializationFormatter = true)]
public virtual void GetObjectData(SerializationInfo info, StreamingContext context)
{
Console.WriteLine("Map::GetObjectData() called!");
info.AddValue("mID", mID);
info.AddValue("mMapName", mMapName);
}

void IDeserializationCallback.OnDeserialization(Object sender)
{
Console.WriteLine("Map::OnDeserialization() called!");
if (m_SiInfo == null)
{
return;
}

mID = m_SiInfo.GetInt32("mID");
mMapName = m_SiInfo.GetString("mMapName");
}

private SerializationInfo m_SiInfo;

public Map()
{
mID = 0;
mMapName = "DefaultMap";
}

public int ID
{
get
{
return mID;
}
set
{
mID = value;
}

}
private int mID;

public string MapName
{
get
{
return mMapName;
}
set
{
mMapName = value;
}
}
private string mMapName;
}

static void Main(string[] args)
{
string mMapSavePath = "./mapInfo.dat";
Map mMap = new Map();
mMap.ID = 110;
mMap.MapName = "TonyMap";
BinaryFormatter bf = new BinaryFormatter ();
if (!File.Exists(mMapSavePath))
{
FileStream fsc = File.Create(mMapSavePath);
fsc.Close();
}

FileStream fs = File.Open(mMapSavePath, FileMode.Open);
bf.Serialize(fs, mMap);
fs.Close();

//Deserialization
Map mDSMap;
BinaryFormatter dsbf = new BinaryFormatter ();
if (File.Exists(mMapSavePath))
{
FileStream dsfs = File.Open(mMapSavePath, FileMode.Open);
mDSMap = (Map)dsbf.Deserialize(dsfs);
dsfs.Close();
Console.WriteLine(string.Format("Map.ID = {0}, Map.MapName = {1}", mDSMap.ID, mDSMap.MapName));
}
}

Serialization
可以看到我们成功自定义了数据的填充和解析,避免了不必要的reflection调用。(

—————————2018/04/22————————————-
但实际测试发现并没有加快序列化和反序列化的速度,反而增加了内存开销。详情参考:Data-Config-Automation)
—————————2018/04/22————————————-

更多关于Serialization学习参考《CLR via C#》 – Runtime Serialization章节

Note:
The .NET Framework also offers other serialization technologies that are designed
more for interoperating between CLR data types and non-CLR data types. (以下serialization技术支持CLR data type和non-CLR data types之间的交互,支持从XML序列化和反序列化,这里暂时没有深入学习了解)

  1. System.Xml.Serialization.XmlSerializer class
  2. System.Runtime.Serialization.DataContractSerializer class
    还有一种方式序列化是通过SoapFormatter类,.soap格式。
    还有一种高效的平台无关话的序列化反序列化方式,参见Google Protocol Buffer学习
    待续……

Platform Invoke

跨语言的调用,比如managed的C#调用unmanaged的C++代码
DllImport – Allow reusing existing unmanaged code in a managed application.

DllImport Attribute在DllImport的时候很重要,确保我们能找到正确的unmanaged function,传入正确的参数类型等。

DllImport Attribute有以下几个重要的参数:
EntryPoint – 指明我们将要导入的unmanaged方法名(只有指明正确的方法名,才能找到该方法)
CharSet – 指明如何去处理string类型,比如unicode or ansi(宽字符和单个字符是不一样的)
CallingConvention – 指明函数的调用约定(一般我们会涉及到__stdcall和__cdecl,前者是C++的标准调用约定,后者是C语言调用约定,只有用同样的调用约定我们才能正确调用方法)
Note:
不同的调用约定会决定参数的传入顺序,传参方式,堆栈维护,如何生成方法名等。

普通参数类型的调用事例:

1
2
3
4
5
6
7
8
9
10
11
12
13
14
15
16
17
18
19
20
21
22
23
24
25
26
27
28
29
30
31
32
33
34
35
36
37
38
39
40
41
42
43
44
45
46
47
48
49
50
51
52
53
54
55
56
57
58
59
60
61
62
63
64
65
66
67
68
MyMath.h
#ifndef MATH_H
#define MATH_H
#endif

#include "stdafx.h"

#define UTILITYDLL_API _declspec(dllexport)

class MyMath
{
public:
static UTILITYDLL_API int __stdcall MyAdd(int a, int b);

static UTILITYDLL_API int __cdecl MySubstract(int a, int b);
};

MyMath.cpp
#include "stdafx.h"
#include "MyMath.h"
#include <string>

using namespace std;

UTILITYDLL_API int __stdcall MyMath::MyAdd(int a, int b)
{
return a + b;
}

UTILITYDLL_API int __cdecl MyMath::MySubstract(int a, int b)
{
return a - b;
}

extern "C"
{
UTILITYDLL_API double MyMultiple(double a, double b)
{
return a * b;
}
};

UTILITYDLL_API double __stdcall MyDivision(double a, double b)
{
return a / b;
}

struct MyStruct
{
int mID;
bool mBMan;
};
extern "C"
{
UTILITYDLL_API int ModifyMyStruct(MyStruct* ms)
{
if(ms->mBMan == true)
{
ms->mBMan = false;
return sizeof(MyStruct);
}else
{
ms->mID = -1;
ms->mAge = -1;
return sizeof(MyStruct);
}
}
};
1
2
3
4
5
6
7
8
9
10
11
12
13
14
15
16
17
18
19
20
21
22
23
24
25
26
27
28
29
30
31
32
33
34
35
36
37
38
39
40
41
42
43
44
45
46
47
48
49
50
51
52
53
54
55
56
57
58
59
60
61
62
63
64
65
66
67
68
69
70
71
72
73
74
75
76
77
78
79
80
81
82
83
84
85
86
87
88
89
90
91
92
93
94
95
96
97
98
99
100
101
102
103
104
105
106
107
108
109
110
111
112
113
114
115
116
117
118
119
120
121
122
using System;
using System.Collections.Generic;
using System.Linq;
using System.Text;
using System.Collections;
using System.Collections.Generic;

using System.Runtime.InteropServices;

namespace CSharpStudy
{
class Program
{
#region DLL import Study
[StructLayout(LayoutKind.Explicit, Pack = 1)]
public struct MyStruct
{
[FieldOffset(0)] public int mID;
[FieldOffset(4)] public bool mBMan;
[FieldOffset(5)] public int mAge;
}

[StructLayout(LayoutKind.Sequential)]
public struct MyStruct2
{
public int mID;
public bool mBMan;
public int mAge;
}

[StructLayout(LayoutKind.Explicit)]
public struct MyStructExplicit
{
[FieldOffset(0)] public Byte mByte;
[FieldOffset(4)] public int mID;
}

[StructLayout(LayoutKind.Explicit, Pack = 1)]
public struct MyStructExplicit2
{
[FieldOffset(0)]
public Byte mByte;
[FieldOffset(1)]
public int mID;
}

[StructLayout(LayoutKind.Explicit, Pack = 2)]
public struct MyStructExplicit3
{
[FieldOffset(0)] public Byte mByte;
[FieldOffset(2)] public int mID;
}

[DllImport("TESTDLL.dll", EntryPoint = "?MyAdd@MyMath@@SGHHH@Z")]
public static extern int MyAdd(int a, int b);

[DllImport("TESTDLL.dll", EntryPoint = "?MySubstract@MyMath@@SAHHH@Z", CallingConvention = CallingConvention.Cdecl)]
public static extern int MySubstract(int a, int b);

[DllImport("TESTDLL.dll", EntryPoint = "MyMultiple", CallingConvention = CallingConvention.Cdecl)]
public static extern double MyMultiple(double a, double b);
#endregion

static void Main(string[] args)
{
#region DLL import Study
int a = 1;
int b = 2;
int sum = 0;
sum = MyAdd(a, b);
Console.WriteLine(string.Format("{0} + {1} = {2}", a, b, sum));

int substractionresult = 0;
substractionresult = MySubstract(a, b);
Console.WriteLine(string.Format("{0} - {1} = {2}", a, b, substractionresult));

double multiplier = 1;
double multiplicand = 2;
double multipleresult = 0;
multipleresult = MyMultiple(multiplier, multiplicand);
Console.WriteLine(string.Format("{0} * {1} = {2}", multiplier, multiplicand, multipleresult));

double divisor = 1;
double dividend = 2;
double divisionresult = 0;
divisionresult = MyDivision(divisor, dividend);
Console.WriteLine(string.Format("{0} / {1} = {2}", divisor, dividend, divisionresult));

MyStruct ms = new MyStruct();
MyStruct2 ms2 = new MyStruct2();
MyStructExplicit mse = new MyStructExplicit();
MyStructExplicit2 mse2 = new MyStructExplicit2();
MyStructExplicit3 mse3 = new MyStructExplicit3();
Int32 sizeofms = 0;
ms.mID = 4;
ms.mBMan = false;
ms.mAge = 4;
ms2.mID = 5;
ms2.mBMan = false;
ms2.mID = 5;
mse.mID = 1;
mse.mByte = 1;
mse2.mID = 2;
mse2.mByte = 2;
mse3.mID = 3;
mse3.mByte = 3;
Console.WriteLine(string.Format("sizeof(MyStruct) = {0}", Marshal.SizeOf(ms)));
Console.WriteLine(string.Format("sizeof(MyStructExplicit) = {0}", Marshal.SizeOf(mse)));
Console.WriteLine(string.Format("sizeof(MyStructExplicit2) = {0}", Marshal.SizeOf(mse2)));
Console.WriteLine(string.Format("sizeof(MyStructExplicit3) = {0}", Marshal.SizeOf(mse3)));
Console.WriteLine(string.Format("ms.mID = {0}, ms.mBMan = {1}, ms.mAge = {2}", ms.mID, ms.mBMan, ms.mAge));
sizeofms = ModifyMyStruct(ref ms);
Console.WriteLine(string.Format("ms.mID = {0}, ms.mBMan = {1}, ms.mAge = {2}, sizeofms = {3}", ms.mID, ms.mBMan, ms.mAge, sizeofms));
Console.WriteLine(string.Format("ms2.mID = {0}, ms2.mBMan = {1}, ms2.mAge = {2}", ms2.mID, ms2.mBMan, ms2.mAge));
sizeofms = ModifyMyStruct2(ref ms2);
Console.WriteLine(string.Format("ms2.mID = {0}, ms2.mBMan = {1}, ms2.mAge = {2}, sizeofms = {3}", ms2.mID, ms2.mBMan, ms2.mAge, sizeofms));
#endregion

Console.ReadKey();
}
}
}

Output:
PlatformInvokeDemo

分析上述事例:
针对MyAdd方法我们定义了__Stdcall的C++调用约定方式,而且属于类的静态方法,所以在C#中import的时候我们需要指明具体的方法名(通过VS自带的dumpbin我们可以打出TESTDLL.dll里的符号表信息 – dmpbin.exe /all TESTDLL.dll > TestDllDump.txt,我们可以找到MyAdd方法的具体方法名,否者会显示找不到EntryPoint方法MyAdd),原本还需要指明调用约定为__stdcall,但CallingConvention的默认值就是__stdcall,所以这里就不用指明了。

针对MySubstract方法我们定义了__cdecl的C调用约定方式,而且属于类的静态方法,所以我们在C#中import的时候需要指明具体的方法名和指明调用约定为CallingConvention = CallingConvention.Cdecl,否者会显示调用堆栈不对称等问题。

针对MyMultiple方法我们定义了__cdecl的C调用约定方式,同时是全局方法,所以我们只需要指明调用约定为__cdecl,直接指明调用方法为MyMultiple就能找到MyMultiple方法了。

针对MyDivision方法我们定义了__stdcall的C++调用约定方式,同时是全局方法,但由于__stdcall调用约定对方法名生成的方式(包含函数名,参数字节数信息等),我们不能直接通过MyDivision来调用MyDivision方法而需要在EntryPoint里指定方法全名。

除了找到正确的函数方法和指定正确的函数调用约定等信息外,我们在Manage code调用Unmanaged code的时候需要保证Manage struct和Unmanage struct的内存布局要一致,以确保unmanaged code访问managed数据的时候拿到正确信息。

These structures can have any legal name; there is no relationship between the native and managed version of the two structures other than their data layout. Therefore, it is vital that the managed version contains fields that are the same size and in the same order as the native version.
从官网可以看出,managed code的函数名字并不重要,我们必须确保结构体的内存布局要一致。

那我们为何要进行内存对齐了?
一下参考百度百科:

平台原因(移植原因)
不是所有的硬件平台都能访问任意地址上的任意数据的;某些硬
件平台只能在某些地址处取某些特定类型的数据,否则抛出硬件异常。
性能原因
数据结构(尤其是栈)应该尽可能地在自然边界上对齐。原因在于,为了访问
未对齐的内存,处理器需要作两次内存访问;而对齐的内存访问仅需要一次访问

从测试例子里可以看出,当我们通过StructLayoutAttribute.Pack指定MyStuct的内存对齐方式是1的时候,MyStruct的大小只有9bytes,而MyStruct2使用默认采用结构体内数据最大的值作为对齐方式,事例中是int即4bytes为对齐方式,MyStruct2的大小是12bytes。反观C++返回的MyStruct的大小是12(可以看出是以4bytes为对齐方式),所以如果我们传递MyStruct的时候访问数据就出问题了,而MyStruct2访问到了正确的数据。

而后续的MyStructExplicit,MyStructExplicit2,MyStructExplicit3则展示了通过制定Pack的值(即内存对齐大小)是如何影响数据结构的大小的。

更多:
StructLayoutAttribute.Pack
在 Visual Studio 2015 之前,可以使用 Microsoft 专用关键字 __alignof 和 declspec(alignas) 来指定大于默认值的对齐方式。从 Visual Studio 2015 开始,应使用 C++11 标准关键字 alignof 和 alignas (C++) 以获得最高代码可移植性。

Event

C#里的Event响应相当于listener and obsever 模式里触发监听回调。Delegate好比C++里的回调 – 当事件发生时调用

“The common language runtime’s (CLR’s) event model is based on delegates.”
event key word

定义Event我们需要做一下几件事,下面模拟邮件收发事件提醒为例:

  1. 定义EventArgs(这个必须继承至EventArgs,里面包含了我们事件发生时所需要传递的信息,如果什么都不需要传递,使用EventArgs即可)
1
2
3
4
5
6
7
8
9
10
11
12
13
14
15
16
17
18
19
20
21
22
// Define a type that will hold any additional information that should be sent to receivers of the event notification
internal class NewMailEventArgs : EventArgs
{
public NewMailEventArgs(String from, String to, String subject)
{
m_From = from;
m_To = to;
m_Subject = subject;
}

public String From{ get { return m_From; } }

private readonly String m_From;

public String To { get { return m_To; } }

private readonly String m_To;

public String Subject { get { return m_Subject; } }

private readonly String m_Subject;
}
  1. 定义Event成员,用于指定监听什么样的Event
1
2
3
4
5
6
7
8
9
10
11
12
class EmailManager
{
// Define the event member
// 虽然这里只有简短的一句话,
// 但是编译器会给我们去定义关于此事件的监听添加和删除代码
// 详情请看下面截图
// 这样一来我们只要通过NewEmail就能添加和删除监听NewMailEventArgs事件的delegate了
// EventHandler决定了我们监听事件的Delegate原型如下
// public delegate void EventHandler(object sender, EventArgs e);
// 监听的事件是NewMailEventArgs
public event EventHandler<NewMailEventArgs> NewMail;
}
![EventExtraCode](/img/CSharp/EventDefinition.PNG)
  1. 定义需要监听事件的类并提供添加和删除监听的方法
1
2
3
4
5
6
7
8
9
10
11
12
13
14
15
16
17
18
19
20
21
22
class Fax
{
public Fax(EmailManager em)
{
// Trigger add_NewMail method
em.NewMail += FaxMsg;
}

// Delegate that is used to listen for NewMailEventArgs
public void FaxMsg(Object sender, NewMailEventArgs e)
{
Console.WriteLine("Faxing mail message:");
Console.WriteLine("From = {0}, To = {1}, Subject = {2}", e.From, e.To, e.Subject);
}

// Remove listener for NewMailEventArgs
public void Unregester(EmailManager em)
{
// Trigger remove_NewMail method
em.NewMail -= FaxMsg;
}
}
  1. 定义事件触发和事件通知方法
1
2
3
4
5
6
7
8
9
10
11
12
13
14
15
16
17
18
19
20
21
22
23
24
25
26
27
28
29
30
31
32
33
class EmailManager
{
......

// Define a method responsible for raising the event
// to notify registered objects that the event has occurred
// If this class is sealed, make this method private and nonvirtual
// 事件通知
protected virtual void OnNewMail(NewMailEventArgs e)
{
// Copy a reference to the delegate field now into a temporary field for thread safety
// Be careful race condition
EventHandler<NewMailEventArgs> temp = NewMail;
// 这里有thread safe问题,但由于delegate is immutable,
// 所以我们把NewMail传递给临时变量temp后,无论别人如何改变NewMail都没关系了
// If any methods registered interest with our event, notify them
if (temp != null)
{
temp(this, e);
}
}

// Define a method that translates the input into the desired event
// 事件触发
public void SimulateNewMail(String from, String to, String subject)
{
// Hold the information we want to pass
NewMailEventArgs e = new NewMailEventArgs(from, to, subject);

// Call OnNewMail to notify registered objects that the event has occured
OnNewMail(e);
}
}
  1. 测试Event
1
2
3
4
5
6
7
8
9
10
11
12
static void Main(string[] args)
{
EmailManager emailmanager = new EmailManager();

Fax fax = new Fax(emailmanager);

emailmanager.SimulateNewMail("Tony", "Tom", "Hello World!");

fax.Unregester(emailmanager);

emailmanager.SimulateNewMail("Tom", "Tony", "Hello World Again!");
}

Test Result:
EventTestResult
可以看出我们成功的添加了自定义的事件监听也成功的移除了事件监听。

Note:
一般来说,设计事件监听都会设计成通过Dictionary来存储EventKey和Delegate,通过判断Dictinary里面是否存在该事件来添加Delegate,如果不存在则添加该事件监听。删除监听同理。

Chars, Strings, and Working with Text

Chars:
“In the .NET Framework, characters are always represented in 16-bit Unicode code values, easing the development of global applications.A character is represented with an instance of the System.Char structure (a value type).”

说到字符和字符串,就不得不提字符编码了,从上面可以看出,.NET的Char都是采用16bit的Unicode编码,主要是为了语言通用话(包含所有的字符编码)。还有一点就是Char是Structure是Value type。

针对字符本身的方法(Char):
Char还提供了很多获取字符具体类型等相关信息的方法,e.g IsDigit, IsLetter,
IsWhiteSpace, IsUpper,GetUnicodeCategory(得到字符关于Unicode的分类信息)……

1
2
3
4
5
6
Char c = 'a';
UnicodeCategory uc = Char.GetUnicodeCategory(c);
Console.WriteLine("UnicodeCategory = {0}", uc.ToString());
c = '1';
uc = Char.GetUnicodeCategory(c);
Console.WriteLine("UnicodeCategory = {0}", uc.ToString());

针对字符全球化(CultureInfo):
在Char里面很多方法都有包含CultureInfo参数类型的版本,这个是针对全球化指定特定语言。

1
2
CultureInfo ci = CultureInfo.CurrentCulture;
Console.WriteLine("CurrentCulture = {0}", ci);

CharAndCultureInfoOutput

Strings:
“The String type is derived immediately from Object, making it a reference type.”

String的构建:

  1. 通过Literal string构建
    虽然String是reference type,但我们构建String的时候不是通过new,而直接通过literal string(e.g. String s = “Tony”;)
  2. 支持像C++里那样特殊符号代表特定含义
    String s = “Hi\r\nthere”;
  3. 跨平台考虑
    特殊符号在不同平台有不同的表示方式,所以出于跨平台考虑,我们最好使用Environment里的变量来表示特定环境的特定符号
1
2
3
4
5
6
String s1= "Tony";
String s2 = "Hi\nTony!";
String s3 = "Hi" + Environment.NewLine + "Tom!";
Console.WriteLine("s1 = {0}", s1);
Console.WriteLine("s2 = {0}", s2);
Console.WriteLine("s3 = {0}", s3);

StringConstructOutput

多个String合并:
多个字符串合并的时候最主要的是避免通过重复的literal string去构建String,因为String是reference type,多个literal string的构建会在heap上分配多个内存。正确的是通过System.Text.StringBuilder去构建。

“StringBuilder’s members allow you to manipulate this character array, effectively shrinking the string or changing the characters in the string.”

Unlike a String, a StringBuilder represents a mutable string. This means that most of StringBuilder’s members change the contents in the array of characters and don’t cause new objects to be allocated on the managed heap.”

可以看出StringBuilder之所以不会构建多个String是因为它内部构建了可变的character array,这样允许我们在StringBuilder里操作的时候不会触发新的String构建。这样以来我们就可以利用里面现有的String去动态构建我们需要的String了。
Error:

1
String s = "Hi" + "there!";

Right:

1
2
3
4
5
6
7
8
String sp1 = "Tony";
String sp2 = " and ";
String sp3 = "Tom";
StringBuilder sb = new StringBuilder("Hello ", 50);
sb.Append(sp1);
sb.Append(sp2);
sb.Append(sp3);
Console.WriteLine("sb = {0}", sb.ToString());

StringCatenationOutput

String比较:
String.Compare(***)
……
比较的时候需要注意可能有不同国家的语言,这里需要注意需要传入CultureInfo作为比较的语言环境参数。

同时当我们的代码文件中直接书写了特定国家语言或语言Unicode编码的时候,我们需要把文件存储为Unicode格式,否则到时候编译器无法正常解析。

程序中大量的比较特别是针对特定国家语言的String比较很费时,我们应该尽量避免。

同时String是immuatable的,我们可以重复利用现有的String,无需大量重复构造相同的String去增加memory负担。
CLR里有一个叫internal hash table的东西,所有的Strings作为key,所有String的reference作为value。因为String是immutable的且是reference type,我们可以通过访问internal hash table去查看是否存在现有String,这样一来就避免了重构相同的String。

1
2
3
String ss = "internal string";
String sintern = String.Intern(ss);
Console.WriteLine("sintern = {0}",sintern);

StringConstructionWithMemorySave

“String objects referred to by the internal hash table can’t be freed until the AppDomain is unloaded or the process terminates.”

“System.Runtime.CompilerServices.CompilationRelaxations.NoStringInterning flag will control whether to inern all of the string.”

Security String:
System.Security.SecureString ……

Note:
String object is immutable. The String class is sealed, which means that you cannot use it as a base class for your own type.

Enumerated and Bit Flags

  1. Enum
    “Every enumerated type is derived directly from System.Enum, which is derived from System.ValueType, which in turn is derived from System.Object”
    首先可以看出Enumerated属于Value Type。
    这里还是说一下使用Enumerate的好处:
    1. “Enumerated types make the program much easier to write, read, and maintain.”(可视化,容易看懂,无需hard code)
    2. “Enumerated types are strongly typed.”(类型传递不对,编译器会报错)
      Enumerate在C#里作为一个最基础的type,且是面向对象的,C#给我们提供了很多可以相互转化的方法(e.g. 比如Enum到String – ToString() String到Enum – Parse())
1
2
3
4
5
6
7
8
9
10
11
12
13
14
15
16
17
18
enum Colors
{
BLACK = 0,
RED = 1,
GREEN = 2,
BLUE = 3,
WHITE = 4
};

static void Main(string[] args)
{
Colors c = Colors.RED;
Console.WriteLine("Decimal format: c = {0}", c.ToString("D"));
Console.WriteLine("General format: c = {0}", c.ToString("G"));
Colors c2 = (Colors)Enum.Parse(typeof(Colors), "GREEN", true);
Console.WriteLine("Decimal format: c2 = {0}", c2.ToString("D"));
Console.WriteLine("General format: c2 = {0}", c2.ToString("G"));
}
Output:
![EnumeratesOuput](/img/CSharp/Enumerates.PNG)
    还有一点值得注意的就是enum无法定义methods,properties,or events。
    针对methods我们可以通过C#里extention methods(详情见Methods那一节)的特性给enum添加methods。
1
2
3
4
5
6
7
8
9
10
11
12
13
14
15
16
17
18
19
20
21
22
23
24
25
26
27
28
29
[Flags]
enum Actions
{
NONE = 0,
READ = 0x0001,
WRITE = 0x0002,
READANDWRITE = READ | WRITE,
DELETE = 0x0004,
QUERY = 0x0008,
Sync = 0x0010
};

internal static class ActionsExtensionMethods
{
public static Actions Set(this Actions flags, Actions setflags)
{
return flags | setflags;
}
}

static void Main(string[] args)
{
Actions actions = Actions.READ;
Console.WriteLine("actions = {0}", actions.ToString());
actions = actions | Actions.DELETE;
Console.WriteLine("actions = {0}",actions.ToString());
actions = actions.Set(Actions.WRITE);
Console.WriteLine("actions = {0}", actions.ToString());
}
Output:
![EnumWithExtentionMethod](/img/CSharp/EnumWithExtentionMethod.PNG)
    Note:
    "Symbols defined by an enumerated type are constant values."
  1. Bit
    如果说Enum是一个成员代表一个含义,那么Bit可以看做是一个Bit代表一组含义。
    最经常用到的地方就是File的访问控制权限:
1
2
3
4
5
6
7
8
9
10
11
12
13
14
15
16
17
18
19
public enum FileAttributes {
ReadOnly = 0x00001,
Hidden = 0x00002,
System = 0x00004,
Directory = 0x00010,
Archive = 0x00020,
368 PART III Essential Types
Device = 0x00040,
Normal = 0x00080,
Temporary = 0x00100,
SparseFile = 0x00200,
ReparsePoint = 0x00400,
Compressed = 0x00800,
Offline = 0x01000,
NotContentIndexed = 0x02000,
Encrypted = 0x04000,
IntegrityStream = 0x08000,
NoScrubData
}

这里有个比较方便的用法,可以把enum看做一组Bits。
定义enum的时候加上前缀[Flags],可以使enum的成员被看做一组bits。

1
2
3
4
5
6
7
8
9
10
11
12
13
14
15
16
17
18
19
[Flags]
enum Actions
{
NONE = 0,
READ = 0x0001,
WRITE = 0x0002,
READANDWRITE = READ | WRITE,
DELETE = 0x0004,
QUERY = 0x0008,
Sync = 0x0010
};

static void Main(string[] args)
{
Actions actions = Actions.READ;
Console.WriteLine("actions = {0}", actions.ToString());
actions = actions | Actions.DELETE;
Console.WriteLine("actions = {0}",actions.ToString());
}

BitWithFlag
BitWithoutFlag

Custom Attributes

“they’re just a way to associate additional information with a target.The compiler emits this additional information into the managed module’s metadata.”
上面这句话可以理解成,custom attributes是为了关联一些额外的信息到特定的目标上(这里的目标可以是class,event,methods…..),这些额外的信息是被编译器编译保存到了module的metadata里。

让我们看个Custom Attributes例子:

1
2
3
4
5
6
7
8
9
10
11
12
13
14
15
16
17
18
19
20
21
22
23
24
25
26
27
using System;
[assembly: SomeAttr] // Applied to assembly
[module: SomeAttr] // Applied to module
[type: SomeAttr] // Applied to type
internal sealed class SomeType<[typevar: SomeAttr] T> { // Applied to generic type variable
[field: SomeAttr] // Applied to field
public Int32 SomeField = 0;
[return: SomeAttr] // Applied to return value
[method: SomeAttr] // Applied to method
public Int32 SomeMethod(
[param: SomeAttr] // Applied to parameter
Int32 SomeParam)
{
return SomeParam;
}

[property: SomeAttr] // Applied to property
public String SomeProp {
[method: SomeAttr] // Applied to get accessor method
get { return null; }
}

[event: SomeAttr] // Applied to event
[field: SomeAttr] // Applied to compiler-generated field
[method: SomeAttr] // Applied to compiler-generated add & remove methods
public event EventHandler SomeEvent;
}

从上面可以看出我们可以定义custom attribute的范围很广,包括assembly,module,type,filed,method…….

“A custom attribute is simply an instance of a type.”
Custom attribute其实也是一个类,只是我们定义custom attribute的时候触发了这些类的构造,把custom attribute的信息写入到了metadata里。

那么知道了Custom attribute是一个类,那么怎么定义Custom attribute了?
“Common Language Specification (CLS) compliance, custom attribute classes must be derived, directly or indirectly, from the public abstract System.Attribute class.”
从上面可以看出custom attribute必须直接或间接的继承至System.Attribute class.

接下来我们使用MSDN上的例子来详细了解下Custom Attribute是怎么工作的。

1
2
3
4
5
6
7
8
9
10
11
12
13
14
15
16
17
18
19
20
21
22
23
24
25
26
27
28
29
30
31
32
33
34
35
36
37
38
39
40
41
42
43
44
45
46
47
48
49
50
51
52
53
54
55
56
57
58
59
60
61
62
63
64
65
66
67
68
69
70
using System;
using System.Reflection;

namespace CustomAttrCS {
// An enumeration of animals. Start at 1 (0 = uninitialized).
public enum Animal {
// Pets.
Dog = 1,
Cat,
Bird,
}

// A custom attribute to allow a target to have a pet.
// 定义Custom attribute必须直接或间接继承至Attribute
public class AnimalTypeAttribute : Attribute {
// The constructor is called when the attribute is set.
// 构建的时候我们可以去设置含参和不含参构造函数
public AnimalTypeAttribute()
{
thePet = Animal.Bird;
}

public AnimalTypeAttribute(Animal pet) {
thePet = pet;
}

// Keep a variable internally ...
protected Animal thePet;

// .. and show a copy to the outside world.
public Animal Pet {
get { return thePet; }
set { thePet = Pet; }
}
}

// A test class where each method has its own pet.
class AnimalTypeTestClass {
// 定义custom attribute的时候,我们可以调用对应构造函数
[AnimalType(Animals.DOG)]
public void DogMethod() { }
// 除了调用构造函数外,我们还可以调用Custom Attribute Class的Property设定特定值
[AnimalType(Pet = Animals.CAT)]
public void CatMethod() { }

[AnimalType()]
public void BirdMethod() { }
}

class DemoClass {
static void Main(string[] args) {
// 通过反射去检查AnimalTypeTestClass里的方法是否定义了Attribute
AnimalTypeTestClass testClass = new AnimalTypeTestClass();
Type type = testClass.GetType();
// Iterate through all the methods of the class.
foreach(MethodInfo mInfo in type.GetMethods()) {
// Iterate through all the Attributes for each method.
foreach (Attribute attr in
Attribute.GetCustomAttributes(mInfo)) {
// Check for the AnimalType attribute.
if (attr.GetType() == typeof(AnimalTypeAttribute))
Console.WriteLine(
"Method {0} has a pet {1} attribute.",
mInfo.Name, ((AnimalTypeAttribute)attr).Pet);
}

}
}
}
}

Output:
CustomAttribute
Note:
“all non-abstract attributes must contain at least one public constructor.”(非abstract attributes必须至少有一个public构造函数)

知道了如何自定义Custom Attribute,但Attribute可以用于Assembly,module,type…..,我们如何限制其使用的地方了?
AttributeUsageAttribute用于指定Custom Attribute的使用范围。
AttributeTargets包含了所有可指定的使用范围。
同时AttributeTargets还有连个成员变量,m_allowMultiple,m_inherited,前者决定这个attribute是否允许针对同一个target设定多个,后者决定含该attribute修饰的类的子类是否继承AttributeUsage设定。

1
2
3
4
5
6
7
8
9
10
11
12
13
14
15
[AttributeUsage(AttributeTargets.Method, Inherited = false)]public class AnimalTypeAttribute : Attribute {
......
}

class AnimaTypeTestClass
{
// 因为AnimaTypeAttribute定义了只对Method有效,所以这里对构造函数就无效
//[AnimalType(Animals.CAT)]
//AnimaTypeTestClass() { }

[AnimalType(Animals.DOG)]
public void DogMethod() { }

......
}

知道了Custom Attribute的定义和其限制作用,那么Custom Attribute有什么实际意义了?
还记得在Enumerated Types and Bit Flags讲到的[FLAG]标记改变了Enum.ToString(),Format()行为吗?
正是因为我们动态检查了绑定在Enum上的Flag属性导致的。
而实现动态检查的底层方法是通过reflection(反射 – 参见Hosting,AppDomain,Assembly,Reflection章节)
还记得之前MSDN的例子是如何检查类里各方法是否定义了Attribute吗(这里就是使用了反射)?

1
2
3
4
5
6
7
8
9
10
11
12
13
14
15
// 通过反射去检查AnimalTypeTestClass里的方法是否定义了Attribute
AnimalTypeTestClass testClass = new AnimalTypeTestClass();
Type type = testClass.GetType();
// Iterate through all the methods of the class.
foreach(MethodInfo mInfo in type.GetMethods()) {
// Iterate through all the Attributes for each method.
foreach (Attribute attr in
Attribute.GetCustomAttributes(mInfo)) {
// Check for the AnimalType attribute.
if (attr.GetType() == typeof(AnimalTypeAttribute))
Console.WriteLine(
"Method {0} has a pet {1} attribute.",
mInfo.Name, ((AnimalTypeAttribute)attr).Pet);
}
}

这样一来我们就可以动态的判断是否定义了Attribute并获取Attribute里定义的信息。
.NET里有一个System.Reflection.CustomAttributeExtensions class,这个了定义了真多各个target(module,event,method……)的获取关于自定义信息的三个方法:

  1. IsDefined
  2. GetCustomAttributes
  3. GetCustomAttribute
    第二和第三方法调用的时候会触发Attribute Class的构造函数,那么我们怎么才能在不触发Attribute Class构造函数的情况下获取Attrbute信息了?
    答案是:System.Reflection.CustomAttributeData的GetCustomAttributes方法(利用反射,但要注意的是CustomAttributeData的GetCustomAttributes只有四个版本分别是Assembly,Module, ParameterInfo and MemberInfo)

知道了如何去检查method是否包含Custom Attribute,那么我们怎样去判断两个instances完全一样了(所有Custom Attribute都一样)
这里我们可以通过System.Attribute的Equals方法去判断,这里的Equals被重写了,会通过reflection去检查每一个attribute进行比较。
除了上述方法我们也可以在自定义的Attribute里重写Equal和Match方法去实现特定比较判断。

使用和定义Custom attribute的时候需要注意的点:

  1. “When applying an attribute to a target in source code, the C# compiler allows
    you to omit the Attribute suffix to reduce programming typing and to improve the
    readability of the source code.”(注意定义custom attribute的时候,我们可以省略attribute后缀)
  2. “When defining an attribute class’s instance constructor, fields, and properties, you must restrict yourself to a small subset of data types.”(当定义Custom Attribute时,我们只能声明基础类型的fields,properties,constructor(必须符合CLS-compilation))
  3. “Be aware that only Attribute, Type, and MethodInfo classes implement reflection
    methods that honor the Boolean inherit parameter.”(只有Attribute,Type and MethodInfo实现了反射inherit parameter信息的方法)

Exceptions and State Management

What is Exception?
“An expcetion is when a member fails to complete the task it is supposed to perform as indicated by ites name.”

Exception-Handling Mechanics
The .NET Framework exception handling mechanism is built using the Structured Exception Handling(SEH) mechanism offered by Windows.

首先看一下捕获异常的最基本写法:

1
2
3
4
5
6
7
8
9
10
11
12
try{
// Put code requiring graceful recovery and/or cleanup operations here...
}
catch(excetion)
{
// Put code that recovers from any kind of exception
}
finally
{
// Put code that cleans up any operations started within the try block here...
// The code in here ALWAYS executes, regardless of whether an exception is thrown.
}

Try Block:
“A try block contains code that requires common cleanup operations, exception recovery operations, or both.”

Note:
“Sometimes developers ask how much code they should put inside a single try
block. The answer to this depends on state management.”

Catch Block:
“A catch block contains code to execute in response to an exception.”

Note:
“When debugging through a catch block by using Microsoft Visual Studio, you can
see the currently thrown exception object by adding the special $exception variable name to a watch window.”(当调试catch block的时候,可以通过查看$exception变量名查看异常信息)

Finally Block:
“A finally block contains code that’s guaranteed to execute. Typically, the code in a finally block performs the cleanup operations required by actions taken in the try block.”

CLS and Non-CLS Exceptions:
CLS(Common Language Specification) – throw Exception-derived objects
Non-CLS – throw Exception not derived from Exception

After CLR 2.0:
“Microsoft introduced a new RuntimeWrappedException class (defined in the System.Runtime.CompilerServices namespace). This class is derived from Exception, so it is a CLS-compliant exception type. The RuntimeWrappedException class contains a private field of type Object (which can be accessed by using RuntimeWrappedException’s WrappedException read-only property). In CLR 2.0, when a non–CLS-compliant exception is thrown, the CLR automatically constructs an instance of the RuntimeWrappedException class and initializes its private field to refer to the object that was actually thrown.”(CLR 2.0之后,通过RuntimeWrapperdException class把所有的Non-CLS Exception都封装成了CLS Exception)

如果想要就支持2.0之前的行为:

1
2
using System.Runtime.CompilerServices;
[assembly:RuntimeCompatibility(WrapNonExceptionThrows = false)]

接下来让我们看看Exception的基类:
Systen.Exception
以下是一些重要的Properties:
ExceptionProperties
必要重要的一些Properties:

  1. Message(描述了和异常相关的重要信息)
  2. StackTrace(描述了导致抛出异常的方法相关信息)

我们也可以通过System.Diagnostics.StackTrace去获取详细的堆栈信息。

但有些时候我们会发现有些方法没有显示在详细的堆栈信息里:
原因有两个:

  1. the stack is really a record of where the thread should return to, not where the thread has come from. (Stack只记录返回点不记录当前点)
  2. The just-in-time (JIT) compiler can inline methods to avoid the overhead of calling and returning from a separate method(JIT编译器使得一些方法称为了inlie的(在当前方法被调用的地方直接展开),从而无法记录到Stack里)

禁止JIT inlie需要用到System.Runtime.CompilerServices.MethodImplAttribute里的MethodImplOption.NoInlining:

1
2
3
4
[MethodImpl(MethodImplOptions.NoInlining)]
public void SomeMethod() {
......
}

FCL(Framework Class Library)里定义很多现成的Exception。

Throwing an Exception:
当我们需要自己抛出异常的时候,我们需要考虑如下:

  1. 哪一个Exccetion class我们应该继承(是否使用现有的Exception class)
  2. 传递什么样的string到exception构造函数里(传递说明为什么方法不能完成要抛出这个异常)

Defining Your Own Exception Class:
自定义Exception类是比较容易出问题且冗长的。
原因如下:
“The main reason for this is because all Exception-derived types should be serializable so that they can cross an AppDomain boundary or be written to a log or database”(我们必须保证自定义的Exception类支持序列化,因为我们可能会跨AppDomain去写入Log或则数据库里)

Note:
“When you throw an exception, the CLR resets the starting point for the exception;
that is, the CLR remembers only the location where the most recent exception object
was thrown.”(当我们再次抛出异常的时候,CLR会重置异常,只记录最近异常Object)

Guidelines and Best Practices:

  1. Use finally Blocks Liberally(finlly always execute, do cleanup operations)
  2. Do not Catch Everything
  3. Recovering Gracefully from an Exception(catch some exceptions that are known in advanced and try to recover from it)
  4. Backing Out of a Partially Completed Operation When an Unrecoverble Exception Occus – Maintaining State
1
2
3
4
5
6
7
8
9
10
11
12
13
14
15
16
17
18
public void SerializeObjectGraph(FileStream fs, IFormatter formatter, Object rootObj) {
// Save the current position of the file.
Int64 beforeSerialization = fs.Position;
try {
// Attempt to serialize the object graph to the file.
formatter.Serialize(fs, rootObj);
}
catch { // Catch any and all exceptions.
// If ANYTHING goes wrong, reset the file back to a good state.
fs.Position = beforeSerialization;
// Truncate the file.
fs.SetLength(fs.Position);
// NOTE: The preceding code isn't in a finally block because
// the stream should be reset only when serialization fails.
// Let the caller(s) know what happened by re-throwing the SAME exception.
throw;
}
}
Note:
"After you’ve caught and handled the exception, don’t swallow it—let the caller know that the exception occurred. You do this by re-throwing the same exception."(特别是写给别人用的时候,再次抛出异常让使用者可以去捕获并知道发生了什么)
  1. Hiding an Implementation Detail to Maintain a “Contract”
    “you might find it useful to catch one exception and re-throw a different exception.”(抛出更符合当前API行为的异常。或则增加更多符合当前API的异常的信息。)

Unhandled Exceptions:
什么时候会出现Unhandled Exceptions?
“When an exception is thrown, the CLR climbs up the call stack looking for catch blocks that match the type of the exception object being thrown. If no catch block matches the thrown exception type, an unhandled exception occurs.”(当异常被抛出却没有对应的catch的时候,成为Unhandled Exception)
更多内容参考《CLR via C#》 – Unhandled Exceptions

Note:
“When the CLR detects that any thread in the process has had an unhandled exception, the CLR terminates the process.”(当CLR检测到任何线程有未处理的异常的时候,CLR会终止进程)

Debugging Exceptions:
VS -> Debug -> Exception
ExceptionWindow
如果针对特定异常勾选抛出,那么当该异常被抛出的会后,程序会进入断点(帮助我们快速定位特定异常)。不勾选也会进入断点(前提是该异常是unhandled)

也可以通过上述窗口添加自定义的异常。

Exception-Handling Performance Considerations:
……

Constrained Excecution Regions(CERs):
……

更多内容待学习……

The Managed Heap and Garbage Collection

这一小节会讲到CLR里重要的内存管理(GC)。
首先要区分栈(Stack)和堆(Heap)。
下面堆栈的学习参考C# Heap(ing) Vs Stack(ing) in .NET: Part I
栈 – The Stack is more or less responsible for keeping track of what’s executing in our code (or what’s been “called”).
这里栈可以理解为用于记录代码执行顺序。
Note:
栈是LIFO(Last In First Out)原则。
堆 – The Heap is more or less responsible for keeping track of our objects (our data, well… most of it;)
堆是记录那些动态分配内存的(比如reference type)
哪些是分配在栈上,哪些分配在堆上,记住下面两个原则:

  1. A Reference Type always goes on the Heap; easy enough, right? (索引类型都是分配在堆上)
  2. Value Types and Pointers always go where they were declared. This is a little more complex and needs a bit more understanding of how the Stack works to figure out where “things” are declared. (值类型和指针是分配在栈上)
    下面让我们结合实例来看一下是如何分配在栈和堆上的?
1
2
3
4
5
6
7
8
9
10
11
public class MyInt
{
public int MyValue;
}

public MyInt AddFive(int pValue)
{
MyInt result = new MyInt();
result.MyValue = pValue + 5;
return result;
}

当调用AddFive方法的时候,首先函数参数pValue会入栈
StackAndHeapPart1
然后因为我们创建了索引类型的MyInt实例,这时候MyInt会在堆上分配内存,同时在栈上会生成一个指针指向MyInt在堆上的索引地址
StackAndHeapPart2
当我们给result.MyValue赋值时,我们通过result Pointer记录的地址去访问堆上的MyValue成员并修改值。
最后我们返回result时,栈被清理,只剩下堆上我们分配的数据。
StackAndHeapPart3
而剩下堆上的数据,就是由CLR的GC来管理了。
NOTE :
“The method does not live on the stack and is illustrated just for reference.”
接下来看看CLR的GC是如何工作的。
在了解GC之前,让我们看看C#里在堆上分配内存是如何分配的?
这里就不得不提new这个关键字了。
当我们通过new去创建reference type的时候,会经历下列步骤:

  1. Calculate the number of bytes required for the type’s fields)(计算type所需分配的内存)
  2. Add the bytes required for an object’s overhead(contain a type object pointer and a sync block index)(为type分配object pointer和sync block index所需内存 – 如果是32-bit Application则分配8 bytes,如果是64-bit Application则分配16 bytes)
  3. Zero out the memory start at NextObjPtr(Indicates where the next object is to be allocated within the heap). Return reference. Move on NextObjPtr to next address that is available to be allocated..(根据NextObjPtr指向的可用堆上的起始位置分配内存并清零,然后传递指向type的内存起始位置的NextObjPtr到构造函数去进行初始化,初始化完成后返回type的索引,最后把NextObjPtr指向下一个heap可分配内存的位置。)
    知道了我们在堆上是如何分配内存,让我们看看GC是如何工作来管理所有堆上分配的内存的?

让我们来了解下GC Algorithm:

  1. Reference Counting Algorithm(COM use)
    就是我们平时说的索引计数,通过判断当前所有指针指向特定对象的数量来决定是否要回收该对象内存。
    缺点:
    Circular references会导致内存永远无法回收(e.g. A包含了B的索引,B也包含了A的索引)
  2. Reference Tracking Algorithm(CLR use. Cares only about reference type variables)
    步骤如下:
    1. Marking Phase
      CLR first suspends all threads in the process(prevents threads from accessing objects and changing their state while the CLR examines them)
      Marking All objects to 0(means all objects should be deleted)
      Scan active roots to marking object(not mark the same object again to avoid circular references)
      标记阶段,首先悬挂所有线程防止访问Objects和相关状态。
      然后标记所有在堆上对象的引用为0,然后扫描所有active的roots(即reference type variables – 引用类型的变量),如果有roots指向任何一个堆上的Object,就标记该Object并对该Object内部的roots进行扫描标记。这里最重要的一点就是对标记过的Object不会再扫描内部root(比如有roots指向了A,我们标记了A,然后检查A内部发现B,因为B还没被标记所以标记B并检查B内部,在B内部又发现了A但因为A已经被标记了,所以不会再次标记A,这样一来如果最初指向A的roots不存在了的话,A和B都会因为没有引用不会被标记而清除。这样一来就避免了Circular references)
      Note:
      “Refer to all reference type variables as roots.”
    2. Compacting Phase
      Shifts the memory consumed by the marked objects down in the heap, compacting all the surviving objects together so that they are contiguous in memory.(reduce application’s working set size &access fast in future & no address space fragmentation issues)
      CLR resumes all the application’s threads and they continue to access the objects as if the GC never happened at all
      Note:
      A static field keeps whatever object it refers to forever or until the AppDomain that the types are loaded into is unloaded
      在标记阶段完成后,所有标记为0的堆上对象内存都会被回收。
      压缩阶段主要是为了内存的高效利用(防止内存碎片化)。
      要注意的是静态变量在内存中的位置不会改变。

接下来看看如何提升GC的performance:
CLR’s GC assumptions(提升GC性能的最基本假设):
The newer an object is, the shorter its lifetime will be(越新的对象lifetime越短)
The older an object is, the longer its lifetime will be(越旧的对象lifetime越长)
Collecting a portion of the heap is faster than collecting the whole heap(GC一部分heap比GC所有heap快)
基于上述理论:
Heap被分为了Generation 0,1,2。
GCGenerations
最初创建的对象会存放在generation 0,GC首先检查Generation 0的对象,objects在通过第一次GC后会提升到generation 1,当generation 1对象数量超过generation 0的时候,GC就会检查generation 0和1,同理当 object从generation 1存活下来后会被存放到generation 2。
通过上述方式,我们GC就不必每次都对整个heap的对象进行检查以达到GC优化的目的。
Note:
The Managed heap supports only three generations: generation 0,1,2
The garbage collector fine-tunes itself automatically based on the memory load required by your application.
关于更多GC的学习详情参考《CLR vir C#》 – The Managed Heap and Garbage Collection章节
Note:
Finalize methods are called at the completion of a garbage collection on objects that the GC has determined to be garbage.(Object的Finalize方法是在Object在完成内存被回收之前调用)
Finalize is not equal to destructor in C++(Finalize!=C++的析构函数)

Threading

What is Thread?
“A thread is a Windows concept whose job is to virtualize the CPU. “

Major parts of Thread:

  1. Thread kernel object(“data structes contains a bunch of properties that describe the thread”描述线程信息的数据对象)
  2. Thread environment block(TEB)(“The TEB contains the head of the thread’s exception-handling chain. In addition, the TEB containes the thread’s thread-local storage data and some data structures for use by GDI and OpenGL graphics”)
  3. User-mode stack(“The use-mode stack is used for local variables and arguments passed to methods. It also contains the address indicating what the thread should execute next when the current method returns”)
  4. Kernel-mode stack(“The kernel-mode stack is also used when application code passes arguments to a krenel-mode function in the operating system”)
  5. DLL thread-attach and thread-detach notifications

Why do we need Thread?
Benfits:

  1. Responsiveness(同一时间只能运行一个程序,单核CPU一个程序卡死就会导致整个电脑卡死)
  2. Data safe(程序卡死后重启会导致数据丢失)
  3. Performance(多核CPU可以同时执行多个任务,使得处理任务更高效)

Shorcomings:

  1. Threads consume a lot of memory and require time to create, destroy…..(创建和销毁费时,并且消耗大量内存)
  2. Context switches(Change to other thread) takes much time(Thread切换费时)

How to use Thread correctly?
“Have the number of thread that is no more than the number of CPUs on that machine.”

Note:
“A CLR thread is identical to a Windows thread”

Thread Scheduling and Priorities

待续……

C# In Depth(third edition)

C#1

Non Generic Collections

1
ArrayList list = new ArrayList();

Sorting an ArrayList using IComparer


C#2

Strongly Typed Collections

1
List<T> list = new List<T>();

Sorting an List using IComparer or Comparision

1
2
3
4
5
6
7
8
9
10
11
12
13
14
15
class ProductNameComparer : IComparer<Product>
{
public int Compare(Product p1, Product p2)
{
return p1.Name.CompareTo(p2.Name);
}
}
// IComparer<T>
List<Product> products = new List<Product>();
products.Sort(new ProductNameComparer());
// Comparison<T>
products.Sort(delegate(Product x, Product y)
{
return x.Name.CompareTo(y.Name);
});

Nullable Value Type

1
decimal? price = null;

C#3

Properties

Automatically Implementaed Properties

1
2
3
4
class ClassName
{
public type PropertyName{get;set;}
}

Sorting using Comparision from a lambda expression

1
2
List<Product> products = new List<Product>();
products.Sort((x, y) => x.Name.CompareTo(y.Name));

Extension Method

1
2
3
4
5
public static class StringExtension
public static int getLength(this string s)
{
return s.Length;
}

LINQ(Language-Integrated Query)

“LINQ is at the heart of the changes in C# 3. The aim is to make it easy to write queries against multiple data sources with consistent syntax and features, in a readable and composable fashion.”

1
2
3
4
List<Product> products = new List<Product>();
var filtered = from Product p in products
where p.Price > 10
select p;

C#4

Named Arguments

1
2
3
4
5
6
7
8
9
10
11
12
13
14
15
class Product
{
public string Name
{
get { return name; }
}
readonly string name;

public Product(string name)
{
this.name = name;
}
}

Product product = new Product( name : "TonyTang"),

Optional Parameters

1
2
3
4
5
public int Sum(int a,int b = 0)
{
return a + b;
}
var sum = Sum(1);

DLR(Dynamic Language Runtime)

CSharp Evolution

CSharpEvolution1
CSharpEvolution2
CSharpEvolution3

参考书籍下载:
《C#入门经典第五版》
《CLR Via C# Fourth Edition》 - Jeffrey Richter
《C# in Depth 3rd Edition》 - Jon Skeet