Introduction
Unity游戏开发过程中我会需要通过Editor相关工具来编写一些工具和可视化显示工等,用于辅助完成特定的功能和编辑器开发,本章节用于整理和学习Unity相关的Editor知识,好让自己对于Editor的相关知识有一个系统的学习和整理。
Editor绘制分类
Unity里的UI包含多种UI:
- UI Toolkit(最新一代的UI系统框架,高性能跨平台,基础Web技术)
- UGUI(老版的UI系统,2022年为止用的最多的官方UI系统)
- IMGUI(Immediate Mode Graphical User Interface,code-Driven的GUI系统)
而我们现在主要Editor用到的GUI暂时是指IMGUI,未来更多的学习中心是UI Toolkit(通吃Editor和运行时开发的新一代UI框架)。
这里UGUI在Editor篇章就不重点讲述,本文重点学习IMGUI和UI Toolkit(TODO)。
上述三中UI适用场景和适用人群,这里放两张官方的图片用于有个基础认知:


详细的对比参考:
UI-system-compare
Note:
- UI Toolkit是官方主推的未来用于Editor和Runtime的新UI框架
IMGUI
IMGUI主要用于绘制我们Editor的自定义UI(比如自定义窗口UI,自定义面板UI,自定义场景UI等)
GUI
GUI主要由Type,Position和Content组成
- Type标识了GUI是什么类型的GUI(比如GUI.Label表示是一个标签)
- Position标识了GUI的显示位置和大小等信息(Rect)
- Content标识了GUI显示的内容(可以是一个文本可以使一个图片)
Type:
我们常用的GUI类型比如Lable(标签),Button(按钮),TextField(输入文本),Toggle(选择按钮)等
Position:
位置和大小信息主要通过Rect结构来表示位置和大小信息
Content:
GUI内容显示比如常用的文本和图标等形式
这里实现了一个简单的纯GUI的Unity学习项目:
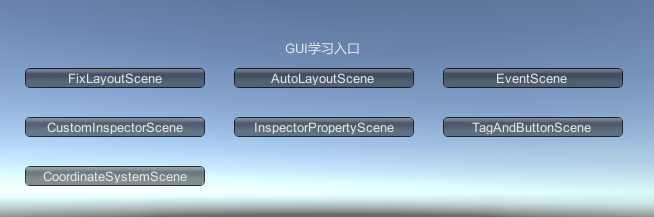
Git地址见文章最后
Note:
- GUI的坐标系是左上角0,0
GUI Layout
GUI的排版分为两类:
- 固定排版
- 自动排版
固定排版:
固定排版是指我通过调用构建传递Rect信息的方式,显示的指明GUI的显示位置和大小信息。但这样的方式在我们不知道UI布局(比如动态布局动态大小)的时候就很难实现完美的UI布局。
接下来我们直接实战看下效果:
1
2
3
4
5
6
7
8
9
10
11
12
13
14
15
16
17
18
19
20
21
22
23
24
25
26
27
28
29
|
using System.Collections;
using System.Collections.Generic;
using UnityEngine;
public class FixLayoutDraw : MonoBehaviour
{
private void OnGUI()
{
GUI.Label(new Rect(0f, 0f, 300f, 100f), $"固定排版文本位置信息:(0, 0)大小:(300, 100)");
GUI.BeginGroup(new Rect(Screen.width / 2 - 100, Screen.height / 2 - 100, 300f, 200f));
GUI.Box(new Rect(0, 25, 300, 50), "GUI组里的Box位置:(0, 25)大小:(300, 50)");
if(GUI.Button(new Rect(0, 100, 300, 50), "GUI组里的按钮位置:(0, 100)大小:(300, 50)"))
{
Debug.Log($"点击的GUI组里的按钮");
}
GUI.EndGroup();
}
}
|
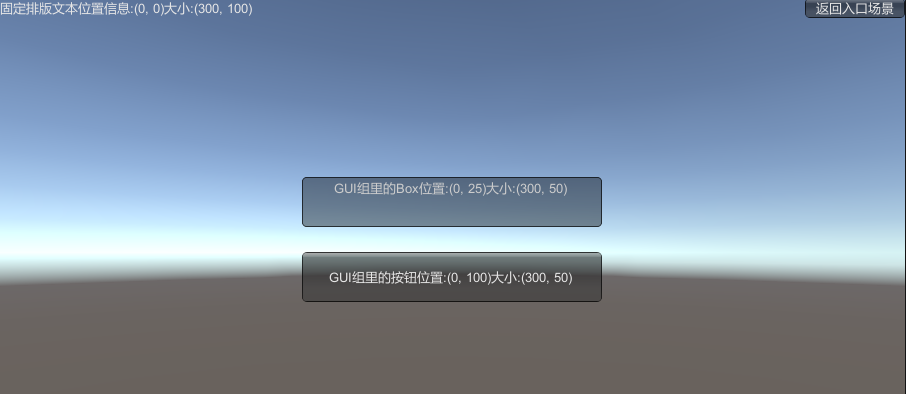
Note:
- GUI Group可以实现GUI按组控制显示的功能
自动排版:
自动排版顾名思义不再需要向固定排版一样对于每一个组件都写死位置和大小信息,自动排版的组件(Type)会根据设置的相关信息进行自动适配。
1
2
3
4
5
6
7
8
9
10
11
12
13
14
15
16
17
18
19
20
21
22
23
24
25
26
27
28
29
30
31
32
33
34
35
36
37
38
39
40
41
42
43
44
45
46
47
48
49
50
51
52
53
|
using System.Collections;
using System.Collections.Generic;
using UnityEngine;
public class AutoLayoutDraw : MonoBehaviour
{
private void OnGUI()
{
if(GUILayout.Button("自动排版的第一个按钮"))
{
Debug.Log($"点击了自动排版的第一个按钮!");
}
GUILayout.BeginArea(new Rect(Screen.width / 2 - 150, Screen.height / 2 - 150, 300, 300));
if(GUILayout.Button("自动排版中心区域内的按钮1"))
{
Debug.Log($"点击了自动排版中心区域内的按钮1!");
}
if (GUILayout.Button("自动排版中心区域内的按钮2"))
{
Debug.Log($"点击了自动排版中心区域内的按钮2!");
}
GUILayout.EndArea();
GUILayout.BeginArea(new Rect(Screen.width - 300, Screen.height - 100, 300, 100));
GUILayout.BeginVertical();
if (GUILayout.Button("自动排版右下角区域内的按钮1", GUILayout.Width(200f)))
{
Debug.Log($"点击了自动排版右下角区域内的按钮1!");
}
if (GUILayout.Button("自动排版右下角区域内的按钮2", GUILayout.ExpandWidth(true)))
{
Debug.Log($"点击了自动排版右下角区域内的按钮2!");
}
GUILayout.EndVertical();
GUILayout.EndArea();
}
}
|
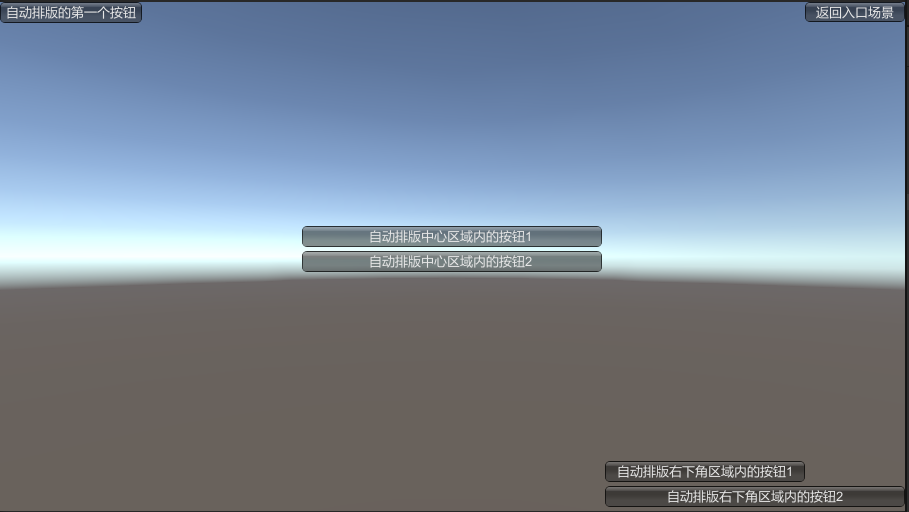
Note:
自动布局可以帮我们方便快速的完成UI布局适配而不需要写死所有组件的大小和位置
GUILayout主要用于GUI的自动排版,而EditorGUILayout主要用于Edtior的GUI自动排版
GUI.BeginChange()和GUI.EndChange()的配套使用可以检测指定GUI的值是否变化,做到检测变化响应后做指定的事情
GUISkin和GUIStyle
GUISkins are a collection of GUIStyles. Styles define the appearance of a GUI Control. You do not have to use a Skin if you want to use a Style.
从介绍可以看出GUISkins是GUIStyls的合集,GUIStyles定义了我们GUI的样式。
但如何得知Unity支持哪些GUIStyle了?
GUIStyle查看器工具(网上搜索到别人写的):
1
2
3
4
5
6
7
8
9
10
11
12
13
14
15
16
17
18
19
20
21
22
23
24
25
26
27
28
29
30
31
32
33
34
35
36
37
38
39
| using UnityEngine;
using UnityEditor;
public class EditorStyleViewer : EditorWindow
{
private Vector2 scrollPosition = Vector2.zero;
private string search = string.Empty;
[MenuItem("Tools/GUI样式查看器")]
public static void Init()
{
EditorWindow.GetWindow(typeof(EditorStyleViewer));
}
void OnGUI()
{
GUILayout.BeginHorizontal("HelpBox");
GUILayout.Label("单击示例将复制其名到剪贴板", "label");
GUILayout.FlexibleSpace();
GUILayout.Label("查找:");
search = EditorGUILayout.TextField(search);
GUILayout.EndHorizontal();
scrollPosition = GUILayout.BeginScrollView(scrollPosition);
foreach (GUIStyle style in GUI.skin)
{
if (style.name.ToLower().Contains(search.ToLower()))
{
GUILayout.BeginHorizontal("PopupCurveSwatchBackground");
GUILayout.Space(7);
if (GUILayout.Button(style.name, style))
{
EditorGUIUtility.systemCopyBuffer = "\"" + style.name + "\"";
}
GUILayout.FlexibleSpace();
EditorGUILayout.SelectableLabel("\"" + style.name + "\"");
GUILayout.EndHorizontal();
GUILayout.Space(11);
}
}
GUILayout.EndScrollView();
}
}
|
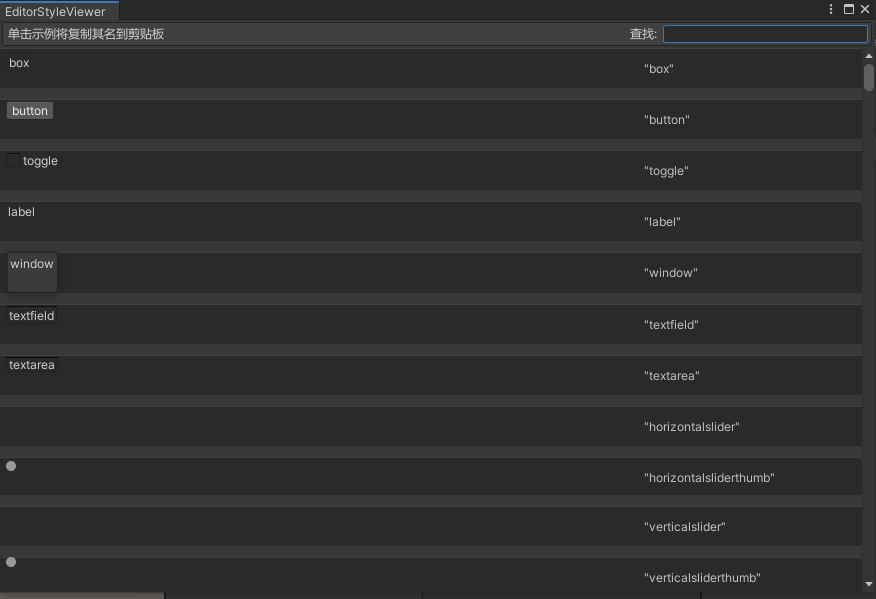
Note:
- 我们可以右键创建一个GUISkin资源后加载指定GUISkin来控制我们的GUI显示风格
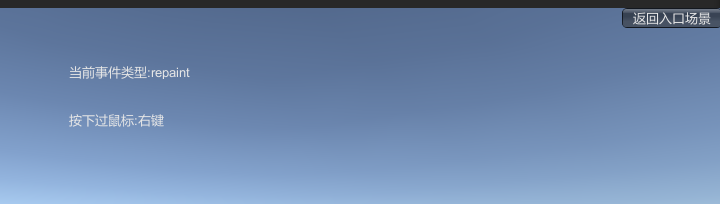
UIEvent
这里说的UIEvent主要是指玩家操作触发的一些事件信息,只有有了这些事件信息的我们才能编写对应的交互反馈。
Unity的事件信息统一由Event这个类封装,我们通过访问Event可以实现自定义的按钮响应和交互。
1
2
3
4
5
6
7
8
9
10
11
12
13
14
15
16
17
18
19
20
21
22
23
24
25
26
27
28
29
30
31
32
33
34
35
36
37
38
39
40
41
42
43
44
45
46
47
48
49
50
51
52
53
54
55
56
57
58
|
using System;
using System.Collections;
using System.Collections.Generic;
using UnityEngine;
public class EventDraw : MonoBehaviour
{
private string mEventInfo;
private string mKeyDownEvent;
private string mMouseDownEvent;
private void OnGUI()
{
mEventInfo = string.Empty;
mEventInfo = $"当前事件类型:{Event.current.type}";
if(Event.current.type == EventType.KeyDown && Event.current.keyCode != KeyCode.None)
{
mKeyDownEvent = $"按下过按键码:{Event.current.keyCode}";
}
if (Event.current.type == EventType.MouseDown)
{
if(Event.current.button == 0)
{
mMouseDownEvent = $"按下过鼠标:左键";
}
else if (Event.current.button == 1)
{
mMouseDownEvent = $"按下过鼠标:右键";
}
}
GUILayout.BeginArea(new Rect(Screen.width / 2 - 200, Screen.height / 2 - 200, 400, 400));
GUILayout.Label($"{mEventInfo}", GUILayout.Width(400), GUILayout.Height(20));
GUILayout.Label($"{mKeyDownEvent}", GUILayout.Width(400), GUILayout.Height(20));
GUILayout.Label($"{mMouseDownEvent}", GUILayout.Width(400), GUILayout.Height(20));
GUILayout.EndArea();
}
}
|
IMGUI实战
了解了GUI相关的基础知识后,让我们来深入学习了解下GUI在Editor里的运用。
Editor个人接触到的按显示区域来分类的话,个人接触过以下几类:
- Scene场景辅助GUI绘制
- Editor纯工具窗口绘制
- Inspector面板绘制
- 其他Editor功能
Scene辅助GUI绘制
Scene的GUI绘制主要分为两种:
- Gizmos
- Handles
Gizmos
Gizmos主要用于绘制Scene场景里的可视化调试(比如绘制线,图标,cube等),不支持交互。
Note:
- Gizmos的代码需要卸载OnDrawGizmos()或OnDrawGizmosSelected()方法内,区别是前者是Scene场景一直显示,后者是只有包含该脚本的指定对象被选中时显示。
Handles
Handles主要用于绘制Scene场景里3D可交互UI(比如可拉伸坐标轴,按钮等)。
Note:
- Handles的绘制代码需要卸载OnSceneGUI()方法内
- Handles里依然支持GUI的2D GUI绘制,但需要把代码写在Hanldes.BeginGUI和Handles.EndGUI内。
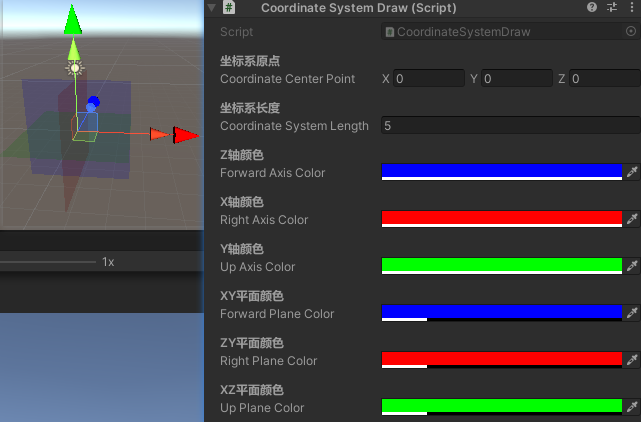
实战
- Gizmos+Handles绘制Scene场景里的坐标系
1
2
3
4
5
6
7
8
9
10
11
12
13
14
15
16
17
18
19
20
21
22
23
24
25
26
27
28
29
30
31
32
33
34
35
36
37
38
39
40
41
42
43
44
45
46
47
48
49
50
51
52
53
54
55
56
57
58
59
60
61
62
63
64
65
66
67
68
69
70
71
72
73
74
75
76
77
78
79
80
81
82
83
84
85
86
87
88
89
90
91
92
93
94
95
96
97
98
99
100
101
102
103
104
105
106
107
108
109
110
111
112
113
114
115
116
117
118
119
120
121
122
123
124
125
126
127
128
129
130
|
using System.Collections;
using System.Collections.Generic;
using UnityEngine;
public class CoordinateSystemDraw : MonoBehaviour
{
[Header("坐标系原点")]
public Vector3 CoordinateCenterPoint = Vector3.zero;
[Header("坐标系长度")]
public float CoordinateSystemLength = 1.0f;
[Header("Z轴颜色")]
public Color ForwardAxisColor = Color.blue;
[Header("X轴颜色")]
public Color RightAxisColor = Color.red;
[Header("Y轴颜色")]
public Color UpAxisColor = Color.green;
[Header("XY平面颜色")]
public Color ForwardPlaneColor = new Color(0, 0, 255, 48);
[Header("ZY平面颜色")]
public Color RightPlaneColor = new Color(255, 0, 0, 48);
[Header("XZ平面颜色")]
public Color UpPlaneColor = new Color(0, 255, 0, 48);
private Vector3 ForwardPlaneSize = new Vector3(1, 1, 0.001f);
private Vector3 RightPlaneSize = new Vector3(0.001f, 1, 1);
private Vector3 UpPlaneSize = new Vector3(1, 0.001f, 1);
private Color mOriginalColor;
void OnDrawGizmos()
{
DrawForwardPlane();
DrawRightPlane();
DrawUpPlane();
}
private void DrawForwardPlane()
{
mOriginalColor = GUI.color;
Gizmos.color = ForwardPlaneColor;
ForwardPlaneSize.x = CoordinateSystemLength;
ForwardPlaneSize.y = CoordinateSystemLength;
Gizmos.DrawCube(CoordinateCenterPoint, ForwardPlaneSize);
Gizmos.color = mOriginalColor;
}
private void DrawRightPlane()
{
mOriginalColor = GUI.color;
Gizmos.color = RightPlaneColor;
RightPlaneSize.y = CoordinateSystemLength;
RightPlaneSize.z = CoordinateSystemLength;
Gizmos.DrawCube(CoordinateCenterPoint, RightPlaneSize);
Gizmos.color = mOriginalColor;
}
private void DrawUpPlane()
{
mOriginalColor = GUI.color;
Gizmos.color = UpPlaneColor;
UpPlaneSize.x = CoordinateSystemLength;
UpPlaneSize.z = CoordinateSystemLength;
Gizmos.DrawCube(CoordinateCenterPoint, UpPlaneSize);
Gizmos.color = mOriginalColor;
}
}
|
1
2
3
4
5
6
7
8
9
10
11
12
13
14
15
16
17
18
19
20
21
22
23
24
25
26
27
28
29
30
31
32
33
34
35
36
37
38
39
40
41
42
43
44
45
46
47
48
49
50
51
52
53
54
55
56
57
58
59
60
61
62
63
64
65
66
67
68
69
70
71
72
73
|
using System.Collections;
using System.Collections.Generic;
using UnityEditor;
using UnityEngine;
[CustomEditor(typeof(CoordinateSystemDraw))]
public class CoordinateSystemDrawEditor : Editor
{
SerializedProperty mCoordinateCenterPointProperty;
SerializedProperty mCoordinateSystemLengthProperty;
SerializedProperty mForwardAxisColorProperty;
SerializedProperty mRightAxisColorProperty;
SerializedProperty mUpAxisColorProperty;
protected void OnEnable()
{
mCoordinateCenterPointProperty = serializedObject.FindProperty("CoordinateCenterPoint");
mCoordinateSystemLengthProperty = serializedObject.FindProperty("CoordinateSystemLength");
mForwardAxisColorProperty = serializedObject.FindProperty("ForwardAxisColor");
mRightAxisColorProperty = serializedObject.FindProperty("RightAxisColor");
mUpAxisColorProperty = serializedObject.FindProperty("UpAxisColor");
}
protected virtual void OnSceneGUI()
{
if(Event.current.type == EventType.Repaint)
{
Handles.color = mForwardAxisColorProperty.colorValue;
Handles.ArrowHandleCap(1, mCoordinateCenterPointProperty.vector3Value,
Quaternion.LookRotation(Vector3.forward),
mCoordinateSystemLengthProperty.floatValue, EventType.Repaint);
Handles.color = mRightAxisColorProperty.colorValue;
Handles.ArrowHandleCap(1, mCoordinateCenterPointProperty.vector3Value,
Quaternion.LookRotation(Vector3.right),
mCoordinateSystemLengthProperty.floatValue, EventType.Repaint);
Handles.color = mUpAxisColorProperty.colorValue;
Handles.ArrowHandleCap(1, mCoordinateCenterPointProperty.vector3Value,
Quaternion.LookRotation(Vector3.up),
mCoordinateSystemLengthProperty.floatValue, EventType.Repaint);
}
}
}
|
效果展示:
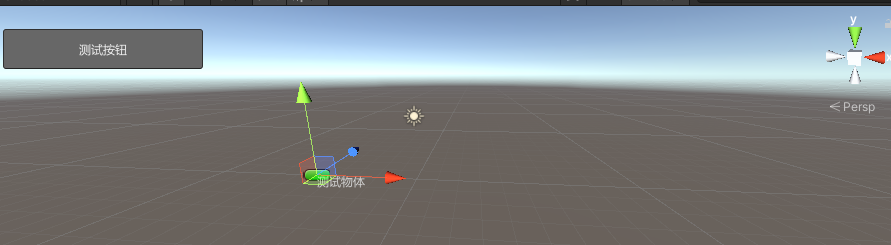
- Gizmos绘制物体的标签和2D可交互按钮显示
1
2
3
4
5
6
7
8
9
10
11
12
13
14
15
16
17
18
19
20
21
22
23
24
25
26
27
28
29
30
31
32
33
34
35
36
37
38
39
40
41
|
using System.Collections;
using System.Collections.Generic;
using UnityEngine;
public class TagAndButtonDraw : MonoBehaviour
{
[Header("物体名")]
public string Name = "GUI测试物体";
[Header("物体标签名")]
public string TagName = "sv_icon_name3";
void OnDrawGizmos()
{
DrawTag();
}
private void DrawTag()
{
Gizmos.DrawIcon(transform.position, TagName, false);
}
}
|
1
2
3
4
5
6
7
8
9
10
11
12
13
14
15
16
17
18
19
20
21
22
23
24
25
26
27
28
29
30
31
32
33
34
35
36
37
38
39
40
41
42
43
44
45
46
|
using System.Collections;
using System.Collections.Generic;
using UnityEditor;
using UnityEngine;
[CustomEditor(typeof(TagAndButtonDraw))]
public class TagAndButtonDrawEditor : Editor
{
SerializedProperty mNameProperty;
protected void OnEnable()
{
mNameProperty = serializedObject.FindProperty("Name");
}
protected virtual void OnSceneGUI()
{
var tagAndButtonDraw = (TagAndButtonDraw)target;
if(tagAndButtonDraw == null)
{
return;
}
Handles.Label(tagAndButtonDraw.transform.position, mNameProperty.stringValue);
Handles.BeginGUI();
if(GUILayout.Button("测试按钮", GUILayout.Width(200f), GUILayout.Height(40f)))
{
Debug.Log($"物体按钮被点击!");
Selection.activeGameObject = tagAndButtonDraw.gameObject;
}
Handles.EndGUI();
}
}
|
效果展示:
关于GUI的Icon详细列表可以查询这里:
Unity Editor Built-in Icons
Editor窗口绘制
Editor的窗口绘制需要继承至EditorWindow类,然后在**OnGUI()**方法内利用GUI相关接口编写UI排版代码。
这一类代码工具代码写的比较多就不详细介绍了,主要是使用GUILayout和EditorGUILayout以及GUI相关的接口编写,使用MenuItem定义窗口UI入口,GenericMenu编写自定义菜单,Handles编写一些可视化线等。然后结合Event模块编写一些自定义的操作控制。
实战
典型例子1-资源打包工具窗口的编写:
效果展示:
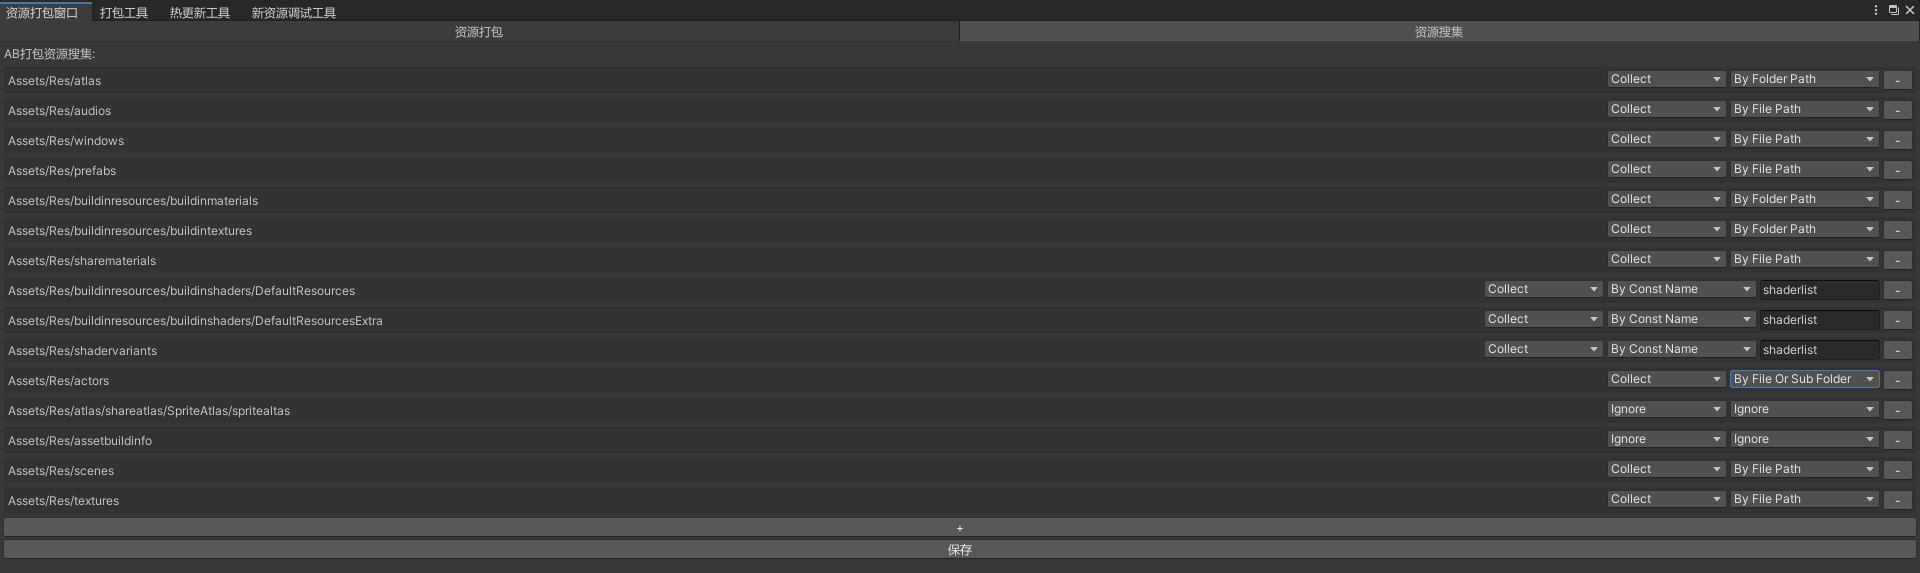
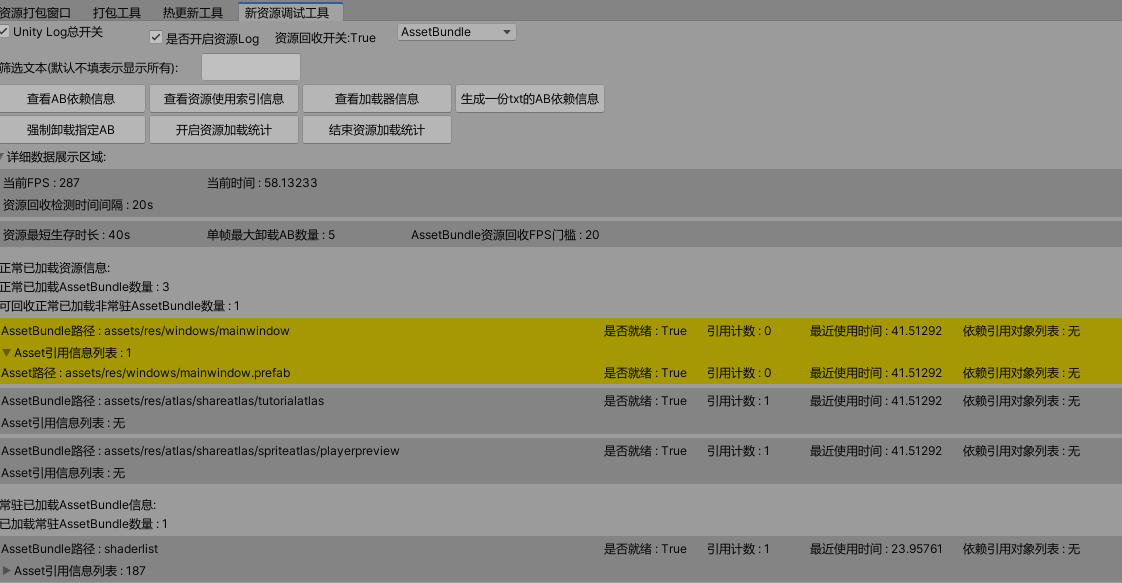
详情参见:
AssetBundleManager
典型例子2-行为树编辑器编写:
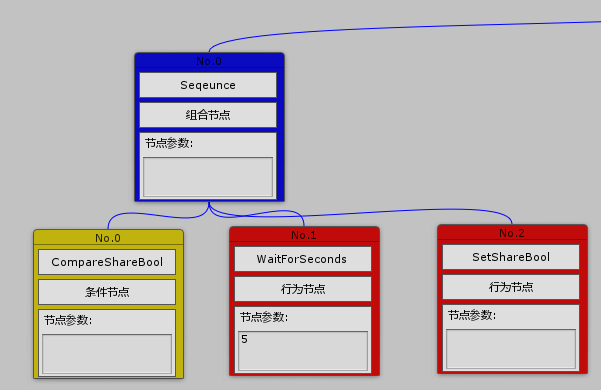
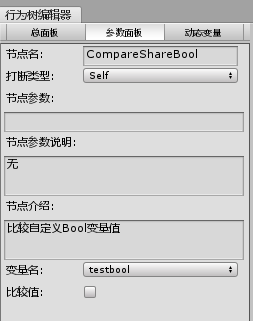
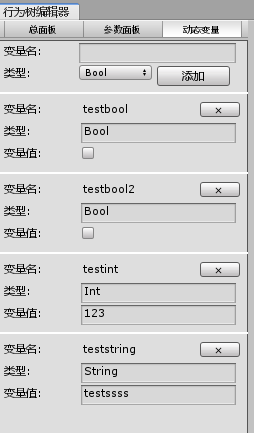
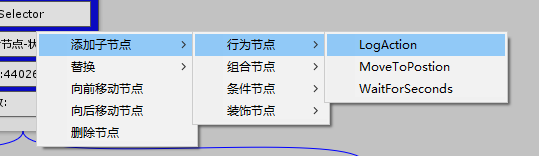
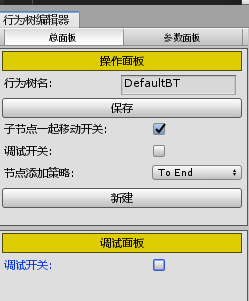
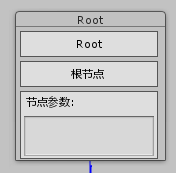

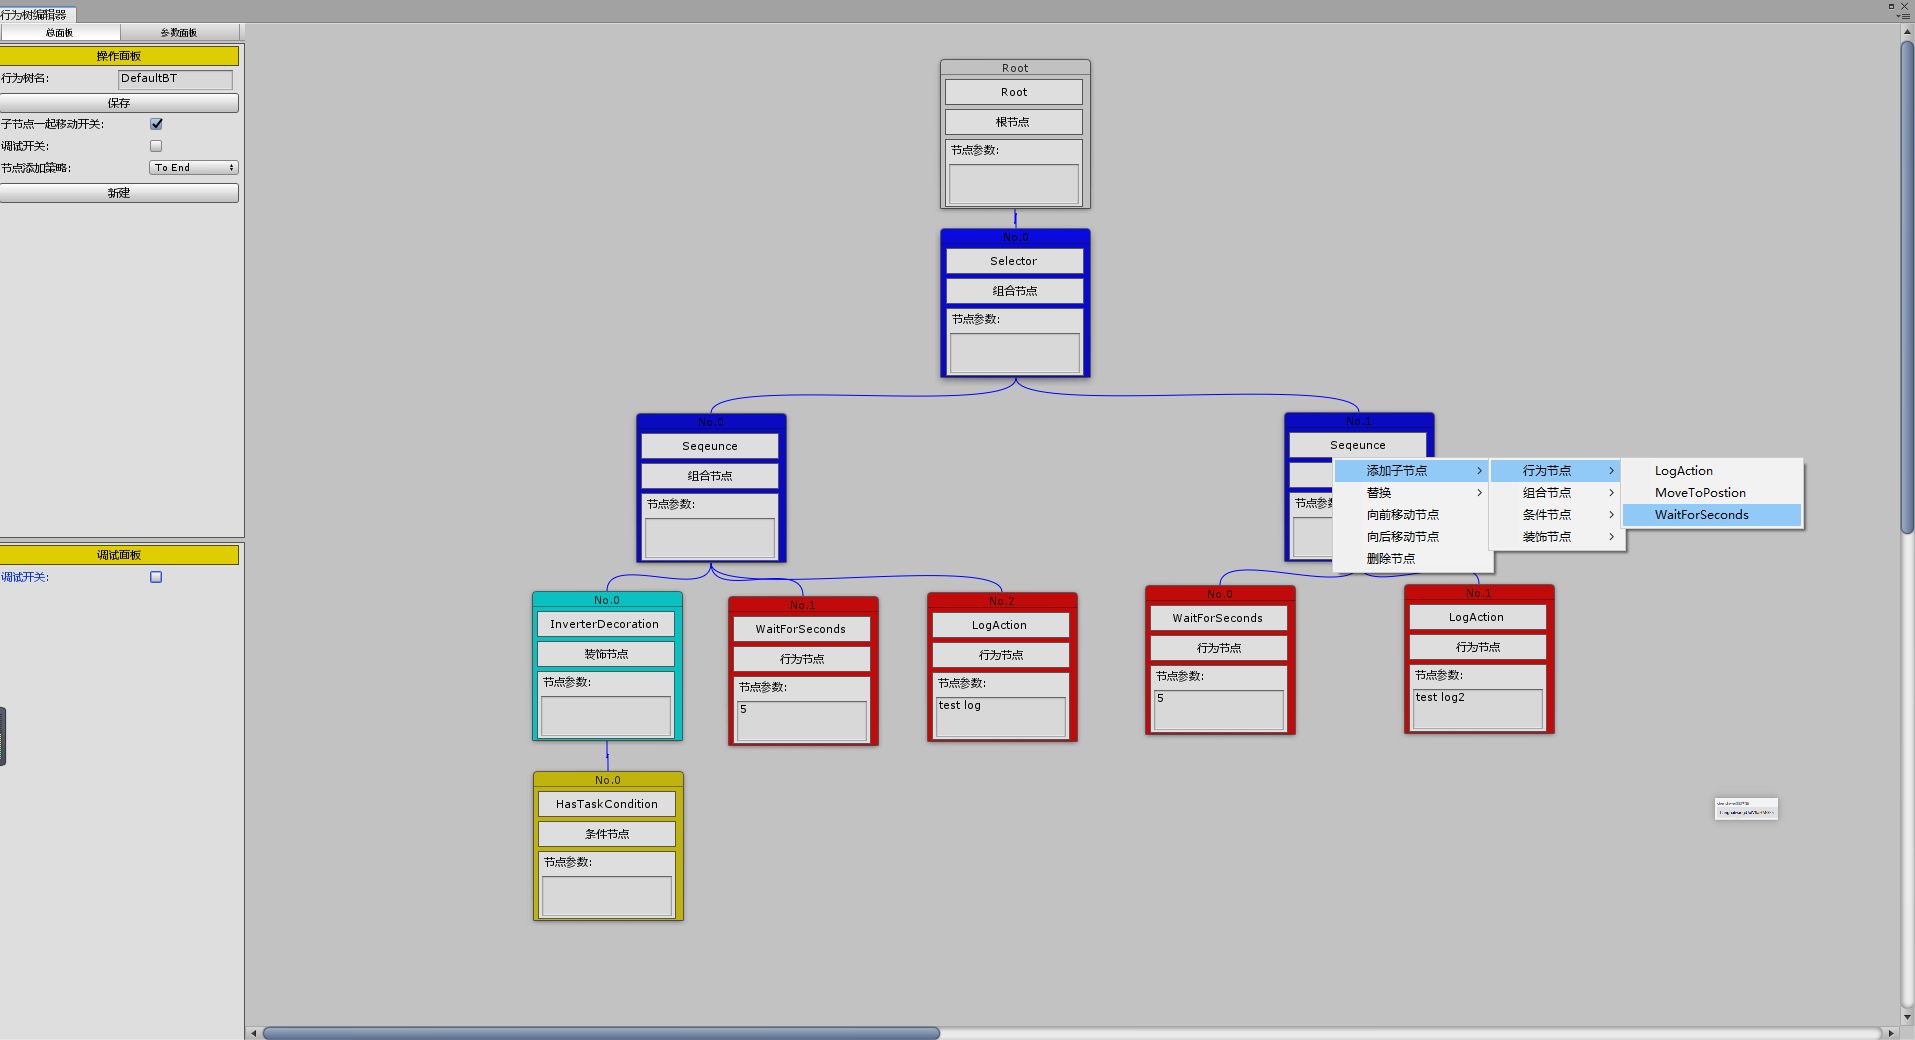
详情参见:
BehaviourTreeForLua
Note:
- 主要注意GUI和GUILayout或EditorGUILayout在自动排版上有区分,前者通过自定义布局实现排版布局,后者通过自动排版实现排版布局。
Inspector面板绘制
Inspector的面板绘制跟Unity序列化相关,常规的Inspector默认显示是通过继承Monobehaviour或ScriptableObject结合标记Serializable(标记类或结构体需要序列化),SerializedFied(标记成员需要序列化),NonSerialized(标记成员不需要序列化)和HideInInspector(标记成员不显示在面板上)来实现字段序列化和显示控制。
详细的序列化支持规则参考:
Serialization rules
实战
基础版的序列化事例:
1
2
3
4
5
6
7
8
9
10
11
12
13
14
15
16
17
18
19
20
21
22
23
24
25
26
27
28
29
30
31
32
33
34
35
36
37
38
39
40
41
42
43
44
45
46
47
48
49
50
51
52
53
54
55
56
57
58
59
60
61
62
63
64
65
66
67
68
69
70
71
|
using System;
using System.Collections;
using System.Collections.Generic;
using UnityEngine;
public class CustomInspectorDraw : MonoBehaviour
{
[Serializable]
public class SerilizableClass
{
[Header("类的整形数据")]
public int ClassIntValue;
[HideInInspector]
[Header("类隐藏不显示的字符串数据")]
public string ClassHideInspectorStringValue;
[NonSerialized]
[Header("类不序列化的布尔数据")]
public bool ClassNonSerializedBoolValue;
}
[Header("字符串数据")]
public string StringValue;
[Header("布尔数据")]
public bool BoolValue;
[Header("GameObject对象数据")]
public GameObject GoValue;
[Header("整形数组数据")]
public int[] IntArrayValue;
[Header("序列化类成员")]
public SerilizableClass SerilizabledClass;
}
|
效果展示:
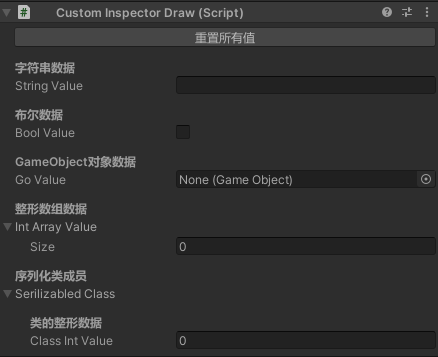
如果我们需要自定义Inspector的面板显示,我们需要继承Editor类然后重写OnInspectorGUI接口进行自定义UI的代码编写,主要使用GUI,EditorGUI相关接口。
自定义Inspector事例:
1
2
3
4
5
6
7
8
9
10
11
12
13
14
15
16
17
18
19
20
21
22
23
24
25
26
27
28
29
30
31
32
33
34
35
36
37
38
39
40
41
42
43
44
45
46
47
48
49
50
51
52
53
54
55
56
57
58
59
60
61
62
63
64
65
66
67
68
69
70
71
|
using System;
using System.Collections;
using System.Collections.Generic;
using UnityEngine;
public class CustomInspectorDraw : MonoBehaviour
{
[Serializable]
public class SerilizableClass
{
[Header("类的整形数据")]
public int ClassIntValue;
[HideInInspector]
[Header("类隐藏不显示的字符串数据")]
public string ClassHideInspectorStringValue;
[NonSerialized]
[Header("类不序列化的布尔数据")]
public bool ClassNonSerializedBoolValue;
}
[Header("字符串数据")]
public string StringValue;
[Header("布尔数据")]
public bool BoolValue;
[Header("GameObject对象数据")]
public GameObject GoValue;
[Header("整形数组数据")]
public int[] IntArrayValue;
[Header("序列化类成员")]
public SerilizableClass SerilizabledClass;
}
|
1
2
3
4
5
6
7
8
9
10
11
12
13
14
15
16
17
18
19
20
21
22
23
24
25
26
27
28
29
30
31
32
33
34
35
36
37
38
39
40
41
42
43
44
45
46
47
48
49
50
51
52
53
54
55
56
57
58
59
60
61
62
63
64
65
66
67
68
69
70
71
72
73
74
75
76
77
78
79
80
81
82
83
84
85
86
87
88
89
90
|
using System.Collections;
using System.Collections.Generic;
using UnityEditor;
using UnityEngine;
[CustomEditor(typeof(CustomInspectorDraw))]
public class CustomInspectorDrawEditor : Editor
{
SerializedProperty StringValueProperty;
SerializedProperty BoolValueProperty;
SerializedProperty GoValueProperty;
SerializedProperty IntArrayValueProperty;
SerializedProperty SerilizabledClassProperty;
SerializedProperty ClassIntValueProperty;
SerializedProperty ClassHideInspectorStringValueProperty;
private void OnEnable()
{
StringValueProperty = serializedObject.FindProperty("StringValue");
BoolValueProperty = serializedObject.FindProperty("BoolValue");
GoValueProperty = serializedObject.FindProperty("GoValue");
IntArrayValueProperty = serializedObject.FindProperty("IntArrayValue");
SerilizabledClassProperty = serializedObject.FindProperty("SerilizabledClass");
ClassIntValueProperty = SerilizabledClassProperty.FindPropertyRelative("ClassIntValue");
ClassHideInspectorStringValueProperty = SerilizabledClassProperty.FindPropertyRelative("ClassHideInspectorStringValue");
}
public override void OnInspectorGUI()
{
serializedObject.Update();
EditorGUILayout.BeginVertical();
if(GUILayout.Button("重置所有值", GUILayout.ExpandWidth(true), GUILayout.Height(20f)))
{
StringValueProperty.stringValue = string.Empty;
BoolValueProperty.boolValue = false;
GoValueProperty.objectReferenceValue = null;
IntArrayValueProperty.arraySize = 0;
ClassIntValueProperty.intValue = 0;
ClassHideInspectorStringValueProperty.stringValue = string.Empty;
}
EditorGUILayout.PropertyField(StringValueProperty);
EditorGUILayout.PropertyField(BoolValueProperty);
EditorGUILayout.PropertyField(GoValueProperty);
EditorGUILayout.PropertyField(IntArrayValueProperty);
EditorGUILayout.PropertyField(SerilizabledClassProperty, true);
EditorGUILayout.EndVertical();
serializedObject.ApplyModifiedProperties();
}
}
|
效果展示:
如果想实现通用的属性重置,可以参考SerializedObject(比如GetIteractor())和SerializedProperty(比如propertyType和propertyPath以及XXXValue等)相关接口实现遍历重置。
通过重写Editor的OnInspectorGUI()方法确实实现了自定义Inspector显示,但每一个属性的显示都要通过编写自定义UI代码的方式去展示重用率低同时重复劳动多。
接下来这里要讲的是通过自定义属性标签实现面向标签的自定义Inspector绘制控制,从而实现高度的可重用属性标签。
自定义Inspector属性绘制标签由两部分组成:
- 自定义标签继承至PropertyAttribute(控制自定义属性标签的值)
- 自定义标签绘制继承至PropertyDrawer(控制自定义属性标签的显示绘制)
比如我们想实现一个类似Range标签和纹理Preview显示的标签功能:
1
2
3
4
5
6
7
8
9
10
11
12
13
14
15
16
17
18
19
20
21
22
23
24
25
26
27
28
29
30
31
32
|
using System.Collections;
using System.Collections.Generic;
using UnityEngine;
public class TRangeAttribute : PropertyAttribute
{
public readonly float MinValue;
public readonly float MaxValue;
public TRangeAttribute(float minValue, float maxValue)
{
MinValue = minValue;
MaxValue = maxValue;
}
}
|
1
2
3
4
5
6
7
8
9
10
11
12
13
14
15
16
17
18
19
20
21
22
23
24
25
26
27
28
29
30
31
32
33
34
35
|
using System.Collections;
using System.Collections.Generic;
using UnityEditor;
using UnityEngine;
[CustomPropertyDrawer(typeof(TRangeAttribute))]
public class TRangeDrawer : PropertyDrawer
{
public override void OnGUI(Rect position, SerializedProperty property, GUIContent label)
{
var tRangeAttribute = (TRangeAttribute)attribute;
if(property.propertyType == SerializedPropertyType.Integer)
{
EditorGUI.IntSlider(position, property, (int)tRangeAttribute.MinValue, (int)tRangeAttribute.MaxValue, label);
}
else if(property.propertyType == SerializedPropertyType.Float)
{
EditorGUI.Slider(position, property, tRangeAttribute.MinValue, tRangeAttribute.MaxValue, label);
}
else
{
EditorGUILayout.LabelField(label, "请使用TRange到float或int上!");
}
}
}
|
1
2
3
4
5
6
7
8
9
10
11
12
13
14
15
16
17
18
19
20
21
|
using System.Collections;
using System.Collections.Generic;
using UnityEngine;
public class TPreviewAttribute : PropertyAttribute
{
public TPreviewAttribute()
{
}
}
|
1
2
3
4
5
6
7
8
9
10
11
12
13
14
15
16
17
18
19
20
21
22
23
24
25
26
27
28
29
30
31
32
33
34
35
36
37
38
39
40
41
42
43
44
45
46
47
48
49
50
51
52
53
54
55
56
57
58
59
60
61
62
63
64
65
66
67
68
69
70
71
72
73
74
75
76
77
78
79
80
81
|
using System.Collections;
using System.Collections.Generic;
using UnityEditor;
using UnityEngine;
[CustomPropertyDrawer(typeof(TPreviewAttribute))]
public class TPreviewDrawer : PropertyDrawer
{
public override float GetPropertyHeight(SerializedProperty property, GUIContent label)
{
return base.GetPropertyHeight(property, label) + 64f;
}
public override void OnGUI(Rect position, SerializedProperty property, GUIContent label)
{
EditorGUI.BeginProperty(position, label, property);
EditorGUI.PropertyField(position, property, label);
Texture2D previewTexture = GetAssetPreview(property);
if (previewTexture != null)
{
Rect previewRect = new Rect()
{
x = position.x + GetIndentLength(position),
y = position.y + EditorGUIUtility.singleLineHeight,
width = position.width,
height = 64
};
GUI.Label(previewRect, previewTexture);
}
EditorGUI.EndProperty();
}
private float GetIndentLength(Rect sourceRect)
{
Rect indentRect = EditorGUI.IndentedRect(sourceRect);
float indentLength = indentRect.x - sourceRect.x;
return indentLength;
}
private Texture2D GetAssetPreview(SerializedProperty property)
{
if (property.propertyType == SerializedPropertyType.ObjectReference)
{
if (property.objectReferenceValue != null)
{
Texture2D previewTexture = AssetPreview.GetAssetPreview(property.objectReferenceValue);
return previewTexture;
}
return null;
}
return null;
}
}
|
1
2
3
4
5
6
7
8
9
10
11
12
13
14
15
16
17
18
19
20
21
22
23
24
25
26
27
28
29
30
31
32
33
34
35
36
37
|
using System.Collections;
using System.Collections.Generic;
using UnityEngine;
public class InspectorPropertyDraw : MonoBehaviour
{
[TRange(0, 100)]
[Header("整形数值")]
public int IntValue;
[TRange(0, 100)]
[Header("float数值")]
public float FloatValue;
[TPreview]
[Header("预览的预制件")]
public GameObject PreviewPrefab;
}
|
效果展示:
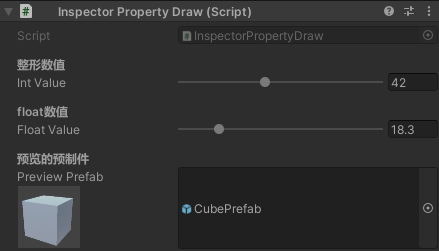
以上两个自定义属性显示标签主要参考:
Property Drawers
Unity 拓展编辑器入门指南
通过上面的基础学习,我们对于自定义Inspector面板的绘制就有基础的了解了,详细深入的学习在实战中进一步学习了解,这里就不再一一赘述。
Note:
- Unity默认不支持序列化Dictionary和多维数组等,需要自己通过ISerializationCallbackReceiver接口进行自定义序列化支持
- Unity不支持序列化null以及多态的数据
- 尽量使用SerializedObject和SerializedProperty(泛型设计支持)进行Inspector编写,支持Undo系统,不会有嵌套预制件保存问题
- SerializedObject.Update()的调用是为了确保数据修改同步,SerializedObject.ApplyModifiedProperties()是为了对于数据的修改写入生效。总结在OnInspectorGUI()方法最前面调用serializedObject.Update()在最后调用serializedObject.ApplyModifiesdProperties()确保对于SerializedObject和SerializedProperty的修改和读取正确。
TreeView绘制
基础知识
TreeView是一个比较特殊的绘制UI,他可以以树状结构来显示我们的指定数据信息(这个个人平时用的不多作为学习了解)
首先让我们看下官网对TreeView的介绍:
TreeView is an IMGUI control used to display hierarchical data that you can expand and collapse. Use TreeView to create highly customizable list views and multi-column tables for Editor windows, which you can use alongside other IMGUI controls and components.
可以看到TreeView主要用于实现可以自定义快捷操作的多行多列窗口显示的组件。
让我们先了解一下TreeView里几个重要的类,方法和相关概念:
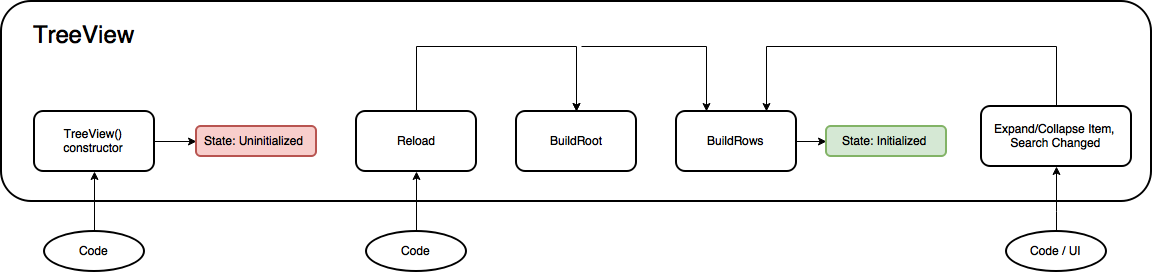
TreeView构建流程图:
在了解官方更多抽象之前,让我们先了解几个TreeView里的基本但很重要的概念。
TreeView表示我们想要构建树状网格结构显示的基类抽象。
TreeView里的单元格由TreeViewItem定义,TreeViewItem表里树状结构里的每一条单元数据。
TreeViewItem里的id必须唯一,用于查询TreeViewItem的状态数据(TreeViewState),depth标识着单条数据在树状结构里的第几层(同时也标识这TreeViewItem之间的深度即父子关系),displayName标识着TreeViewItem的显示名字。
TreeViewState记录着TreeViewItem的一些操作序列化数据(e.g. 比如选择状态,展开状态,滚动状态等)。
MultiColumnHeader是TreeView支持多列显示的抽象类。
MultiColumnHeaderState跟TreeViewState类似,是用于构建MultiColumnHeader的状态数据。
从上面的基础介绍可以看出,简单的TreeView对于数据单元的构建是通过TreeViewItem封装而来,而TreeViewItem能封装的数据仅限于id和displayName,这样对于我们快速访问自定义数据并不友好,个人猜测这也是为什么官方为设计泛型TreeView的原因。
Note:
- BuildRoot在编辑器每次Reload时会调用。BuildRows在每次BuildRoot调用后以及发生折叠展开操作时。
- TreeView的初始化发生在每次调用TreeView的Reload方法时。
深入学习
接下来让我们看看官方事例是如何抽象泛型TreeView的。
让我们先来简单理解下各个抽象类的含义:
TreeElement – 自定义TreeViewItem的数据定义基类抽象,负责抽象需要序列化的数据以及TreeViewItem所需的父子概念。
TreeModel – 泛型定义,用于封装所有的TreeElement数据,抽象出跟节点数据概念以及唯一ID获取以及数据添加删除等接口。
TreeElementUtility – TreeElement数据相关操作辅助方法(e.g. 从数据列表构建TreeElement树状结构或从根节点反向构建数据列表等)。
TreeViewItem – 泛型定义,抽象不同数据类型的TreeElement封装访问。
TreeViewWithTreeModel – 泛型定义,抽象不同数据类型的TreeModel的TreeView封装访问以及通用的数据添加以及搜索等功能。
实战实现
以下代码根据官方TreeView多列事例(MultiColumnWindow)代码学习编写,但部分类名有所更改,请自行对上官方定义。
接下来看下实战我们怎么基于官方的泛型抽象,实现自定义一个消息统计树状结构展示以及增删改查的。
先看下本人的类定义:
- MessageAsset(继承至ScriptableObject) – 消息统计基础数据定义,用于填充一些基础的消息统计数据(e.g. 消息黑名单,消息介绍等)。
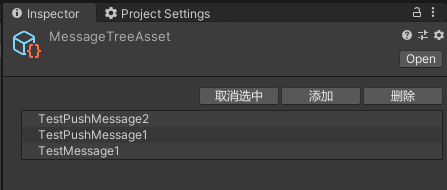
- MessageTreeAsset(继承至ScriptableObject) – 消息TreeView的原始数据Asset结构定义。
- MessageTreeAssetEditor(继承至Editor) – 自定义MessageTreeAsset的Inspector面板显示(支持增删以及查看基础数据等操作)。
- MessageTreeViewElement(继承至TreeViewElement) – 消息TreeView的单条数据结构定义。
- MessageWindow(继承至EditorWindow) – 消息辅助窗口的窗口实现。
- MessageTreeView(继承至TreeViewWithModel) – 实现泛型的TreeView定义,将MessageTreeViewElement作为自定义数据结构。
先直接放几张效果图:
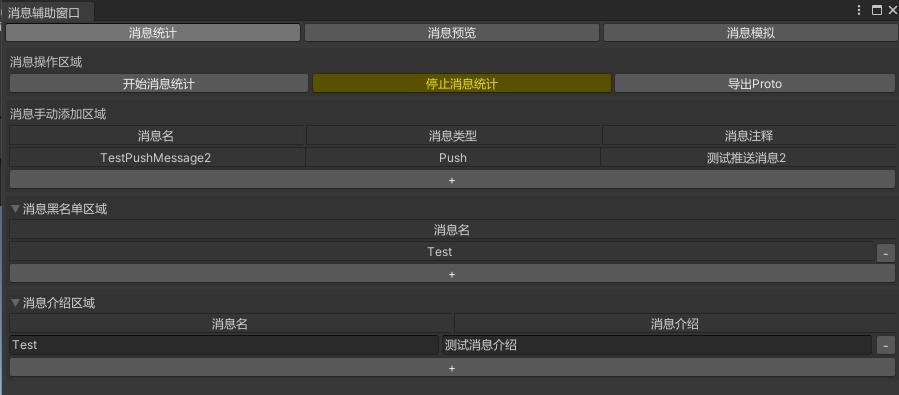

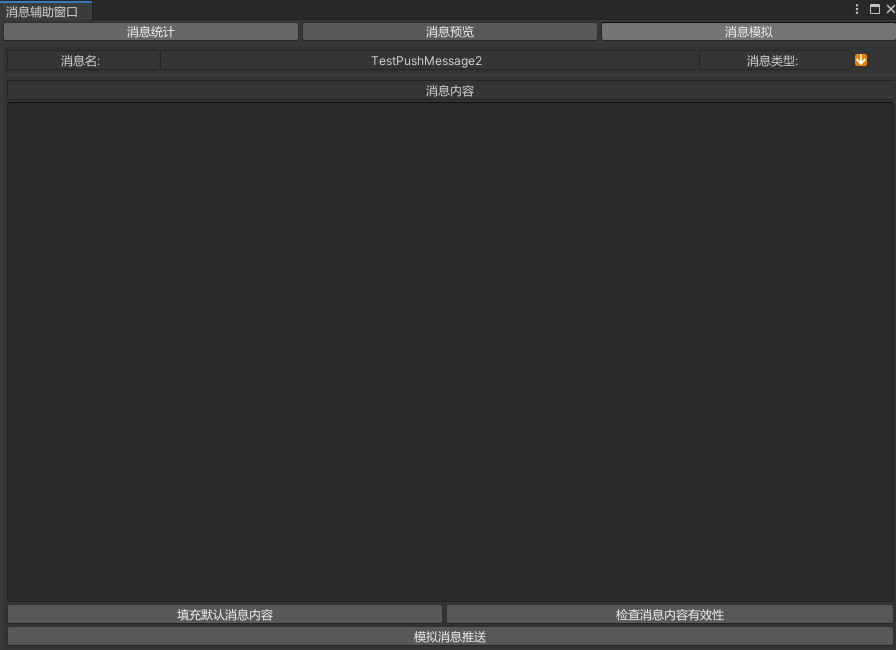
TreeView的泛型实现和自定义Inspector是第二张和第四张效果图。
本人实现了自定义MessageTreeeViewElement数据结构的TreeView展示。
1
2
3
4
5
6
7
8
9
10
11
12
13
14
15
16
17
18
19
20
21
22
23
24
25
26
27
28
29
30
31
32
33
34
35
36
37
38
39
40
41
42
43
44
45
46
47
48
49
50
51
52
53
54
55
56
57
58
59
60
61
62
63
64
65
66
67
68
69
70
71
72
73
74
75
76
77
78
79
|
using System;
using System.Collections;
using System.Collections.Generic;
using UnityEngine;
[Serializable]
public class MessageTreeViewElement : TreeViewElement
{
public enum MessageType
{
Request = 0,
Push,
}
[Header("消息名")]
public string MsgName;
[Header("消息类型")]
public MessageTreeViewElement.MessageType MsgType;
[Header("消息内容")]
public string MsgContent;
[Header("消息注释")]
public string MsgAnnotation;
public MessageTreeViewElement(int id, int depth, string name) : base(id, depth, name)
{
MsgName = name;
}
public MessageTreeViewElement(int id, int depth, string name, MessageType msgType, string msgContent, string msgAnnotation) : base(id, depth, name)
{
MsgName = name;
MsgType = msgType;
MsgContent = msgContent;
MsgAnnotation = msgAnnotation;
}
}
|
通过使MessageTreeView继承TreeViewWithTreeModel实现泛型的TreeView自定义构建和行列展示以及搜索排序等功能。
接下来我将细节展示我是如何实现TreeView的自定义数据构建和行列展示以及搜索排序等功能的。
为了支持多列显示,我们必须传递MultiColumnHeader来构建MessageTreeView:
1
2
3
4
5
6
7
8
9
10
11
12
13
14
15
16
|
public MessageTreeView(TreeViewState state, MultiColumnHeader multicolumnHeader, TreeModel<MessageTreeViewElement> model) : base(state, multicolumnHeader, model)
{
columnIndexForTreeFoldouts = 0;
showAlternatingRowBackgrounds = true;
showBorder = true;
multicolumnHeader.sortingChanged += OnSortingChanged;
Reload();
}
|
多列的数据状态MultiColumnHeaderState通过自定义方法构建返回:
1
2
3
4
5
6
7
8
9
10
11
12
13
14
15
16
17
18
19
20
21
22
23
24
25
26
27
28
29
30
31
32
33
34
35
36
37
38
39
40
41
42
43
44
45
46
47
48
49
50
51
52
53
54
55
56
57
58
59
60
61
62
63
64
65
66
67
68
69
70
71
72
73
74
|
public static MultiColumnHeaderState CreateDefaultMultiColumnHeaderState()
{
var columns = new[]
{
new MultiColumnHeaderState.Column
{
headerContent = new GUIContent("消息名", "消息名"),
contextMenuText = "消息名",
headerTextAlignment = TextAlignment.Center,
sortedAscending = true,
sortingArrowAlignment = TextAlignment.Right,
width = 200,
minWidth = 200,
maxWidth = 250,
autoResize = false,
allowToggleVisibility = false
},
new MultiColumnHeaderState.Column
{
headerContent = new GUIContent(EditorGUIUtility.FindTexture("FilterByLabel"), "消息类型"),
contextMenuText = "消息类型",
headerTextAlignment = TextAlignment.Center,
sortedAscending = true,
sortingArrowAlignment = TextAlignment.Right,
width = 40,
minWidth = 40,
maxWidth = 60,
autoResize = false,
allowToggleVisibility = false
},
new MultiColumnHeaderState.Column
{
headerContent = new GUIContent("消息注释", "消息注释"),
contextMenuText = "消息介绍",
headerTextAlignment = TextAlignment.Center,
sortingArrowAlignment = TextAlignment.Right,
width = 200,
minWidth = 200,
maxWidth = 250,
autoResize = false,
allowToggleVisibility = false,
},
new MultiColumnHeaderState.Column
{
headerContent = new GUIContent("消息内容", "消息内容"),
contextMenuText = "消息内容",
headerTextAlignment = TextAlignment.Center,
sortingArrowAlignment = TextAlignment.Right,
width = 120,
minWidth = 120,
maxWidth = 150,
autoResize = false,
allowToggleVisibility = false,
},
new MultiColumnHeaderState.Column
{
headerContent = new GUIContent("删除", "删除"),
contextMenuText = "删除",
headerTextAlignment = TextAlignment.Center,
sortingArrowAlignment = TextAlignment.Right,
width = 80,
minWidth = 80,
maxWidth = 80,
autoResize = false,
allowToggleVisibility = false,
}
};
var state = new MultiColumnHeaderState(columns);
return state;
}
|
MessageTreeView通过重写BuildRoot,BuildRows和RowGUI接口实现根节点构建以及只构建可见的行数据和显示:
TreeViewWithModel.cs
1
2
3
4
5
6
7
8
9
10
11
12
13
14
15
16
17
18
19
20
21
22
23
24
25
26
27
28
29
30
31
32
33
34
35
36
37
38
39
40
41
42
43
44
45
46
47
48
49
50
51
52
53
54
55
56
57
58
59
60
61
62
63
64
65
66
|
protected override TreeViewItem BuildRoot()
{
return new TreeViewItemGeneric<T>(TreeModel.Root.ID, -1, TreeModel.Root.Name, TreeModel.Root);
}
protected override IList<TreeViewItem> BuildRows(TreeViewItem root)
{
if (TreeModel.Root == null)
{
Debug.LogError("TreeModel Root is null. Did you call SetData()?");
}
RowList.Clear();
if (!string.IsNullOrEmpty(searchString))
{
Search(TreeModel.Root, searchString, RowList);
}
else
{
if (TreeModel.Root.HasChild())
{
AddChildrenRecursive(TreeModel.Root, 0, RowList);
}
}
SetupParentsAndChildrenFromDepths(root, RowList);
return RowList;
}
void AddChildrenRecursive(T parent, int depth, IList<TreeViewItem> newRows)
{
foreach (T child in parent.ChildList)
{
var item = new TreeViewItemGeneric<T>(child.ID, depth, child.Name, child);
newRows.Add(item);
if (child.HasChild())
{
if (IsExpanded(child.ID))
{
AddChildrenRecursive(child, depth + 1, newRows);
}
else
{
item.children = CreateChildListForCollapsedParent();
}
}
}
}
|
MessageTreeView.cs
1
2
3
4
5
6
7
8
9
10
11
12
13
14
15
16
17
18
19
20
21
22
23
24
25
26
27
28
29
30
31
32
33
34
35
36
37
38
39
40
41
42
43
44
45
46
47
48
49
50
51
52
53
54
55
56
57
58
59
60
61
62
63
64
65
66
67
68
|
protected override IList<TreeViewItem> BuildRows(TreeViewItem root)
{
var rows = base.BuildRows(root);
SortIfNeeded(root, rows);
return rows;
}
protected override void RowGUI(RowGUIArgs args)
{
var item = (TreeViewItemGeneric<MessageTreeViewElement>)args.item;
for (int i = 0; i < args.GetNumVisibleColumns(); ++i)
{
CellGUI(args.GetCellRect(i), item, (MessageTreeColumns)args.GetColumn(i), ref args);
}
}
void CellGUI(Rect cellRect, TreeViewItemGeneric<MessageTreeViewElement> item, MessageTreeColumns column, ref RowGUIArgs args)
{
CenterRectUsingSingleLineHeight(ref cellRect);
switch (column)
{
case MessageTreeColumns.MessageName:
base.RowGUI(args);
break;
case MessageTreeColumns.MessageType:
var iconTexture = item.Data.MsgType == MessageTreeViewElement.MessageType.Push ? PushIconTexture : PullIconTexture;
GUI.DrawTexture(cellRect, iconTexture, ScaleMode.ScaleToFit);
break;
case MessageTreeColumns.MessageAnnotation:
item.Data.MsgAnnotation = EditorGUI.TextField(cellRect, item.Data.MsgAnnotation);
break;
case MessageTreeColumns.MessageContent:
if (GUI.Button(cellRect, "编辑消息内容"))
{
var messageWindow = MessageWindow.OpenMessageWindow();
messageWindow.SetSelectedMessageSimulation(item.Data);
messageWindow.SelectMessageTag(MessageWindow.MessageTag.MessageSimulation);
}
break;
case MessageTreeColumns.MessageDelete:
if (GUI.Button(cellRect, "-"))
{
TreeModel.RemoveElementByID(item.Data.ID);
}
break;
}
}
|
上面构建自定义行数据和展示用到了几个比较重要的接口:
IsExpanded() – 判定指定数据ID节点是否展开
CreateChildListForCollapsedParent() – 为没展开的数据节点创建一个假的子节点,避免构建所有子数据节点
SetupParentsAndChildrenFromDepths() – 通过根节点和自定义构建的行数据节点,自动进行深度以及父子关系关联。
为了支持列排序设置,通过在MessageTreeView构造函数里监听MultiColumnHeader.sortingChanged接口实现自定义排序:
1
2
3
4
5
6
7
8
9
10
11
12
13
14
15
16
17
18
19
20
21
22
23
24
25
26
27
28
29
30
31
32
33
34
35
36
37
38
39
40
41
42
43
44
45
46
47
48
49
50
51
52
53
54
55
56
57
58
59
60
61
62
63
64
65
66
67
68
69
70
71
72
73
74
75
76
77
78
79
80
81
82
83
84
85
86
87
88
89
90
91
92
93
94
95
96
97
98
99
100
101
102
103
104
105
106
107
108
109
110
111
112
113
114
115
116
117
118
119
120
121
122
123
124
125
126
127
128
129
130
131
132
133
134
135
136
137
|
multicolumnHeader.sortingChanged += OnSortingChanged;
void OnSortingChanged(MultiColumnHeader multiColumnHeader)
{
SortIfNeeded(rootItem, GetRows());
}
private void SortIfNeeded(TreeViewItem root, IList<TreeViewItem> rows)
{
if (rows.Count <= 1)
{
return;
}
if (multiColumnHeader.sortedColumnIndex == -1)
{
return;
}
SortByMultipleColumns();
TreeToList(root, rows);
Repaint();
}
void SortByMultipleColumns()
{
var sortedColumns = multiColumnHeader.state.sortedColumns;
if (sortedColumns.Length == 0)
{
return;
}
SortByColumnIndex(0);
}
private void SortByColumnIndex(int index)
{
var sortedColumns = multiColumnHeader.state.sortedColumns;
if (sortedColumns.Length == 0 || sortedColumns.Length <= index)
{
return;
}
if (!mSortOptionsMap.ContainsKey(sortedColumns[index]))
{
return;
}
var childTreeViewItems = rootItem.children.Cast<TreeViewItemGeneric<MessageTreeViewElement>>();
SortOption sortOption = mSortOptionsMap[sortedColumns[index]];
bool ascending = multiColumnHeader.IsSortedAscending(sortedColumns[index]);
switch (sortOption)
{
case SortOption.MsgName:
if (ascending)
{
childTreeViewItems = childTreeViewItems.OrderBy(treeViewItemGeneric => treeViewItemGeneric.Data.MsgName);
}
else
{
childTreeViewItems = childTreeViewItems.OrderByDescending(treeViewItemGeneric => treeViewItemGeneric.Data.MsgName);
}
break;
case SortOption.MsgType:
if (ascending)
{
childTreeViewItems = childTreeViewItems.OrderBy(treeViewItemGeneric => treeViewItemGeneric.Data.MsgType);
}
else
{
childTreeViewItems = childTreeViewItems.OrderByDescending(treeViewItemGeneric => treeViewItemGeneric.Data.MsgType);
}
break;
}
rootItem.children = childTreeViewItems.Cast<TreeViewItem>().ToList();
}
private void TreeToList(TreeViewItem root, IList<TreeViewItem> result)
{
if (root == null)
{
throw new NullReferenceException("不能传空根节点!");
}
if (result == null)
{
throw new NullReferenceException("不能传空结果列表!");
}
result.Clear();
if (root.children == null)
{
return;
}
Stack<TreeViewItem> stack = new Stack<TreeViewItem>();
for (int i = root.children.Count - 1; i >= 0; i--)
{
stack.Push(root.children[i]);
}
while (stack.Count > 0)
{
TreeViewItem current = stack.Pop();
result.Add(current);
if (current.hasChildren && current.children[0] != null)
{
for (int i = current.children.Count - 1; i >= 0; i--)
{
stack.Push(current.children[i]);
}
}
}
}
|
为了支持树状消息自定义搜索展示,构建SearchField并绑定TreeView的SetFocusAndEnsureSelectedItem接口:
MessageWindow.cs
1
2
3
4
5
6
7
8
9
10
11
12
13
14
15
16
17
| mSearchField = new SearchField();
mSearchField.downOrUpArrowKeyPressed += mMessageTreeView.SetFocusAndEnsureSelectedItem;
private void DrawSearchBarArea(Rect rect)
{
if(mMessageTreeView != null)
{
mMessageTreeView.searchString = mSearchField.OnGUI(rect, mMessageTreeView.searchString);
}
}
|
TreeViewWithTreeModel.cs
1
2
3
4
5
6
7
8
9
10
11
12
13
14
15
16
17
|
protected override IList<TreeViewItem> BuildRows(TreeViewItem root)
{
***
if (!string.IsNullOrEmpty(searchString))
{
Search(TreeModel.Root, searchString, RowList);
}
***
}
|
为了操作方便,我还监听了MessageTreeAsset的双击打开操作,快速打开窗口进行消息预览:
MessageWindow.cs
1
2
3
4
5
6
7
8
9
10
11
12
13
14
15
16
17
18
19
|
[OnOpenAsset]
public static bool OnOpenAsset(int instanceID, int line)
{
var treeAsset = EditorUtility.InstanceIDToObject(instanceID) as MessageTreeAsset;
if (treeAsset != null)
{
var window = OpenMessageWindow();
window.SetTreeAsset(treeAsset);
window.SelectMessageTag(MessageTag.MessagePreview);
return true;
}
return false;
}
|
TreeElementUtility.cs负责实现二楼TreeViewElement相关的几个比较重要的方法接口:
TreeElementUtility.cs
1
2
3
4
5
6
7
8
9
10
11
12
13
14
15
16
17
18
19
20
21
22
23
24
25
26
27
28
29
30
31
32
33
34
35
36
37
38
39
40
41
42
43
44
45
46
47
48
49
50
51
52
| /// <summary>
/// 将树形根节点转换到数据列表
/// </summary>
/// <typeparam name="T"></typeparam>
/// <param name="root"></param>
/// <param name="result"></param>
public static void TreeToList<T>(T root, IList<T> result) where T : TreeViewElement
{
******
}
/// <summary>
/// 从数据列表里生成TreeView
/// </summary>
/// <typeparam name="T"></typeparam>
/// <param name="list"></param>
/// <returns>返回根节点</returns>
public static T ListToTree<T>(IList<T> list) where T : TreeViewElement
{
******
}
/// <summary>
/// 检查数据列表信息
/// </summary>
/// <typeparam name="T"></typeparam>
/// <param name="list"></param>
public static void ValidateDepthValues<T>(IList<T> list) where T : TreeViewElement
{
******
}
/// <summary>
/// 查找TreeView列表的根数据
/// </summary>
/// <param name="treeViewElementList"></param>
/// <returns></returns>
public static T FindRootTreeViewElement<T>(IList<T> treeViewElementList) where T : TreeViewElement
{
******
}
/// <summary>
/// 更新节点深度信息
/// </summary>
/// <typeparam name="T"></typeparam>
/// <param name="root"></param>
public static void UpdateDepthValues<T>(T root) where T : TreeViewElement
{
******
}
|
完整代码链接:
EditorUIStudy
上述Git还包含了其他Editor相关GUI学习的代码,TreeView的入口为Tools->消息辅助窗口。
本章节内容比较多,单独提一篇来记录学习,详情参考:
UIToolkit学习
UGUI
UGUI是UIToolkit之前出的一套用于运行时的UI框架,本篇章主要学习Editor相关的GUI,这里就不深入学习讲解了。
学习总结
- Gizmos主要用于绘制Scene场景里的可视化调试(比如绘制线,图标,cube等),不支持交互。
- Handles主要用于绘制Scene场景里3D可交互UI(比如可拉伸坐标轴,按钮等)。
- GUI的坐标系是左上角0,0
- GUISkins是GUIStyls的合集,GUIStyles定义了我们GUI的样式
Editor数据存储
这里说的Editor的数据存储主要是针对Unity概念,而非常规的序列化反序列化方案。
在了解数据存储之前,我们需要了解Unity里关于序列化的一些概念和规则。
Unity序列化规则
字段序列化规则:
- public或者有SerializeField标签
- 非static
- 非const
- 非readonly
- 基础数据类型(e.g. int,float,double,bool string ……)
- 枚举
- Fixed-size buffers(?不太清楚是指bit,byte还是啥)
- Unity一些内置类型(e.g. Vector2,Vector3,Rect,Matrix4x4,Color,AnimationCurve)
- 标记有Serializable的自定义class
- 符合以上条件类型的列表或数组
详细规则见:
Script serialization
注意事项:
- Unity不支持序列化多层数据结构类型(e.g. 多维数组,不定长数组,Dictionary,nested container types(?这个没太明白是指什么类型))
解决方案:
- 通过class封装,定义成常规支持的数据结构
- 通过自定义序列化接口ISerializationCallbackReceiver,编写自定义序列化代码
序列化自定义Class
序列化自定义Class必须满足一下两个条件:
- 有Serializable标签
- 非static Class
Unity序列化自定义Class有两种方式:
- By Reference(按引用,C#里引用的概念,确保同一个对象序列化反序列化指向同一个对象)
- By Value(按值,类似C#里值类型的概念,只序列化值不保持引用关系,即反序列化后引用会丢失只有值会还原)
默认Unity序列化非继承UntiyEngine.Object的自定义Class方式是By Value,要想支持By Reference需要添加SerializeReference标签(在需要序列化的自定义Class成员上)
SerializeReference主要支持以下几种情况:
- 字段可以为null
- 序列化可以保持引用,反序列化后可以指向同一对象
- 实现定义父类类型但序列化反序列化子类数据的多态序列化反序列化
让我们实战理解一下以上概念:
BaseCustomClass.cs(自定义Class基类)
1
2
3
4
5
6
7
8
9
10
11
12
13
14
15
16
17
18
19
20
21
22
23
| using System;
using System.Collections;
using System.Collections.Generic;
using UnityEngine;
[Serializable]
public class BaseCustomClass
{
[Header("名字")]
public string Name;
public BaseCustomClass(string name)
{
Name = name;
}
}
|
ChildCustomClass.cs(自定义子类)
1
2
3
4
5
6
7
8
9
10
11
12
13
14
15
16
17
18
19
20
21
22
23
| using System;
using System.Collections;
using System.Collections.Generic;
using UnityEngine;
[Serializable]
public class ChildCustomClass : BaseCustomClass
{
[Header("子名字")]
public string ChildName;
public ChildCustomClass(string name, string childName) : base(name)
{
ChildName = childName;
}
}
|
GrandchildCustomClass.cs(自定义孙子类)
1
2
3
4
5
6
7
8
9
10
11
12
13
14
15
16
17
18
19
20
21
22
23
24
25
26
27
28
29
30
| using System;
using System.Collections;
using System.Collections.Generic;
using UnityEngine;
[Serializable]
public class GrandchildCustomClass : ChildCustomClass
{
[Header("孙子名")]
public string GrandchildName;
[Header("孙子目标GameObject")]
public GameObject GrandchildTargetGo;
public GrandchildCustomClass(string name, string childName, string grandchildName, GameObject grandchildTargetGo) : base(name, childName)
{
GrandchildName = grandchildName;
GrandchildTargetGo = grandchildTargetGo;
}
}
|
SerializeReferenceMono.cs(序列化自定义类测试脚本)
1
2
3
4
5
6
7
8
9
10
11
12
13
14
15
16
17
18
19
20
21
22
23
24
25
26
27
28
29
30
31
32
33
34
35
36
37
38
39
40
41
42
43
44
45
46
47
48
49
50
51
52
53
54
55
56
57
58
59
60
61
62
63
64
65
66
67
68
69
70
71
72
73
74
75
76
77
78
79
80
81
82
83
84
85
86
87
88
89
90
91
| using System.Collections;
using System.Collections.Generic;
using UnityEngine;
public class SerializeReferenceMono : MonoBehaviour
{
[Header("基类对象")]
[SerializeReference]
public BaseCustomClass BaseClass;
[Header("子类对象1")]
[SerializeReference]
public ChildCustomClass ChildClass1;
[Header("子类对象2")]
[SerializeReference]
public ChildCustomClass ChildClass2;
[Header("孙子类对象1")]
public GrandchildCustomClass GrandchildClass1;
[Header("孙子类对象2")]
public GrandchildCustomClass GrandchildClass2;
[ContextMenu("初始化")]
void Init()
{
Debug.Log("SerializeReferenceMono.Init()");
BaseClass = new GrandchildCustomClass("测试多态基名字", "测试多态子名字", "测试多态孙名字", this.gameObject);
var childClassInstance = new ChildCustomClass("测试自定义Class序列化By Reference基名字", "测试自定义Class序列化By Reference子名字");
ChildClass1 = childClassInstance;
ChildClass2 = childClassInstance;
var grandChildClassInstance = new GrandchildCustomClass("测试自定义Class序列化By Value基名字", "测试自定义Class序列化By Value子名字", "测试自定义Class序列化By Value孙名字", this.gameObject);
GrandchildClass1 = grandChildClassInstance;
GrandchildClass2 = grandChildClassInstance;
}
[ContextMenu("测试序列化")]
void TestSerialization()
{
Debug.Log("SerializeReferenceMono.TestSerialization()");
if(ChildClass1 == ChildClass2)
{
Debug.Log($"ChildClass1 == ChildClass2");
}
else
{
Debug.Log($"ChildClass1 != ChildClass2");
}
if (GrandchildClass1 == GrandchildClass2)
{
Debug.Log($"GrandchildClass1 == GrandchildClass2");
}
else
{
Debug.Log($"GrandchildClass1 != GrandchildClass2");
}
}
private void Awake()
{
Debug.Log($"SerializeReferenceMono.Awake()");
}
private void Start()
{
Debug.Log($"SerializeReferenceMono.Start()");
}
}
|
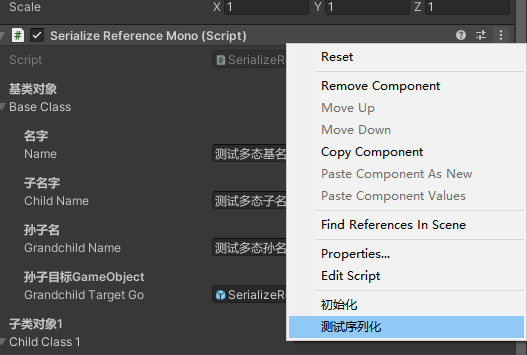
首先通过创建一个挂载了SerializeReferenceMono组件的GameObject,通过扩展的Inspector操作面板初始化数据:
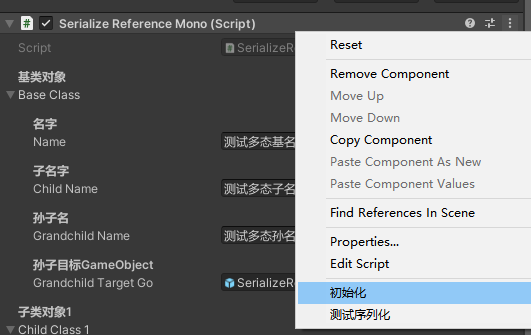
初始化后我们会看到我们初始化后的数据:

从上面可以看到我们成功初始化了我们想要的数据,从BaseClass成员已经可以看到标记了SerializeReference后我们成功实现了多重继承后的数据序列化。
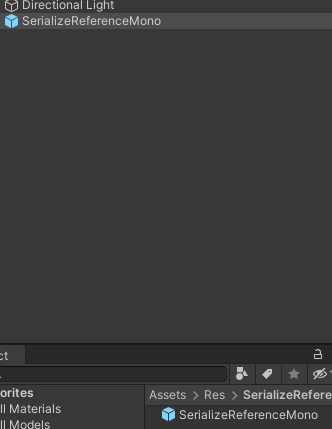
接下来我们把初始化数据后的GameObject做成预制件,通过反向丢进场景实例化触发反序列化来测试自定义Class的SerializeReference相关的设计。
最后一步,实例化预制件后通过Inspector操作面板测试自定义Class的SerializeReference设计:
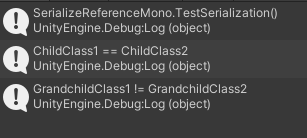
从上面的打印可以看出,即使经历了Prefab的实例化(即SerializeReferenceMono脚本的数据反序列化),我们最初标记SerializeReference的ChildCustomClass序列化同一对象后反序列化依然是指向同一对象(By Reference),而没有标记SerializeReference的GrandchildCustomClass反序列化后指向的是不同对象(By Value),从而验证了Unity SerializeReference的By Reference序列化反序列化设计。
Note:
- Unity用By Value的方式序列化自定义Class更高效,但没法还原引用。
Unity序列化方案
Monobehaviour
说到数据存储,Unity里最典型的就是Monobehaviour,这个比较常用,只要符合前面提到的成员序列化要求即可。主要要注意的是自定义序列化Class的成员,看是否需要By Reference序列化
比较简单这里就不实战举例了。
ScriptableObject
ScriptableObject是Unity提供的一种可以序列化数据成本地Asset的一种方式
使用ScriptableObejct的两大场景如下:
- 想在Editor下存储一些数据
- 想在运行时序列化一些数据到本地
比较简单这里就不实战举例了。
Unity数据存储方案
EditorPrefs
Unity用于存储Editor本地数据的类(存储位置好像是注册表里)。
比较简单这里就不实战举例了。
Note:
- 运行时用PlayerPref
JsonUtility
Unity提供的Json工具类,用于Json的序列化和反序列化。
比较简单这里就不实战举例了。
其他
这里的其他是指其他常见的序列化方式:
- 二进制(e.g. Protobuf, FlagBuffer …….)
- XML
Editor常用标签
编译相关
InitializeOnLoadAttribute
用于在Unity loads(个人理解是Unity打开或编译完成)后初始化一些Editor脚本
InitializeOnLoadMethodAttribute
用于在Unity loads(个人理解是Unity打开或编译完成)后初始化一些Editor脚本),但在InitializeOnLoadAttribute之后执行
具体使用在博主编写的Asset可配置化管线后处理工具以及路点编辑工具有使用:
AssetPipeline
PathPointTool
Note:
- InitializeOnLoadMethodAttribute在InitializeOnLoadAttribute之后执行
- InitializeOnLoadAttribute在Asset导入完成前触发,不要在此流程里操作Asset相关东西,要处理Asset相关东西使用AssetPostprocessor.OnPostProcessAllAssets接口流程
打包流程相关
PostProcessBuildAttrbute
打包后处理流程通知标签
Inspector相关
Header
字段显示标题文本标签
HideInInspector
不在Inpector显示标签
CustomPropertyDrawer
自定义标签绘制
Range
限定值范围标签
具体使用在博主编写的Unity Editor先关学习里使用:
UnityEditor知识
EditorUIStudy
序列化相关
待添加……
Editor相关
ExecuteInEditMode
允许部分实例化脚本在不运行时执行一些声明周期方法(e.g. Awake,Update,OnGUI ……)
OnOpenAsset
响应Asset双击打开
ExecuteAlways
允许脚本在运行和非运行时总时运行(e.g. Update, OnGUI ……)
Editor操作扩展
窗口菜单
MenuItem用于扩展窗口菜单操作以及Asset右键操作等
比较简单这里就不实战举例了。
AddComponentMenu用于扩展添加组件菜单
比较简单这里就不实战举例了。
Inspector菜单
ContextMenu用于扩展指定脚本的Inspector操作栏
比较简单这里就不实战举例了。
ScriptableObject菜单
CreateAssetMenu用于创建继承至ScriptableObject的Asset菜单操作
比较简单这里就不实战举例了。
Editor工具分类
EditorUtility是Unity Editor里功能比较广泛的工具类,大部分接口跟Editor UI和Asset操作相关。
GUI相关
HandleUtility
3D场景GUI绘制相关辅助工具类
待添加……
Asset相关
PrefabUtility
Unity里针对预制件操作相关的工具类
序列化相关
SerializationUtility
Unity序列化相关的工具类
Github
参考学习Github:
ThreeDDrawing
个人Github:
AssetPipeline
PathPointTool
EditorUIStudy
Reference
Unity 拓展编辑器入门指南
Script serialization
