Unity组件绑定
文章目錄
前言
游戏开发过程中我们经常会需要访问一些指定节点,组件和脚本。
常规方式会通过编写GetChild(?)和GetComponent<?>()代码的方式去获取节点和组件,但这样对于开发来说并不高效同时运行时的GetChild(?)和GetComponent<?>()也是有运行开销的。
为了寻求更高效,高性能和便捷的方式,这里引出组件绑定的工具方案。
实现一套通用的组件绑定方案,为未来游戏快速开发打下基础。
组件绑定原理
- 通过Object数组实现通用类型的组件绑定存储
- 通过自定义Inspector实现绑定对象,绑定对象组件绑定选择以及模板类型选择,代码生成等UI操作界面
- 通过模板+代码生成实现组件绑定的自定义快速代码生成(通过生成partial代码不入侵原始逻辑代码)
- 结合自定义ScriptableObject自定义不同模板类型的不同代码输出目录实现自定义代码目录输出设置
功能实现
- 支持通节点不同组件的绑定
- 支持节点自定义变量名和注释定义
- 支持自定义代码模板的选择生成
- 支持组件绑定代码不入侵功能代码(利用partial class)功能生成代码
- 支持不同模板类型代码生成输出目录设置
实战实现
组件绑定脚本
1 | /// <summary> |
1 | /// <summary> |
从上面的可以看出节点组件和脚本的数据绑定核心是通过脚本序列化Object[]数组以及相关数据的方式实现绑定节点数据存储的。
组件绑定自定义面板
1 | /// <summary> |
这部分代码主要是实现ComponentBinder的Inspector自定义GUI显示,从而实现我们想要的自定义UI操作。
组件绑定模板代码生成
1 | /// <summary> |
1 | /// <summary> |
此文件主要是通过自定义选择的模板文件*.txt结合TTemplate工具类实现模板文件txt里的内容自定义生成输出我们想要的代码。
窗口模板文件示例:
1 | /* |
窗口组件绑定模板示例:
1 | /* |
其他模板生成参考文件:
CellUIBinder.txt,CellUITemplate.txt,GameObjectUIBinder.txt
组件绑定设置
1 | /// <summary> |
1 | /// <summary> |
实战使用
组件绑定设置
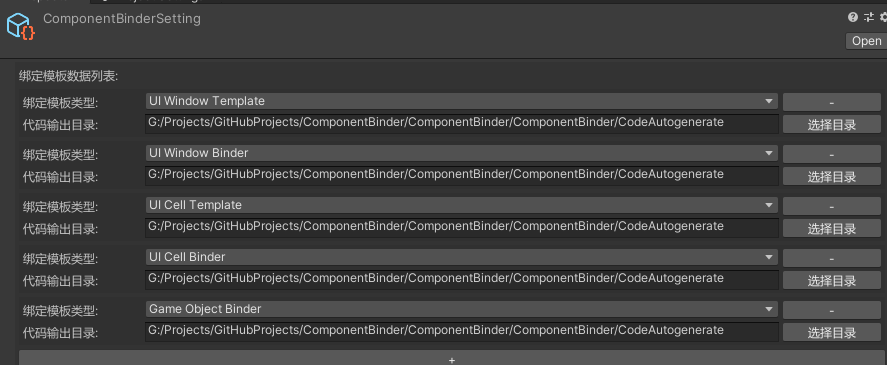
通过自定义模板类型的代码输出路径设置实现自定义代码输出设置
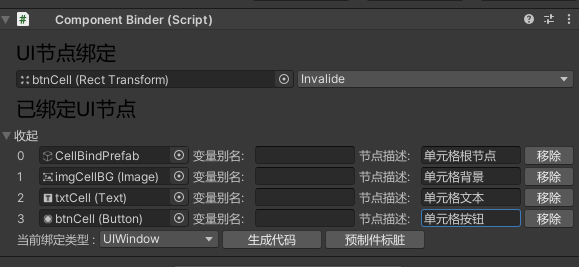
组件绑定选择
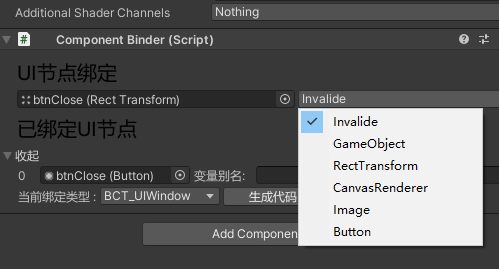
- 支持通节点不同组件的绑定
- 支持节点自定义变量名和注释定义
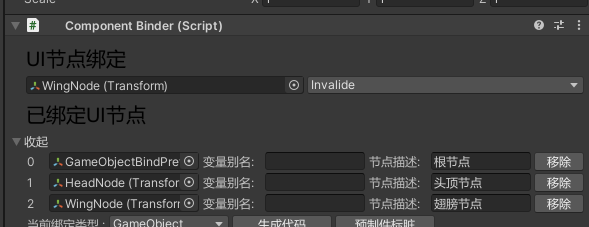
自定义绑定节点代码注释

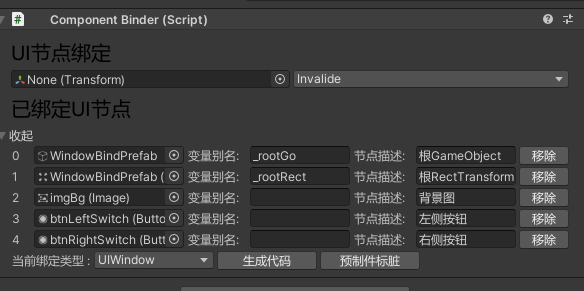
窗口模板组件绑定设置以及代码生成
1
2
3
4
5
6
7
8
9
10
11
12
13
14
15
16
17
18
19
20
21
22
23
24
25
26
27
28
29
30
31
32
33
34
35
36
37
38
39
40
41
42
43
44
45
46
47
48
49
50
51
52
53
54
55/*
* Description: WindowBindPrefab.cs
* Author: TONYTANG
* Create Date: 2022//05/29
*/
using UnityEngine;
using UnityEngine.UI;
using TH.Modules.UI;
namespace Game.Modules.UI
{
/// <summary>
/// WindowBindPrefab窗口
/// </summary>
public class WindowBindPrefab : BaseWindow
{
public WindowBindPrefab()
{
}
/// <summary>
/// 添加监听
/// </summary>
protected override void addListeners()
{
base.addListeners();
}
/// <summary>
/// 窗口显示
/// </summary>
protected override void onShow()
{
base.onShow();
}
/// <summary>
/// 移除监听
/// </summary>
protected override void removeListeners()
{
base.removeListeners();
}
/// <summary>
/// 窗口销毁
/// </summary>
protected override void onDestroy()
{
base.onDestroy();
}
}
}1
2
3
4
5
6
7
8
9
10
11
12
13
14
15
16
17
18
19
20
21
22
23
24
25
26
27
28
29
30
31
32
33
34
35
36
37
38
39
40
41
42
43
44
45
46
47
48
49
50
51
52
53
54
55
56
57
58/*
* Description: WindowBindPrefabBinder.cs
* Author: TONYTANG
* Create Date: 2022//05/29
*/
using UnityEngine;
using UnityEngine.UI;
using TH.Modules.UI;
namespace Game.Modules.UI
{
/// <summary>
/// WindowBindPrefab窗口的组件绑定
/// </summary>
public partial class WindowBindPrefab
{
/// <summary> 根GameObject /// </summary>
private GameObject _rootGo;
/// <summary> 根RectTransform /// </summary>
private RectTransform _rootRect;
/// <summary> 背景图 /// </summary>
private Image imgBg;
/// <summary> 左侧按钮 /// </summary>
private Button btnLeftSwitch;
/// <summary> 右侧按钮 /// </summary>
private Button btnRightSwitch;
/// <summary>
/// 缓存组件
/// </summary>
protected override void cacheComponents()
{
base.cacheComponents();
_rootGo = mComponentBinder.NodeDatas[0].NodeTarget as GameObject;
_rootRect = mComponentBinder.NodeDatas[1].NodeTarget as RectTransform;
imgBg = mComponentBinder.NodeDatas[2].NodeTarget as Image;
btnLeftSwitch = mComponentBinder.NodeDatas[3].NodeTarget as Button;
btnRightSwitch = mComponentBinder.NodeDatas[4].NodeTarget as Button;
}
/// <summary>
/// 释放组件
/// </summary>
protected override void disposeComponents()
{
base.disposeComponents();
_rootGo = null;
_rootRect = null;
imgBg = null;
btnLeftSwitch = null;
btnRightSwitch = null;
}
}
}更多的代码生成示例,参考Github源代码工程。
重点知识
- 利用自定义UI结合Object[]实现自定义组件绑定数据序列化
- 利用代码生成使用partial实现组件绑定代码无缝插入工程代码实现快速替换和访问
