Unity学习
Unity Introduction
因为后期发现目录越来越长导致前面的一些代码模块不具可读性,所以在这里加很多…过度符
……………………………………………..
……………………………………………..
……………………………………………..
……………………………………………..
……………………………………………..
……………………………………………..
……………………………………………..
……………………………………………..
……………………………………………..
……………………………………………..
……………………………………………..
……………………………………………..
……………………………………………..
……………………………………………..
……………………………………………..
……………………………………………..
……………………………………………..
……………………………………………..
……………………………………………..
……………………………………………..
……………………………………………..
……………………………………………..
……………………………………………..
……………………………………………..
……………………………………………..
……………………………………………..
……………………………………………..
……………………………………………..
……………………………………………..
……………………………………………..
……………………………………………..
……………………………………………..
……………………………………………..
……………………………………………..
……………………………………………..
……………………………………………..
……………………………………………..
……………………………………………..
……………………………………………..
……………………………………………..
……………………………………………..
What is Unity?
Unity is a cross-platform game engine developed by Unity Technologies and used to develop video games for PC, consoles, mobile devices and websites. First released on June 8, 2005
(from wiki))
Why should we study Unity?
- Cross-platform
- Free
- Complete SDK documentation
- Many free assets
Which programming language are we using?
- C# (推荐入门书籍《C#入门经典》,进阶书籍《CLR via C#》)
- Javascript
- Boo
Unity Tutorial Study
Website: Unity Tutorials
ROLL-A-BALL
Game Introduction
控制小球移动收集场景里的方块,UI会显示当前收集的方块数量,当所有方块通过碰撞收集后游戏UI提示You Win
Code
PlayerController.cs1
2
3
4
5
6
7
8
9
10
11
12
13
14
15
16
17
18
19
20
21
22
23
24
25
26
27
28
29
30
31
32
33
34
35
36
37
38
39
40
41
42
43
44
45
46
47
48
49
50
51using UnityEngine;
using System.Collections;
using UnityEngine.UI;
public class PlayerController : MonoBehaviour {
public float m_Speed;
public Text m_CountText;
public Text m_WinText;
private Rigidbody m_RB;
private int m_Count;
void Start()
{
m_RB = GetComponent<Rigidbody> ();
m_Count = 0;
SetCountText();
m_WinText.text = "";
}
void FixedUpdate()
{
float moveHorizontal = Input.GetAxis ("Horizontal");
float moveVertical = Input.GetAxis ("Vertical");
Vector3 movement = new Vector3(moveHorizontal, 0.0f, moveVertical);
m_RB.AddForce (movement * m_Speed);
}
void OnTriggerEnter(Collider other)
{
if (other.gameObject.CompareTag ("Pickup"))
{
other.gameObject.SetActive(false);
m_Count++;
SetCountText();
}
}
void SetCountText()
{
m_CountText.text = "Count: " + m_Count.ToString();
if (m_Count >= 12)
{
m_WinText.text = "You Win!";
}
}
}
CameraController.cs1
2
3
4
5
6
7
8
9
10
11
12
13
14
15
16
17
18using UnityEngine;
using System.Collections;
public class CameraController : MonoBehaviour {
public GameObject m_Player;
private Vector3 m_Offset;
// Use this for initialization
void Start () {
m_Offset = transform.position - m_Player.transform.position;
}
// Update is called once per frame
void LateUpdate () {
transform.position = m_Player.transform.position + m_Offset;
}
}
Rotator.cs1
2
3
4
5
6
7
8
9
10
11
12
13
14
15using UnityEngine;
using System.Collections;
public class Rotator : MonoBehaviour {
// Use this for initialization
void Start () {
}
// Update is called once per frame
void Update () {
transform.Rotate (new Vector3 (15, 35, 45) * Time.deltaTime);
}
}
Captures
Game Play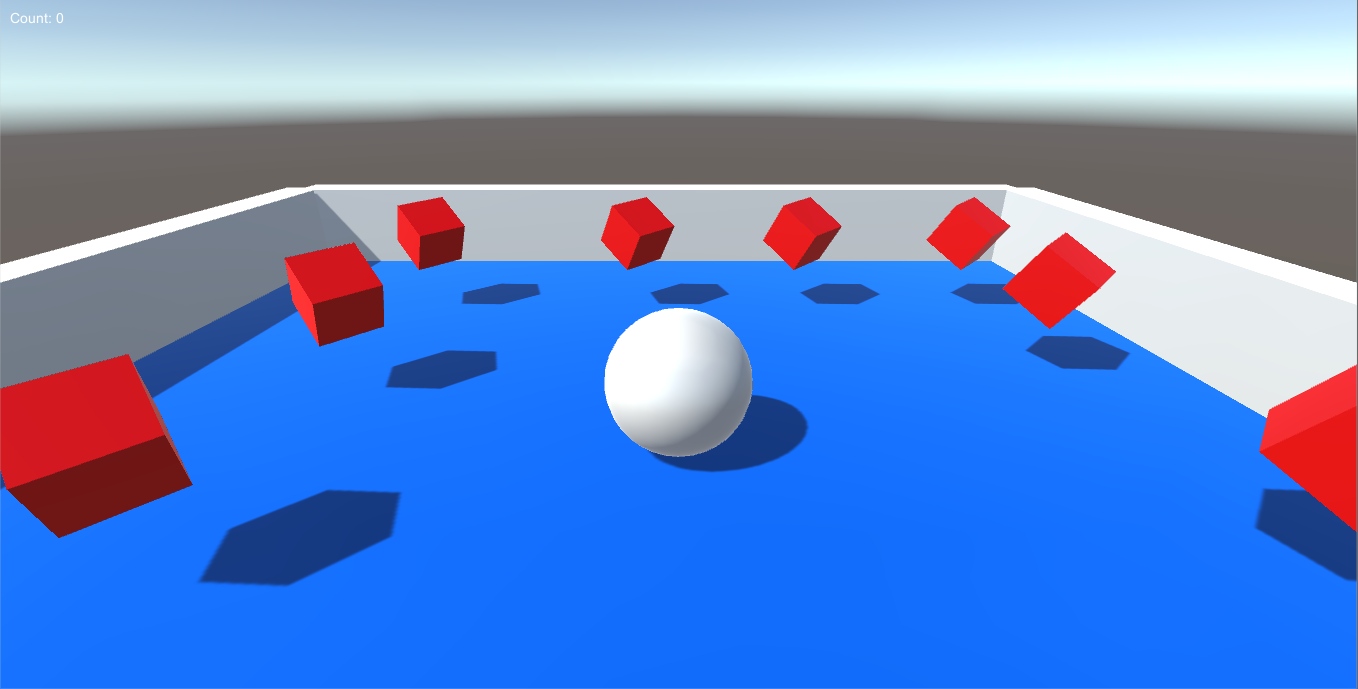
Win Game
SPACE SHOOTER
Game Introduction
Top Down Game
好比全民打飞机
Code
ShipController.cs1
2
3
4
5
6
7
8
9
10
11
12
13
14
15
16
17
18
19
20
21
22
23
24
25
26
27
28
29
30
31
32
33
34
35
36
37
38
39
40
41
42
43
44
45
46
47
48
49
50
51
52
53
54
55
56
57
58
59
60
61
62
63
64
65
66
67
68
69
70
71using UnityEngine;
using System.Collections;
[System.Serializable]
public class Boundary
{
public float m_MinX,m_MaxX,m_MinZ,m_MaxZ;
}
public class ShipController : MonoBehaviour {
public float m_Speed = 8;
public float m_Tilt = 4;
public float fireRate = 0.5F;
private float nextFire = 0.0F;
public Boundary m_Boundary;
public GameObject m_Shot;
public Transform m_ShotSpawn;
private AudioSource m_FireAudio;
private Rigidbody m_ShipRB;
private GameController m_GameController;
// Use this for initialization
void Start () {
m_ShipRB = GetComponent<Rigidbody> ();
m_FireAudio = GetComponent<AudioSource> ();
GameObject gamecontrollerobject = GameObject.FindGameObjectWithTag ("GameController");
if (gamecontrollerobject != null) {
m_GameController = gamecontrollerobject.GetComponent<GameController>();
}
if (m_GameController == null) {
Debug.Log("m_GameController == null in ShipController::Start()");
}
}
void Update(){
if (Input.GetKey(KeyCode.J) && Time.time > nextFire) {
nextFire = Time.time + fireRate;
GameObject clone = Instantiate (m_Shot, m_ShotSpawn.position, m_ShotSpawn.rotation) as GameObject;
m_FireAudio.Play();
}
}
void FixedUpdate(){
if (!m_GameController.IsGameEnd ()) {
float moveHorizontal = Input.GetAxis ("Horizontal");
float moveVertical = Input.GetAxis ("Vertical");
Vector3 movement = new Vector3 (moveHorizontal, 0.0f, moveVertical);
m_ShipRB.velocity = movement * m_Speed;
m_ShipRB.position = new Vector3 (
Mathf.Clamp (m_ShipRB.position.x, m_Boundary.m_MinX, m_Boundary.m_MaxX),
0.0f,
Mathf.Clamp (m_ShipRB.position.z, m_Boundary.m_MinZ, m_Boundary.m_MaxZ)
);
m_ShipRB.rotation = Quaternion.Euler (0.0f, 0.0f, -m_ShipRB.velocity.x * m_Tilt);
} else {
m_ShipRB.rotation = Quaternion.Euler(0.0f,0.0f,0.0f);
m_ShipRB.velocity = new Vector3(0.0f,0.0f,0.0f);
}
}
}
GameController.cs1
2
3
4
5
6
7
8
9
10
11
12
13
14
15
16
17
18
19
20
21
22
23
24
25
26
27
28
29
30
31
32
33
34
35
36
37
38
39
40
41
42
43
44
45
46
47
48
49
50
51
52
53
54
55
56
57
58
59
60
61
62
63
64
65
66
67
68
69
70
71
72
73
74
75
76
77
78
79
80
81
82
83
84
85
86
87
88
89
90
91
92
93
94
95
96
97using UnityEngine;
using System.Collections;
using UnityEngine.UI;
public class GameController : MonoBehaviour {
public GameObject m_Hazard;
public Vector3 m_SpawnValue = new Vector3(5.5f,0.0f,8.0f);
public int m_HazardCount = 4;
public float m_SpawnWait = 1.0f;
public float m_StartWait = 3.0f;
public float m_WaveWait = 4.0f;
public Text m_ScoreText;
public Text m_WinText;
public Button m_RestartButton;
public int m_WinningScore = 200;
private int m_Score = 0;
private bool m_IsGameEnd = false;
private bool m_RestartGame = false;
private AudioSource m_BackgroundAudio;
// Use this for initialization
void Start () {
StartCoroutine (SpawnAsteriod());
UpdateScore ();
m_WinText.text = "";
m_RestartButton.gameObject.SetActive (false);
m_RestartButton.onClick.AddListener (RestartGame);
m_BackgroundAudio = GetComponent<AudioSource> ();
}
void Update()
{
if (m_RestartGame) {
Debug.Log("Restart Game Now");
Application.LoadLevel(Application.loadedLevel);
}
}
public bool IsGameEnd()
{
return m_IsGameEnd;
}
private void RestartGame()
{
Debug.Log("Restart Button clicked");
m_RestartGame = true;
}
IEnumerator SpawnAsteriod(){
yield return new WaitForSeconds (m_StartWait);
while (true) {
for (int i = 0; i < m_HazardCount; i++) {
Vector3 spawnposition = new Vector3 (Random.Range (-m_SpawnValue.x, m_SpawnValue.x), 0.0f, m_SpawnValue.z);
Quaternion spawnrotation = Quaternion.identity;
Instantiate(m_Hazard,spawnposition,spawnrotation);
yield return new WaitForSeconds (m_SpawnWait);
}
yield return new WaitForSeconds (m_WaveWait);
if(m_IsGameEnd)
{
break;
}
}
}
public void AddScore(int score)
{
m_Score += score;
UpdateScore ();
}
void UpdateScore()
{
m_ScoreText.text = "Score: " + m_Score;
if (m_Score >= m_WinningScore) {
m_WinText.text = "Congratulation! You Win";
m_IsGameEnd = true;
m_RestartButton.gameObject.SetActive (true);
m_BackgroundAudio.Stop();
}
}
}
DestroyByContact.cs1
2
3
4
5
6
7
8
9
10
11
12
13
14
15
16
17
18
19
20
21
22
23
24
25
26
27
28
29
30
31
32
33
34
35
36
37
38
39
40
41
42using UnityEngine;
using System.Collections;
public class DestroyByContact : MonoBehaviour {
public GameObject m_ExplosionObject;
public GameObject m_PlayerExplosionObject;
private GameController m_GameController;
public int m_ScoreValue = 10;
void Start()
{
GameObject gamecontrollerobject = GameObject.FindGameObjectWithTag ("GameController");
if (gamecontrollerobject != null) {
m_GameController = gamecontrollerobject.GetComponent<GameController>();
}
if (m_GameController == null) {
Debug.Log("m_GameController == null");
}
}
void OnTriggerEnter(Collider other) {
if (other.tag == "Boundary") {
return ;
}
Debug.Log ("other.tag = " + other.tag);
Instantiate (m_ExplosionObject, transform.position, transform.rotation);
if (other.tag == "Player") {
Instantiate (m_PlayerExplosionObject, other.transform.position, other.transform.rotation);
}
if (other.tag == "Bullet") {
Debug.Log("Asteriod is destroied by Bullet");
m_GameController.AddScore(m_ScoreValue);
}
Destroy(other.gameObject);
Destroy (gameObject);
}
}
DestroyByTime.cs1
2
3
4
5
6
7
8
9
10
11
12using UnityEngine;
using System.Collections;
public class DestroyByTime : MonoBehaviour {
public float m_LifeTime = 5.0f;
// Use this for initialization
void Start () {
Destroy (gameObject,m_LifeTime);
}
}
GameBoundary.cs1
2
3
4
5
6
7
8
9using UnityEngine;
using System.Collections;
public class GameBoundary : MonoBehaviour {
void OnTriggerExit(Collider other) {
Destroy(other.gameObject);
}
}
Mover.cs1
2
3
4
5
6
7
8
9
10
11
12
13
14
15
16
17
18
19
20
21
22
23
24
25
26
27
28
29
30
31
32using UnityEngine;
using System.Collections;
public class Mover : MonoBehaviour {
public float m_Speed = 8;
private Rigidbody m_RigidBody;
private GameController m_GameController;
// Use this for initialization
void Start () {
m_RigidBody = GetComponent<Rigidbody> ();
m_RigidBody.velocity = transform.forward * m_Speed;
GameObject gamecontrollerobject = GameObject.FindGameObjectWithTag ("GameController");
if (gamecontrollerobject != null) {
m_GameController = gamecontrollerobject.GetComponent<GameController>();
}
if (m_GameController == null) {
Debug.Log("m_GameController == null in ShipController::Start()");
}
}
void Update(){
if (m_GameController.IsGameEnd ())
{
m_RigidBody.rotation = Quaternion.Euler(0.0f,0.0f,0.0f);
m_RigidBody.velocity = new Vector3(0.0f,0.0f,0.0f);
}
}
}
RandomRotator.cs1
2
3
4
5
6
7
8
9
10
11
12
13
14
15
16
17
18
19
20using UnityEngine;
using System.Collections;
public class RandomRotator : MonoBehaviour {
public float m_Tumble = 5;
private Rigidbody m_Rigidbody;
// Use this for initialization
void Start () {
m_Rigidbody = GetComponent<Rigidbody> ();
m_Rigidbody.angularVelocity = Random.insideUnitSphere * m_Tumble;
}
// Update is called once per frame
void Update () {
}
}
Captures
Game Play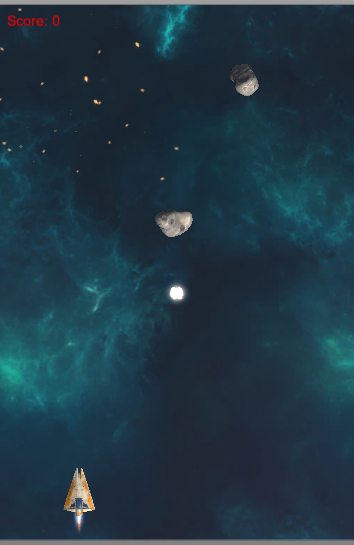
Win Game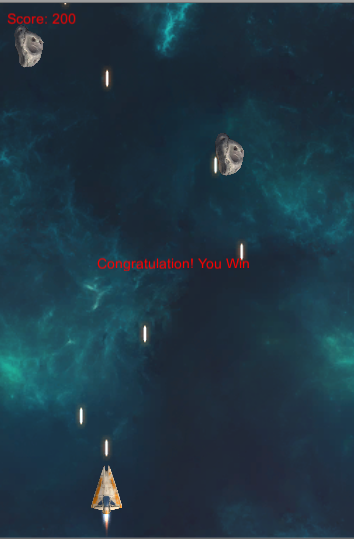
Survival Shooter
Game Introduction
固定(2.5D — isometric projection)第三人称视角游戏
Code
CameraFollow.cs1
2
3
4
5
6
7
8
9
10
11
12
13
14
15
16
17
18
19
20
21
22using UnityEngine;
using System.Collections;
public class CameraFollow : MonoBehaviour {
public Transform m_Target;
public float m_Smoothing = 5.0f;
Vector3 m_Offset;
// Use this for initialization
void Start () {
m_Offset = transform.position - m_Target.position;
}
// Update is called once per frame
void Update () {
Vector3 targetCamPos = m_Target.position + m_Offset;
transform.position = Vector3.Lerp (transform.position, targetCamPos, m_Smoothing * Time.deltaTime);
}
}
PlayerShooting.cs1
2
3
4
5
6
7
8
9
10
11
12
13
14
15
16
17
18
19
20
21
22
23
24
25
26
27
28
29
30
31
32
33
34
35
36
37
38
39
40
41
42
43
44
45
46
47
48
49
50
51
52
53
54
55
56
57
58
59
60
61
62
63
64
65
66
67
68
69
70
71
72
73
74
75
76
77
78
79
80
81
82
83
84
85
86
87using UnityEngine;
public class PlayerShooting : MonoBehaviour
{
public int damagePerShot = 20;
public float timeBetweenBullets = 0.15f;
public float range = 100f;
float timer;
Ray shootRay;
RaycastHit shootHit;
int shootableMask;
ParticleSystem gunParticles;
LineRenderer gunLine;
AudioSource gunAudio;
Light gunLight;
float effectsDisplayTime = 0.2f;
void Awake ()
{
shootableMask = LayerMask.GetMask ("Shootable");
gunParticles = GetComponent<ParticleSystem> ();
gunLine = GetComponent <LineRenderer> ();
gunAudio = GetComponent<AudioSource> ();
gunLight = GetComponent<Light> ();
}
void Update ()
{
timer += Time.deltaTime;
if(Input.GetButton ("Fire1") && timer >= timeBetweenBullets && Time.timeScale != 0)
{
Shoot ();
}
if(timer >= timeBetweenBullets * effectsDisplayTime)
{
DisableEffects ();
}
}
public void DisableEffects ()
{
gunLine.enabled = false;
gunLight.enabled = false;
}
void Shoot ()
{
timer = 0f;
gunAudio.Play ();
gunLight.enabled = true;
gunParticles.Stop ();
gunParticles.Play ();
gunLine.enabled = true;
gunLine.SetPosition (0, transform.position);
shootRay.origin = transform.position;
shootRay.direction = transform.forward;
if(Physics.Raycast (shootRay, out shootHit, range, shootableMask))
{
EnemyHealth enemyHealth = shootHit.collider.GetComponent <EnemyHealth> ();
Debug.Log("Shootting");
Debug.Log("shootHit.collider.name = " + shootHit.collider.name);
if(enemyHealth != null)
{
Debug.Log("enermyHealth != null");
enemyHealth.TakeDamage (damagePerShot, shootHit.point);
}
gunLine.SetPosition (1, shootHit.point);
}
else
{
Debug.Log("Not shot");
gunLine.SetPosition (1, shootRay.origin + shootRay.direction * range);
}
}
}
PlayerMovement.cs1
2
3
4
5
6
7
8
9
10
11
12
13
14
15
16
17
18
19
20
21
22
23
24
25
26
27
28
29
30
31
32
33
34
35
36
37
38
39
40
41
42
43
44
45
46
47
48
49
50
51
52
53
54
55
56
57
58
59
60
61
62
63
64
65
66
67using UnityEngine;
public class PlayerMovement : MonoBehaviour
{
public float m_Speed = 6.0f;
Vector3 m_Movement;
Animator m_Anim;
Rigidbody m_PlayerRigidbody;
int m_FloorMask;
float m_CamRayLength = 100.0f;
void Awake()
{
m_FloorMask = LayerMask.GetMask ("Floor");
m_Anim = GetComponent<Animator> ();
m_PlayerRigidbody = GetComponent<Rigidbody> ();
}
void FixedUpdate()
{
float h = Input.GetAxisRaw ("Horizontal");
float v = Input.GetAxisRaw ("Vertical");
Move (h, v);
Turning ();
Animating(h,v);
}
void Move(float h, float v)
{
m_Movement.Set (h, 0.0f, v);
m_Movement = m_Movement.normalized * m_Speed * Time.deltaTime;
m_PlayerRigidbody.MovePosition (transform.position + m_Movement);
}
void Turning()
{
Ray camRay = Camera.main.ScreenPointToRay (Input.mousePosition);
RaycastHit floorHit;
if(Physics.Raycast(camRay,out floorHit,m_CamRayLength, m_FloorMask))
{
Vector3 playerToMouse = floorHit.point - transform.position;
playerToMouse.y = 0.0f;
Quaternion newRotation = Quaternion.LookRotation(playerToMouse);
m_PlayerRigidbody.MoveRotation(newRotation);
}
}
void Animating(float h, float v)
{
bool walking = (h != 0.0f || v != 0.0f);
m_Anim.SetBool ("IsWalking", walking);
}
}
PlayerHealth.cs1
2
3
4
5
6
7
8
9
10
11
12
13
14
15
16
17
18
19
20
21
22
23
24
25
26
27
28
29
30
31
32
33
34
35
36
37
38
39
40
41
42
43
44
45
46
47
48
49
50
51
52
53
54
55
56
57
58
59
60
61
62
63
64
65
66
67
68
69
70
71
72
73
74
75
76
77
78
79using UnityEngine;
using UnityEngine.UI;
using System.Collections;
public class PlayerHealth : MonoBehaviour
{
public int startingHealth = 100;
public int currentHealth;
public Slider healthSlider;
public Image damageImage;
public AudioClip deathClip;
public float flashSpeed = 5f;
public Color flashColour = new Color(1f, 0f, 0f, 0.1f);
Animator anim;
AudioSource playerAudio;
PlayerMovement playerMovement;
//PlayerShooting playerShooting;
bool isDead;
bool damaged;
void Awake ()
{
anim = GetComponent <Animator> ();
playerAudio = GetComponent <AudioSource> ();
playerMovement = GetComponent <PlayerMovement> ();
//playerShooting = GetComponentInChildren <PlayerShooting> ();
currentHealth = startingHealth;
}
void Update ()
{
if(damaged)
{
damageImage.color = flashColour;
}
else
{
damageImage.color = Color.Lerp (damageImage.color, Color.clear, flashSpeed * Time.deltaTime);
}
damaged = false;
}
public void TakeDamage (int amount)
{
damaged = true;
currentHealth -= amount;
healthSlider.value = currentHealth;
playerAudio.Play ();
if(currentHealth <= 0 && !isDead)
{
Death ();
}
}
void Death ()
{
isDead = true;
//playerShooting.DisableEffects ();
anim.SetTrigger ("Die");
playerAudio.clip = deathClip;
playerAudio.Play ();
playerMovement.enabled = false;
//playerShooting.enabled = false;
}
public void RestartLevel ()
{
Application.LoadLevel (Application.loadedLevel);
}
}
EnemyMovement.cs1
2
3
4
5
6
7
8
9
10
11
12
13
14
15
16
17
18
19
20
21
22
23
24
25
26
27
28
29
30using UnityEngine;
using System.Collections;
public class EnemyMovement : MonoBehaviour
{
Transform player;
PlayerHealth playerHealth;
EnemyHealth enemyHealth;
NavMeshAgent nav;
void Awake ()
{
player = GameObject.FindGameObjectWithTag ("Player").transform;
playerHealth = player.GetComponent <PlayerHealth> ();
enemyHealth = GetComponent <EnemyHealth> ();
nav = GetComponent <NavMeshAgent> ();
}
void Update ()
{
if(enemyHealth.currentHealth > 0 && playerHealth.currentHealth > 0)
{
nav.SetDestination (player.position);
}
else
{
nav.enabled = false;
}
}
}
EnemyHealth.cs1
2
3
4
5
6
7
8
9
10
11
12
13
14
15
16
17
18
19
20
21
22
23
24
25
26
27
28
29
30
31
32
33
34
35
36
37
38
39
40
41
42
43
44
45
46
47
48
49
50
51
52
53
54
55
56
57
58
59
60
61
62
63
64
65
66
67
68
69
70
71
72
73
74
75
76using UnityEngine;
public class EnemyHealth : MonoBehaviour
{
public int startingHealth = 100;
public int currentHealth;
public float sinkSpeed = 2.5f;
public int scoreValue = 10;
public AudioClip deathClip;
Animator anim;
AudioSource enemyAudio;
ParticleSystem hitParticles;
CapsuleCollider capsuleCollider;
bool isDead;
bool isSinking;
void Awake ()
{
anim = GetComponent <Animator> ();
enemyAudio = GetComponent <AudioSource> ();
hitParticles = GetComponentInChildren <ParticleSystem> ();
capsuleCollider = GetComponent <CapsuleCollider> ();
currentHealth = startingHealth;
isDead = false;
}
void Update ()
{
if(isSinking)
{
transform.Translate (-Vector3.up * sinkSpeed * Time.deltaTime);
}
}
public void TakeDamage (int amount, Vector3 hitPoint)
{
Debug.Log ("isDead = " + isDead);
if(isDead)
return;
enemyAudio.Play ();
currentHealth -= amount;
hitParticles.transform.position = hitPoint;
hitParticles.Play();
if(currentHealth <= 0)
{
Death ();
}
}
void Death ()
{
isDead = true;
capsuleCollider.isTrigger = true;
anim.SetTrigger ("Dead");
enemyAudio.clip = deathClip;
enemyAudio.Play ();
}
public void StartSinking ()
{
GetComponent <NavMeshAgent> ().enabled = false;
GetComponent <Rigidbody> ().isKinematic = true;
isSinking = true;
ScoreManager.score += scoreValue;
Destroy (gameObject, 2f);
}
}
EnemyAttack.cs1
2
3
4
5
6
7
8
9
10
11
12
13
14
15
16
17
18
19
20
21
22
23
24
25
26
27
28
29
30
31
32
33
34
35
36
37
38
39
40
41
42
43
44
45
46
47
48
49
50
51
52
53
54
55
56
57
58
59
60
61
62
63
64
65
66
67
68
69
70
71
72
73
74
75
76
77
78
79
80
81
82using UnityEngine;
using System.Collections;
public class EnemyAttack : MonoBehaviour
{
public float timeBetweenAttacks = 0.5f;
public int attackDamage = 10;
public float validAttackDistance = 1.0f;
Animator anim;
GameObject player;
PlayerHealth playerHealth;
EnemyHealth enemyHealth;
bool playerInRange;
float timer;
void Awake ()
{
player = GameObject.FindGameObjectWithTag ("Player");
playerHealth = player.GetComponent <PlayerHealth> ();
enemyHealth = GetComponent<EnemyHealth>();
anim = GetComponent <Animator> ();
}
/*
void OnTriggerEnter (Collider other)
{
if(other.gameObject == player)
{
playerInRange = true;
}
}
void OnTriggerExit (Collider other)
{
if(other.gameObject == player)
{
playerInRange = false;
}
}
*/
void OnCollisionEnter(Collision collision) {
if(collision.gameObject == player)
{
playerInRange = true;
}
}
void OnCollisionExit(Collision collision) {
if(collision.gameObject == player)
{
playerInRange = false;
}
}
void Update ()
{
timer += Time.deltaTime;
if(timer >= timeBetweenAttacks && playerInRange && enemyHealth.currentHealth > 0)
{
Attack ();
}
if(playerHealth.currentHealth <= 0)
{
anim.SetTrigger ("PlayerDead");
}
}
void Attack ()
{
timer = 0f;
if(playerHealth.currentHealth > 0)
{
playerHealth.TakeDamage (attackDamage);
}
}
}
ScoreManager.cs1
2
3
4
5
6
7
8
9
10
11
12
13
14
15
16
17
18
19
20
21using UnityEngine;
using UnityEngine.UI;
using System.Collections;
public class ScoreManager : MonoBehaviour
{
public static int score;
Text text;
void Awake ()
{
text = GetComponent <Text> ();
score = 0;
}
void Update ()
{
text.text = "Score: " + score;
}
}
EnemyManager.cs1
2
3
4
5
6
7
8
9
10
11
12
13
14
15
16
17
18
19
20
21
22
23
24
25
26using UnityEngine;
public class EnemyManager : MonoBehaviour
{
public PlayerHealth playerHealth;
public GameObject enemy;
public float spawnTime = 3f;
public Transform[] spawnPoints;
void Start ()
{
InvokeRepeating ("Spawn", spawnTime, spawnTime);
}
void Spawn ()
{
if(playerHealth.currentHealth <= 0f)
{
return;
}
int spawnPointIndex = Random.Range (0, spawnPoints.Length);
Instantiate (enemy, spawnPoints[spawnPointIndex].position, spawnPoints[spawnPointIndex].rotation);
}
}
GameOverManager.cs1
2
3
4
5
6
7
8
9
10
11
12
13
14
15
16
17
18
19
20
21
22using UnityEngine;
public class GameOverManager : MonoBehaviour
{
public PlayerHealth playerHealth;
Animator anim;
void Awake()
{
anim = GetComponent<Animator>();
}
void Update()
{
Debug.Log ("playerHealth.currentHealth = " + playerHealth.currentHealth);
if (playerHealth.currentHealth <= 0)
{
anim.SetTrigger("GameOver");
}
}
}
Captures
Game(因为一些原因没有截图)
图片来源
2D-ROGUELIKE-TUTORIAL
Game Introduction
Over the course of the project will create procedural tile based levels, implement turn based movement, add a hunger system, audio and mobile touch controls.
Code
BoardManager.cs1
2
3
4
5
6
7
8
9
10
11
12
13
14
15
16
17
18
19
20
21
22
23
24
25
26
27
28
29
30
31
32
33
34
35
36
37
38
39
40
41
42
43
44
45
46
47
48
49
50
51
52
53
54
55
56
57
58
59
60
61
62
63
64
65
66
67
68
69
70
71
72
73
74
75
76
77
78
79
80
81
82
83
84
85
86
87
88
89
90
91
92
93
94
95
96using UnityEngine;
using System;
using System.Collections.Generic;
using Random = UnityEngine.Random;
public class BoardManager : MonoBehaviour {
[Serializable]
public class Count
{
public int minimum;
public int maximum;
public Count(int min, int max)
{
minimum = min;
maximum = max;
}
}
public int columns = 8;
public int rows = 8;
public Count wallCount = new Count(5,9);
public Count foodCount = new Count(1,5);
public GameObject exit;
public GameObject[] floorTiles;
public GameObject[] wallTiles;
public GameObject[] foodTiles;
public GameObject[] enemyTiles;
public GameObject[] outerwallTiles;
private Transform boardHolder;
private List<Vector3> gridPositions = new List<Vector3>();
void InitialiseList()
{
gridPositions.Clear ();
for (int x = 1; x < columns - 1; x++)
{
for(int y = 1; y < rows - 1; y++)
{
gridPositions.Add(new Vector3(x,y,0f));
}
}
}
void BoardSetup()
{
boardHolder = new GameObject ("Board").transform;
for(int x = -1; x < columns + 1; x++)
{
for(int y = -1; y < rows + 1; y++)
{
GameObject toInstantiate = floorTiles[Random.Range (0,floorTiles.Length)];
if(x == -1 || x == columns || y == -1 || y == rows)
{
toInstantiate = outerwallTiles[Random.Range(0,outerwallTiles.Length)];
}
GameObject instance = Instantiate (toInstantiate, new Vector3(x,y,0f),Quaternion.identity) as GameObject;
instance.transform.SetParent(boardHolder);
}
}
}
Vector3 RandomPosition()
{
int randomIndex = Random.Range (0, gridPositions.Count);
Vector3 randomPosition = gridPositions [randomIndex];
gridPositions.RemoveAt(randomIndex);
return randomPosition;
}
void LayoutObjectAtRandom(GameObject[] tileArray, int minimum, int maximum)
{
int objectCount = Random.Range (minimum, maximum + 1);
for (int i = 0; i < objectCount; i++) {
Vector3 randomPosition = RandomPosition();
GameObject tileChoice = tileArray[Random.Range (0, tileArray.Length)];
Instantiate(tileChoice, randomPosition, Quaternion.identity);
}
}
public void SetupScene(int level)
{
BoardSetup ();
InitialiseList ();
LayoutObjectAtRandom (wallTiles, wallCount.minimum, wallCount.maximum);
LayoutObjectAtRandom (foodTiles, foodCount.minimum, foodCount.maximum);
int enemyCount = (int)Mathf.Log (level, 2f);
LayoutObjectAtRandom (enemyTiles, enemyCount, enemyCount);
Instantiate (exit, new Vector3 (columns - 1, rows - 1, 0f), Quaternion.identity);
}
}
GameManager.cs1
2
3
4
5
6
7
8
9
10
11
12
13
14
15
16
17
18
19
20
21
22
23
24
25
26
27
28
29
30
31
32
33
34
35
36
37
38
39
40
41
42
43
44
45
46
47
48
49
50
51
52
53
54
55
56
57
58
59
60
61
62
63
64
65
66
67
68
69
70
71
72
73
74
75
76
77
78
79
80
81
82
83
84
85
86
87
88
89
90
91
92
93
94
95
96
97
98
99
100
101
102
103
104
105
106
107
108
109
110
111using UnityEngine;
using System.Collections;
using System.Collections.Generic;
using UnityEngine.UI;
public class GameManager : MonoBehaviour {
public float levelStartDelay = 2f;
public float turnDelay = 0.1f;
public static GameManager instance = null;
public BoardManager boardScript;
public int playerFoodPoints = 30;
[HideInInspector]public bool playerTurn = true;
private Text levelText;
private GameObject levelImage;
private int level = 1;
private bool doingSetup;
private List<Enemy> enemies;
private bool enemiesMoving;
void Awake()
{
if (instance == null)
{
instance = this;
} else if (instance != this)
{
Destroy (gameObject);
}
DontDestroyOnLoad(gameObject);
enemies = new List<Enemy> ();
boardScript = GetComponent<BoardManager> ();
InitGame ();
}
private void OnLevelWasLoaded(int index)
{
level++;
InitGame ();
}
void InitGame()
{
doingSetup = true;
levelImage = GameObject.Find ("LevelImage");
levelText = GameObject.Find ("LevelText").GetComponent<Text> ();
levelText.text = "Day " + level;
levelImage.SetActive (true);
Invoke ("HideLevelImage", levelStartDelay);
enemies.Clear ();
boardScript.SetupScene (level);
}
private void HideLevelImage()
{
levelImage.SetActive (false);
doingSetup = false;
}
public void GameOver()
{
levelText.text = "After " + level + " days, you starved.";
levelImage.SetActive (true);
enabled = false;
}
// Update is called once per frame
void Update () {
if (playerTurn || enemiesMoving || doingSetup ) {
return ;
}
StartCoroutine (MoveEnemies ());
}
public void AddEnemyToList(Enemy script)
{
enemies.Add (script);
}
IEnumerator MoveEnemies()
{
enemiesMoving = true;
yield return new WaitForSeconds(turnDelay);
if (enemies.Count == 0) {
yield return new WaitForSeconds(turnDelay);
}
for (int i = 0; i < enemies.Count; i++) {
enemies[i].MoveEnemy();
yield return new WaitForSeconds(turnDelay);
}
Debug.Log ("GameManager::MoveEnemies");
playerTurn = true;
enemiesMoving = false;
}
}
MovingObject.cs1
2
BoardManager.cs1
2
3
4
5
6
7
8
9
10
11
12
13
14
15
16
17
18
19
20
21
22
23
24
25
26
27
28
29
30
31
32
33
34
35
36
37
38
39
40
41
42
43
44
45
46
47
48
49
50
51
52
53
54
55
56
57
58
59
60
61
62
63
64
65
66using UnityEngine;
using System.Collections;
public abstract class MovingObject : MonoBehaviour {
public float moveTime = 0.1f;
public LayerMask blockingLayer;
private BoxCollider2D BoxCollider;
private Rigidbody2D rb2D;
private float inverseMoveTime;
// Use this for initialization
protected virtual void Start () {
BoxCollider = GetComponent<BoxCollider2D> ();
rb2D = GetComponent<Rigidbody2D> ();
inverseMoveTime = 1f / moveTime;
}
protected bool Move(int xDir, int yDir, out RaycastHit2D hit)
{
Vector2 start = transform.position;
Vector2 end = start + new Vector2 (xDir, yDir);
BoxCollider.enabled = false;
hit = Physics2D.Linecast (start, end, blockingLayer);
BoxCollider.enabled = true;
if( hit.transform == null)
{
StartCoroutine(SmoothMovement(end));
return true;
}
return false;
}
protected IEnumerator SmoothMovement(Vector3 end)
{
float sqrRemainingDistance = (transform.position - end).sqrMagnitude;
while (sqrRemainingDistance > float.Epsilon) {
Vector3 newPosition = Vector3.MoveTowards(rb2D.position, end, inverseMoveTime * Time.deltaTime);
rb2D.MovePosition(newPosition);
sqrRemainingDistance = (transform.position - end).sqrMagnitude;
yield return null;
}
}
protected virtual void AttemptMove<T>(int xDir, int yDir) where T : Component
{
RaycastHit2D hit;
bool canMove = Move (xDir, yDir, out hit);
if (hit.transform == null) {
return ;
}
T hitComponent = hit.transform.GetComponent<T> ();
if (!canMove && hitComponent != null) {
OnCanMove(hitComponent);
}
}
protected abstract void OnCanMove<T>(T component) where T : Component;
}
Player.cs1
2
3
4
5
6
7
8
9
10
11
12
13
14
15
16
17
18
19
20
21
22
23
24
25
26
27
28
29
30
31
32
33
34
35
36
37
38
39
40
41
42
43
44
45
46
47
48
49
50
51
52
53
54
55
56
57
58
59
60
61
62
63
64
65
66
67
68
69
70
71
72
73
74
75
76
77
78
79
80
81
82
83
84
85
86
87
88
89
90
91
92
93
94
95
96
97
98
99
100
101
102
103
104
105
106
107
108
109
110
111
112
113
114
115
116
117
118
119
120
121
122
123
124
125
126
127
128
129
130
131
132
133
134
135
136
137
138
139
140
141
142
143
144
145
146
147
148
149
150
151
152
153
154
155
156
157
158using UnityEngine;
using System.Collections;
using UnityEngine.UI;
public class Player : MovingObject {
public int wallDamage = 1;
public int pointsPerFood = 10;
public int pointsPerSoda = 20;
public float restartLevelDelay = 1f;
public Text foodText;
public AudioClip moveSound1;
public AudioClip moveSound2;
public AudioClip eatSound1;
public AudioClip eatSound2;
public AudioClip drinkSound1;
public AudioClip drinkSound2;
public AudioClip gameOverSound;
private Animator animator;
private int food;
private Vector2 touchOrigin = -Vector2.one;
protected override void Start()
{
foodText.text = "Food:" + food;
animator = GetComponent<Animator> ();
food = GameManager.instance.playerFoodPoints;
base.Start();
}
private void OnDisable()
{
GameManager.instance.playerFoodPoints = food;
}
// Update is called once per frame
void Update () {
if (!GameManager.instance.playerTurn) {
return ;
}
Debug.Log ("Player::Update() called");
int horizontal = 0;
int vertical = 0;
#if UNITY_EDITOR || UNITY_STANDLONE || UNITY_WEBPLAYER
horizontal = (int)Input.GetAxisRaw ("Horizontal");
vertical = (int)Input.GetAxisRaw ("Vertical");
if (horizontal != 0) {
vertical = 0;
}
#else
if(Input.touchCount > 0)
{
Touch myTouch = Input.touches[0];
if(myTouch.phase == TouchPhase.Began)
{
touchOrigin = myTouch.position;
}
else if(myTouch.phase == TouchPhase.Ended && touchOrigin.x >= 0)
{
Vector2 touchEnd = myTouch.position;
float x = touchEnd.x - touchOrigin.x;
float y = touchEnd.y - touchOrigin.y;
touchOrigin.x = -1;
if(Mathf.Abs(x) > Mathf.Abs(y))
{
horizontal = x > 0 ? 1 : -1;
}
else
{
vertical = y > 0 ? 1 : -1;
}
}
}
#endif
if (horizontal != 0 || vertical != 0 ) {
AttemptMove<Wall>(horizontal, vertical);
}
}
protected override void AttemptMove<T>(int xDir, int yDir)
{
food--;
foodText.text = "Food:" + food;
base.AttemptMove<T> (xDir, yDir);
RaycastHit2D hit;
if(Move (xDir, yDir, out hit))
{
SoundManager.instance.RandomizeSfx(moveSound1,moveSound2);
}
CheckIfGameOver ();
GameManager.instance.playerTurn = false;
}
private void OnTriggerEnter2D(Collider2D other)
{
if (other.tag == "Exit") {
Invoke ("Restart", restartLevelDelay);
enabled = false;
} else if (other.tag == "Food") {
food += pointsPerFood;
other.gameObject.SetActive(false);
foodText.text = "+:" + pointsPerFood + "Food: " + food;
SoundManager.instance.RandomizeSfx(drinkSound1,drinkSound2);
} else if (other.tag == "Soda") {
food += pointsPerSoda;
other.gameObject.SetActive(false);
foodText.text = "+:" + pointsPerSoda + "Food: " + food;
SoundManager.instance.RandomizeSfx(drinkSound1,drinkSound2);
}
}
protected override void OnCanMove<T>(T component)
{
Wall hitWall = component as Wall;
hitWall.DamageWall (wallDamage);
animator.SetTrigger ("PlayerChop");
}
private void Restart()
{
Application.LoadLevel (Application.loadedLevel);
}
public void LoseFood(int loss)
{
animator.SetTrigger ("PlayerHit");
food -= loss;
foodText.text = "-:" + loss + "Food: " + food;
CheckIfGameOver();
}
private void CheckIfGameOver()
{
if (food <= 0) {
SoundManager.instance.PlaySingle(gameOverSound);
SoundManager.instance.musicSource.Stop();
GameManager.instance.GameOver();
}
}
}
Enemy.cs1
2
3
4
5
6
7
8
9
10
11
12
13
14
15
16
17
18
19
20
21
22
23
24
25
26
27
28
29
30
31
32
33
34
35
36
37
38
39
40
41
42
43
44
45
46
47
48
49
50
51
52
53
54
55
56
57
58using UnityEngine;
using System.Collections;
public class Enemy : MovingObject {
public int playerDamager;
private Animator animator;
private Transform target;
private bool skipMove;
public AudioClip enemyAttack1;
public AudioClip enemyAttack2;
protected override void Start () {
GameManager.instance.AddEnemyToList (this);
animator = GetComponent<Animator> ();
target = GameObject.FindGameObjectWithTag ("Player").transform;
base.Start ();
}
protected override void AttemptMove<T>(int xDir, int yDir)
{
if (skipMove) {
skipMove = false;
return;
}
base.AttemptMove<T> (xDir, yDir);
skipMove = true;
}
public void MoveEnemy()
{
int xDir = 0;
int yDir = 0;
if (Mathf.Abs (target.position.x - transform.position.x) < float.Epsilon) {
yDir = target.position.y > transform.position.y ? 1 : -1;
} else {
xDir = target.position.x > transform.position.x ? 1 : -1;
}
AttemptMove<Player> (xDir, yDir);
}
protected override void OnCanMove<T>(T component)
{
Player hitPlayer = component as Player;
animator.SetTrigger ("enemyAttack");
hitPlayer.LoseFood (playerDamager);
SoundManager.instance.RandomizeSfx (enemyAttack1, enemyAttack2);
}
}
SoundManager.cs1
2
3
4
5
6
7
8
9
10
11
12
13
14
15
16
17
18
19
20
21
22
23
24
25
26
27
28
29
30
31
32
33
34
35
36
37
38
39
40
41
42
43
44
45
46
47
48using UnityEngine;
using System.Collections;
public class SoundManager : MonoBehaviour {
public AudioSource efxSource;
public AudioSource musicSource;
public static SoundManager instance = null;
public float lowPitchRange = 0.95f;
public float highPitchRange = 1.05f;
void Awake()
{
if (instance == null) {
instance = this;
} else if (instance != this) {
Destroy(gameObject);
}
DontDestroyOnLoad (gameObject);
}
public void PlaySingle(AudioClip clip)
{
efxSource.clip = clip;
efxSource.Play ();
}
public void RandomizeSfx(params AudioClip[] clips)
{
int randomIndex = Random.Range (0, clips.Length);
float randomPitch = Random.Range (lowPitchRange, highPitchRange);
efxSource.pitch = randomPitch;
efxSource.clip = clips [randomIndex];
efxSource.Play ();
}
// Use this for initialization
void Start () {
}
// Update is called once per frame
void Update () {
}
}
Wall.cs1
2
3
4
5
6
7
8
9
10
11
12
13
14
15
16
17
18
19
20
21
22
23
24
25
26
27
28
29using UnityEngine;
using System.Collections;
public class Wall : MonoBehaviour {
public Sprite dmgSprite;
public int hp = 4;
private SpriteRenderer spriteRenderer;
public AudioClip wallChop1;
public AudioClip wallChop2;
void Awake()
{
spriteRenderer = GetComponent<SpriteRenderer> ();
}
public void DamageWall(int loss)
{
spriteRenderer.sprite = dmgSprite;
hp -= loss;
SoundManager.instance.RandomizeSfx (wallChop1, wallChop2);
if (hp <= 0) {
gameObject.SetActive(false);
}
}
}
Loder.cs1
2
3
4
5
6
7
8
9
10
11
12
13
14
15
16
17
18
19
20using UnityEngine;
using System.Collections;
public class Loader : MonoBehaviour {
public GameObject gameManager;
void Awake()
{
if (GameManager.instance == null)
{
Instantiate (gameManager);
}
}
// Update is called once per frame
void Update () {
}
}
Captures
Game Start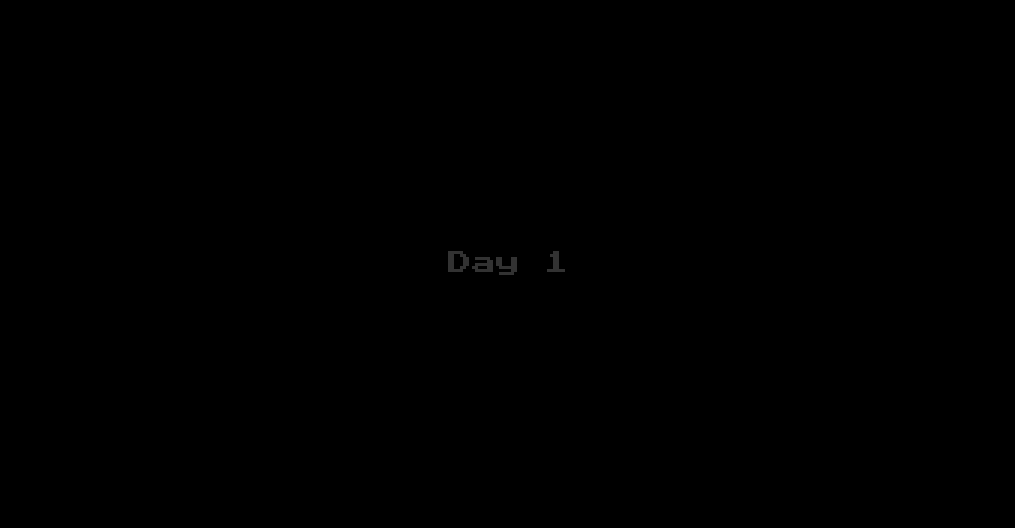
Game Play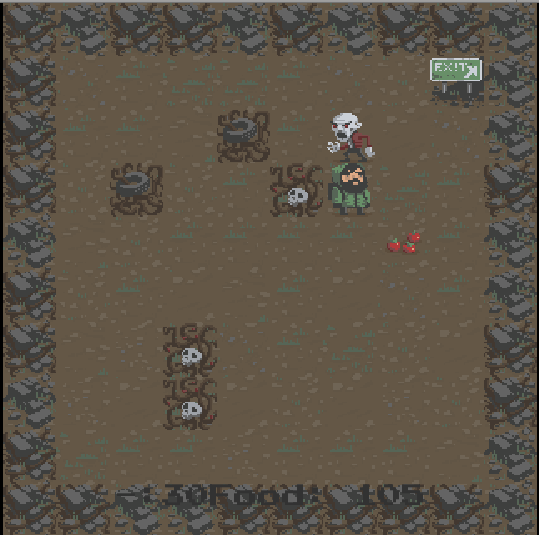
lose Game
Particle System
依然从What,Why,How这三个点来学习理解Particle System,最后在学习理解的基础上,来理解如何抽象Particle System在AB资源中的加载管理。
What
Particles are small, simple images or meshes that are displayed and moved in great numbers by a particle system.(粒子系统控制成千上万的粒子(粒子是很小很简单的image或者meshes组成)显示与移动)
上一张图来看下Particle System的组成: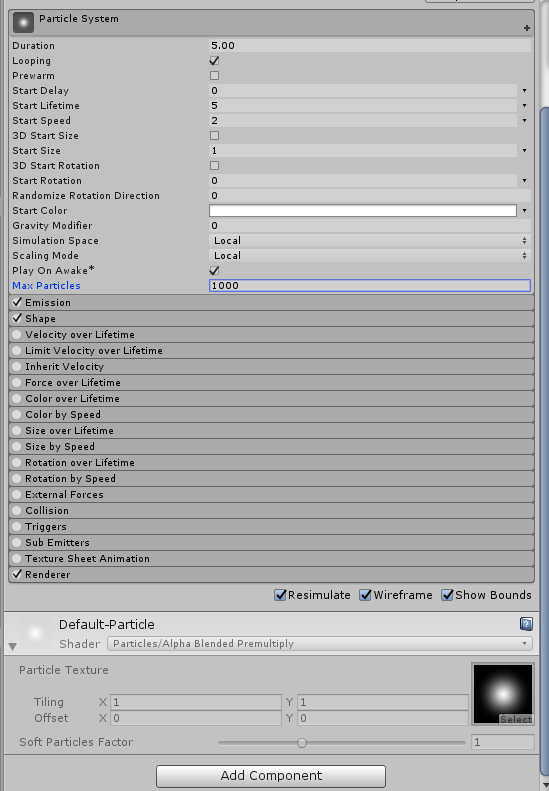
可以看到Particle System由很多部分控制组成,这里我直接关注最后一个Module,Renderer Module,因为这是影响粒子效果最终显示结果最重要的模块。
Renderer Module组成: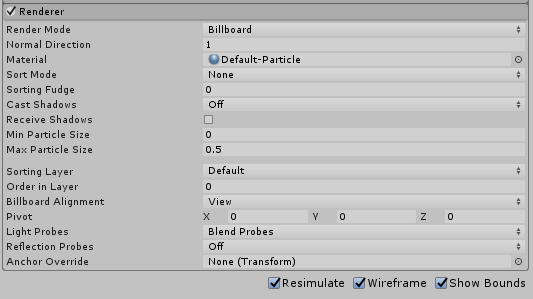
可以看到Renderer Module控制了Particle System底层用到的Material,以及显示模式等。如果我们要使用自己的Material以及Shader去实现特定的粒子效果,那么要修改的地方正是Renderer Module。
Note:
大部分粒子效果都是通过Billboard来展示的(e.g. 烟,火,雪,雾等),因为这些对于玩家视觉效果而言通过billboard展示和纯3D模拟展示区别并不大,但billboard能降低CPU和GPU性能开销。
Why
There are other entities in games, however, that are fluid and intangible in nature and consequently difficult to portray using meshes or sprites. For effects like moving liquids, smoke, clouds, flames and magic spells, a different approach to graphics known as particle systems can be used to capture the inherent fluidity and energy. (粒子系统是为了实现那些Sprite以及Mesh不好模拟表现的效果,比如烟雾,云,液体等效果。粒子系统本质还是基于Image或者Mesh。)
How
在Unity里创建一个Particle System很简单,GameObject > Effects > Particle System或者直接给GameObject添加Particle System组件即可。
待续
Note:
粒子系统依然可以添加Animator去做粒子系统的帧动画属性控制。参考:Using Particle Systems in Unity — Animation bindings
Using in AB
待续
Animation System
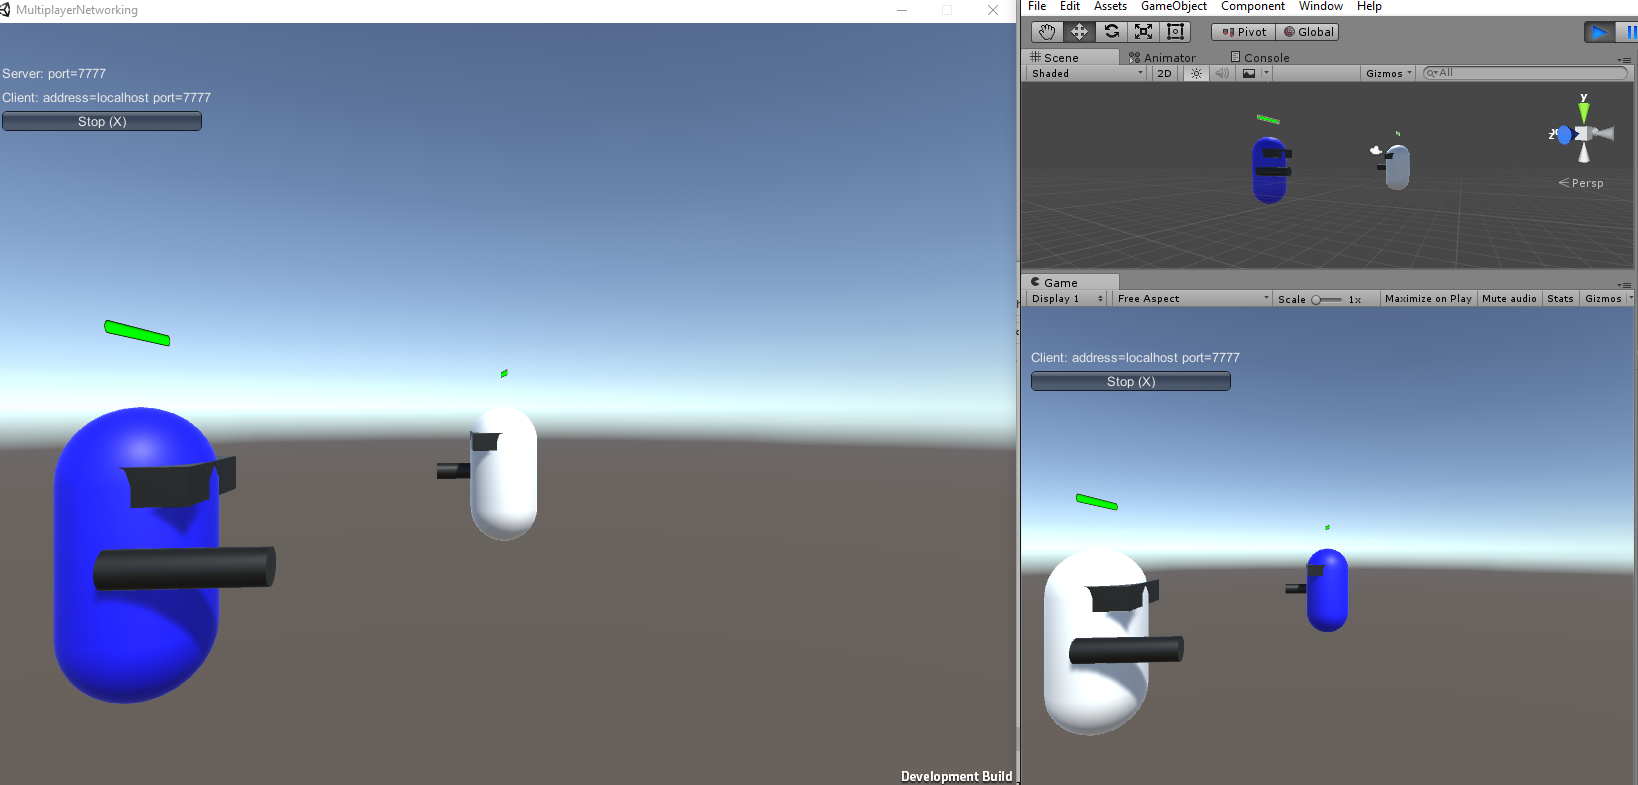
Multiplayer Networking
这里采用HLAPI(Hight Level API)来制作简单的Multiplayer Networking Game。
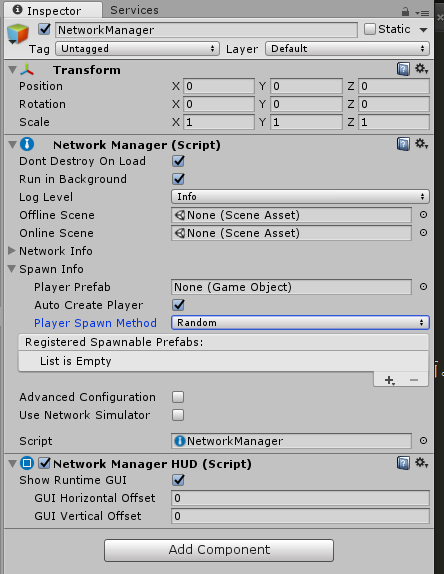
我们需要通过NetworkkManager去管理网络状态。
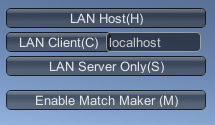
- 创建一个Empty Object改名为NetworkManager,然后Add NetworkManager Component到上面。 同时添加一个NetworkManagerHUD Component用于显示对NetworkManager简单控制的UI。
- 创建我们的Player Prefab(用于代表我们的Player)
这里简单的创建一个Capsule 和Cube GameObject简单制作一个Player Prefab
添加NetworkIdentity到Player上用于表示Player,并勾上Local Player Autority。
然后创建prefab并保存。
The NetworkIdentity identifies objects across the network, between server and clients. The NetworkIdentity is used to synchronize information in the object with the network.
Player Object They represent the player on the server and so have the ability to run commands (which are secure client-to-server remote procedure calls) from the player’s client. In this server authoritative system, other non-player server side objects do not have the capability to receive commands directly from objects on clients.
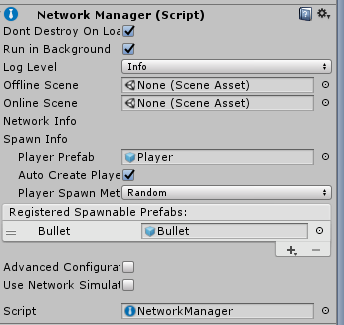
可以看出NetworkIdentity用于在Server和Clients之间标识对象,同步信息。这样一来Player就具有了从client在server上远程执行commands的能力,就可以通过Client来控制Player Object了。 - Registering The Player Prefab
在Client控制Player Object之前,我们需要去注册该Player Prefab到Network Manager,然后Network Manager会去负责在Server和Client端Spawn Object。
把Player Prefab设置到Network Manager的Player Prefab参数上。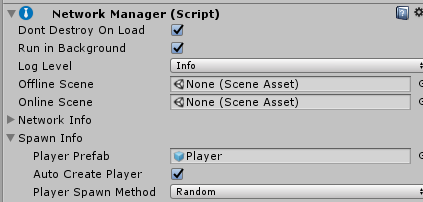
Note:
Only the server should create instances of objects which have NetworkIdentity as otherwise they will not be properly connected to the system.(只有server可以创建含NetworkIdentity的实例对象,否则无法正常连接到server system) Creating Player Movement(Single Player)
在通过server远程执行commands控制Player移动之前,我们先编写简单的控制逻辑用于本地的移动。
挂载PlayerController.cs到Player Prefab上。1
2
3
4
5
6
7
8
9
10
11
12
13
14
15
16
17using UnityEngine;
using System.Collections;
public class PlayerController : MonoBehaviour {
public float mRotateSpeed = 150.0f;
public float mMoveSpeed = 3.0f;
void Update () {
var x = Input.GetAxis("Horizontal") * Time.deltaTime * mRotateSpeed;
var z = Input.GetAxis("Vertical") * Time.deltaTime * mMoveSpeed;
transform.Rotate(0, x, 0);
transform.Translate(0, 0, z);
}
}Testing Player Movement Online
支持Player Prefab单机控制后,让我们看看如何实现通过Online控制。
首先通过NetworkManagerHUD去把本机作为Host,点击LAN Host(H)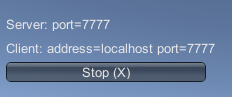
开启host后NetworkManager会自动根据设定的Player Prefab去创建一个。
为了测试我们需要运行两个游戏程序,一个作为Host,一个作为Client。
先打包发布PC办。
运行PC版作为Host。(点击LAN Hosts(H))
然后运行Editor版作为Client进行连接。(点击LAN Client)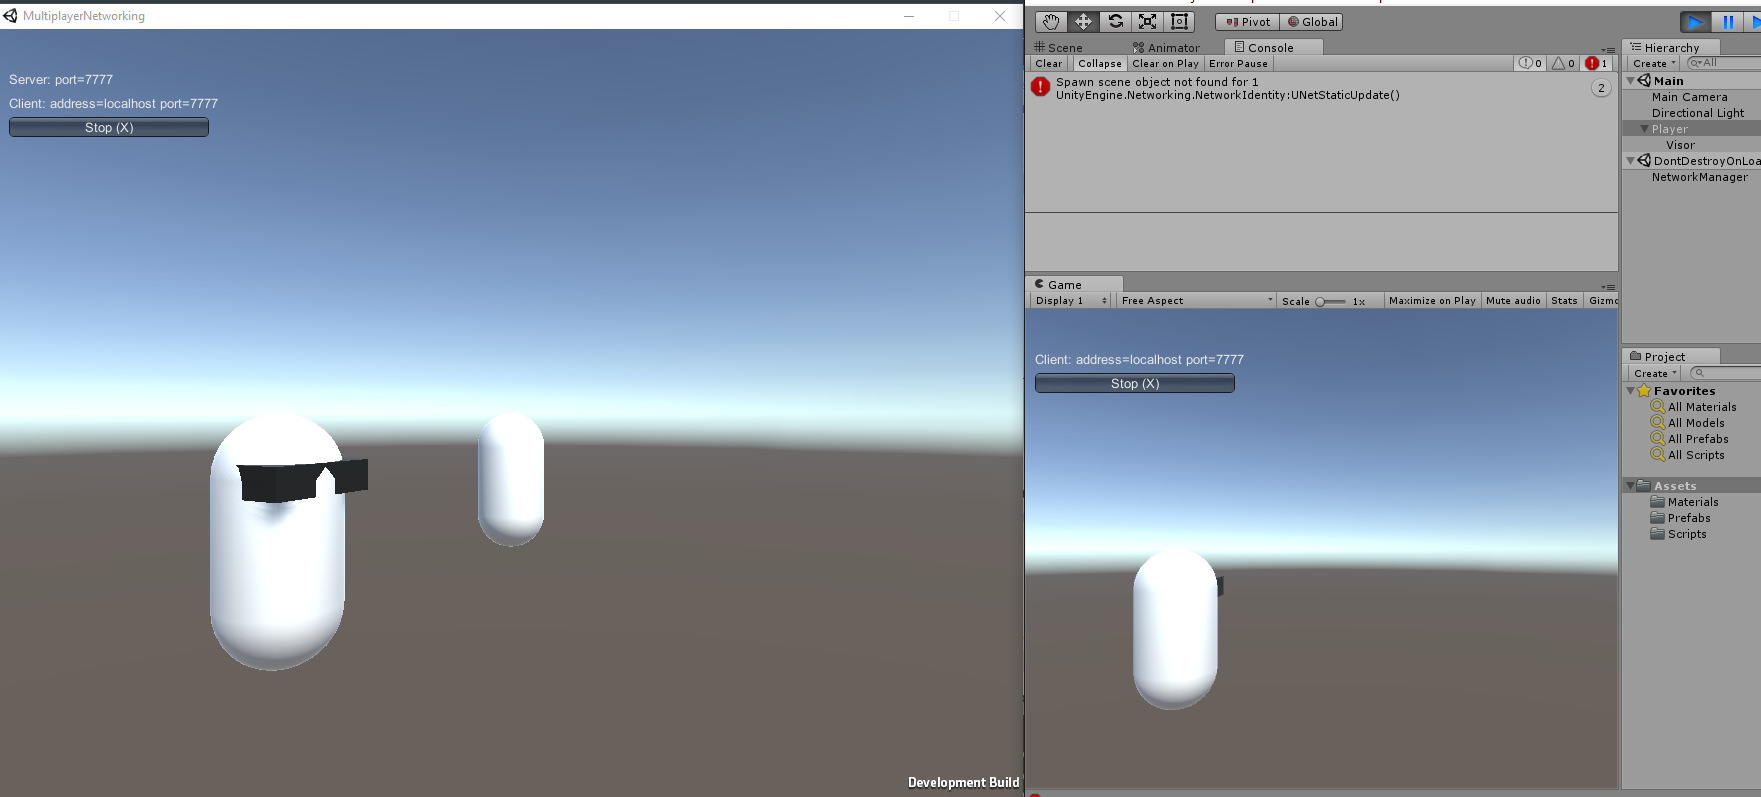
在Server一侧出现了两个Player Prefab创建的对象,但在Server一侧控制的时候会控制两个物体的移动,并且在Client一侧控制并不会影响到Server一侧。
这是因为PlayerController脚本还没有network-aware(通过NetworkBehaviour在去获取network相关的一些信息去区分Server和Client等)。
所以我们还需要使Client与Host通过NetworkManager进行数据同步。- Networking Player Movement
要使PlayerController脚本network-aware,我们需要使PlayerController继承至NetworkBehaviour(所有需要networking features(receive various callback, automatically synchronize state from server-to-client……)的对象都应该继承至NetworkBehaviour)
The LocalPlayer is the player GameObject “owned” by the local Client. This ownership is set by the NetworkManager when a Client connects to the Server and new player GameObjects are created from the player prefab. When a Client connects to the Server, the instance created on the local client is marked as the LocalPlayer.
可以看出当Client连接到Server的时候,NetworkManager会把新生成的Player GameObject标记为Client的LocalPlayer,然后通过isLocalPlayer去判断是否是本地控制的对象,这样一来解决了同时控制了其他Player物体的问题。
但是Client和Server之间Player数据的同步还没有解决。
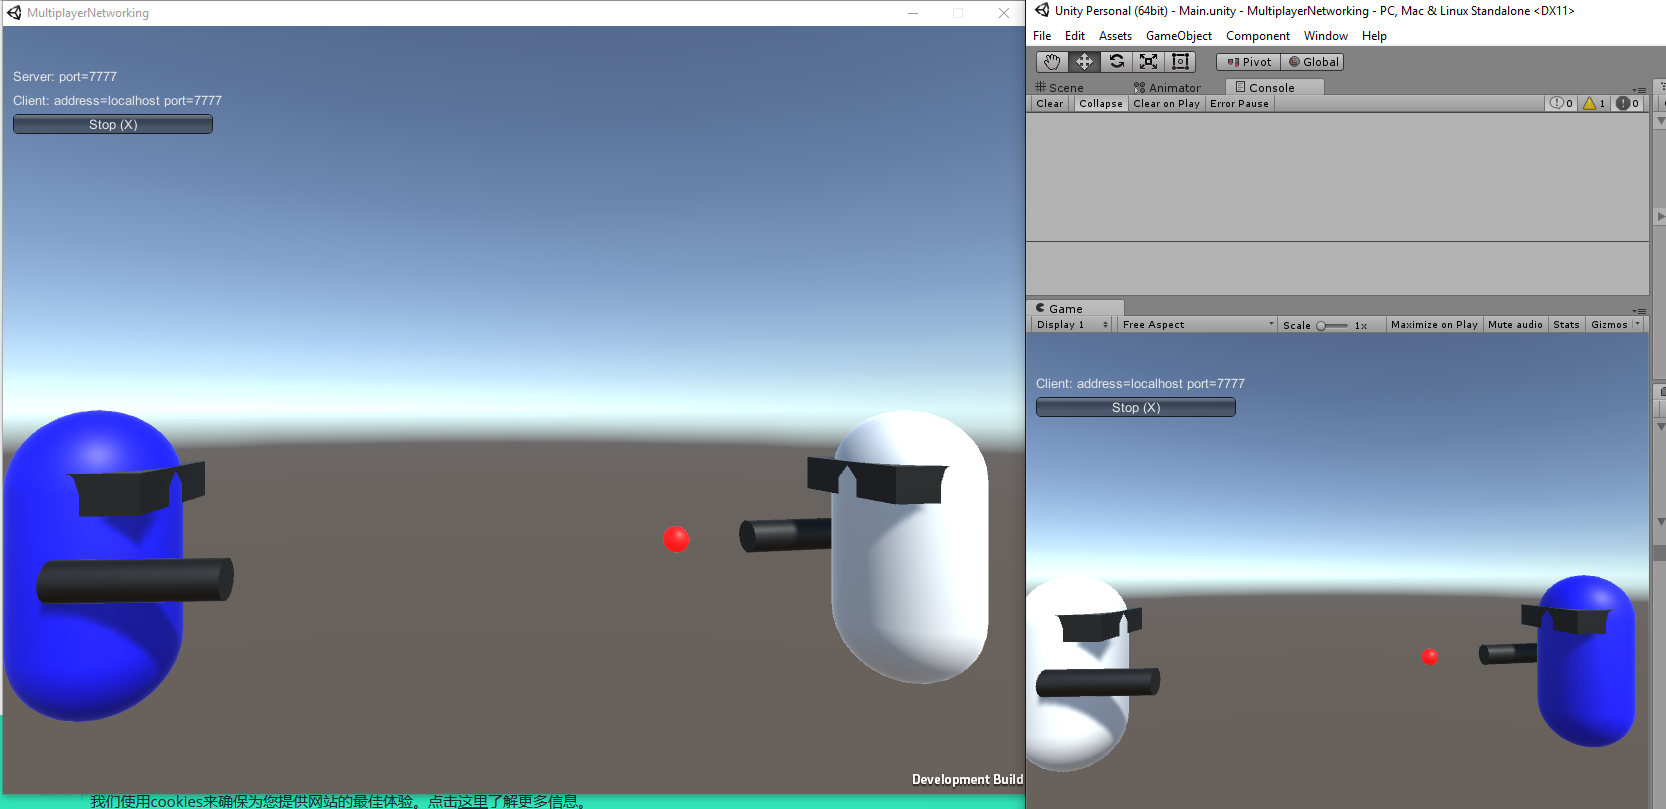
在Player Prefab上我们需要挂载NetworkTransform component,NetworkTransform 回去负责GameObject的trasnform同步。 - Testing Multiplayer Movement
再次发布PC版,运行PC版作为Server,Editor版作为Client测试。
这遇到个错误”Spawn scene object not found for 1
UnityEngine.Networking.NetworkIdentity:UNetStaticUpdate()”
根据这里的讨论重新制作Prefab和挂载居然能解决问题,感觉是Unity的bug。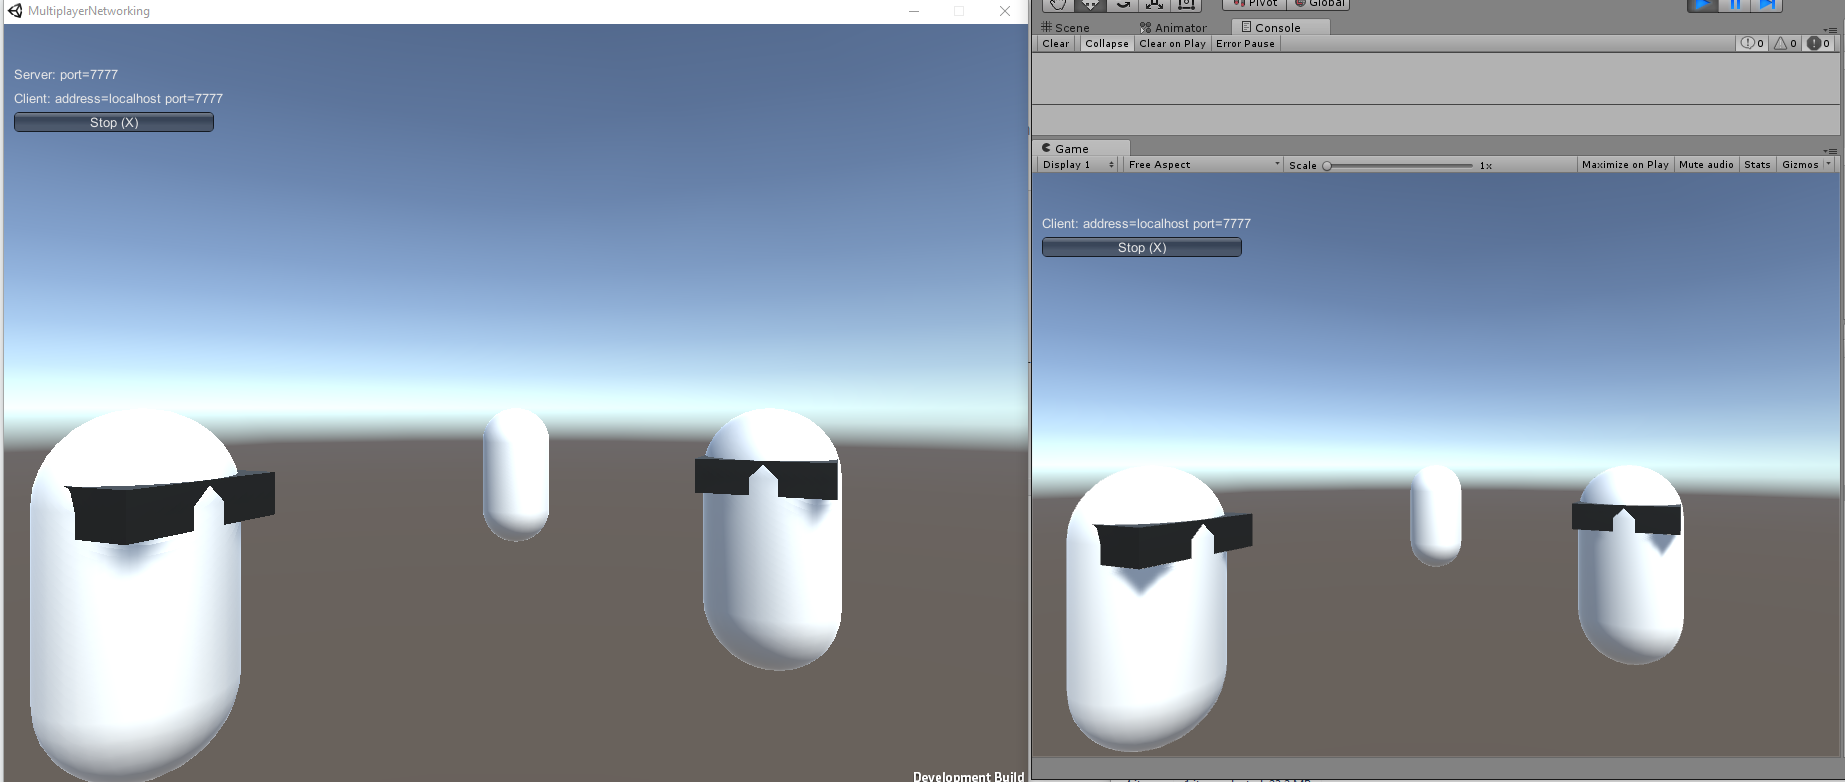
NetworkTransform的一些设定可以控制Network数据同步设定。 Identifying The Local Player
为了显示区分Client和Server的Player对象,我们通过利用NetworkBehaviour的接口方法去修改Local Player的颜色信息。
OnStartLocalPlayer — “Called when the local player object has been set up.”1
2
3
4
5public override void OnStartLocalPlayer()
{
base.OnStartLocalPlayer();
GetComponent<MeshRenderer>().material.color = Color.blue;
}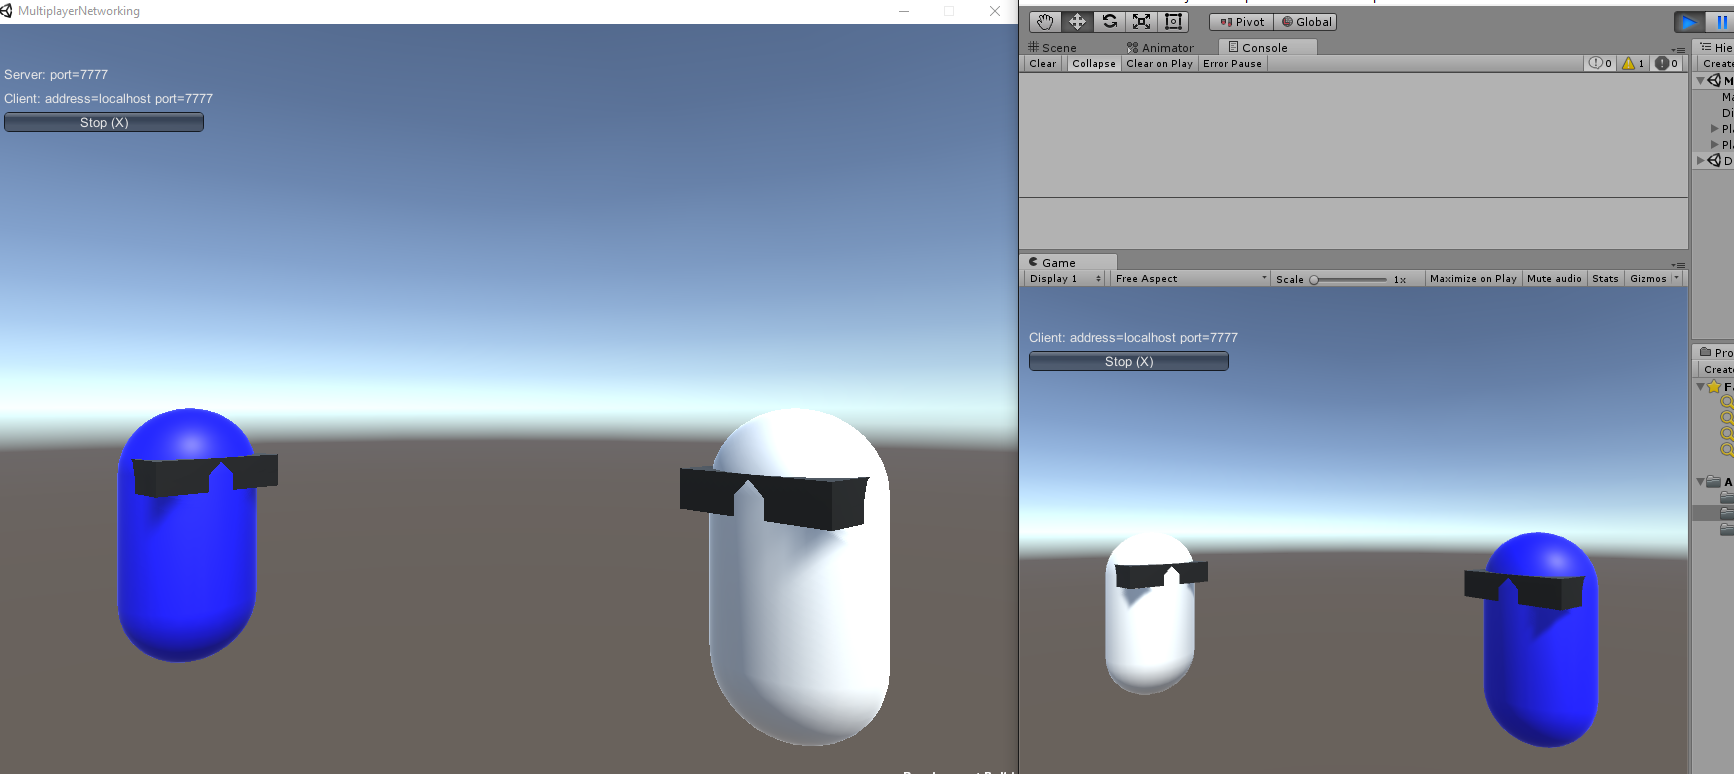
可以看到OnStartLocalPlayer是针对于Local Player而言的,所以只有Local Player看到自己控制的对象颜色变了,在另一个Client端因为并没有同步material信息,所以看到的依然是默认Spawn的白色。(NetworkBehaviour里还有很多类似的回调方法会在Server和Client创建GameObject的时候调用)Shooting(Single Player)
为了增加网络交互,这里我们先测试单机版的shooting功能。
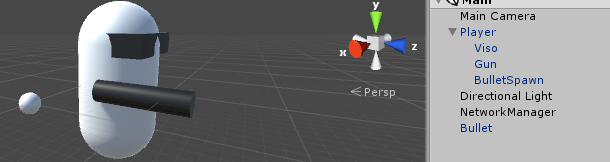
创建并调整Sphere作为Bullet Prefab。同时修改Player添加Cylinder作为Gun,并设置BulletSpawn作为子弹发射点。
制作完如下:
增加PlayerController.cs的射击功能。1
2
3
4
5
6
7
8
9
10
11
12
13
14
15
16
17
18
19
20
21void Update()
{
......
if(Input.GetKeyDown(KeyCode.Space))
{
Fire();
}
}
void Fire()
{
//Create the bullet from the prefab
GameObject bullet = (GameObject)Instantiate(mBulletPrefab, mBulletSpawn.position, mBulletSpawn.rotation);
//Add velocity to the bullet
bullet.GetComponent<Rigidbody>().velocity = bullet.transform.forward * mBulletSpeed;
//Destroy the bullet after 2 seconds
Destroy(bullet, 2.0f);
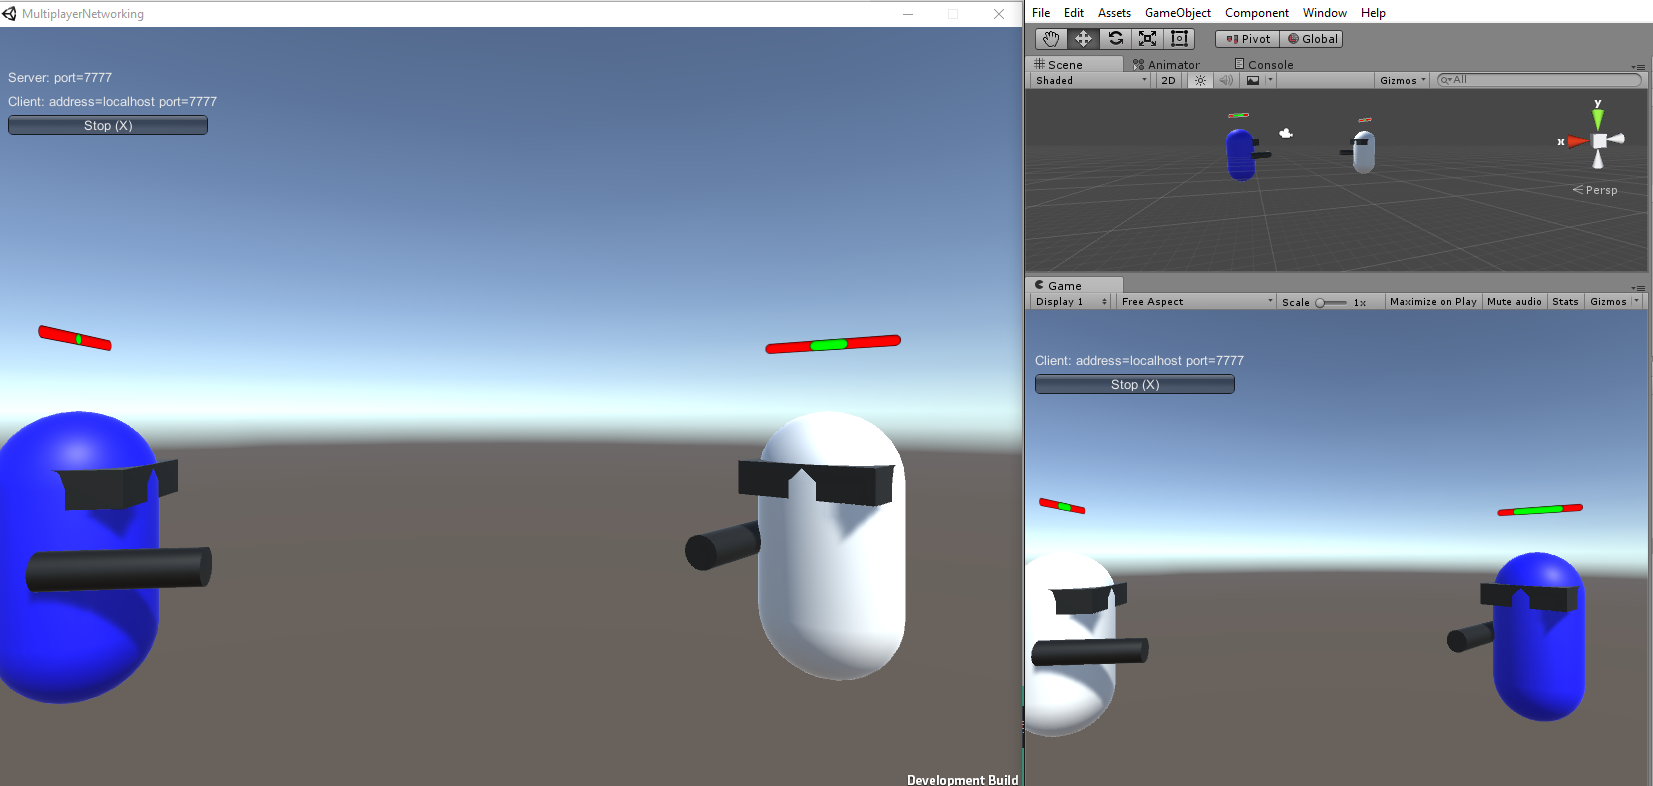
}然后发布联机测试:
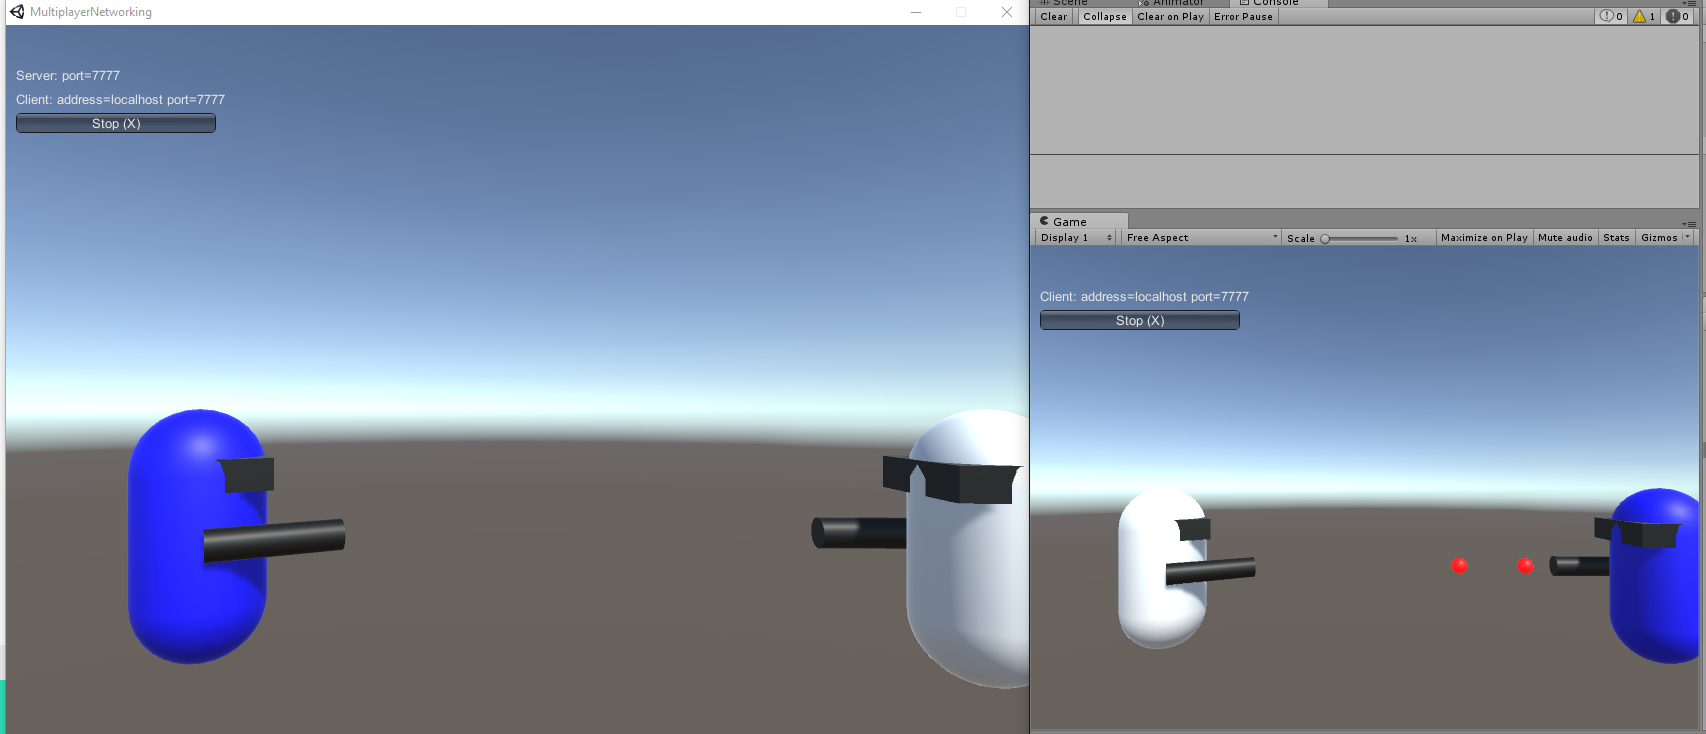
从上面可以看到Bullet并没有同步显示到Server端,这是因为我们的Bullet并没有挂载NetworkIdentity脚本用于标识Server和Client对象,不具备在client在server之间信息同步的能力。并且也没有挂载NetworkTransform去同步位置数据。Adding Multiplayer Shooting
那么通过上面的分析,要想Bullet具备网络数据同步功能,我们需要做如下几件事:- Add NetworkIdentity到Bullet上(用于标识Server和Client对象,使其具备在server上执行commands能力)
- Add NetworkTransform到Bullet上(用于同步位置信息)
- 设置Network Send Rate to 0(因为Bullet不会改变方向和速度,是通过物理驱动,所以不用同步位置信息每个Client也能计算出来)
- 添加Bullet Prefab作为Network Manager Spawnable的对象
- 修改PlayerController,通过CMD去Spawn Bullet
1
2
3
4
5
6
7
8
9
10
11
12
13
14
15
16
17
18
19
20
21
22
23
24
25
26
27
28
29
30
31
32
33
34
35
36
37
38
39
40
41
42
43
44
45
46
47
48
49
50
51
52
53
54
55
56
57using UnityEngine;
using System.Collections;
using UnityEngine.Networking;
public class PlayerController : NetworkBehaviour {
public float mRotateSpeed = 150.0f;
public float mMoveSpeed = 3.0f;
public GameObject mBulletPrefab;
public Transform mBulletSpawn;
public float mBulletSpeed = 6.0f;
void Update () {
if(!isLocalPlayer)
{
return;
}
var x = Input.GetAxis("Horizontal") * Time.deltaTime * mRotateSpeed;
var z = Input.GetAxis("Vertical") * Time.deltaTime * mMoveSpeed;
transform.Rotate(0, x, 0);
transform.Translate(0, 0, z);
//
if(Input.GetKeyDown(KeyCode.Space))
{
CmdFire();
}
}
[Command]
void CmdFire()
{
//Create the bullet from the prefab
GameObject bullet = (GameObject)Instantiate(mBulletPrefab, mBulletSpawn.position, mBulletSpawn.rotation);
//Add velocity to the bullet
bullet.GetComponent<Rigidbody>().velocity = bullet.transform.forward * mBulletSpeed;
//Spawn the bullet on the clients
NetworkServer.Spawn(bullet);
//Destroy the bullet after 2 seconds
Destroy(bullet, 2.0f);
}
public override void OnStartLocalPlayer()
{
base.OnStartLocalPlayer();
GetComponent<MeshRenderer>().material.color = Color.blue;
}
}
为了使Bullet真正在多个Client之间同步,下面需要理解几个概念:- Remote Actions
先来看看Remote Actions的调用框架: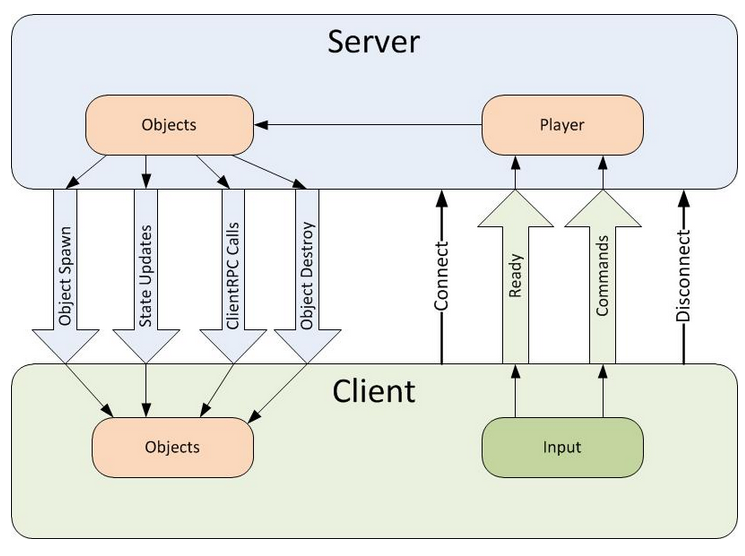
Remote Actions分为:
Commands - which are called from the client and run on the server(client调用,server执行)
ClientRpc calls - which are called on the server and run on clients.(server调用,client执行)
这里我们看一下Commands,前面我们提到过通过isLocalPlayer区分Local Player的控制等操作。
除了通过isLocalPlayer我们还是通过Command attribute来实现。(NetworkManager在Server端创建的包含NetworkIdentity的Player Object可以通过commands的形式从client端调用server端方法)
The [Command] attribute indicates that the following function will be called by the Client, but will be run on the Server.
When making a networked command, the function name must begin with “Cmd”.
Command方法必须以Cmd开头。
Commands are sent from player objects on the client to player objects on the server. Commands can only be sent from YOUR player object, so you cannot control the objects of other players.
Commands只能从Local Player Object发送到Server端Player对应的Obejct,所以不能控制其他Player Obejct,这也就是为什么不用区分isLocalPlayer也能确保在Client端只影响Local Player Object的原因(但在Server端需要区分,不然Host点击Space会导致所有的Client都发射子弹) - Object Spawning
In the Multiplayer Networking HLAPI “Spawn” means more than just “Instantiate”. It means to create a GameObject on the Server and on all of the Clients connected to the Server. The GameObject will then be managed by the spawning system; state updates are sent to Clients when the object changes on the Server.
可以看出Multiplayer Networking的Object Spawn是针对Server和所有Clients而言的,需要在Server上创建该GameObject然后同步到所有连接的Clients上,Server管理了所有的需要同步的状态信息。
比如有2个Player,那么创建结构如下:
Object和Player Objects Creation的完整流程参考官网
Player Health(Single Player)
增加Bullet的碰撞逻辑,编写Bullet Script。(这里遇到了Bullet脚本无效,重新制作Bullet prefab后又可以了)
Bullet.cs1
2
3
4
5
6
7
8
9
10
11
12
13
14
15
16
17
18using UnityEngine;
using System.Collections;
public class Bullet : MonoBehaviour {
public int mDamage = 10;
public void OnCollisionEnter(Collision collision)
{
GameObject hit = collision.gameObject;
Health health = hit.GetComponent<Health>();
if(health != null)
{
health.TakeDamage(mDamage);
}
Destroy(gameObject);
}
}接下来Health逻辑代码。
Health.cs1
2
3
4
5
6
7
8
9
10
11
12
13
14
15
16
17
18
19
20
21
22
23
24using UnityEngine;
using System.Collections;
using UnityEngine.UI;
public class Health : MonoBehaviour {
public const int mMaxHealth = 100;
public int mCurrentHealth = mMaxHealth;
public RectTransform mHealthBar;
public void TakeDamage(int amount)
{
mCurrentHealth -= amount;
if(mCurrentHealth <= 0)
{
mCurrentHealth = 0;
Debug.Log("Dead!");
}
mHealthBar.sizeDelta = new Vector2(mCurrentHealth, mHealthBar.sizeDelta.y);
}
}血条可视化HealthBar制作。
用3D UI的Image来制作血条。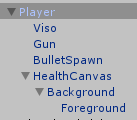
动态修改HealthBar的Forground的Rect来显示当前血量。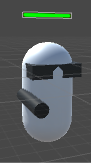

添加Billboard脚本(挂载到HealthBarCanva上),确保血条始终面向Camera。
Billboard.cs1
2
3
4
5
6
7
8
9using UnityEngine;
using System.Collections;
public class Billboard : MonoBehaviour {
void Update () {
transform.LookAt(Camera.main.transform);
}
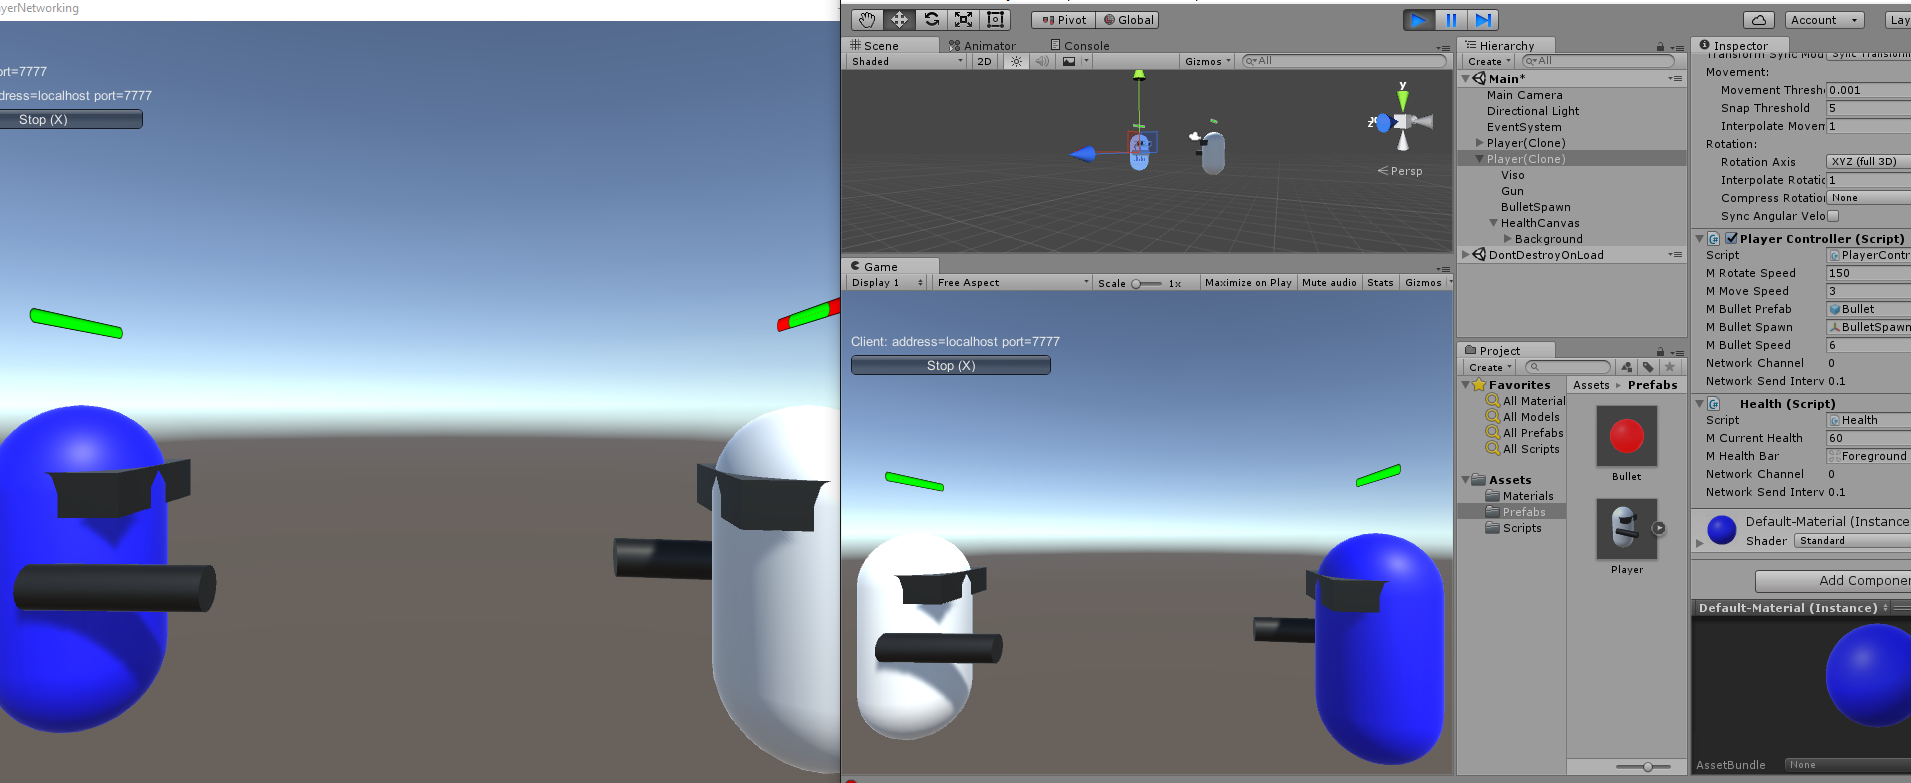
}测试效果:
可以看到血条更新了但是,血条在Server和Client端并不一致,这是因为Bullet和Health脚本是工作在Local的并没有通过网络同步数据。Networking Player Health
Changes to the player’s current health should only be applied on the Server. These changes are then synchronized on the Clients. This is called Server Authority.
改变Player血量应该是在Server端修改,然后再同步到Client端。(这叫做Server Authority)
先了解一个概念State Synchronization
State Synchronization is done from the Server to Remote Clients.
还记得之前讲到的Remote Action里的ClientRpc calls吗?
Which are called on the server and run on clients.(server调用,client执行)
ClientRpc calls用于同步Server端控制的数据。(Commands用于同步Client端控制的数据,比如前面我们用Commands同步子弹发射。)
[SyncVars]标记的成员变量就是用于把server端控制的数据同步到client端
SyncLists are like SyncVars but they are lists of values instead of individual values.SyncLists do not require the SyncVar attributes.(SyncLists相当于List < SyncVars > ,SyncLists不需要[SyncVar]关键词)
我们可以通过重写NetworkBehaviour的OnSerialize和OnDeSerialize函数去自定义序列化行为。
Serialization Flow on server and client详情参考
这里需要用到SyncVars来标记我们的mCurrentHealth值并且通过isServer来使TakeDamage只在Server上起作用(因为是作为Server端控制的数据):1
2
3
4
5
6
7
8
9
10
11
12
13
14
15
16
17
18
19
20
21......
public class Health : NetworkBehaviour {
public const int mMaxHealth = 100;
[SyncVar]
public int mCurrentHealth = mMaxHealth;
public RectTransform mHealthBar;
public void TakeDamage(int amount)
{
if(!isServer)
{
return;
}
......
}
}
但从上面可以看出只有Server端的血条更新,虽然Client端的值显示变化了但是血条UI却没有变化,这是因为我们指同步了mCurrentHealth数据但没有同步HealthBar Foreground的Rect。
这里需要介绍SyncVar hook. SyncVar hooks will link a function to the SyncVar. These functions are invoked on the Server and all Clients when the value of the SyncVar changes.当SyncVa变化的时候SyncVar Hooks关联的方法会在Server和所有Clients里调用。(用于更新Server和Client的一些相关数据,这里我们是为了更新HealthBar Foreground的Rect)1
2
3
4
5
6
7
8
9
10
11
12
13
14
15
16
17
18
19
20
21......
public class Health : NetworkBehaviour {
public const int mMaxHealth = 100;
[SyncVar(hook = "OnChangeHealth")]
public int mCurrentHealth = mMaxHealth;
public RectTransform mHealthBar;
public void TakeDamage(int amount)
{
......
}
void OnChangeHealth(int currenthealth)
{
mHealthBar.sizeDelta = new Vector2(currenthealth, mHealthBar.sizeDelta.y);
}
}再次测试效果:
终于成功的同步了mCurrentHealth数据和HealthBar Forground的Rect数据。Death And Respawning
ClientRpc在这里正式出场(用于同步Server端控制的数据)。
ClientRpc calls can be sent from any spawned object on the Server with a NetworkIdentity. Even though this function is called on the Server, it will be executed on the Clients.
ClientRpc修饰的方法在Server端调用,但会在Client端执行。([ClientRpc]修饰的方法需要加Rpc前缀)
这里我们为了使Player在血量为零后Respawn,我们需要添加[ClientRpc]修饰的Respawn方法到Health脚本中。1
2
3
4
5
6
7
8
9
10
11
12
13
14
15
16
17
18
19
20
21
22
23
24
25
26
27
28
29
30
31
32
33
34
35
36
37
38
39
40
41
42
43
44
45......
public class Health : NetworkBehaviour {
public const int mMaxHealth = 100;
[SyncVar(hook = "OnChangeHealth")]
public int mCurrentHealth = mMaxHealth;
public RectTransform mHealthBar;
public void TakeDamage(int amount)
{
if(!isServer)
{
return;
}
mCurrentHealth -= amount;
if(mCurrentHealth <= 0)
{
mCurrentHealth = mMaxHealth;
RpcRespawn();
Debug.Log("Dead!");
}
}
void OnChangeHealth(int currenthealth)
{
mHealthBar.sizeDelta = new Vector2(currenthealth, mHealthBar.sizeDelta.y);
}
[ClientRpc]
void RpcRespawn()
{
//这里不知道为什么要加这个判断,按理只有对应的Client才会调用此方法
if(isLocalPlayer)
{
//move back to zero location
transform.position = Vector3.zero;
}
}
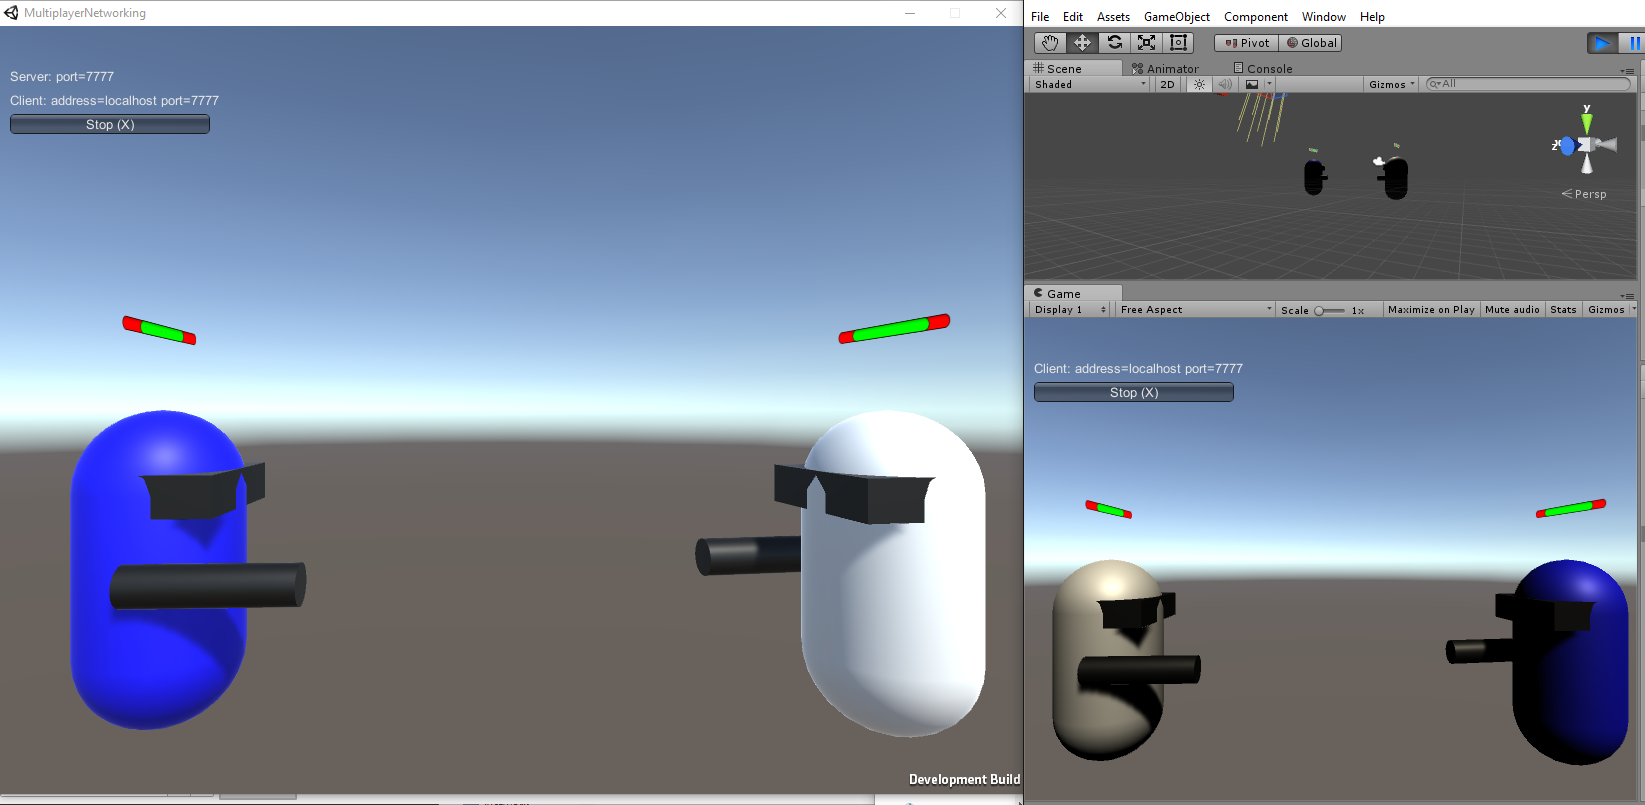
}测试效果:
可以看到我们成功把生命值归零的Client重置到了原点处。Handling Non-Player Obejcts
Enemy属于non-player,属于Server端控制的对象。
所以在设置NetworkIdentity的时候,勾选Server Only(By setting Server Only to true, this prevents the Enemy Spawner from being sent to the Clients.)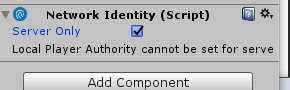
添加Enemy Spawn的功能。
EnemySpawner.cs1
2
3
4
5
6
7
8
9
10
11
12
13
14
15
16
17
18
19
20
21
22
23
24
25
26
27
28
29
30
31using UnityEngine;
using System.Collections;
using UnityEngine.Networking;
public class EnemySpawner : NetworkBehaviour{
public GameObject mEnemyPrefab;
public int mNumberOfEnemies;
public override void OnStartServer()
{
base.OnStartServer();
for(int i = 0; i < mNumberOfEnemies; i++)
{
Vector3 spawnposition = new Vector3(
Random.Range(-8.0f, 8.0f),
0.0f,
Random.Range(-8.0f, 8.0f));
Quaternion spawnrotation = Quaternion.Euler(
0.0f,
Random.Range(0, 180),
0.0f);
GameObject enemy = (GameObject)Instantiate(mEnemyPrefab,spawnposition, spawnrotation);
NetworkServer.Spawn(enemy);
}
}
}OnStartServer is called on the Server when the Server starts listening to the Network
OnStartServer在Server端启动的时候调用,这里用来初始化敌人。
在Player Prefab基础上制作EnemyPrefab。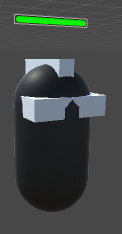
添加EnemyPrefab到NetworkManager的Spawnable List里。
设置EnemySpawner。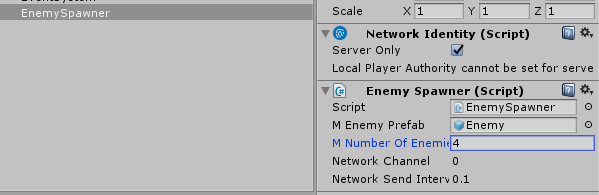
测试效果: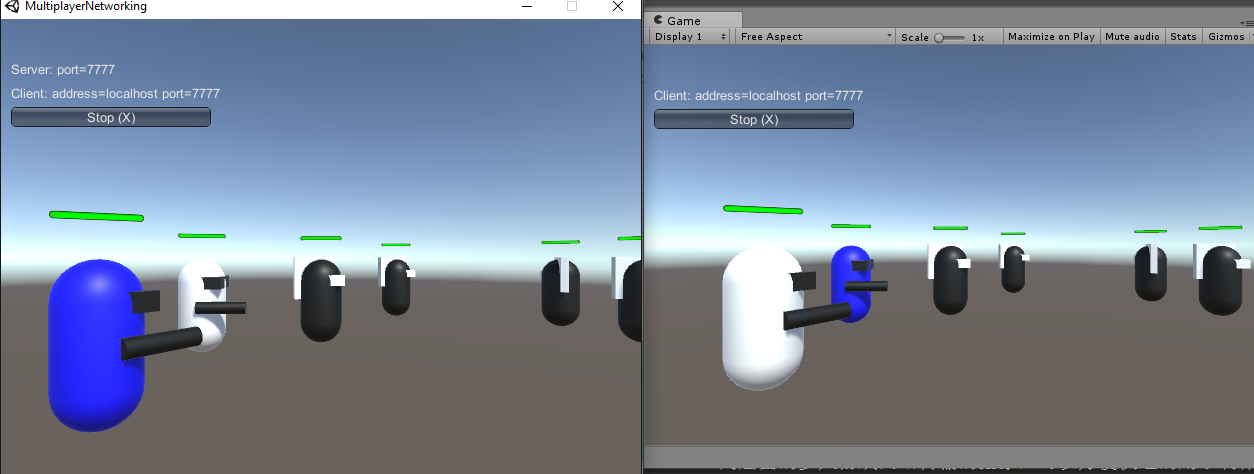
成功创建了Server管理的Enemy。Destroying Enemies
因为Enemy Prefab采用的是Player的Health设定,所以生命值归零时会重置到原点,这并非我们想要的,我们需要Enemy被打死后被摧毁掉。
这里需要修改Health脚本去做判断。1
2
3
4
5
6
7
8
9
10
11
12
13
14
15
16
17
18
19
20
21
22
23
24
25
26
27
28
29
30
31
32......
public class Health : NetworkBehaviour {
......
public void TakeDamage(int amount)
{
if(!isServer)
{
return;
}
mCurrentHealth -= amount;
if(mCurrentHealth <= 0)
{
if (mDestroyOnDeath)
{
Destroy(gameObject);
}
else
{
mCurrentHealth = mMaxHealth;
RpcRespawn();
}
Debug.Log("Dead!");
}
}
.......
}在Enemy Prefab上勾选mDestroyOnDeath。
再次测试: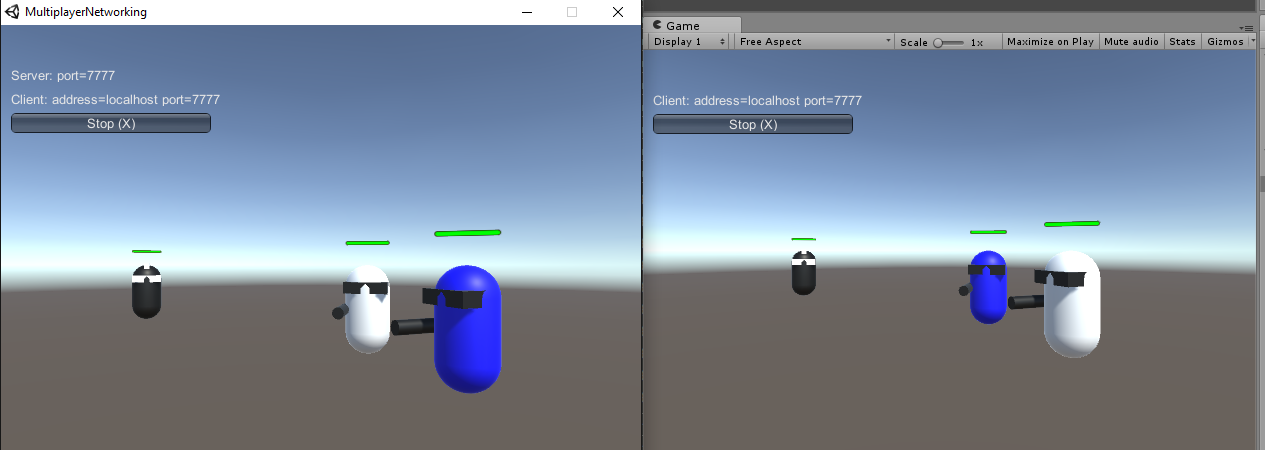
成功摧毁Enemy。- Spawning And Respawning
随机Spawn到不同的位置。
The NetworkStartPosition component可以用于spawn object到不同的位置。
在场景里创建Gameobject添加NetworkStartPosition并设定位置。
NetworkManager会自动去找到这些带有NetworkStartPosition component的Gameobject,把他们的位置作为Start Position的选项。(Round Robin Player Spawn Method on the Network Manager)
Spawn和Respawn等内容详情参考Spawning and Respawning
Multiplayer Networking教程学习终于结束了。但初次接触Unity Networking的学习,还有很多地方理解错误的地方,欢迎纠正。
编辑器界面
Hierachy
游戏组成元素(这个tutorial里,好比小球,方块,地面,摄像机,灯光,墙等)
主要用于对物件的归类管理- Create Empty可以用于层次管理归类
Project
游戏原件管理(这个tutorial里,好比材质,C#脚本)
主要用于对一次性资源的归类管理- 可通过创建Folder进行资源整理归类
Scene
编辑场景- 右上角可以切换视角
- 可以切换Local和Global模式进行移动物体
Game
运行时场景(可动态编辑查看物体属性)Inspector
对象属性查看- 通过物体名字左边的Active勾选框可以决定物体是否在编辑器可见可选
- 可以通过点击界面的?来打开相应面板的介绍页面
工具
MonoDevelop
C#,Js脚本编辑器(也可自己设定编辑器为VS Edit->Preference->External Tools->External Script Editor)
ILSpy
ILSpy is the open-source .NET assembly browser and decompiler.
可以用于反编译一些Unity项目学习源代码
ildasm(安装VS自带的工具)
IL反编译工具
可以通过这个工具查看编译生成的IL中间代码
Blender
Blender is a professional free and open-source 3D computer graphics software product used for creating animated films, visual effects, art, 3D printed models, interactive 3D applications and video games.
主要用于制作一些3D模型和动画然后到处FBX用于Unity
VSTU
工具原名UnityVS,由于微软收购了SyntaxTree(制作UnityVS的公司)的公司,微软将UnityVS置入了VS开发套件中。
VSTU(Visual Studio Tools For Unity)
使Visual Studio支持Unity开发。
好处:
- 构建多平台游戏
- 在Visual Studio中调试
- 在Visual Studio创建Unity脚本
- 使用Visual Studio提高工作效率(e.g. 智能提示,高亮,快速查询Unity API,快速查询或插入Unity方法等)
- 免费获取开发Unity所需的全部内容
既然能让我们继续使用熟悉的VS作为开发IDE,那么让我们看看怎么集成安装吧。
Unity version 4.0.0 or higher; Unity version 5.2.0 or higher to take advantage of built-in support for Visual Studio Tools for Unity version 2.1 or higher.
注意Unity 5.2.0及以上版本已经内置支持VSTU了。
这里讲讲老版本需要如何安装继承VSTU: - 下载对应版本的VSTU
- 导入VSTU到Unity(Assets -> Import Package -> Visual Studio 20** Tools)
- 设置Unity debug开发环境(File -> Building Setting 下勾选Development Build和Script Debugging)
- 设定VS 20作为默认IDE(Edit -> Preference -> External Tools -> External Script Editor设置成VS 20)
- 支持调试managed dll
这里使用VSTU有几个快捷和帮助快速开发的小技巧:
- Ctrl+Shift+M(显示可定义的Monobehavior方法,并帮助自动生成方法定义)
- Ctrl+Shift+Q(熟悉了Unity API后,这个可以快速检索方法并生成方法定义)
- Alt+Shift+E(查看Unity项目目录结构文件)
- F5快速调试Unity Code(首先需要设定Unity debug环境(前面提到过),然后需要通过Debug -> Attach Unity Debugger(Attach到Unity进程上,最后运行Unity即可))
- Unity的错误,警告等信息显示在VS的error list里
相关概念学习
Unity Engine
C Sharp
Unity支持C#的作为编程语言,这里不得不了解下C#的历史。
C#是微软推出的一种基于.NET框架的、面向对象的高级编程语言。C#的发音为“C sharp”,模仿音乐上的音名“C♯”(C调升),是C语言的升级的意思。其正确写法应和音名一样为“C♯”[来源请求],但大多数情况下“♯”符号被井号“#”所混用;两者差别是:“♯”的笔画是上下偏斜的,而“#”的笔画是左右偏斜。C♯由C语言和C++派生而来,继承了其强大的性能,同时又以.NET框架类库作为基础,拥有类似Visual Basic的快速开发能力。C#由安德斯·海尔斯伯格主持开发,微软在2000年发布了这种语言。
相关C#学习
Mono
——————————2018/04/22——————————————————-
突然找到一篇讲述.Net,Mono以及Unity之间关系的好文,里面详细梳理了.Net,C#,Mono和Unity之前的关系和概念,结合.Net Framework相关概念可以加深理解,这里给出这篇好文的链接:扒一扒.net、.net framework、mono和Unity
——————————2018/04/22——————————————————-
IL2CPP
既然Mono这么好,那么为什么还需要IL2CPP了?
Why do we need IL2CPP?
- C# runtime performance still lags behind C/C++(C#运行效率没有C/C++好)
- Latest and greatest .NET language and runtime features are not supported in Unity’s current version of Mono.(新版本的.Net语言和运行时特性没有被当前的Unity版本支持)
- With around 23 platforms and architecture permutations, a large amount of effort is required for porting, maintaining, and offering feature and quality parity.(Mono VM在跨平台的维护上很费时费力)
- Garbage collection can cause pauses while running(Mono VM现有的GC很容易使得游戏卡顿)
IL2CPP Components
- AOT(Ahead of Time) compiler
Ahead-of-time (AOT) compilation is the act of compiling a high-level programming language such as C or C++, or an intermediate language such as Java bytecode or .NET Common Intermediate Language (CIL) code, into a native (system-dependent) machine code with the intention of executing the resulting binary file natively.(预编译IL到系统相关的机器代码。 C# -> IL -> C++ -> Machine code) - IL2CPP Virtual Machine
Provide additional services (like a GC, metadata, platform specific resources)(提供运行时的一些功能比如GC,访问平台相关资源等)
Mono and IL2CPP compile and execution process
我们来看看使用Mono和使用IL2CPP时的脚本编译运行过程:
下面两张图来源
Mono: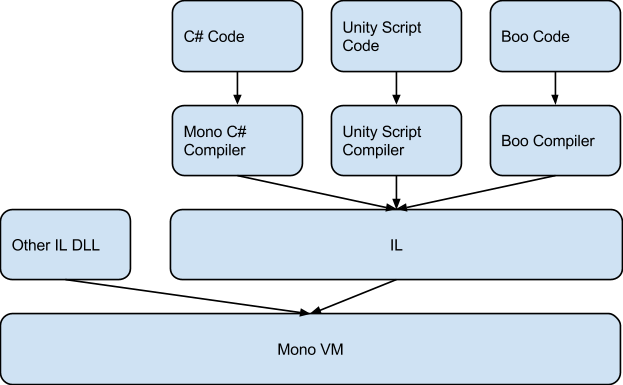
IL2CPP: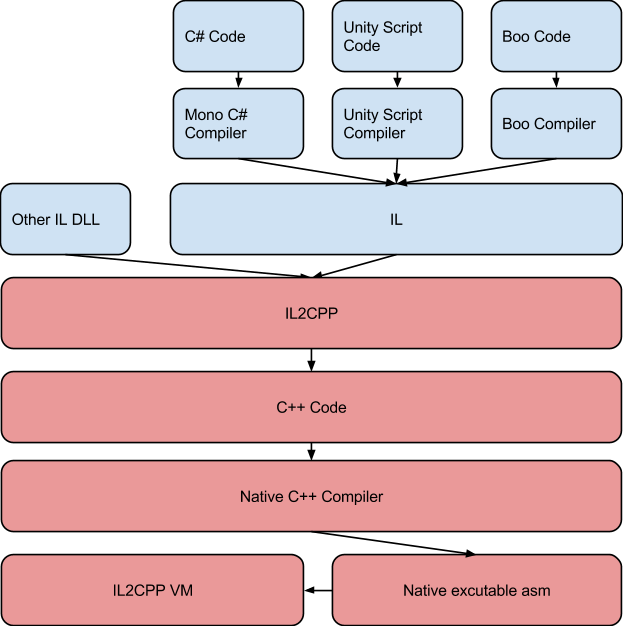
从上图可以看出编译成IL后,会被IL2CPP再次编译成C++,然后通过Native的C++编译器编译C++代码到相关平台的汇编代码,最后运行在IL2CPP VM里。
这样做的好处官网提到了下几点:
Performance(效率上的优化),原因如下
. C++ compilers and linkers provide a vast array of advanced optimisations previously unavailable.
. Static analysis is performed on your code for optimisation of both size and speed.
. Unity-focused optimisations to the scripting runtime.All code generation is done to C++ rather than architecture specific machine code. The cost of porting and maintenance of architecture specific code generation is now more amortised. (因为现在是通过利用现有的C++编译器编译C++而没有直接编译成特定架构的机器代码,这样一来跨平台的移植和维护责任就更分散了)
Feature development and bug fixing proceed much faster. For us, days of mucking in architecture specific files are replaced by minutes of changing C++. Features and bug fixes are immediately available for all platforms. (功能开发和bug修改更容易快捷。通过修改IL2CPP的C++生成就能快速的针对多个平台有效)
IL2CPP is not tied to any one specific garbage collector, instead interacting with a pluggable API(GC导致游戏卡顿的现象也可以通过不同的GC方式来改善)
Note:
IL2CPP支持了arm64机器架构(Mono不支持, Apple新出的设备大多基于arm64)
AOT & JIT
之前有讲到过AOT和JIT,那么这里为什么还要再次提他了?
主要原因是在IOS平台开发中,Mono .NET只支持AOT(Ahead of Time预编译生成所有对应机器代码),而不是通过JIT在运行时去编译成对应的机器代码。在IOS上采用full-AOT模式。
在这一限制下,我们必须明白什么是AOT什么是JIT,并且要知道哪些特性会使用到JIT导致IOS不支持。
AOT
AOT详细介绍
AOT大概意思就是预编译所有的IL到系统相关的机器代码。 C# -> IL -> C++ -> Machine code
JIT
JIT:
在C# Study中有讲到JIT是在执行Assembly Code(也就是C#编译的CIL中间程序)运行时编译成本地机器代码。
Full-AOT模式可以看出Mono .NET在IOS上不支持动态生成代码。
那么具体哪些特性不被IOS支持,哪些用法会触发动态生成代码了?
IOS AOT Limitations
- Profiler
- Reflection.Emit
- Reflection.Emit.Save functionality
- COM bindings
- The JIT engine
- Metadata verifier (since there is no JIT)
在这里我从官网提取几个典型问题来说明:
P/Invokes in Generic Types
P/Invokes in generic classes aren’t supported:1
2
3
4class GenericType<T> {
[DllImport ("System")]
public static extern int getpid ();
}不支持对泛型类的P/Invoke
Value types as Dictionary Keys
值类型作为Dictionary的Key时会有问题,实际上实现了IEquatable的类型都会有此问题,因为Dictionary的默认构造函数会使用EqualityComparer .Default作为比较器,而对于实现了IEquatable 的类型,EqualityComparer .Default要通过反射来实例化一个实现了IEqualityComparer 的类(可以参考EqualityComparer 的实现)。 解决方案是自己实现一个IEqualityComparer ,然后使用Dictionary )构造器创建Dictionary实例。
讲到如果T实现了IEquatable,那么就会反射实例化一个实现了IEqualityCompareer 的类,这里通过查看EqaulityCompare 源码可以看到确实如此。 1
2
3
4
5
6
7
8
9
10
11
12
13
14
15
16
17
18
19
20
21
22
23
24
25
26
27
28
29
30
31
32
33
34
35
36
37
38
39
40
41
42
43
44
45
46
47
48
49
50
51
52
53
54
55public abstract class EqualityComparer<t> : IEqualityComparer, IEqualityComparer<t>
{
static EqualityComparer<t> defaultComparer;
public static EqualityComparer<t> Default {
[System.Security.SecuritySafeCritical] // auto-generated
#if !FEATURE_CORECLR
[TargetedPatchingOptOut("Performance critical to inline across NGen image boundaries")]
#endif
get {
Contract.Ensures(Contract.Result<equalitycomparer<t>>() != null);
EqualityComparer<t> comparer = defaultComparer;
if (comparer == null) {
comparer = CreateComparer();
defaultComparer = comparer;
}
return comparer;
}
}
[System.Security.SecuritySafeCritical] // auto-generated
private static EqualityComparer<t> CreateComparer() {
Contract.Ensures(Contract.Result<equalitycomparer<t>>() != null);
RuntimeType t = (RuntimeType)typeof(T);
// Specialize type byte for performance reasons
if (t == typeof(byte)) {
return (EqualityComparer<t>)(object)(new ByteEqualityComparer());
}
// If T implements IEquatable<t> return a GenericEqualityComparer<t>
if (typeof(IEquatable<t>).IsAssignableFrom(t)) {
//return (EqualityComparer<t>)Activator.CreateInstance(typeof(GenericEqualityComparer<>).MakeGenericType(t));
return (EqualityComparer<t>)RuntimeTypeHandle.CreateInstanceForAnotherGenericParameter((RuntimeType)typeof(GenericEqualityComparer<int>), t);
}
// If T is a Nullable<u> where U implements IEquatable<u> return a NullableEqualityComparer<u>
if (t.IsGenericType && t.GetGenericTypeDefinition() == typeof(Nullable<>)) {
RuntimeType u = (RuntimeType)t.GetGenericArguments()[0];
if (typeof(IEquatable<>).MakeGenericType(u).IsAssignableFrom(u)) {
//return (EqualityComparer<t>)Activator.CreateInstance(typeof(NullableEqualityComparer<>).MakeGenericType(u));
return (EqualityComparer<t>)RuntimeTypeHandle.CreateInstanceForAnotherGenericParameter((RuntimeType)typeof(NullableEqualityComparer<int>), u);
}
}
// If T is an int-based Enum, return an EnumEqualityComparer<t>
// If you update this check, you need to update the METHOD__JIT_HELPERS__UNSAFE_ENUM_CAST case in getILIntrinsicImplementation
if (t.IsEnum && Enum.GetUnderlyingType(t) == typeof(int))
{
return (EqualityComparer<t>)RuntimeTypeHandle.CreateInstanceForAnotherGenericParameter((RuntimeType)typeof(EnumEqualityComparer<int>), t);
}
// Otherwise return an ObjectEqualityComparer<t>
return new ObjectEqualityComparer<t>();
}
......
}注意下面这个分支
1
2
3
4
5// If T implements IEquatable<t> return a GenericEqualityComparer<t>
if (typeof(IEquatable<t>).IsAssignableFrom(t)) {
//return (EqualityComparer<t>)Activator.CreateInstance(typeof(GenericEqualityComparer<>).MakeGenericType(t));
return (EqualityComparer<t>)RuntimeTypeHandle.CreateInstanceForAnotherGenericParameter((RuntimeType)typeof(GenericEqualityComparer<int>), t);
}当我们的的T也就是我们的Dictionary
接口的话,里面的代码实现看不太懂,大概是动态创建实现了IEqualityComparer 的类,然后实例化返回了一个作为TKey的EqualityComparer。
“This works for reference types (as the reflection+create a new type step is skipped)”
当我们传递的TKey是reference types的时候不会触发创建实现了IEqualityCompareer的类,直接返回ObjectEqualityComparer ()。
解决方案:
如果我们一定要在IOS上把value type作为Dictionary的Key的话,我们需要自己实现一个实现了IEqualityCompareer的类,然后作为TKey的EqualityComparer传递给Dictionary
比如我们要给int添加我们自己的比较方法,那么按如下方式写即可。1
2
3
4
5
6
7
8
9
10
11
12
13
14
15
16
17
18
19
20
21
22
23
24
25
26
27
28
29
30
31
32
33public class ValueTypeComparer : EqualityComparer<int>
{
public override bool Equals(int a, int b)
{
Console.WriteLine("ValueTypeComparer:Equals() called");
if (a == b)
{
return true;
}
else
{
return false;
}
}
public override int GetHashCode(int a)
{
Console.WriteLine("ValueTypeComparer:GetHashCode() called");
return a.GetHashCode();
}
}
class Program
{
static void Main(string[] args)
{
ValueTypeComparer valuetypecomparer = new ValueTypeComparer();
int vt1 = 1;
Dictionary<int, bool> mydictionary1 = new Dictionary<int, bool>(valuetypecomparer);
mydictionary1.Add(vt1, true);
mydictionary1.ContainsKey(vt1);
}
}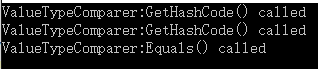
- System.Reflection.Emit
The System.Reflection.Emit namespace contains classes that allow a compiler or tool to emit metadata and Microsoft intermediate language (MSIL) and optionally generate a PE file on disk..aspx)
可以看出System.Reflection.Emit是用于动态生成代码,这一点明显违背了Full-AOT的原则。
在了解Emit是如何动态生成代码之前,可以先了解一下AppDomain的概念
AppDomain负责Assebmly的加载和隔离,代码是加载在AppDomain里执行的。
接下来让我们看看System.Reflection.Emit是如何动态生成代码的:
先来看下MSDN官网介绍
The System.Reflection.Emit namespace contains classes that allow a compiler or tool to emit metadata and Microsoft intermediate language (MSIL) and optionally generate a PE file on disk..aspx)
可以看出System.Reflection.Emit包含了很多可以动态创建程序集,类,方法的类。
以下学习主要参考C#反射发出System.Reflection.Emit学习
这位博主对Emit研究的很透侧,讲解的也通熟易懂。
Emit生成代码的基本流程:
构建程序集
1
2AssemblyName aname = new AssemblyName("DynamicgAssembly");
AssemblyBuilder ab = AppDomain.CurrentDomain.DefineDynamicAssembly(aname, AssemblyBuilderAccess.RunAndSave);创建模块
1
ModuleBuilder mb = ab.DefineDynamicModule(aname.Name, aname.Name + ".dll");
定义类
1
TypeBuilder tb = mb.DefineType("DynamicType", TypeAttributes.Public);
定义类成员(方法,属性等)
1
2
3
4
5
6
7
8
9
10
11
12
13
14// 创建方法签名
MethodBuilder methodb = tb.DefineMethod("Hello",MethodAttributes.Public);
// 定义方法实现
// 这里比较重要,可以把这里理解成代码反编译之后的函数调用操作的代码化
ILGenerator il = methodb.GetILGenerator();
//OpCodes包含所有的Microsoft Intermediate Language (MSIL) instructions
//OpCodes.Ldstr表示加载一个字符串到evaluation stack。
il.Emit(OpCodes.Ldstr, "Hello, World!");
//OpCodes.Call表示调用方法
il.Emit(OpCodes.Call, typeof(Console).GetMethod("WriteLine", new Type[] { typeof(string) }));
//OpCodes.Ret表示返回,当evaluation stack有值时会返回栈顶值。
il.Emit(OpCodes.Ret);
tb.CreateType();创建Assembly
1
ab.Save("DynamicAssemble.dll");

结合反编译我们生成的DynamicAssemble.dll可以看出,我们是通过Emit把函数定义用IL指令定义出来了。
毫无疑问这是动态生成了程序集,方法等,所以在Full-AOT面前,IOS是不支持的。
让我们来看个实际的问题:
The game crashes with the error message “ExecutionEngineException: Attempting to JIT compile method ‘SometType`1
这里是由于在序列化的时候使用了泛型方法导致的。
The Mono .NET implementation for iOS is based on AOT. It compiles only those generic type methods (where a value type is used as a generic parameter) which are explicitly used by other code. When such methods are used only via reflection or from native code (ie, the serialization system) then they get skipped during AOT compilation.The AOT compiler can be hinted to include code by adding a dummy method somewhere in the script code. This can refer to the missing methods and so get them compiled ahead of time.
可以看出在Full-AOT下,如果我们在反射和序列化中使用泛型方法,该方法会被AOT过滤掉,不预编译,要想使该泛型方法参与预编译,我们需要定义一个不使用的方法去显示调用该类去通知AOT去预编译该方法。
本人遇到这个问题是:
ExecutionEngineException: Attempting to JIT compile method ‘**TypeMetadata:.ctor ()’ while running with –aot-only
Why did my BinarySerialzer stop working?
根据上面的说法是BinaryFormatter里的ObjectWriter去动态生成了我们自定义的value type类导致的JIT。
通过下面代码可以使ObjectWriter采用反射去实现而非JIT生成动态类。1
Environment.SetEnvironmentVariable("MONO_REFLECTION_SERIALIZER", "yes");
但是反射很慢,如果频繁进行序列化反序列化的话,在IOS上并不是一种好的解决办法。
根据这里的讨论,可以看出Google Protocol Buffers是一个不错的解决方案(当然我们得绕过默认使用JIT)。
Note:
IOS只支持static code, Unlike traditional Mono/.NET, code on the iPhone is statically compiled ahead of time instead of being compiled on demand by a JIT compiler(IOS只支持full aot,不支持JIT).所以有些动态特性没法被Full AOT支持。
But the entire Reflection API, including Type.GetType (“someClass”), listing methods, listing properties, fetching attributes and values works just fine.(反射依然在IOS可用)
Protocol Buffers
Unity Using
- Layout — 排版,可用于存储我们在Unity里面的面板排版设置,通过制定layout使用特定排版
- Prefab — 原件,可在场景里重复利用,而且Prefab的改变可以通过点击Inspector界面的Apply影响到所有从该Prefab里创建出的对象
- Tag — Scene里面所有物体的唯一标识,用于确保正确识别物体,通过对物体添加tag可以在程序里用于身份判别
- Static collider — will not be affected by collision (not cause collide). Unity keep static collider mesh in cach
- Dynamic collider — will be affected by collision
- Is Trigger — when no collide caused(e.g. static collider), we can use trigger to enter collide event(只有没有物理碰撞的物体才会触发Trigger的)
- Rigibody body — Moved by using physical force, use dynamic collider
- Kinematic body — Moved by using the transform instead of physical force
- Mesh Collider — Use Model mesh as collider mesh (一般只用于简单的三角形数量少的mesh)
- AudioSource — 声音在Unity里也是组件的形式存在
- C# Script — 每个物体可以绑定多个脚本用于不同逻辑,特别是用于原件一些特有的逻辑特性
- 2.5D — 在3D的世界里通过平行投影(Orthographic Projection - isometric projection)实现
- Raycast — 射线碰撞检测(Physics.Raycast()在物体是is triiger on的时候不会触发)
- LayerMask — 可以用于选择和射线检测过滤
- NavMeshAgent — Unity的Navigation system可以提供最基本的路径AI寻址(只需要指定agent相关参数,在代码里设定跟踪目标) — 添加后需要Bake Navigation
- Animation Controller — 动画管理,通过给物体添加Animator并设定动画状态机之间的切换规则来实现动画状态切换管理(通过给UI添加Animator我们也可以在Anmation面板设置简单动画)
- LineRenderer — 可以用于在3D世界里绘制线条,实现可视化一些射线检测物体碰撞等
- Select icon — 可以给没有实际物体或透明物体一个颜色标记(容易看到3D世界位置)
- Canvas — 画布是所有UI所应该在的区域(UI的层级关系会影响渲染顺序) — 通过设定Render Mode实现不同的效果(Screen Space - Overlay不会受Camera的投影方式影响,永远在场景上. Screen Space - Camera会受Camera的投影方式影响,比如在透视投影里就会有近大远小的效果. World Space会把UI当做3D空间里的物体来对待,有深度概念会被遮挡 ))
- Physics2D.Linecast — 可用于检测特定layer的射线检测
**Input — 不同平台要使用不同平台的AIP
e.g.1
2
3
4
5
6
7
8
9
10
11
12
13
14
15
16
17
18
19
20
21
22
23
24
25
26
27
28
29
30
31
32#if UNITY_EDITOR || UNITY_STANDLONE || UNITY_WEBPLAYER
horizontal = (int)Input.GetAxisRaw ("Horizontal");
vertical = (int)Input.GetAxisRaw ("Vertical");
if (horizontal != 0) {
vertical = 0;
}
#else
if(Input.touchCount > 0)
{
Touch myTouch = Input.touches[0];
if(myTouch.phase == TouchPhase.Began)
{
touchOrigin = myTouch.position;
}
else if(myTouch.phase == TouchPhase.Ended && touchOrigin.x >= 0)
{
Vector2 touchEnd = myTouch.position;
float x = touchEnd.x - touchOrigin.x;
float y = touchEnd.y - touchOrigin.y;
touchOrigin.x = -1;
if(Mathf.Abs(x) > Mathf.Abs(y))
{
horizontal = x > 0 ? 1 : -1;
}
else
{
vertical = y > 0 ? 1 : -1;
}
}
}
#endifDontDestroyOnLoad() — 加载新的scene的时候保证对象不会被销毁
- Invoke() — 延时调用方法
快捷键学习
F — 在Scene界面选中对象后可以快速聚焦到该物体
Ctrl + ‘ — 打开脚本的类Reference page
Ctrl + D — Duplicated(复制)物体
项目编译发布
PC
- File -> Build Setting 设置平台PC
- Drag Scene file to Scenes to build 选择要编译的场景
- 点击Build 编译游戏
IOS
Native Code Compilation
PC平台使用C++编写的库的时候是通过lib或者dll的静态和动态链接
但在IOS移动平台使用的时候,这些代码必须以插件的形式调用,以静态方式链接。
Managed plugins and Native Plugins
Note:1
2
3
4
5
6
7
8
9
10#if UNITY_IPHONE || UNITY_XBOX360
//On iOS and Xbox 360 plugins are statically linked into
//the executable, so we have to use **Internal as the
//library name.
[DllImport ("**Internal")]
#else
// Other platforms load plugins dynamically, so pass the name
// of the plugin's dynamic library.
[DllImport ("PluginName")]
#endif
在真正编译到IOS上使用之前,我们必须通过cross compile把Native code编译成.a的文件,然后静态链接到项目中使用。(需要在Mac电脑上cross compile)
以下以开源工具Zlib为例:
Zlib Download
参考文章:Building Universal Binaries for iOS
解压打开文件夹后会发现,目录下有MakeFile, .configure, MakeFile.in等文件。MakeFile是编写了编译规则的文件用于自动编译的工具(在Unix,Linux系统上广泛运用)。而configure和MakeFile.in是通过Autoconf和Automake工具生成,用于编写高阶语言来生成makefile而无需手动编写复杂的makefie.。通过调用.configure并传入参数,.configure就会以MakeFile.in为模板产生我们预期的MakeFile。(这里我对MakeFile,autoconf,automake都不熟悉,现阶段的认识是这样的)
我们将会通过.configure生成我们需要的Makefile用于编译程序:
- .configure —prefix=${PWD}/installdir(用于生成makefile,—prefix用于指定make install后的文件夹)
- unset CC(先重置一次CC编译设定,避免出问题)
- export CC=”xcrun -sdk iphoneos clang -arch armv7”(这里很重要,在调用makefile之前,我们通过设置环境变量CC的值来指定make的编译设定,比如编译工具,编译架构等,-sdk 指定SDK路径用于搜索相关工具(比如编译工具等) -arch 用于指定编译出的文件架构类型)
- make clean(清理make生成的文件)
- make(执行makefile进行编译)
- make install(安装make生成的相关文件到对应目录)
- lipo -info libz.a(通过lipo工具来查看生成的libz.a文件是基于什么架构的)
上述有几个概念需要提一下:
xcrum(个人理解是,通过这个工具可以在不改makefile的前提下,通过命令行指定开发工具的一些信息) properties.
clang — clang是 是一个C、C++、Objective-C和Objective-C++编程语言的编译器前端。它采用了底层虚拟机(LLVM)作为其后端。它的目标是提供一个GNU编译器套装(GCC)的替代品。Clang是LLVM编译器工具集的前端(front-end),目的是输出代码对应的抽象语法树(Abstract Syntax Tree, AST),并将代码编译成LLVM Bitcode。接着在后端(back-end)使用LLVM编译成平台相关的机器语言 。Clang支持C、C++、Objective C。(可以理解成Mac上的编译工具,支持多种语言编译生成多种平台相关的机器语言)
Universal binary — 可以理解成multiarchitecture binary,支持多种架构的二进制文件(比如我们这里针对IOS生成的armv7架构的libz.a,我们也可以再生成一个针对simulator的i386架构的libz.a,然后通过执行lipo -create -arch i386 libz.a(386) -arch armv7 libz.a(armv7) -output libz_fatbinary.a生成同时支持simulator和IOS的.a文件)
lipo — 苹果上用于生成Universal binary的工具(lipo -info libz.a用于查看.a文件支持的架构信息)
Note:
Simulator(模拟器)使用的.a文件是基于i386的,而IOS真机使用的.a文件是基于armv7 or armv8的。
Prepare XCode Project
- File -> Build Setting 设置平台IOS
- Drag Scene file to Scenes to build 选择要编译的场景
- 点击Build
这样一来XCode项目就生成了。
Compile XCode Project
条件:
- 需要苹果开发者账号
待续……
Note:
跨平台自动化编译工具CMake
版块学习
UGUI
在Unity 4.6版本后推出的官方的GUI
Coordinates System
Screen coordinates
Is 2D, measured in pixels and start in the lower left corner at (0,0) and go to (Screen.width, Screen.height). Screen coordinates change with the resolution of the device, and even the orientation (if you app allows it) on mobile devices.
左下角为(0,0),右上角为(Screen.width, Screen.height)GUI coordinates
Is used by the GUI system. They are identical to Screen coordinates except that they start at (0,0) in the upper left and go to (Screen.width, Screen.height) in the lower right.
左上角为(0,0),右下角为(Screen.width, Screen.height)Viewport coordinates
Is the same no matter what the resolution. The are 2D, start at (0,0) in the lower left and go to (1,1) in the upper right. For example (0.5, 0.5) in viewport coordinates will be the center of the screen no matter what resolution or orientation.
相对于摄像机坐标系而言的,近平面(0,0),远平面(1,1),(0.5,0.5)表示在摄像机坐标系的中间。World coordinates
Is a 3D coordinates system and where all of your object live.
世界坐标系的(x,y,z)
Unity Unit & Pixel Per Unit
Unity Unit
Unity Unit代表Unity里的一个Unit单位代表物理大小,默认是1 unit = 1 meter
所以我们在建模的时候如果想导入到Unity后保持scale(1,1,1)就应该把建模软件也设定成1 unit = 1 meter。
Unity Unit主要影响的是Physical(比如重力加速度的运算,如果修改Unit为厘米,但不重新计算重力加速度,那么物体会落的很快)Pixel Per Unit
Pixel Per Unit主要影响Sprite在屏幕上的映射显示。表示多少个像素等价于一个Unit,后面会详细讲到。
Canvas
The Canvas is the area that all UI elements should be inside.(所有的UI元素都必须处于Canvas里)
以下学习参考Unity UGUI 原理篇(二):Canvas Scaler 縮放核心
UI Render Space:
Screen Space(Overlay) — 不会受Camera的投影方式影响,永远在场景上.(不用设置Camera)
Screen Space(Camera) — 需要设置Camera,会受Camera的投影方式影响,比如在透视投影里就会有近大远小的效果,有遮挡的概念. (正交投影会根据摄像机的Orthographic Size和PPU设定去显示UI)。Screen Space下屏幕分辨率变化,Canva会自动缩放UI去适应。
World Space — 会把UI当做3D空间里的物体来对待,有深度概念会被遮挡。
Canvas Scaler:
The Canvas Scaler component is used for controlling the overall scale and pixel density of UI elements in the Canvas. This scaling affects everything under the Canvas, including font sizes and image borders.
可以看出Canvas Scaler是控制了UI在画布上的具体显示,这个好比NGUI里UIRoot下的Scaling Style设定。
UI Scale Mode有如下三种:
Constant Pixel Size
Makes UI elements retain the same size in pixels regardless of screen size.
保持UI像素大小与屏幕大小无关(相当于NGUI里的UIRoot的PixelPerfect)
参数Scale Factor — Scales all UI elements in the Canvas by this factor.
通过Scale Factor去scale canvas的大小已达到整体scale UI的目的。
我们设置屏幕大小为1024 768,Scale Factor为1时:
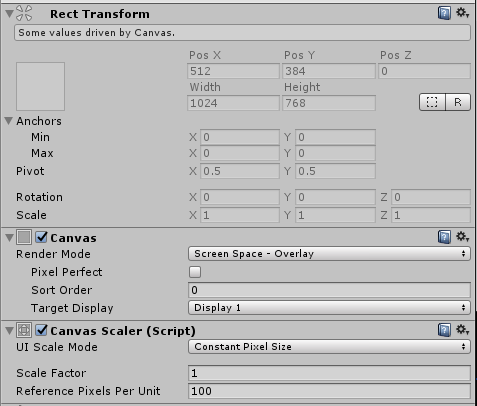
可以看到Canva Size为1024 768,Scale为(1,1,1)
当我们设置Scale Factor为2时:
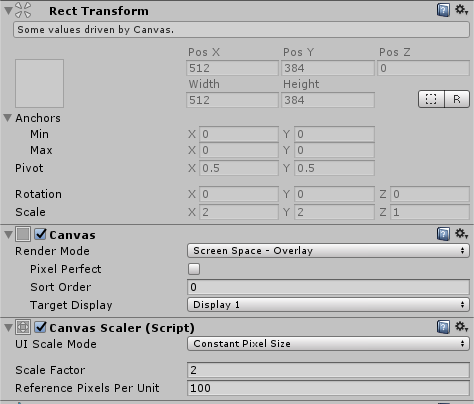
可以看到Canva Size为512 * 384,Scale为(2,2,1)
这样一来所有Canva下的UI就相当于放大了两倍。
Note:
这里注意区分Screen Size和Canva Size是两个概念。
参数Reference Pixels Per Unit — If a sprite has this ‘Pixels Per Unit’ setting, then one pixel in the sprite will cover one unit in the UI.
PPU指定了多少个像素表示一个Unit。如果Sprite有设置PPU,那么会把Sprite里的1 pixel转换成UI中的1 pixel。
这里引用下源码,下面源码来源
Image.cs1
2
3
4
5
6
7
8
9
10
11
12
13
14
15
16
17
18
19
20
21
22
23
24
25
26
27public float pixelsPerUnit
{
get
{
float spritePixelsPerUnit = 100;
if (sprite)
spritePixelsPerUnit = sprite.pixelsPerUnit;
float referencePixelsPerUnit = 100;
if (canvas)
referencePixelsPerUnit = canvas.referencePixelsPerUnit;
return spritePixelsPerUnit / referencePixelsPerUnit;
}
}
public override void SetNativeSize()
{
if (overrideSprite != null)
{
float w = overrideSprite.rect.width / pixelsPerUnit;
float h = overrideSprite.rect.height / pixelsPerUnit;
rectTransform.anchorMax = rectTransform.anchorMin;
rectTransform.sizeDelta = new Vector2(w, h);
SetAllDirty();
}
}可以看到当我们设置了Sprite的PPU后,Sprite的可显示区域(Rect)的大小计算如下:
SpriteRectSize = SpriteSize * SpritePPU / CanvaReferencePPU
所以如果我们设置SpritePPU和CanvaReferencePPU一样,那么SpriteRect的大小就会以Sprite的原始大小为准。
Note:
SetNatieSize需要通过点击Image Component的Set Native Size触发。Scale With Screen Size
以预设的Resolution为基准来进行自适应计算。(相当于NGUI里的Fixed Size)
Screen Match Mode的设定则决定了如何基于高度和宽度变化去适应。
以下是CanvasScaler.cs源码:1
2
3
4
5
6
7
8
9
10
11
12
13
14
15
16
17
18
19
20
21
22
23
24
25
26
27
28
29
30Vector2 screenSize = new Vector2(Screen.width, Screen.height);
float scaleFactor = 0;
switch (m_ScreenMatchMode)
{
case ScreenMatchMode.MatchWidthOrHeight:
{
// We take the log of the relative width and height before taking the average.
// Then we transform it back in the original space.
// the reason to transform in and out of logarithmic space is to have better behavior.
// If one axis has twice resolution and the other has half, it should even out if widthOrHeight value is at 0.5.
// In normal space the average would be (0.5 + 2) / 2 = 1.25
// In logarithmic space the average is (-1 + 1) / 2 = 0
float logWidth = Mathf.Log(screenSize.x / m_ReferenceResolution.x, kLogBase);
float logHeight = Mathf.Log(screenSize.y / m_ReferenceResolution.y, kLogBase);
float logWeightedAverage = Mathf.Lerp(logWidth, logHeight, m_MatchWidthOrHeight);
scaleFactor = Mathf.Pow(kLogBase, logWeightedAverage);
break;
}
case ScreenMatchMode.Expand:
{
scaleFactor = Mathf.Min(screenSize.x / m_ReferenceResolution.x, screenSize.y / m_ReferenceResolution.y);
break;
}
case ScreenMatchMode.Shrink:
{
scaleFactor = Mathf.Max(screenSize.x / m_ReferenceResolution.x, screenSize.y / m_ReferenceResolution.y);
break;
}
}Screen Match Mode有三中:
- MatchWidthOrHeight(根据Screen Size相对于预设Resolution的宽度和高度变化去计算ScaleFactor(缩放Canva Size))
举例说明:
Reference Size为1024 768。Screen Size为960 640。
LogWidth = Mathf.Log(screenSize.x / m_ReferenceResolution.x, kLogBase) = Log2( 960 / 1024) = Log2(0.9375);
LogHeight = Mathf.Log(screenSize.y / m_ReferenceResolution.y, kLogBase) = Log2( 640 / 768) = Log2(0.8333);
logWeightedAverage = Mathf.Lerp(logWidth, logHeight, m_MatchWidthOrHeight) = Lerp(Log2(0.9375), Log2(0.8333), MatchWidthOrHeight));
scaleFactor = Mathf.Pow(kLogBase, logWeightedAverage) = Pow(2, Lerp(Log2(0.9375), Log2(0.8333), MatchWidthOrHeight)));
MatchWidthOrHeight会决定Width和Height Scale所占比例。
如果MatchWidthOrHeight为0。
scaleFactor = Mathf.Pow(kLogBase, logWeightedAverage) = Pow(2, Lerp(Log2(0.9375), Log2(0.8333), 0))) = Pow(2, Log2(0.9375)) = 0.9375;
Canva Size Width = Screen Size Width / scaleFactor = 960 / 0.9375 = 1024
Canva Size Height = Screen Size Height / scaleFactor = 640 / 0.9375 = 682.667
为什么需要通过先取对数在进行平均混合了?
假設Reference Resolution為400300,Screen Size為200600 大小關係是
Reference Resolution Width 是 Screen Size Width的2倍
Reference Resolution Height 是 Screen Size 的0.5倍
看起来如下图:
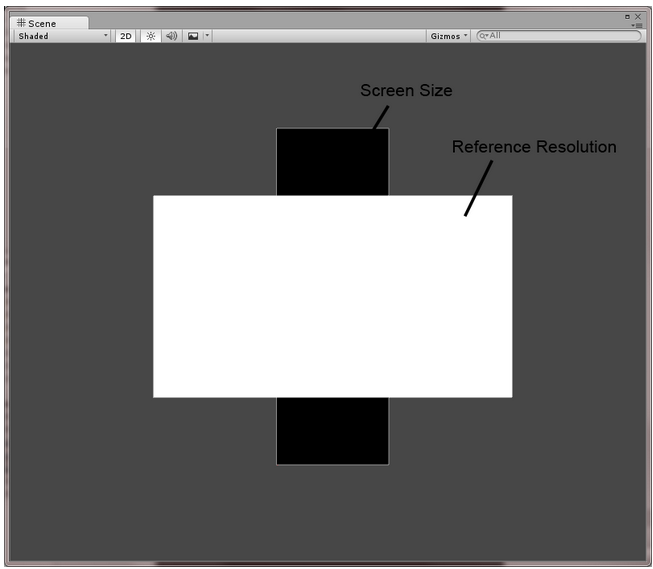
當March為0.5時,ScaleFactor應該要是 1 (拉平) — ?没太理解这里拉平的概念
ScaleFactor Width: 200/400=0.5
ScaleFactor Height:600/300=2
一般混合:
ScaleFactor = March ScaleFactor Width + (1 - March) ScaleFactorHeight
ScaleFactor = 0.5 0.5 + 0.5 2 = 1.25
對數混合:
logWidth:log2(0.5) = -1
logHeight:log2(2) = 1
logWeightedAverage:0
ScaleFactor:Pow(2,0) = 1 - Expand(将Canva Size基于宽度或高度去扩大)
以Scale Factor Width和Scale Factor Height中小的为准。 - Shrink(将Canva Size基于宽度或高度去收缩)
以Scale Factor Width和Scale Factor Height中大的为准。
scaleFactor一般混合為1.25,對數混合為1,結果很明顯,使用對數混合能更完美的修正大小
可以看出UGUI的自适应都是基于动态计算Scale Factor(也就是Canva Size即Canva Scale的大小)来实现的。
- MatchWidthOrHeight(根据Screen Size相对于预设Resolution的宽度和高度变化去计算ScaleFactor(缩放Canva Size))
Constant Physical Size
Makes UI elements retain the same physical size regardless of screen size and resolution.
保持UI的Physical Size(DPI - Dots Per Inch 每英寸像素点)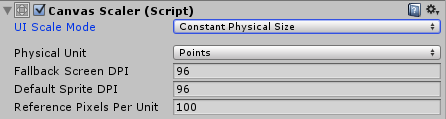
Physical Unit:使用的單位种类
1
2
3
4
5
6
7| 单位种类 | 中文 | 与1英寸关系 |
| ----------- | -------------- | ------------- |
| Centimeters | 公分(cm,厘米) | 2.54 |
| Millimeters | 毫米(mm,毫米) | 25.4 |
| Inches | 英寸 | 1 |
| Points | 点 | 72 |
| Picas |皮卡(十二点活字)| 6 |Fallback Screen DPI:备用Dpi,当找不到设备Dpi時,使用此值
- Default Sprite DPI:预设的图片Dpi
1
2
3
4
5
6
7
8
9
10
11
12
13
14float currentDpi = Screen.dpi;
float dpi = (currentDpi == 0 ? m_FallbackScreenDPI : currentDpi);
float targetDPI = 1;
switch (m_PhysicalUnit)
{
case Unit.Centimeters: targetDPI = 2.54f; break;
case Unit.Millimeters: targetDPI = 25.4f; break;
case Unit.Inches: targetDPI = 1; break;
case Unit.Points: targetDPI = 72; break;
case Unit.Picas: targetDPI = 6; break;
}
SetScaleFactor(dpi / targetDPI);
SetReferencePixelsPerUnit(m_ReferencePixelsPerUnit * targetDPI / m_DefaultSpriteDPI);
结论:
ScaleFactor 為 “目前硬體dpi” 佔了 “目標單位” 的比例
ReferencePixelsPerUnit 要與目前的Dpi在運算求出新的值,再傳入Canvas中求出大小,公式如下:
新的Reference Pixels Per Unit = Reference Pixels Per Unit * Physical Unit / Default Sprite DPI
UI大小 = 原圖大小(Pixels) / (Pixels Per Unit / 新的 Reference Pixels Per Unit)
(关于基于Constant Physical Size这一点还没看明白,上面资料来源)
RectTransform:
The Rect Transform is a new transform component that is used for all UI elements instead of the regular Transform component. Rect Transforms have position, rotation, and scale just like regular Transforms, but it also has a width and height, used to specify the dimensions of the rectangle.
RectTransform是用于指定UI相关的一些信息(Position,Rotation,scale,Anchors,Pivot等)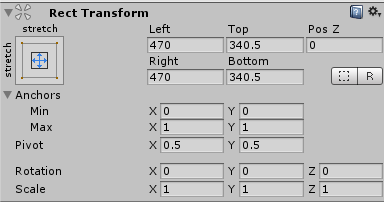
Pivot(枢轴):
物体的transform变化,比如scale,position,rotation都会以这个点为基准来变化
Anchors(锚点):
主要用于UI的layout排版,根据Anchors的位置设置不同,UI会在父节点RectTransform变化的时候做出适当的变化(这里的Anchors相当于完成了NGUI里UIAnchor和UIStreach的任务)。Anchors能够保证以4个锚点设定的相对位置(可以相对屏幕比例,也可以相对特定像素值)。
Layout System:
Layout System是基于RectTransform之上的系统,用自动调整一个或多个元素的大小,位置,间隔等。(用于UI布局很重要)
详细学习参考Unity UGUI 原理篇(五):Auto Layout 自動佈局
结论:
UI Render Mode决定了UI的显示方式。
UI Scale Mode决定了UI的大方向(保持像素还是保持比例还是保持物理大小)自适应策略。
Pivot决定了自适应的基准点。
Anchors决定了自适应变化的参考物(比如我们把锚点都设置在父RectTransform的左上角,那么自适应的时候无论父RectTransform大小如何变化该UI都是相对于父RectTransform的位置都不会变化(但UI大小会变,因为我们可能设置了Scale With Screen Size使得Canvas会自适应屏幕变化(Canvas Scale值会变)),如果我们把锚点设置到父RectTranform的四个角,那么UI就会根据父RectTransform的大小的变化比例去适应(一般用于背景显示,保证背景铺满屏幕,可能会拉伸))
在得出最终结论之前,让我们来看一个像素完美显示问题。
如何保证Pixel Perfect 2D?
参考文章Pixel Perfect 2D
The secret to making your pixelated game look nice is to ensure that your sprite is rendered on a nice pixel boundary. In other words, ensure that each pixel of your sprite is rendered on one screen pixel (or any other round number). The trick to achieving this result is tweaking the camera’s orthographic size (and live with the consequences).
从上面可以看出要保证Pixel Perfect显示,我们需要保证Sprite的一个像素在屏幕上对应显示像素为整数倍(最好1:1)。要做到这一点通过修改Camera Orthographic Size可以做到。正如NGUI 2.7屏幕自适应学习中提到的,我们要保证PPU = Screen.height / 2 / Orthographic Size;
因为我们不可能修改物理的Screen.height,所以为了在不同设备上完美显示像素,我们能做的是动态修改Orthographic Size或制作多套PPU Asset去动态使用。
详情参考:1
2
3
4
5
6
7
8Vertical Resolution | PPU | PPU Scale | Orthographics Size | Size Change
---------------------|--------|-----------|--------------------|----------------
768 | 32 | 1x | 12 | 100%
1080 | 32 | 1x | 16.875 | 140%
1080 | 48 | 1x | 11.25 | 93.75%
1080 | 32 | 2x | 8.4375 | 70.31%
1440 | 32 | 2x | 11.25 | 93.75%
1536 | 32 | 2x | 12 | 100%
但是由于修改Orthographic Size会导致Visible World Space变化,所以还需要根据项目实际情况做出修正。
- Thick Borders
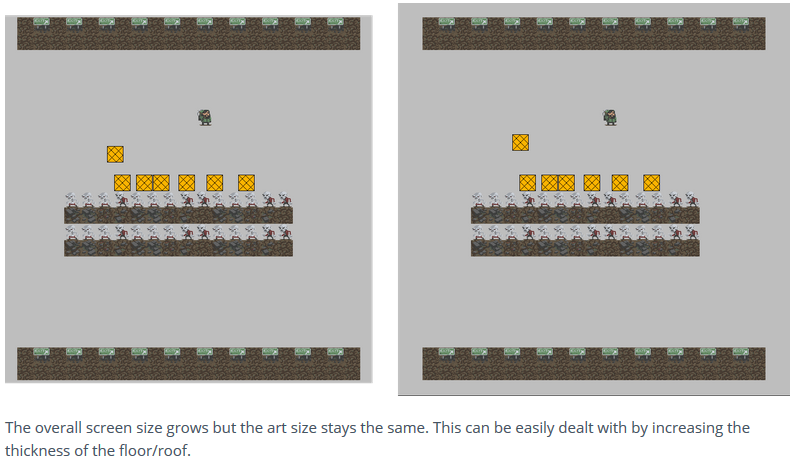
如果是2D游戏有边框限制且Orthographic Size变化不大,我们可以通过只调整边框厚度去弥补 - Increase Asset Resolution
通过制作多套PPU的Asset,已达到修正Orthographics Size值(从前面表格可以看出,通过使用不同PPU Asset可以在保证Pixel Perfect的前提下尽量减小Orthographics Size的变化)的目的。(Size Change变化不大的话可以采用第一种方案按情况弥补) - Halving Orthographic Size
如果Screen.height变化很大,导致计算出的Orthographics Size变化很大,我们可以通过修正(以2倍数为基准)Orthographic Size大小使其Size Change变化不大,然后通过Thick Borders来做最后修正。(比如表格上面从768变到1440的时候,我们Orthographics Size不是22.5而是22.5/2=11.25来修正。这个方法的好处是不需要做多套PPU的Asset)
UGUI自适应的结论就不言而喻了,一般来说都是基于按比例的缩放,所以设置如下(2D为例):
UI Render Mode — Screen Space(Camera),设置Main Camera为Orthographic,Orthographic Size设置为Screen.height / 2 / PPU(使用Screen Space(Camera)为了配合Orthographic Camera对Scren Unit进行细分)
UI Scale Mode — Scale With Screen Size,设置基准Resolution,同时Screen Match Mode为MatchWidthOrHeight = 0-1(适应宽和高的比例,根据实际情况选择e.g. 横版2D或者竖版2D黑边要求不一样)。
Pivot — 不出意外都设置在UI的中心点
Anchors — 如果是和父RectTransform大小一起适应的话,放到父RectTransform的四个角即可(可能会有拉伸,多用于背景显示)。如果想保持UI相对于父RectTransform的特定比例的位置即设置锚点到特定比例位置即可。如果只想保持相对位置不变,四个锚点都设置到同一个点即可(一般UI都有固定位置,一般都设置成这个)。更多的UI排版使用Layout,Layout Group管理。
美术制作的时候以UI Scale Mode里设置的Resolution基准和PPU设定来制作(比如Resolution基准决定了背景图片的大小,PPU设定决定UI大小(PPU = Screen.height / 2 / Orthographic Size),如果设定Screen.height = 768,Orthographic Size = 12, 那么PPU = 32, 1 unit = 32 pixel,屏幕UI高度为24 Unit,如果想设计button占屏幕高度1 unit,那么32 * 32 像素即可)。
然后在游戏里通过动态计算Orthographic Size来确保Pixel Perfect显示。1
Orthographic Size = Screen.height / 2 / PPU(32);
当Screen.height(Orthographic Size变化大)变化大的时候,我们通过按2的倍数的比例来修正Orthographic Size。(也可以通过制作多套PPU的Asset来动态替换)
EventSystem
UI要想响应UI Event,必须在场景里创建EventSystem(创建UI Canvas的时候会自动创建)。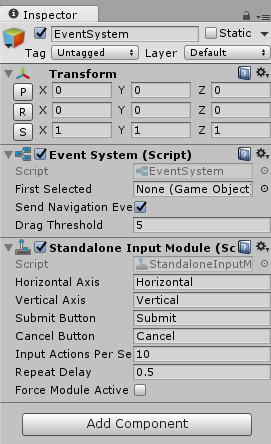
可以看到现在Event System主要是由2个Component构成:
- Event System
The EventSystem is responsible for processing and handling events in a Unity scene. A scene should only contain one EventSystem.
Event System是负责处理场景里的事件,负责更新Input Module
点击Play后,选中Event System,然后在场景里交互的时候,EventSystem会显示出当前交互的信息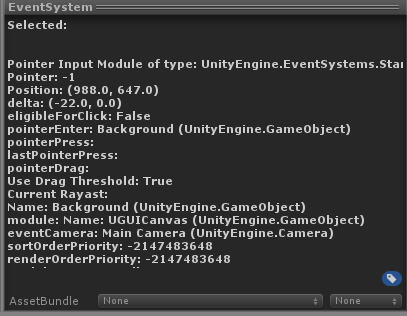
Send Navigation Events — 用于控制是否开启UI导航功能(通过按下键盘上下左右来选择)
通过设置Button的Navigation为Explicit我们可以设置该Button的具体导航情况: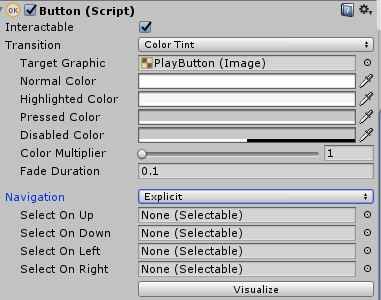
- Standalone Input Module
Input module for working with, mouse, keyboard, or controller.An Input Module is a component of the EventSystem that is responsible for raising events and sending them to GameObjects for handling.
负责Input输入的控制,负责触发和发送事件到指定对象
Event System 触发流程- 使用者输入(触摸、键盘)
- 透过Scene中的Raycasters计算哪个元素被点中
- 使用Input Module,发送Event到指定对象
Canvas上的GraphicRaycaster负责设定UI相关的raycast信息响应: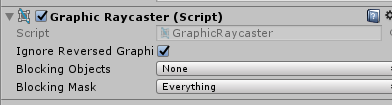
同理PhycsicsRaycaster会负责物理的raycast相关的信息响应。(比如响应位于一个含Collider3D物体之上)
UGUI Atlas
以下学习参考UGUI研究院之全面理解图集与使用(三)
NGUI的Atlas是通过提前制作好,但UGUI里这一概念模糊了,我们通过设定Sprite的信息:![]()
通过设置tag来决定图集tag。
然后在打包或主动使用Sprite Packer的时候会去打包图集,Sprite Packer设定Edit -> Project Setting -> Editor:![]()
为了方便查看Sprite Packer打包和Draw call情况,我们采用Always Enable。
我们也可以通过打开Sprite Packer主动去查看图集的打包情况:![]()
通过Profiler可以查看到当前Draw Call: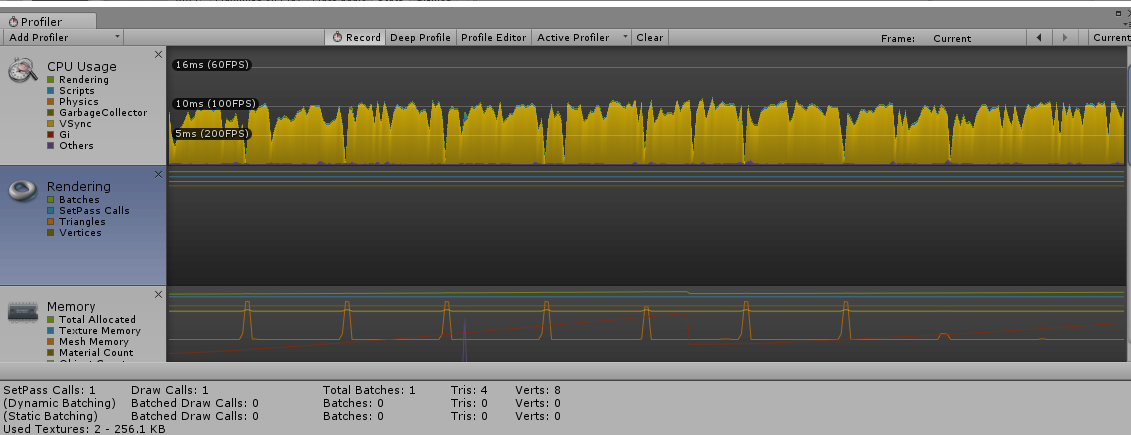
关于根据图片名字动态创建Sprite的方案(通过把小图片关联到Prefab上,然后通过Resources.load来加载来实现)以及图集在线更新方案(Assetbundle)参考UGUI研究院之全面理解图集与使用(三)
Note:
因为在同一个图集里所以,纹理图片只需加载一张,只需通过UV坐标切换就能实现渲染多个Sprite,所以在同一个图集里的Sprite渲染都放在一个Draw Call里就能完成。(关于Draw Call以后的学习再深入学习)
Resources下面的Sprite不会被打包到图集里。
图集的存放位置在Assets同级目录的Library/AtlasCache下
关于Font Atlas,UGUI采用动态字体,我们直接导入.ttf等文件就能使用了。
Multiplayer Networking
The Hight Level API
Using this means you get access to commands which cover most of the common requirements for multiuser games without needing to worry about the “lower level” implementation details.
高层面的多人游戏网络传输的抽象,可以方便快速的用于制作简单的多人网络游戏。
多人网络概念:
Server and Host: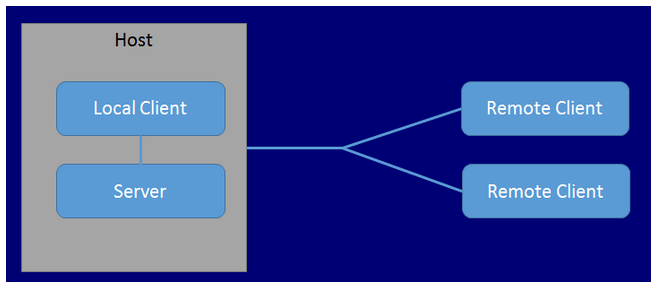
The host is a server and a client in the same process. The host uses a special kind of client called the LocalClient, while other clients are RemoteClients. The LocalClient communicates with the (local) server through direct function calls and message queues, since it is in the same process. It actually shares the scene with the server. RemoteClients communicate with the server over a regular network connection.
Host和Client运行在一个Process里。一个Host多个Client,Host相当于本地通信,其他的Clients通过network通信。
支持实现如下功能:
- Control the networked state of the game using a “Network Manager”.(通过NetworkManager管理网络状态)
- Operate “client hosted” games, where the host is also a player client.(运行Client Host游戏)
- Serialize data using a general-purpose serializer.(序列化数据)
- Send and receive network messages.(网络数据message发送接收)
- Send networked commands from clients to servers.(从clients发送networked commands到servers)
- Make remote procedure calls (RPCs) from servers to clients.(servers到clients的远程程序调用)
- Send networked events from servers to clients.(从servers发送networed events到clients)
实例学习参考Multiplayer Networking
The HLAPI is a new set of networking commands built into Unity, within a new namespace: UnityEngine.Networking.
在UnityEngine.Networking下HLAPI提供了大量方便的接口方法用于开发多人游戏。
让我们看看Unity里网络编程的大体框架结构: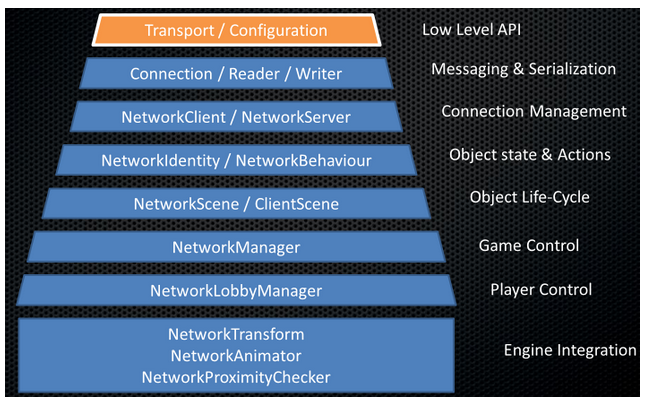
更多内容待学习
Using The Transport Layer API
The Transport Layer is a thin layer working on top of the operating system’s sockets-based networking. It’s capable of sending and receiving messages represented as arrays of bytes, and offers a number of different “quality of service” options to suit different scenarios. It is focused on flexibility and performance, and exposes an API within the UnityEngine.Networking.NetworkTransport class.
基于Socket-based networking的底层接口,用于实现自定义的网络传输。
Support two protocols:
- UDP for generic communications
- WebSockets for WebGL
更多内容待学习
Unity Shader
详情参见Unity_Shader
Excel数据读取
Unity官网给出TextAsset类用于读取下列格式的文件:
.txt, .html, .htm, .xml, .bytes, .json, .csv(逗号分隔值(Comma-Separated Values,CSV,有时也称为字符分隔值,因为分隔字符也可以不是逗号),其文件以纯文本形式存储表格数据(数字和文本)), .yaml, .fnt
从上面可以看出并不支持直接对excel(.xlsx,.xls等格式)的解析。
通过官网可以看出TextAsset是针对文本和二进制类型文件的读取,具体的解析还得自己去写。
所以并不是我想找的Excel解析的解决方案。
让我们来看看这篇文章Unity3D游戏开发之当游戏开发遇上Excel。
作者对Excel解析下了不少功夫。
从上面可以看出,针对Excel解析作者找到了三中解决方案:
- Microsoft.Office.Interop.Excel
基于微软提供的Office API,这组API以COM组件的形式给出,我们可以通过调用该API实现对Excel文件的解析。微软的Office API特点是使用起来方便,可以使用C#、Visual Basic等语言进行相关开发。可是这种解决方案的的缺点同样很明显,因为COM组件主要依赖于系统,因此使用COM组件需要在系统中注册,这将对代码的可移植性产生影响,而且受制于COM技术,这种解决方案只能运行在Windows平台上,无法实现跨平台,加之解析速度较慢,因此这种方案通常只适合在解析速度要求不高,运行环境为Windows平台的应用场景。
关键词:
不跨平台 - ExcelReader
ExcelRead就是跨平台目标下解析Excel文件的首选方案。
ExcelRead website
从描述来看支持Windows和OS X,Linux等(注意不包含移动端IOS和Android)。但就PC端来看已经足够作为解析Excel的方式了。
Note:
针对移动端的时候可以采用先在PC端把数据读取出来写到单独的数据文件,然后再到移动端去读取解析。 - FastExcel
FastExcel是一个在开源世界里的一个java编写的工具。FastExcel Website。官网上有简单demo方便快速集成。
接下来我选择以ExcelReader为解决方案,尝试使用ExcelReader来解析Excel。
- 下载Dll,官网的建议是直接下载DLL来用
ExcelReader DLL Download
可以看到主要有两个DLL(Excel.4.5.dll & ICSharpCode.SharpZiplib.dll)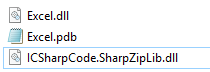
- 导入DLL到Unity(Unity对Managed Plugins支持很方便,直接在Asset下创建一个目录copy进去即可)
Note:
这里要注意的一点,需要采用基于.net 2.0的dll而非基于.net 4.5的(我想是由于mono还不支持所有.net的特性导致的) - 通过导入命名空间就可以正常使用ExcelReader库了
以下是根据代码参考Unity3D游戏开发之当游戏开发遇上Excel和Unity3D研究院之MAC&Windows跨平台解析Excel(六十五)和Excel Data Reader - Read Excel files in .NET:1
2
3
4
5
6
7
8
9
10
11
12
13
14
15
16
17
18
19
20
21
22
23
24
25
26
27
28
29
30
31
32
33
34
35
36
37
38
39
40
41
42
43
44
45
46
47
48
49
50
51
52
53
54
55
56
57
58
59
60
61
62
63
64
65
66
67
68
69
70
71
72
73
74
75
76
77
78
79using UnityEngine;
using System.Collections;
using Excel;
using System.IO;
using System.Data;
using System;
public class GameConfigurationManager
{
public static GameConfigurationManager mLMInstance = new GameConfigurationManager();
public string ConfigurationPath
{
set
{
mConfigurationPath = value;
}
}
private string mConfigurationPath = "/Configuration/AccountPasswordAndGameSetting.xlsx";
private bool mIsConfigurationComplete = false;
private GameConfigurationManager()
{
}
public void Init()
{
if(!mIsConfigurationComplete)
{
try
{
ReadConfiguration();
mIsConfigurationComplete = true;
}
catch(Exception e)
{
mIsConfigurationComplete = false;
Debug.Log("Exception " + e.ToString());
}
}
}
private void ReadConfiguration()
{
Debug.Log("Application.dataPath = " + Application.dataPath);
Debug.Log("mConfigurationPath = " + mConfigurationPath);
FileStream stream = File.Open(Application.dataPath + mConfigurationPath, FileMode.Open, FileAccess.Read);
// Reading from a excel file
IExcelDataReader excelreader = ExcelReaderFactory.CreateOpenXmlReader(stream);
// DataSet -- the result of each spreadsheet will be created in the result tables
DataSet result = excelreader.AsDataSet();
int sheetcount = result.Tables.Count;
Debug.Log("sheetcount = " + sheetcount);
for(int m = 0; m < sheetcount; m++)
{
int rows = result.Tables[m].Rows.Count;
int columns = result.Tables[m].Columns.Count;
Debug.Log(string.Format("Table[{0}] with row = {1} columns = {2}", m, rows, columns));
for(int i = 0; i < rows; i++)
{
for(int j = 0; j < columns; j++)
{
string value = result.Tables[m].Rows[i][j].ToString();
Debug.Log(string.Format("result.Tables[{0}].Rows[{1}][{2}] = {3}",m,i,j,value));
}
}
}
excelreader.Close();
}
}
通过上述方法我成功的打印出了AccountPasswordAndGameSetting.xlsx里2个sheet的数据,见下图:

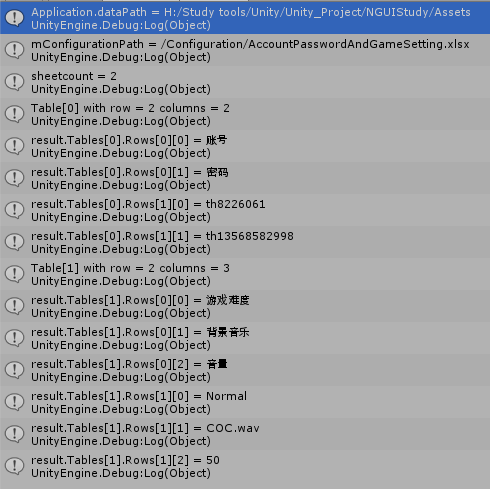
Note:
上面有用到DataSet,DataSet类是属于System.Data.dll里的,所以我们还必须Copy存放在**\Unity\Editor\Data\Mono\lib\mono\2.0下的System.Data.dll到我们的Dlls目录。
资源管理
Plugins
详情参见Unity-Plugins
C#脚本
public成员 — 编辑器可见可编辑
[System.Serializable] — 标志该类可以被序列化到Inspector
[HideInInspector] — 标志该成员在编辑器不可见
StartCoroutine(Function()) && yield && WaitForSeconds — 联合使用可以实现对游戏逻辑的等待判断(多线程访问控制)
GameObject.FindGameObjectWithTag(Name) — 用于寻找特定tag的对象
Virtual Method — Virtual Method使该方法可以被重写
abstract — 定义该类是抽象类 && 该方法是抽象方法(需要被子类实现)
Persistence - Saving and Loading Data
PlayerPrefs
Stores and accesses player preferences between game sessions. (用于存储一些不重要的用户设定的数据,比如游戏分辨率,游戏难度等)
IOS里面的.plist文件,Andoid里面的Preference(程序数据文件)
Seralization
What is seralization?
serialization is the process of converting the state an object to a set of bytes in order to store (or transmit) the object into memory, a database or a file.
C# Serialization
GameController.cs1
2
3
4
5
6
7
8
9
10
11
12
13
14
15
16
17
18
19
20
21
22
23
24
25
26
27
28
29
30
31
32
33
34
35
36
37
38
39
40
41
42
43
44
45
46
47
48
49
50
51
52
53
54
55
56
57
58
59
60
61
62
63
64
65
66
67
68
69
70
71
72
73
74
75
76
77
78
79
80
81
82
83
84
85
86
87
88
89
90
91
92
93
94
95
96
97
98
99
100
101
102
103
104
105
106
107
108
109
110
111
112
113
114
115
116
117
118
119
120
121
122
123
124
125
126using UnityEngine;
using System.Collections;
using System;
using System.Runtime.Serialization.Formatters.Binary;
using System.IO;
using UnityEngine.UI;
public class GameController : MonoBehaviour {
public static GameController mController;
public PlayerData mPlayerData;
public float mPreferenceHealth = 0;
private string mPlayerSavePath;
void Awake()
{
if (mController == null) {
DontDestroyOnLoad (gameObject);
mController = this;
} else if (mController != this) {
Destroy(gameObject);
}
mPlayerData = new PlayerData ();
mPlayerSavePath = Application.persistentDataPath + "/playerInfo.dat";
Debug.Log ("mPlayerSavePath = " + mPlayerSavePath);
}
void OnGUI()
{
GUI.Label (new Rect (10, 10, 200, 30), "Preference Health: " + mPreferenceHealth);
GUI.Label (new Rect (10, 50, 200, 30), "mPlayerData.mHealth: " + mPlayerData.mHealth);
if (GUI.Button (new Rect (10, 90, 120, 30), "Increase Health")) {
mPreferenceHealth += 10;
mPlayerData.mHealth += 10;
}
if (GUI.Button (new Rect (10, 130, 120, 30), "Decrease Health")) {
mPreferenceHealth -= 10;
mPlayerData.mHealth -= 10;
}
if (GUI.Button (new Rect (10, 170, 120, 30), "Save File")) {
Save ();
}
if (GUI.Button (new Rect (10, 210, 120, 30), "Load File")) {
Load ();
}
if (GUI.Button (new Rect (10, 250, 120, 30), "Save Preference")) {
SavePreference ();
}
if (GUI.Button (new Rect (10, 290, 120, 30), "Load Preference")) {
LoadPreference ();
}
}
public void Save()
{
Debug.Log ("Application.persistentDataPath = " + Application.persistentDataPath);
if (!File.Exists (mPlayerSavePath)) {
FileStream fsc = File.Create(mPlayerSavePath);
fsc.Close();
}
BinaryFormatter bf = new BinaryFormatter ();
FileStream fs = File.Open (mPlayerSavePath, FileMode.Open);
bf.Serialize (fs, mPlayerData);
fs.Close ();
}
public void Load()
{
if(File.Exists(mPlayerSavePath))
{
BinaryFormatter bf = new BinaryFormatter();
FileStream fs = File.Open(mPlayerSavePath,FileMode.Open);
mPlayerData = (PlayerData)bf.Deserialize(fs);
fs.Close();
Debug.Log("Load: mPlayerData.mHealth = " + mPlayerData.mHealth);
Debug.Log("Load: mPlayerData.mB.BuildingType = " + mPlayerData.mB.mBT);
}
}
public void SavePreference()
{
//Player preference
PlayerPrefs.SetFloat ("Health", mPreferenceHealth);
}
public void LoadPreference()
{
Debug.Log("Pre Health = " + PlayerPrefs.GetFloat("Health"));
mPreferenceHealth = PlayerPrefs.GetFloat ("Health");
}
}
[Serializable]
public class PlayerData
{
public float mHealth = 100;
public Building mB = new Building();
}
[Serializable]
public enum BuildingType
{
E_WALL = 0
}
[Serializable]
public class Building
{
public BuildingType mBT = BuildingType.E_WALL;
}

Note:
Cross Platform except Web
Unity Editor Window, Menu Item & ScriptableObject
1 | using UnityEditor; |
通过自定义Menu Item的功能,我们可以快速创建一些我们所需要的原件
通过自定义Editor Window,我们可以用于制作特定数据的编辑框
ScriptableObject主要用于存储一些不重要的数据,和Monobehaviour的主要区别就是不用attach到游戏对象上,需要通过CreateInstance的方式来创建
结合自定义Editor Window和ScriptableObject的存储,我们可以通过自定义编辑框自定义数据并使用
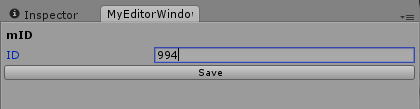
Coroutine
Why are we using coroutines?
- Making things happen step by step
- Writing routines that need to happen over time
- Writing routines that have to wait for another operation to complete
What is a coroutine?
Coroutines are not threads and coroutines are not asynchronous.
A coroutine is a function that is executed partially and, presuming suitable conditions are met, will be resumed at some point in the future until its work is done.
The start of a coroutine corresponds to the creation of an object of type coroutine. That object is tied to the MonoBehaviour component that hosted the call.
How long is the life cycle? & When does coroutine get called?
The lifetime of the Coroutine object is bound to the lifetime of the MonoBehaviour object, so if the latter gets destroyed during process, the coroutine object is also destroyed. Whenever game object that is bound to coroutine is destroyed or inactive(e.g. gameobject.SetActive(false), Destroy(gameobject)), the coroutine will stop to be called. Coroutine is run until a yield is found.
GameController.cs1
2
3
4
5
6
7
8
9
10
11
12
13
14
15
16
17
18
19
20
21
22
23
24
25
26
27
28
29
30
31
32
33
34
35
36
37
38
39
40
41
42
43
44
45
46
47
48
49
50
51
52
53
54
55
56
57
58
59
60
61
62
63
64
65
66
67
68
69
70
71
72
73
74
75
76
77using UnityEngine;
using System.Collections;
using System;
using System.Runtime.Serialization.Formatters.Binary;
using System.IO;
using UnityEngine.UI;
//For Menu Item
using UnityEditor;
public class GameController : MonoBehaviour {
public static GameController mController;
public GameObject mCoroutineObject;
private float mInputTimer = 0.0f;
public float mValidInputDeltaTime = 0.5f;
void Awake()
{
if (mController == null) {
DontDestroyOnLoad (gameObject);
mController = this;
} else if (mController != this) {
Destroy(gameObject);
}
}
void Update()
{
mInputTimer += Time.deltaTime;
if (mInputTimer > mValidInputDeltaTime) {
if (Input.GetKey (KeyCode.C)) {
mInputTimer = 0.0f;
Debug.Log ("Ative Coroutine Game Object");
mCoroutineObject.SetActive (true);
}
}
if (mInputTimer > mValidInputDeltaTime) {
if (Input.GetKey (KeyCode.U)) {
mInputTimer = 0.0f;
Debug.Log ("UnAtive Coroutine Game Object");
mCoroutineObject.SetActive (false);
}
}
if (mInputTimer > mValidInputDeltaTime) {
if (Input.GetKey (KeyCode.E)) {
mInputTimer = 0.0f;
Debug.Log ("Enable Coroutine MonoBehaviour");
mCoroutineObject.GetComponent<CoroutineStudy>().enabled = true;
}
}
if (mInputTimer > mValidInputDeltaTime) {
if (Input.GetKey (KeyCode.D)) {
mInputTimer = 0.0f;
Debug.Log ("Desable Coroutine MonoBehaviour");
mCoroutineObject.GetComponent<CoroutineStudy>().enabled = false;
}
}
if (mInputTimer > mValidInputDeltaTime) {
if (Input.GetKey (KeyCode.K)) {
mInputTimer = 0.0f;
Debug.Log ("Destroy Coroutine Game Object");
Destroy(mCoroutineObject);
}
}
}
}
CoroutineStudy.cs1
2
3
4
5
6
7
8
9
10
11
12
13
14
15
16
17
18
19
20
21
22
23
24
25
26
27
28
29
30
31
32
33
34
35
36
37
38
39
40
41
42
43
44
45
46
47
48
49
50
51
52
53
54
55
56
57
58
59
60
61
62
63
64
65
66
67
68
69
70
71
72
73
74
75
76
77
78
79
80
81
82
83
84
85
86
87
88
89
90
91
92
93
94
95
96
97using UnityEngine;
using System.Collections;
public class CoroutineStudy : MonoBehaviour {
private string mCoroutineText;
private bool isFixedCall = false; //Makesure Update() and LateUpdate() and FixedUpdate() Log only once
private bool isUpdateCall = false;
private bool isLateUpdateCall = false;
void Awake()
{
mCoroutineText = "";
}
void Start()
{
}
void OnGUI()
{
GUI.Label (new Rect (10, 10, 200, 30), "Coroutine Text: " + mCoroutineText);
if (GUI.Button (new Rect (400, 10, 120, 30), "Start Coroutine")) {
mCoroutineText = "";
StartCoroutine (CoroutineCall ());
}
}
void FixedUpdate()
{
if (!isFixedCall)
{
Debug.Log("FixedUpdate Call Begin");
StartCoroutine(FixedCoutine());
Debug.Log("FixedUpdate Call End");
isFixedCall = true;
}
}
IEnumerator FixedCoutine()
{
Debug.Log("This is Fixed Coroutine Call Before");
yield return null;
Debug.Log("This is Fixed Coroutine Call After");
}
void Update()
{
if (!isUpdateCall)
{
Debug.Log("Update Call Begin");
StartCoroutine(UpdateCoutine());
Debug.Log("Update Call End");
isUpdateCall = true;
}
}
IEnumerator UpdateCoutine()
{
Debug.Log("This is Update Coroutine Call Before");
yield return null;
Debug.Log("This is Update Coroutine Call After");
}
void LateUpdate()
{
if (!isLateUpdateCall)
{
Debug.Log("LateUpdate Call Begin");
StartCoroutine(LateCoutine());
Debug.Log("LateUpdate Call End");
isLateUpdateCall = true;
}
}
IEnumerator LateCoutine()
{
Debug.Log("This is Late Coroutine Call Before");
yield return null;
Debug.Log("This is Late Coroutine Call After");
}
private IEnumerator CoroutineCall()
{
for (int i = 1; i <= 20; i++) {
mCoroutineText = i.ToString();
Debug.Log("Coroutine Text: " + mCoroutineText);
yield return new WaitForSeconds(1.0f);
}
mCoroutineText = "Finished";
}
}
ScreenShots
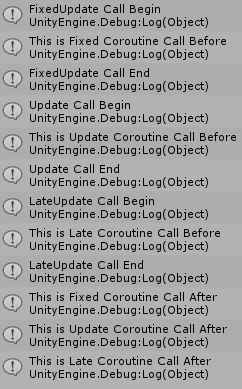
Note:
Diable Monobehaviour(e.g. Monobehaviour.enabled = false) will not influence coroutine.
Coroutine with yiled return null will get called after LateUpdate()(仅根据上面的测试结果)
通过返回WaitForSeconds() || WaitForEndOfFrame() || WaitForFixedUpdate() 等yield return 支持的返回类型可以实现coroutine在特定时刻继续调用
StartCoroutine()支持嵌套调用用于实现特定等待特定运算后继续执行特定代码
How to stop coroutines?
IEnumerator coroutine = WaitForSeconds(3.0f);
StartCoroutine(coroutine);
StopCoroutine(coroutine);
Note:
注意如果gameobject处于InActive或则has been destroyed,Coroutine不会再被调用,可以通过Monobehaviour.enabled = false来实现使物体不可见但会出发coroutine的效果
Go depth in Coroutine
参考文章:Coroutine,你究竟干了什么?
在更深入了解coroutine之前让我们先了解下什么是IEnumerator和yield?
IEnumrator
Supports a simple iteration over a non-generic collection..aspx)
在C#里IEnumerator组要是为了自定义类型支持迭代器访问.
yield
yield是C# 2.0引入的特性,表明调用yield的方法是iterator.每一次的迭代访问该方法,都会调用MoveNext()方法,而调用MoveNext()方法的时候就会执行该方法代码,但如果执行IEnumerator方法到yield的时候,该方法就会返回并且记录下yield的位置,并在下一次调用该方法的时候继续执行。
通过yield break我们可以结束方法迭代。
为什么要提IEnumerator和yield了?
因为Coroutine其实就是一个IEnumerator的迭代器。
在我们调用StartCoroutine的时候迭代器就被我们添加到了coroutine列表中
而Coroutine管理者会每一帧去迭代访问判断每一个coroutine是否达到条件可以删除并继续执行
CoroutineManager.cs
1 | using UnityEngine; |
ScreenShots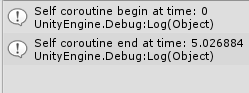
Unity优化注意事项
Code
Use For or while instead of foreach
Foreach在通过Mono编译后会造成额外的内存分配(通过VS编译好像不会 — 这个未测试)
参考网站
ForEachAndFor.cs1
using UnityEngine;
using System.Collections;
using System.Collections.Generic;

public class ForEachAndFor : MonoBehaviour {

    private List<int> mTestList;

	// Use this for initialization
	void Start () {
        mTestList = new List<int>(1000);
        for(int i = 0; i < mTestList.Count; i++)
        {
            mTestList[i] = i;
        }
	}

	// Update is called once per frame
	void Update () {

        foreach(var it in mTestList)
        {

        }
        /*
        for(int i = 0; i < mTestList.Count; i++)
        {

        }
        */
	}
}
ScreenShorts:

从上面的测试结果可以看出foreach确实分配了额外40B的内存开销
让我们看看foreach代码反编译后的样子(我用的ILSpy):1
using System;
using System.Collections.Generic;
using UnityEngine;

public class ForEachAndFor : MonoBehaviour
{
	private List<int> mTestList;

	private void Start()
	{
		this.mTestList = new List<int>(1000);
		for (int i = 0; i < this.mTestList.get_Count(); i++)
		{
			this.mTestList.set_Item(i, i);
		}
	}

	private void Update()
	{
		using (List<int>.Enumerator enumerator = this.mTestList.GetEnumerator())
		{
			while (enumerator.MoveNext())
			{
				int current = enumerator.get_Current();
			}
		}
	}
}
从上面看看不出为什么会有内存分配
让我们通过IL反编译工具看生成的IL底层内容(通过IL反编译工具,安装VS就自带的)1
.method private hidebysig instance void  Update() cil managed
{
  // 代码大小       55 (0x37)
  .maxstack  8
  .locals init (int32 V_0,
           valuetype [mscorlib]System.Collections.Generic.List`1/Enumerator<int32> V_1)
  IL_0000:  ldarg.0
  IL_0001:  ldfld      class [mscorlib]System.Collections.Generic.List`1<int32> ForEachAndFor::mTestList
  IL_0006:  callvirt   instance valuetype [mscorlib]System.Collections.Generic.List`1/Enumerator<!0> class [mscorlib]System.Collections.Generic.List`1<int32>::GetEnumerator()
  IL_000b:  stloc.1
  .try
  {
    IL_000c:  br         IL_0019
    IL_0011:  ldloca.s   V_1
    IL_0013:  call       instance !0 valuetype [mscorlib]System.Collections.Generic.List`1/Enumerator<int32>::get_Current()
    IL_0018:  stloc.0
    IL_0019:  ldloca.s   V_1
    IL_001b:  call       instance bool valuetype [mscorlib]System.Collections.Generic.List`1/Enumerator<int32>::MoveNext()
    IL_0020:  brtrue     IL_0011
    IL_0025:  leave      IL_0036
  }  // end .try
  finally
  {
    IL_002a:  ldloc.1
    IL_002b:  box        valuetype [mscorlib]System.Collections.Generic.List`1/Enumerator<int32>
    IL_0030:  callvirt   instance void [mscorlib]System.IDisposable::Dispose()
    IL_0035:  endfinally
  }  // end handler
  IL_0036:  ret
} // end of method ForEachAndFor::Update
可以看出Mono编译出来的代码在finally进行了一次将valuetype的Enumerator,boxing的过程(这里并不是非常明白底层代码对应的代码,但看大概意思应该是using那里编译后导致的boxing)
关于Box和Unbox参考
从官网可以看出在Boxing Value type的时候会将信息临时存储在Heap上从而造成的额外内存开销
Rendering
减少渲染的物体数量和精度
Physic
Close Unnecessary Collision
(Edit -> Project Settings -> Physics)
只打开需要碰撞检测的Layer之间的碰撞检测
Memory
Avoid Uneccessary GC
尽量重复使用申请的内存,不要每一次都重新申请
游戏相关
Shuffle Bag
在Unity和C#中有Random Class,可以为我们提供伪随机数,但伪随机数毕竟不是真正的随机,并且无法保证各个事件发生的几率,这样一来会导致我们的游戏趣味性大大降低。
一下学习参考:
Shuffle Bags: Making Random() Feel More Random
Never-ending Shuffled Sequences - When Random is too Random
实现参考:
Shuffle bag algorithm implemented in C#
那么什么是Shuffle Bag了?
“
A Shuffle Bag is a technique for controlling randomness to create the distribution we desire. The idea is:
Pick a range of values with the desired distribution.
Put all these values into a bag.
Shuffle the bag’s contents.
Pull the values out one by one until you reach the end.
Once you reach the end, you start over, pulling the values out one by one again.
“
从上面可以看出Shuffle Bag主要是通过把所有可能都放到List里,然后通过随机选择在里面选取一个,而被选择过的不记入下一次选择考虑范围内,直到List里所有可能都被选择完为止。
这样一来List里填充的数据就确定了每一个事件发生的概率。
并且只通过一次填充数据就能无限随机选择下去。
代码实现:1
2
3
4
5
6
7
8
9
10
11
12
13
14
15
16
17
18
19
20
21
22
23
24
25
26
27
28
29
30
31
32
33
34
35
36
37
38
39
40
41
42
43
44
45
46
47
48
49
50
51
52
53
54
55
56
57
58
59
60
61
62
63
64
65
66
67
68
69
70
71
72
73
74
75
76
77
78
79
80
81
82
83
84
85
86
87
88
89
90
91
92
93
94
95
96
97
98
99
100
101
102
103
104
105
106
107
108
109
110
111
112
113
114
115
116
117
118
119
120
121
122
123
124
125
126
127
128
129using UnityEngine;
using System.Collections;
using System.Collections.Generic;
public class ShuffleBag<T> : ICollection<T>, IList<T>
{
private List<T> mData = new List<T>();
private int mCursor = 0;
private T last;
public T Next()
{
if (mData.Count == 0)
{
return default(T);
}
if (mCursor < 1)
{
mCursor = mData.Count - 1;
if (mData.Count < 1)
{
return default(T);
}
return mData[0];
}
int grab = Mathf.FloorToInt(Random.value * (mCursor + 1));
T temp = mData[grab];
mData[grab] = mData[mCursor];
mData[mCursor] = temp;
mCursor--;
return temp;
}
//IList[T] implementation
public int IndexOf(T item)
{
return mData.IndexOf(item);
}
public void Insert(int index, T item)
{
mData.Insert(index, item);
mCursor = mData.Count - 1;
}
public void RemoveAt(int index)
{
mData.RemoveAt(index);
mCursor = mData.Count - 1;
}
public T this[int index]
{
get
{
return mData[index];
}
set
{
mData[index] = value;
}
}
//IEnumerable[T] implementation
IEnumerator<T> IEnumerable<T>.GetEnumerator()
{
return mData.GetEnumerator();
}
//ICollection[T] implementation
public void Add(T item)
{
mData.Add(item);
mCursor = mData.Count - 1;
}
public int Count
{
get
{
return mData.Count;
}
}
public void Clear()
{
//mCursor = 0;
mData.Clear();
}
public bool Contains(T item)
{
return mData.Contains(item);
}
public void CopyTo(T[] array, int arrayindex)
{
foreach (T item in mData)
{
array.SetValue(item, arrayindex);
arrayindex++;
}
}
public bool Remove(T item)
{
bool removesuccess = mData.Remove(item);
mCursor = mData.Count - 1;
return removesuccess;
}
public bool IsReadOnly
{
get
{
return false;
}
}
//IEnumerable implementation
IEnumerator IEnumerable.GetEnumerator()
{
return mData.GetEnumerator();
}
}
C#学习
Book down load link: c#入门经典第五版
